SpringBoot整合Shiro(Mybatis-plus)
官网:https://shiro.apache.org/
然后点击下载我们就可以下载不同的版本(也可以基于Maven去管理)
Shiro是一款主流的Java安全框架,不依赖任何容器,可以运行在javase和javaee项目中,它的主要作用是对访问系统的用户身份进行认证,授权,会话管理,加密等操作。(相当于过滤器的功能)
Shiro就是用来解决安全管理的系统化框架.
根据不同的用户访问不同的菜单
不同的用户权限不同
Shiro核心组件

Shiro的核心组件
用户,角色,权限
会给角色赋予权限,给用户赋予角色(比如一个删除商品的模块,张三这个用户能不能删除,我们就要看他有没有这个权限,我们不会把权限直接给到张三,而是给张三赋一个删除商品的角色)
 用户拥有角色,而角色拥有权限
1.UsernamePasswordToken,Shiro用来封装用户登录信息,使用用户的登录信息来创建Token(拿着Token就可以通过Shiro的验证,验证是否合法以及带了哪些权限)令牌,我们会把用户的信息存到数据库里面,对用户输入的信息去数据库查询,看它有没有对应的权限,如果有就放行。
2.SecurityManager,Shiro的核心部分,负责安全认证和授权(封装以后的操作都在这里执行)
3.Subject:Shiro的抽象概念,包含了用户信息(将来我们在系统当中需要取到用户信息的话,我们通过Subject里面去取)。
4.Releam:开发者自定义的模块,根据项目的需求,验证和授权的逻辑全部写在Releam中。
5.AuthenticationInfo,用户的角色信息集合,认证时使用。
6.AuthorzationInfo,角色的权限信息集合,授权时使用。
7.DefaultWebSecurityDManager:安全管理器,开发者自定义的Realm需要注入到DefaultWebSerurityDManager进行管理才能生效。
8.ShiroFilterFactoryBean,过滤器工厂,Shiro的基本运行机制是开发者定制规则,Shiro去执行,具体的执行操作就是ShiroFilterFactoryBean创建的一个个Filter对象来完成。


![]()
<!-- https://mvnrepository.com/artifact/org.apache.shiro/shiro-spring -->
<dependency>
    <groupId>org.apache.shiro</groupId>
    <artifactId>shiro-spring</artifactId>
    <version>1.5.3</version>
</dependency>
1.创建SpringBoot应用,集成Shiro及相关组件,pom.xml
<?xml version="1.0" encoding="UTF-8"?>
<project xmlns="http://maven.apache.org/POM/4.0.0" xmlns:xsi="http://www.w3.org/2001/XMLSchema-instance"
         xsi:schemaLocation="http://maven.apache.org/POM/4.0.0 https://maven.apache.org/xsd/maven-4.0.0.xsd">
    <modelVersion>4.0.0</modelVersion>
    <parent>
        <groupId>org.springframework.boot</groupId>
        <artifactId>spring-boot-starter-parent</artifactId>
        <version>2.3.4.RELEASE</version>
        <relativePath/> <!-- lookup parent from repository -->
    </parent>
    <groupId>com.southwind</groupId>
    <artifactId>springbootshiro</artifactId>
    <version>0.0.1-SNAPSHOT</version>
    <name>springbootshiro</name>
    <description>Demo project for Spring Boot</description>

    <properties>
        <java.version>1.8</java.version>
    </properties>

    <dependencies>
        <dependency>
            <groupId>org.springframework.boot</groupId>
            <artifactId>spring-boot-starter-thymeleaf</artifactId>
        </dependency>
        <dependency>
            <groupId>org.springframework.boot</groupId>
            <artifactId>spring-boot-starter-web</artifactId>
        </dependency>

        <dependency>
            <groupId>org.projectlombok</groupId>
            <artifactId>lombok</artifactId>
            <optional>true</optional>
        </dependency>
        <dependency>
            <groupId>org.springframework.boot</groupId>
            <artifactId>spring-boot-starter-test</artifactId>
            <scope>test</scope>
            <exclusions>
                <exclusion>
                    <groupId>org.junit.vintage</groupId>
                    <artifactId>junit-vintage-engine</artifactId>
                </exclusion>
            </exclusions>
        </dependency>
        <dependency>
            <groupId>org.apache.shiro</groupId>
            <artifactId>shiro-spring</artifactId>
            <version>1.5.3</version>
        </dependency>
		<dependency>
		    <groupId>mysql</groupId>
		    <artifactId>mysql-connector-java</artifactId>
		</dependency>

		<dependency>
		    <groupId>com.baomidou</groupId>
		    <artifactId>mybatis-plus-boot-starter</artifactId>
		    <version>3.3.1.tmp</version>
		</dependency>
    </dependencies>

    <build>
        <plugins>
            <plugin>
                <groupId>org.springframework.boot</groupId>
                <artifactId>spring-boot-maven-plugin</artifactId>
            </plugin>
        </plugins>
    </build>

</project>
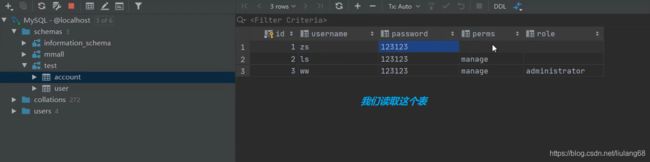 perms是权限的意思role是角色的意思
正常应该拆分成角色表,权限表,用户表(用户表通过外键去跟角色表关联,角色表再通过外键跟权限表进行关联)。
<dependency>
    <groupId>mysql</groupId>
    <artifactId>mysql-connector-java</artifactId>
</dependency>

<dependency>
    <groupId>com.baomidou</groupId>
    <artifactId>mybatis-plus-boot-starter</artifactId>
    <version>3.3.1.tmp</version>
</dependency>
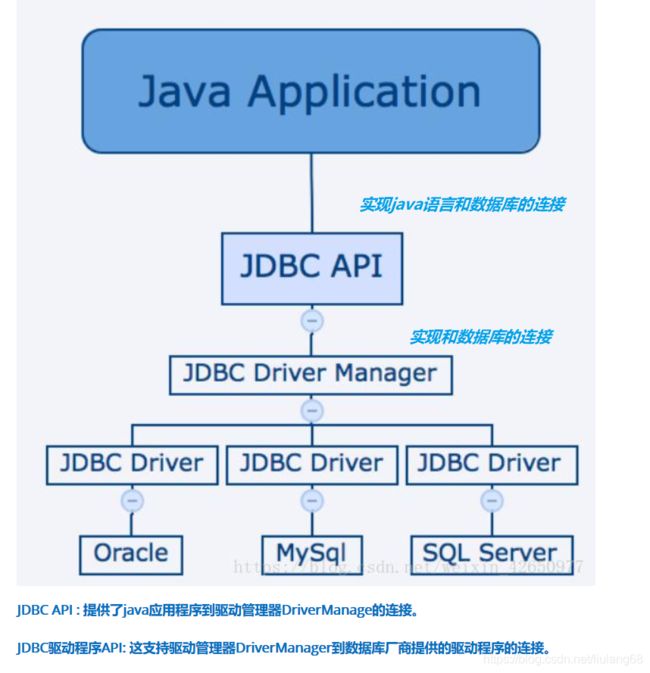 我们这里的mybatis-plus里面就继承了jdbc的规范
接下来就需要创建实体类了
使用mybatis-plus实体类也不需要加注解和数据库绑定会自动绑定的
package com.southwind.entity;

import lombok.Data;

@Data
public class Account {
    private Integer id;
    private String username;
    private String password;
    private String perms;
    private String role;
}
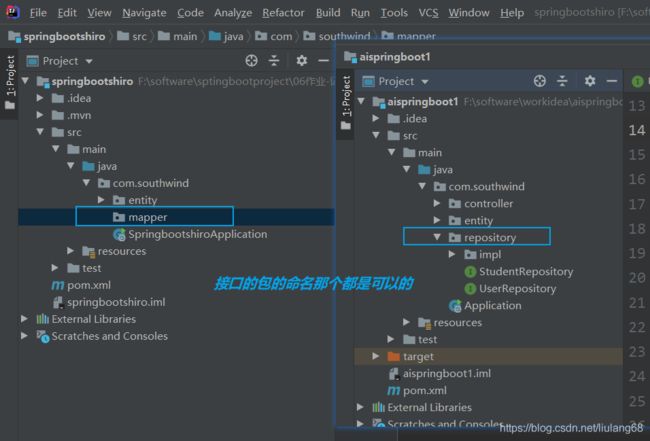
创建了实体类以后接下来就是创建接口了
![]()

package com.southwind.mapper;

import com.baomidou.mybatisplus.core.mapper.BaseMapper;
import com.southwind.entity.Account;
import org.springframework.stereotype.Repository;

//泛型只写实体类就可以了
@Repository
public interface AccountMapper extends BaseMapper<Account> {

}
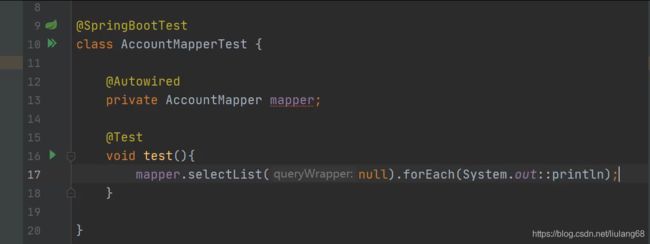
写好接口我们首先要测试一下这个接口能不能用
 Failed to configure a DataSource: ‘url’ attribute is not specified and no embedded datasource could be configured.
报这个错误的原因是因为我们没有写数据库的配置
spring:
  datasource:
    url: jdbc:mysql://localhost:3306/test?useUnicode=true&characterEncoding=utf-8&serverTimezone=GMT%2B8
    username: root
    password: root
    driver-class-name: com.mysql.cj.jdbc.Driver
//把sql语句的输出打印出来
mybatis-plus:
  configuration:
    log-impl: org.apache.ibatis.logging.stdout.StdOutImpl
接口写好就可以写service层了(业务层了)
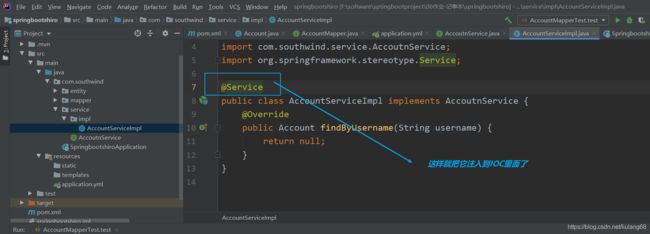
我们注入是实现类而不是接口(service的实现类必须加上@Service的注解)
package com.southwind.service;

import com.southwind.entity.Account;

public interface AccoutService {
    public Account findByUsername(String username);
}
package com.southwind.service.impl;
import com.baomidou.mybatisplus.core.conditions.query.QueryWrapper;
import com.southwind.entity.Account;
import com.southwind.mapper.AccountMapper;
import com.southwind.service.AccoutService;
import org.springframework.beans.factory.annotation.Autowired;
import org.springframework.stereotype.Service;
@Service
public class AccountServiceImpl implements AccoutService {
@Autowired
private AccountMapper accountMapper;
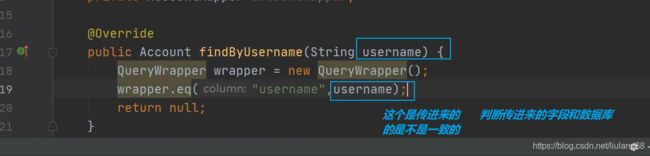
@Override
public Account findByUsername(String username) {
QueryWrapper wrapper=new QueryWrapper();
wrapper.eq("username",username);
return accountMapper.selectOne(wrapper);
}
}
接下来就开始定义自己的业务逻辑了(在realm定义自己的逻辑了)


在这里插入代码片
写好以后我们需要进行配置才可以生效(就和我们写过滤器要进行过滤器的配置一样)
所以我们这里需要创建一个config的包
 最后我们还需要注入一个工厂(把manage注入到里面)
package com.southwind.config;
import com.southwind.realm.AccountRealm;
import org.apache.shiro.spring.web.ShiroFilterFactoryBean;
import org.apache.shiro.web.mgt.DefaultWebSecurityManager;
import org.springframework.beans.factory.annotation.Qualifier;
import org.springframework.context.annotation.Bean;
import org.springframework.context.annotation.Configuration;
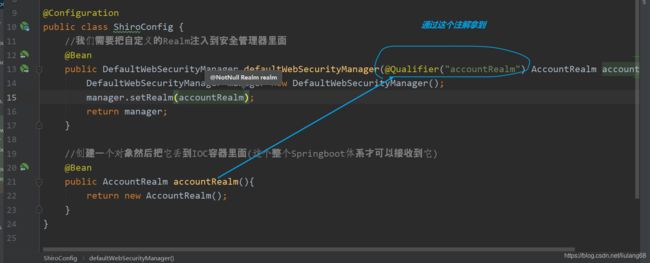
@Configuration
public class ShiroConfig {
//创建一个对象然后把它丢到IOC容器里面(这个整个Springboot体系才可以接收到它)
@Bean
public AccountRealm accountRealm(){
return new AccountRealm();
}
//我们需要把自定义的Realm注入到安全管理器里面
@Bean
public DefaultWebSecurityManager securityManager(@Qualifier("accountRealm") AccountRealm accountRealm){
DefaultWebSecurityManager manager=new DefaultWebSecurityManager();
manager.setRealm(accountRealm);
return manager;
}
@Bean
public ShiroFilterFactoryBean shiroFilterFactoryBean(@Qualifier("securityManager") DefaultWebSecurityManager securityManager){
ShiroFilterFactoryBean factoryBean=new ShiroFilterFactoryBean();
factoryBean.setSecurityManager(securityManager);
return factoryBean;
}
}
整个过程就是先写好自定义模块Realm然后注入到IOC然后一次就是注入安装管理器,然后把管理器注入到过滤器工厂。(这里的bean的名字就是定义的方法名)
![]() 配置类写好以后我们就需要去注入它的认证授权规则了
配置类写好以后我们就需要去注入它的认证授权规则了
认证过滤器:
anno:无需认证.(相当于游客也可以登录)
authc:必须认证才可以登录
authcBasic:需要通过HTTPBasic认证
user:不一定通过认证,只要曾经被Shiro记录即可,比如:记住我。
授权过滤器
perms:必须拥有某个权限才能访问。
role:必须拥有某个角色才能访问。
port:请求的端口必须是指定值才可以。
rest:请求必须基于RESTful,POST,PUT,GET,DELETE.
ssl:必须是安全的URL请求,协议HTTPS.

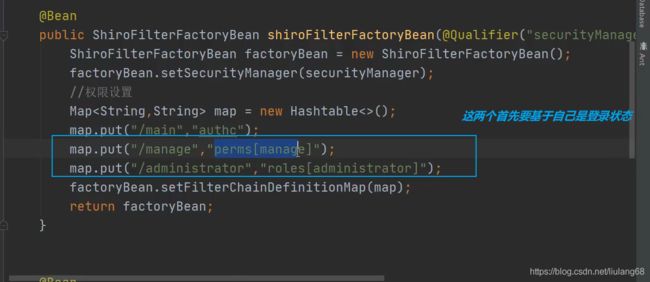
接下来就是看怎么给资源赋予认证和授权的逻辑,这个逻辑我们是写到过滤器工厂里面的
Hashtable 和 HashMap的区别
参考文章:https://blog.csdn.net/java2000_net/article/details/2512510
package com.southwind.config;

import com.southwind.realm.AccountRealm;
import org.apache.shiro.spring.web.ShiroFilterFactoryBean;
import org.apache.shiro.web.mgt.DefaultWebSecurityManager;
import org.springframework.beans.factory.annotation.Qualifier;
import org.springframework.context.annotation.Bean;
import org.springframework.context.annotation.Configuration;

import java.util.HashMap;
import java.util.Hashtable;
import java.util.Map;

@Configuration
public class ShiroConfig {

    //创建一个对象然后把它丢到IOC容器里面(这个整个Springboot体系才可以接收到它)
    @Bean
    public AccountRealm accountRealm(){
        return new AccountRealm();
    }

    //我们需要把自定义的Realm注入到安全管理器里面
    @Bean
    public DefaultWebSecurityManager securityManager(@Qualifier("accountRealm") AccountRealm accountRealm){
        DefaultWebSecurityManager manager=new DefaultWebSecurityManager();
        manager.setRealm(accountRealm);
        return manager;
    }

    @Bean
    public ShiroFilterFactoryBean shiroFilterFactoryBean(@Qualifier("securityManager") DefaultWebSecurityManager securityManager){
        ShiroFilterFactoryBean factoryBean=new ShiroFilterFactoryBean();
        factoryBean.setSecurityManager(securityManager);
        //权限设置
        Map<String,String> map=new Hashtable<>();
        //当我们访问/main的时候必须认证
        map.put("/main","authc");
        //访问/manage必须具有manage的权限,这里我们是可以赋予多个权限的,它是一个数据
        map.put("/manage","perms[manage]");
        //访问/administrator必须赋予administrator的角色
        map.put("/administrator","roles[administrator]");
        //集合创建好以后factoryBean里面
        factoryBean.setFilterChainDefinitionMap(map);
        return factoryBean;
    }


}
然后我们写一个controller层
package com.southwind.controller;

import org.apache.shiro.SecurityUtils;
import org.apache.shiro.authc.IncorrectCredentialsException;
import org.apache.shiro.authc.UnknownAccountException;
import org.apache.shiro.authc.UsernamePasswordToken;
import org.apache.shiro.subject.Subject;
import org.springframework.stereotype.Controller;
import org.springframework.ui.Model;
import org.springframework.web.bind.annotation.GetMapping;
import org.springframework.web.bind.annotation.PathVariable;
import org.springframework.web.bind.annotation.PostMapping;

@Controller
public class AccountController {
    @GetMapping("/{url}")
    public String redirect(@PathVariable("url") String url){
        return url;
    }

    @PostMapping("/login")
    public String login(String username, String password, Model model){
        Subject subject= SecurityUtils.getSubject();
        UsernamePasswordToken token=new UsernamePasswordToken(username,password);
        try {
            subject.login(token);
            return "index";//登录成功回到首页
        } catch (UnknownAccountException e) {  //用户名不存在抛出的异常
            e.printStackTrace();
            model.addAttribute("msg","用户名不存在");
            return "login";//重新登录
        }catch (IncorrectCredentialsException e){  //密码错误抛出的异常
            e.printStackTrace();
            model.addAttribute("msg","密码错误");
            return "login";
        }

    }

}
接下来我们就开始配置视图解析器
spring:
  datasource:
    url: jdbc:mysql://localhost:3306/test?useUnicode=true&characterEncoding=utf-8&serverTimezone=GMT%2B8
    username: root
    password: root
    driver-class-name: com.mysql.cj.jdbc.Driver
  thymeleaf:
    prefix: classpath:/templates/
    suffix: .html
mybatis-plus:
  configuration:
    log-impl: org.apache.ibatis.logging.stdout.StdOutImpl
接下来就是在templates里面创建我们要的3个页面
 有了登录才有角色和权限的说法(有的页面我们没有设置就是可以随意访问的)
idea中捕获异常的快捷键(ctrl+alt+t)
当我们访问设置了认证的页面资源以后它会帮我们跳转到login.jsp页面(但是我们现在没有jsp),所以我们现在需要自己写一个login.html(想办法让它跳转到login.html).所以我们要在ShiroConfig里面设置成登录页面是到login.html
form表单的提交使用的是问号传参的方法,所以我们不需要使用注解去获取参数
https://blog.csdn.net/liulang68/article/details/108851037
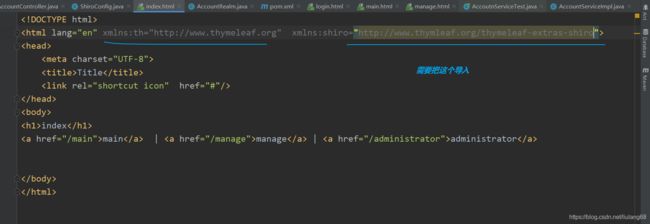
<!DOCTYPE html>
<html lang="en">
<head>
    <meta charset="UTF-8">
    <title>Title</title>
    <link rel="shortcut icon"  href="#"/>
</head>
<body>
<h1>index</h1>
<a href="/main">main</a>  | <a href="/manage">manage</a> | <a href="/administrator">administrator</a>


</body>
</html>
<!DOCTYPE html>
<html lang="en" xmlns:th="http://www.thymeleaf.org">
<head>
    <meta charset="UTF-8">
    <title>Title</title>
    <link rel="shortcut icon"  href="#"/>
</head>
<body>
<form action="/login" method="post">
    <table>
        <span th:text="${msg}"  style="color: red"></span>
        <tr>
            <td>用户名:</td>
            <td>
                <input type="text" name="username">
            </td>
        </tr>
        <tr>
            <td>密码:</td>
            <td>
                <input type="password" name="password">
            </td>
        </tr>
        <tr>
            <td>
                <input type="submit" value="登录">
            </td>
        </tr>
    </table>
</form>

</body>
</html>
认证的页面登录就可以访问了,授权的页面不仅需要登录还需要实现授权(前面我们是设置了资源的权限,现在我们是实现授权这样我们就可以访问哪些带有权限的资源了)
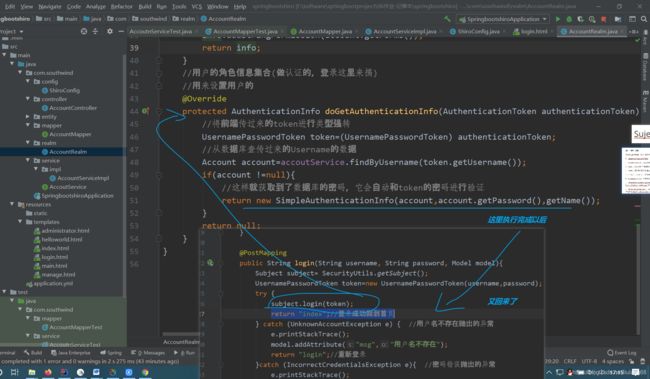
package com.southwind.realm;

import com.southwind.entity.Account;
import com.southwind.service.AccoutService;
import org.apache.shiro.SecurityUtils;
import org.apache.shiro.authc.*;
import org.apache.shiro.authz.AuthorizationInfo;
import org.apache.shiro.authz.SimpleAuthorizationInfo;
import org.apache.shiro.realm.AuthorizingRealm;
import org.apache.shiro.subject.PrincipalCollection;
import org.apache.shiro.subject.Subject;
import org.springframework.beans.factory.annotation.Autowired;

import java.util.HashSet;
import java.util.Set;


public class AccountRealm  extends AuthorizingRealm {
    @Autowired
    private AccoutService accoutService;


    //角色的权限信息集合(授权的判断全部写在这里,登录之后是否具有某些权限交给它来搞)
    //用来设置角色和权限的
    @Override
    protected AuthorizationInfo doGetAuthorizationInfo(PrincipalCollection principalCollection) {
        //获取当前登录的用户信息
        Subject subject= SecurityUtils.getSubject();
        Account account=(Account) subject.getPrincipal();
        //设置角色(这里用set集合,因为set集合可以防止重复)
//        Set roles=new HashSet<>();
        Set<String> roles=new HashSet<>();
        roles.add(account.getRole());
        //用来存放角色的集合
        SimpleAuthorizationInfo info=new SimpleAuthorizationInfo(roles);

        //设置权限
        info.addStringPermission(account.getPerms());
        return info;
    }
    //用户的角色信息集合(做认证的,登录这里来搞)
    //用来设置用户的
    @Override
    protected AuthenticationInfo doGetAuthenticationInfo(AuthenticationToken authenticationToken) throws AuthenticationException {
        //将前端传过来的token进行类型强转
        UsernamePasswordToken token=(UsernamePasswordToken) authenticationToken;
        //从数据库查传过来的Username的数据
        Account account=accoutService.findByUsername(token.getUsername());
        if(account !=null){
            //这样就获取到了数据库的密码,它会自动和token的密码进行验证
            return new SimpleAuthenticationInfo(account,account.getPassword(),getName());
        }
        return null;
    }
}
package com.southwind.config;

import com.southwind.realm.AccountRealm;
import org.apache.shiro.spring.web.ShiroFilterFactoryBean;
import org.apache.shiro.web.mgt.DefaultWebSecurityManager;
import org.springframework.beans.factory.annotation.Qualifier;
import org.springframework.context.annotation.Bean;
import org.springframework.context.annotation.Configuration;

import java.util.HashMap;
import java.util.Hashtable;
import java.util.Map;

@Configuration
public class ShiroConfig {

    //创建一个对象然后把它丢到IOC容器里面(这个整个Springboot体系才可以接收到它)
    @Bean
    public AccountRealm accountRealm(){
        return new AccountRealm();
    }

    //我们需要把自定义的Realm注入到安全管理器里面
    @Bean
    public DefaultWebSecurityManager securityManager(@Qualifier("accountRealm") AccountRealm accountRealm){
        DefaultWebSecurityManager manager=new DefaultWebSecurityManager();
        manager.setRealm(accountRealm);
        return manager;
    }

    @Bean
    public ShiroFilterFactoryBean shiroFilterFactoryBean(@Qualifier("securityManager") DefaultWebSecurityManager securityManager){
        ShiroFilterFactoryBean factoryBean=new ShiroFilterFactoryBean();
        factoryBean.setSecurityManager(securityManager);
        //权限设置
        Map<String,String> map=new Hashtable<>();
        //当我们访问/main的时候必须认证
        map.put("/main","authc");
        //访问/manage必须具有manage的权限,这里我们是可以赋予多个权限的,它是一个数据
        map.put("/manage","perms[manage]");
        //访问/administrator必须赋予administrator的角色
        map.put("/administrator","roles[administrator]");
        //集合创建好以后factoryBean里面
        factoryBean.setFilterChainDefinitionMap(map);
        //设置登录页面
        factoryBean.setLoginUrl("/login");
        //设置未授权页面
        factoryBean.setUnauthorizedUrl("/unauth");
        return factoryBean;
    }


}
package com.southwind.controller;

import org.apache.shiro.SecurityUtils;
import org.apache.shiro.authc.IncorrectCredentialsException;
import org.apache.shiro.authc.UnknownAccountException;
import org.apache.shiro.authc.UsernamePasswordToken;
import org.apache.shiro.subject.Subject;
import org.springframework.stereotype.Controller;
import org.springframework.ui.Model;
import org.springframework.web.bind.annotation.GetMapping;
import org.springframework.web.bind.annotation.PathVariable;
import org.springframework.web.bind.annotation.PostMapping;
import org.springframework.web.bind.annotation.ResponseBody;

@Controller
public class AccountController {
    @GetMapping("/{url}")
    public String redirect(@PathVariable("url") String url){
        return url;
    }

    @PostMapping("/login")
    public String login(String username, String password, Model model){
        Subject subject= SecurityUtils.getSubject();
        UsernamePasswordToken token=new UsernamePasswordToken(username,password);
        try {
            subject.login(token);
            return "index";//登录成功回到首页
        } catch (UnknownAccountException e) {  //用户名不存在抛出的异常
            e.printStackTrace();
            model.addAttribute("msg","用户名不存在");
            return "login";//重新登录
        }catch (IncorrectCredentialsException e){  //密码错误抛出的异常
            e.printStackTrace();
            model.addAttribute("msg","密码错误");
            return "login";
        }

    }

    @GetMapping("/unauth")
    @ResponseBody
    public String unauth(){
        return "未授权,无法访问";
    }

}

 根据不同的用户显示不同的菜单
Shiro整合Thymeleaf
<dependency>
            <groupId>com.github.theborakompanioni</groupId>
            <artifactId>thymeleaf-extras-shiro</artifactId>
            <version>2.0.0</version>
 </dependency>
2.配置类添加ShiroDialect(这样thymeleaf才可以识别shiro的语言)
package com.southwind.config;

import at.pollux.thymeleaf.shiro.dialect.ShiroDialect;
import com.southwind.realm.AccountRealm;
import org.apache.shiro.spring.web.ShiroFilterFactoryBean;
import org.apache.shiro.web.mgt.DefaultWebSecurityManager;
import org.springframework.beans.factory.annotation.Qualifier;
import org.springframework.context.annotation.Bean;
import org.springframework.context.annotation.Configuration;

import java.util.HashMap;
import java.util.Hashtable;
import java.util.Map;

@Configuration
public class ShiroConfig {

    //创建一个对象然后把它丢到IOC容器里面(这个整个Springboot体系才可以接收到它)
    @Bean
    public AccountRealm accountRealm(){
        return new AccountRealm();
    }

    //我们需要把自定义的Realm注入到安全管理器里面
    @Bean
    public DefaultWebSecurityManager securityManager(@Qualifier("accountRealm") AccountRealm accountRealm){
        DefaultWebSecurityManager manager=new DefaultWebSecurityManager();
        manager.setRealm(accountRealm);
        return manager;
    }

    @Bean
    public ShiroFilterFactoryBean shiroFilterFactoryBean(@Qualifier("securityManager") DefaultWebSecurityManager securityManager){
        ShiroFilterFactoryBean factoryBean=new ShiroFilterFactoryBean();
        factoryBean.setSecurityManager(securityManager);
        //权限设置
        Map<String,String> map=new Hashtable<>();
        //当我们访问/main的时候必须认证
        map.put("/main","authc");
        //访问/manage必须具有manage的权限,这里我们是可以赋予多个权限的,它是一个数据
        map.put("/manage","perms[manage]");
        //访问/administrator必须赋予administrator的角色
        map.put("/administrator","roles[administrator]");
        //集合创建好以后factoryBean里面
        factoryBean.setFilterChainDefinitionMap(map);
        //设置登录页面
        factoryBean.setLoginUrl("/login");
        //设置未授权页面
        factoryBean.setUnauthorizedUrl("/unauth");
        return factoryBean;
    }
    @Bean
    public ShiroDialect shiroDialect(){  //shiroDialect方言
        return new ShiroDialect();
    }

}
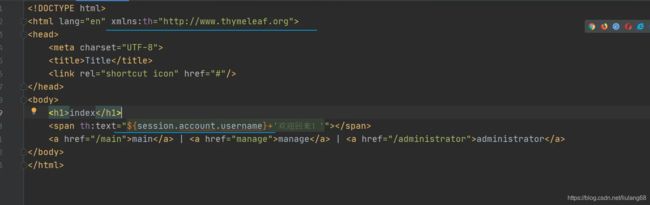
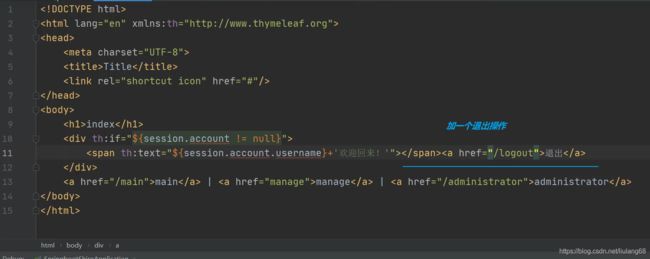
3.接下来我们就可以在页面里面使用了

<html lang="en" xmlns:th="http://www.thymeleaf.org" xmlns:shiro="http://www.thymleaf.org/thymeleaf-extras-shiro">
<head>
<meta charset="UTF-8">
<title>Titletitle>
<link rel="shortcut icon" href="#"/>
head>
<body>
<h1>indexh1>
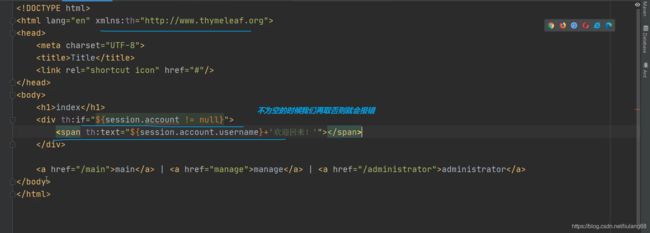
<div th:if="${session.account!=null}">
<span th:text="${session.account.username}+'欢迎回来'">span><a href="/logout">退出a>
div>
<a href="/main">maina>
<div shiro:hasPermission="manage">
<a href="/manage">managea>
div>
<div shiro:hasRole="administrator">
<a href="/administrator">administratora>
div>
body>
html>