Java(SSM)项目遇到的问题及解决
Java(SSM)项目遇到的问题及解决办法
-
- 无法登陆,C3P0连接池报错java.lang.AbstractMethodError: ...
- 报错URI is not registered (Settings | Languages & Frameworks | Schemas and DTDs)
- 图片img src=...裂图或404,location.href或者WeAdminShow 404
- Android Studio报错
- some tips
- 后续补充-1
-
- java调用python
- 后端实时传递进度,前端弹窗显示进度条
- idea导出war包
- Tomcat部署项目
- MySQL8.0.12中mysql数据库被篡改
- 后续补充-2
-
- 1.报错
- 2.python-opencv安装
- 3.java生成PDF的方法
- 后续补充-3
无法登陆,C3P0连接池报错java.lang.AbstractMethodError: …
在项目pom.xml中更改C3p0版本:
<dependency>
    <groupId>com.mchange</groupId>
    <artifactId>c3p0</artifactId>
    <version>0.9.5.2</version>
</dependency>
报错URI is not registered (Settings | Languages & Frameworks | Schemas and DTDs)
统一资源标识符没有注册
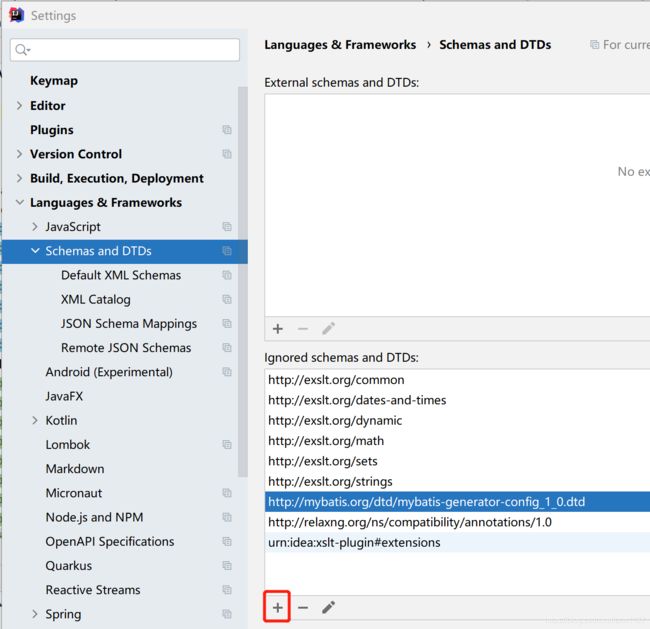
解决办法:File->Settings->Language&Frameworks->Schemes and DTDs,在Ignored Schemes and DTDs框中点“+”添加实际红色报错的语句(链接)。

图片img src=…裂图或404,location.href或者WeAdminShow 404
绝对路径问题
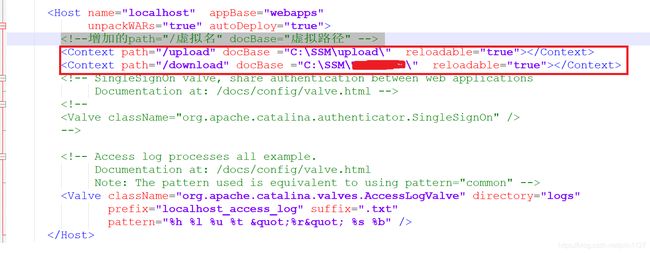
找到tomcat目录/conf/server.xml中的host标签内添加路径声明:
在js等文件中使用如下示例代码即可成功访问图片:
<img src="/upload/1.png">
location.href='/download/'+"A.doc"
WeAdminShow("test",'/download/'+"A.pdf")
!!!一定要配全,但凡有一个没配置也不行
Android Studio报错
1.“Failed to install the following Android SDK packages as some licences have not been accepted”
解决办法:
打开命令行,进入到报错的sdk路径,找到可以处理licences的文件,(报错的路径在Android Studio里是有显示的)
cd C:\Android\SDK
cd tools
cd bin
这时该路径下有一个windows批处理文件sdkmanager,用这个来解决问题,调用命令
sdkmanager --licenses会出现很多的licenses等待同意,全部yes(y)就可以了。
2.“Windows Defender might be impacting your build performance.”
解决办法:
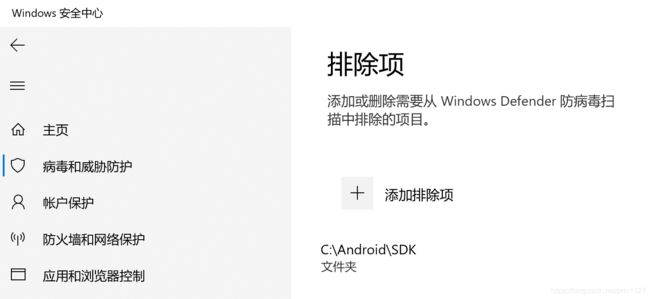
将文件夹加入到Windows Defender免扫描中。
设置->windows安全中心->病毒和威胁防护-“病毒和威胁防护”设置-管理设置->排除项->添加或删除排除项,将报错路径添加进来。

some tips
1.idea内代码自动排版对齐快捷键:
Ctrl+Alt+L
2.chrome浏览器清除浏览器缓存:
(1)设置->高级设置->清除浏览器缓存
(2)Ctrl+Shift+Del
3.ftl模板要在idea内打开修改
后续补充-1
java调用python
//执行python脚本
//需传入的参数
String a = "aaa", b = "bbb"
//设置命令行传入参数
String[] args = new String[] { "python", "C:\\Users\\Desktop\\test1.py", a, b};
Process pr = Runtime.getRuntime().exec(args);
//该方法只能传递字符串
BufferedReader in = new BufferedReader(new InputStreamReader(pr.getInputStream()));
String line;
while ((line = in.readLine()) != null) {
System.out.println(line);
}
in.close();
int res=pr.waitFor();//0为成功
System.out.println("res: "+res);
import sys
print sys.argv[0]
print sys.argv[1]
print sys.argv[2]后端实时传递进度,前端弹窗显示进度条
思路:前端通过ajax调用后端算法,并利用setInterval函数定时通过ajax调用后端进度函数,两个ajax“并列”
后端在A方法中实时修改进度,通过B方法传递进度
    @RequestMapping(value = "/B", method = RequestMethod.POST)
    @ResponseBody
    public Map<String,Object> B(){
        Map<String,Object> map = new HashMap<>();
        map.put("percent",progressValue);
        System.out.println("进度百分数为" + progressValue);
        return map;
    }
可以参考:https://c.runoob.com/codedemo/3370
$.ajax({
    async : true,
    type : 'post',
    url : "/pic/A",
    dataType : 'json',
    data: {
        "id": data.id, //向A函数传参
    },
    success: function (data1) {
        if(data1.code == "0"){
        }else{
            alert("图片文件夹不存在!")
        }
    },
    error: function () {
        alert("错误!")
    }
    });
var value = "0%";
showProgress(value);
//设置定时器,每隔5秒获取requestSession中的百分数
var time = setInterval(function () {
    $.ajax({
        async: true,
        type: 'post',
        dataType: 'json',
        url: "/pic/B",
        //获取百分数成功,修改相关值
        success: function (data2) {
            value = data2.percent;
            //layer.msg('value='+value,{time: 1000,offset: 'auto'});
            moveProgress(value);
            //changeDiv(value);
            //下载完成后,刷新百分数,并在2秒后关闭标签
            if (value == "100%") {
/*setTimeout(function (){
    CloseDiv('MyDiv','backk');
},2000);*/
showSuccess();
clearInterval(time);
            }else if(value=="-1"){
clearInterval(time);
var modal = document.getElementById('myModal');
modal.style.display = "none";
            }
        },
    });
}, 5000);
head标签内添加下述代码:
    <style>
        /* 弹窗 (background) */
        .modal {
            display: none; /* 默认隐藏 */
            position: fixed; /* 固定定位 */
            z-index: 1; /* 设置在顶层 */
            left: 0;
            top: 0;
            width: 100%;
            height: 100%;
            overflow: auto;
            background-color: rgb(0,0,0);
            background-color: rgba(0,0,0,0.4);
        }
        /* 弹窗内容 */
        .modal-content {
            background-color: #fefefe;
            margin: 15% auto;
            padding: 20px;
            border: 1px solid #888;
            width: 80%;
        }
        #myProgress {
            width: 100%;
            background-color: #ddd;
        }
        #myBar {
            width: 0%;
            height: 30px;
            background-color: #4CAF50;
            text-align: center;
            line-height: 30px;
            color: white;
        }
        /* 关闭按钮 */
        .close {
            color: #aaa;
            float: right;
            font-size: 28px;
            font-weight: bold;
            margin:-6% -4%;
        }
        .close:hover,
        .close:focus {
            color: black;
            text-decoration: none;
            cursor: pointer;
        }
    style>
body标签内添加下述代码:
<div id="myModal" class="modal">

    <div class="modal-content">
        <span class="close">×span>
        <div id="myProgress">
            <div id="myBar">0%div>
        div>
        <br>
    div>
div><script type="text/javascript" src="../lib/layui/layui.js" charset="utf-8"></script>
<script>
function showProgress(width) {
// 获取弹窗
var modal = document.getElementById('myModal');
modal.style.display = "block";
// 获取 元素,用于关闭弹窗
var span = document.querySelector('.close');
// 点击 (x), 关闭弹窗
span.onclick = function() {
modal.style.display = "none";
}
var elem = document.getElementById("myBar");
elem.style.width = width;
//layer.msg('value='+width,{time: 1000,offset: 'auto'});
elem.innerHTML = width;
// 在用户点击其他地方时,关闭弹窗
window.onclick = function(event) {
if (event.target == modal) {
modal.style.display = "none";
}
}
}
function moveProgress(width) {
var elem = document.getElementById("myBar");
elem.style.width = width;
//layer.msg('value='+width,{time: 1000,offset: 'auto'});
elem.innerHTML = width;
}
</script>idea导出war包
File->Project Structure->Artifacts
点击“+”号,选择“Web Application:Archive”;选择“For ‘xxx:war exploded’”

默认保存在“xxx\out\artifacts\xxx_war”路径下
Build->Build Artifacts…在弹出框中选择***:war,点击Build即可。
成功后就可以在目录下找到war包。
Tomcat部署项目
将xxx_war包放在tomcat\webapps目录下
在tomcat\conf\server.xml中增加映射:
<Context path="/" docBase="../webapps/xxx_war" reloadable="true">Context>点击tomcat\bin\startup.bat启动服务器
(shutdown.bat关闭)
出现错误或异常时,可以在tomcat\logs里查看catalina相关日志。
MySQL8.0.12中mysql数据库被篡改
事件:不小心在navicat中对mysql运行了sql文件,使得mysql中原数据消失,无法连接到数据库。
报错:1130 Host ‘localhost’ is not allowed to connect to this MySQL server…或者2003 cannot not connect to mysql server…
排查过程:停止mysql服务,管理员身份同时打开两个cmd,一个只输入mysqld --console --skip-grant-tables --shared-memory,另一个输入mysql -uroot -p后无需输入密码(直接回车),进入mysql控制命令,输入select * FROM mysql.user,显示user为空(empty set)。
思路:navicat路径下data文件夹出错
解决步骤:
1.win10系统中在搜索框输入“服务”,找到mysql,停止服务;
win7中Windows+R,输入“services.msc”,找到mysql,停止服务;
使用管理员权限打开cmd(C:/Windows/System32),输入net stop mysql停止服务。
2.将原安装路径下文件全部删除,重新解压安装包到安装路径。
3.在安装路径下新建my.ini文件,粘贴下列代码:
[mysqld]
port=3306
# 设置mysql的安装目录(你自己的目录)
basedir=D:\mysql8
# 设置mysql数据库的数据的存放目录
datadir=D:\mysql8\data
# 允许最大连接数
max_connections=200
# 允许连接失败的次数。
max_connect_errors=10
# 服务端使用的字符集默认为UTF8
character-set-server=utf8
# 创建新表时将使用的默认存储引擎
default-storage-engine=INNODB
# 默认使用“mysql_native_password”插件认证
default_authentication_plugin=mysql_native_password
[mysql]
# 设置mysql客户端默认字符集
default-character-set=utf8
[client]
# 设置mysql客户端连接服务端时默认使用的端口
port=3306
default-character-set=utf8
4.在安装路径下新建一个空的data文件夹
5.使用管理员权限打开cmd,进入安装路径下的bin文件夹,输入mysqld -remove,删除原配置的mysql服务
输入mysqld --initialize --console,一定要记住此时显示的密码
输入mysqld --install mysql8,成功后输入net start mysql8
服务启动成功后,输入mysql -u root -p,输入刚才记下的密码,
进入mysql控制界面,输入ALTER user 'root'@'localhost' IDENTIFIED BY 'newpassword';
执行成功后,输入exit,退出mysql控制界面
再次输入mysql -u root -p,输入修改后的新密码,能够进入mysql指令界面,则成功。
6.tips
(1)若报错“Data Dictionary initialization failed.”,则重新执行上述操作,并不再执行第4步,即不再创建data文件夹。
(2)MySql 从8.0开始修改密码有了变化,在user表加了字段authentication_string
若执行ALTER语句修改密码失败,则
use mysql;
update user set authentication_string='' where user='root';--将字段置为空
ALTER user 'root'@'localhost' IDENTIFIED BY 'root';--修改密码为root
后续补充-2
1.报错
ImportError: Something is wrong with the numpy installation. While importing we detected an older version of numpy in [’…/lib/python3.7/site-packages/numpy’]. One method of fixing this is to repeatedly uninstall numpy until none is found, then reinstall this version.
解决办法:输入两次pip uninstall numpy命令,后执行pip install numpy重新安装numpy
2.python-opencv安装
有些指令或方法安装后import cv2还是会飘红报错,找不到cv2
正确安装指令是pip install opencv-python
3.java生成PDF的方法
https://blog.csdn.net/sand_clock/article/details/85328849
后续补充-3
上传数据失败
报错:
java.lang.NoSuchMethodError: com.google.common.base.Platform.systemNanoTime()J
则在本地maven仓库中C:\Users***.m2\repository\com\google\中删除collections文件夹即可
