Python PyAutoGUI模块自动化控制鼠标和键盘
文章目录
- 1. PyAutoGUI安装
- 2. 程序失去控制时如何终止程序
- 3. 控制鼠标移动
-
- 3.1 移动鼠标
- 3.2 获取鼠标位置
- 4. 控制鼠标交互
-
- 4.1 点击鼠标
- 4.2 拖动鼠标
- 4.3 滚动鼠标
- 5. 处理屏幕
-
- 5.1 获取屏幕快照
- 5.2 分析屏幕快照
- 6. 图像识别
- 7. 控制键盘
-
- 7.1 通过键盘发送一个字符串
- 7.2 键名
- 7.3 按下和释放键盘
- 7.4 热键组合
- 8. 复习 PyAutoGUI 的函数
-
- 8.1 PyAutoGUI 常用函数
- 8.2 PyAutoGUI函数用法举例
- 9. PyAutoGUI参考资料
1. PyAutoGUI安装
pyautogui 模块包含了一些函数,可以让你的Python脚本控制鼠标移动、按键和滚动鼠标滚轮。
window上直接运行pip install pyautogui即可安装PyAutoGUI模块。
2. 程序失去控制时如何终止程序
如果你的程序出了问题,程序可能失去控制,但你的程序继续到处移动鼠标,停止它可能很难,所以需要有方法来强制停止程序。
-
通过注销关闭所有程序
停止失去控制的 GUI 自动化程序,最简单的方法可能是注销,在 Windows 和 Linux 上,注销的热键是Ctrl-Alt-Del。 -
将鼠标移动到屏幕左上角,故意触发异常
pyautogui也有自动防故障功能,如果你尽可能快地向左上移动鼠标,自动防故障功能都将停止程序。即如果将鼠标移到屏幕的左上角,将导致pyautogui产生pyautogui .FailSafeException异常,终止程序。
>>> import pyautogui
>>> pyautogui.PAUSE = 1
>>> pyautogui.FAILSAFE = True
这里我们导入 pyautogui,并将 pyautogui.PAUSE 设置为 1,即每次函数调用后暂停一秒。将 pyautogui.FAILSAFE 设置为 True,启动自动防故障功能。
3. 控制鼠标移动
pyautogui 的鼠标函数使用 x、y 坐标,下图中展示了计算机屏幕的坐标系统。原点的 x、y 都是零,在屏幕的左上角。向右 x 坐标增加,向下 y 坐标增加。所有坐标都是正整数,没有负数坐标。
分辨率是屏幕的宽和高有多少像素。如果屏幕的分辨率设置为 1920 ×1080,那么左上角的坐标是(0,0),右下角的坐标是(1919,1079)。

pyautogui.size() 函数返回两个整数的元组,包含屏幕的宽和高的像素数:
>>> import pyautogui
>>> pyautogui.size()
(1920, 1080)
>>> width, height = pyautogui.size()
3.1 移动鼠标
pyautogui.moveTo() 函数将鼠标立即移动到屏幕的指定位置。表示 x、y 坐标的整数值分别构成了函数的第一个和第二个参数。可选的 duration 整数或浮点数关键字参数,指定了将鼠标移到目的位置所需的秒数。如果不指定,默认值是零,表示立即移动:
>>> import pyautogui
>>> for i in range(10):
 pyautogui.moveTo(100, 100, duration=0.25)
 pyautogui.moveTo(200, 100, duration=0.25)
 pyautogui.moveTo(200, 200, duration=0.25)
 pyautogui.moveTo(100, 200, duration=0.25)
pyautogui.moveRel() 函数相对于当前的位置移动鼠标。下面的例子以正方形的模式移动鼠标,只是它从鼠标当前所在的位置开始,按正方形移动:
>>> import pyautogui
>>> for i in range(10):
 pyautogui.moveRel(100, 0, duration=0.25)
 pyautogui.moveRel(0, 100, duration=0.25)
 pyautogui.moveRel(-100, 0, duration=0.25)
 pyautogui.moveRel(0, -100, duration=0.25)
3.2 获取鼠标位置
通过调用 pyautogui.position() 函数,可以确定鼠标当前的位置。它将返回函数调用时,鼠标 x、y 坐标的元组:
>>> pyautogui.position()
(311, 622)
>>> pyautogui.position()
(377, 481)
>>> pyautogui.position()
(1536, 637)
4. 控制鼠标交互
4.1 点击鼠标
要向计算机发送虚拟的鼠标点击,就调用 pyautogui.click() 方法。默认情况下,点击将使用鼠标左键,点击发生在鼠标当前所在位置。如果希望点击在鼠标当前位置以外的地方发生,可以传入 x、y 坐标作为可选的第一第二参数。
如果想指定鼠标按键,就加入 button 关键字参数,值分别为 'left'、'middle'或 'right'。例如,pyautogui.click(100,150,button='left')将在坐标(100,150)处点击鼠标左键。而 pyautogui.click(200,250,button='right')将在坐标(200,250)处点击右键。
>>> import pyautogui
>>> pyautogui.click(10, 5)
另外,pyautogui.doubleClick() 函 数执 行 双 击 鼠 标 左 键 。pyautogui.rightClick() 和 pyautogui.middleClick() 函数将分别执行双击右键和双击中键。
4.2 拖动鼠标
“拖动”意味着移动鼠标,同时按住一个按键不放。PyAutoGUI 提供了 pyautogui.dragTo() 和 pyautogui.dragRel() 函数,将鼠标拖动到一个新的位置,或相对当前位置的位置。 dragTo() 和 dragRel() 的参数与moveTo() 和 moveRel() 相同:x 坐标/水平移动,y 坐标/垂直移动,以及可选的时间间隔。
举例:请打开 Windows 上的画图软件,让鼠标停留在绘图应用的画布上,同时选中铅笔或画笔工具,在新的文件编辑窗口中输入以下内容,保存为 spiralDraw.py:
import pyautogui, time
time.sleep(5)
pyautogui.click() # click to put drawing program in focus
distance = 200
while distance > 0:
	pyautogui.dragRel(distance, 0, duration=0.2) # move right
	distance = distance - 5
	pyautogui.dragRel(0, distance, duration=0.2) # move down
	pyautogui.dragRel(-distance, 0, duration=0.2) # move left
	distance = distance - 5
	pyautogui.dragRel(0, -distance, duration=0.2) # move up
在运行这个程序时,会有 5 秒钟的延迟,让你选中铅笔或画笔工具,并让鼠标停留在画图工具的窗口上。spiralDraw.py将绘制一个正方形旋转图:

4.3 滚动鼠标
滚动鼠标的函数是 scroll(),传递正整数表示向上滚动,传递负整数表示向下滚动。
>>> pyautogui.scroll(200)
5. 处理屏幕
pyautogui 拥有屏幕快照的功能,可以根据当前屏幕的内容创建图形文件。
5.1 获取屏幕快照
要在 Python 中获取屏幕快照,就调用 pyautogui.screenshot() 函数:
>>> import pyautogui
>>> im = pyautogui.screenshot()
im 变量将包含一个屏幕快照的 Image 对象。现在可以调用 im 变量中 Image 对象的方法,就像所有其他 Image 对象一样:
>>> im.getpixel((0, 0))
(176, 176, 175)
>>> im.getpixel((50, 200))
(130, 135, 144)
向 getpixel() 函数传入坐标元组,如(0,0)或(50,200),它将告诉你图像中这些坐标处的像素颜色。getpixel() 函数的返回值是一个 RGB 元组,包含 3 个整数,表示像素的红绿蓝值。
5.2 分析屏幕快照
如果屏幕上指定的 x、y 坐标处的像素与指定的颜色匹配,PyAutoGUI 的pixelMatchesColor() 函数将返回 True。pixelMatchesColor() 函数第一和第二个参数是整数,对应 x 和 y 坐标。第三个参数是一个元组,包含 3 个整数,是屏幕像素必须匹配的 RGB 颜色:
>>> import pyautogui
>>> im = pyautogui.screenshot()
>>> im.getpixel((50, 200))
(130, 135, 144)
>>> pyautogui.pixelMatchesColor(50, 200, (130, 135, 144))
True
>>> pyautogui.pixelMatchesColor(50, 200, (255, 135, 144))
False
给定坐标处的颜色应该“完全”匹配。即使只是稍有差异,那么函数也会返回 False。
6. 图像识别
如果事先不知道应该点击哪里,怎么办?可以使用图像识别,向PyAutoGUI 提供希望点击的图像,让它去弄清楚坐标。
例如,如果你以前获得了屏幕快照,截取了提交按钮的图像,保存为submit.png,那么 locateOnScreen() 函数将返回图像所在处的坐标:
>>> import pyautogui
>>> pyautogui.locateOnScreen('submit.png')
(643, 745, 70, 29)
locateOnScreen() 函数返回4个整数的元组,是屏幕上首次发现该图像时左边的x 坐标、顶边的 y 坐标、宽度以及高度。如果屏幕上找不到该图像,locateOnScreen() 函数将返回 None。
在得到图像所在屏幕区域的 4 整数元组后,就可以点击这个区域的中心。将元组传递给center()函数,它将返回该区域中心的 x、y 坐标。用center()得到中心坐标后,将 click() 坐标传递给函数,就会点击屏幕上该区域的中心,这个区域匹配你传递给 locateOnScreen() 函数的图像:
>>> pyautogui.locateOnScreen('submit.png')
(643, 745, 70, 29)
>>> pyautogui.center((643, 745, 70, 29))
(678, 759)
>>> pyautogui.click((678, 759))
7. 控制键盘
7.1 通过键盘发送一个字符串
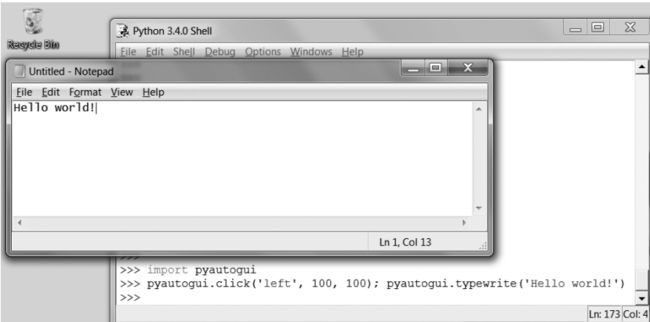
如下代码Python 首先在坐标(100,100)处发出虚拟鼠标点击,这将点击文件编辑窗口,让它获得焦点。typewrite() 函数调用将向窗口发送文本 Hello world!
>>> pyautogui.click(100, 100); pyautogui.typewrite('Hello world!', 0.25)
7.2 键名
除了单个字符串参数,还可以向 typewrite() 函数传递这些键字符串的列表。例如,以下的调用表示按 a 键,然后是 b 键,然后是左箭头两次,最后是 X 和 Y 键:
>>> pyautogui.typewrite(['a', 'b', 'left', 'left', 'X', 'Y'])
因为按下左箭头将移动键盘光标,所以这会输出 XYab。
下表列出了 pyautogui的键盘键字符串,你可以将它们传递给 typewrite() 函数,模拟任何按键组合。也可以查看 pyautogui.KEYBOARD_KEYS 列表,看看 pyautogui 接受的所有可能的键字符串。


7.3 按下和释放键盘
就像 mouseDown() 和 mouseUp() 函数一样,pyautogui.keyDown() 和 pyautogui.keyUp() 将向计算发送虚拟的按键和释放。方便起见,pyautogui 还提供了pyautogui.press() 函数,它调用这两个函数,模拟完整的击键。
运行下面的代码,它将打印出美元字符(通过按住 Shift 键并按 4 得到):
>>> pyautogui.keyDown('shift'); pyautogui.press('4'); pyautogui.keyUp('shift')
如果你需要在文本输入框内打一个字符串,typewrite() 函数就更适合。但对于接受单个按键命令的应用,press() 函数是更简单的方式。
7.4 热键组合
拷贝选择内容的常用热键是 Ctrl-C,用户按住Ctrl键,然后按C键,然后释放C和Ctrl键。要用pyautogui的keyDown() 和keyUp() 函数来做到这一点,必须输入以下代码:
pyautogui.keyDown('ctrl')
pyautogui.keyDown('c')
pyautogui.keyUp('c')
pyautogui.keyUp('ctrl')
这相当复杂。作为替代,可以使用 pyautogui.hotkey() 函数,它接受多个键字符串参数,按顺序按下,再按相反的顺序释放:
pyautogui.hotkey('ctrl', 'c')
8. 复习 PyAutoGUI 的函数
8.1 PyAutoGUI 常用函数
8.2 PyAutoGUI函数用法举例
>>> import pyautogui

>>> screenWidth, screenHeight = pyautogui.size() # Get the size of the primary monitor.
>>> screenWidth, screenHeight
(2560, 1440)

>>> currentMouseX, currentMouseY = pyautogui.position() # Get the XY position of the mouse.
>>> currentMouseX, currentMouseY
(1314, 345)

>>> pyautogui.moveTo(100, 150) # Move the mouse to XY coordinates.

>>> pyautogui.click()          # Click the mouse.
>>> pyautogui.click(100, 200)  # Move the mouse to XY coordinates and click it.
>>> pyautogui.click('button.png') # Find where button.png appears on the screen and click it.

>>> pyautogui.move(400, 0)      # Move the mouse 400 pixels to the right of its current position.
>>> pyautogui.doubleClick()     # Double click the mouse.
>>> pyautogui.moveTo(500, 500, duration=2, tween=pyautogui.easeInOutQuad)  # Use tweening/easing function to move mouse over 2 seconds.

>>> pyautogui.write('Hello world!', interval=0.25)  # type with quarter-second pause in between each key
>>> pyautogui.press('esc')     # Press the Esc key. All key names are in pyautogui.KEY_NAMES

>>> with pyautogui.hold('shift'):  # Press the Shift key down and hold it.
        pyautogui.press(['left', 'left', 'left', 'left'])  # Press the left arrow key 4 times.
>>> # Shift key is released automatically.

>>> pyautogui.hotkey('ctrl', 'c') # Press the Ctrl-C hotkey combination.

>>> pyautogui.alert('This is the message to display.') # Make an alert box appear and pause the program until OK is clicked.
9. PyAutoGUI参考资料
- PyAutoGUI官方文档

