面试—C++《智能指针》常考点
目录
1.为什么需要智能指针
2. 内存泄漏
2.1 什么是内存泄漏,内存泄漏的危害
2.2 内存泄漏分类
2.3 如何检测内存泄漏
2.4如何避免内存泄漏
3.智能指针的使用及原理
3.3 std::auto_ptr
3.4 std::unique_ptr
1.为什么需要智能指针
下面我们先分析一下下面这段程序有没有什么内存方面的问题?
int div()
{
	int a, b;
	cin >> a >> b;
	if (b == 0)
		throw invalid_argument("除0错误");
	return a / b;
}
void Func()
{
	// 1、如果p1这里new 抛异常会如何?
	// 2、如果p2这里new 抛异常会如何?
	// 3、如果div调用这里又会抛异常会如何?
	int* p1 = new int;
	int* p2 = new int;
	cout << div() << endl;
	delete p1;
	delete p2;
}
int main()
{
	try
	{
		Func();
	}
	catch (exception& e)
	{
		cout << e.what() << endl;
	}
	return 0;
}
上面的三种情况会有内存泄漏的问题
2. 内存泄漏
2.1 什么是内存泄漏,内存泄漏的危害
什么是内存泄漏:内存泄漏指因为疏忽或错误造成程序未能释放已经不再使用的内存的情况。内
存泄漏并不是指内存在物理上的消失,而是应用程序分配某段内存后,因为设计错误,失去了对
该段内存的控制,因而造成了内存的浪费。
内存泄漏的危害:长期运行的程序出现内存泄漏,影响很大,如操作系统、后台服务等等,出现
内存泄漏会导致响应越来越慢,最终卡死。
void MemoryLeaks()
{
 // 1.内存申请了忘记释放
 int* p1 = (int*)malloc(sizeof(int));
 int* p2 = new int;
 // 2.异常安全问题
 int* p3 = new int[10];
 Func(); // 这里Func函数抛异常导致 delete[] p3未执行,p3没被释放.
 delete[] p3;
}
2.2 内存泄漏分类
C/C++程序中一般我们关心两种方面的内存泄漏:
堆内存泄漏(Heap leak)
堆内存指的是程序执行中依据须要分配通过malloc / calloc / realloc / new等从堆中分配的一
块内存,用完后必须通过调用相应的 free或者delete 删掉。假设程序的设计错误导致这部分
内存没有被释放,那么以后这部分空间将无法再被使用,就会产生Heap Leak。
系统资源泄漏
指程序使用系统分配的资源,比方套接字、文件描述符、管道等没有使用对应的函数释放
掉,导致系统资源的浪费,严重可导致系统效能减少,系统执行不稳定。
2.3 如何检测内存泄漏
在linux下内存泄漏检测:linux下几款内存泄漏检测工具
在windows下使用第三方工具:VLD工具说明
其他工具:内存泄漏工具比较
2.4如何避免内存泄漏
1. 工程前期良好的设计规范,养成良好的编码规范,申请的内存空间记着匹配的去释放。ps:
这个理想状态。但是如果碰上异常时,就算注意释放了,还是可能会出问题。需要下一条智
能指针来管理才有保证。
2. 采用RAII思想或者智能指针来管理资源。
3. 有些公司内部规范使用内部实现的私有内存管理库。这套库自带内存泄漏检测的功能选项。
4. 出问题了使用内存泄漏工具检测。
总结一下:
内存泄漏非常常见,解决方案分为两种:
1、事前预防型。如智能指针等。2、事后查错型。如泄漏检测工具。
3.智能指针的使用及原理
RAII(Resource Acquisition Is Initialization)是一种利用对象生命周期来控制程序资源(如内存、文件句柄、网络连接、互斥量等等)的简单技术。
在对象构造时获取资源,接着控制对资源的访问使之在对象的生命周期内始终保持有效,最后在
对象析构的时候释放资源。借此,我们实际上把管理一份资源的责任托管给了一个对象。这种做
法有两大好处:
不需要显式地释放资源。
采用这种方式,对象所需的资源在其生命期内始终保持有效
// 使用RAII思想设计的SmartPtr类
template
class SmartPtr
{
public:
	//RAII
	SmartPtr(T* ptr = nullptr)
		: _ptr(ptr)
	{}
	~SmartPtr()
	{
		delete[] _ptr;
		cout << "delete[]:" << _ptr << endl;
	}
	//像指针一样:
	T* operator->()
	{
		return _ptr;
	}
	T& operator*()
	{
		return *_ptr;
	}
private:
	T* _ptr;
};
int div()
{
	int a, b;
	cin >> a >> b;
	if (b == 0)
		throw invalid_argument("除0错误");
	return a / b;
}
void Func()
{
	SmartPtr sp1(new int[10]);
	SmartPtr sp2(new int[10]);
	cout << div() << endl;
}
int main()
{
	try
	{
		Func();
	}
	catch (const exception& e)
	{
		cout << e.what() << endl;
	}
	return 0;
}
运行截图:
3.3 std::auto_ptr
std::auto_ptr文档
C++98版本的库中就提供了auto_ptr的智能指针。下面演示的auto_ptr的使用及问题。
auto_ptr的实现原理:管理权转移的思想,下面简化模拟实现了一份ns::auto_ptr来了解它的原理
// C++98 管理权转移 auto_ptr
namespace ns
{
	template
	class auto_ptr
	{
	public:
		auto_ptr(T* ptr)
			:_ptr(ptr)
		{}
		auto_ptr(auto_ptr& sp)
			:_ptr(sp._ptr)
		{
			// 管理权转移
			sp._ptr = nullptr;
		}
		auto_ptr& operator=(auto_ptr& ap)
		{
			// 检测是否为自己给自己赋值
			if (this != &ap)
			{
				// 释放当前对象中资源
				if (_ptr)
					delete _ptr;
				// 转移ap中资源到当前对象中
				_ptr = ap._ptr;
				ap._ptr = NULL;
			}
			return *this;
		}
		~auto_ptr()
		{
			if (_ptr)
			{
				cout << "delete:" << _ptr << endl;
				delete _ptr;
			}
		}
		// 像指针一样使用
		T& operator*()
		{
			return *_ptr;
		}
		T* operator->()
		{
			return _ptr;
		}
	private:
		T* _ptr;
	};
}
 //结论:auto_ptr是一个失败设计,很多公司明确要求不能使用auto_ptr
int main()
{
	ns::auto_ptr sp1(new int);
	ns::auto_ptr sp2(sp1); // 管理权转移
	// sp1悬空
	*sp2 = 10;
	cout << *sp2 << endl;
	cout << *sp1 << endl;
	return 0;
}
运行截图:
3.4 std::unique_ptr
C++11中开始提供更靠谱的unique_ptr
unique_ptr官方文档
unique_ptr的实现原理:简单粗暴的防拷贝,下面简化模拟实现了一份unique_ptr来了解它的原
理
namespace ns
{
	template
	class unique_ptr
	{
	public:
		unique_ptr(T* ptr)
			:_ptr(ptr)
		{}
		~unique_ptr()
		{
			if (_ptr)
			{
				cout << "delete:" << _ptr << endl;
				delete _ptr;
			}
		}
		// 像指针一样使用
		T& operator*()
		{
			return *_ptr;
		}
		T* operator->()
		{
			return _ptr;
		}
		unique_ptr(const unique_ptr& sp) = delete;
		unique_ptr& operator=(const unique_ptr& sp) = delete;
	private:
		T* _ptr;
	};
}
int main()
{
	 ns::unique_ptr sp1(new int);
	 ns::unique_ptr sp2(sp1);

	 std::unique_ptr sp1(new int);
	 std::unique_ptr sp2(sp1);

 return 0;
}
运行截图:
3.5 std::shared_ptr
C++11中开始提供更靠谱的并且支持拷贝的shared_ptr
std::shared_ptr文档
shared_ptr的原理:是通过引用计数的方式来实现多个shared_ptr对象之间共享资源。
1. shared_ptr在其内部,给每个资源都维护了着一份计数,用来记录该份资源被几个对象共享。
2. 在对象被销毁时(也就是析构函数调用),就说明自己不使用该资源了,对象的引用计数减一。
3. 如果引用计数是0,就说明自己是最后一个使用该资源的对象,必须释放该资源;
4. 如果不是0,就说明除了自己还有其他对象在使用该份资源,不能释放该资源,否则其他对象就成野指针了。
namespace ns
{
	template
	class shared_ptr
	{
	public:
		shared_ptr(T* ptr = nullptr)
			:_ptr(ptr)
			, _pRefCount(new int(1))
		{}
		shared_ptr(const shared_ptr& sp)
			:_ptr(sp._ptr)
			, _pRefCount(sp._pRefCount)
		{
			++(*_pRefCount);
		}
		void Release()
		{
			if (--(*_pRefCount) == 0)
			{
				cout << "delete:" << _ptr << endl;
				delete _ptr;
				delete _pRefCount;
			}
		}
		shared_ptr& operator=(const shared_ptr& sp)
		{
			//if (this != &sp)
			if (_ptr != sp._ptr)
			{
				Release();
				_ptr = sp._ptr;
				_pRefCount = sp._pRefCount;
				++(*_pRefCount);
			}
			return *this;
		}
		~shared_ptr()
		{
			Release();
		}
		// 像指针一样使用
        int use_count()
		{
			return *_pRefCount;
		}
		T* get() const
		{
			return _ptr;
		}
		T& operator*()
		{
			return *_ptr;
		}
		T* operator->()
		{
			return _ptr;
		}
	private:
		T* _ptr;
		int* _pRefCount;
	};
}
int main()
{
	ns::shared_ptr sp1(new int(10));
	ns::shared_ptr sp2(sp1);
	ns::shared_ptr sp3(sp2);

	ns::shared_ptr sp4(new int(10));
	ns::shared_ptr sp5(sp4);
	sp1 = sp5;
	return 0;
}
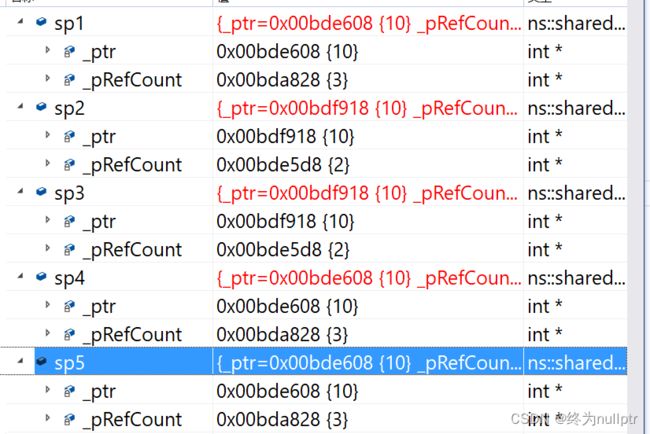
运行截图:
存在的问题:当多个线程同时进行拷贝的时候就会出现数据不一致的问题
int main()
{
	int n = 1000;
	ns::shared_ptrsp1(new int(10));
	thread t1([&]()
		{
			for (int i = 0; i < n; i++)
			{
				ns::shared_ptr sp2(sp1);
			}
		});
	thread t2([&]()
		{
			for (int i = 0; i < n; i++)
			{
				ns::shared_ptr sp3(sp1);
			}
		});
	t1.join();
	t2.join();
	cout << sp1.use_count() << endl;
	cout << sp1.get() << endl;

	return 0;
}
运行截图:
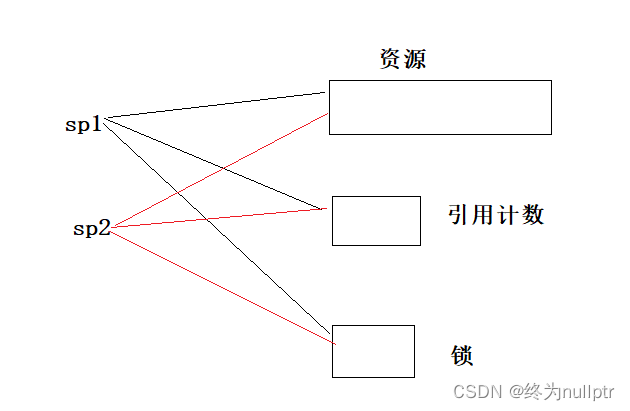
解决方式:在对象拷贝的过程中进行加锁
namespace ns
{
	template
	class shared_ptr
	{
	public:
		shared_ptr(T* ptr = nullptr)
			:_ptr(ptr)
			, _pRefCount(new int(1))
			,_pmut(new mutex)
		{}
		shared_ptr(const shared_ptr& sp)
			:_ptr(sp._ptr)
			, _pRefCount(sp._pRefCount)
			, _pmut(sp._pmut)
		{
			_pmut->lock();
			++(*_pRefCount);
			_pmut->unlock();

		}
		void Release()
		{
			//释放锁
			bool flag = false;
			_pmut->lock();
			if (--(*_pRefCount) == 0)
			{
				cout << "delete:" << _ptr << endl;
				delete _ptr;
				delete _pRefCount;
				flag = true;
			}
			_pmut->unlock();
			if (flag)
				delete _pmut;
		}
		shared_ptr& operator=(const shared_ptr& sp)
		{
			if (_ptr != sp._ptr)
			{
				Release();
				_ptr = sp._ptr;
				_pRefCount = sp._pRefCount;
				_pmut->lock();
				++(*_pRefCount);
				_pmut->unlock();

			}
			return *this;
		}
		int use_count()
		{
			return *_pRefCount;
		}
		T* get() const
		{
			return _ptr;
		}
		~shared_ptr()
		{
			Release();
		}
		// 像指针一样使用
		T& operator*()
		{
			return *_ptr;
		}
		T* operator->()
		{
			return _ptr;
		}
	private:
		T* _ptr;
		int* _pRefCount;
		mutex* _pmut;
	};
}
运行截图:
此时解决了拷贝时引用计数数据不一致的问题,但是在访问资源的时候又存在线程安全的问题:
struct Date
{
	int _year = 0;
	int _month = 0;
	int _day = 0;
};
int main()
{
	int n = 10000;
	ns::shared_ptrsp1(new Date());
	thread t1([&]()
		{
			for (int i = 0; i < n; i++)
			{
				ns::shared_ptr sp2(sp1);
				sp2->_year++;
				sp2->_month++;
				sp2->_day++;
			}
		});
	thread t2([&]()
		{
			for (int i = 0; i < n; i++)
			{
				ns::shared_ptr sp3(sp1);
				sp3->_year++;
				sp3->_month++;
				sp3->_day++;
			}
		});
	t1.join();
	t2.join();
	cout << sp1.use_count() << endl;
	cout << sp1.get() << endl;
	cout << sp1->_year << endl;
	cout << sp1->_month << endl;
	cout << sp1->_day << endl;
	return 0;
}
运行截图:
解决方案:在外部访问资源的时候给每个线程进行加锁:
int main()
{
	int n = 10000;
	mutex mut;
	ns::shared_ptrsp1(new Date());
	thread t1([&]()
		{
			for (int i = 0; i < n; i++)
			{
				mut.lock();
				ns::shared_ptr sp2(sp1);
				sp2->_year++;
				sp2->_month++;
				sp2->_day++;
				mut.unlock();
			}
		});
	thread t2([&]()
		{
			for (int i = 0; i < n; i++)
			{
				mut.lock();
				ns::shared_ptr sp3(sp1);
				sp3->_year++;
				sp3->_month++;
				sp3->_day++;
				mut.unlock();
			}
		});
	t1.join();
	t2.join();
	cout << sp1.use_count() << endl;
	cout << sp1.get() << endl;
	cout << sp1->_year << endl;
	cout << sp1->_month << endl;
	cout << sp1->_day << endl;
	return 0;
}
运行截图:
总结:
shared_ptr 本身是线程安全的。(拷贝和析构时,引用计数++ --是线程安全的)
shared_ptr 管理资源的访问不是线程安全的,需要用的地方自行保护。
std::shared_ptr的循环引用
struct ListNode
{
	int _data;
	ns::shared_ptr _prev;
	ns::shared_ptr _next;
	~ListNode() { cout << "~ListNode()" << endl; }
};
int main()
{
	ns::shared_ptr node1(new ListNode);
	ns::shared_ptr node2(new ListNode);
	//不存在循环引用:
	cout << node1.use_count() << endl;
	cout << node2.use_count() << endl;
	//循环引用
	node1->_next = node2;
	node2->_prev = node1;
	cout << node1.use_count() << endl;
	cout << node2.use_count() << endl;
	return 0;
}
运行截图:
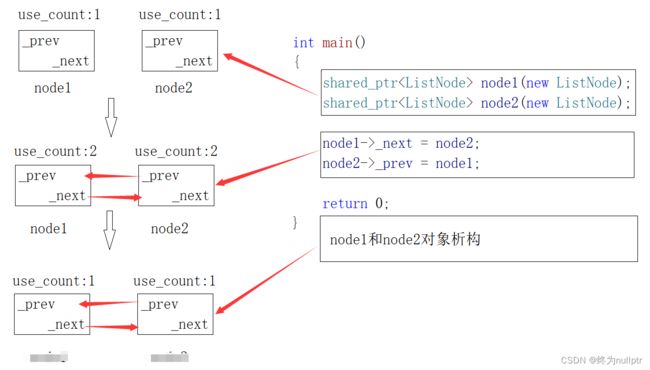
循环引用分析:
1. node1和node2两个智能指针对象指向两个节点,引用计数变成1,我们不需要手动
delete。
2. node1的_next指向node2,node2的_prev指向node1,引用计数变成2。
3. node1和node2析构,引用计数减到1,但是_next还指向下一个节点。但是_prev还指向上
一个节点。
4. 也就是说_next析构了,node2就释放了。
5. 也就是说_prev析构了,node1就释放了。
6. 但是_next属于node的成员,node1释放了,_next才会析构,而node1由_prev管理,_prev
属于node2成员,所以这就叫循环引用,谁也不会释放。
如图所示:
解决方案:在引用计数的场景下,把节点中的_prev和_next改成weak_ptr就可以了
简单模拟实现weak_ptr:
namespace ns
{
	template
	class weak_ptr
	{
	public:
		weak_ptr()
			:_ptr(nullptr){}
		weak_ptr(const shared_ptr& sp)
			:_ptr(sp.get()) {}
		weak_ptr& operator=(const shared_ptr& sp)
		{
			_ptr = sp.get();
			return *this;
		}
		T& operator*()
		{
			return *_ptr;
		}
		T* operator->()
		{
			return _ptr;
		}
	private:
		T* _ptr;
	};
}
测试代码:
struct ListNode
{
	int _data;
    //可以指向/访问资源,但是不参与资源的管理,不增加引用计数
	ns::weak_ptr _prev;
	ns::weak_ptr _next;
	~ListNode() { cout << "~ListNode()" << endl; }
};
int main()
{
	ns::shared_ptr node1(new ListNode);
	ns::shared_ptr node2(new ListNode);
	cout << node1.use_count() << endl;
	cout << node2.use_count() << endl;
	node1->_next = node2;
	node2->_prev = node1;
	cout << node1.use_count() << endl;
	cout << node2.use_count() << endl;
	return 0;
}
运行截图:
解决原理:
node1->_next = node2;和node2->_prev = node1时weak_ptr的_next和_prev不会增加node1和node2的引用计数。
定址删除器
如果是new[]出来的对象,通过智能指针如何管理呢?
int main()
{
	ns::shared_ptr sp2(new string[10]);
	return 0;
}
运行截图:
解决方式:在析构的时候给类对象提供专门的删除器进行删除
//定址删除器:
template
struct Deletearray
{
	void operator()(const T* ptr)
	{
		delete[] ptr;
		cout << "delete[]" << endl;
	}
};
int main()
{
	//可以通过自定义的仿函数进行删除:
	std::shared_ptr sp2(new string[10],Deletearray());
	//也可以通过lambda表达式进行删除:
	std::shared_ptr sp3(new string[10], [](string* ptr) {delete[] ptr; });
	return 0;
}
运行截图:
模拟实现库中的shared_ptr:
namespace ns
{
	template
	class default_delete
	{
	public:
		void operator()(const T* ptr)
		{
			delete ptr;
		}
	};
	template>
	class shared_ptr
	{
	public:
		shared_ptr(T* ptr = nullptr)
			:_ptr(ptr)
			, _pRefCount(new int(1))
			, _pmut(new mutex)
		{}
		shared_ptr(const shared_ptr& sp)
			:_ptr(sp._ptr)
			, _pRefCount(sp._pRefCount)
			, _pmut(sp._pmut)
		{
			_pmut->lock();
			++(*_pRefCount);
			_pmut->unlock();

		}
		void Release()
		{
			//释放锁
			bool flag = false;
			_pmut->lock();
			if (--(*_pRefCount) == 0)
			{
				//cout << "delete:" << _ptr << endl;
				//delete _ptr;
				//转化为定址删除器进行删除
				_del(_ptr);
				delete _pRefCount;
				flag = true;
			}
			_pmut->unlock();
			if (flag)
				delete _pmut;
		}
		shared_ptr& operator=(const shared_ptr& sp)
		{
			if (_ptr != sp._ptr)
			{
				Release();
				_ptr = sp._ptr;
				_pRefCount = sp._pRefCount;
				_pmut = sp._pmut;
				_pmut->lock();
				++(*_pRefCount);
				_pmut->unlock();

			}
			return *this;
		}
		int use_count() const
		{
			return *_pRefCount;
		}
		T* get() const
		{
			return _ptr;
		}
		~shared_ptr()
		{
			Release();
		}
		// 像指针一样使用
		T& operator*()
		{
			return *_ptr;
		}
		T* operator->()
		{
			return _ptr;
		}
	private:
		T* _ptr;
		int* _pRefCount;
		mutex* _pmut;
		D _del;
	};
}
//定址删除器:
template
struct Deletearray
{
void operator()(const T* ptr)
{
delete[] ptr;
cout << "delete[]" << endl;
}
};
int main()
{
//可以通过自定义的仿函数进行删除:
ns::shared_ptr> sp2(new string[10]);
return 0;
} 运行截图:


