@RefreshScope源码解析
@RefreshScope
今天正好学习到了使用nacos作为配置中心,同时在配置的过程中也遇到了一些问题。
我们都知道配置要使用bootstrap.yml,当我使用application.yml进行配置的时候(同样以@Value去取值),还是以bootastrap.yml为准,这引发了我的好奇,第一个猜想即它使用了代理。
我们点开@RefrshScope,那么也证明了这个结论:
@Scope("refresh")
public @interface RefreshScope {
   /**
    * @see Scope#proxyMode()
    */
   ScopedProxyMode proxyMode() default ScopedProxyMode.TARGET_CLASS;

}
下面对其流程做出解析。先来看看@Scope吧
一、@Scope
我们平常所使用的@scope都为singleton或是prototype,这两个是spring硬编码的
但除了@scope之外,我们还有Scope接口,用于我们实现我们的自定义逻辑。因为作为spring的扩展点,它为我们提供了几个方法:
public interface Scope {
    //得到Bean实例,通过objectFactory,可生成我们的对象,就像是mybatis一样,把我们的mapper解析为mapperFactoryBean
    Object get(String name, ObjectFactory<?> objectFactory);
    //销毁Bean
    Object remove(String name);
    //为指定名称的Bean注册销毁时的回调函数
    void registerDestructionCallback(String name, Runnable callback);
    Object resolveContextualObject(String key);
    String getConversationId();
}
它实际上会自动给我们注入一些它自定义的Scope
也就是在我们的初始化阶段,会在beanFactory中注册多个Scope实例。如:
String SCOPE_REQUEST = "request";
String SCOPE_SESSION = "session";
String SCOPE_APPLICATION = "application";
String SERVLET_CONTEXT_BEAN_NAME = "servletContext";
....
beanFactory.registerScope(WebApplicationContext.SCOPE_REQUEST, new RequestScope());
来看下RequestScope,它其实就是Scope的实现类


那么我们怎么获取的呢,肯定是在getBean->doGetBean中。我们可以看见它会对scope进行判断,应证了我们的之前的结论,默认的除了singleton和prototye之外,还有我们自己实现的,它会进行判断。
protected <T> T doGetBean() {
    ...
    if (mbd.isSingleton()) {

    }
    else if (mbd.isPrototype()) {

    }
    //在这里
    else {
        //从我们已经解析出的bd中拿到scope
        String scopeName = mbd.getScope();
		final Scope scope = this.scopes.get(scopeName);
        try {
            //通过scopeName获得我们的Scope,就是之前注册的
            //然后通过get,去拿到我们的实例,可以看到是我们的ObjectFactory,会调用getObject去拿到我们的对象。待会我们以`request`来进行讲解
			 Object scopedInstance = scope.get(beanName, new ObjectFactory<Object>() {
                    @Override
                    public Object getObject() throws BeansException {
                        beforePrototypeCreation(beanName);
                        try {
                            return createBean(beanName, mbd, args);
                        }
                        finally {
                            afterPrototypeCreation(beanName);
                        }
                    }
                });
			bean = getObjectForBeanInstance(scopedInstance, name, beanName, mbd);
			}
    }
}
那么它是怎么创建的呢,我们去看看,懂了这个,那么我们的@RefreshScope就简单啦。我们点入这个lambda表达式里的createBean去看看,实际上经过lambda的实现原理是编译器会生成对应的私有方法,然后在运行期间JVM会生成实现函数式接口的内部类。具体实现为lambdaMetaFactory来生成一个内部类,可以通过添加参数-Djdk.internal.lambda.dumpProxyClasses查看,其会返回一个CallSite,相当于我们需要调用的一个句柄。
public static CallSite metafactory(MethodHandles.Lookup caller,
                                   String invokedName,
                                   MethodType invokedType,
                                   MethodType samMethodType,
                                   MethodHandle implMethod,
                                   MethodType instantiatedMethodType)
    throws LambdaConversionException {
    AbstractValidatingLambdaMetafactory mf;
    mf = new InnerClassLambdaMetafactory(caller, invokedType,
                                         invokedName, samMethodType,
                                         implMethod, instantiatedMethodType,
                                         false, EMPTY_CLASS_ARRAY, EMPTY_MT_ARRAY);
    mf.validateMetafactoryArgs();
    return mf.buildCallSite();
}
好了,我们再去看看createBean具体做了什么事情。我们以scope为request为例,它的Scope
public abstract class AbstractRequestAttributesScope implements Scope {

   @Override
   public Object get(String name, ObjectFactory<?> objectFactory) {
      //RequestContextHolder在我们平常的开发中可以用于获取当前的HttpServletRequest.它实际上是我们由我们的spring-mvc设置进去的(也就是请求来到我们的DispatcherServlet,然后交给它的父类FrameworkServlet,里面有个processRequest方法用于处理请求,在这里面设置进去。具体代码可参加目录,见附录1),并且用ThreadLocal进行了修饰
      //eg:HttpServletRequest request =
      //((ServletRequestAttributes) RequestContextHolder.getRequestAttributes()).getRequest();
      RequestAttributes attributes = RequestContextHolder.currentRequestAttributes();
      //我们来看看RequestAttribute
      Object scopedObject = attributes.getAttribute(name, getScope());
      //如果没有就通过getObject生成一个放到RequestAttributes中
      if (scopedObject == null) {
         scopedObject = objectFactory.getObject();
         attributes.setAttribute(name, scopedObject, getScope());
         Object retrievedObject = attributes.getAttribute(name, getScope());
         if (retrievedObject != null) {
            scopedObject = retrievedObject;
         }
      }
      return scopedObject;
   }
我们继续来看ServletRequestAttributes:
public class ServletRequestAttributes extends AbstractRequestAttributes {
    private final HttpServletRequest request;
    private HttpServletResponse response;
    private volatile HttpSession session;

    //根据'request'还是'session'获取对象
    public Object getAttribute(String name, int scope) {
        //request
        if (scope == SCOPE_REQUEST) {
            return this.request.getAttribute(name);
        }
        //setssion
        else {
            HttpSession session = getSession(false);
            if (session != null) {
                try {
                    Object value = session.getAttribute(name);
                    if (value != null) {
                        this.sessionAttributesToUpdate.put(name, value);
                    }
                    return value;
                }
            }
            return null;
        }
    }
    //根据作用域的值将指定对象存储到request还是session中
    public void setAttribute(String name, Object value, int scope) {
        if (scope == SCOPE_REQUEST) {
            this.request.setAttribute(name, value);
        }
        else {
            HttpSession session = getSession(true);
            this.sessionAttributesToUpdate.remove(name);
            session.setAttribute(name, value);
        }
    }

}
那么request和session到这里就结束了。
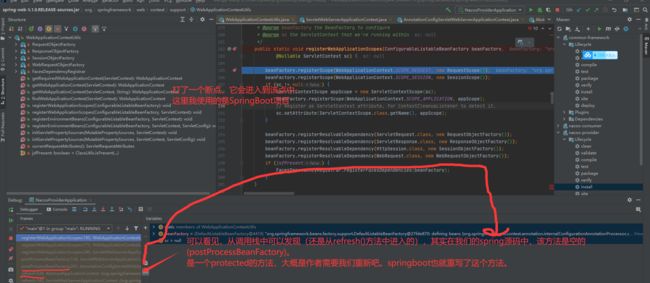
相应的,我们的@RefreshScope也会注册Scope的实现.。在哪注册呢,因为其实现了BeanFactoryPostProcessor,会在实例化bean之前注册进去。


其实我们可以看见,我们是不能注册scopeName为为singleton和prototype的,因为该2者是spring硬编码的方式。如下图所示:

那么@RefreshScope一定得监听文件的变化,比如我们在nacos中配置后会点击发布按钮,它就相当于一次事件。当我们用Java写热加载时,也是会对文件的修改事件进行监听,具体可参考我的这篇文章 java实现热加载
我们在RefreshScope中其实并没有找到多少方法

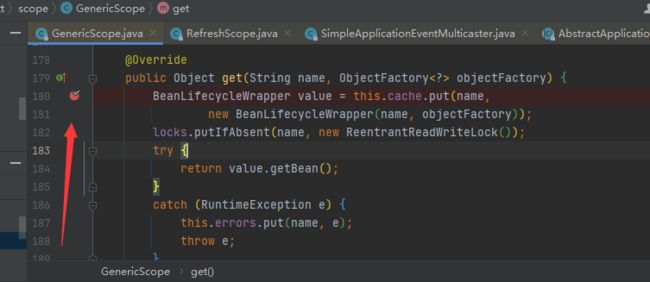
那么我们点击进入其父类GenericScope:
@Override
public Object get(String name, ObjectFactory<?> objectFactory) {
   BeanLifecycleWrapper value = this.cache.put(name,
         new BeanLifecycleWrapper(name, objectFactory));
   locks.putIfAbsent(name, new ReentrantReadWriteLock());
   try {
      return value.getBean();
   }
   catch (RuntimeException e) {
      this.errors.put(name, e);
      throw e;
   }
}
它会从BeanLifecycleWraper中拿,类似于一个缓存。
当在RefreshScope中调用refresh也即调用父类GenericScope从map中remove掉。然后向当前的context发布RefreshScopeRefreshedEvent(name)事件。

哪么什么时候回去重新getBean呢,我们打开nacos,来调试一下。
首先我们先在GenericScope的get方法上打一个断点
看看什么时候会调用

然后对我们标注了@RefreshScope的bean进行实例化

每次发一个请求的时候都会进入get拿,因为我们知道对于spring来说,不管是创建还是取都是通过doGetBean方法
我们来回顾一下

现在我们在nacos发布一下,再看看get方法的调用栈,来说明它是怎么监听的。

这说明了一个问题,我们猜测,也许做的更改是在nacos中,当我的请求发来时,才会去刷新我用@RefreshScope修饰的bean,否则这里的username不应是piwenjing,而是推荐工程才对。类似于一种懒加载的方式。但是当我们之后又进行修改之后它是会先destroy的,也就是remove掉。若修改则出发事件,会进行destroy,如:

请求才会缓存起来
下面我们发送一个请求

很好,应征了我们的初步猜测,请求在这阻塞住了。当然spring肯定会在这做一个加锁处理,不然每个人都来刷新怎么办。
但是这里它有一个很奇怪的地方,在这里它的value放的是一个ReentrantReadWriteLock,有什么用呢?其实也就是增加删除的时候拿写锁,读的时候是读锁,在下面会解析到,不得不说作者真厉害!
我们来观测什么时候修改我们的username的,把BeanLifecycleWrapper调出来,观测其值变化
来对应一下

那么这个userName是怎么设置的呢?肯定是反射了,运行时可以动态修改嘛。我们倒回去看看寻找一点思路:

获得了以上3个线索,我们明白,肯定是在get:-1这个栈帧上的地方我们对userName进行了赋值的操作。说到cglib,那么其实我们对get方法进行了代理,它会进行两次get方法对吧,一次原方法,一次代理方法,这也是之前为什么会进入get方法两次的原因,因为是从map中取,存在则会取得相同的,这里没有毛病。如果你感兴趣可以自己调试一下。
为了再现spring如何修改,我再次修改nacos中的配置,发现此时应用进入了refresh的方法,接下来我们就可以慢慢进行调试,查看推荐工程如何变成推荐工程214了


注意这里的cache是我们的ScopeCache
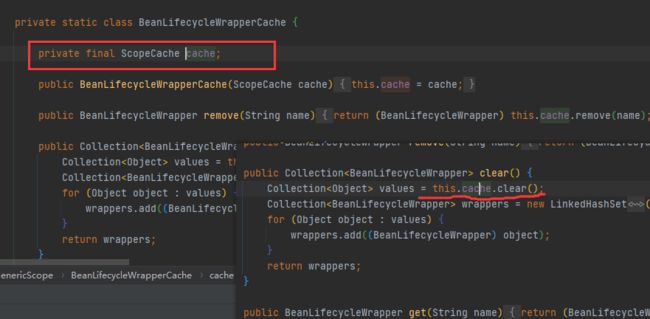

这个cache里有我们的configController的Wrapper

但实际上我们的destroy并没有销毁我们的userName,因为你看见我的userName还有值,这里是很奇怪的?这里困惑了我很久。
WrapperCollection
wrappers;在这里是一个局部变量,生命周期只在destroy方法,spring在这里是为了取出来再做进一步处理。在这里可以看到我们的username也没有消除,也许spring是想后续的过程中可以拿到原来的信息又可以这么进行处理。
在这里其实我们也可以学到spring的一些代码细节,很多地方都有体现。spring会将“生命周期”的一些步骤放到不同的方法里,尽管一个方法可以解决。
而销毁wrapper,如它的名字一样,只是一个cache而已,它存放了需要热部署的内容,当你clear之后,其他人是获取不了的,只有重新设置。
再次destroy,再destroy中会调用callback方法,如下图所示:

也就是说,BeanLifecycleWrapper给你提供了选择,你可以在其销毁的时候注册一个Runnable方法进行调用!!!。在这里也给我们在设计的时候提供了一些启发。

出来后继续发布了一个事件
Over。
附录1,HttpServletRequest如何设置进RequestContextHolder的
protected final void processRequest(HttpServletRequest request, HttpServletResponse response){
        LocaleContext previousLocaleContext = LocaleContextHolder.getLocaleContext();
        LocaleContext localeContext = buildLocaleContext(request);

        RequestAttributes previousAttributes = RequestContextHolder.getRequestAttributes();
        ServletRequestAttributes requestAttributes = buildRequestAttributes(request, response, previousAttributes);

		// ***************************************//
    	//                   步骤            		 //
    	//先设置,处理业务逻辑doService(),再finally移除//


        //将requestAttributes设置到RequestContextHolder,是一个ServletRequestAttributes
        initContextHolders(request, localeContext, requestAttributes);

        try {
            //具体的业务逻辑
            doService(request, response);
        }
        finally {
            //重置RequestContextHolder之前设置RequestAttributes
            resetContextHolders(request, previousLocaleContext, previousAttributes);
            if (requestAttributes != null) {
                requestAttributes.requestCompleted();
            }
            publishRequestHandledEvent(request, response, startTime, failureCause);
        }
		...
    }