instant-ngp中run.py的使用
在https://blog.csdn.net/fengbingchun/article/details/129642774 中对instant-ngp进行了简单介绍,这里简单介绍下如何使用其中的run.py.
1. 若能运行run.py,首先需要使用CMake编译instant-ngp源码,然后调用其中的.pyd文件,在windows上通过CMake编译instant-ngp源码:
(1).从https://github.com/NVlabs/instant-ngp clone code:
git clone --recursive https://github.com/nvlabs/instant-ngp(2).本机安装cuda 11.6,并将C:\Program Files\NVIDIA GPU Computing Toolkit\CUDA\v11.6\extras\visual_studio_integration\MSBuildExtensions 目录下的四个文件CUDA 11.6.props, CUDA 11.6.targets, CUDA 11.6.xml, Nvda.Build.CudaTasks.v11.1.dll, 拷贝到C:\Program Files (x86)\Microsoft Visual Studio\2019\Community\MSBuild\Microsoft\VC\v160\BuildCustomizations 目录下;
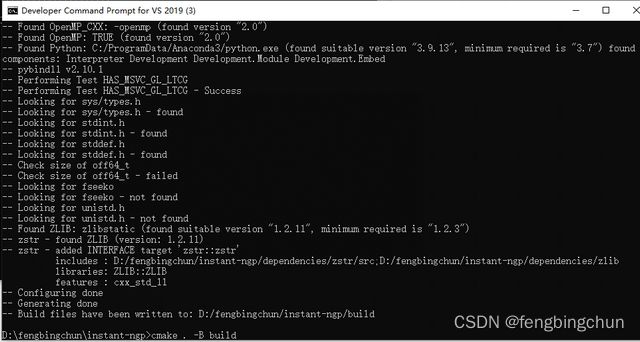
(3).打开Developer Command Prompt for VS 2019,并将其定位到instant-ngp目录下,执行以下命令,执行结果如下图所示:
cmake . -B build(4).执行以下命令,执行结果如下图所示:
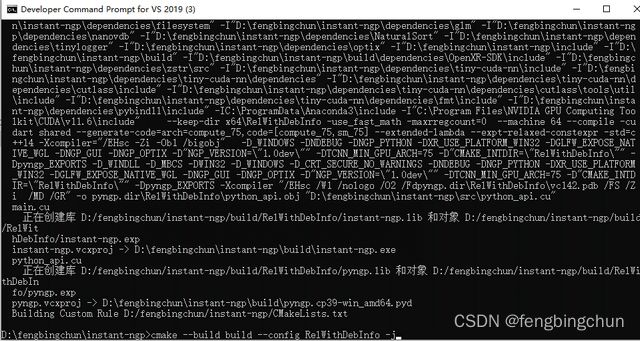
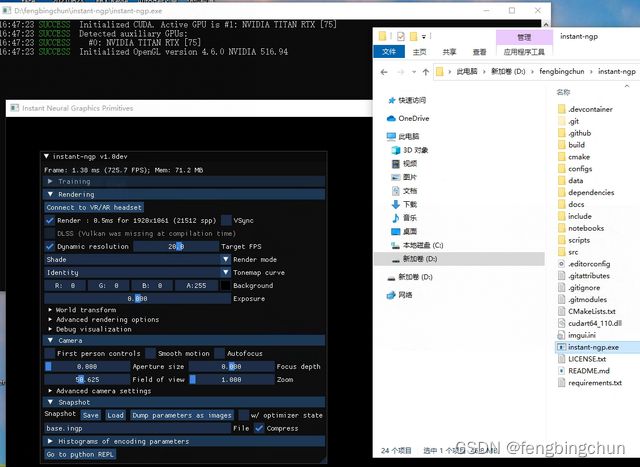
cmake --build build --config RelWithDebInfo -j执行完后会在当前目录下生成执行文件instant-ngp.exe,直接双击即可运行,说明编译成功,如下图所示:
经测试,在windows上通过Git Bash执行上述命令也可以正常生成可执行文件instant-ngp.exe.
打开build目录下的instant-ngp.sln,结果如下图所示:
2. 运行run.py:
(1).在通过CMake编译后,会在build目录下生成pyngp.cp39-win_amd64.pyd,此pyd文件是由python 3.9.13生成的;
(2).参考https://blog.csdn.net/fengbingchun/article/details/129642774 构建虚拟环境instant-ngp2,将其定位到instant-ngp目录下,依次执行如下命令:
conda create -n instant-ngp2 python=3.9.13
conda activate instant-ngp2
pip install -r requirements.txt
conda install -c conda-forge colmap
conda install -c conda-forge ffmpeg
conda install -c conda-forge mpir
(3).将pyngp.cp39-win_amd64.pyd拷贝到instant-ngp2所安装目录的DLLs目录下,这里为C:\ProgramData\Anaconda3\envs\instant-ngp2\DLLs,否则执行run.py时会报找不到ngp的error;
(4).执行如下命令,获取使用说明:
python scripts/run.py --help3. run.py支持的输入参数说明:
(1).--scene, --training_data: 默认为空,要加载的scene,可以是scene的name或训练数据的完整路径,如训练lego,保存为lego.ingp,执行如下命令:执行结果如下图所示: 生成的lego.ingp,可通过instant-ngp.exe Load,支持的图像格式: "png", "jpg", "jpeg", "bmp", "gif", "tga", "pic", "pnm", "psd", "exr";
python scripts/run.py --scene "D:\fengbingchun\instant-ngp\data\nerf\lego" --save_snapshot "lego.ingp"(2).--mode: 默认为空,已废弃;
(3).--network: 默认为空,网络配置的path,如果未指定,则使用scene的默认值,如instant-ngp\configs\nerf\base.json;
(4).--load_snapshot, --snapshot: 默认为空,在train之前加载此snapshot,推荐扩展名: .ingp或.msgpack;
(5).--save_snapshot: 默认为空,train后保存此snapshot,推荐扩展名: .ingp或.msgpack;
(6).--nerf_compatibility: 若指定则为True,不指定则为False;将参数与原始NeRF匹配.在某些scene中可能会导致速度变慢和效果更差,但在合成场景(synthetic scenes)有助于提高PSNR(Peak Signal to Noise Ratio, 峰值信噪比);
(7).--test_transforms: 默认为空,到nerf style transforms json的路径,我们将从中计算PSNR,如执行如下命令,执行结果如下图所示:
python scripts/run.py --scene "D:\fengbingchun\instant-ngp\data\nerf\lego" --load_snapshot "lego.ingp" --save_snapshot "lego2.ingp" --nerf_compatibility --test_transforms "D:\fengbingchun\instant-ngp\data\nerf\lego\transforms.json" (8).--near_distance: 默认值为-1,float类型,为nerf设置train rays开始的相机距离,<0表示使用ngp默认值;
(9).--exposure: 默认值为0.0,float类型,控制image的亮度(brightness),正值增加亮度,负值降低亮度;
(10).--screenshot_transforms: 默认为空,NeRF transforms.json文件路径;
(11).--screenshot_frames: list,指定需要截图的帧;
(12).--screenshot_dir: 默认为空,指定保存截图的路径;
(13).--screenshot_spp: 默认值为16, int类型,截图中每个像素的样本数,如执行如下命令,执行结果如下图所示:
python scripts/run.py --scene "D:\fengbingchun\instant-ngp\data\nerf\lego" --load_snapshot "lego.ingp" --save_snapshot "lego2.ingp" --screenshot_transforms "D:\fengbingchun\instant-ngp\data\nerf\lego\transforms.json" --screenshot_dir "D:\fengbingchun" --screenshot_frames (5, 10, 15) --screenshot_spp 8 --screenshot_w 400 --screenshot_h 400 (14).--video_camera_path: 默认为空,要渲染的相机路径,如base_cam.json;
(15).--video_camera_smoothing: 若指定则为True,不指定则为False, 对相机轨迹(trajectory)应用smoothing;
(16).--video_loop_animation: 若指定则为True,不指定则为False,在连续循环中连接最后一个和第一个关键帧;
(17).--video_fps: 默认值为60,int类型,每秒帧数;
(18).--video_n_seconds: 默认值为1,int类型,渲染视频的秒数;
(19).--video_spp: 默认值为8,int类型,每个像素的样本数,数字越大意味着噪点越少,但渲染速度越慢;
(20).--video_output: 默认值为video.mp4, str类型,输出视频的文件名;
(21).--save_mesh: 默认为空,从NeRF或SDF模型输出基于marching-cubes的mesh,支持OBJ或PLY格式,生成的.obj文件可使用windows上的3D查看器打开;
(22).--marching_cubes_res: 默认值为256,int类型,设置marching cubes grid分辨率,如执行如下命令,执行结果如下图所示:
python scripts/run.py --scene "D:\fengbingchun\instant-ngp\data\nerf\lego" --load_snapshot "lego.ingp" --save_mesh "lego_mesh.obj" --marching_cubes_res 512 (23).--width, --screenshot_w: 默认值为0,int类型, GUI和屏幕截图的分辨率宽度;
(24).--height, --screenshot_h: 默认值为0,int类型, GUI和屏幕截图的分辨率高度;
(25).--gui: 若指定则为True,不指定则为False, 以交互式方式运行测试平台GUI,如执行如下命令,执行结果如下图所示:
python scripts/run.py --scene "D:\fengbingchun\instant-ngp\data\nerf\lego" --load_snapshot "lego.ingp" --save_mesh "lego_mesh.obj" --marching_cubes_res 512 --width 1920 --height 1080 --gui --train (26).--train: 若指定则为True,不指定则为False, 如果启用了GUI,则控制是否立即开始训练;
(27).--n_steps: 默认值为-1,int类型,停止(quitting)前要训练的步数;
(28).--second_window: 若指定则为True,不指定则为False, 打开包含a copy of the main output的第二个窗口;
(29).--vr: 若指定则为True,不指定则为False, 渲染VR头戴式设备;
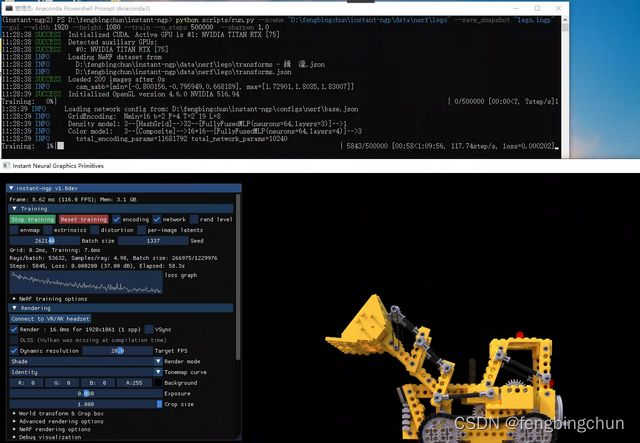
(30).--sharpen: 默认值为0,float类型,设置应用于NeRF训练图像的锐化量(amount of sharpening),范围:[0.0, 1.0],如执行如下命令,执行结果如下图所示:
python scripts/run.py --scene "D:\fengbingchun\instant-ngp\data\nerf\lego" --save_snapshot "lego.ingp" --gui --width 1920 --height 1080 --train --n_steps 500000 --sharpen 1.0


