springboot入门案例,web开发
目录
一.SpringBoot框架入门
1.1Spring Boot 简介
1.2Spring Boot 的特性
1.3Spring Boot 四大核心
二. 入门案例
2.1 第一个 SpringBoot 项目
2.1.1 开发步骤
2.2入门案例
2.3 入门案例分析
2.4 Spring Boot的核心配置文件
2.4.1 核心配置格式
2.4.2 多环境配置
2.4.4 SpringBoot自定义配置
2.5 SpringBoot前端使用JSP
2.5.4 在pom.xml文件中配置以下依赖项
2.5.6 在 application.properties文件配置 SpringMVC的视图展示为jsp
2.5.7 com.tx.springboot.controller.Indexcontroller
三 .SpringBoot框架Web开发
3.1SpringBoot集成Mybatis
3.2 SpringBoot 事务支持
3.3SpringBoot 下的Spring MVC
3.3.1 @Controller
3.3.2@RestController
3.3.3 @RequestMapping(常用)
3.3.4 @GetMapping
3.3.5 @PostMapping
3.3.6 @PutMapping
3.3.7 @DeleteMapping
3.4 Http接口请求工具Postman
3.5 SpringBoot 实现RESTful
3.5.1了解RESTful
3.5.2 SpringBoot开发RESTful
3.5.4请求冲突问题
3.5.5 RESTful原则
3.6 Spring Boot集成Redis
3.6.1 Spring Boot集成Redis
3.7 SpringBoot 集成dubbo
3.7.1 基本集成步骤
3.7.2 SpringBoot 集成SSM+Dubbo+Redis
一.SpringBoot框架入门
1.1Spring Boot 简介
1.2Spring Boot 的特性
1.3Spring Boot 四大核心
- 自动配置
- 起步依赖
- Actuator
- 命令行界面
二. 入门案例
2.1 第一个 SpringBoot 项目
2.1.1 开发步骤
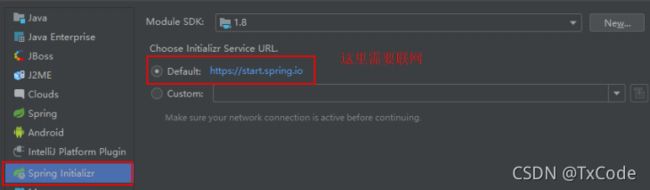
1.创建一个 Module,选择类型为 Spring Initializr 快速构建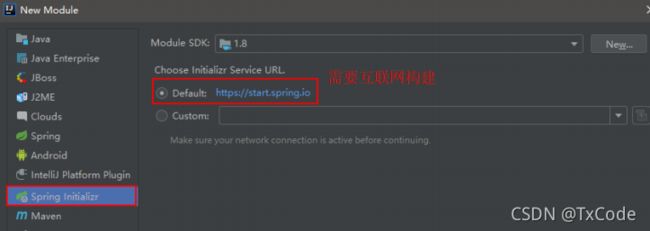
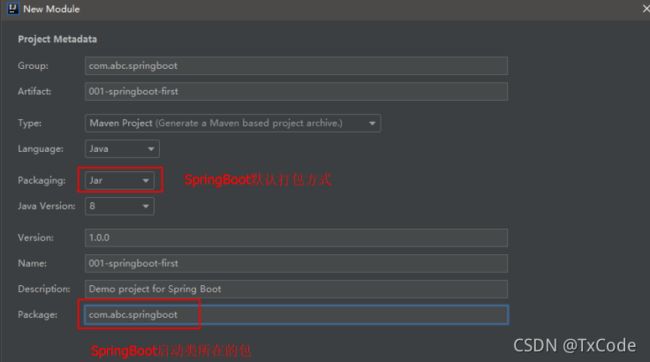
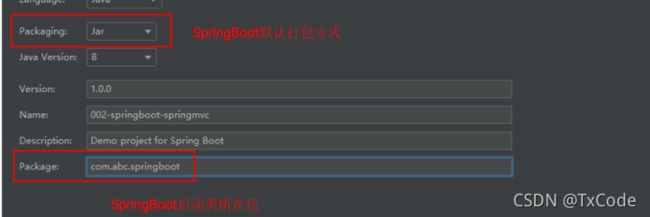
2.设置GAV坐标及pom配置信息
3.选择 Spring Boot 版本及依赖(会根据选择的依赖自动添加起步依赖并进行自动配置)
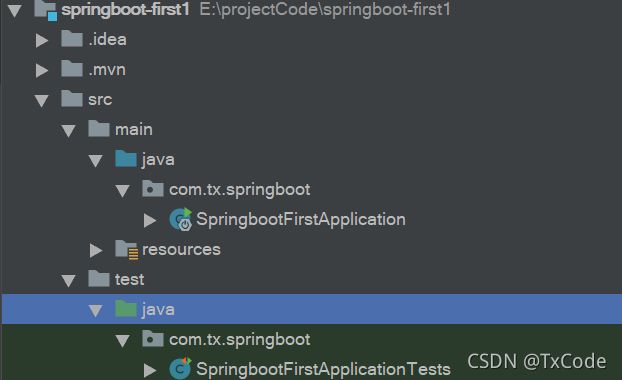
4.设置模块名称、Content Root 路径及模块文件的目录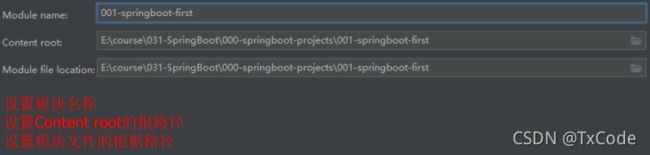
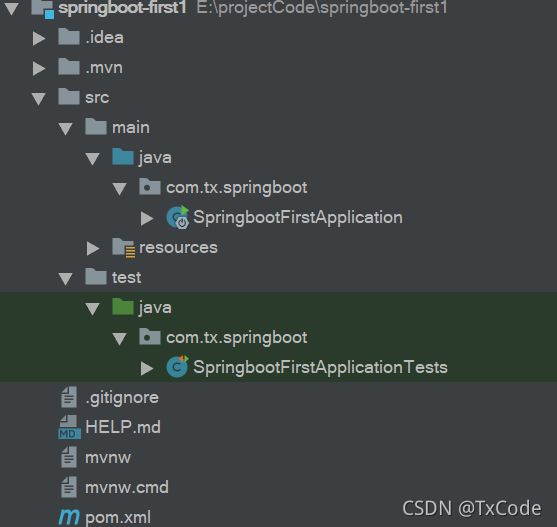
5.项目创建完毕,如
2.2入门案例
1.创建一个新的 Module,选择类型为 Spring Initializr
2.指定GAV及pom配置信息
3.选择 Spring Boot 版本及依赖

4.修改 Content Root 路径及文件所在目录

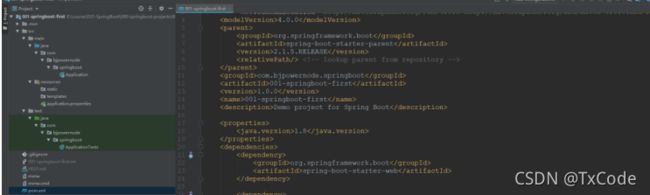
5.对 POM.xml 文件进行解释
    4.0.0


        org.springframework.boot
        spring-boot-starter-parent
        2.5.5


    com.tx.springboot
    springboot-first
    0.0.1-SNAPSHOT

    springboot-first

    Demo project for Spring Boot


        1.8


            org.springframework.boot
            spring-boot-starter-web


            org.springframework.boot
            spring-boot-starter-test
            test


                org.springframework.boot
                spring-boot-maven-plugin
6.对SpringBoot项目结构进行说明
7.创建一个springmvc的spring bootController
package com.tx.springboot.web;

import org.springframework.web.bind.annotation.RequestMapping;
import org.springframework.web.bind.annotation.ResponseBody;
import org.springframework.web.bind.annotation.RestController;

@RestController
public class SpringBootController {

    @RequestMapping("/springBoot/say")
    public @ResponseBody String say(){
        return "hello Spring boot";
    }
}
8.在IDEA中右键,运行Application类中的main方法
![]()
9.在浏览器中输入 http://localhost:8080/springBoot/say 访问

2.3 入门案例分析
2.4 Spring Boot的核心配置文件
Spring boot的核心配置文件用于配置Spring Boot程序,名字必须application开始
2.4.1 核心配置格式
(1).properties文件(默认采用该文件)
#设置内嵌Tomcat端口
server.port=9090

#配置项目上下文根
server.servlet.context-path=/003-springboot-port-context-path
(2).yml文件
server:
    port: 9090
    servlet:
context-path: /004-springboot-yml2.4.2 多环境配置
(1) 项目名称:005-springboot-multi-environment
为每个环境创建一个配置文件,命名必须application-环境表示.propertiest|yml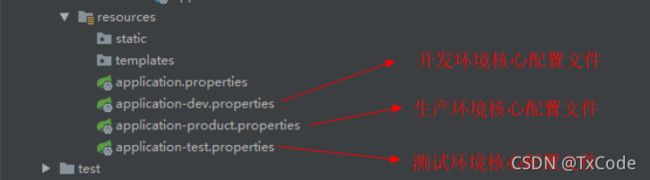
application-dev.properties
#开发环境
#设置内嵌tomcat默认端口号
server.port=8080
#设置项目的上下文根
server.servlet.context-path=/dev
#使用yml文件形式
server:
port: 8080
servlet:
context-path: /devapplication-product.properties
#生产环境

#配置内嵌的tomcat默认端口号
server.port=80

#配置项目山下文根
server.servlet.context-path=/product
application-test.properties
#测试环境

#配置内嵌tomcat端口号
server.port=8081
#配置项目的上下文根
server.servlet.context-path=/test
在总配置文件application.properties进行环境的激活
#springboot主核心配置文件
#激活使用的配置文件
spring.profiles.active=product(dev,test)
yml多文档方式 — 分隔不同配置
---
server:
  port: 8081
spring:
  profiles: dev
---
server:
  port: 8082
spring:
  profiles: test
---
server:
  prot: 8083
spring:
  profiles: pro
---
spring:
  profiles:
      active: pro
2.4.4 SpringBoot自定义配置
案例演示:
在 SpringBoot 的核心配置文件中,除了使用内置的配置项之外,我们还可以在自定义配置,然后采用如下注解去读取配置的属性值.
(1)@Value注解
在核心配置文件application.properties中,添加两个自定义配置项school.name 和website.
#设置内嵌tomcat端口号
server.port=8080
#设置上下文根
server.servlet.context-path=/

school.name=tx
websit=http://www.baidu.com
application.yml格式配置
server:
    port: 9090
    servlet:
        context-path: /

school:
    name: ssm
websit: http://www.baidu.com
在SpringbootController中的定义属性,并且使用@Value注解或者自定义配置值。
@Controller
public class IndexController {

    @Value("${school.name}")
    private String schoolName;

    @Value("${websit}")
    private String websit;

    @RequestMapping(value = "/say")
    public @ResponseBody String say() {
        return "Hello:" + schoolName + ":" + websit;
    }
}
(2)@ConfigurationProperties
@Component//将此类将给spring容器进行管理
@ConfigurationProperties(prefix = "school")
public class School {

    private String name;

    private String websit;

    public String getName() {
        return name;
    }
    public void setName(String name) {
        this.name = name;
    }
    public String getWebsit() {
        return websit;
    }
    public void setWebsit(String websit) {
        this.websit = websit;
    }
}
application.properties配置文件
server.port=8080
server.servlet.context-path=/

school.name=ssm
school.websit=http://www.baidu.com
application.yml配置文件
server:
    port: 9090
    servlet:
        context-path: /

school:
    name: ssm
    websit: http://www.baidu.com
在IndexController中注入School配置类
@Controller
public class IndexController {

    @Autowired
    private School school;

    @Autowired
    private Abc abc;

    @RequestMapping(value = "/say")
    public @ResponseBody String say() {

        return "school.name="+school.getName()+"-----school.websit="+school.getWebsit() + "====abc.name"+abc.getName()+"===abc.websit="+abc.getWebsit();
    }
}
(3) 在school类中使用了ConfigurationProperties注解后,IDEA会出现一个警告不影响程序的执行
            org.springframework.boot
            spring-boot-configuration-processor
            true
(4)中文乱码
如果在SpringBoot核心配置文件中有中文信息,会出现乱码
2.5 SpringBoot前端使用JSP
2.5.4 在pom.xml文件中配置以下依赖项
            org.springframework.boot
            spring-boot-starter-web


            org.apache.tomcat.embed
            tomcat-embed-jasper


                src/main/webapp

                META-INF/resources


                    *.*


                org.springframework.boot
                spring-boot-maven-plugin
2.5.6 在 application.properties文件配置 SpringMVC的视图展示为jsp
#配置视图解析器
#其中:/ 表示目录为src/main/webapp
spring.mvc.view.prefix=/
spring.mvc.view.suffix=.jsp
yml文件形式
#配置SpringMVC视图解析器
#其中:/ 表示目录为src/main/webapp
spring:
    mvc:
        view:
            prefix: /
            suffix: .jsp
2.5.7 com.tx.springboot.controller.Indexcontroller
@Controller
public class IndexController {

    @RequestMapping(value = "/say")
    public ModelAndView say() {
        ModelAndView mv = new ModelAndView();
        mv.addObject("message","Hello,SpringBoot");
        mv.setViewName("say");
        return mv;
    }
}
三 .SpringBoot框架Web开发
3.1SpringBoot集成Mybatis
实现步骤:
1.准备数据库
2.创建项目 springboot-web-mybatis
3.在pom.xml中添加相关jar依赖
4.配置application.properties数据源
5.代码实现
5.运行测试
实现:
数据库
创建项目如同前例
pom.xml中添加依赖jar
        1.8


            org.springframework.boot
            spring-boot-starter-web


            mysql
            mysql-connector-java


            org.mybatis.spring.boot
            mybatis-spring-boot-starter
            2.0.0


                src/main/java

                    **/*.xml


                org.mybatis.generator
                mybatis-generator-maven-plugin
                1.3.6


                    GeneratorMapper.xml
                    true
                    true


                org.springframework.boot
                spring-boot-maven-plugin
application.properties配置数据源
#设置连接数据库的配置
spring.datasource.driver-class-name=com.mysql.cj.jdbc.Driver
spring.datasource.url=jdbc:mysql://192.168.154.128:3306/springboot?useUnicode=true&characterEncoding=UTF-8&useJDBCCompliantTimezoneShift=true&useLegacyDatetimeCode=false&serverTimezone=GMT%2B8
spring.datasource.username=root
spring.datasource.password=333
代码开发
将接口和映射文件分开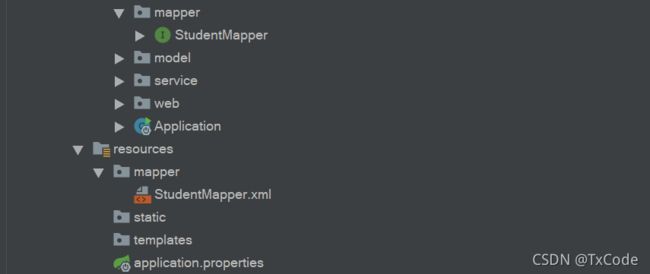
在application.properties配置文件指定映射文件的位置。
#指定MyByBatis映射文件的路径
mybatis.mapper-locations=classpath:mapper/*.xml
3.2 SpringBoot 事务支持
@SpringBootApplication
@MapperScan(basePackages = "com.abc.springboot.mapper")
@EnableTransactionManagement //开启事务支持(可选项,但@Transactional必须添加)
Public class Application{
}
@Transactional //添加此注解书名该方法添加的事务管理
public int update(Student student){
int updateCount = studentMapper.updateByPrimaryKeySelective(student);
System.out.println("跟新结果"+updateCount);
//在此构造一个除数为0的异常,测试事务是否起做用
int a = 10/0;
return updateCount;
}3.3SpringBoot 下的Spring MVC
springboot下的SpringMVC和之前的SpringMVC使用是完全一样的,主要有以下注解
3.3.1 @Controller
3.3.2@RestController
3.3.3 @RequestMapping(常用)
3.3.4 @GetMapping
3.3.5 @PostMapping
3.3.6 @PutMapping
3.3.7 @DeleteMapping
3.4 Http接口请求工具Postman
3.5 SpringBoot 实现RESTful
3.5.1了解RESTful
- 比如我们要访问一个 http 接口:http://localhost:8080/boot/order?id=1021&status=1
- 采用 RESTFul 风格则 http 地址为:http://localhost:8080/boot/order/1021/1
3.5.2 SpringBoot开发RESTful
SpringBoot开发RESTful主要是几个注解实现
- @PathVariable (获取url中的数据,最主要的注解)
- @PostMapping
- @DeleteMapping
- @PutMapping
- @GetMapping
   @GetMapping(value = "/student/detail/{id}/{age}")
    public Object student1(@PathVariable("id") Integer id,
                           @PathVariable("age") Integer age) {
        Map retMap = new HashMap<>();

        retMap.put("id",id);
        retMap.put("age",age);
        return retMap;
    }
    @DeleteMapping(value = "/student/detail/{id}/{status}")
    public Object student2(@PathVariable("id") Integer id,
                           @PathVariable("status") Integer status) {
        Map retMap = new HashMap<>();

        retMap.put("id",id);
        retMap.put("status",status);
        return retMap;
    }

    //以上代码student1和student2会出现请求路径冲突问题
    //通常在RESTful风格中方法的请求方式会按增删改查的请求方式来区分
    //修改请求路径
    //RESUful请求风格要求路径中使用的单词都是名称,最好不要出现动词

    @DeleteMapping(value = "/student/{id}/detail/{city}")
    public Object student3(@PathVariable("id") Integer id,
                           @PathVariable("city") Integer city) {
        Map retMap = new HashMap<>();

        retMap.put("id",id);
        retMap.put("city",city);
        return retMap;
    }
总结:如上代码例,student1,student2形参相同,但请求方式不同来区分
传递参数变简单了
服务提供者对外只需要一个接口服务,而不是传统的CRUD四个接口
3.5.4请求冲突问题
改请求方式,改路径
3.5.5 RESTful原则
增post请求,删delete请求,改put请求,查get请求
请求路劲不要出现动词例如:
3.6 Spring Boot集成Redis
3.6.1 Spring Boot集成Redis
思路梳理:完善根据学生id查询学生,先从redis缓存中查找,无法找到,在从数据库查找,然后放到redis缓存中
实现步骤:
1.Mybatis逆向工程生成实体bean和数据持层
mybatis逆向工程
2.pom.xml添加redis依赖
     org.springframework.boot
     spring-boot-starter-data-redis
3.springBoot核心配置文件
#设置redis配置信息
spring.redis.host=10.0.4.10
spring.redis.port=6379
spring.redis.password=123456

-------------------------------
#使用yml文件格式
Spring:
    redis:
        host: 10.0.4.10
        password: 123456
        port: 6379
4.启动redis服务
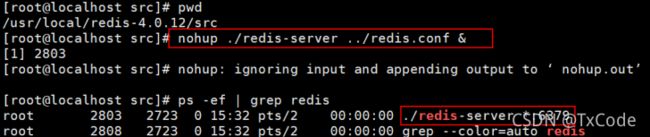
5.编写代码
//将数据存入redis
redisTemplate.opsForValue().set(key,value);
//将数据取出
redisTemplate.opsForValue().get(key);
3.7 SpringBoot 集成dubbo
3.7.1 基本集成步骤
众所周知dubbo是一个分布式框架,我们创建一个服务接口,服务提供方,服务消费方
1.开发dubbo服务接口
(1)创建一个普通maven项目,dubbo服务接口工程
(2)创建需要的接口,例如:UserService接口
2.开发dubbo服务提供者
(1)创建SpringBoot框架的 web项目
(2)pom.xml添加依赖(Dubbo集成SpringBoot起步依赖,注册中心,接口工程)
            org.springframework.boot
            spring-boot-starter-web


            com.alibaba.spring.boot
            dubbo-spring-boot-starter
            2.0.0


            com.101tec
            zkclient
            0.10


            com.tx.springboot
            020-springboot-dubbo-interface
            1.0.0
(3)服务提供者的核心配置
#设置内嵌Tomcat端口号
server.port=8081
#设置上下文根
server.servlet.context-path=/

#设置连接数据库的配置
spring.datasource.driver-class-name=com.mysql.cj.jdbc.Driver
spring.datasource.url=jdbc:mysql://192.168.154.128:3306/springboot?useUnicode=true&characterEncoding=UTF-8&useJDBCCompliantTimezoneShift=true&useLegacyDatetimeCode=false&serverTimezone=GMT%2B8
spring.datasource.username=root
spring.datasource.password=333

#设置dubbo的配置
spring.application.name=021-springboot-dubbo-provider
#当前工程是一个服务提供者
spring.dubbo.server=true
#设置注册中心
spring.dubbo.registry=zookeeper://192.168.154.128:2181
(4)编写接口实现类
@Component
@Service(interfaceClass = StudentService.class,version = "1.0.0",timeout = 15000)
//dubbo:service interface="" version="" timeout=""
public class StudentServiceImpl implements StudentService {

    @Override
    public Integer queryAllStudentCount() {
        //调用数据持久层
        return 1250;
    }
}
(5)SpringBoot入口程序类开启dubbo配置支持注解
@SpringBootApplication      //开启spring配置
@EnableDubboConfiguration   //开启dubbo配置
public class Application {

    public static void main(String[] args) {
        SpringApplication.run(Application.class, args);
    }
}
(6)启动zookeeper服务
//window系统直接点击
//linux ./zkServer.sh start
3.开发dubbo服务消费者
(1)创建SpringBoot Web项目
(2)pom.xml依赖
    org.springframework.boot
    spring-boot-starter-web


    com.alibaba.spring.boot
    dubbo-spring-boot-starter
    2.0.0


    com.101tec
    zkclient
    0.10


    com.tx.springboot
    020-springboot-dubbo-interface
    1.0.0
#设置内嵌Tomcat端口号
server.port=8080
server.servlet.context-path=/

#设置dubbo配置
spring.application.name=022-springboot-dubbo-consumer
#指定注册中心
spring.dubbo.registry=zookeeper://192.168.154.128:2181
(4)编写controller类,远程调用dubbo服务
@Controller
public class StudentController {
    //dubbo:reference interface="" version="" check=false
    @Reference(interfaceClass = StudentService.class,version = "1.0.0",check = false)
    private StudentService studentService;

    @RequestMapping(value = "/student/count")
    public @ResponseBody Object studentCount() {

        Integer allStudentCount = studentService.queryAllStudentCount();

        return "学生总人数为:"+allStudentCount;
    }
}
(5)在SpringBoot入口类上开启Dubbo配置
@SpringBootApplication  //开启spring注解配置
@EnableDubboConfiguration   //开启dubbo配置
public class Application {

    public static void main(String[] args) {
        SpringApplication.run(Application.class, args);
    }
}
(6)测试
3.7.2 SpringBoot 集成SSM+Dubbo+Redis
实现步骤:
1.创建Maven java工程,Dubbo接口
2.创建Dubbo服务提供者项目
(1)给Dubbo服务提供者添加依赖
            org.springframework.boot
            spring-boot-starter-web


            com.alibaba.spring.boot
            dubbo-spring-boot-starter
            2.0.0


            com.101tec
            zkclient
            0.10


            org.mybatis.spring.boot
            mybatis-spring-boot-starter
            2.0.0


            mysql
            mysql-connector-java


            org.springframework.boot
            spring-boot-starter-data-redis


            com.bjpowernode.springboot
            023-springboot-dubbo-ssm-interface
            1.0.0
(2)手动指定资源配置文件路径
        src/main/java

            **/*.xml
(3)配置Mybatis逆向工程
(4)服务提供方核心配置
#配置内嵌Tomcat端口号
server.port=8081
#设置上下文根
server.servlet.context-path=/

#设置连接数据库信息
spring.datasource.driver-class-name=com.mysql.cj.jdbc.Driver
spring.datasource.url=jdbc:mysql://192.168.154.128:3306/springboot?useUnicode=true&characterEncoding=UTF-8&useJDBCCompliantTimezoneShift=true&useLegacyDatetimeCode=false&serverTimezone=GMT%2B8
spring.datasource.username=root
spring.datasource.password=333

#设置dubbo配置
spring.application.name=024-springboot-dubbo-ssm-provider
#声明当前工程为服务提供者
spring.dubbo.server=true
#设置注册中心
spring.dubbo.registry=zookeeper://192.168.154.128:2181

#设置redis配置
spring.redis.host=192.168.154.128
spring.redis.port=6379
spring.redis.password=123456
(5)配置服务提供方启动类
@SpringBootApplication
@MapperScan(basePackages = "com.tx.springboot.mapper")
@EnableDubboConfiguration   //开启dubbo配置
public class Application {

    public static void main(String[] args) {
        SpringApplication.run(Application.class, args);
    }
}
(6)业务接口实现类
3.创建dubbo服务消费者项目
(1)创建项目,Springboot
(2)添加依赖
            org.springframework.boot
            spring-boot-starter-web


            com.alibaba.spring.boot
            dubbo-spring-boot-starter
            2.0.0


            com.101tec
            zkclient
            0.10


            com.bjpowernode.springboot
            023-springboot-dubbo-ssm-interface
            1.0.0


            org.apache.tomcat.embed
            tomcat-embed-jasper
(3)核心配置
#设置内嵌Tomcat端口号
server.port=8080
server.servlet.context-path=/

#设置dubbo配置
spring.application.name=025-springboot-dubbo-ssm-consumer
spring.dubbo.registry=zookeeper://192.168.154.128:2181

#配置视图解析器
spring.mvc.view.prefix=/
spring.mvc.view.suffix=.jsp
(4)启动类配置
@SpringBootApplication
@EnableDubboConfiguration   //开启dubbo配置
public class Application {

    public static void main(String[] args) {
        SpringApplication.run(Application.class, args);
    }
}
(5)控制层
@Controller
public class StudentController {

    @Reference(interfaceName = "com.tx.springboot.service.StudentService",version = "1.0.0",check = false)
    private StudentService studentService;

    @RequestMapping(value = "/student/detail/{id}")
    public String studentDetail(Model model,
                                @PathVariable("id") Integer id) {

        Student student = studentService.queryStudentById(id);
        model.addAttribute("student",student);
        return "studentDetail";
    }
}