tensorflow2.0 BP神经网络 fashion MNIST图像分类
我愿定格那极致的美好!
基于BP神经网络的fashion MNIST图像分类
- fashion MNIST图像分类
-
- 数据集简介
- 数据的预处理
- BP神经网络
- 模型部分代码
- BP神经网络实验结果
- 致谢
fashion MNIST图像分类
数据集简介
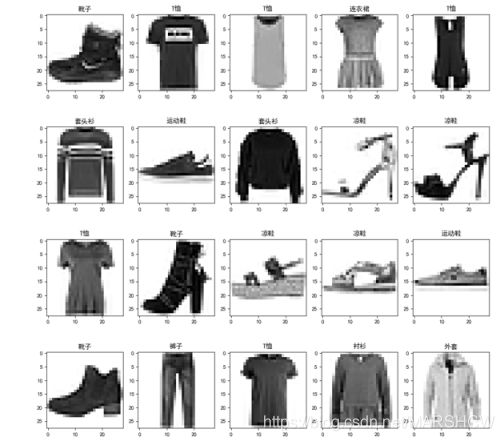
在 2017年8月份,德国研究机构Zalando Research在GitHub上推出了一个全新的数据集——fashion MNIST数据集,其中训练集包含60000个样例,测试集包含 10000个样例,分为10类,每一类的样本训练样本数量和测试样本数量相同。该数据集是一个替代 MNIST手写数据集的图像数据,比 MNIST数据复杂一些。该数据集的数据量较小,适用于用来验证某个算法可否正常运行和机器学习的入门。数据集的样本都来自日常穿着的衣裤鞋包,每个都是 28× 28的灰度图像,其中总共有10类标签,每张图像都有各自的标签,分别是T-shirt/top(T恤)、Trouser(裤子)、Pullover(套衫)、Dress(裙子)、Coat(外套)等10个服装类型,值得注意的是该数据集在我对数据集预处理时,发现其中有一些数据标签错误,这导致了数据在训练之后得不到很高的准确率。
数据的预处理
在进行分类之前,需要对数据进行归一化。归一化可以加快训练网络的收敛性,归纳统一样本的统计分布特性,这里将数据归一化到0-1之间,使之符合概率分布,也能够加速梯度下降求解除最优解。归一化也可以使用其他的归一算法。归一化代码如下:
x_train, x_test = x_train / 255.0, x_test / 255.0
本实验采用交叉验证的方法,交叉验证可以缓解单独测试结果的片面性和训练数据不足的问题。在数据预处理之后,需要对数据进行切分,切分为训练集和验证集以及测试集。将50000张测试集的数据中切割48000张图片进行训练,将2000张图片进行测试,最后将10000张图进行测试。具体的宿数据集切分代码如下所示:
数据集切分
x_valid,x_train=x_train[:2000],x_train[2000:]
y_valid,y_train=y_train[:2000],y_train[2000:]
数据集显示如下

#-*- coding=utf-8 -*-
#author: cw96
#desc:BP NN
#date:2020/6/11


import tensorflow as tf
import os
import numpy as np
from matplotlib import pyplot as plt
import time
import math
import random
import numpy
from tqdm import tqdm_notebook as tqdm
from tensorflow.keras.utils import plot_model

#数据预处理
def pretreatment():

    '''
    @introduction:数据预处理,将数据归一化,如果必要,可以进行数据混洗;其次将数据分割
    @return :
               x_train 训练数据
               y_train 训练数据标签
               x_valid 验证数据
               y_valid 验证数据标签
               x_test 测试数据
               y_test 测试数据标签
    '''
    np.set_printoptions(threshold=np.inf)#控制台输出所有的值,不需要省略号
    fashion = tf.keras.datasets.fashion_mnist
    (x_train, y_train), (x_test, y_test) = fashion.load_data()
    x_train, x_test = x_train / 255.0, x_test / 255.0

    #数据集切分
    x_valid,x_train=x_train[:2000],x_train[2000:]
    y_valid,y_train=y_train[:2000],y_train[2000:]
    return x_valid,x_train,y_valid,y_train,x_test,y_test
BP神经网络
反向传播神经网络(BP)是在人工神经网络(ANN)的基础上发展起来的,人工神经网络是采用计算机信息处理的角度去模仿人或者动物神经网络的网络模型。而反向传播神经网络是上世纪八十年代中期,Rumelhart等人提出了误差反向传播算法,该算法首先根据前向计算过程得到预测值与实际标签值的误差,然后从输出层反向传播误差,并且根据误差调整各层的权重参数和偏置项的参数,最后收敛得到网络的最优解。在实际的应用中,多分类问题常用交叉熵,而回归问题常常使用均方误差。
反向传播神经网络示例

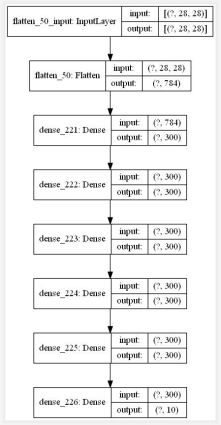
本实验BP神经网络模型

模型部分代码
#模型训练
def model_train(x_train,y_train,x_valid,y_valid,choice=False):
    '''
    @introduction:训练模型,根据需求保存模型
    @parameter:
               x_train 训练数据
               y_train 训练数据标签
               x_valid 验证数据
               y_valid 验证标签
               choice 选择是否读取保存的模型,默认值为不读取

    @return : model和history
    '''

    #模型处理
    def model_read(model):

        save_path = "BPNN_model.h5"
        if os.path.exists(save_path):#判断文件是否存在
            print('\n')
            print('-------------------******模型读入*****----------------------')
            model=tf.keras.models.load_model(save_path)

        else:
            print('文件不存在')
        return model
    def model_save(model):
        save_path = "BPNN_model.h5"
        model.save(save_path)

    #模型定义
    model = tf.keras.models.Sequential([
        tf.keras.layers.Flatten(input_shape=[28,28]),
        tf.keras.layers.Dense(300, activation=tf.nn.relu),
        tf.keras.layers.Dense(300, activation=tf.nn.relu),
        tf.keras.layers.Dense(300, activation=tf.nn.relu),
        tf.keras.layers.Dense(300, activation=tf.nn.relu),
        tf.keras.layers.Dense(300, activation=tf.nn.relu),
        #tf.keras.layers.Dense(100, activation=tf.nn.relu),

        #tf.keras.layers.Dropout(0.2) , #丢弃部分神经元,防止过拟合
        tf.keras.layers.Dense(10, activation='softmax')
    ])

    model.summary()

    #配置参数
    #引入指数衰减学习率或不引入
    ad1 = tf.keras.optimizers.Adam(lr=0.001, beta_1=0.9, beta_2=0.999, epsilon=1e-08)
    ad2 = 'adam'
    model.compile(optimizer=ad2,
                  loss=tf.keras.losses.SparseCategoricalCrossentropy(from_logits=False),
                  metrics=['sparse_categorical_accuracy'])

    if choice:#继续训练
        model=model_read(model)
        history = model.fit(x_train, y_train, batch_size=128, epochs=5, validation_data=(x_valid, y_valid), validation_freq=1)
        model_save(model)
    else:#新训练
        history = model.fit(x_train, y_train, batch_size=128, epochs=13, validation_data=(x_valid, y_valid), validation_freq=1)
        model_save(model)
    return history,model

#模型读取
def model_get():
    '''
    @introduction: 模型读取
    @return: model 已经训练好的模型
    '''
    save_path = "BPNN_model.h5"
    if os.path.exists(save_path):#判断文件是否存在
        print('\n>>>>>>>>>>>>模型读入>>>>>>>>>>>>>>>>>>\n')
        model=tf.keras.models.load_model(save_path)
        plot_model(model, to_file='BPNN_model.jpg',show_shapes=True)
        for i in tqdm(range(100)):
            if(i==99):
                print('模型读入成功!')
    else:
        print('文件不存在')
    return model

#数据可视化
def figshow(history):
    '''
    introductoin:  数据可视化,画出训练损失函数和验证集上的准确率
    '''
    # 显示训练集和验证集的acc和loss曲线
    print('\n\n\n')
    print('----------------------------------------图像绘制------------------------------------')
    acc = history.history['sparse_categorical_accuracy']
    val_acc = history.history['val_sparse_categorical_accuracy']
    loss = history.history['loss']
    val_loss = history.history['val_loss']

    plt.subplots(figsize=(6,4))
    plt.plot(acc, label='Training Accuracy')
    plt.plot(val_acc, label='Validation Accuracy')
    plt.title('Training and Validation Accuracy')
    plt.legend()
    plt.show()

    plt.subplots(figsize=(6,4))
    plt.plot(loss, label='Training Loss')
    plt.plot(val_loss, label='Validation Loss')
    plt.title('Training and Validation Loss')
    plt.legend()
    plt.show()

#测试集测试
def data_test(x_test,y_test,model):
    '''
    @introduction :输出模型在测试集上的top1准确率和top2准确率
    @parameter :
               x_test  测试集数据
               y_test  测试数据标签
               model   训练好的模型
    @return :
              top1_acc   top1标准下的准确率
              top2_acc   top2标准下的准确率

    '''
    print('****************************test******************************')
    loss, acc = model.evaluate(x_test, y_test)
    top1_acc = acc

    #print("test_accuracy:{:5.2f}%".format(100 * acc))
    y_pred = model.predict(x_test)
    k_b = tf.math.top_k(y_pred,2).indices
    idx=0
    acc=0.0
    for i in k_b:
        if y_test[idx] in i.numpy():
            acc=acc+1
        idx=idx+1
    top2_acc=acc/y_test.shape[0]
    print('top1准确率:{0}\ntop2准确率:{1}'.format(top1_acc,top2_acc))
    return top1_acc,top2_acc

#随机测试20张图片
def random_test(x_test,y_test,model):
    '''
    @introduction: 产生20个不同整数作为下标索引,输出预测值与真实值,两者比较
    @parameter : x_test  测试集数据
                 y_test  测试集标签
                 model  训练好的模型

    '''
    def randomNums(a, b, n):#产生n个不同的随机整数
        all_num = list(range(a, b))
        res = []

        while n:
            numpy.random.seed(2)
            index = math.floor(numpy.random.uniform() * len(all_num))
            res.append(all_num[index])
            del all_num[index]
            n -= 1
        return res

    test_idx = randomNums(0, 10000,20)  #测试集大小为10000,索引范围是[0,10000)


    print('\n------------------------------------随机测试-----------------------------------------\n')

    pred_img=[]  #预测的图片
    d_label=[]   #预测图片的标签
    for i in test_idx:
        pred_img.append(x_test[i])
        d_label.append(y_test[i])
    pred_img = numpy.array(pred_img)#转换为ndarray格式
    pred_prob = model.predict(pred_img)  #预测概率
    pred_label = numpy.argmax(pred_prob,1)  #索引

    labels = ['T恤','裤子','套头衫','连衣裙','外套','凉鞋','衬衫','运动鞋','包','靴子']
    plt.figure(figsize=(14,14))
    #显示前10张图像,并在图像上显示类别
    for i in range(20):
        plt.subplot(4,5,i+1)
        plt.grid(False)
        plt.imshow(pred_img[i,:,],cmap=plt.cm.binary)
        plt.rcParams['font.sans-serif']=['SimHei'] #用来正常显示中文标签
        t = labels[pred_label[i]]+'('+labels[d_label[i]]+')'
        plt.title(t)
    plt.show()


if __name__ == '__main__':

    x_valid,x_train,y_valid,y_train,x_test,y_test = pretreatment()
    model = model_get()
#     history,model = model_train(x_train,y_train,x_valid,y_valid,True)
#     figshow(history)
#     data_test(x_test,y_test,model)

    #random_test(x_test,y_test,model)
BP神经网络实验结果
在将整个数据集切分之后,将训练集打包分为128个batch进行分步训练,主要分为两步:第一步,使用默认学习率进行初步的训练,得到基本的模型,此时先训练设置迭代次数为13次,并且保存模型,便于第二次的训练;第二步,将第一步的模型读取出来,设置一个较小的学习率继续训练,根据损失函数的情况动态的调整迭代次数,最后得到训练好的模型。
实验进行第一步,首先观察第一步的实验结果,验证集和训练集损失函数在不断的下降,模型没有过拟合。在迭代13次后此后,所得到的模型在测试集上的Top1准确率为88.05%,top2准确率为96.84%,预测的结果基本正确。所以,在下一步训练中,次数迭代的步长不宜过长,迭代的次数也可以适当的减少。
1.训练准确率和验证集上的准确率

2.训练准确率和验证集上的损失函数

3.第一步训练的准确率
![]()
实验进行到第二步,观察第二步的实验结果,将此模型运用在测试集上,测得Top1准确率为89.51%,top2准确率为97.09%。相对于第一步的准确率有所上升。在进行多次实验时,发现对数据进行混洗时,往往能够将TOP1准确率提高到90%左右。
第二步训练的准确率![]()
致谢
感谢诸君观看,如果感觉有用的话,点个赞吧!