pytorch-多层感知机,最简单的深度学习模型,将非线性激活函数引入到模型中。
-
多层感知机,线性回归和softmax回归在内的单层神经网络。然而深度学习主要关注多层模型。在本节中,我们将以多层感知机(multilayer perceptron,MLP)为例,介绍多层神经网络的概念。
-
隐藏层
- 多层感知机在单层神经网络的基础上引入了一到多个隐藏层(hidden layer)。隐藏层位于输入层和输出层之间。
- 假设我们设计一个多层感知机中,输入和输出个数分别为4和3,中间的隐藏层中包含了5个隐藏单元(hidden unit)。由于输入层不涉及计算,多层感知机的层数设计为2。隐藏层中的神经元和输入层中各个输入完全连接(可以不用完全,设计简单点就完全连接),输出层中的神经元和隐藏层中的各个神经元也完全连接。因此,多层感知机中的隐藏层和输出层都是全连接层。
- 具体来说,给定一个小批量样本 X ∈ R n × d \boldsymbol{X} \in \mathbb{R}^{n \times d} X∈Rn×d,其批量大小为n,输入个数为d。假设多层感知机只有一个隐藏层,其中隐藏单元个数为h。记隐藏层的输出(也称为隐藏层变量或隐藏变量)为 H \boldsymbol{H} H,有 H ∈ R n × h \boldsymbol{H} \in \mathbb{R}^{n \times h} H∈Rn×h。因为隐藏层和输出层均是全连接层,可以设隐藏层的权重参数和偏差参数分别为 W h ∈ R d × h \boldsymbol{W}_h \in \mathbb{R}^{d \times h} Wh∈Rd×h和 b h ∈ R 1 × h \boldsymbol{b}_h \in \mathbb{R}^{1 \times h} bh∈R1×h,输出层的权重和偏差参数分别为 W o ∈ R h × q \boldsymbol{W}_o \in \mathbb{R}^{h \times q} Wo∈Rh×q和 b o ∈ R 1 × q \boldsymbol{b}_o \in \mathbb{R}^{1 \times q} bo∈R1×q。
- 先来看一种含单隐藏层的多层感知机的设计。其输出 O ∈ R n × q \boldsymbol{O} \in \mathbb{R}^{n \times q} O∈Rn×q的计算为
- H = X W h + b h , O = H W o + b o , \begin{aligned} \boldsymbol{H} &= \boldsymbol{X} \boldsymbol{W}_h + \boldsymbol{b}_h,\\ \boldsymbol{O} &= \boldsymbol{H} \boldsymbol{W}_o + \boldsymbol{b}_o, \end{aligned} HO=XWh+bh,=HWo+bo,
- 也就是将隐藏层的输出直接作为输出层的输入。如果将以上两个式子联立起来,可以得到
- O = ( X W h + b h ) W o + b o = X W h W o + b h W o + b o . \boldsymbol{O} = (\boldsymbol{X} \boldsymbol{W}_h + \boldsymbol{b}_h)\boldsymbol{W}_o + \boldsymbol{b}_o = \boldsymbol{X} \boldsymbol{W}_h\boldsymbol{W}_o + \boldsymbol{b}_h \boldsymbol{W}_o + \boldsymbol{b}_o. O=(XWh+bh)Wo+bo=XWhWo+bhWo+bo.
- 从联立后的式子可以看出,虽然神经网络引入了隐藏层,却依然等价于一个单层神经网络:其中输出层权重参数为 W h W o \boldsymbol{W}_h\boldsymbol{W}_o WhWo,偏差参数为 b h W o + b o \boldsymbol{b}_h \boldsymbol{W}_o + \boldsymbol{b}_o bhWo+bo。不难发现,即便再添加更多的隐藏层,以上设计依然只能与仅含输出层的单层神经网络等价。
-
激活函数
- 神经网络模拟了人类神经元的工作机理,激活函数(Activation Function)是一种添加到人工神经网络中的函数,旨在帮助网络学习数据中的复杂模式。在神经元中,输入的input经过一系列加权求和后作用于另一个函数,这个函数就是这里的激活函数。类似于人类大脑中基于神经元的模型,激活函数最终决定了是否传递信号以及要发射给下一个神经元的内容。在人工神经网络中,一个节点的激活函数定义了该节点在给定的输入或输入集合下的输出。标准的计算机芯片电路可以看作是根据输入得到开(1)或关(0)输出的数字电路激活函数。
- 激活函数可以分为线性激活函数(线性方程控制输入到输出的映射,如f(x)=x等)以及非线性激活函数(非线性方程控制输入到输出的映射,比如Sigmoid、Tanh、ReLU、LReLU、PReLU、Swish 等)
- 因为神经网络中每一层的输入输出都是一个线性求和的过程,下一层的输出只是承接了上一层输入函数的线性变换,所以如果没有激活函数,那么无论你构造的神经网络多么复杂,有多少层,最后的输出都是输入的线性组合,纯粹的线性组合并不能够解决更为复杂的问题。而引入激活函数之后,我们会发现常见的激活函数都是非线性的,因此也会给神经元引入非线性元素,使得神经网络可以逼近其他的任何非线性函数,这样可以使得神经网络应用到更多非线性模型中。
- 一般来说,在神经元中,激活函数是很重要的一部分,为了增强网络的表示能力和学习能力,神经网络的激活函数都是非线性的,通常具有以下几点性质:
- 连续并可导(允许少数点上不可导),可导的激活函数可以直接利用数值优化的方法来学习网络参数;
- 激活函数及其导数要尽可能简单一些,太复杂不利于提高网络计算率;
- 激活函数的导函数值域要在一个合适的区间内,不能太大也不能太小,否则会影响训练的效率和稳定性。
- 上述问题的根源在于全连接层只是对数据做仿射变换(affine transformation),而多个仿射变换的叠加仍然是一个仿射变换。解决问题的一个方法是引入非线性变换,例如对隐藏变量使用按元素运算的非线性函数进行变换,然后再作为下一个全连接层的输入。这个非线性函数被称为激活函数(activation function)。下面我们介绍几个常用的激活函数。
- ReLU函数
-
ReLU(rectified linear unit)函数提供了一个很简单的非线性变换。给定元素x,该函数定义为 ReLU ( x ) = max ( x , 0 ) \text{ReLU}(x) = \max(x, 0) ReLU(x)=max(x,0).可以看出,ReLU函数只保留正数元素,并将负数元素清零。
-
%matplotlib inline import torch import numpy as np import matplotlib.pylab as plt from IPython import display def use_svg_display(): """Use svg format to display plot in jupyter""" display.display_svg() def set_figsize(figsize=(3.5, 2.5)): use_svg_display() # 设置图的尺寸 plt.rcParams['figure.figsize'] = figsize def xyplot(x_vals, y_vals, name): set_figsize(figsize=(5, 2.5)) plt.plot(x_vals.detach().numpy(), y_vals.detach().numpy()) plt.xlabel('x') plt.ylabel(name + '(x)') x = torch.arange(-8.0, 8.0, 0.1, requires_grad=True) y = x.relu() xyplot(x, y, 'relu') -
通过
Tensor提供的relu函数来绘制ReLU函数。可以看到,该激活函数是一个两段线性函数。显然,当输入为负数时,ReLU函数的导数为0;当输入为正数时,ReLU函数的导数为1。尽管输入为0时ReLU函数不可导,但是我们可以取此处的导数为0。下面绘制ReLU函数的导数。 -
y.sum().backward() xyplot(x, x.grad, 'grad of relu') -
ReLU 函数是深度学习中较为流行的一种激活函数,相比于 sigmoid 函数和 tanh 函数,它具有如下优点:
- 当输入为正时,导数为1,一定程度上改善了梯度消失问题,加速梯度下降的收敛速度;计算速度快得多。
- ReLU 函数中只存在线性关系,因此它的计算速度比 sigmoid 和 tanh 更快。
- 被认为具有生物学合理性(Biological Plausibility),比如单侧抑制、宽兴奋边界(即兴奋程度可以非常高)
-
ReLU函数的不足:
- Dead ReLU 问题。当输入为负时,ReLU 完全失效,在正向传播过程中,这不是问题。有些区域很敏感,有些则不敏感。但是在反向传播过程中,如果输入负数,则梯度将完全为零;
- 不以零为中心:和 Sigmoid 激活函数类似,ReLU 函数的输出不以零为中心,ReLU 函数的输出为 0 或正数,给后一层的神经网络引入偏置偏移,会影响梯度下降的效率。
-
为了解决 ReLU 激活函数中的梯度消失问题,当 x < 0 时,我们使用 Leaky ReLU——该函数试图修复 dead ReLU 问题。
-
- sigmoid函数
-
sigmoid函数可以将元素的值变换到0和1之间: sigmoid ( x ) = 1 1 + exp ( − x ) \text{sigmoid}(x) = \frac{1}{1 + \exp(-x)} sigmoid(x)=1+exp(−x)1.sigmoid函数在早期的神经网络中较为普遍,但它目前逐渐被更简单的ReLU函数取代。在“循环神经网络”会利用它值域在0到1之间这一特性来控制信息在神经网络中的流动。下面绘制了sigmoid函数。当输入接近0时,sigmoid函数接近线性变换。
-
y = x.sigmoid() xyplot(x, y, 'sigmoid') -
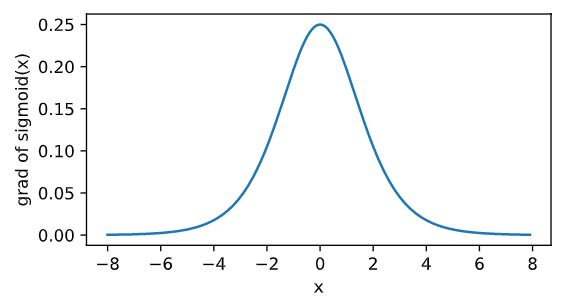
依据链式法则,sigmoid函数的导数 sigmoid ′ ( x ) = sigmoid ( x ) ( 1 − sigmoid ( x ) ) \text{sigmoid}'(x) = \text{sigmoid}(x)\left(1-\text{sigmoid}(x)\right) sigmoid′(x)=sigmoid(x)(1−sigmoid(x)).下面绘制了sigmoid函数的导数。当输入为0时,sigmoid函数的导数达到最大值0.25;当输入越偏离0时,sigmoid函数的导数越接近0。
-
x.grad.zero_() y.sum().backward() xyplot(x, x.grad, 'grad of sigmoid') -
Sigmoid 函数的输出范围是 0 到 1。由于输出值限定在 0 到1,因此它对每个神经元的输出进行了归一化;用于将预测概率作为输出的模型。由于概率的取值范围是 0 到 1,因此 Sigmoid 函数非常合适;梯度平滑,避免「跳跃」的输出值;函数是可微的。这意味着可以找到任意两个点的 sigmoid 曲线的斜率;明确的预测,即非常接近 1 或 0。
-
Sigmoid 激活函数存在的不足:
- 梯度消失:注意:Sigmoid 函数趋近 0 和 1 的时候变化率会变得平坦,也就是说,Sigmoid 的梯度趋近于 0。神经网络使用 Sigmoid 激活函数进行反向传播时,输出接近 0 或 1 的神经元其梯度趋近于 0。这些神经元叫作饱和神经元。因此,这些神经元的权重不会更新。此外,与此类神经元相连的神经元的权重也更新得很慢。该问题叫作梯度消失。因此,想象一下,如果一个大型神经网络包含 Sigmoid 神经元,而其中很多个都处于饱和状态,那么该网络无法执行反向传播。
- 不以零为中心:Sigmoid 输出不以零为中心的,,输出恒大于0,非零中心化的输出会使得其后一层的神经元的输入发生偏置偏移(Bias Shift),并进一步使得梯度下降的收敛速度变慢。
- 计算成本高昂:exp() 函数与其他非线性激活函数相比,计算成本高昂,计算机运行起来速度较慢。
-
- tanh函数
-
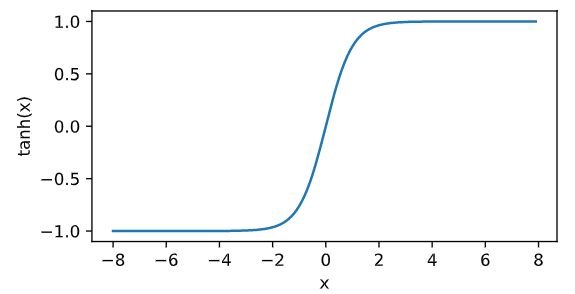
tanh(双曲正切)函数可以将元素的值变换到-1和1之间: tanh ( x ) = 1 − exp ( − 2 x ) 1 + exp ( − 2 x ) \text{tanh}(x) = \frac{1 - \exp(-2x)}{1 + \exp(-2x)} tanh(x)=1+exp(−2x)1−exp(−2x).接着绘制tanh函数。当输入接近0时,tanh函数接近线性变换。虽然该函数的形状和sigmoid函数的形状很像,但tanh函数在坐标系的原点上对称。
-
y = x.tanh() xyplot(x, y, 'tanh') -
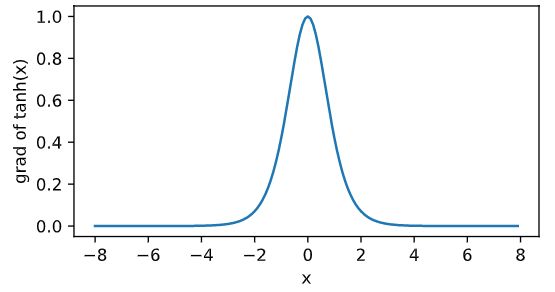
依据链式法则,tanh函数的导数 tanh ′ ( x ) = 1 − tanh 2 ( x ) \text{tanh}'(x) = 1 - \text{tanh}^2(x) tanh′(x)=1−tanh2(x).下面绘制了tanh函数的导数。当输入为0时,tanh函数的导数达到最大值1;当输入越偏离0时,tanh函数的导数越接近0。
-
x.grad.zero_() y.sum().backward() xyplot(x, x.grad, 'grad of tanh') -
你可以将 Tanh 函数想象成两个 Sigmoid 函数放在一起。在实践中,Tanh 函数的使用优先性高于 Sigmoid 函数。负数输入被当作负值,零输入值的映射接近零,正数输入被当作正值:当输入较大或较小时,输出几乎是平滑的并且梯度较小,这不利于权重更新。二者的区别在于输出间隔,tanh 的输出间隔为 1,并且整个函数以 0 为中心,比 sigmoid 函数更好;在 tanh 图中,负输入将被强映射为负,而零输入被映射为接近零。
-
tanh存在的不足:
- 与sigmoid类似,Tanh 函数也会有梯度消失的问题,因此在饱和时(x很大或很小时)也会「杀死」梯度。
-
-
多层感知机
-
多层感知机就是含有至少一个隐藏层的由全连接层组成的神经网络,且每个隐藏层的输出通过激活函数进行变换。多层感知机的层数和各隐藏层中隐藏单元个数都是超参数。以单隐藏层为例并沿用本节之前定义的符号,多层感知机按以下方式计算输出:
-
H = ϕ ( X W h + b h ) , O = H W o + b o , \begin{aligned} \boldsymbol{H} &= \phi(\boldsymbol{X} \boldsymbol{W}_h + \boldsymbol{b}_h),\\ \boldsymbol{O} &= \boldsymbol{H} \boldsymbol{W}_o + \boldsymbol{b}_o, \end{aligned} HO=ϕ(XWh+bh),=HWo+bo,
-
其中 ϕ \phi ϕ表示激活函数。在分类问题中,可以对输出 O \boldsymbol{O} O做softmax运算,并使用softmax回归中的交叉熵损失函数。在回归问题中,将输出层的输出个数设为1,并将输出 O \boldsymbol{O} O直接提供给线性回归中使用的平方损失函数。
-
-
多层感知机的从零开始实现
-
动手实现一个多层感知机。首先导入实现所需的包或模块。获取和读取数据,继续使用Fashion-MNIST数据集。我们将使用多层感知机对图像进行分类。
-
import torch import numpy as np import torchvision import sys def load_data_fashion_mnist(batch_size, resize=None, root='~/Datasets/FashionMNIST'): """Download the fashion mnist dataset and then load into memory.""" trans = [] if resize: trans.append(torchvision.transforms.Resize(size=resize)) trans.append(torchvision.transforms.ToTensor()) transform = torchvision.transforms.Compose(trans) mnist_train = torchvision.datasets.FashionMNIST(root=root, train=True, download=True, transform=transform) mnist_test = torchvision.datasets.FashionMNIST(root=root, train=False, download=True, transform=transform) if sys.platform.startswith('win'): num_workers = 0 # 0表示不用额外的进程来加速读取数据 else: num_workers = 4 train_iter = torch.utils.data.DataLoader(mnist_train, batch_size=batch_size, shuffle=True, num_workers=num_workers) test_iter = torch.utils.data.DataLoader(mnist_test, batch_size=batch_size, shuffle=False, num_workers=num_workers) return train_iter, test_iter batch_size = 256 train_iter, test_iter = load_data_fashion_mnist(batch_size) print(train_iter, test_iter) -
<torch.utils.data.dataloader.DataLoader object at 0x000001BBFF227040> <torch.utils.data.dataloader.DataLoader object at 0x000001BBFF20F6A0> -
定义模型参数
- Fashion-MNIST数据集中图像形状为 28 × 28 28 \times 28 28×28,类别数为10。本节中依然使用长度为 28 × 28 = 784 28 \times 28 = 784 28×28=784的向量表示每一张图像。因此,输入个数为784,输出个数为10。实验中,设超参数隐藏单元个数为256。
-
num_inputs, num_outputs, num_hiddens = 784, 10, 256 W1 = torch.tensor(np.random.normal(0, 0.01, (num_inputs, num_hiddens)), dtype=torch.float) b1 = torch.zeros(num_hiddens, dtype=torch.float) W2 = torch.tensor(np.random.normal(0, 0.01, (num_hiddens, num_outputs)), dtype=torch.float) b2 = torch.zeros(num_outputs, dtype=torch.float) params = [W1, b1, W2, b2] for param in params: param.requires_grad_(requires_grad=True) print(W1.shape,b1.shape,W2.shape,b2.shape) print(W1.grad,b1.grad,W2.grad,b2.grad) print(W1.requires_grad,b1.requires_grad,W2.requires_grad,b2.requires_grad) -
torch.Size([784, 256]) torch.Size([256]) torch.Size([256, 10]) torch.Size([10])
None None None None
True True True True
-
定义激活函数
-
定义模型
-
同softmax回归一样,通过
view函数将每张原始图像改成长度为num_inputs的向量。然后实现上文中多层感知机的计算表达式。 -
def net(X):
    X = X.view((-1, num_inputs))
    H = relu(torch.matmul(X, W1) + b1)
    return torch.matmul(H, W2) + b2
-
-
定义损失函数:为了得到更好的数值稳定性,我们直接使用PyTorch提供的包括softmax运算和交叉熵损失计算的函数。
-
loss = torch.nn.CrossEntropyLoss()
def cross_entropy(y_hat, y):
    return - torch.log(y_hat.gather(1, y.view(-1, 1)))
-
-
训练模型
- 训练多层感知机的步骤训练softmax回归的步骤没什么区别。直接调用``train_ch3`函数。在这里设超参数迭代周期数为10,学习率为100.0。
-
def train_ch3(net, train_iter, test_iter, loss, num_epochs, batch_size,params=None, lr=None, optimizer=None): for epoch in range(num_epochs): train_l_sum, train_acc_sum, n = 0.0, 0.0, 0 for X, y in train_iter: y_hat = net(X) l = loss(y_hat, y).sum() # 梯度清零 if optimizer is not None: optimizer.zero_grad() elif params is not None and params[0].grad is not None: for param in params: param.grad.data.zero_() l.backward() if optimizer is None: sgd(params, lr, batch_size) else: optimizer.step() # “softmax回归的简洁实现”一节将用到 train_l_sum += l.item() train_acc_sum += (y_hat.argmax(dim=1) == y).sum().item() n += y.shape[0] test_acc = evaluate_accuracy(test_iter, net) print('epoch %d, loss %.4f, train acc %.3f, test acc %.3f' % (epoch + 1, train_l_sum / n, train_acc_sum / n, test_acc)) def sgd(params, lr, batch_size): for param in params: param.data -= lr * param.grad/batch_size # 注意这里更改param时用的param.data def evaluate_accuracy(data_iter, net): acc_sum, n = 0.0, 0 for X, y in data_iter: acc_sum += (net(X).argmax(dim=1) == y).float().sum().item() n += y.shape[0] return acc_sum / n num_epochs, lr = 10, 100.0 train_ch3(net, train_iter, test_iter, loss, num_epochs, batch_size, params, lr) -
epoch 1, loss 0.0030, train acc 0.710, test acc 0.780
epoch 2, loss 0.0019, train acc 0.825, test acc 0.803
epoch 3, loss 0.0017, train acc 0.843, test acc 0.827
epoch 4, loss 0.0015, train acc 0.855, test acc 0.826
epoch 5, loss 0.0014, train acc 0.865, test acc 0.769
epoch 6, loss 0.0014, train acc 0.870, test acc 0.862
epoch 7, loss 0.0013, train acc 0.875, test acc 0.777
epoch 8, loss 0.0013, train acc 0.878, test acc 0.804
epoch 9, loss 0.0012, train acc 0.882, test acc 0.856
epoch 10, loss 0.0012, train acc 0.886, test acc 0.831
-
预测
-
from IPython import display
from matplotlib import pyplot as plt
def get_fashion_mnist_labels(labels):
    text_labels = ['t-shirt', 'trouser', 'pullover', 'dress', 'coat',
                   'sandal', 'shirt', 'sneaker', 'bag', 'ankle boot']
    return [text_labels[int(i)] for i in labels]
def use_svg_display():
    # 用矢量图显示
    display.display_svg()
def show_fashion_mnist(images, labels):
    use_svg_display()
    # 这里的_表示我们忽略(不使用)的变量
    _, figs = plt.subplots(1, len(images), figsize=(12, 12))
    for f, img, lbl in zip(figs, images, labels):
        f.imshow(img.view((28, 28)).numpy())
        f.set_title(lbl)
        f.axes.get_xaxis().set_visible(False)
        f.axes.get_yaxis().set_visible(False)
    plt.show()
print(net)
X, y = next(iter(test_iter))
true_labels = get_fashion_mnist_labels(y.numpy())
pred_labels = get_fashion_mnist_labels(net(X).argmax(dim=1).numpy())
titles = [true + '\n' + pred for true, pred in zip(true_labels, pred_labels)]
show_fashion_mnist(X[0:9], titles[0:9])
-
-
多层感知机的pytorch简洁实现
-
使用PyTorch来实现上一节中的多层感知机。
-
import torch from torch import nn from torch.nn import init import torchvision import numpy as np import sys def load_data_fashion_mnist(batch_size, resize=None, root='~/Datasets/FashionMNIST'): """Download the fashion mnist dataset and then load into memory.""" trans = [] if resize: trans.append(torchvision.transforms.Resize(size=resize)) trans.append(torchvision.transforms.ToTensor()) transform = torchvision.transforms.Compose(trans) mnist_train = torchvision.datasets.FashionMNIST(root=root, train=True, download=True, transform=transform) mnist_test = torchvision.datasets.FashionMNIST(root=root, train=False, download=True, transform=transform) if sys.platform.startswith('win'): num_workers = 0 # 0表示不用额外的进程来加速读取数据 else: num_workers = 4 train_iter = torch.utils.data.DataLoader(mnist_train, batch_size=batch_size, shuffle=True, num_workers=num_workers) test_iter = torch.utils.data.DataLoader(mnist_test, batch_size=batch_size, shuffle=False, num_workers=num_workers) return train_iter, test_iter def train_ch3(net, train_iter, test_iter, loss, num_epochs, batch_size,params=None, lr=None, optimizer=None): for epoch in range(num_epochs): train_l_sum, train_acc_sum, n = 0.0, 0.0, 0 for X, y in train_iter: y_hat = net(X) l = loss(y_hat, y).sum() # 梯度清零 if optimizer is not None: optimizer.zero_grad() elif params is not None and params[0].grad is not None: for param in params: param.grad.data.zero_() l.backward() if optimizer is None: sgd(params, lr, batch_size) else: optimizer.step() # “softmax回归的简洁实现”一节将用到 train_l_sum += l.item() train_acc_sum += (y_hat.argmax(dim=1) == y).sum().item() n += y.shape[0] test_acc = evaluate_accuracy(test_iter, net) print('epoch %d, loss %.4f, train acc %.3f, test acc %.3f' % (epoch + 1, train_l_sum / n, train_acc_sum / n, test_acc)) class FlattenLayer(nn.Module): def __init__(self): super(FlattenLayer, self).__init__() def forward(self, x): # x shape: (batch, *, *, ...) return x.view(x.shape[0], -1) def evaluate_accuracy(data_iter, net): acc_sum, n = 0.0, 0 for X, y in data_iter: acc_sum += (net(X).argmax(dim=1) == y).float().sum().item() n += y.shape[0] return acc_sum / n batch_size = 256 train_iter, test_iter = load_data_fashion_mnist(batch_size) # 数据获取 num_inputs, num_outputs, num_hiddens = 784, 10, 256 # 多层感知机超参数设置 net = nn.Sequential( # 模型构建 FlattenLayer(), nn.Linear(num_inputs, num_hiddens), nn.ReLU(), nn.Linear(num_hiddens, num_outputs), ) for params in net.parameters(): # 模型初始化 init.normal_(params, mean=0, std=0.01) loss = torch.nn.CrossEntropyLoss() # 损失函数 optimizer = torch.optim.SGD(net.parameters(), lr=0.5) # 优化器 num_epochs = 10 train_ch3(net, train_iter, test_iter, loss, num_epochs, batch_size, None, None, optimizer) -
epoch 1, loss 0.0031, train acc 0.706, test acc 0.778
epoch 2, loss 0.0019, train acc 0.822, test acc 0.830
epoch 3, loss 0.0016, train acc 0.844, test acc 0.850
epoch 4, loss 0.0015, train acc 0.855, test acc 0.832
epoch 5, loss 0.0014, train acc 0.864, test acc 0.860
epoch 6, loss 0.0013, train acc 0.873, test acc 0.817
epoch 7, loss 0.0013, train acc 0.878, test acc 0.839
epoch 8, loss 0.0013, train acc 0.881, test acc 0.853
epoch 9, loss 0.0012, train acc 0.885, test acc 0.853
epoch 10, loss 0.0012, train acc 0.888, test acc 0.852
-
-
模型预测
-
from IPython import display
from matplotlib import pyplot as plt
def get_fashion_mnist_labels(labels):
    text_labels = ['t-shirt', 'trouser', 'pullover', 'dress', 'coat',
                   'sandal', 'shirt', 'sneaker', 'bag', 'ankle boot']
    return [text_labels[int(i)] for i in labels]
def use_svg_display():
    # 用矢量图显示
    display.display_svg()
def show_fashion_mnist(images, labels):
    use_svg_display()
    # 这里的_表示我们忽略(不使用)的变量
    _, figs = plt.subplots(1, len(images), figsize=(12, 12))
    for f, img, lbl in zip(figs, images, labels):
        f.imshow(img.view((28, 28)).numpy())
        f.set_title(lbl)
        f.axes.get_xaxis().set_visible(False)
        f.axes.get_yaxis().set_visible(False)
    plt.show()
print(net)
X, y = next(iter(test_iter))
true_labels = get_fashion_mnist_labels(y.numpy())
pred_labels = get_fashion_mnist_labels(net(X).argmax(dim=1).numpy())
titles = [true + '\n' + pred for true, pred in zip(true_labels, pred_labels)]
show_fashion_mnist(X[0:9], titles[0:9])
-


