【机器学习算法复现】随机森林,以又放回的方式构建的决策树为基础的集成学习方法,可回归可分类不同任务注意评价指标。
- 随机森林就是通过集成学习的Bagging思想将多棵树集成的一种算法:它的基本单元就是决策树。随机森林的名称中有两个关键词,一个是“随机”,一个就是“森林”。“森林”很好理解,一棵叫做树,那么成百上千棵就可以叫做森林了,其实这也是随机森林的主要思想–集成思想的体现。随机森林是一种由决策树构成的集成算法,他在很多情况下都能有不错的表现。
- 随机森林或随机决策森林是用于分类,回归和其他任务的集成学习方法,其通过在训练时构建多个决策树并输出作为类的模式(分类)或平均预测(回归)的类来操作。个别树木。随机决策森林纠正决策树过度拟合其训练集的习惯。
-
在解释随机森林前,需要先提一下决策树。决策树是一种很简单的算法,他的解释性强,也符合人类的直观思维。这是一种基于if-then-else规则的有监督学习算法,下面的图片可以直观的表达决策树的逻辑。(1条消息) 【机器学习算法复现】决策树,树形结构解决属性选择问题,一种可回归可分类的有监督学习算法_羞儿的博客-CSDN博客
-
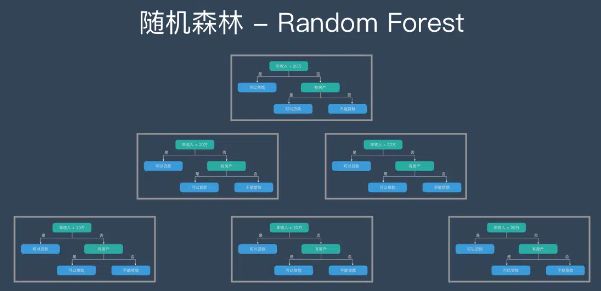
随机森林 – Random Forest | RF,随机森林是由很多决策树构成的,不同决策树之间没有关联。
-
当我们进行分类任务时,新的输入样本进入,就让森林中的每一棵决策树分别进行判断和分类,每个决策树会得到一个自己的分类结果,决策树的分类结果中哪一个分类最多,那么随机森林就会把这个结果当做最终的结果。
- 构造随机森林的 4 个步骤
-
- 一个样本容量为N的样本,有放回的抽取N次,每次抽取1个,最终形成了N个样本。这选择好了的N个样本用来训练一个决策树,作为决策树根节点处的样本。
- 当每个样本有M个属性时,在决策树的每个节点需要分裂时,随机从这M个属性中选取出m个属性,满足条件m << M。然后从这m个属性中采用某种策略(比如说信息增益)来选择1个属性作为该节点的分裂属性。
- 决策树形成过程中每个节点都要按照步骤2来分裂(很容易理解,如果下一次该节点选出来的那一个属性是刚刚其父节点分裂时用过的属性,则该节点已经达到了叶子节点,无须继续分裂了)。一直到不能够再分裂为止。注意整个决策树形成过程中没有进行剪枝。
- 按照步骤1~3建立大量的决策树,这样就构成了随机森林了。
-
- 随机森林的优缺点Random forests - classification description (berkeley.edu)
- 它可以出来很高维度(特征很多)的数据,并且不用降维,无需做特征选择;它可以判断特征的重要程度;可以判断出不同特征之间的相互影响;不容易过拟合;训练速度比较快,容易做成并行方法;实现起来比较简单;对于不平衡的数据集来说,它可以平衡误差;如果有很大一部分的特征遗失,仍可以维持准确度。
- 随机森林已经被证明在某些噪音较大的分类或回归问题上会过拟合。对于有不同取值的属性的数据,取值划分较多的属性会对随机森林产生更大的影响,所以随机森林在这种数据上产出的属性权值是不可信的
- 随机森林分类效果(错误率)与两个因素有关:
-
- 森林中任意两棵树的相关性:相关性越大,错误率越大;(弱分类器应该good且different)
- 森林中每棵树的分类能力:每棵树的分类能力越强,整个森林的错误率越低。(弱分类器应该good且different)
- 减小特征选择个数m,树的相关性和分类能力也会相应的降低;增大m,两者也会随之增大。所以关键问题是如何选择最优的m,这也是随机森林的一个重要参数。
-
- OOB (袋外错误率)[机器学习基础复习] 随机森林(Random Forest) - 知乎 (zhihu.com)
- 构建随机森林的关键问题就是如何选择最优的特征数m这个参数,要解决这个问题主要依据计算袋外错误率OOB error(out-of-bag error)。
- 对于一个具有n个样本的训练集,我们有放回的抽取n个样本进行训练,那么每个样本不被抽到的概率为 p = ( 1 − 1 n ) n p=(1-\frac1n)^n p=(1−n1)n,当m越来越大时,p趋于1/3,也就是森林形成后的过程中有三分之一的数据是没有被用到的。那么这三分之一的数据可以当做测试集来计算模型的误差率,我们将这些没用有用到的数据经过森林预测得到类别,在于其真实值进行比较,求出错误率即可。这样就避免了使用交叉验证或者使用其他的测试集来计算泛化误差率。这样计算分类错误率的方法可以被证明是无偏的。
- 随机森林有一个重要的优点就是,没有必要对它进行交叉验证或者用一个独立的测试集来获得误差的一个无偏估计。它可以在内部进行评估,也就是说在生成的过程中就可以对误差建立一个无偏估计。
- 在构建每棵树时,我们对训练集使用了不同的bootstrap sample(随机且有放回地抽取)。所以对于每棵树而言(假设对于第k棵树),大约有1/3的训练实例没有参与第k棵树的生成,它们称为第k棵树的oob样本。而这样的采样特点就允许我们进行oob估计,它的计算方式如下:
- 对每个样本,计算它作为oob样本的树对它的分类情况(约1/3的树);
- 然后以简单多数投票作为该样本的分类结果;
- 最后用误分个数占样本总数的比率作为随机森林的oob误分率。
- oob误分率是随机森林泛化误差的一个无偏估计,它的结果近似于需要大量计算的k折交叉验证。这样,就可以通过比较oob误分率来选择一个最好的特征数m。
- 随机森林参数
- 在scikit-learn中,RF的分类器是RandomForestClassifier,回归器是RandomForestRegressor。RF的参数也包括两部分,第一部分是Bagging框架的参数,第二部分是一棵CART决策树的参数。具体的参数参考随机森林分类器的函数原型:
-
sklearn.ensemble.RandomForestClassifier(
        n_estimators=10, criterion='gini',
        max_depth=None,min_samples_split=2,
        min_samples_leaf=1, min_weight_fraction_leaf=0.0,
        max_features='auto', max_leaf_nodes=None,
        min_impurity_split=1e-07,bootstrap=True,
        oob_score=False, n_jobs=1,
        random_state=None, verbose=0,
        warm_start=False, class_weight=None)
- Bagging框架参数
- n_estimators: 弱学习器(决策树)的个数。一般来说n_estimators太小,容易欠拟合,n_estimators太大,计算量会太大,并且n_estimators到一定的数量后,再增大n_estimators获得的模型提升会很小,所以一般选择一个适中的数值。默认是100。
- oob_score:即是否采用袋外样本来评估模型的好坏。默认False。推荐设置为True,因为袋外分数反应了一个模型拟合后的泛化能力。
- criterion: 即CART树做划分时对特征的评价标准。分类模型和回归模型的损失函数是不一样的。分类RF对应的CART分类树默认是基尼系数gini,另一个可选择的标准是信息增益(information gain)。回归RF对应的CART回归树默认是均方差mse,另一个可以选择的标准是绝对值差mae。一般来说选择默认的标准就已经很好的。
- 决策树参数
-
-
RF划分时考虑的最大特征数 max_features: 就是之前提到的“在每个节点处,从M中随机选择m个特征维度”中的那个m。默认是"auto",意味着每个节点在划分时随机考虑 N \sqrt{N} N 个特征;如果是"log2"意味着划分时随机考虑 l o g 2 N log_2^N log2N 个特征;如果是整数,代表考虑的特征绝对数。如果是浮点数,代表考虑特征百分比,即考虑百分比*总特征维度数取整后的特征数。一般用默认的"auto"就可以了;如果特征数非常多,可以灵活使用刚才描述的其他取值来控制划分时考虑的最大特征数,以控制决策树的生成时间。
-
决策树最大深度max_depth: 默认可以不输入,如果不输入的话,决策树在建立子树的时候不会限制子树的深度。一般来说,数据少或者特征少的时候可以不管这个值。如果模型样本量多,特征也多的情况下,推荐限制这个最大深度,具体的取值取决于数据的分布。常用的可以取值10-100之间。
-
内部节点再划分所需最小样本数min_samples_split: 这个值限制了子树继续划分的条件,如果某节点的样本数少于min_samples_split,则不会继续再划分。默认是2。如果样本量数量级非常大,则推荐增大这个值。
-
叶子节点最少样本数min_samples_leaf: 这个值限制了叶子节点最少的样本数,如果某叶子节点数目小于样本数,则会和兄弟节点一起被剪枝,只保留原来的父节点。默认是1。如果样本量数量级非常大,则推荐增大这个值。
-
叶子节点最小的样本权重和min_weight_fraction_leaf:这个值限制了叶子节点所有样本权重和的最小值,如果小于这个值,则会和兄弟节点一起被剪枝,只保留原来的父节点。 默认是0,就是不考虑权重问题。如果我们有较多样本有缺失值,或者分类树样本的分布类别非常不平衡,就会引入样本权重,这时我们就要注意这个值了。
-
最大叶子节点数max_leaf_nodes: 通过限制最大叶子节点数,可以防止过拟合,默认是"None”,即不限制最大的叶子节点数。如果加了限制,算法会建立在最大叶子节点数内最优的决策树。如果特征非常多的话,可以加以限制,具体的值可以通过交叉验证得到。
-
节点划分最小不纯度min_impurity_split: 这个值限制了决策树的增长,如果某节点的不纯度(基于基尼系数,均方差)小于这个阈值,则该节点不再生成子节点。即为叶子节点 。一般不推荐改动,默认值1e-7。
-
-
- 为什么要有放回抽样Random forests - classification description (berkeley.edu)
- 如果不放回抽样,每棵树用的样本完全不同,结果是有偏的,基学习器之间的相似性小,投票结果差,模型偏差大
- 如果不抽样,基学习器用所有样本,那么模型的泛化能力弱,基学习器之前相似性太大差异性太小,模型的偏差大
- 为什么不随机抽样? 自助采样首先可以产生一部分袋外样本,可以用来做袋外估计,另一方自助采样一定程度上改变了每个基学习器的所用数据的样本分布,一定程度上引入了噪音,增加了模型的泛化能力
使用随机森林完成鸢尾花分类任务
-
导包,加载数据
-
from sklearn import datasets from sklearn.model_selection import train_test_split from sklearn.ensemble import RandomForestClassifier import numpy as np from matplotlib.colors import ListedColormap import matplotlib.pyplot as plt iris = datasets.load_iris() print(iris['data'].shape, iris['target'].shape) # (150, 4) (150,) X = iris.data[:,[2,3]] y = iris.target print('Class labels:', np.unique(y)) # 划分数据集为训练集和测试集 X_train, X_test, y_train, y_test = train_test_split(X, y, test_size=0.3, random_state=1, stratify=y) print(X_train.shape, y_train.shape)-
(150, 4) (150,)
Class labels: [0 1 2]
(105, 2) (105,)
-
-
训练,并绘制分类决策边界:
-
def plot_decision_regions(X, y, classifier, test_idx=None, resolution=0.02): # setup marker generator and color map markers = ('s', 'x', 'o', '^', 'v') colors = ('red', 'blue', 'lightgreen', 'gray', 'cyan') cmap = ListedColormap(colors[:len(np.unique(y))]) # plot the decision surface x1_min, x1_max = X[:, 0].min() - 1, X[:, 0].max() + 1 x2_min, x2_max = X[:, 1].min() - 1, X[:, 1].max() + 1 xx1, xx2 = np.meshgrid(np.arange(x1_min, x1_max, resolution), np.arange(x2_min, x2_max, resolution)) Z = classifier.predict(np.array([xx1.ravel(), xx2.ravel()]).T) Z = Z.reshape(xx1.shape) plt.contourf(xx1, xx2, Z, alpha=0.3, cmap=cmap) plt.xlim(xx1.min(), xx1.max()) plt.ylim(xx2.min(), xx2.max()) for idx, cl in enumerate(np.unique(y)): plt.scatter(x=X[y == cl, 0], y=X[y == cl, 1],alpha=0.8, c=colors[idx], marker=markers[idx], label=cl,) # highlight test samples if test_idx: # plot all samples X_test, y_test = X[test_idx, :], y[test_idx] plt.scatter(X_test[:, 0], X_test[:, 1], edgecolor='black', alpha=1.0, linewidth=1, marker='o', s=100, label='test set') forest = RandomForestClassifier(criterion='gini', # 划分准则 n_estimators=25, # 25个基学习器(决策树) random_state=1, n_jobs=2) # 并行执行 forest.fit(X_train, y_train) X_combined = np.vstack((X_train, X_test)) y_combined = np.hstack((y_train, y_test)) plot_decision_regions(X_combined, y_combined, classifier=forest, test_idx=range(105,150)) plt.xlabel('petal length') plt.ylabel('petal width') plt.legend(loc='upper left') plt.show() -
随机森林-特征重要性
-
使用随机森林获得特征重要性,数据集:白酒数据,共有13个特征,使用RandomForestClassifier训练,然后调用feature_importances_属性获得特征重要性:
-
import pandas as pd import numpy as np from sklearn.ensemble import RandomForestClassifier from sklearn.model_selection import train_test_split import matplotlib.pyplot as plt data_dir = './data/' # Wine dataset and rank the 13 features by their respective importance measures df_wine = pd.read_csv(data_dir+'wine.data', header=None, names=['Class label', 'Alcohol', 'Malic acid', 'Ash', 'Alcalinity of ash', 'Magnesium', 'Total phenols', 'Flavanoids', 'Nonflavanoid phenols', 'Proanthocyanins', 'Color intensity', 'Hue', 'OD280/OD315 of diluted wines', 'Proline']) print('Class labels', np.unique(df_wine['Class label'])) print('numbers of features:', len(df_wine.keys())-1) df_wine.head() -
计算重要特征
-
# 划分训练集测试集 X, y = df_wine.iloc[:, 1:].values, df_wine.iloc[:, 0].values X_train, X_test, y_train, y_test = train_test_split(X, y, test_size=0.3, random_state=0, stratify=y) print(X_train.shape) feat_labels = df_wine.columns[1:] forest = RandomForestClassifier(n_estimators=200, random_state=1) # 实例化随机森林 forest.fit(X_train, y_train) importances = forest.feature_importances_ print(len(importances)) print(importances) """ numpy.argsort(a, axis=-1, kind=’quicksort’, order=None) 功能: 将矩阵a在指定轴axis上排序,并返回排序后的下标 参数: a:输入矩阵, axis:需要排序的维度 返回值: 输出排序后的下标 """ indices = np.argsort(importances)[::-1] # 取反后是从大到小 print(indices) for i in range(X_train.shape[1]): print("%2d) %-*s %f" % (i + 1, 30, feat_labels[indices[i]], importances[indices[i]])) -
(124, 13) 13 [0.11535953 0.02485979 0.01367936 0.0206145 0.03254997 0.04019533 0.18793917 0.01096301 0.02611948 0.13488692 0.06345939 0.13440744 0.19496612] [12 6 9 11 0 10 5 4 8 1 3 2 7] 1) Proline 0.194966 2) Flavanoids 0.187939 3) Color intensity 0.134887 4) OD280/OD315 of diluted wines 0.134407 5) Alcohol 0.115360 6) Hue 0.063459 7) Total phenols 0.040195 8) Magnesium 0.032550 9) Proanthocyanins 0.026119 10) Malic acid 0.024860 11) Alcalinity of ash 0.020615 12) Ash 0.013679 13) Nonflavanoid phenols 0.010963 -
随机森林算法(RandomForest)的输出有一个变量是 feature_importances_ ,翻译过来是 特征重要性,RF可以输出两种 feature_importance,分别是Variable importance和Gini importance,两者都是feature_importance,只是计算方法不同。
-
Variable importance :选定一个feature M,在所有OOB样本的feature M上人为添加噪声,再测试模型在OOB上的判断精确率,精确率相比没有噪声时下降了多少,就表示该特征有多重要。假如一个feature对数据分类很重要,那么一旦这个特征的数据不再准确,对测试结果会造成较大的影响,而那些不重要的feature,即使受到噪声干扰,对测试结果也没什么影响。这就是 Variable importance 方法的朴素思想。
-
Gini importance : 选定一个feature M,统计RF的每一棵树中,由M形成的分支节点的Gini指数下降程度(或不纯度下降程度)之和,这就是M的importance。两者对比来看,前者比后者计算量更大,后者只需要一边构建DT,一边做统计就可以。从sklearn的官方文档对feature_importances_参数的描述来看,sklearn应当是使用了Gini importance对feature进行排序,同时sklearn把所有的Gini importance以sum的方式做了归一化,得到了最终的feature_importances_输出参数。
-
plt.title('Feature Importance')
plt.bar(range(X_train.shape[1]), importances[indices], align='center')
plt.xticks(range(X_train.shape[1]), feat_labels[indices], rotation=90)
plt.xlim([-1, X_train.shape[1]])
plt.tight_layout()
plt.show()
-
-
随机森林-回归任务
-
数据集:房价预测,导包加载数据。
-
from sklearn.ensemble import RandomForestRegressor from sklearn.metrics import mean_squared_error df = pd.read_csv('./data/housing.data.txt',header=None,sep='\s+', names= ['CRIM', 'ZN', 'INDUS', 'CHAS', 'NOX', 'RM', 'AGE', 'DIS', 'RAD', 'TAX', 'PTRATIO', 'B', 'LSTAT', 'MEDV']) df.head() -
数据集划分及训练预测,回归树的评价指标scikit-learn/_criterion.pyx at main · scikit-learn/scikit-learn (github.com)
-
# 划分数据集 X = df.iloc[:, :-1].values y = df['MEDV'].values X_train, X_test, y_train, y_test =train_test_split(X, y, test_size=0.2, random_state=1) print(X_train.shape, y_train.shape) # The 'criterion' parameter of RandomForestRegressor must be a str among {'friedman_mse', 'poisson', 'absolute_error', 'squared_error'}. forest = RandomForestRegressor(n_estimators=100, criterion='friedman_mse', random_state=1, n_jobs=-1) forest.fit(X_train, y_train) # 训练 y_train_pred = forest.predict(X_train) y_test_pred = forest.predict(X_test) print(len(y_train_pred)) print(len(y_test_pred)) print('friedman_mse train: %.3f, test: %.3f' % (mean_squared_error(y_train, y_train_pred), mean_squared_error(y_test, y_test_pred))) -
(404, 13) (404,)
404
102
friedman_mse train: 1.254, test: 8.657
-
-
推荐的GPU平台
colab(推荐使用,需要VPN,免费GPU):https://colab.research.google.com/
矩阵云:https://matpool.com/
极客云:https://www.jikecloud.net/
DBC:https://www.dbchain.ai/home
极链云:https://cloud.videojj.com/store
Featurize:https://featurize.cn/
openbayes:https://openbayes.com/
MistGPU:https://mistgpu.com/


