Centos7 搭建LNMP架构服务器实战
Centos7 搭建LNMP架构服务器实战
- 前言
- 需求分析
-
- 拓朴设计及各服务器地址规划
- 配置部分
-
- 后端服务器实现
-
- Web-1 nginx整合
- Web-2 nginx整合
- 后端服务器测试
- 高可用Web集群的搭建
-
- Ha1 keepalived
- Ha2 keepalived
- Web-1&Web-2中配置虚拟ip
- 高可用测试
- NFS共享存储服务器配置
-
- stronge主机中的配置
- Web-1和Web-2中的配置
- 共享存储服务器测试
- MySQL高可用集群
-
-
- DB-master中/etc/my.cnf配置:
- DB-slave中/etc/my.cnf配置:
- 在DB-master 上授权远程访问
- 在DB-slave 上授权远程访问
- 在DB-master 上告知DB-slave 的文件名与位置
- 在DB-slave上告知DB-master的文件名与位置
- 分别开启 start slave
-
- DB-master中keepalived配置
- DB-slave中keepalived配置
-
- 创建mysql服务器内的测试脚本文件
- 通过访问虚拟ip `192.168.11.20`获取文件
-
前言
大家好,我是秃头。这是我在接触Linux以后做的第一个实战练习,也算是比较不错的收官了 ,本次实践比较偏新手向,做完第一个实战练习,突然对linux心有所感,这是后半部分的一个实践,整体的一个实战是从规划设计网络开始的,这些已经是后半部分了,这个如果有人有需求的话,可以写出来供大家参考。
需求分析
在Linux中搭建 Nginx+Mysql+PHP 的架构。
- 准备多台主机将 Web 和数据库分离部署;
- 使Web 服务器实现高可用负载均衡,采用LVS+Dr模式,并且在LVS上配置keepalived设置监听,当一个Web服务器发生故障时,另一个Web服务器可以自动生效。;
- 搭建基于NFS存储服务器的共享文件夹;
- 搭建 keepalived+mysql双主机实现mysql高可用,使两台mysql服务器其中有一台有故障后,另一台可以立马接替其进行工作;
拓朴设计及各服务器地址规划
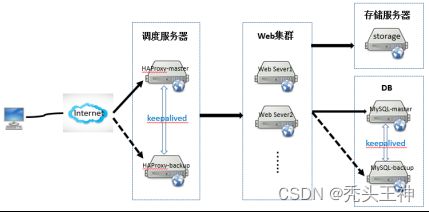
Ps:这张图是我忘了从哪扒下来的,如侵权,请告诉我,我将马上修改。
各服务器地址规划如下:
| 主机名 | IP地址 | 角色 | 虚拟IP |
|---|---|---|---|
| Ha-1(centos7) | 192.168.11.30 | 主LVS调度服务器 | 192.168.11.100 |
| Ha-2(centos7) | 192.168.11.40 | 备份LVS调度服务器 | |
| Web-1(centos7) | 192.168.11.10 | 后端服务器 (Nginx+PHP) |
|
| Web-2(centos7) | 192.168.11.20 | ||
| Stronge(centos7) | 192.168.11.50 | 存储服务器NFS | 无 |
| DB-master(centos7) | 192.168.11.80 | 主MySql服务器 | 192.168.11.200 |
| DB-slave(centos7) | 192.168.11.90 | 备份MySql服务器 |
配置部分
重中之重,记得把你的防火墙给我关咯!!!
systemctl stop firewalld.service
systemctl disable firewalld.service
setenforce 0
后端服务器实现
Web-1 nginx整合
nginx.conf:
worker_processes  1;
events {
    worker_connections  1024;
}
http {
    include       mime.types;
    default_type  application/octet-stream;
    sendfile        on;
    keepalive_timeout  65;
    server {
        listen       80;
        server_name  localhost;
        location / {
            root   html;
            index  index.html index.htm index.php;
        }
        error_page   500 502 503 504  /50x.html;
        location = /50x.html {
            root   html;
        }
        location ~ \.php$ {
            root           html;
            fastcgi_pass   127.0.0.1:9000;
            fastcgi_index  index.php;
            fastcgi_param  SCRIPT_FILENAME  $document_root$fastcgi_script_name;
            include        fastcgi_params;
        }
    }
Ps:如果你想图方便的话,在Web-1创建完成以后可以克隆一个Web-2(笑)
Web-2 nginx整合
nginx.conf:
worker_processes  1;
events {
    worker_connections  1024;
}
http {
    include       mime.types;
    default_type  application/octet-stream;
    sendfile        on;
    keepalive_timeout  65;
    server {
        listen       80;
        server_name  localhost;
        location / {
            root   html;
            index  index.html index.htm index.php;
        }
        error_page   500 502 503 504  /50x.html;
        location = /50x.html {
            root   html;
        }
        location ~ \.php$ {
            root           html;
            fastcgi_pass   127.0.0.1:9000;
            fastcgi_index  index.php;
            fastcgi_param  SCRIPT_FILENAME  $document_root$fastcgi_script_name;
            include        fastcgi_params;
        }
    }
后端服务器测试
1.a分别使用cat查看web服务器中nginx主页文件内容和php测试文件内容


访问测试
访问192.168.11.10可以看到修改后的nginx主页

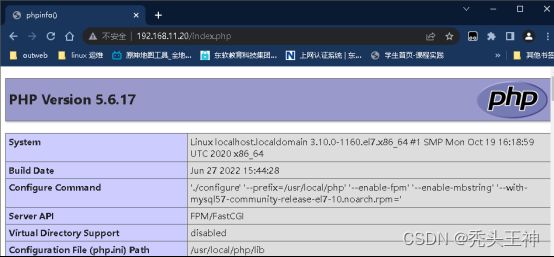
访问192.168.11.10/index.php可以查看到php版本

访问192.168.11.20同上
高可用Web集群的搭建
Ha1 keepalived
keepalived.conf:
! Configuration File for keepalived

global_defs {
   notification_email {
     [email protected]
     [email protected]
     [email protected]
   }
   notification_email_from [email protected]
   smtp_server 127.0.0.1
   smtp_connect_timeout 30
   router_id LVS_01
   vrrp_skip_check_adv_addr
   vrrp_garp_interval 0
   vrrp_gna_interval 0
}

vrrp_instance VI_1 {
    state MASTER
    interface ens33
    virtual_router_id 51
    priority 100
    advert_int 1
    authentication {
        auth_type PASS
        auth_pass 1111
    }
    virtual_ipaddress {
        192.168.11.100
    }
}


virtual_server 192.168.11.100 80 {
    delay_loop 6
    lb_algo rr
    lb_kind DR
    #persistence_timeout 0
    protocol TCP

    real_server 192.168.11.10 80 {
        weight 1
        TCP_CHECK {
            connect_timeout 3
            connect_port 80
            nb_get_retry 3
            delay_before_retry 3
        }
    }

    real_server 192.168.11.20 80 {
        weight 1
        TCP_CHECK {
            connect_timeout 3
            connect_port 80
            nb_get_retry 3
            delay_before_retry 3
        }
    }
}
Ha2 keepalived
keepalived.conf:
! Configuration File for keepalived

global_defs {
   notification_email {
     [email protected]
     [email protected]
     [email protected]
   }
   notification_email_from [email protected]
   smtp_server 127.0.0.1
   smtp_connect_timeout 30
   router_id LVS_02
   vrrp_skip_check_adv_addr
   vrrp_garp_interval 0
   vrrp_gna_interval 0
}

vrrp_instance web-ha {
    state BACKUP
    interface ens33
    virtual_router_id 51
    priority 90
    advert_int 1
    authentication {
        auth_type PASS
        auth_pass 1111
    }
    virtual_ipaddress {
        192.168.11.20
    }
}

virtual_server 192.168.11.100 80 {
    delay_loop 6
    lb_algo rr
    lb_kind DR
    persistence_timeout 0
protocol TCP

    real_server 192.168.11.10 80 {
        weight 1
        TCP_CHECK {
            connect_timeout 3
            connect_port 80
            nb_get_retry 3
            delay_before_retry 3
        }
    }

    real_server 192.168.11.20 80 {
        weight 1
        TCP_CHECK {
            connect_timeout 3
            connect_port 80
            nb_get_retry 3
            delay_before_retry 3
        }
    }
}
Web-1&Web-2中配置虚拟ip
ip addr add 192.168.11.100/32 brd 192.168.11.100 dev lo:0
高可用测试
使用ip a s来查看你的web-1 web-2的网络配置

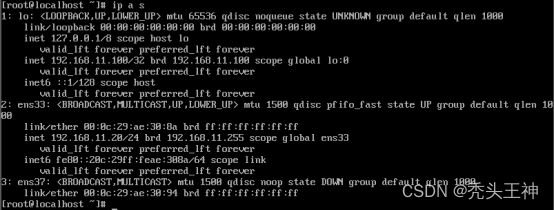
使用不同的浏览器访问虚拟ip

在linux内部使用curl命令![]()

在这里我们关闭ha-1的keepalived服务

然后我们发现虚拟ip漂移到ha-2上了(Ps:仔细观察两图的ens33网卡区分俩主机)

在ha-2上执行ipvsadm -ln

NFS共享存储服务器配置
stronge主机中的配置
yum -y install rpcbind nfs-utils
systemctl start rpcbind.service          #启动rpcbind服务
systemctl enable rpcbind.service 		 #开机启动rpcbind服务
systemctl start  nfs.service			 #启动nfs服务
systemctl enable nfs.service			 #开机启动rpcbind服务
mkdir /www
chown -R nfsnobody.nfsnobody /www
vim /etc/exports文件内容为:/www    192.168.11.0/24(rw,sync,root_squash)
systemctl reload nfs.service   #重载服务
exportfs -v					   #查看已配置好的路径及相关配置
Web-1和Web-2中的配置
yum -y install rpcbind nfs-utils
systemctl start rpcbind.service          #启动rpcbind服务
systemctl enable rpcbind.service 		 #开机启动rpcbind服务
systemctl start  nfs.service			 #启动nfs服务
systemctl enable nfs.service			 #开机启动rpcbind服务
mkdir -p /www
showmount -e 192.168.11.50
mount -t nfs 192.168.11.50:/www /www
共享存储服务器测试
通过cat /etc/export查看设置的路径及相关权限

在web-1中用df -h查看挂载信息,cat查看在共享目录下创建的信息

在web-2中使用相同的操作

在storge下查看共享目录信息
MySQL高可用集群
DB-master中/etc/my.cnf配置:
server-id=11   #任意自然数n,只要保证两台MySQL主机不重复就可以了。
log-bin=master.log   #开启二进制日志
log_bin_index = mysql-bin.index
relay_log = mysql-relay-bin
relay_log_index = mysql-relay-bin.index
read_only = 1
skip_slave_start = 1
auto_increment_increment=2   #步进值auto_imcrement。
auto_increment_offset=1   #起始值。binlog-ignore=mysql   #忽略mysql库
binlog-ignore=information_schema   #忽略information_schema库
slave-skip-errors = all
DB-slave中/etc/my.cnf配置:
server-id = 12
log_bin = slave-bin
log_bin_index = mysql-bin.index
relay_log = mysql-relay-bin
relay_log_index = mysql-relay-bin.index
read_only = 1
skip_slave_start = 1
log_slave_updates = 1
auto-increment-increment = 2
auto-increment-offset = 2      #此处区别于1的配置
slave-skip-errors = all
在DB-master 上授权远程访问
MariaDB [(none)]> GRANT REPLICATION SLAVE ON *.* TO 'slave'@'192.168.11.90' IDENTIFIED BY '123';
Query OK, 0 rows affected, 1 warning (0.06 sec)

MariaDB [(none)]> flush privileges;
Query OK, 0 rows affected (0.05 sec)
在DB-slave 上授权远程访问
MariaDB [(none)]> GRANT REPLICATION SLAVE ON *.* TO 'master'@'192.168.11.80' IDENTIFIED BY '123';
Query OK, 0 rows affected, 1 warning (0.04 sec)

MariaDB[(none)]> flush privileges;
Query OK, 0 rows affected (0.03 sec)
在DB-master 上告知DB-slave 的文件名与位置
在DB-slave上查看show master status;

MariaDB [(none)]> CHANGE MASTER TO
-> MASTER_HOST='192.168.11.90',
-> MASTER_USER='master',
-> MASTER_PASSWORD='123',
-> MASTER_LOG_FILE='slave.000003',
-> MASTER_LOG_POS=398;
在DB-slave上告知DB-master的文件名与位置
在DB-master上查看show master status;

MariaDB [(none)]> CHANGE MASTER TO
-> MASTER_HOST='192.168.11.80',
-> MASTER_USER='slave',
-> MASTER_PASSWORD='123',
-> MASTER_LOG_FILE='master.000003',
-> MASTER_LOG_POS=575;
分别开启 start slave
Show slave status \G;查看slave状态


DB-master中keepalived配置
! Configuration File for keepalived
global_defs {
   notification_email {
     [email protected]
     [email protected]
     [email protected]
   }
   notification_email_from [email protected]
   smtp_server 127.0.0.1
   smtp_connect_timeout 30
   router_id DB_master
vrrp_skip_check_adv_addr
   vrrp_garp_interval 0
   vrrp_gna_interval 0
}
vrrp_instance mariadb-ha {
    state BACKUP
    interface ens33
    virtual_router_id 60
    priority 100
    advert_int 1
    authentication {
        auth_type PASS
        auth_pass 1111
}
    virtual_ipaddress {
        192.168.11.200/24
    }
}
virtual_server 192.168.11.200 3306 {
    delay_loop 6
    lb_algo rr
    lb_kind DR
    #persistence_timeout 50
    protocol TCP

    real_server 192.168.11.80 3306 {
        weight 1
        TCP_CHECK {
            connect_timeout 3
            connect_port 3306
            nb_get_retry 3
            delay_before_retry 3
        }
    }
}
DB-slave中keepalived配置
! Configuration File for keepalived

global_defs {
   notification_email {
     [email protected]
     [email protected]
     [email protected]
   }
   notification_email_from [email protected]
   smtp_server 127.0.0.1
   smtp_connect_timeout 30
   router_id db_slave
   vrrp_skip_check_adv_addr
   vrrp_garp_interval 0
   vrrp_gna_interval 0
}
vrrp_instance maria-ha {
    state BACKUP
    interface ens33
    virtual_router_id 60
    priority 90
    advert_int 1
    authentication {
        auth_type PASS
        auth_pass 1111
}
    virtual_ipaddress {
        192.168.11.200/24
    }
}

virtual_server 192.168.11.200 3306 {
    delay_loop 6
    lb_algo rr
    lb_kind DR
    #persistence_timeout 50
    protocol TCP

    real_server 192.168.11.90 3306 {
        weight 1
        TCP_CHECK {
            connect_timeout 3
            connect_port 3306
            nb_get_retry 3
            delay_before_retry 3
        }
    }
}
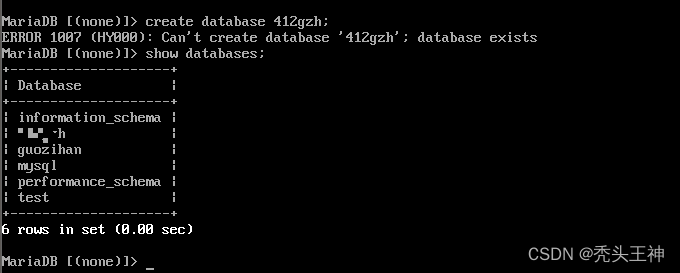
在DB-master中通过create database *****h;创建一个数据库,使用show databases;查看
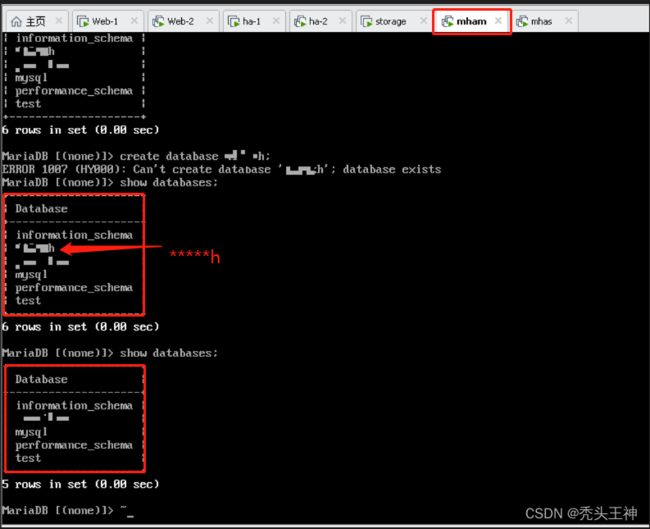
在DB-slave中通过drop database *****h;删除并通过show databases;查看

DB-master中再次查看发现没有*****h数据库
在DB-master中使用show slave status\G;查看slave状态

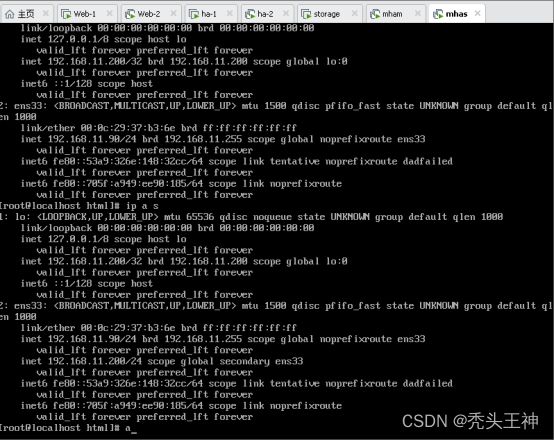
ip a s查看DB-master的ip和虚拟ip

DB-slave的ip与虚拟ip

通过service mariadb status来查看mysql服务状态
通过service keepalived status来查看keepalived服务状态


然后service mariadb stop关闭mysql服务
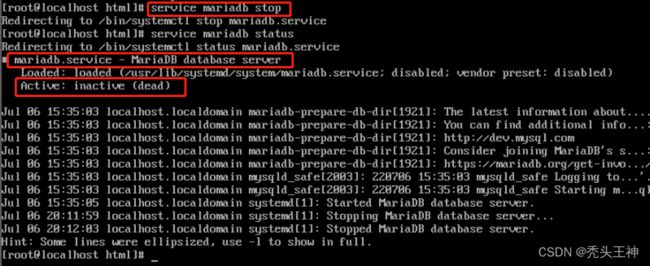
这里我们发现keepalived服务与其一起自动关闭了

随后我们打开DB-slave,发现虚拟ip漂移到了备用mysql服务器上
随后我们创建一个任何主机都可以连接的*****han用户

在ha-1使用mysql -h 192.168.11.200 -u *****han -p '*****han'随后输入你的密码。

由上图可见,ha-1访问数据库成功
创建mysql服务器内的测试脚本文件
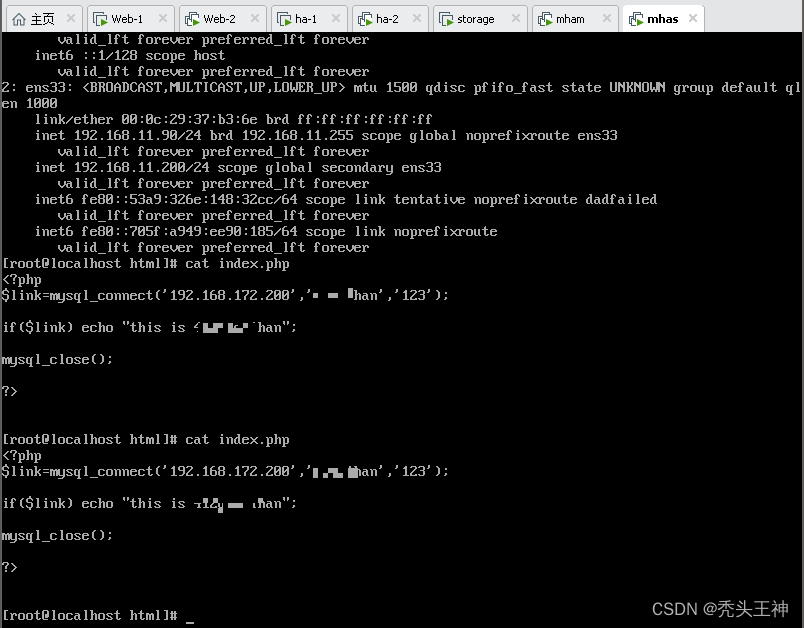
vim /usr/local/nginx/html/index.php
$link=mysql_connect('192.168.11.30','yinmingyang','123');
if($link) echo "this is ********han";
mysql_close();
?>

