03Vue3-模板语法
文章目录
-
- 模板语法
-
- 1. 插值操作
- 2. 计算属性
- 3. 事件监听
- 4. 条件渲染
- 5. 列表渲染
- 6. v-model
- 模板语法应用——简易购物车
模板语法
1. 插值操作
- 插值:{{}}
双大括号里支持表达式,如:
{{ number + 1 }} {{ ok ? ‘YES’ : ‘NO’ }} {{
message.split(’’).reverse().join(’’)}}
-
指令:v-
(在{{}}和v-指令进行数据绑定时,支持js单个表达式)
{{msg}}
{{msg}}
,就相当于插值表达式的功能
,可以输出html代码
data:{
msg:‘test message’,
title:Title
} -
v-bind
插值{{}}只能用在模板内容中,用于动态内容绑定
如果希望元素的属性也可以动态绑定,需要通过v-bind指令
<a v-bind:href="url"> ... a>


<a :href="url"> ... a>


<a :[key]="url"> ... a>
- 绑定有意义元素中的属性
<template>
<h2 title="this is a test">{{msg}}h2>
<h2 v-bind:title="msg">{{msg}}h2>
<h2 :title="info">{{info}}h2>
<img :src="imgsrc" width="100" height="100" alt="">
<a :href="url">百度a>
template>
<script>
const data = {
msg: 'this is a test',
info: 'new info',
imgsrc: 'https://v3.vuejs.org/logo.png',
title: 'Title
',
url: 'http://www.baidu.com'
}
export default {
name: 'App',
data() {
return data
}
}
script>
- 绑定class属性,四种用法(字符串,数组,对象,方法)
<template>

<div :class="[one,two]">box4div>

<div :class="active">box5div>


<div :class="{one:isOne, two:isTwo}">box6div>


<div :class="{demo:demo}">box6div>

<div :class="{demo}">box6div>


<div :class="getStyleArr()">box7div>
<div :class="getStyleObject()">box8div>
template>

<script>
const data = {
    one: 'one',
    two: 'two',
    active: ['one','two'],
    isOne: true,
    isTwo: false,
    demo: true
}
export default {
  name: 'App',
  data() {
    return data
  },
  methods() {
    getStyleArr() {
      return [this.one,this.two];
    },
    getStyleObject() {
      return {
        one: this.isOne,
        two: this.isTwo
      }
}
script>
<style scoped>
.one {
  background-color: rebeccapurple;
  font-weight: bold;
}
.two {
  background-color: #42b983;
}
.demo {
  background-color: #333;
}
style>
- 绑定style属性
有种方法,一种数组语法、一种是对象语法
<template>

<div :style="['font-size:100px','background:red']">box1div>

<div :style="[fontSize, bgColor]">box2div>
<div :style="['font-size:'+size+'px','background:'+color]">box3div>


<div :style="{fontSize: '15px', 'background-color':'yellow'}">box9div>
<div :style="{'font-size': '15px', 'background-color':'yellow'}">box9div>
template>

<script>
const data = {
    fontSize: 'font-size:50px',
    bgColor: 'background-color:green',
    size: 90,
    color: 'yellow'
}
export default {
  name: 'App',
  data() {
    return data
  }
script>
2. 计算属性
computed计算属性有缓存的功能,计算属性在处理一些复杂逻辑时是很有用的。
<template>
<div>
    <h3>{{name}} - {{slogen}}h3>
    <h3>{{name +' - ' + slogen}}h3>
    <h3>{{getTitle()}}h3>
    <h3>{{title}}h3>
div>
template>

<script>
const data = {
    name: '张三',
    slogen: '新的世界'
}
export default {
  name: 'App',
  data() {
    return data
  },
  computed: {
    title: {
      get() {
        console.log('get computed')
        return this.name+ ' - '+this.slogen;
      }
    }
  },
  methods: {
    getTitle() {
      console.log('get methods')
      return this.name+ ' - '+this.slogen;
    }
  }
}
script>
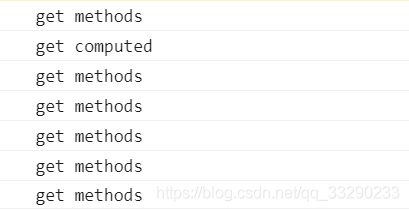
methods和computed两者有什么区别呢?
如果有多个数据
    <h3>{{getTitle()}}h3>
    <h3>{{getTitle()}}h3>
    <h3>{{getTitle()}}h3>
    <h3>{{title}}h3>
    <h3>{{title}}h3>
    <h3>{{title}}h3>
methods里的getTitle()是使用多少次方法就调用多少次。
而computed有缓存的作用,只计算一次,computed里的title依赖于name和sologen,只要name和slogen没有变化,这个两个属性值就一直保存在缓存中,若更改,则相应title绑定也会更新。
计算属性默认只有getter,需要时也提供一个setter
// ...
computed: {
  fullName: {
    // getter
    get() {
      return this.firstName + ' ' + this.lastName
    },
    // setter
    set(newValue) {
      const names = newValue.split(' ')
      this.firstName = names[0]
      this.lastName = names[names.length - 1]
    }
  }
}
// ...
总价:<small>¥</small>{{totalPrice}}
.....
const data = {
    books: [
      {id:1, name:'JS大红本第一版',price:120},
      {id:1, name:'JS大红本第二版',price:130},
      {id:1, name:'JS大红本第三版',price:150},
      {id:1, name:'JS大红本第四版',price:190}
    ]
}
export default {
  name: 'App',
  data() {
    return data
  },
	//计算属性
  computed: {
    totalPrice: {
      get() {
        //汇合
        return this.books.reduce((s,n)=> s+=n.price, 0)
      }
    }
  }
}
3. 事件监听
在前端开发中,需要经常和用户交互
绑定事件监听器指令:v-on
缩写: @ (语法糖)
参数: $event (获取事件对象)
v-on事件修饰符号
.stop阻止事件冒泡.self当事件在该元素本身触发时才触发事件.capture添加事件侦听器是,使用事件捕获模式.prevent阻止默认事件.once事件只触发一次.enter只有在key是Enter时调用- 修饰符可串联
使用修饰符时,顺序很重要;相应的代码会以同样的顺序产生。因此,用 v-on:click.prevent.self 会阻止所有的点击,而 v-on:click.self.prevent 只会阻止对元素自身的点击。
<
!-- 完整语法 -->
<a v-on:click="doSomething"> ... a>


<a @click="doSomething"> ... a>


<a @[event]="doSomething"> ... a>
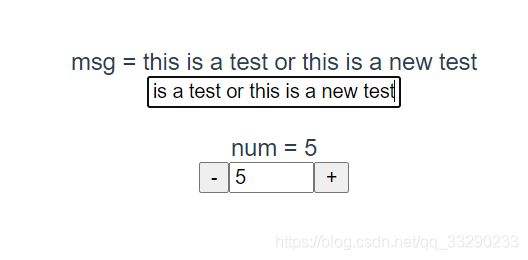
<template>
  <div>
    msg = {{msg}}<br>
    <input type="text" v-model="msg"><br><br>
    num = {{num}}<br>
    //<button @click="num--">-button>
    <button @click="sub">-button>
    <input type="text" size="3" v-model="num">
    //<button @click="num++">+button>
    <button @click="add">+button>
  div>
template>

<script>
const data = {
    msg: 'this is a test',
    num: 0,
    max: 10,
    min: 0
}
export default {
  name: 'App',
  data() {
    return data
  },
  methods: {
    add() {
      if (this.num >= this.max) {
        this.num = this.max;
      } else {
        this.num++;
      }

    },
    sub() {
      if (this.num <= this.min) {
        this.num = this.min;
      }else {
        this.num--;
      }
    }
  }
}
script>

<style>
.....
style>
<button @click="sub('sub',$event)">-button>
<input type="text" size="3" v-model="num">
<button @click="add">+button>
 add(e) {
      console.log(e);          //没传参,获取得到事件对象
      if (this.num >= this.max) {
        this.num = this.max;
      } else {
        this.num++;
 }

},
sub(p) {
	 console.log(p,e);          //传参了,一个为’sub',一个为事件对象
	 if (this.num <= this.min) {
	   this.num = this.min;
	 }else {
	   this.num--;
	 }
 }
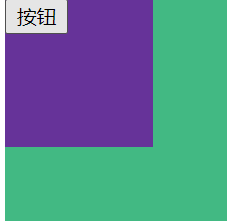
<div @click="one()" class="box1">
    <div @click="two()" class="box2">
      <button @click="three()">按钮button>
    div>
div>

<script>
.....
export default {
  name: 'App',
  data() {
    return data
  },
  methods: {
    one() {
      console.log('one');
    },
    two() {
      console.log('two');
    },
    three() {
      console.log('three');
    }

  }
}
script>
<style scoped>
.box1 {
  width: 150px;
  height: 150px;
  background-color: #42b983;
}
.box2 {
  width: 100px;
  height: 100px;
  background-color: rebeccapurple;
}
style>
<div @click.self.stop="two()" class="box2">
   <button @click="three()">按钮button>
div>
4. 条件渲染
v-if 和 v-show
v-if 是“真正”的条件渲染,因为它会确保在切换过程中条件块内的事件监听器和子组件适当地被销毁和重建。
v-show 就简单得多——不管初始条件是什么,元素总是会被渲染并保留在 DOM 中,并且只是简单地基于 CSS 进行切换(display)
v-if有更高的切换开销,而v-show有更高的初始渲染开销。因此,如果需要非常频繁地切换,则使用v-show较好;如果在运行时条件很少改变,则使用v-if较好。
条件分支 v-if v-else
多条件分支 v-if v-else-if v-else
<h1 v-if="awesome">Vue is awesome!h1>
<h1 v-else>Oh no h1>
<button @click="isShow = !isShow">显示/隐藏button>
<h1 v-if="isShow">Vue is awesome!h1>
<h1 v-show="isShow">Oh no h1>
5. 列表渲染
遍历指令:v-for
遍历数组 v-for=”(item, [index]) in 数组”
遍历对象 v-for=”(value, [key], [index]) in 对象”
vue中列表循环需加:key="唯一标识" 唯一标识可以是item里面id index等,因为vue组件高度复用增加Key可以标识组件的唯一性,为了更好地区别各个组件 key的作用主要是为了高效的更新虚拟DOM,使用diff算法的处理方法,对操作前后的dom树同一层的节点进行对比,一层一层对比
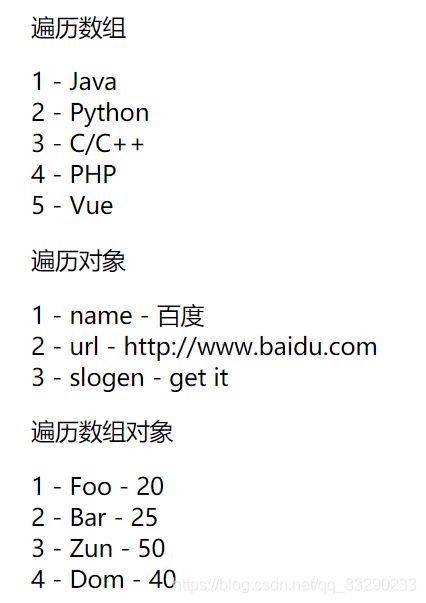
<div id="app">
	<ul>
      <p>遍历数组p>
      <li v-for="(item,index) in list" :key="item">{{ index+1}} - {{ item }}li>
    ul>
    <ul>
      <p>遍历对象p>
      <li v-for="(item,key,index) in obj" :key="item">{{index+1}} - {{ key}} - {{ item }}li>
    ul>
    <ul>
      <p>遍历数组对象p>
      <li v-for="(item,index) in books" :key="item.id">{{ index+1 }} - {{ item.name }} - {{item.price}}li>
    ul>

div>
Vue.createApp({
  data() {
    return {
      list: ['Java','Python','C/C++','PHP','Vue'],
      obj: {
	    name: '百度',
	    url: 'http://www.baidu.com',
	    slogen: 'get it'
	  },
	 books: [
	    {id:1, name:'Foo',price:20},
	    {id:2, name:'Bar',price:25},
	    {id:3, name:'Zun',price:50},
	    {id:4, name:'Dom',price:40},
	  ]
    }
  }
}).mount('#app')
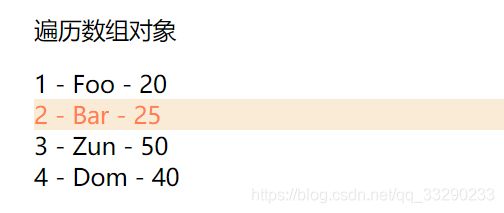
<div id="app">
    <ul>
      <p>遍历数组对象p>
     <li :class="{active:item.active}" @mouseenter="over(index)" v-for="(item,index) in books" :key="item.id">{{ index+1 }} - {{ item.name }} - {{item.price}}li>
    ul>

div>
Vue.createApp({
  data() {
    return {
      books: [
	   {id:1, name:'Foo',price:20, active: false},
	    {id:2, name:'Bar',price:25, active: false},
	    {id:3, name:'Zun',price:50, active: false},
	    {id:4, name:'Dom',price:40, active: false},
	  ]
    }
  },
  methods: {
    over(index) {
      for (let i in this.books) {
        if (index == i)
          this.books[index].active = true;
        else
          this.books[i].active = false;
      }
   }
}).mount('#app')
6. v-model
v-model指令的本质是: 它负责监听用户的输入事件,从而更新数据,并对一些极端场景进行一些特殊处理。同时,v-model会忽略所有表单元素的value、checked、selected特性的初始值,它总是将vue实例中的数据作为数据来源。 然后当输入事件发生时,实时更新vue实例中的数据。
实现原理:
v-model的修饰符号:
.lazy懒加载修饰符.number修饰符让其转换为 number 类型·.trim修饰符可以自动过滤掉输入框的首尾空格
v-model 组件上的 v-model 默认会利用名为 value 的 prop 和名为 input 的事件。 v-model用于表单数据的双向绑定,其实它就是一个语法糖,这个背后就做了两个操作:
1. v-bind绑定一个value属性
2. v-on指令给当前元素绑定input事件
自定义组件使用v-model,有以下操作:
1. 接收一个value prop
2. 触发input事件,并传入新值
在原生表单元素中 c
等价于 简写
@input是对输入事件的一个监听,:value="parentData"是将监听事件中的数据放入到input。
在自定义组件中
c my-component v-model="inputValue"> 等价于
this.$emit('input', value)
v-model不仅可以给input赋值还可以获取input中的数据,而且数据的获取是实时的,因为语法糖中是用@input对输入框进行监听的。
- 输入框
双向绑定
<input type="text" v-model="msg"><br>
    {{msg}}
单向绑定
<input type="text" :value="msg"><br>
    {{msg}}


<input type="text" :value="msg" @input="msg=$event.target.value"><br>
    {{msg}}
- 单选框
<label for="one">
   <input type="radio" id="one" value="男" v-model="sex">男
 label>
 <label for="two">
   <input type="radio" id="two" value="女" v-model="sex">女
 label>
 <br> sex: {{sex}}
Vue.createApp({
  data() {
    return {
      sex: '男'
    }
  }
}).mount("#app")
- 复选框
单个复选框
<input type="checkbox" v-model="checked" id="checkbox">
<label for="checkbox">{{checked}}label>
Vue.createApp({
  data() {
    return {
      checked: false
    }
  }
}).mount("#app")
多个复选框
<div id="app">
  <input type="checkbox" id="jack" value="Jack" v-model="checkedNames" />
  <label for="jack">Jacklabel>
  <input type="checkbox" id="john" value="John" v-model="checkedNames" />
  <label for="john">Johnlabel>
  <input type="checkbox" id="mike" value="Mike" v-model="checkedNames" />
  <label for="mike">Mikelabel>
  <br />
  <span>Checked names: {{ checkedNames }}span>
div>
Vue.createApp({
  data() {
    return {
      checkedNames: []
    }
  }
}).mount("#app")
- 选择框
<div id="app">
  <select v-model="selected">
      <option disabled value="">Please select oneoption>
      <option>Aoption>
      <option>Boption>
      <option>Coption>
  select>
  <span>Selected: {{ selected }}span>
div>
Vue.createApp({
  data() {
    return {
      selected : ''
    }
  }
}).mount("#app")
选择框多选时
<select v-model="selected" multiple>
  <option>Aoption>
  <option>Boption>
  <option>Coption>
select>
<br />
<span>Selected: {{ selected }}span>
<div id="app">
  <select v-model="selected">
     <option v-for="op in options" :value="op.value" :key="op.value">{{op.name}}option>
  select>
  <span>Selected: {{ selected }}span>
div>
Vue.createApp({
  data() {
    return {
      selected: 'zs',
	  options: [
	    {name:'张三',value:'zs'},
	    {name:'王五',value:'ww'},
	    {name:'李四',value:'ls'},
	    {name:'梅芳',value:'mf'},
	  ]
    }
  }
}).mount("#app")
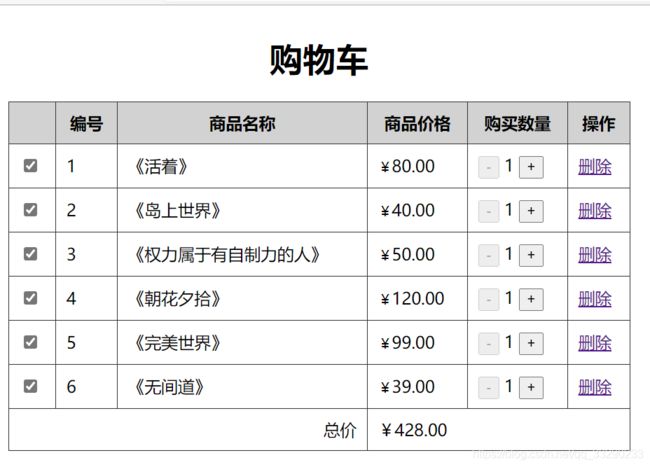
模板语法应用——简易购物车
<template>
  <div>
    <div v-if="cartlist.length <= 0">您没有选择的商品,购物车为空,<a href="#">去购物a>div>
    <table v-else>
      <caption><h1>购物车h1>caption>
      <tr>
        <th>th>
        <th>编号th>
        <th>商品名称th>
        <th>商品价格th>
        <th>购买数量th>
        <th>操作th>
      tr>
      <tr v-for="(item,index) in cartlist" :key="item.id">
        <td><input type="checkbox" v-model="item.checked">td>
        <td>{{item.id}}td>
        <td>{{item.name}}td>
        <td><small>¥small>{{item.price.toFixed(2)}}td>
        <td>
          <button @click="item.count--" :disabled="item.count <= 1 ">-button>
          {{ item.count}}
          <button @click="item.count++">+button>
        td>
        <td><a href="#" @click.prevent="del(index)">删除a>td>
      tr>
      <tr>
        <td colspan="3" align="right">总价td>
        <td colspan="3">{{ totalPrice }}td>
      tr>
    table>
  div>

template>

<script>
export default {
  name: 'App',
  data() {
    return {
      cartlist: [
        {id:1, checked:true, name:'《活着》', price:80, count:1},
        {id:2, checked:true, name:'《岛上世界》', price:40, count:1},
        {id:3, checked:true, name:'《权力属于有自制力的人》', price:50, count:1},
        {id:4, checked:true, name:'《朝花夕拾》', price:120, count:1},
        {id:5, checked:true, name:'《完美世界》', price:99, count:1},
        {id:6, checked:true, name:'《无间道》', price:39, count:1},
      ]
    }
  },
  computed: {
    totalPrice: {
      get() {
        let sum = 0;
        for (let book of this.cartlist) {
          if (book.checked)
            sum += book.count * book.price;
        }
        return '¥'+sum.toFixed(2);
      }
    }
  },
  methods: {
    del(index) {
          this.cartlist.splice(index,1)
      }
    }
}
script>

<style scoped>
table {
  width: 600px;
  border: 1px solid #333;
  border-collapse: collapse;
}
th {
  background-color: #d2d2d2;
}
td, th {
  bord`在这里插入代码片`er: 1px solid #333333;
  padding: 10px;
}
style>
