03_Apache Pulsar的Local与分布式集群构建、Pulsar的分布式集群模式、Pulsar的分布式集群模式构建\启动\测试
1.3.Apache Pulsar的Local与分布式集群构建
1.3.1 Apache Pulsar的Local模式构建
1.3.1.1.Apache Pulsar的Local模式基本使用
1.3.2.Apache Pulsar的分布式集群模式
1.3.2.1.安装zookeeper集群
1.3.3.Apache Pulsar的分布式集群模式构建
1.3.4.Apache Pulsar的分布式集群模式启动
1.3.5.Apache Pulsar的分布式集群模式测试
1.3.Apache Pulsar的Local与分布式集群构建
1.3.1 Apache Pulsar的Local模式构建
Standalone Local单机本地模式, 是pulsar最简单的安装方式, 此种方式仅适用于测试学习使用, 并无法作为开发
中使用。
下载Apache pulsar 2.8.1
https://pulsar.apache.org/download/
![]()
服务器系统要求:
Currently, Pulsar is available for 64 - bit macOS, Linux, and Windows. To use Pulsar, you need to install 64 - bit JRE/JDK 8 or later versions. (目前,Pulsar可用于64位macOS、Linux和Windows。使用Pulsar需要安装64位JRE/JDK 8或更高版本。)
第一步: 上传Pulsar安装包到linux服务器中,并解压。
cd /export/software
rz 上传即可apache-pulsar-2.8.1-bin.tar.gz
tar -zxvf apache-pulsar-2.8.1-bin.tar.gz -C /export/server
构建软连接:
cd /export/server
ln -s apache-pulsar-2.8.1-bin puslar_2.8.1
**第二步:**启动单击模式Pulsar
cd /export/server/pulsar-2.8.1/bin/
./pulsar standalone
1.3.1.1.Apache Pulsar的Local模式基本使用
在pulsar的bin目录下,专门提供了一个pulsar-client的客户端工具,Pulsar-Client工具允许使用者在运行的集群中消费并发送消息到Pulsar Topic中。
模拟开启消费者监听数据:
[root@flink01 bin]# cd /export/server/pulsar-2.8.1/bin
[root@flink01 bin]# ./pulsar-client consume my-topic -s "first-subscription"
12:58:23.523 [pulsar-client-io-1-1] INFO  org.apache.pulsar.client.impl.ConnectionPool - [[id: 0x7da58a5b, L:/192.168.106.100:38570 - R:localhost/192.168.106.100:6650]] Connected to server
12:58:23.768 [pulsar-client-io-1-1] INFO  org.apache.pulsar.client.impl.ConsumerStatsRecorderImpl - Starting Pulsar consumer status recorder with config: {
  "topicNames" : [ "my-topic" ],
  "topicsPattern" : null,
  "subscriptionName" : "first-subscription",
  "subscriptionType" : "Exclusive",
  "subscriptionMode" : "Durable",
  "receiverQueueSize" : 1000,
  "acknowledgementsGroupTimeMicros" : 100000,
  "negativeAckRedeliveryDelayMicros" : 60000000,
  "maxTotalReceiverQueueSizeAcrossPartitions" : 50000,
  "consumerName" : null,
  "ackTimeoutMillis" : 0,
  "tickDurationMillis" : 1000,
  "priorityLevel" : 0,
  "maxPendingChunkedMessage" : 10,
  "autoAckOldestChunkedMessageOnQueueFull" : false,
  "expireTimeOfIncompleteChunkedMessageMillis" : 60000,
  "cryptoFailureAction" : "FAIL",
  "properties" : { },
  "readCompacted" : false,
  "subscriptionInitialPosition" : "Latest",
  "patternAutoDiscoveryPeriod" : 60,
  "regexSubscriptionMode" : "PersistentOnly",
  "deadLetterPolicy" : null,
  "retryEnable" : false,
  "autoUpdatePartitions" : true,
  "autoUpdatePartitionsIntervalSeconds" : 60,
  "replicateSubscriptionState" : false,
  "resetIncludeHead" : false,
  "keySharedPolicy" : null,
  "batchIndexAckEnabled" : false,
  "ackReceiptEnabled" : false,
  "poolMessages" : true,
  "maxPendingChuckedMessage" : 10
}
12:58:23.795 [pulsar-client-io-1-1] INFO  org.apache.pulsar.client.impl.ConsumerStatsRecorderImpl - Pulsar client config: {
  "serviceUrl" : "pulsar://localhost:6650/",
  "authPluginClassName" : null,
  "authParams" : null,
  "authParamMap" : null,
  "operationTimeoutMs" : 30000,
  "statsIntervalSeconds" : 60,
  "numIoThreads" : 1,
  "numListenerThreads" : 1,
  "connectionsPerBroker" : 1,
  "useTcpNoDelay" : true,
  "useTls" : false,
  "tlsTrustCertsFilePath" : "",
  "tlsAllowInsecureConnection" : false,
  "tlsHostnameVerificationEnable" : false,
  "concurrentLookupRequest" : 5000,
  "maxLookupRequest" : 50000,
  "maxLookupRedirects" : 20,
  "maxNumberOfRejectedRequestPerConnection" : 50,
  "keepAliveIntervalSeconds" : 30,
  "connectionTimeoutMs" : 10000,
  "requestTimeoutMs" : 60000,
  "initialBackoffIntervalNanos" : 100000000,
  "maxBackoffIntervalNanos" : 60000000000,
  "enableBusyWait" : false,
  "listenerName" : null,
  "useKeyStoreTls" : false,
  "sslProvider" : null,
  "tlsTrustStoreType" : "JKS",
  "tlsTrustStorePath" : "",
  "tlsTrustStorePassword" : "",
  "tlsCiphers" : [ ],
  "tlsProtocols" : [ ],
  "memoryLimitBytes" : 0,
  "proxyServiceUrl" : null,
  "proxyProtocol" : null,
  "enableTransaction" : false
}
12:58:23.849 [pulsar-client-io-1-1] INFO  org.apache.pulsar.client.impl.ConsumerImpl - [my-topic][first-subscription] Subscribing to topic on cnx [id: 0x7da58a5b, L:/192.168.106.100:38570 - R:localhost/192.168.106.100:6650], consumerId 0
12:58:24.035 [pulsar-client-io-1-1] INFO  org.apache.pulsar.client.impl.ConsumerImpl - [my-topic][first-subscription] Subscribed to topic on localhost/192.168.106.100:6650 -- consumer: 0

在下方等待消息
- 模拟生产一条数据:
[root@flink01 ~]# cd /export/server/pulsar-2.8.1/bin
[root@flink01 bin]# ./pulsar-client produce my-topic --messages "hello-pulsar-xxxxxxxxxxxxxxxxxx"
13:03:43.375 [pulsar-client-io-1-1] INFO  org.apache.pulsar.client.impl.ConnectionPool - [[id: 0x02e5ef9e, L:/192.168.106.100:38658 - R:localhost/192.168.106.100:6650]] Connected to server
13:03:43.573 [pulsar-client-io-1-1] INFO  org.apache.pulsar.client.impl.ProducerStatsRecorderImpl - Starting Pulsar producer perf with config: {
  "topicName" : "my-topic",
  "producerName" : null,
  "sendTimeoutMs" : 30000,
  "blockIfQueueFull" : false,
  "maxPendingMessages" : 1000,
  "maxPendingMessagesAcrossPartitions" : 50000,
  "messageRoutingMode" : "RoundRobinPartition",
  "hashingScheme" : "JavaStringHash",
  "cryptoFailureAction" : "FAIL",
  "batchingMaxPublishDelayMicros" : 1000,
  "batchingPartitionSwitchFrequencyByPublishDelay" : 10,
  "batchingMaxMessages" : 1000,
  "batchingMaxBytes" : 131072,
  "batchingEnabled" : true,
  "chunkingEnabled" : false,
  "compressionType" : "NONE",
  "initialSequenceId" : null,
  "autoUpdatePartitions" : true,
  "autoUpdatePartitionsIntervalSeconds" : 60,
  "multiSchema" : true,
  "accessMode" : "Shared",
  "properties" : { }
}
13:03:43.618 [pulsar-client-io-1-1] INFO  org.apache.pulsar.client.impl.ProducerStatsRecorderImpl - Pulsar client config: {
  "serviceUrl" : "pulsar://localhost:6650/",
  "authPluginClassName" : null,
  "authParams" : null,
  "authParamMap" : null,
  "operationTimeoutMs" : 30000,
  "statsIntervalSeconds" : 60,
  "numIoThreads" : 1,
  "numListenerThreads" : 1,
  "connectionsPerBroker" : 1,
  "useTcpNoDelay" : true,
  "useTls" : false,
  "tlsTrustCertsFilePath" : "",
  "tlsAllowInsecureConnection" : false,
  "tlsHostnameVerificationEnable" : false,
  "concurrentLookupRequest" : 5000,
  "maxLookupRequest" : 50000,
  "maxLookupRedirects" : 20,
  "maxNumberOfRejectedRequestPerConnection" : 50,
  "keepAliveIntervalSeconds" : 30,
  "connectionTimeoutMs" : 10000,
  "requestTimeoutMs" : 60000,
  "initialBackoffIntervalNanos" : 100000000,
  "maxBackoffIntervalNanos" : 60000000000,
  "enableBusyWait" : false,
  "listenerName" : null,
  "useKeyStoreTls" : false,
  "sslProvider" : null,
  "tlsTrustStoreType" : "JKS",
  "tlsTrustStorePath" : "",
  "tlsTrustStorePassword" : "",
  "tlsCiphers" : [ ],
  "tlsProtocols" : [ ],
  "memoryLimitBytes" : 0,
  "proxyServiceUrl" : null,
  "proxyProtocol" : null,
  "enableTransaction" : false
}
13:03:43.644 [pulsar-client-io-1-1] INFO  org.apache.pulsar.client.impl.ProducerImpl - [my-topic] [null] Creating producer on cnx [id: 0x02e5ef9e, L:/192.168.106.100:38658 - R:localhost/192.168.106.100:6650]
13:03:43.699 [pulsar-client-io-1-1] INFO  org.apache.pulsar.client.impl.ProducerImpl - [my-topic] [standalone-1-0] Created producer on cnx [id: 0x02e5ef9e, L:/192.168.106.100:38658 - R:localhost/192.168.106.100:6650]
13:03:43.775 [main] INFO  com.scurrilous.circe.checksum.Crc32cIntChecksum - SSE4.2 CRC32C provider initialized
13:03:43.864 [main] INFO  org.apache.pulsar.client.impl.PulsarClientImpl - Client closing. URL: pulsar://localhost:6650/
13:03:43.878 [pulsar-client-io-1-1] INFO  org.apache.pulsar.client.impl.ProducerImpl - [my-topic] [standalone-1-0] Closed Producer
13:03:43.902 [pulsar-client-io-1-1] INFO  org.apache.pulsar.client.impl.ClientCnx - [id: 0x02e5ef9e, L:/192.168.106.100:38658 ! R:localhost/192.168.106.100:6650] Disconnected
13:03:45.979 [main] INFO  org.apache.pulsar.client.cli.PulsarClientTool - 1 messages successfully produced
[root@flink01 bin]#
1.3.2.Apache Pulsar的分布式集群模式
搭建 Pulsar 集群至少需要 3 个组件:ZooKeeper 集群、BookKeeper 集群和 broker 集群(Broker 是 Pulsar 的自身实例)
。这三个集群组件如下:
- ZooKeeper 集群(3 个 ZooKeeper 节点组成)
- bookie 集群(也称为 BookKeeper 集群,3 个 BookKeeper 节点组成)
- broker 集群(3 个 Pulsar 节点组成)
Pulsar 的安装包已包含了搭建集群所需的各个组件库。无需单独下载 ZooKeeper 安装包和 BookKeeper 安装包。
(在实际中,zookeeper我们并不仅仅应用在pulsar上, 包括HBase等其他的组件也需要依赖, 所以我们此处zookeeper使用外置zk集群环境)
注意: 如果是在内网测试环境搭建集群,为了避免防火墙造成端口开启繁琐,可以关闭服务器防火墙。
1.3.2.1.安装zookeeper集群
修改/etc/hosts
[root@node3 etc]# vim /etc/hosts

192.168.106.103    node1
192.168.106.104    node2
192.168.106.105    node3
# 这个值默认是8080
admin.serverPort=9099

# The number of milliseconds of each tick
tickTime=5000
# The number of ticks that the initial
# synchronization phase can take
initLimit=10
# The number of ticks that can pass between
# sending a request and getting an acknowledgement
syncLimit=5
# the directory where the snapshot is stored.
# do not use /tmp for storage, /tmp here is just
# example sakes.
dataDir=/root/apache-zookeeper-3.6.3-bin/data
dataLogDir=/root/apache-zookeeper-3.6.3-bin/logs
# the port at which the clients will connect
clientPort=2181
# the maximum number of client connections.
# increase this if you need to handle more clients
#maxClientCnxns=60
#
# Be sure to read the maintenance section of the
# administrator guide before turning on autopurge.
#
# http://zookeeper.apache.org/doc/current/zookeeperAdmin.html#sc_maintenance
#
# The number of snapshots to retain in dataDir
autopurge.snapRetainCount=10
# Purge task interval in hours
# Set to "0" to disable auto purge feature
autopurge.purgeInterval=1

## Metrics Providers
#
# https://prometheus.io Metrics Exporter
#metricsProvider.className=org.apache.zookeeper.metrics.prometheus.PrometheusMetricsProvider
#metricsProvider.httpPort=7000
#metricsProvider.exportJvmInfo=true

quorumListenOnAllIPs=true

server.1=node1:2888:3888
server.2=node2:2888:3888
server.3=node3:2888:3888
在三个节点上执行:
mkdir -p /root/apache-zookeeper-3.6.3-bin/data
mkdir -p /root/apache-zookeeper-3.6.3-bin/logs
分别往data目录下执行:
# node1节点操作
echo 1 > /root/apache-zookeeper-3.6.3-bin/data/myid
# node2节点操作
echo 2 > /root/apache-zookeeper-3.6.3-bin/data/myid
# node3节点操作
echo 3 > /root/apache-zookeeper-3.6.3-bin/data/myid
1.3.3.Apache Pulsar的分布式集群模式构建
分布式模式 最低需要三台服务器进行安装操作, 本次我们将采用VMware进行虚拟化三台机器进行, 并且每台机器已经提
前将JDK1.8和zookeeper集群安装配置完成了, 如有需要, 可参考提供的前置安装笔记。
- 第一步: 将下载的pulsar安装包上传到linux服务器, 并解压
cd /export/software
rz 上传即可apache-pulsar-2.8.1-bin.tar.gz
tar -zxvf apache-pulsar-2.8.1-bin.tar.gz -C /export/server
构建软连接:
cd /export/server
ln -s apache-pulsar-2.8.1-bin pulsar-2.8.1
cd /export/server/pulsar-2.8.1/conf/
vim bookkeeper.conf

修改其第56行:修改本地ip地址
advertisedAddress=node1
修改其39行:
journalDirectory=/export/server/pulsar-2.8.1/tmp/journal
修改其389行:
ledgerDirectories=/export/server/pulsar-2.8.1/tmp/ledger
修改602行:
zkServers=node1:2181,node2:2181,node3:2181
- 第三步:修改broker集群的配置文件
cd /export/server/pulsar-2.8.1/conf/
vim broker.conf
修改第98行: 修改集群的名称
clusterName=pulsar-cluster
修改第23行: 配置zookeeper地址
zookeeperServers=node1:2181,node2:2181,node3:2181
修改第26行: 配置zookeeper地址
configurationStoreServers=node1:2181,node2:2181,node3:2181
修改第44行: 更改为本地ip地址
advertisedAddress=node1
- 第四步: 将配置好bookies目录和brokers目录发送到第二台和第三台
cd /export/server
scp -r apache-pulsar-2.8.1/ node2:$PWD
scp -r apache-pulsar-2.8.1/ node3:$PWD

在第二台和第三台节点上分别配置软连接
cd /export/server
ln -s apache-pulsar-2.8.1/ pulsar-2.8.1
- 第五步: 修改第二台和第三台的broker的地址和bookies地址
node2:
cd /export/server/pulsar-2.8.1/conf/
vim bookkeeper.conf
修改其第56行:修改本地ip地址
advertisedAddress=node2
vim broker.conf
修改第44行: 更改为本地ip地址
advertisedAddress=node2
第三台节点: 都更改为对应IP地址或者主机名即可
- 第六步(可以不执行):分别修改node1,node2,node3三个节点下的bindAddress,分别为各自主机的主机命名,比如node1节点改成node1:
[root@node1 conf]# grep -rn 0.0.0.0 ./
./proxy.conf:49:# Hostname or IP address the service binds on, default is 0.0.0.0.
./proxy.conf:50:bindAddress=0.0.0.0
./standalone.conf:33:# Hostname or IP address the service binds on, default is 0.0.0.0.
./standalone.conf:34:bindAddress=0.0.0.0
./websocket.conf:45:# Hostname or IP address the service binds on, default is 0.0.0.0.
./websocket.conf:46:bindAddress=0.0.0.0
./broker.conf:40:# Hostname or IP address the service binds on, default is 0.0.0.0.
./broker.conf:41:bindAddress=0.0.0.0

[root@node1 conf]# vim ./proxy.conf +50
[root@node1 conf]# vim ./standalone.conf +34
[root@node1 conf]# vim ./websocket.conf +46
[root@node1 conf]# vim broker.conf +41
最终结果:
[root@node1 conf]# grep -rn bindAddress ./
./proxy.conf:50:bindAddress=node1
./standalone.conf:34:bindAddress=node1
./websocket.conf:46:bindAddress=node1
./broker.conf:41:bindAddress=node1
[root@node1 conf]#

[root@node2 conf]# grep -rn bindAddress ./
./proxy.conf:50:bindAddress=node2
./standalone.conf:34:bindAddress=node2
./websocket.conf:46:bindAddress=node2
./broker.conf:41:bindAddress=node2

[root@node3 conf]# grep -rn bindAddress ./
./proxy.conf:50:bindAddress=node3
./standalone.conf:34:bindAddress=node3
./websocket.conf:46:bindAddress=node3
./broker.conf:41:bindAddress=node3
- 第七步(可以不执行):修改localhost:8080的地址:
[root@node1 conf]# grep -rn localhost:8080 ./
./presto/catalog/pulsar.properties:24:pulsar.broker-service-url=http://localhost:8080
./presto/catalog/pulsar.properties:26:pulsar.web-service-url=http://localhost:8080
./client.conf:25:webServiceUrl=http://localhost:8080/
./functions_worker.yml:59:pulsarWebServiceUrl: http://localhost:8080
按照类似第6步执行,将localhost分别改成:node1, node2, node3.
- 第八步(可以不执行):修改6650的hostname
[root@node1 conf]# grep -rn localhost:6650 ./
./client.conf:30:brokerServiceUrl=pulsar://localhost:6650/
./functions_worker.yml:56:pulsarServiceUrl: pulsar://localhost:6650
分别在node1,node2,node3中进行如下修改:
在./client.conf:30中localhost:6650改成:node1/2/3:6650
在./functions_worker.yml:56中localhost:6650改成:node1/2/3:6650
1.3.4.Apache Pulsar的分布式集群模式启动
- 第一步:首先启动zookeeper集群
cd $ZOOKEEPER_HOME/bin
./zkServer.sh start
注意: 三个节点依次都要启动, 启动后通过
./zkServer.sh status
查看状态, 必须看到一个leader 和两个follower 才可以使用
- 第二步: 初始化元数据(此操作, 仅需要初始化一次即可)
cd /export/server/pulsar-2.8.1/bin
首先初始化Pulsar集群元数据:
./pulsar initialize-cluster-metadata \
--cluster pulsar-cluster \
--zookeeper node1:2181,node2:2181,node3:2181 \
--configuration-store node1:2181,node2:2181,node3:2181 \
--web-service-url http://node1:8080,node2:8080,node3:8080 \
--web-service-url-tls https://node1:8443,node2:8443,node3:8443 \
--broker-service-url pulsar://node1:6650,node2:6650,node3:6650 \
--broker-service-url-tls pulsar+ssl://node1:6651,node2:6651,node3:6651

接着初始化bookkeeper集群: 若出现提示输入Y/N: 请输入Y
./bookkeeper shell metaformat   (只在node1上执行)
- 第三步: 启动bookkeeper服务
cd /export/server/pulsar-2.8.1/bin
./pulsar-daemon start bookie
注意: 三个节点都需要依次启动
验证是否启动: 可三台都检测
./bookkeeper shell bookiesanity
提示:
Bookie sanity test succeeded 认为启动成功
- 第四步: 启动Broker
cd /export/server/pulsar-2.8.1/bin
./pulsar-daemon start broker
注意: 三个节点都需要依次启动

检测是否启动(执行上面的完成后,要等一会儿后执行下面的命令,否则会查询不到结果):
./pulsar-admin brokers list pulsar-cluster
./pulsar-daemon stop bookie
./pulsar-daemon stop broker
1.3.5.Apache Pulsar的分布式集群模式测试
在pulsar的bin目录下,专门提供了一个pulsar-client的客户端工具,Pulsar-Client工具允许使用者在运行的集群中消费并发消息到Pulsar Topic中。
- 模拟开启消费者监听数据:
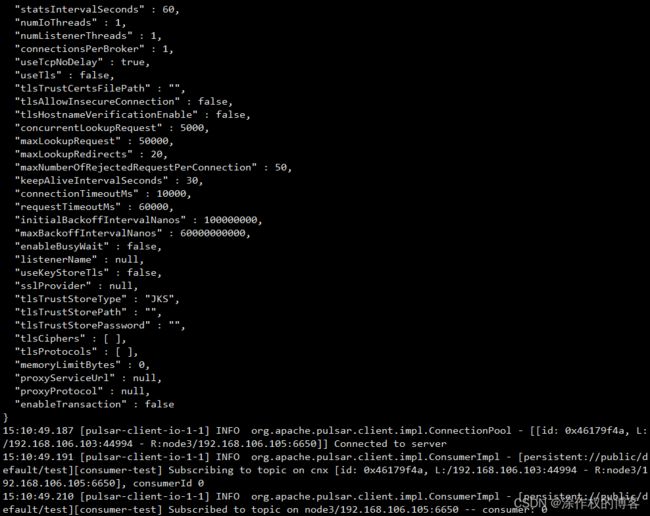
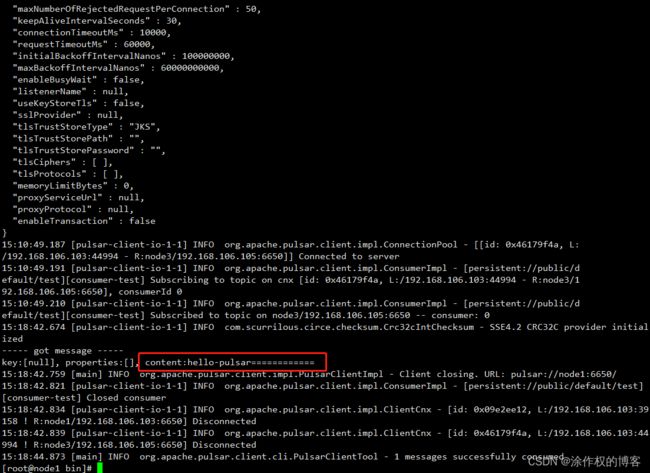
./pulsar-client consume persistent://public/default/test -s "consumer-test"
- 模拟生产一条数据
./pulsar-client produce persistent://public/default/test --messages "hello-pulsar============"


