FFmpeg从零开始
2022.3.28
色彩空间
YUV,是一种颜色编码方法。常使用在各个视频处理组件中。 YUV在对照片或视频编码时,考虑到人类的感知能力,允许降低色度的带宽。“Y”表示明亮度(Luminance或Luma),也就是灰阶值,“U”和“V”表示的则是色度(Chrominance或Chroma),作用是描述影像色彩及饱和度,用于指定像素的颜色。
YUV的表示法称为A:B:C表示法:
- 4:4:4表示完全取样。
- 4:2:2表示2:1的水平取样,垂直完全采样。
- 4:2:0表示2:1的水平取样,垂直2:1采样。
- 4:1:1表示4:1的水平取样,垂直完全采样。
图文介绍:https://zhuanlan.zhihu.com/p/75735751
FFmpeg多媒体处理工具
FFmpeg是一套可以用来记录、转换数字音频、视频,并能将其转化为流的开源计算机程序。采用LGPL或GPL许可证。它提供了录制、转换以及流化音视 频的完整解决方案。它包含了非常先进的音频/视频编解码库libavcodec,为了保证高可移植性和编解码质量,libavcodec里很多codec 都是从头开发的。
接下来将逐步学习FFmpeg的使用
-
ubuntu中搭建开发环境
- 下载安装VSCode
从VScode官网下载.deb文件,然后双击该文件会打开软件中心进行安装。
但是直接下载速度会很慢,一开始以为是网的问题,几次都被中断,下载失败。
这里需要换源进行下载:
来到官网 点击下载之后 在下载列表里 右击鼠标选择 copy download link 比如我的这个就是
https://az764295.vo.msecnd.net/stable/ccbaa2d27e38e5afa3e5c21c1c7bef4657064247/code_1.62.3-1637137107_amd64.deb
在/stable前换成vscode.cdn.azure.cn 即
https://vscode.cdn.azure.cn/stable/ccbaa2d27e38e5afa3e5c21c1c7bef4657064247/code_1.62.3-1637137107_amd64.deb
- VSCode环境配置
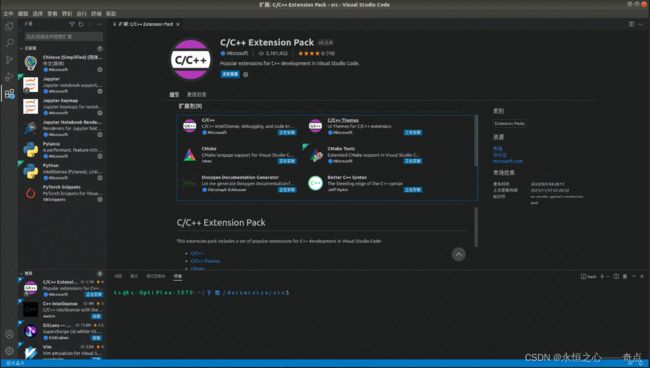
安装C/C++插件
2022.3.29
- 或者使用CLion。以下为安装Clion的方式:
https://blog.csdn.net/xiaowenshen/article/details/118761466?spm=1001.2014.3001.5506
- 配置运行C++环境
https://blog.csdn.net/qq_26388117/article/details/114066907
- 下载安装ffmpeg
第一步:添加源。
sudo add-apt-repository ppa:djcj/hybrid
第二步:更新源。
sudo apt-get update
第三步:下载安装。
sudo apt-get install ffmpeg
我又遇到的问题是安装好之后找不到安在哪了。一般apt-get命令的安装路径就以下几个:
/usr/bin /usr/lib
/usr/share /usr/share/man
可以使用如下命令来查看:
dpkg -L 软件包名
-
ffmpeg源码编译
-
安装相关工具
-
打开终端,执行以下命令,安装相关工具:
sudo apt-get install -y autoconf automake build-essential git libass-dev libfreetype6-dev libsdl2-dev libtheora-dev libtool libva-dev libvdpau-dev libvorbis-dev libxcb1-dev libxcb-shm0-dev libxcb-xfixes0-dev pkg-config texinfo wget zlib1g-dev sudo apt-get install -y nasam yasm cmake mercurial
-
源码下载
在终端输入以下指令,ffmpeg的源码会克隆在"/home/用户名/"路径下:
git clone git://source.ffmpeg.org/ffmpeg.git ffmpeg
得到文件夹ffmpeg。进入ffmpeg文件夹
如果使用git下载不成功,可以直接在网页下载压缩包,地址如下:
https://launchpad.net/ubuntu/+source/ffmpeg/7:4.4-6ubuntu5
-
进行本地编译(在解压后的文件路径下进行)
-
配置configure
./configure --enable-shared --disable-yasm --prefix=/usr/local/ffmpeg
//--enable-shared 编译共享库 切记要编译共享库,因为我现在不知道静态库怎么搞
//--disable-yasm 不使用yasm,默认使用yasm配置会很麻烦,需要下载yasm
//--prefix=/usr/local/ffmpeg 编译完成后输出我们要用的文件路径
//最简化的配置方式,编译出来的库也最大,可以参照ffmpeg功能清单去掉不必要的功能减少库的体积,定制自己的ffmpeg
-
编译
make
-
编译安装
sudo make install
-
配置动态链接库 (目前没有感受到这个有啥用)
将解压后的文件夹移动到/usr/local/
执行 sudo vim /etc/ld.so.conf
加入 /usr/local/ffmpeg/lib
执行 sudo ldconfig
执行 export PATH=/usr/local/ffmpeg/bin/:$PATH
执行 env
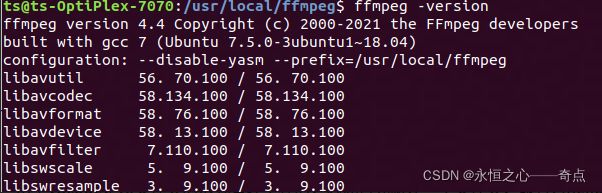
测试:ffmpeg -version
2022.3.30
-
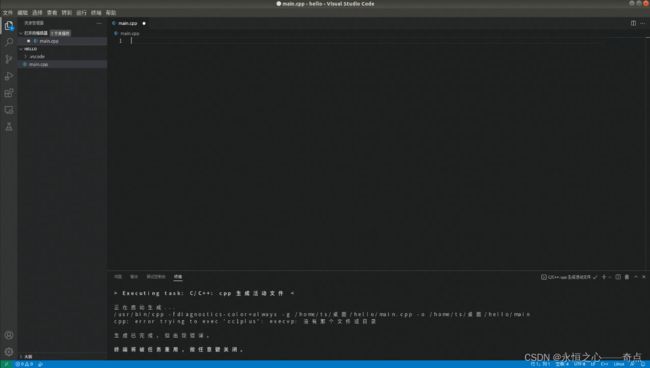
建立工程(VSCode之后再看环境搭建,先用CLion)
由于VScode是以文件夹的形式管理工程的,因此首先新建一个文件夹,命名为hello;
然后通过VScode打开此文件夹;
接着在这个文件夹下新建文件,环境就搭建完成了。
- 在CLion中可以很方便的直接新建项目就好了
主要编写CMakeFile.txt文件:
1.cmake verson,指定cmake版本
cmake_minimum_required(VERSION 3.2)
2.project name,指定项目的名称,一般和项目的文件夹名称对应
PROJECT(test)
3.head file path,头文件目录
INCLUDE_DIRECTORIES(
include
)
4.source directory,源文件目录
AUX_SOURCE_DIRECTORY(src DIR_SRCS)
5.set environment variable,设置环境变量,编译用到的源文件全部都要放到这里,否则编译能够通过,但是执行的时候会出现各种问题,比如"symbol lookup error xxxxx , undefined symbol"
SET(TEST_MATH
${DIR_SRCS}
)
6.add executable file,添加要编译的可执行文件
ADD_EXECUTABLE(${PROJECT_NAME} ${TEST_MATH})
7.add link library,添加可执行文件所需要的库,比如我们用到了libm.so(命名规则:lib+name+.so),就添加该库的名称
TARGET_LINK_LIBRARIES(${PROJECT_NAME} m)
(CMake学习参考以下链接)
http://phonzia.github.io/2015/12/CMake
https://www.cnblogs.com/presbyter/p/10222122.html
2022.3.31
-
学习ffmpeg库
首先准备直接找一个简单的demo试试,但是发现第一,它跑不起来;第二,代码看不懂,主要其实是对ffmpeg库完全未知,不知道里面有些什么类型,什么函数,参数什么意思,怎么使用,就会很难入手。所以去先去下载了一个ffmpeg基础库编程。可以根据情况有选择性的看。
暂时无法在文档外展示此内容
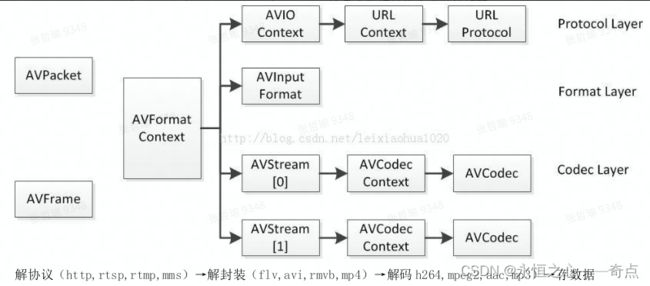
首先搞懂ffmpeg框架: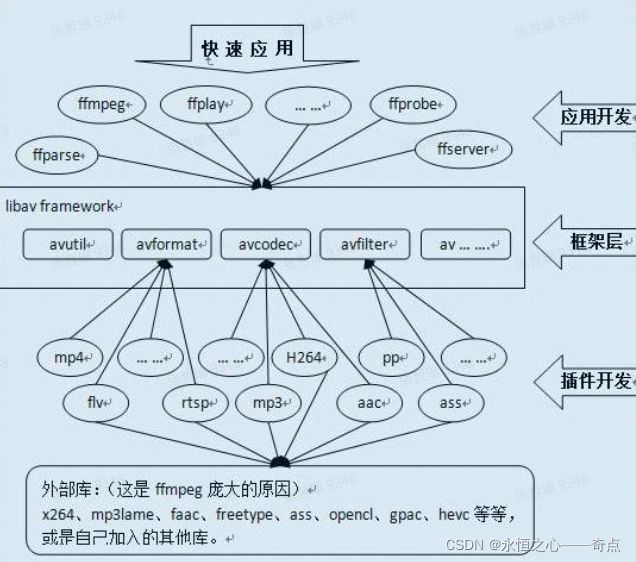
开始使用ffmpeg库编程时,流媒体数据流程如下: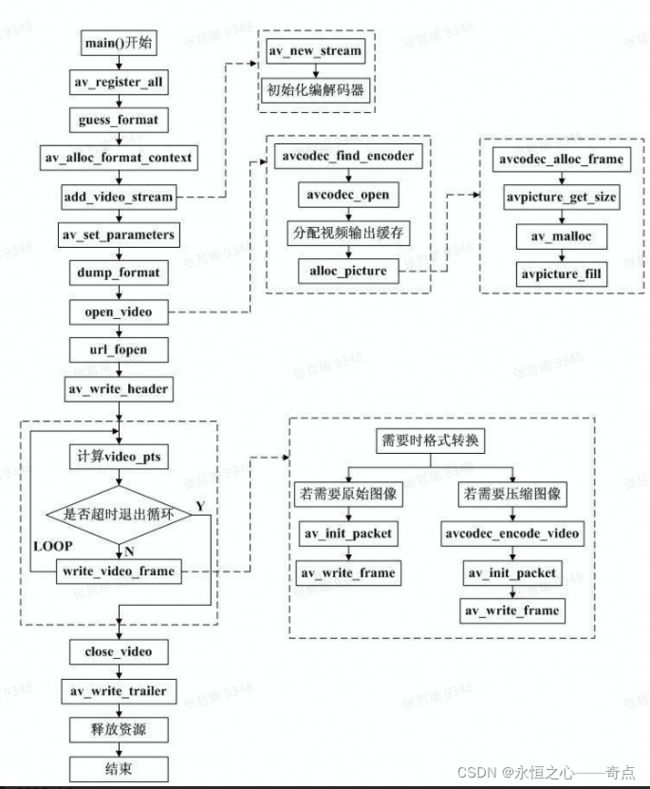
2022.4.1
现在开始学习多媒体处理基本流程:
-
视频编解码(多媒体中最基本最核心的)
AVCodec/AVCodecContext/MsrleContext 这几个数据结构定义了编解码
器的核心架构
主要结构体如下:
//AVCodec结构体

typedef struct AVCodec

{

// 标示 Codec 的名字, 比如,"h264" "h263" 等。

const char name;

// 标示 Codec 的类型,有 video ,audio 等类型。

enum CodecType type;

// 标示 Codec 的 ID,有 CODEC_ID_H264 等。

enum CodecID id;

// 标示具体的 Codec 对应的 Context 的 size,如:H264Context。

int priv_data_size;

// 以下标示 Codec 对外提供的操作,每一种解码器都会实现这些操作。

int(init)(AVCodecContext);

int(encode)(AVCodecContext*, uint8_t *buf, int buf_size, void data);

int(close)(AVCodecContext);

int(decode)(AVCodecContext *, void *outdata, int *outdata_size,

uint8_t *buf, int buf_size);

struct AVCodec *next;

}AVCodec;

/*

AVCodec 是类似 COM 接口的数据结构,表示音视频编解码器,着重于功能函数,一种媒体类型对应一个

AVCodec 结构,在程序运行时有多个实例。

*/

//AVCodecontext结构体

typedef struct AVCodecContext

{

int bit_rate;

int frame_number;

//扩展数据,如 mov 格式中 audio trak 中 aac 格式中 esds 的附加解码信息。

unsigned char *extradata;

//扩展数据的 size

int extradata_size;

//视频的原始的宽度与高度

int width, height; // 此逻辑段仅针对视频

//视频一帧图像的格式,如 YUV420

enum PixelFormat pix_fmt;

//音频的采样率

int sample_rate;

//音频的声道的数目

int channels;

int bits_per_sample;

int block_align;

// 指向相应的解码器,如:ff_h264_decoder

struct AVCodec *codec;

//指向具体相应的解码器的 context,如 H264Context

void *priv_data;

//公共操作函数

int(*get_buffer)(struct AVCodecContext *c, AVFrame *pic);

void(*release_buffer)(struct AVCodecContext *c, AVFrame *pic);

int(*reget_buffer)(struct AVCodecContext *c, AVFrame *pic);

}AVCodecContext;

/*

AVCodecContext 结构表示程序运行的当前 Codec 使用的上下文,着重于所有 Codec 共有的属性(并且是在程

序运行时才能确定其值)和关联其他结构的字段。 extradata 和 extradata_size 两个字段表述了相应 Codec 使用的私有

数据;codec 字段关联相应的编解码器;priv_data 字段关联各个具体编解码器独有的属性 context,和 AVCodec 结

构中的 priv_data_size 配对使用。

*/

//AVFrame结构体

typedef struct AVFrame {

#define AV_NUM_DATA_POINTERS 8

uint8_t *data[AV_NUM_DATA_POINTERS];

int linesize[AV_NUM_DATA_POINTERS];

uint8_t **extended_data;

/**宽高 */

int width, height;

int nb_samples;

int format;

/**是否是关键帧*/

int key_frame;

/**帧类型(I,B,P)*/

enum AVPictureType pict_type;

uint8_t *base[AV_NUM_DATA_POINTERS];

AVRational sample_aspect_ratio;

int64_t pts;

int64_t pkt_pts;

int64_t pkt_dts;

int coded_picture_number;

int display_picture_number;

int quality;

int reference;

/**QP 表*/

int8_t *qscale_table;

int qstride;

int qscale_type;

/**跳过宏块表 */

uint8_t *mbskip_table;

/**运动矢量表*/

int16_t (*motion_val[2])[2];

/**宏块类型表 */

uint32_t *mb_type;

/**DCT 系数 */

short *dct_coeff;

/**参考帧列表 */

int8_t *ref_index[2];

void *opaque;

uint64_t error[AV_NUM_DATA_POINTERS];

int type;

int repeat_pict;

int interlaced_frame;

int top_field_first;

int palette_has_changed;

int buffer_hints;

AVPanScan *pan_scan;

int64_t reordered_opaque;

void *hwaccel_picture_private;

struct AVCodecContext *owner;

void *thread_opaque;

/**

* log2 of the size of the block which a single vector in motion_val represents:

* (4->16x16, 3->8x8, 2-> 4x4, 1-> 2x2)

* - encoding: unused

* - decoding: Set by libavcodec.

*/

uint8_t motion_subsample_log2;

/**(音频)采样率

*/

int sample_rate;

uint64_t channel_layout;

int64_t best_effort_timestamp;

int64_t pkt_pos;

int64_t pkt_duration;

AVDictionary *metadata;

54《FFmpeg 基础库编程开发》

int decode_error_flags;

#define FF_DECODE_ERROR_INVALID_BITSTREAM 1

#define FF_DECODE_ERROR_MISSING_REFERENCE 2

int64_t channels;

} AVFrame;

/*

AVFrame 结构体一般用于存储原始数据(即非压缩数据,例如对视频来说是 YUV, RGB,对音频来说是 PCM),

此外还包含了一些相关的信息。因此在使用 FFMPEG 进行码流分析的时候,AVFrame 是一个很重要的结构体。

*/

//AVInputformat结构体

typedef struct AVInputFormat

{

// 标示 format 的名字, 比如:“mov” “mp4” 等。

const char *name;

// 标示具体的 format 对应的 Context 的 size,如:MovContext。

int priv_data_size;

//具体的操作函数

int(*read_probe)(AVProbeData*);

int(*read_header)(struct AVFormatContext *,AVFormatParameters *ap);

int(*read_packet)(struct AVFormatContext *, AVPacket *pkt);

int(*read_close)(struct AVFormatContext*);

struct AVInputFormat *next;

} AVInputFormat;

/*

AVInputFormat 是类似 COM 接口的数据结构,表示输入文件容器格式,着重于功能函数,一种文件容器格式对应

一个 AVInputFormat 结构,在程序运行时有多个实例。next 变量用于把所有支持的输入文件容器格式连接成链表,

便于遍历查找。

*/

//AVFormatContext结构体

typedef struct AVFormatContext

{

//指向 AVInputFormat,如对于 mp4 或 mov 为 ff_mov_demuxer

struct AVInputFormat *iformat;

// 指向具体的格式对应的 Context,如:MovContext。

void *priv_data;

//指向数据读取统一接口 context

ByteIOContext pb;

//流的数目

int nb_streams;

//至少 2 个指针元素分别指向 video stream 和 audio stream

AVStream *streams[MAX_STREAMS];

} AVFormatContext;

/*

AVFormatContext 结构表示程序运行的当前文件容器格式使用的上下文,着重于所有文件容器共有的属性(并且是在

程序运行时才能确定其值)和关联其他结构的字段。 iformat 字段关联相应的文件容器格式; pb 关联广义的输入文件;

streams 关联音视频流;priv_data 字段关联各个具体文件容器独有的属性上下文,和 priv_data_size 配对使用。

*/

//AVStream结构体

typedef struct AVStream

{

//指向解码器 context,用于关联解码器

AVCodecContext *actx;

//codec 解析器,每一种编码器在进行压缩时都会对实际负载数据进行封装,加//入头信息,如 h264,需要解析 nal

单元,关联通过 avav_find_stream_info()

struct AVCodecParserContext *parser;

//指向解复用的流的 context,比如 mp4 的 MovStreamcontext

void *priv_data;

AVRational time_base;

//用于 seek 时使用,用于快速索引关键帧,如 flv 的 keyframes 索引表和 mp4 的 I

//帧的索引表都存于此,很重要

AVIndexEntry *index_entries;

//index_entries 的元素的个数

int nb_index_entries;

nt index_entries_allocated_size;

double frame_last_delay;

} AVStream;

/*

AVStream 结构表示当前媒体流的上下文,着重于所有媒体流共有的属性(并且是在程序运行时才能确定其值)和关联

其他结构的字段。actx 字段关联当前音视频媒体使用的编解码器的 context;priv_data 字段关联解析各个具体媒体

流解复用拆包用的 context;还有关键帧的索引表也存于此。

*/

//MOVStreamContext

/*

MOVStreamContext 结构用于保存从 mov 或 mp4 中进行拆包解复用从头部得到的信息。

*/

//AVPacket结构体

typedef struct AVPacket

{

//显示时间戳

int64_t pts;

//解码时间戳

int64_t dts;

//记录在文件或网络中的流中的字节的位置

int64_t pos;

//实际数据指针

uint8_t *data;

//实际的数据的大小

int size;

//该 packet 所属的流的索引,一般为 0 或者 1

int stream_index;

int flags;

//析构函数

void(*destruct)(struct AVPacket*);

} AVPacket;

/*

AVPacket 代表音视频数据帧,固有的属性是一些标记,时钟信息,和压缩数据首地址,大小等信息。

*/

//AVPacketList结构体

typedef struct AVPacketList

{

AVPacket pkt;

struct AVPacketList *next;

} AVPacketList;

/*

AVPacketList 把音视频 AVPacket 组成一个小链表 。

*/
关键函数介绍:
-
avformat_open_input()
FFMPEG 打开媒体的的过程开始于 avformat_open_input,在该函数中,FFMPEG 完成了:
输入输出结构体 AVIOContext 的初始化;
输入数据的协议(例如 RTMP,或者 file)的识别(通过一套评分机制):1 判断文件名的后缀 2 读取文件头的数据进行比对;
-
avcodec_register_all()
ffmpeg 注册复用器,编码器等的函数 av_register_all()。该函数在所有基于 ffmpeg 的应用程序中几乎都是第一个被调用的。只有调用了该函数,才能使用复用器,编码器等。
-
av_read_frame()
ffmpeg 中的 av_read_frame()的作用是读取码流中的音频若干帧或者视频一帧。例如,解码视频的时候,每解码一个视频帧,需要先调用 av_read_frame()获得一帧视频的压缩数据,然后才能对该数据进行解码
通过 av_read_packet(),读取一个包,需要说明的是此函数必须是包含整数帧的,不存在半帧的情况,以 ts流 为 例 , 是 读 取 一 个 完 整 的 PES 包 ( 一 个 完 整 pes 包 包 含 若 干 视 频 或 音 频 es 包 ), 读 取 完 毕 后 , 通 过av_parser_parse2()分析出视频一帧(或音频若干帧),返回,下次进入循环的时候,如果上次的数据没有完全取完,则 st = s->cur_st;不会是 NULL,即再此进入 av_parser_parse2()流程,而不是下面的 av_read_packet(**)流程,这样就保证了,如果读取一次包含了 N 帧视频数据(以视频为例),则调用 av_read_frame()N 次都不会去读数据,而是返回第一次读取的数据,直到全部解析完毕。
-
avcodec_decode_video2()
ffmpeg 中的 avcodec_decode_video2()的作用是解码一帧视频数据。输入一个压缩编码的结构体 AVPacket,输出一个解码后的结构体 AVFrame。
-
transcode_init()
transcode_init()函数是在转换前做准备工作的.
2.解码视频
主要流程如下图:

- 解复用(Demux)
当我们打开一个多媒体文件之后,第一步就是解复用。因为在一个多媒体文件中,既包括音频也包括视频,而且音频和视频都是分开进行压缩的,因为音频和视频的压缩算法不一样,既然压缩算法不一样,那么肯定解码也不一样,所以需要对音频和视频分别进行解码。虽然音频和视频是分开进行压缩的,但是为了传输过程的方便,将压缩过的音频和视频捆绑在一起进行传输。所以我们解码的第一步就是将这些绑在一起的音频和视频流分开来,也就是传说中的解复用。总而言之,解复用这一步就是将文件中捆绑在一起的音频流和视频流分开来以方便后面分别对它们进行解码。

- 解码(Decode)
一个多媒体文件肯定是经过某种或几种格式的压缩的,也就是通常所说的视频和音频编码,编码是为了减少数据量,否则的话对我们的存储设备是一个挑战,如果是流媒体的话对网络带宽也是一个几乎不可能完成的任务。所以我们必须对媒体信息进行尽可能的压缩。
- ffmpeg中解码流程对应的API函数
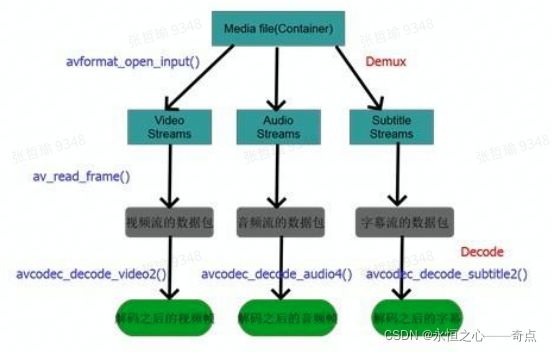
Ffmpeg 中 Demux 这一步是通过 avformat_open_input ()这个 api 来做的,这个 api 读出文件的头部信息,并做 demux,在此之后我们就可以读取媒体文件中的音频和视频流,然后通过 av_read_frame()从音频和视频流中读取出基本数据流 packet,然后将 packet 送到 avcodec_decode_video2()和相对应的 api 进行码。

/**

* FFMPEG视频解码流程

* 1、av_register_all():注册所有组件。

* 2、avformat_open_input():打开输入视频文件。

* 3、avformat_find_stream_info():获取视频文件信息

* 4、avcodec_find_decoder():查找解码器。

* 5、avcodec_open2():打开解码器。

* 6、av_read_frame():从输入文件读取一帧压缩数据。

* 7、avcodec_decode_video2():解码一帧压缩数据。

* 8、avcodec_close():关闭解码器。

* 9、avformat_close_input():关闭输入视频文件。

*/

#include "stdafx.h"

#include

#define __STDC_CONSTANT_MACROS

#ifdef _WIN32

//Windows

extern "C"

{

#include "libavcodec/avcodec.h"

#include "libavformat/avformat.h"

#include "libswscale/swscale.h"

#include "libavutil/imgutils.h"

};

#else

//Linux...

#ifdef __cplusplus

extern "C"

{

#endif

#include

#include

#include

#include

#ifdef __cplusplus

};

#endif

#endif

int main()

{

//文件格式上下文

AVFormatContext *pFormatCtx; // 封装格式上下文结构体,也是统领全局的结构体,保存了视频文件封装 格式相关信息。

int i = 0, videoindex;

AVCodecContext *pCodecCtx; // 编码器上下文结构体,保存了视频(音频)编解码相关信息。

AVCodec *pCodec; // AVCodec是存储编解码器信息的结构体。

AVFrame *pFrame, *pFrameYUV; // AVFrame是包含码流参数较多的结构体

unsigned char *out_buffer;

AVPacket *packet; // AVPacket是存储压缩编码数据相关信息的结构体

int y_size;

int ret, got_picture;

// struct SwsContext结构体位于libswscale类库中, 该类库主要用于处理图片像素数据, 可以完成图片像素格式的转换, 图片的拉伸等工作.

struct SwsContext *img_convert_ctx;

char filepath[] = "input.mkv";

FILE *fp_yuv = fopen("output.yuv", "wb+");

av_register_all(); // 注册所有组件

avformat_network_init(); // 对网络库进行全局初始化。

pFormatCtx = avformat_alloc_context(); // 初始化AVFormatContext结构体指针。使用avformat_free_context()释放内存。

if (avformat_open_input(&pFormatCtx, filepath, NULL, NULL) != 0) // 打开输入流并读取header。必须使用avformat_close_input()接口关闭。

{

printf("Couldn't open input stream.\n");

return -1;

}

//读取一部分视音频数据并且获得一些相关的信息

if (avformat_find_stream_info(pFormatCtx, NULL) < 0) // 读取媒体文件的包以获取流信息

{

printf("Couldn't find stream information.\n");

return -1;

}

//查找视频编码索引

videoindex = -1;

for (i = 0; i < pFormatCtx->nb_streams; i++)

{

if (pFormatCtx->streams[i]->codec->codec_type == AVMEDIA_TYPE_VIDEO)

{

videoindex = i;

break;

}

}

if (videoindex == -1)

{

printf("Didn't find a video stream.\n");

return -1;

}

//编解码上下文

pCodecCtx = pFormatCtx->streams[videoindex]->codec;

//查找解码器

pCodec = avcodec_find_decoder(pCodecCtx->codec_id); // 查找符合ID的已注册解码器

if (pCodec == NULL)

{

printf("Codec not found.\n");

return -1;

}

//打开解码器

if (avcodec_open2(pCodecCtx, pCodec, NULL) < 0)

{

printf("Could not open codec.\n");

return -1;

}

//申请AVFrame,用于原始视频

pFrame = av_frame_alloc();

//申请AVFrame,用于yuv视频

pFrameYUV = av_frame_alloc();

//分配内存,用于图像格式转换

out_buffer = (unsigned char *)av_malloc(av_image_get_buffer_size(AV_PIX_FMT_YUV420P, pCodecCtx->width, pCodecCtx->height, 1));

// 根据指定的图像参数和提供的数组设置参数指针和linesize大小

av_image_fill_arrays(pFrameYUV->data, pFrameYUV->linesize, out_buffer,AV_PIX_FMT_YUV420P, pCodecCtx->width, pCodecCtx->height, 1);

packet = (AVPacket *)av_malloc(sizeof(AVPacket));

//Output Info-----------------------------

printf("--------------- File Information ----------------\n");

//手工调试函数,输出tbn、tbc、tbr、PAR、DAR的含义

av_dump_format(pFormatCtx, 0, filepath, 0);

printf("-------------------------------------------------\n");

//申请转换上下文。 sws_getContext功能:初始化 SwsContext 结构体指针

img_convert_ctx = sws_getContext(pCodecCtx->width, pCodecCtx->height, pCodecCtx->pix_fmt,

pCodecCtx->width, pCodecCtx->height, AV_PIX_FMT_YUV420P, SWS_BICUBIC, NULL, NULL, NULL);

//读取数据

while (av_read_frame(pFormatCtx, packet) >= 0) // 读取码流中的音频若干帧或者视频一帧

{

if (packet->stream_index == videoindex)

{

// avcodec_decode_video2 功能:解码一帧视频数据

ret = avcodec_decode_video2(pCodecCtx, pFrame, &got_picture, packet);

if (ret < 0)

{

printf("Decode Error.\n");

return -1;

}

if (got_picture >= 1)

{

//成功解码一帧

sws_scale(img_convert_ctx, (const unsigned char* const*)pFrame->data, pFrame->linesize, 0, pCodecCtx->height,

pFrameYUV->data, pFrameYUV->linesize); // 转换图像格式

y_size = pCodecCtx->width*pCodecCtx->height;

// fwrite 功能:把 pFrameYUV 所指向数据写入到 fp_yuv 中。

fwrite(pFrameYUV->data[0], 1, y_size, fp_yuv); //Y

fwrite(pFrameYUV->data[1], 1, y_size / 4, fp_yuv); //U

fwrite(pFrameYUV->data[2], 1, y_size / 4, fp_yuv); //V

printf("Succeed to decode 1 frame!\n");

}

else

{

//未解码到一帧,可能时结尾B帧或延迟帧,在后面做flush decoder处理

}

}

av_free_packet(packet); // free

}

//flush decoder

//FIX: Flush Frames remained in Codec

while (true)

{

if (!(pCodec->capabilities & CODEC_CAP_DELAY))

return 0;

// avcodec_decode_video2 功能:解码一帧视频数据

ret = avcodec_decode_video2(pCodecCtx, pFrame, &got_picture, packet);

if (ret < 0)

{

break;

}

if (!got_picture)

{

break;

}

sws_scale(img_convert_ctx, (const unsigned char* const*)pFrame->data, pFrame->linesize, 0, pCodecCtx->height,

pFrameYUV->data, pFrameYUV->linesize); // 转换图像格式

int y_size = pCodecCtx->width*pCodecCtx->height;

// fwrite 功能:把 pFrameYUV 所指向数据写入到 fp_yuv 中。

fwrite(pFrameYUV->data[0], 1, y_size, fp_yuv); //Y

fwrite(pFrameYUV->data[1], 1, y_size / 4, fp_yuv); //U

fwrite(pFrameYUV->data[2], 1, y_size / 4, fp_yuv); //V

printf("Flush Decoder: Succeed to decode 1 frame!\n");

}

sws_freeContext(img_convert_ctx);

av_frame_free(&pFrameYUV);

av_frame_free(&pFrame);

avcodec_close(pCodecCtx);

avformat_close_input(&pFormatCtx);

fclose(fp_yuv);

return 0;

} -
编码视频(YUV编码为H.264)

/**

*************** FFMPEG视频编码流程 *******************

* 01、av_register_all():注册FFmpeg所有编解码器;

* 02、avformat_alloc_output_context2():初始化输出码流的AVFormatContext;

* 03、avio_open():打开输出文件;

* 04、av_new_stream():创建输出码流的AVStream;

* 05、avcodec_find_encoder():查找编码器;

* 06、avcodec_open2():打开编码器;

* 07、avformat_write_header():写文件头(对于某些没有文件头的封装格式,不需要此函数。比如说MPEG2TS);

* 08、不停地从码流中提取出YUV数据,进行编码;

* avcodec_encode_video2():编码一帧视频。即将AVFrame(存储YUV像素数据)编码为AVPacket(存储H.264等格式的码流数据);

* av_write_frame():将编码后的视频码流写入文件;

* 09、flush_encoder():输入的像素数据读取完成后调用此函数。用于输出编码器中剩余的AVPacket;

* 10、av_write_trailer():写文件尾(对于某些没有文件头的封装格式,不需要此函数。比如说MPEG2TS);

*/

#include

#define __STDC_CONSTANT_MACROS

#ifdef _WIN32

//Windows

extern "C"

{

#include "libavutil/opt.h"

#include "libavcodec/avcodec.h"

#include "libavformat/avformat.h"

};

#else

//Linux...

#ifdef __cplusplus

extern "C"

{

#endif

#include

#include

#include

#ifdef __cplusplus

};

#endif

#endif

// 输入的像素数据读取完成后调用此函数,用于输出编码器中剩余的AVPacket

int flush_encoder(AVFormatContext *fmt_ctx,unsigned int stream_index){

int ret;

int got_frame;

AVPacket enc_pkt;

if (!(fmt_ctx->streams[stream_index]->codec->codec->capabilities & CODEC_CAP_DELAY))

return 0;

while (1) {

enc_pkt.data = NULL;

enc_pkt.size = 0;

av_init_packet(&enc_pkt);

//编码一帧视频。即将AVFrame(存储YUV像素数据)编码为AVPacket(存储H.264等格式的码流数据)。

ret = avcodec_encode_video2 (fmt_ctx->streams[stream_index]->codec, &enc_pkt,

NULL, &got_frame);

av_frame_free(NULL);

if (ret < 0)

break;

if (!got_frame){

ret=0;

break;

}

printf("Flush Encoder: Succeed to encode 1 frame!\tsize:%5d\n",enc_pkt.size);

/* mux encoded frame */

ret = av_write_frame(fmt_ctx, &enc_pkt);

if (ret < 0)

break;

}

return ret;

}

int main(int argc, char* argv[])

{

AVFormatContext* pFormatCtx; // 封装格式上下文结构体,也是统领全局的结构体,保存了视频文件封装 格式相关信息。

AVOutputFormat* fmt; // AVOutputFormat 结构体主要用于muxer,是音视频文件的一个封装器。

AVStream* video_st; // AVStream是存储每一个视频/音频流信息的结构体。

AVCodecContext* pCodecCtx; // 编码器上下文结构体,保存了视频(音频)编解码相关信息。

AVCodec* pCodec; // AVCodec是存储编解码器信息的结构体。

AVPacket pkt; // AVPacket是存储压缩编码数据相关信息的结构体

uint8_t* picture_buf;

AVFrame* pFrame; // AVFrame是包含码流参数较多的结构体

int picture_size;

int y_size;

int framecnt=0;

//FILE *in_file = fopen("src01_480x272.yuv", "rb"); // 输入原始YUV数据

FILE *in_file = fopen("../ds_480x272.yuv", "rb"); // 输入原始YUV数据

int in_w=480,in_h=272; // 输入数据的宽度和高度

int framenum=100; // 要编码的帧

//const char* out_file = "src01.h264"; // 输出文件路径

//const char* out_file = "src01.ts";

//const char* out_file = "src01.hevc";

const char* out_file = "ds.h264";

av_register_all(); // 注册ffmpeg所有编解码器

//方法1.

pFormatCtx = avformat_alloc_context(); // 初始化 pFormatCtx。 AVFormatContext 用 avformat_alloc_context() 进行初始化

//Guess Format

fmt = av_guess_format(NULL, out_file, NULL); // av_guess_format 这是一个决定视频输出时封装方式的函数,其中有三个参数,写任何一个参数,都会自动匹配相应的封装方式。

pFormatCtx->oformat = fmt;

//方法2.

//avformat_alloc_output_context2(&pFormatCtx, NULL, NULL, out_file); // 初始化输出码流的AVFormatContext

//fmt = pFormatCtx->oformat;

//Open output URL

if (avio_open(&pFormatCtx->pb,out_file, AVIO_FLAG_READ_WRITE) < 0){ // avio_open 打开输出文件

printf("Failed to open output file! \n");

return -1;

}

video_st = avformat_new_stream(pFormatCtx, 0); // 创建输出码流的AVStream

video_st->time_base.num = 1; // num 分子

video_st->time_base.den = 25; // den 分母

if (video_st==NULL){

return -1;

}

// 必须设置的参数

pCodecCtx = video_st->codec;

//pCodecCtx->codec_id =AV_CODEC_ID_HEVC;

pCodecCtx->codec_id = fmt->video_codec;

pCodecCtx->codec_type = AVMEDIA_TYPE_VIDEO;

pCodecCtx->pix_fmt = PIX_FMT_YUV420P;

pCodecCtx->width = in_w;

pCodecCtx->height = in_h;

pCodecCtx->time_base.num = 1;

pCodecCtx->time_base.den = 25;

pCodecCtx->bit_rate = 400000;

pCodecCtx->gop_size=250;

//H264

//pCodecCtx->me_range = 16;

//pCodecCtx->max_qdiff = 4;

//pCodecCtx->qcompress = 0.6;

pCodecCtx->qmin = 10;

pCodecCtx->qmax = 51;

// 可选参数

pCodecCtx->max_b_frames=3;

// 设置选项

AVDictionary *param = 0;

//H.264

if(pCodecCtx->codec_id == AV_CODEC_ID_H264) {

av_dict_set(¶m, "preset", "slow", 0);

av_dict_set(¶m, "tune", "zerolatency", 0);

//av_dict_set(¶m, "profile", "main", 0);

}

//H.265

if(pCodecCtx->codec_id == AV_CODEC_ID_H265){

av_dict_set(¶m, "preset", "ultrafast", 0);

av_dict_set(¶m, "tune", "zero-latency", 0);

}

//Show some Information

av_dump_format(pFormatCtx, 0, out_file, 1); // av_dump_format()是一个手工调试的函数,能使我们看到pFormatCtx->streams里面有什么内容。

pCodec = avcodec_find_encoder(pCodecCtx->codec_id); // 查找编码器

if (!pCodec){

printf("Can not find encoder! \n");

return -1;

}

if (avcodec_open2(pCodecCtx, pCodec,¶m) < 0){ // 打开编码器

printf("Failed to open encoder! \n");

return -1;

}

pFrame = av_frame_alloc(); // AVFrame结构,av_frame_alloc申请内存,av_frame_free释放内存

picture_size = avpicture_get_size(pCodecCtx->pix_fmt, pCodecCtx->width, pCodecCtx->height); //计算这个格式的图片,需要多少字节来存储

picture_buf = (uint8_t *)av_malloc(picture_size);

// 这个函数是为已经分配的空间的结构体AVPicture挂上一段用于保存数据的空间

avpicture_fill((AVPicture *)pFrame, picture_buf, pCodecCtx->pix_fmt, pCodecCtx->width, pCodecCtx->height);

// 写文件头(对于某些没有文件头的封装格式,不需要此函数。比如说MPEG2TS)。

avformat_write_header(pFormatCtx,NULL);

av_new_packet(&pkt,picture_size); // 分配数据包的有效size并初始化

y_size = pCodecCtx->width * pCodecCtx->height;

// 一帧一帧循环操作

for (int i=0; idata[0] = picture_buf; // Y

pFrame->data[1] = picture_buf+ y_size; // U

pFrame->data[2] = picture_buf+ y_size*5/4; // V

// PTS

pFrame->pts=i; // pts : 以时间为基本单位的表示时间戳(应该向用户显示帧的时间)。

int got_picture=0;

// 编码一帧视频。即将AVFrame(存储YUV像素数据)编码为AVPacket(存储H.264等格式的码流数据)。

// 成功时返回0,失败时返回负错误代码 失败时返回错误返回码

int ret = avcodec_encode_video2(pCodecCtx, &pkt,pFrame, &got_picture);

if(ret < 0){

printf("Failed to encode! \n");

return -1;

}

if (got_picture==1){

printf("Succeed to encode frame: %5d\tsize:%5d\n",framecnt,pkt.size);

framecnt++;

pkt.stream_index = video_st->index;

ret = av_write_frame(pFormatCtx, &pkt); // 将编码后的视频码流写入文件,

av_free_packet(&pkt); // free

}

}

// Flush Encoder

int ret = flush_encoder(pFormatCtx,0); // 输入的像素数据读取完成后调用此函数,用于输出编码器中剩余的AVPacket

if (ret < 0) {

printf("Flushing encoder failed\n");

return -1;

}

// 写文件尾(对于某些没有文件头的封装格式,不需要此函数。比如说MPEG2TS)

av_write_trailer(pFormatCtx);

// Clean

if (video_st){

avcodec_close(video_st->codec);

av_free(pFrame);

av_free(picture_buf);

}

avio_close(pFormatCtx->pb);

avformat_free_context(pFormatCtx);

fclose(in_file);

return 0;

} -
视频添加水印
一个代码示例,是关于字幕水印的。主要了解其中的整体框架和用到的库函数,使用过方法。
以下代码中包含一些注释,比较好理解。
#define __STDC_CONSTANT_MACROS

#ifdef _WIN32

#define snprintf _snprintf

//Windows

extern "C"

{

#include "libavcodec/avcodec.h"

#include "libavformat/avformat.h"

#include "libavfilter/avfiltergraph.h"

#include "libavfilter/avcodec.h"

#include "libavfilter/buffersink.h"

#include "libavfilter/buffersrc.h"

#include "libavutil/avutil.h"

#include "libswscale/swscale.h"

#include "SDL/SDL.h"

};

#else

//Linux...

#ifdef __cplusplus

extern "C"

{

#endif

#include

#include

#include

#include

#include

#include

#include

#include

#include

#ifdef __cplusplus

};

#endif

#endif

//Enable SDL?

#define ENABLE_SDL 1

//Output YUV data?

#define ENABLE_YUVFILE 1

const char *filter_descr = "movie=my_logo.png[wm];[in][wm]overlay=5:5[out]";

static AVFormatContext *pFormatCtx;

static AVCodecContext *pCodecCtx;

AVFilterContext *buffersink_ctx;

AVFilterContext *buffersrc_ctx;

AVFilterGraph *filter_graph;

static int video_stream_index = -1;

static int open_input_file(const char *filename) {//打开文件函数

int ret;//相当于return,返回值

AVCodec *dec;

if ((ret = avformat_open_input(&pFormatCtx, filename, NULL, NULL)) < 0) {//判断能否打开

printf( "Cannot open input file\n");

return ret;

}

if ((ret = avformat_find_stream_info(pFormatCtx, NULL)) < 0) {//函数可以读取一部分视音频数据并且获得一些相关的信息

printf( "Cannot find stream information\n");

return ret;

}

/* select the video stream */

ret = av_find_best_stream(pFormatCtx, AVMEDIA_TYPE_VIDEO, -1, -1, &dec, 0);//获取音视频对应的stream_index(流索引)流类型是下列字母之一:v为视频,a为声音,s为字幕,d为数据,t为附件。如果stream_index给出,则它匹配该类型的索引为stream_index的流。否则,它匹配所有这种类型的流。

if (ret < 0) {

printf( "Cannot find a video stream in the input file\n");

return ret;

}

video_stream_index = ret;

pCodecCtx = pFormatCtx->streams[video_stream_index]->codec;

/* init the video decoder */

if ((ret = avcodec_open2(pCodecCtx, dec, NULL)) < 0) {//初始化一个视音频编解码器的AVCodecContext

printf( "Cannot open video decoder\n");

return ret;

}

return 0;

}

static int init_filters(const char *filters_descr) {//初始化AVFilter相关的结构体。

char args[512];

int ret;

AVFilter *buffersrc = avfilter_get_by_name("buffer");//获取输入输出滤波器

AVFilter *buffersink = avfilter_get_by_name("ffbuffersink");

AVFilterInOut *outputs = avfilter_inout_alloc();//分配输出流

AVFilterInOut *inputs = avfilter_inout_alloc();//分配输出流

AVPixelFormat pix_fmts;

AVBufferSinkParams *buffersink_params;//缓冲池参数

filter_graph = avfilter_graph_alloc();//分配滤波图层

/* buffer video source: the decoded frames from the decoder will be inserted here. */

snprintf(args, sizeof(args), "video_size=%dx%d:pix_fmt=%d:time_base=%d/%d:pixel_aspect=%d/%d",

pCodecCtx->width, pCodecCtx->height, pCodecCtx->pix_fmt,

pCodecCtx->time_base.num, pCodecCtx->time_base.den,

pCodecCtx->sample_aspect_ratio.num, pCodecCtx->sample_aspect_ratio.den);//将可变个参数(...)按照format格式化成字符串,然后将其复制到str中

ret = avfilter_graph_create_filter(&buffersrc_ctx, buffersrc, "in",

args, NULL, filter_graph);//创建并向FilterGraph中添加一个Filter

if (ret < 0) {

printf("Cannot create buffer source\n");

return ret;

}

/* buffer video sink: to terminate the filter chain. */

buffersink_params = av_buffersink_params_alloc();

buffersink_params->pixel_fmts = (const AVPixelFormat *) pix_fmts;

ret = avfilter_graph_create_filter(&buffersink_ctx, buffersink, "out",

NULL, buffersink_params, filter_graph);

av_free(buffersink_params);

if (ret < 0) {

printf("Cannot create buffer sink\n");

return ret;

}

/* Endpoints for the filter graph. */

outputs->name = av_strdup("in");

outputs->filter_ctx = buffersrc_ctx;

outputs->pad_idx = 0;

outputs->next = NULL;

inputs->name = av_strdup("out");

inputs->filter_ctx = buffersink_ctx;

inputs->pad_idx = 0;

inputs->next = NULL;

if ((ret = avfilter_graph_parse_ptr(filter_graph, filters_descr,

&inputs, &outputs, NULL)) < 0)//解析字幕水印时返回-22,ffmpeg报错No such filter: 'drawtext'

return ret;

if ((ret = avfilter_graph_config(filter_graph, NULL)) < 0)//检查FilterGraph的配置

return ret;

return 0;

}

int main(int argc, char* argv[])

{

int ret;

AVPacket packet;//定义一个数据包

AVFrame frame;//定义一个框架

int got_frame;

av_register_all();//注册复用器,只有调用了该函数,才能使用复用器,编码器等

avfilter_register_all();//注册 滤镜filter

if ((ret = open_input_file("cuc_ieschool.flv")) < 0)

return -1;

if ((ret = init_filters(filter_descr)) < 0)

return -1;

#if ENABLE_YUVFILE//YUV

FILE *fp_yuv=fopen("test.yuv","wb+");

#endif

#if ENABLE_SDL//SDL

SDL_Surface *screen;

SDL_Overlay *bmp;

SDL_Rect rect;

if(SDL_Init(SDL_INIT_VIDEO | SDL_INIT_AUDIO | SDL_INIT_TIMER)) {

printf( "Could not initialize SDL - %s\n", SDL_GetError());

return -1;

}

screen = SDL_SetVideoMode(pCodecCtx->width, pCodecCtx->height, 0, 0);

if(!screen) {

printf("SDL: could not set video mode - exiting\n");

return -1;

}

bmp = SDL_CreateYUVOverlay(pCodecCtx->width, pCodecCtx->height,SDL_YV12_OVERLAY, screen);

SDL_WM_SetCaption("Simplest FFmpeg Video Filter",NULL);

#endif

/* read all packets */

while (1) {

AVFilterBufferRef *picref;//filter们处理的帧是用AVFilterBufferRef表示的.然后将帧的一些属性也复制到picref中

ret = av_read_frame(pFormatCtx, &packet);

if (ret< 0)

break;

if (packet.stream_index == video_stream_index) {

avcodec_get_frame_defaults(&frame);

got_frame = 0;

ret = avcodec_decode_video2(pCodecCtx, &frame, &got_frame, &packet);

if (ret < 0) {

printf( "Error decoding video\n");

break;

}

if (got_frame) {

frame.pts = av_frame_get_best_effort_timestamp(&frame);

/* push the decoded frame into the filtergraph */

if (av_buffersrc_add_frame(buffersrc_ctx, &frame) < 0) {

printf( "Error while feeding the filtergraph\n");

break;

}

/* pull filtered pictures from the filtergraph */

while (1) {

ret = av_buffersink_get_buffer_ref(buffersink_ctx, &picref, 0);//调用者从sink中获取处理后的帧:av_buffersink_get_buffer_ref(filt_out, &picref, 0);获取后的帧保存在picref中.

if (ret == AVERROR(EAGAIN) || ret == AVERROR_EOF)

break;

if (ret < 0)

goto end;

if (picref) {

#if ENABLE_YUVFILE

//Y, U, V

for(int i=0;ivideo->h;i++){

fwrite(picref->data[0]+picref->linesize[0]*i,1,picref->video->w,fp_yuv);

}

for(int i=0;ivideo->h/2;i++){

fwrite(picref->data[1]+picref->linesize[1]*i,1,picref->video->w/2,fp_yuv);

}

for(int i=0;ivideo->h/2;i++){

fwrite(picref->data[2]+picref->linesize[2]*i,1,picref->video->w/2,fp_yuv);

}

#endif

#if ENABLE_SDL

SDL_LockYUVOverlay(bmp);

int y_size=picref->video->w*picref->video->h;

memcpy(bmp->pixels[0],picref->data[0],y_size); //Y

memcpy(bmp->pixels[2],picref->data[1],y_size/4); //U

memcpy(bmp->pixels[1],picref->data[2],y_size/4); //V

bmp->pitches[0]=picref->linesize[0];

bmp->pitches[2]=picref->linesize[1];

bmp->pitches[1]=picref->linesize[2];

SDL_UnlockYUVOverlay(bmp);

rect.x = 0;

rect.y = 0;

rect.w = picref->video->w;

rect.h = picref->video->h;

SDL_DisplayYUVOverlay(bmp, &rect);

//Delay 40ms

SDL_Delay(40);

#endif

avfilter_unref_bufferp(&picref);

}

}

}

}

av_free_packet(&packet);

}

#if ENABLE_YUVFILE

fclose(fp_yuv);

#endif

end:

avfilter_graph_free(&filter_graph);//释放内存

if (pCodecCtx)

avcodec_close(pCodecCtx);

avformat_close_input(&pFormatCtx);//清理封装上下文

if (ret < 0 && ret != AVERROR_EOF) {

char buf[1024];

av_strerror(ret, buf, sizeof(buf));

printf("Error occurred: %s\n", buf);

return -1;

}

return 0;

}