springboot+mybatis+vue实现一个简单的注册登录功能
1. mybatis简要概述
MyBatis 是一款优秀的持久层框架,它支持定制化 SQL、存储过程以及高级映射。MyBatis 避免了几乎所有的 JDBC 代码和手动设置参数以及获取结果集。MyBatis 可以使用简单的 XML 或注解来配置和映射原生信息,将接口和 Java 的 POJOs(Plain Old Java Objects,普通的 Java对象)映射成数据库中的记录。
2. vue简要概述
Vue.js 是用于构建交互式的 Web 界面的库。它提供了 MVVM 数据绑定和一个可组合的组件系统,具有简单、灵活的 API。
3. 数据库设计
可以使用MySQL或者Navicat设计数据库表格,为了方便测试,只用了两个简单字段用户名和密码,用户user表格设计如下:

userPassword的类型原初我设计的类型是varchar,但是运行工程会报如下错误:
com.mysql.cj.jdbc.exceptions.MysqlDataTruncation: Data truncation: Data too long for column
估计是密码字段过长了,参考博客将类型改为text即可。
4. 新建SpringBoot工程
在创建SpringBoot项目的时候,别忘了将相应依赖加入到工程中,这里需要加入的依赖有:Spring Web,Spring Data JDBC,MySQL Driver、MyBatis Framework。具体看一下pom.xml文件:
<project xmlns="http://maven.apache.org/POM/4.0.0" xmlns:xsi="http://www.w3.org/2001/XMLSchema-instance"
	xsi:schemaLocation="http://maven.apache.org/POM/4.0.0 https://maven.apache.org/xsd/maven-4.0.0.xsd">
	<modelVersion>4.0.0modelVersion>
	<parent>
		<groupId>org.springframework.bootgroupId>
		<artifactId>spring-boot-starter-parentartifactId>
		<version>2.3.2.RELEASEversion>
		<relativePath/>
	parent>
	<groupId>com.example.demo2groupId>
	<artifactId>demo2artifactId>
	<version>0.0.1-SNAPSHOTversion>
	<name>demo2name>
	<description>Demo project for Spring Bootdescription>

	<properties>
		<java.version>1.8java.version>
	properties>

	<dependencies>
		<dependency>
			<groupId>org.springframework.bootgroupId>
			<artifactId>spring-boot-starter-jdbcartifactId>
		dependency>
		<dependency>
			<groupId>org.springframework.bootgroupId>
			<artifactId>spring-boot-starter-webartifactId>
		dependency>
		<dependency>
			<groupId>org.mybatis.spring.bootgroupId>
			<artifactId>mybatis-spring-boot-starterartifactId>
			<version>2.1.3version>
		dependency>

		<dependency>
			<groupId>mysqlgroupId>
			<artifactId>mysql-connector-javaartifactId>
			<scope>runtimescope>
		dependency>
		<dependency>
			<groupId>org.springframework.bootgroupId>
			<artifactId>spring-boot-starter-testartifactId>
			<scope>testscope>
			<exclusions>
				<exclusion>
					<groupId>org.junit.vintagegroupId>
					<artifactId>junit-vintage-engineartifactId>
				exclusion>
			exclusions>
		dependency>
	dependencies>

	<build>
		<plugins>
			<plugin>
				<groupId>org.springframework.bootgroupId>
				<artifactId>spring-boot-maven-pluginartifactId>
			plugin>
		plugins>
	build>

project>
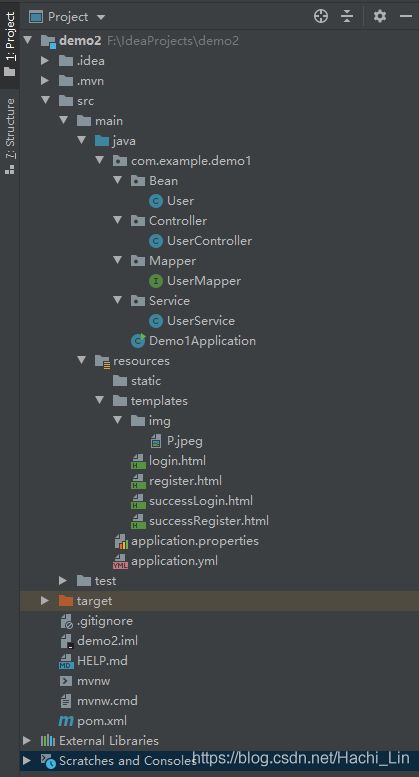
工程具体目录结构如下:

这里的工程生成的配置文件是application.properties,但是我习惯于写yml文件,所以索性又建了一个配置文件。properties和yml中的配置,相互补充;如果冲突,则properties优先级高。application.yml文件内容如下:
server:
  port: 9090
  tomcat:
    uri-encoding: utf-8
spring:
  datasource:
    driver-class-name: com.mysql.cj.jdbc.Driver
    url: jdbc:mysql://localhost:3306/myweb?serverTimezone=UTC&useSSL=false
    username: root
    password: lin936144524
  resources:
    static-locations: classpath:/templates
这里的数据库地址一定要填写正确,还有就是你连接数据库的用户名和密码!
4.1 实体类User.java
package com.example.simole.Bean;

public class User {
    private String UserName;
    private String Password;

    public String getUserName() {
        return UserName;
    }

    public void setUserName(String userName) {
        UserName = userName;
    }

    public String getPassword() {
        return Password;
    }

    public void setPassword(String password) {
        Password = password;
    }
}
4.2 映射类UserMapper.java
package com.example.demo1.Mapper;

import org.apache.ibatis.annotations.Insert;
import org.apache.ibatis.annotations.Mapper;
import org.apache.ibatis.annotations.Select;

@Mapper
public interface UserMapper {
    @Select("select userName from user where userName = #{userName}")
    public String selectUserName(String userName);

    @Select("select userPassword from user where userName = #{userName}")
    public String selectUserPassword(String userName);

    @Insert("insert into user(userName, userPassword) values(#{userName}, #{userPassword})")
    public void addUser(String userName, String userPassword);

}
注意上面的sql语句,userName和userPassword都是我设计的字段,请根据自己设计的字段修改。
4.3 服务层UserService.java
package com.example.demo1.Service;

import com.example.demo1.Bean.User;
import com.example.demo1.Mapper.UserMapper;
import org.springframework.beans.factory.annotation.Autowired;
import org.springframework.stereotype.Service;
import java.security.MessageDigest;
import java.security.NoSuchAlgorithmException;


@Service
public class UserService {
        @Autowired
        private UserMapper userMapper;

        public String selectUserName(User user) {
            String userName = user.getUserName();
            String userPassword = user.getPassword();
            System.out.println(userName);
            System.out.println(userPassword);

            String result = "-1";

            // 将输入的密码使用md5加密
            String passwordMD5 = passwordMD5(userName, userPassword);

            // 用户不存在
            if (userMapper.selectUserName(userName) == null) {
                result = "0";
                return result;
            //  用户存在,但密码输入错误
            }else if(!userMapper.selectUserPassword(userName).equals(passwordMD5) ){
                result = "1";
                return result;
            //  登录成功
            }else if(userMapper.selectUserPassword(userName).equals(passwordMD5)) {
                result = "2";
                return result;
            }
            return result;
        }

        public String addUser(User user) {
            String userName = user.getUserName();
            // 用户存在
            if(userMapper.selectUserName(userName) != null)
                return "0";
            String userPassword = user.getPassword();
            System.out.println(userName + "***" + userPassword);
            String passwordMD5 = passwordMD5(userName, userPassword);
            userMapper.addUser(userName, passwordMD5);
            return "1";
        }

        // md5加密
        public String passwordMD5(String userName, String userPassword) {
            // 需要加密的字符串
            String src = userName + userPassword;
            try {
                // 加密对象,指定加密方式
                MessageDigest md5 = MessageDigest.getInstance("md5");
                // 准备要加密的数据
                byte[] b = src.getBytes();
                // 加密:MD5加密一种被广泛使用的密码散列函数,
                // 可以产生出一个128位(16字节)的散列值(hash value),用于确保信息传输完整一致
                byte[] digest = md5.digest(b);
                // 十六进制的字符
                char[] chars = new char[]{'0', '1', '2', '3', '4', '5',
                        '6', '7', 'A', 'B', 'C', 'd', 'o', '*', '#', '/'};
                StringBuffer sb = new StringBuffer();
                // 处理成十六进制的字符串(通常)
                // 遍历加密后的密码,将每个元素向右位移4位,然后与15进行与运算(byte变成数字)
                for (byte bb : digest) {
                    sb.append(chars[(bb >> 4) & 15]);
                    sb.append(chars[bb & 15]);
                }
                // 打印加密后的字符串
                System.out.println(sb);
                return sb.toString();
            } catch (NoSuchAlgorithmException e) {
                e.printStackTrace();
            }
            return null;
        }
}
4.4 控制层UserController.java
package com.example.demo1.Controller;


import com.example.demo1.Bean.User;
import com.example.demo1.Service.UserService;
import org.springframework.beans.factory.annotation.Autowired;
import org.springframework.web.bind.annotation.*;

@RestController
@RequestMapping("/user")
public class UserController {
    @Autowired
    private UserService userService;

    @ResponseBody
    @RequestMapping(value = "/register",method = RequestMethod.POST)
    public String register(@RequestBody User user) {
        return userService.addUser(user);
    }

    @ResponseBody
    @RequestMapping(value = "/login", method = RequestMethod.POST)
    public String login(@RequestBody User user) {
        return userService.selectUserName(user);
    }
}
5. 前端代码
5.1 login.html
<html lang="en" xmlns:v-on="http://www.w3.org/1999/xhtml">
<head>
<meta charset="UTF-8">
<title>用户登录title>
<link rel="stylesheet" href="https://cdn.jsdelivr.net/npm/[email protected]/dist/css/bootstrap.min.css">
<style type="text/css">
body {
display:flex;
height: 969px;
align-items: center;
padding:40px 0;
background-color: #f5f5f5;
}
form {
display: block;
width: 100%;
max-width: 330px;
padding:15px;
margin: auto;
}
.btn-block {
width:300px;
margin:10px auto;
}
.form-control {
width:300px;
height: 50px;
font-size: 20px;
margin:0 auto -20px;
background-color: #fff;
}
style>
head>
<body class=text-center>
5.2 sucessLogin.html
<html lang="en">
<head>
    <meta charset="UTF-8">
    <title>成功登录title>
    <link rel="stylesheet" href="https://cdn.jsdelivr.net/npm/[email protected]/dist/css/bootstrap.min.css">

head>
<body class="text-center">
    <h1 >成功登录h1>
body>
html>
5.3 register.html
<html lang="en" xmlns:v-on="http://www.w3.org/1999/xhtml">
<head>
<meta charset="UTF-8">
<title>用户注册title>
<link rel="stylesheet" href="https://cdn.jsdelivr.net/npm/[email protected]/dist/css/bootstrap.min.css">
<style type="text/css">
body {
display:flex;
height: 969px;
align-items: center;
padding:40px 0;
background-color: #f5f5f5;
}
form {
display: block;
width: 100%;
max-width: 330px;
padding:15px;
margin: auto;
}
.btn-block {
width:300px;
margin:10px auto;
}
.form-control {
width:300px;
height: 50px;
font-size: 20px;
margin:0 auto -20px;
background-color: #fff;
}
style>
head>
<body class=text-center>
5.4 sucessRegister.html
<html lang="en">
<head>
    <meta charset="UTF-8">
    <title>成功注册title>
    <link rel="stylesheet" href="https://cdn.jsdelivr.net/npm/[email protected]/dist/css/bootstrap.min.css">
    <script src="https://unpkg.com/axios/dist/axios.min.js">script>
    <script src="https://cdn.jsdelivr.net/npm/vue/dist/vue.js">script>
    <style>
        .btn-block {
            width:100px;
            margin:10px auto;
        }
    style>
head>
<body class="text-center">
    <div id="app">
        <h1>成功注册h1>
        <button class="btn btn-lg btn-primary btn-block" @click="Login">前往登录button>
    div>

    <script>
        new Vue({
            el:'#app',
            data:{

            },
            methods:{
                Login:function () {
                    window.location.href = "/login.html"
                }
            }
        })
    script>
body>
html>
6. 结果测试
运行Demo1Application.java
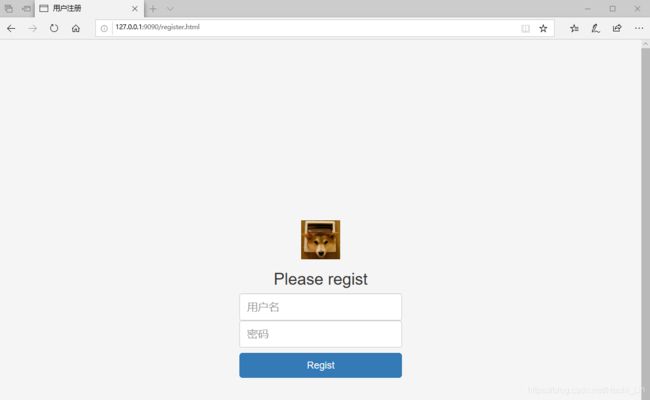
6.1 注册页面
6.2 注册成功页面
6.3 数据库内容
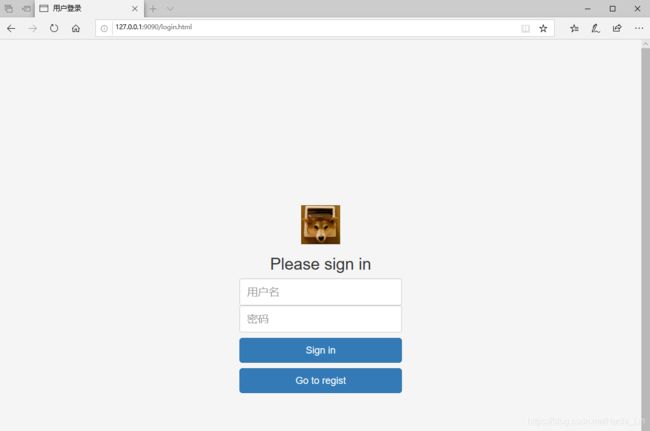
6.4 登录页面
6.5 登录成功页面
参考文档
- https://blog.csdn.net/byteArr/article/details/80955703?utm_medium=distribute.pc_relevant.none-task-blog-BlogCommendFromMachineLearnPai2-5.channel_param&depth_1-utm_source=distribute.pc_relevant.none-task-blog-BlogCommendFromMachineLearnPai2-5.channel_param
- https://blog.csdn.net/Small_Pang/article/details/102569573
- https://www.baidu.com/link?url=gj6z2YsDhAdkPmqEN4Zb_lJTDjHzRDC7Otdz6OExI0Cpd0FM8XgeL_S77fHmojDTQCGQC01t38Gdl3I79UUyBwFBLyRCN0jDcAnf2ECycrq&wd=&eqid=d49351a400011c7f000000065f2f6a82
- https://www.cnblogs.com/zhangchengzi/p/9662247.html


