Spring Batch 综合案例实战上
目录
案例需求
分析
项目准备
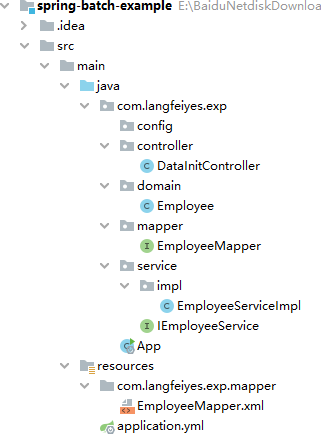
步骤1:新开spring-batch-example
步骤2:导入依赖
步骤3:配置文件
步骤4:建立employee表与employe_temp表
步骤5:建立基本代码体系-domain-mapper-service-controller-mapper.xml
转视频版
到这,整个Spring Batch 教程知识点就全部讲完了,接下来就使用一个综合案例将讲过核心知识串联起来,再来回顾一遍。
案例需求
1>先动态生成50w条员工数据,存放在employee.csv文件中
2>启动作业异步读取employee.csv文件,将读到数据写入到employee_temp表,要求记录读与写消耗时间
3>使用分区的方式将employee_temp表的数据读取并写入到employee表
分析
上面需求存在一定连贯性,为了操作简单,使用springMVC项目, 每一个需求对应一个接口:
1:发起 /dataInit 初始化50w数据进入employee.csv文件
使用技术点:SpringMVC IO
2:发起/csvToDB 启动作业,将employee.csv 数据写入employee_temp表, 记录读与写消耗时间
使用技术点:SpringMVC ItemReader JobExecutionListener
ItemWriter (如果使用Mybatis框架MyBatisBatchItemWriter/MyBatisPagingItemReaderReader)
3:发起/dbToDB 启动作业,将employee_temp数据写入employee表
使用技术点:SpringMVC ItemReader partitioner
ItemWriter(如果使用Mybatis框架:MyBatisBatchItemWriter/MyBatisPagingItemReaderReader)
项目准备
步骤1:新开spring-batch-example
步骤2:导入依赖
    org.springframework.boot
    spring-boot-starter-parent
    2.7.3


    11
    11


        org.springframework.boot
        spring-boot-starter-web


        org.springframework.boot
        spring-boot-starter-batch


        mysql
        mysql-connector-java
        8.0.12


        org.mybatis.spring.boot
        mybatis-spring-boot-starter
        1.3.2


        com.alibaba
        druid-spring-boot-starter
        1.1.14


        org.projectlombok
        lombok


        org.springframework.boot
        spring-boot-starter-validation
步骤3:配置文件
spring:
  datasource:
    username: root
    password: admin
    url: jdbc:mysql://127.0.0.1:3306/springbatch?serverTimezone=GMT%2B8&useSSL=false&allowPublicKeyRetrieval=true
    driver-class-name: com.mysql.cj.jdbc.Driver
    # 初始化数据库,文件在依赖jar包中
  sql:
    init:
      schema-locations: classpath:org/springframework/batch/core/schema-mysql.sql
      #mode: always
      mode: never
  batch:
    job:
      enabled: false

  druid:
    # 连接池配置
    #初始化连接池的连接数量 大小,最小,最大
    initial-size: 10
    min-idle: 10
    max-active: 20
    #配置获取连接等待超时的时间
    max-wait: 60000
    #配置间隔多久才进行一次检测,检测需要关闭的空闲连接,单位是毫秒
    time-between-eviction-runs-millis: 60000
    # 配置一个连接在池中最小生存的时间,单位是毫秒
    min-evictable-idle-time-millis: 30000
    validation-query: SELECT 1 FROM DUAL
    test-while-idle: true
    test-on-borrow: true
    test-on-return: false
    # 是否缓存preparedStatement,也就是PSCache  官方建议MySQL下建议关闭   个人建议如果想用SQL防火墙 建议打开
    pool-prepared-statements: false
    max-pool-prepared-statement-per-connection-size: 20

mybatis:
  configuration:
    default-executor-type: batch


job:
  data:
    path: D:/spring-batch-example/
步骤4:建立employee表与employe_temp表
CREATE TABLE `employee` (
  `id` int NOT NULL AUTO_INCREMENT,
  `name` varchar(255) DEFAULT NULL,
  `age` int DEFAULT NULL,
  `sex` int DEFAULT NULL,
  PRIMARY KEY (`id`)
) ENGINE=InnoDB DEFAULT CHARSET=utf8mb3;
CREATE TABLE `employee_temp` (
`id` int NOT NULL AUTO_INCREMENT,
`name` varchar(255) DEFAULT NULL,
`age` int DEFAULT NULL,
`sex` int DEFAULT NULL,
PRIMARY KEY (`id`)
) ENGINE=InnoDB DEFAULT CHARSET=utf8mb3;步骤5:建立基本代码体系-domain-mapper-service-controller-mapper.xml
domain
@Setter
@Getter
@ToString
public class Employee {
    private Long id;
    private String name;
    private int age;
    private int sex;
}
mapper.java
public interface EmployeeMapper {

    /**
     * 添加
     */
    int save(Employee employee);
}
service接口
public interface IEmployeeService {
    /**
     * 保存
     */
    void save(Employee employee);
}
service接口实现类
@Service
public class EmployeeServiceImpl implements IEmployeeService {
    @Autowired
    private EmployeeMapper employeeMapper;
    @Override
    public void save(Employee employee) {
        employeeMapper.save(employee);
    }
}
启动类
@SpringBootApplication
@EnableBatchProcessing
@MapperScan("com.langfeiyes.exp.mapper")
public class App {

    public static void main(String[] args) {
        SpringApplication.run(App.class, args);
    }
}
Mapper.xml
insert into employee(id, name, age, sex) values(#{id},#{name},#{age},#{sex})
到这,本篇就结束了,欲知后事如何,请听下回分解~
转视频版
看文字不过瘾可以切换视频版:Spring Batch高效批处理框架实战
