知识点2--spring boot实现三层架构-查询列表
本篇开始往后的目标是介绍使用spring boot实现一个三层架构的用户管理demo来帮助大家认识spring boot如何开发,先说明一下整个demo用到的技术:
spring boot spring 的一种升华版本
spring-webmvc spring官网将tomcat、springmvc整合后的一个产物
mybatis-plus是mybatis为了配合spring-boot官方出的一个版本
freemarker是现在较为流行的一种面向开发者的前端展示框架,也可以说是模板引擎的一种,只不过一般都是程序员做测试页面用的,而不是面向用户的页面开发,现在前端市场上用的模板引擎大多是vue,编写SSM的时候我们前端一般用的jsp,但是有一个问题,对于JAVA-Web开发者来说,写jsp意味着要注意很多东西,比如web.xml、jsp标签约束等等一度繁重的东西,且就算写jsp,也只是为了测试后台返回的结果,真正用在项目上时前端是专门的前端开发工程师负责,作为后端只需要配合前端提供后台接口支持就行,这样一来jsp对于java工程师来说就成了一种负担,而freemarker就解决了这一问题,它不需要复杂配置,更是提供了相对便捷的标签,使得我们很轻松的达到测试目的,同时对于开发人员来说其本身也是代替了spring mvc的前端支持
lombok是一个类的特殊方法生成插件,在SSM时我们要对不同的类做很多重复的操作,比如对bean实体生成getter、setter方法等,而lombok插件为我们免除了这一过程,它帮助我们以注解的方式,代替这类重复的代码
ES、kafka、redisweb端相关的技术
现在我们开始写代码
第一步:首先需要新建一个项目,因为上面的插件需要一些配置支持
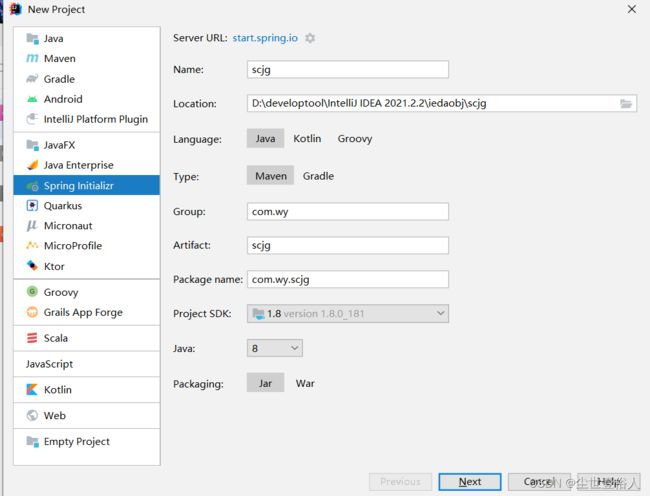
勾选web支持
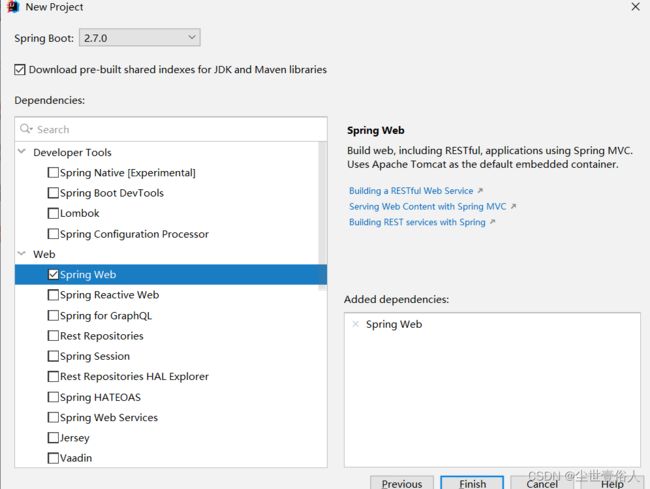
勾选freemarker支持
第二步:pom文件中添加如下依赖
        <dependency>
            <groupId>org.projectlombokgroupId>
            <artifactId>lombokartifactId>
            <optional>trueoptional>
        dependency>


        <dependency>
            <groupId>com.baomidougroupId>
            <artifactId>mybatis-plus-boot-starterartifactId>
            <version>3.3.2version>
        dependency>


        <dependency>
            <groupId>mysqlgroupId>
            <artifactId>mysql-connector-javaartifactId>
        dependency>


        <dependency>
            <groupId>com.baomidougroupId>
            <artifactId>mybatis-plus-generatorartifactId>
            <version>3.3.2version>
        dependency>


        <dependency>
            <groupId>org.apache.velocitygroupId>
            <artifactId>velocity-engine-coreartifactId>
            <version>2.2version>
        dependency>


        <dependency>
            <groupId>org.freemarkergroupId>
            <artifactId>freemarkerartifactId>
            <version>2.3.30version>
        dependency>
添加后大家可以回过头注意一下你当前的pom,你会发现比较与知识点1少了一个spring-boot-starter这个是因为当你选择web支持后spring-boot-starter-web会通过依赖传递默认导入spring-boot-starter不需要在pom中体现,这和知识点1中提到的spring boot内嵌了web服务器有关。去查看依赖会发现web这个依赖下传递的导入了tomcat和mvc
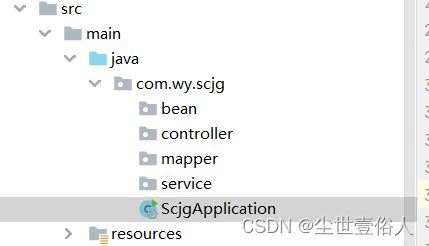
第三步:建立三层架构需要的包
com.wy.scjg.bean
com.wy.scjg.controller
com.wy.scjg.service
com.wy.scjg.mapper
第四步:配置spring boot配置文件
#服务的端口号
server.port=91
#服务的访问地址
#server.servlet.context-path=/helloboot

#数据库驱动程序,如果你使用的驱动是包括5.1以及之前的就使用com.mysql.jdbc.Driver
spring.datasource.driver-class-name=com.mysql.cj.jdbc.Driver
#数据库的连接地址
spring.datasource.url=jdbc:mysql://localhost:3306/test?characterEncoding=UTF8&userSSL=false&serverTimezone=GMT%2B8
#数据库的用户名
spring.datasource.username=root
#数据库的密码
spring.datasource.password=123456
#数据库类型
spring.datasource.type=com.zaxxer.hikari.HikariDataSource


#打印sql语句
#日志配置
mybatis-plus.configuration.log-impl=org.apache.ibatis.logging.stdout.StdOutImpl
#MybatisPlus的dao层xml文件存放地址
mybatis-plus.mapper-locations=classpath:mappers/*.xml


#配置freemarker的解析器
#编码
spring.freemarker.charset=UTF-8
#缓存
spring.freemarker.cache=false
#后缀名称
spring.freemarker.suffix=.ftl
#html类型
spring.freemarker.content-type=text/html
#freemarker加载模板的路径
spring.freemarker.template-loader-path=classpath:/templates/

#springboot默认不带任何前端引擎,但是它提供了静态资源加载能力如果不另行配置,默认加载classpath:/META-INF/resources/、classpath:/resources/、classpath:/static/、classpath:/public/ 这四个路径
spring.web.resources.static-locations=classpath:/static/*
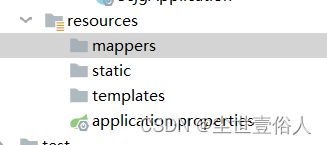
根据上面的配置,在resource下创建存放mapper.xml的文件夹mappers、spring boot静态资源static文件夹、freemarker插件测试页面存放的templates文件夹
第五步:在数据库中准备一个user表,并随意准备几条测试数据
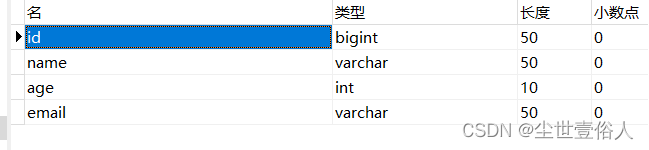
第六步:bean层准备一个实例User.java
package com.wy.scjg.bean;

import lombok.Data;
import lombok.EqualsAndHashCode;
import lombok.experimental.Accessors;

import java.io.Serializable;

@Data
@EqualsAndHashCode(callSuper = false)
@Accessors(chain = true)
public class User implements Serializable {
    /**
     * 主键ID
     */
    private Long id;

    /**
     * 姓名
     */
    private String name;

    /**
     * 年龄
     */
    private Integer age;

    /**
     * 邮箱
     */
    private String email;
}
这里解释一下三个用到的lombok插件注解,Data为该类提供get、set方法,EqualsAndHashCode为该类提供equals和hashCode比较方法,callSuper 参数默认false时表示比较方法所用的属性来自于当前类本身,而非父类,Accessors是对生成的get、set方法做必要的空值,chain默认false时表示get、set方法是无返回值的,反之则返回当前对象
第七步:Dao层,既Mapper层开发对应的User数据接口,并在mappers文件下准备对应的xml
package com.wy.scjg.mapper;

import com.baomidou.mybatisplus.core.mapper.BaseMapper;
import com.wy.scjg.bean.User;
/**
*Dao接口固定继承BaseMapper接口,并泛型操作的数据实体。这里特别说明一下,这是spring boot的写法,同时,它也向下兼容允许spring的写法,区别就在于spring boot为你封装了一些基础的调用数据方法
*/
public interface UserMapper extends BaseMapper<User> {

}
对应的mapper.xml文件
DOCTYPE mapper PUBLIC "-//mybatis.org//DTD Mapper 3.0//EN" "http://mybatis.org/dtd/mybatis-3-mapper.dtd">
<mapper namespace="com.wy.scjg.mapper.UserMapper">


mapper>
Dao层开发,一定要记得在spring boot的启动类中添加一个MapperScan注解,因为启动类会扫描子包,但是Dao层的构成由于没有注解所以不会生成spring的bean实例,所以需要另外告诉spring boot框架Dao层的包在哪里,这就跟SSM也需要特别配置Dao一样,不过spring boot将步骤缩减到只需要告诉他Dao层的接口在哪里就行,如下
package com.wy.scjg;

import com.baomidou.mybatisplus.extension.plugins.PaginationInterceptor;
import org.mybatis.spring.annotation.MapperScan;
import org.springframework.boot.SpringApplication;
import org.springframework.boot.autoconfigure.SpringBootApplication;
import org.springframework.context.annotation.Bean;

@SpringBootApplication
@MapperScan("com.wy.scjg.mapper")
public class ScjgApplication {

    public static void main(String[] args) {
        SpringApplication.run(ScjgApplication.class, args);
    }

}
第八步:service层开发对应的UserService和实现类,并注入Dao层对象
package com.wy.scjg.service;

import com.baomidou.mybatisplus.extension.service.IService;
import com.wy.scjg.bean.User;
/**
*Service接口固定继承IService接口,并泛型操作的数据实体
*/
public interface UserService extends IService<User>{

}
对应的实现类
package com.wy.scjg.service.impl;

import com.baomidou.mybatisplus.extension.service.impl.ServiceImpl;
import com.wy.scjg.bean.User;
import com.wy.scjg.mapper.UserMapper;
import com.wy.scjg.service.UserService;
import org.springframework.stereotype.Service;

/**
 * 实现类固定继承ServiceImpl类,目的是直接注入Dao层以及操作的实例类,并实现自定义的service接口。当然也是向下兼容的
 */
@Service
public class UserServiceImpl extends ServiceImpl<UserMapper, User> implements UserService {

}
第九步:controller层开发控制器
package com.wy.scjg.controller;

import com.baomidou.mybatisplus.core.conditions.query.QueryWrapper;
import com.baomidou.mybatisplus.core.metadata.IPage;
import com.baomidou.mybatisplus.extension.plugins.pagination.Page;
import com.wy.scjg.bean.User;
import com.wy.scjg.service.UserService;
import org.springframework.beans.factory.annotation.Autowired;
import org.springframework.stereotype.Controller;
import org.springframework.web.bind.annotation.RequestMapping;
import org.springframework.web.bind.annotation.RequestParam;

import javax.servlet.http.HttpServletRequest;

@Controller
@RequestMapping("/user")
public class UserController {

    @Autowired
    private UserService userService;

    @RequestMapping("/list")
    public String list(HttpServletRequest request, @RequestParam(defaultValue = "1") long current, @RequestParam(defaultValue = "3") long size, User user){
        //创建分页对象
        Page<User> page =new Page<>(current,size);
        //创建查询条件对象
        QueryWrapper<User> wrapper = new QueryWrapper<>();
        //执行分页查询
        IPage<User> pageInfo = userService.page(page, wrapper);
        //存储到request中
        request.setAttribute("pageInfo",pageInfo);
        return "/user_list";//注意最后一步是返回到测试界面,且不用任何后缀
    }
}
开发controller层,如果用到了mybatisplus自带的分页,一定要在启动类里实例化分页的配置类,这一步本来是不需要,但由于国内用的JDK版本与spring boot版本不合适所有需要手动实例化一个配置bean,如下
package com.wy.scjg;

import com.baomidou.mybatisplus.extension.plugins.PaginationInterceptor;
import org.mybatis.spring.annotation.MapperScan;
import org.springframework.boot.SpringApplication;
import org.springframework.boot.autoconfigure.SpringBootApplication;
import org.springframework.context.annotation.Bean;

@SpringBootApplication
@MapperScan("com.wy.scjg.mapper")
public class ScjgApplication {

    public static void main(String[] args) {
        SpringApplication.run(ScjgApplication.class, args);
    }

    /**
     * 用bean注解将分页配置类添加到spring容器里面
     * @return
     */
    @Bean
    public PaginationInterceptor paginationInterceptor(){
        return new PaginationInterceptor();
    }
}
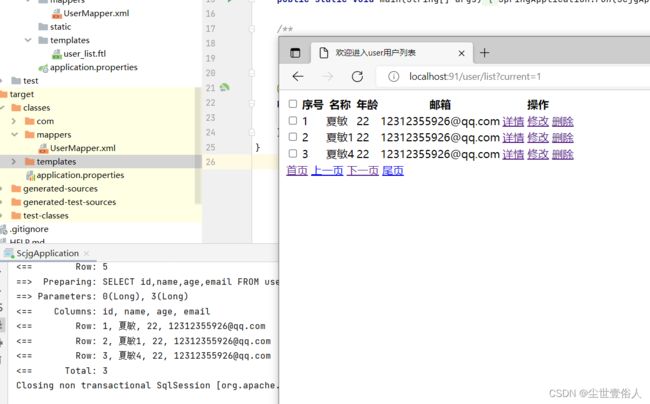
第十步:开发freemarker插件的测试页面
<html>
<head>
    <title>欢迎进入user用户列表title>
head>
<body>
   <table>
       <thead>
       <tr>
           <th><input type="checkbox"/> th>
           <th>序号th>
           <th>名称th>
           <th>年龄th>
           <th>邮箱th>
           <th>操作th>
       tr>
       thead>

       <tbody>
       <#list pageInfo.records as user>
           <tr>
             <td><input type="checkbox" value="${user.id}"/> td>
               <td>${user.id}td>
               <td>${user.name!""}td>
               <td>${user.age!""}td>
               <td>${user.email!""}td>
               <td>
                   <a href="">详情a>
                   <a href="">修改a>
                   <a href="">删除a>
               td>
           tr>
       #list>

       <tr>
           <td colspan="10" center>
               <a href="/user/list?current=1">首页a>
               <a href="/user/list?current=${pageInfo.current-1}">上一页a>
               <a href="/user/list?current=${pageInfo.current+1}">下一页a>
               <a href="/user/list?current=${pageInfo.pages!""}">尾页a>
           td>
       tr>
   table>

body>
html>
!"" 是freemarker的对数据的非空判断,这个必须写上,因为如果你不写,且调用的这个数据是空的,那么它会报错的
第十一步:启动程序,测试效果
最后说一下,在service和Dao层中我任何方法都没有写,但是却可以出现列表效果,这个是因为Service和Dao继承的父类中有自带的方法,并且在继承时进行了注入以及泛型了操作数据返回的类型User,所以初学阶段不要为了没有写代码,但出现了效果这个事费解,本篇大家知道SSM增删改查那一套,在spring boot里怎么操作流程是什么就可以了,详细的后面会说
到此本篇知识点讲解结束,此外 本次整体讲解的spring boot项目已上传github