RabbitMQ简单使用
一、MQ的介绍
1.MQ概述
MQ ( Message Queue ):消息队列,是基础数据结构中 FIFO 的一种数据结构。一般用来解决流量削峰、应用解耦、 异步处理等问题,实现高性能,高可用,可伸缩和最终一致性架构。
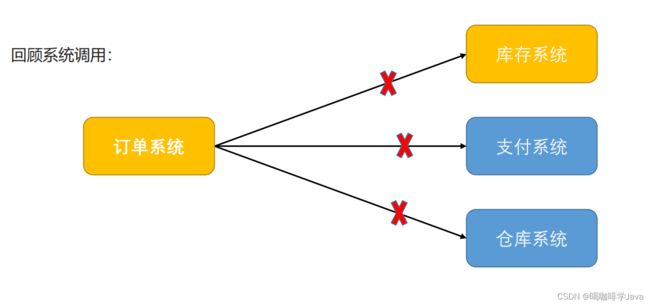
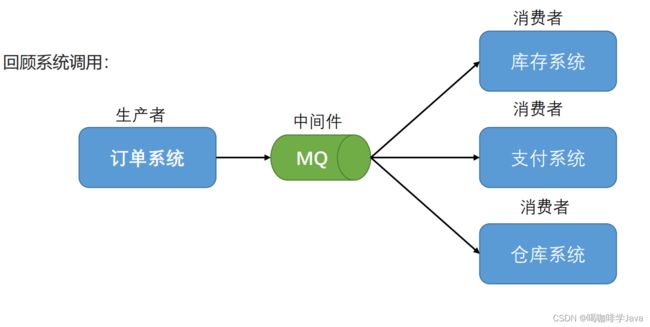
1.1回顾系统调用
- 小结:
- MQ:消息队列,用于消息传递的中间件
- 发送消息方称为生产者
- 接收消息方称为消费者
1.2MQ优缺点
- 优点
- 流量消峰:避免流量高峰时期导致系统挂掉,提高系统稳定性
- 应用解耦:降低系统间依赖,提高系统容错性
- 异步处理:提速增效,提高用户体验感
- 缺点
- 提高了系统复杂度,降低了系统稳定性和可用性
- 带来了数据一致性问题
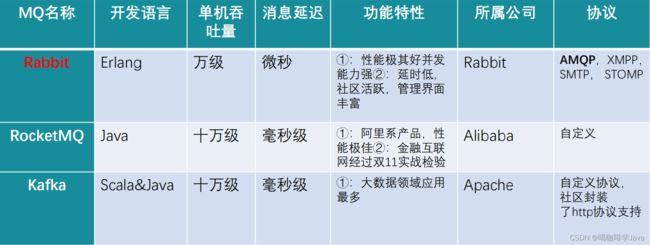
2.常用MQ介绍
AMQP ,即 Advanced Message Queuing Protocol (高级消息队列协议),是一个网络协议,是应用层协议的一个开放标准,为面向消息的中间件设计。2006 年, AMQP 规范发布。
3.RabbitMQ概述
RabbitMQ 是实现了高级消息队列协议( AMQP )的开源消息代理软件(亦称面向消息的中间件)。 官网地址:https://www.rabbitmq.com/
3.1架构图
4.RabbitMQ名词解释
- Producer:生产者,发送消息的程序
- Consumer:消费者,接收消息的程序
- Broker:接收和分发消息的应用,RabbitMQ Server 就是 Message Broker
- Connection:生产者,消费者,Broker之间的TCP连接
- Channel:通信连接信道,降低TCP连接开销
- Virtual host:虚拟主机
- Exchange:交换机,message 到达 broker 先存放到交换机
- Queue:队列,消费者从这里获取消息
- Binding:交换机与队列之间的虚拟连接,用于消息分发
5..RabbitMQ工作模式
 二、RabbitMQ的安装
RabbitMQ官网下载地址:Downloading and Installing RabbitMQ — RabbitMQ
1.安装依赖(在线)
yum install build-essential openssl openssl-devel unixODBC unixODBC-devel make gcc gcc-c++ kernel-devel m4 ncurses-devel tk tc xz
2.安装环境
上传安装包到linux 环境
2.1安装erlang环境
rpm -ivh erlang-23.3.4.5-1.el7.x86_64.rpm
- 如果出现如下错误
- 使用yum升级gblic 版本
sudo yum install zlib-devel bzip2-devel openssl-devel ncurses-devel sqlite-devel readline-devel tk-devel gcc make -y
2.2安装rabbitMQ
-
安装socat
yum install socat -y
-
安装rabbitMQ
rpm -ivh rabbitmq-server-3.8.34-1.suse.noarch.rpm
-
开启管理界面
rabbitmq-plugins enable rabbitmq_management
-
启动rabbitmq
/bin/systemctl start rabbitmq-server.service
2.3rabbitMQ操作
-
开放端口
firewall-cmd --zone=public --add-port=15672/tcp --permanent
firewall-cmd --zone=public --add-port=5672/tcp --permanent
firewall-cmd --reload
-
查看服务状态
/sbin/service rabbitmq-server status
-
停止服务
/sbin/service rabbitmq-server stop
-
添加开机自启动
chkconfig rabbitmq-server on
3.添加用户密码
-
添加账户密码
rabbitmqctl add_user sy 123456
-
设置角色
rabbitmqctl set_user_tags sy administrator
-
设置用户权限
rabbitmqctl set_permissions -p "/" sy ".*" ".*" ".*"
-
查看用户和角色
rabbitmqctl list_users
4.重置命令
-
关闭rabbitMQ
rabbitmqctl stop_app
-
重置命令
rabbitmqctl reset
-
重新启动
rabbitmqctl start_app
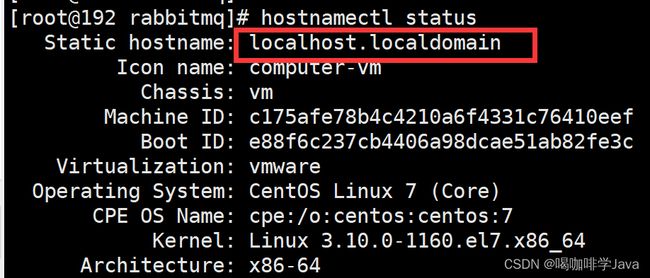
5.服务出问题
-
查看主机名称
hostnamectl status
- 重新设置一下主机名称
hostnamectl set-hostname localhost.localdomain
三、RabbitMQ快速入门
1.使用简单模式完成生产者与消费者之间的通信
1.1通过生产者,发送:hello rabbitMQ 给消费者,完成服务间的通信
1.2实现思路
- 1. 通过Maven构建生产者与消费者项目
- 2. 添加依赖
- 3. 创建生产者与消费者
- 4. 生产者发送消息
- 5. 消费者接收消息
生产者
public class ProducerDemo1 {
    //队列名称
    private final static String QUEUE_NAME = "hello";

    public static void main(String[] args) throws IOException {
        //建立连接工厂
        ConnectionFactory factory = new ConnectionFactory();
        //设置目标主机ip
        factory.setHost("192.168.245.129");
        //设置账号名和密码
        factory.setUsername("wj");
        factory.setPassword("123456");
//        修改端口
//        factory.setPort();
        try (Connection connection = factory.newConnection();
             Channel channel = connection.createChannel()) {
            /*
             queueDeclare(String queue, boolean durable, boolean exclusive, boolean autoDelete,
                            Map arguments)
               参数说明:
                        queue: 队列名称
                        durable: 是否持久化
                        exclusive: 是否一个消费者监听一个队列
                        autoDelete:是否自动删除。如果没有消费者,自动删除队列
                        arguments:参数
             */
            //通道和队列的连接
            channel.queueDeclare(QUEUE_NAME, false, false, false, null);
            //需要发送的消息
            String message = "Hello RabbitMQ";
            //通过最基础的发布
            channel.basicPublish("", QUEUE_NAME, null, message.getBytes());
            System.out.println(" [x] Sent '" + message + "'");
        }catch (Exception e) {
            e.printStackTrace();
        }

    }
}
消费者
public class Consumer {
    private final static String QUEUE_NAME = "hello";

    public static void main(String[] args) throws Exception {
        ConnectionFactory factory = new ConnectionFactory();
        factory.setHost("192.168.245.129");
        //设置账号名和密码
        factory.setUsername("wj");
        factory.setPassword("123456");
        //建立连接
        Connection connection = factory.newConnection();
        Channel channel = connection.createChannel();

        channel.queueDeclare(QUEUE_NAME, false, false, false, null);
        System.out.println(" [*] Waiting for messages. To exit press CTRL+C");
        DeliverCallback deliverCallback = (consumerTag, delivery) -> {
            String message = new String(delivery.getBody(), "UTF-8");
            System.out.println(" [x] Received '" + message + "'");
        };
        channel.basicConsume(QUEUE_NAME, true, deliverCallback, consumerTag -> { });

    }
}四、RabbitMQ 的工作模式
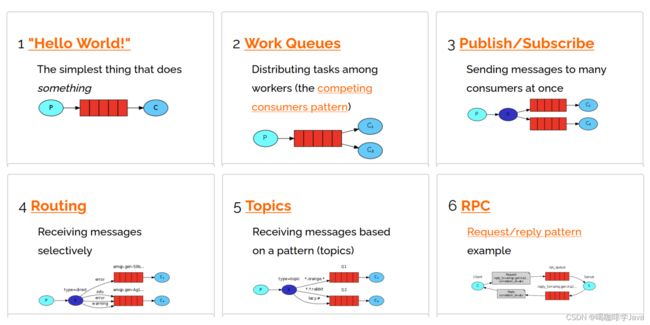
- Work queues 工作队列
- Pub/Sub 订阅模式
- Routing 路由模式
- Topics 通配符模式
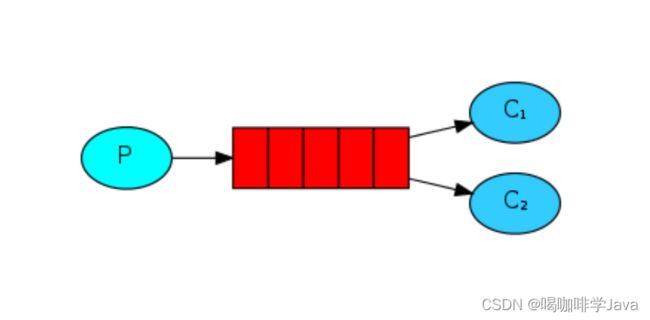
1.Work Queues 工作队列
- 工作队列与简单模式相比,多了一个或一些消费端,多个消费端共同消费同一个队列中的消息
- 使用场景:对于消息生产速度大于消费速度场景,可以增加消费者减少单个消费者压力
- 生产者代码
public class ProducerQueue {
    //队列名称
    private final static String QUEUE_NAME = "work_queue";

    public static void main(String[] args) throws IOException {
        //建立连接工厂
        ConnectionFactory factory = new ConnectionFactory();
        //设置目标主机ip
        factory.setHost("192.168.245.129");
        //设置账号名和密码
        factory.setUsername("wj");
        factory.setPassword("123456");
//        修改端口
//        factory.setPort();
        try (Connection connection = factory.newConnection();
             Channel channel = connection.createChannel()) {
            //通道和队列的连接
            channel.queueDeclare(QUEUE_NAME, false, false, false, null);
            for (int i = 0; i < 10; i++) {
                //需要发送的消息
                String message = "Hello RabbitMQ"+i;
                //通过最基础的发布
                channel.basicPublish("", QUEUE_NAME,
                        MessageProperties.PERSISTENT_TEXT_PLAIN,
                        message.getBytes());
                System.out.println(" [x] Sent '" + message + "'");
            }

        }catch (Exception e) {
            e.printStackTrace();
        }
    }
}- 消费者代码
public class ConsumerQueue {
    private final static String QUEUE_NAME = "work_queue";

    public static void main(String[] args) throws Exception {
        ConnectionFactory factory = new ConnectionFactory();
        factory.setHost("192.168.245.129");
        //设置账号名和密码
        factory.setUsername("wj");
        factory.setPassword("123456");
        //建立连接
        Connection connection = factory.newConnection();
        Channel channel = connection.createChannel();
        channel.queueDeclare(QUEUE_NAME, false, false, false, null);
        channel.basicQos(1);//如果你的消息还没确认,那么同一时间只给你发送一条消息
        System.out.println(" [*] Waiting for messages. To exit press CTRL+C");
        DeliverCallback deliverCallback = (consumerTag, delivery) -> {
            String message = new String(delivery.getBody(), "UTF-8");
            System.out.println(" [x] Received '" + message + "'");
            try {
                Thread.sleep(3000L);
            } catch (InterruptedException e) {
                e.printStackTrace();
            }
        };
        channel.basicConsume(QUEUE_NAME, true, deliverCallback, consumerTag -> { });

    }
}
public class ConsumerQueue2 {
private final static String QUEUE_NAME = "work_queue";
public static void main(String[] args) throws Exception {
ConnectionFactory factory = new ConnectionFactory();
factory.setHost("192.168.245.129");
//设置账号名和密码
factory.setUsername("wj");
factory.setPassword("123456");
//建立连接
Connection connection = factory.newConnection();
Channel channel = connection.createChannel();
channel.queueDeclare(QUEUE_NAME, false, false, false, null);
channel.basicQos(1);//如果你的消息还没确认,那么同一时间只给你发送一条消息
System.out.println(" [*] Waiting for messages. To exit press CTRL+C");
DeliverCallback deliverCallback = (consumerTag, delivery) -> {
String message = new String(delivery.getBody(), "UTF-8");
System.out.println(" [x] Received '" + message + "'");
};
channel.basicConsume(QUEUE_NAME, true, deliverCallback, consumerTag -> { });
}
}1.1小结
- 分发机制:轮询分发机制
- 应用场景:同一条消息,在多个消费者之间只能有一个消费,应用于只需要单节点消费的场景
- 发送验证码
- 发送生日提醒
2. Publish/Subscribe 发布订阅模式
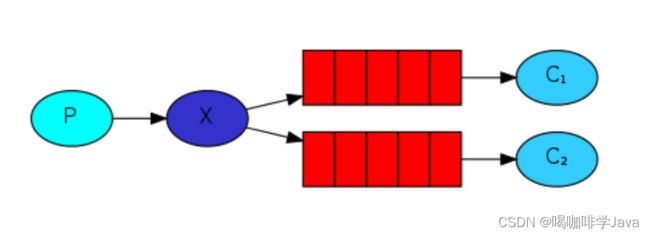
- 在订阅模型中,多了一个Exchange 角色:
- Exchange:交换机(X)。接收生产者发送的消息; 处理投递消息,例如递交给某个特别队列、递交给所有队列、或是将消息丢弃。具体操作根据交换机类型来定义:
- Fanout:广播,将消息交给所有绑定到交换机的队列
- Direct:定向,把消息交给符合指定routing key 的队列
- Topic:通配符,把消息交给符合routing pattern(路由模式) 的队列
- 注意:交换机并不具备存储消息的能力,如果没有队列绑定,则消息会丢失
生产者代码
public class ProducerPubSub {
    //交换机名称
    private final static String EXCHANGE_NAME = "logs";

    public static void main(String[] args) throws IOException {
        //建立连接工厂
        ConnectionFactory factory = new ConnectionFactory();
        //设置目标主机ip
        factory.setHost("192.168.245.129");
        //设置账号名和密码
        factory.setUsername("wj");
        factory.setPassword("123456");
//        修改端口
//        factory.setPort();
        try (Connection connection = factory.newConnection();
             Channel channel = connection.createChannel()) {
            //信道和交换机的绑定
            channel.exchangeDeclare(EXCHANGE_NAME, "fanout");
            //创建队列
            String queue1 = "fanout_queue_1";
            String queue2 = "fanout_queue_2";
            channel.queueDeclare(queue1,true,false,false,null);
            channel.queueDeclare(queue2,true,false,false,null);
            //通道和队列连接
            channel.queueBind(queue1, EXCHANGE_NAME, "");
            channel.queueBind(queue2, EXCHANGE_NAME, "");
            /*routingKey 如果在fanout模式下,指定""*/
            for (int i = 0; i < 10; i++) {
                //需要发送的消息
                String message = "Hello RabbitMQ"+i;
                //通过最基础的发布
                channel.basicPublish(EXCHANGE_NAME, "", null, message.getBytes());
                System.out.println(" [x] Sent '" + message + "'");
            }

        }catch (Exception e) {
            e.printStackTrace();
        }
    }
}
消费者代码
public class ConsumerPubSub {
    //指定接收队列名称String queue1 = "fanout_queue_1"
    private final static String QUEUE_NAME = "fanout_queue_1";

    public static void main(String[] args) throws Exception {
        ConnectionFactory factory = new ConnectionFactory();
        factory.setHost("192.168.245.129");
        //设置账号名和密码
        factory.setUsername("wj");
        factory.setPassword("123456");
        //建立连接
        Connection connection = factory.newConnection();
        Channel channel = connection.createChannel();
        channel.exchangeDeclare(QUEUE_NAME, "fanout");
        channel.queueDeclare(QUEUE_NAME, true, false, false, null);
        channel.basicQos(1);//如果你的消息还没确认,那么同一时间只给你发送一条消息
        System.out.println(" [*] Waiting for messages. To exit press CTRL+C");
        DeliverCallback deliverCallback = (consumerTag, delivery) -> {
            String message = new String(delivery.getBody(), "UTF-8");
            System.out.println(" [x] Received '" + message + "'");
            try {
                Thread.sleep(3000L);
            } catch (InterruptedException e) {
                e.printStackTrace();
            }
        };
        channel.basicConsume(QUEUE_NAME, true, deliverCallback, consumerTag -> { });

    }
}
2.1小结
- 交换机需要与队列进行绑定,绑定之后;一个消息可以被多个消费者都收到。
- 发布订阅模式与工作队列模式的区别:
- 工作队列模式不用定义交换机,而发布/订阅模式需要定义交换机
- 发布/订阅模式的生产方是面向交换机发送消息,工作队列模式的生产方是面向队列发送消息
- 发布/订阅模式需要手动设置队列和交换机的绑定
3. Routing 路由模式
- RoutingKey 编写规则:由一个或多个单词组成,多个单词用.分割,比如order.save
- 在路由模型中:
- 队列与交换机的绑定需要指定路由RoutingKey
- 生产者在向 Exchange 发送消息时,也必须指定消息的 RoutingKey
- 交换机分发的规则根据 RoutingKey 来分发给相应队列
- 生产者代码
public class ProducerRouting {
    //交换机名称
    private final static String EXCHANGE_NAME = "direct_logs";

    public static void main(String[] args) throws IOException {
        //建立连接工厂
        ConnectionFactory factory = new ConnectionFactory();
        //设置目标主机ip
        factory.setHost("192.168.245.129");
        //设置账号名和密码
        factory.setUsername("wj");
        factory.setPassword("123456");
//        修改端口
//        factory.setPort();
        try (Connection connection = factory.newConnection();
             Channel channel = connection.createChannel()) {
            //信道和交换机的绑定
            channel.exchangeDeclare(EXCHANGE_NAME, BuiltinExchangeType.DIRECT);
            //创建队列
            String queue1 = "direct_queue_1";
            String queue2 = "direct_queue_2";
            channel.queueDeclare(queue1,true,false,false,null);
            channel.queueDeclare(queue2,true,false,false,null);
            //通道和队列连接
            channel.queueBind(queue1, EXCHANGE_NAME, "error");
            channel.queueBind(queue2, EXCHANGE_NAME, "error");
            channel.queueBind(queue2, EXCHANGE_NAME, "info");
            channel.queueBind(queue2, EXCHANGE_NAME, "warning");
            /*routingKey 如果在fanout模式下,指定""*/
            for (int i = 0; i < 10; i++) {
                //需要发送的消息
                String message = "Hello RabbitMQ"+i;
                //通过最基础的发布
                if (i % 2 ==0){
                    channel.basicPublish(EXCHANGE_NAME, "error", null, message.getBytes());
                }else{
                    channel.basicPublish(EXCHANGE_NAME, "info", null, message.getBytes());
                }

                System.out.println(" [x] Sent '" + message + "'");
            }

        }catch (Exception e) {
            e.printStackTrace();
        }
    }
}- 消费者代码
public class ConsumerRouting {

    private final static String QUEUE_NAME = "direct_queue_1";

    public static void main(String[] args) throws Exception {
        ConnectionFactory factory = new ConnectionFactory();
        factory.setHost("192.168.245.129");
        //设置账号名和密码
        factory.setUsername("wj");
        factory.setPassword("123456");
        //建立连接
        Connection connection = factory.newConnection();
        Channel channel = connection.createChannel();
        channel.exchangeDeclare(QUEUE_NAME, "fanout");
        channel.queueDeclare(QUEUE_NAME, true, false, false, null);
        channel.basicQos(1);//如果你的消息还没确认,那么同一时间只给你发送一条消息
        System.out.println(" [*] Waiting for messages. To exit press CTRL+C");
        DeliverCallback deliverCallback = (consumerTag, delivery) -> {
            String message = new String(delivery.getBody(), "UTF-8");
            System.out.println(" [x] Received '" + message + "'");
            try {
                Thread.sleep(1000L);
            } catch (InterruptedException e) {
                e.printStackTrace();
            }
        };
        channel.basicConsume(QUEUE_NAME, true, deliverCallback, consumerTag -> { });

    }
}
另外两个消费者改成队列2,其他代码不变
3.1小结
- 生产者发送消息时要指定RoutingKey
- 队列与交换机绑定也需要RoutingKey
4. Topics 通配符模式
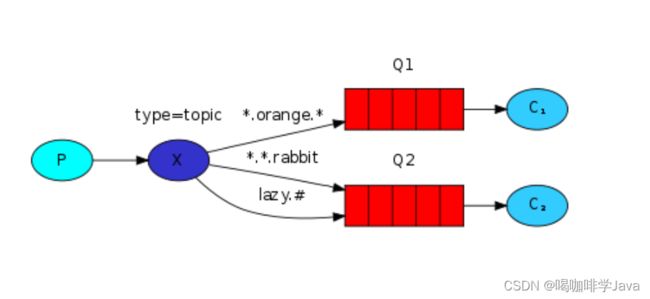
- Topics模式可以通过通配符配置 RoutingKey,会更加灵活
- 通配符规则:
- # 匹配一个或多个词。如order.# 可以匹配 order.save order.product.update…
- * 匹配一个单词。如order.* 可以匹配 order.save
- 生产者代码
public class ProducerTopic {
    //交换机名称
    private final static String EXCHANGE_NAME = "topic_logs";

    public static void main(String[] args) throws IOException {
        //建立连接工厂
        ConnectionFactory factory = new ConnectionFactory();
        //设置目标主机ip
        factory.setHost("192.168.245.129");
        //设置账号名和密码
        factory.setUsername("wj");
        factory.setPassword("123456");
//        修改端口
//        factory.setPort();
        try (Connection connection = factory.newConnection();
             Channel channel = connection.createChannel()) {
            //信道和交换机的绑定
            channel.exchangeDeclare(EXCHANGE_NAME, BuiltinExchangeType.TOPIC);
            //创建队列
            String queue1 = "topic_queue_1";//只记录订单数据wj.order.#
            String queue2 = "topic_queue_2";//wj.# *.log.#
            channel.queueDeclare(queue1,true,false,false,null);
            channel.queueDeclare(queue2,true,false,false,null);
            //通道和队列连接
            channel.queueBind(queue1, EXCHANGE_NAME, "wj.order.#");
            channel.queueBind(queue2, EXCHANGE_NAME, "wj.#");
            channel.queueBind(queue2, EXCHANGE_NAME, "*.log.#");

            /*routingKey 如果在fanout模式下,指定""*/
            for (int i = 0; i < 10; i++) {
                //需要发送的消息
                String message = "Hello RabbitMQ"+i;
                //通过最基础的发布
                if (i % 2 ==0){
                    channel.basicPublish(EXCHANGE_NAME, "wj.order.save", null, message.getBytes());
                }else{
                    channel.basicPublish(EXCHANGE_NAME, "tx.log.save", null, message.getBytes());
                }

                System.out.println(" [x] Sent '" + message + "'");
            }

        }catch (Exception e) {
            e.printStackTrace();
        }
    }
}- 消费者代码
public class ConsumerTopic {

    private final static String QUEUE_NAME = "topic_queue_2";

    public static void main(String[] args) throws Exception {
        ConnectionFactory factory = new ConnectionFactory();
        factory.setHost("192.168.245.129");
        //设置账号名和密码
        factory.setUsername("wj");
        factory.setPassword("123456");
        //建立连接
        Connection connection = factory.newConnection();
        Channel channel = connection.createChannel();
        channel.exchangeDeclare(QUEUE_NAME, "fanout");
        channel.queueDeclare(QUEUE_NAME, true, false, false, null);
        channel.basicQos(1);//如果你的消息还没确认,那么同一时间只给你发送一条消息
        System.out.println(" [*] Waiting for messages. To exit press CTRL+C");
        DeliverCallback deliverCallback = (consumerTag, delivery) -> {
            String message = new String(delivery.getBody(), "UTF-8");
            System.out.println(" [x] Received '" + message + "'");
            try {
                Thread.sleep(1000L);
            } catch (InterruptedException e) {
                e.printStackTrace();
            }
        };
        channel.basicConsume(QUEUE_NAME, true, deliverCallback, consumerTag -> { });

    }
}
4.1小结
- Topic 通配符模式可以实现 Pub/Sub 发布与订阅模式和 Routing 路由模式的功能
- Topic 通配符模式在配置routing key 的时候可以使用通配符,更加灵活好用。
5.工作模式总结
- 1. 简单模式 HelloWorld。一个生产者、一个消费者,不需要设置交换机使用默认的交换机
- 2. 工作队列模式 Work Queue 。一个生产者、多个消费者(排它关系),不需要设置交换 机,使用默认的交换机
- 3. 发布订阅模式 Publish/subscribe。设置类型为 fanout 的交换机同时让交换机和队列绑定,交换机会将消息发送到绑定的队列
- 4. 路由模式 Routing。设置 direct 交换机,并且指定 routing key,交换机根据routing key 将消息发送到对应的队列
- 5. 通配符模式 Topic。设置类型为 topic 的交换机,交换机和队列进行绑定,并且指定通配符方式的 routing key,交换机根据通配符分发消息到队列
五、SpringBoot 整合 RabbitMQ
1.整合
1.1创建生产者服务
-
RabbitMqConfig
@Configuration
@EnableRabbit
public class RabbitMqConfig {
    /**
     * 创建队列成功//core.Queue
     */
    @Bean
    public Queue helloQueue(){
        return new Queue("springboot-queue",true);
    }

    //创建topic队列
    @Bean
    public Queue topicQueue(){
        return new Queue("springboot-topic-queue",true);
    }

    //创建交换机
    @Bean
    public TopicExchange topicExchange(){
        return new TopicExchange("topicExchange");
    }

    //绑定交换机与消息队列
    @Bean
    public Binding topicBing(){
        return BindingBuilder
                .bind(topicQueue())//绑定队列
                .to(topicExchange())//绑定交换机
                .with("wj.*");//制定路由器key
    }
}- 配置文件
spring:
  rabbitmq:
    host: 192.168.245.129
    port: 5672
    username: wj
password: 123456- 发布普通消息
@SpringBootTest
class SpringbootRabbitmqSendApplicationTests {
    @Autowired
    RabbitTemplate template;

    @Autowired
    Queue helloQueue;

    @Test
    void contextLoads() {
        template.convertAndSend(helloQueue.getName(),"hello springboot");
}- 发布路由消息
@SpringBootTest
class SpringbootRabbitmqSendApplicationTests {
    @Autowired
    RabbitTemplate template;

    @Autowired
    Queue helloQueue;

    @Test
    void contextLoads() {
        template.convertAndSend(helloQueue.getName(),"hello springboot");
    }

    @Test
    void send2Topic(){
        template.convertAndSend("topicExchange","wj.order","123456");
    }

}1.2创建消费者服务
配置文件同生产者
@Service
public class MessageReceive {

    @RabbitListener(queues = {"springboot-queue","springboot-topic-queue"})
    public void receive(String body){
        System.out.println(body);
    }
}2.案例
2.1 创建订单服务项目
@Configuration
@EnableRabbit
public class RabbitMqConfig {


    //创建库存队列
    @Bean
    public Queue inventoryQueue(){
        return new Queue("inventory-queue",true);
    }

    //创建支付队列
    @Bean
    public Queue payQueue(){
        return new Queue("pay-queue",true);
    }


    //创建交换机
    @Bean
    public TopicExchange orderExchange(){
        return new TopicExchange("orderExchange");
    }

    //绑定交换机与消息队列
    @Bean
    public Binding inventoryBing(){
        Binding order = BindingBuilder
                .bind(inventoryQueue())//绑定队列
                .to(orderExchange())//绑定交换机
                .with("order.#");//制定路由器key
        return order;
    }

    @Bean
    public Binding payBing(){
        Binding order = BindingBuilder
                .bind(payQueue())//绑定队列
                .to(orderExchange())//绑定交换机
                .with("order.#");//制定路由器key
        return order;
    }
}
2.2 创建库存服务项目
@Service
public class MessageReceive {

    @RabbitListener(queues = {"order-queue"})
    public void receive(String body){
        System.out.println(body);
    }
}
2.3 创建支付服务项目
@Service
public class MessageReceive {

    @RabbitListener(queues = {"order-queue"})
    public void receive(String body){
        System.out.println(body);
    }
}