springboot整合第三方技术
目录
spring boot概述
起步依赖
程序启动
配置文件application.yml
多环境启动
配置文件分类
整合junit
整合mybatis
日志
热部署
整合NoSql
整合缓存
整合任务
整合邮件
整合消息
监控
spring boot概述
- 自动配置。这个是用来解决 Spring 程序配置繁琐的问题
- 起步依赖。这个是用来解决 Spring 程序依赖设置繁琐的问题
- 辅助功能(内置服务器,...)。我们在启动 SpringBoot 程序时既没有使用本地的 tomcat 也没有使用 tomcat 插件,而是使用 SpringBoot 内置的服务器。
起步依赖
springboot的起步依赖主要是一个父工程和一个springweb依赖,
		org.springframework.boot
		spring-boot-starter-parent
		2.5.0


		org.springframework.boot
		spring-boot-starter-web
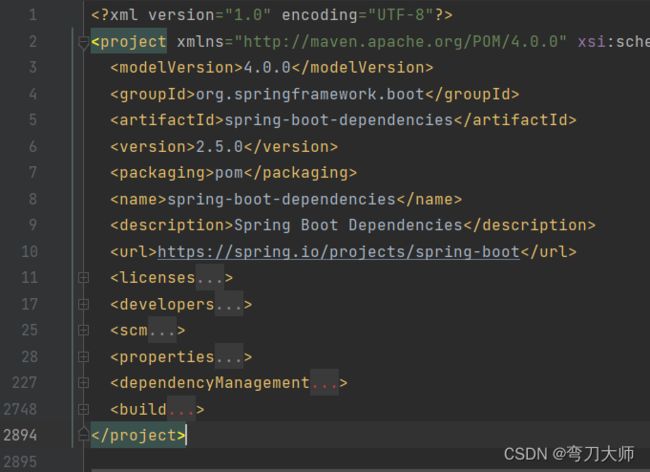
进入到父工程,发现又继承了一个父工程如下,该配置文件真正用于管理spring boot应用中所有的依赖版本,是spring boot的版本仲裁中心
    org.springframework.boot
    spring-boot-dependencies
    2.5.0
再进入该父工程,发现配置结构如下,原来该工程已经包含了几百个依赖,并锁定了200多个版本属性,其中就包含springboot-starter-web,而springboot-starter-web又引入了 spring-web 和 spring-webmvc 的依赖,这就是为什么我们的工程中没有依赖这两个包还能正常使用 springMVC 中的注解的原因,还有spring-boot-starter-tomcat,所以我们的工程才能正常启动
spring boot将所有的功能场景都抽取出来做成多个starter(启动器),只需要在项目中引入这些starter,相关场景的所有依赖都会导入进来,需要用到什么功能就导入什么场景的启动器
在使用 SpringBoot 换技术时只需要导入该技术的起步依赖即可
程序启动
每一个springboot程序都有一个引导类,该类是项目的入口,运行 main 方法就可以启动项目
@SpringBootApplication
public class Springboot09SsmApplication {

	public static void main(String[] args) {
		SpringApplication.run(Springboot09SsmApplication.class, args);
	}

}
配置文件application.yml
# TODO 配置数据源相关信息,同层级左侧对齐,属性名与属性值之间使用冒号+空格作为分隔
server:
  port: 80

spring:
  datasource:
    type: com.alibaba.druid.pool.DruidDataSource
    driver-class-name: com.mysql.cj.jdbc.Driver
    url: jdbc:mysql://localhost:3306/ssm_db #?servierTimezone=UTC
    username: root
    password: 123456
logging:
  level:
    root: info
enterprise:
  name: itcast
  age: 16
  tel: 4006184000
  subject:
    - Java
    - 前端
    - 大数据
优点:
- 容易阅读,yaml 类型的配置文件比 xml 类型的配置文件更容易阅读,结构更加清晰
- 容易与脚本语言交互
- 以数据为核心,重数据轻格式,yaml 更注重数据,而 xml 更注重格式
读取方式:
- @Value("${一级属性名.二级属性名……}")
-
@Autowired
@Data
@ConfigurationProperties(prefix = "servers")
//2.开启对当前bean的属性注入校验
@Validated
public class ServerConfig {
    private String ipAddress;
    //3.设置具体的规则
    @Max(value = 8888,message = "最大值不能超过8888")
    @Min(value = 202,message = "最小值不能低于202")
    private int port;
    @DurationUnit(ChronoUnit.HOURS)
    private long timeout;

}
servers:
ip-address: 192.168.1.1
port: 8888
timeout: -1
多环境启动
#设置启用的环境
spring:
  profiles:
    active: dev

---
#开发
spring:
  config:
    activate:
      on-profile: dev
server:
  port: 80
---
#生产
spring:
  profiles: pro
server:
  port: 81
---
#测试
spring:
  profiles: test
server:
  port: 82
---也可以用命令行启动参数,即指定启用哪个环境配置,又临时指定端口,该方式优先级比配置文件高,属性加载优先顺序可参考配置加载优先级
java –jar springboot.jar –-server.port=88 –-spring.profiles.active=test配置文件分类
配置文件放在不同位置的优先级是不同的,1级与2级用于系统开发阶段设置通用属性,2级常用于项目经理进行整体项目属性调控,3级与4级留做系统打包后设置通用属性,4级常用于运维经理进行线上整体项目部署方案调控
- 1级:classpath:application.yml(优先级低)
- 2级:classpath:config/application.yml
- 3级:file :application.yml
- 4级:file :config/application.yml (优先级高)
多环境开发也可以使用group属性设置配置文件按功能分组,便于线上维护管理
application-devDB.ymlapplication-devRedis.ymlapplication-devMVC.yml
spring:
  profiles:
    active: dev
    group:
      "dev": devDB,devRedis,devMVC
      "pro": proDB,proRedis,proMVC
      "test": testDB,testRedis,testMVC
整合junit
spring整合junit需要使用 @RunWith 注解指定运行器,使用 @ContextConfiguration 注解来指定配置类或者配置文件
@RunWith(SpringJUnit4ClassRunner.class)
@ContextConfiguration(classes = SpringConfig.class)
public class UserServiceTest {
    @Autowired
    private BookService bookService;

    @Test
    public void testSave(){
        bookService.save();
    }
}- 在测试类上添加 SpringBootTest 注解
- 使用 @Autowired 注入要测试的资源
- 定义测试方法进行测试
@SpringBootTest
class Springboot07TestApplicationTests {
    @Autowired
    private BookService bookService;

    @Test
    public void save() {
        bookService.save();
    }
}
整合mybatis
Spring 整合 Mybatis 需要定义很多配置类,包括JdbcConfig 配置类(定义数据源加载properties配置项:driver、url、username、password),MybatisConfig 配置类(定义sqlSessionFactoryBean和映射配置),还要在springconfig导入
@Configuration
@ComponentScan("com.itheima")
@PropertySource("classpath:jdbc.properties")
@Import({JdbcConfig.class,MyBatisConfig.class})
public class SpringConfig {
}
而spring boot只需在 application.yml 配置文件中配置如下内容,并在 Dao 接口上使用 @Mapper告诉 Mybatis 哪个是 dao 接口。 Mybatis 会扫描接口并创建接口的代码对象交给 Spring 管理
spring:
  datasource:
    type: com.alibaba.druid.pool.DruidDataSource #配置使用Druid数据源
    driver-class-name: com.mysql.cj.jdbc.Driver
    url: jdbc:mysql://localhost:3306/ssm_db #?servierTimezone=UTC
    username: root
    password: 123456
//方式一:在Dao接口上添加@Mapper注解,并且确保Dao处在引导类所在包或其子包中
@Mapper
public interface BookDao {
@Select("select * from tbl_book where id = #{id}")
public Book getById(Integer id);
}
//方式二:在引导类上添加@MapperScan注解,其属性为所要扫描的Dao所在包
@SpringBootApplication
@MapperScan("com.itheima.dao")
public class Mybatisplus01QuickstartApplication {
public static void main(String[] args) {
SpringApplication.run(Mybatisplus01QuickstartApplication.class, args);
}
}日志
- - 编程期调试代码
- - 运营期记录信息
- - 记录日常运营重要信息(峰值流量、平均响应时长……)
- - 记录应用报错信息(错误堆栈)
- - 记录运维过程数据(扩容、宕机、报警……)
传统使用方法是创建用来记录日志的log对象,spring boot可以用@Slf4j注解代替
@RestController
@RequestMapping("/books")
public class BookController extends BaseClass{
    private static final Logger log = LoggerFactory.getLogger(BookController.class);
    @GetMapping
    public String getById(){
        log.debug("debug...");
        log.info("info...");
        log.warn("warn...");
        log.error("error...");
        return "springboot is running...2";
    }
}
并在配置文件设置日志级别,一般情况下,开发时候使用DEBUG,上线后使用INFO,运维信息记录使用WARN即可
logging:
	# 设置日志组
    group:
    	# 自定义组名,设置当前组中所包含的包
        ebank: com.itheima.controller
    level:
        # root表示根节点,即整体应用日志级别
    	root: warn
        # 为对应组设置日志级别
        ebank: debug
    	# 为对包设置日志级别
        com.itheima.controller: debug
- TRACE:运行堆栈信息,使用率低
- DEBUG:程序员调试代码使用
- INFO:记录运维过程数据
- WARN:记录运维过程报警数据
- ERROR:记录错误堆栈信息
- FATAL:灾难信息,合并计入ERROR
日志输出可以按自定义格式打印在控制台中,也可以转存写入文件,官方格式如下
logging:
	pattern:
    	console: "%d %clr(%p) --- [%16t] %clr(%-40.40c){cyan} : %m %n"
    # 要求容量到达3KB以后就转存信息到第二个文件中。文件命名规则中的%d标识日期,%i是一个递增变量,用于区分日志文件。
	logback:
    	rollingpolicy:
        	max-file-size: 3KB
            file-name-pattern: server.%d{yyyy-MM-dd}.%i.log
热部署
程序改了,不用重启,服务器会自己悄悄的把更新后的程序给重新加载一遍,这就是热部署。
需要导入开发者工具,再重新构建即可
    org.springframework.boot
    spring-boot-devtools
    true
如需自动启动热部署,按如下配置idea
 可以通过application.yml文件进行设定哪些文件不参与热部署操作
spring:
  devtools:
    restart:
      # 设置不参与热部署的文件或文件夹
      exclude: static/**,public/**,config/application.yml
关闭热部署
spring:
  devtools:
    restart:
      enabled: false
整合NoSql
常见NoSQL数据库产品解决方案:Redis Mongo ES Solr,其中MongoDB是一个开源、高性能、无模式(没有固定的数据存储结构)的文档型数据库。是最像关系型数据库的非关系型数据库
#服务端启动
mongod --dbpath=..\data\db
#客户端启动
mongo --host=127.0.0.1 --port=27017
#新增
db.集合名称.insert/save/insertOne(文档)
#修改
db.集合名称.remove(条件)
#删除
db.集合名称.update(条件,{操作种类:{文档}})
#查询
db.集合.find();
整合步骤:1、导入依赖2、配置客户端3、调用api
      org.springframework.boot
      spring-boot-starter-data-mongodb
spring:
  data:
    mongodb:
      uri: mongodb://localhost/itheima
@Autowired
private MongoTemplate mongoTemplate;
@Test
void find(){
List all = mongoTemplate.findAll(Book.class);
System.out.println(all);
} 整合缓存
缓存是一种介于数据永久存储介质与数据应用之间的数据临时存储介质;使用缓存可以有效的减少低速数据读取过程的次数(例如磁盘IO),提高系统性能;缓存不仅可以用于提高永久性存储介质的数据读取效率,还可以提供临时的数据存储空间;常见的方案包括springboot内置缓存、Ehcache(内存级缓存)、Redis(远程)、Memcached(远程)、jetcache(本地+远程)、j2cache(随意整合)
其中阿里的jetCache对SpringCache进行了封装,在原有功能基础上实现了多级缓存、缓存统计、自动刷新、异步调用、数据报表等功能,并设定了本地缓存与远程缓存的多级缓存解决方案
- 本地缓存(local) LinkedHashMap Caffeine
- 远程缓存(remote) Redis Tair
整合jetcache也是分三步 :1、导入依赖2、配置客户端3、调用api
创建缓存时cacheType如果不进行配置,默认值是REMOTE,即仅使用远程缓存方案
jetcache:
  statIntervalMinutes: 1 #查看缓存命中报表
  local:
    default:
      type: linkedhashmap
      keyConvertor: fastjson #指定key的类型转换方式
  remote:
    default:
      type: redis
      host: localhost
      port: 6379
      keyConvertor: fastjson
      valueEncode: java
      valueDecode: java
      poolConfig:
        maxTotal: 50
@SpringBootApplication
//jetcache启用缓存的主开关
@EnableCreateCacheAnnotation
//开启方法注解缓存
@EnableMethodCache(basePackages = "com.itheima")
public class Springboot20JetCacheApplication {
public static void main(String[] args) {
SpringApplication.run(Springboot20JetCacheApplication.class, args);
}
}//创建缓存对象Cache,并使用注解@CreateCache标记当前缓存的信息
//使用本地缓存@CreateCache(name="jetCache_",expire = 1000,timeUnit = TimeUnit.SECONDS,cacheType = CacheType.LOCAL)
@CreateCache(area="sms",name="jetCache_",expire = 10,timeUnit = TimeUnit.SECONDS)
private Cache jetCache;
@Override
public String sendCodeToSMS(String tele) {
String code = codeUtils.generator(tele);
jetCache.put(tele,code);//put写缓存,get读缓存。
return code;
}
@Override
public boolean checkCode(SMSCode smsCode) {
String code = jetCache.get(smsCode.getTele());
return smsCode.getCode().equals(code);
} 整合任务
定时任务是企业级开发中必不可少的组成部分,诸如长周期业务数据的计算,例如年度报表,诸如系统脏数据的处理,再比如系统性能监控报告,还有抢购类活动的商品上架,这些都离不开定时任务。Quartz技术是一个比较成熟的定时任务框架,但配置有点繁琐,下面介绍spring boot自带的任务管理组件——Task
步骤:1、在引导类用@EnableScheduling开启定时任务功能2、定义Bean,在对应要定时执行的操作上方,使用注解@Scheduled定义执行的时间,执行时间的描述方式还是cron表达式
@Component
public class MyBean {
    @Scheduled(cron = "0/1 * * * * ?")
    public void print(){
        System.out.println(Thread.currentThread().getName()+" :spring task run...");
    }
}
spring:
task:
scheduling:
pool;
size: 1 # 任务调度线程池大小 默认 1
thread-name-prefix: spring_tasks_ # 调度线程名称前缀 默认 scheduling-
shutdown:
await-termination: false # 线程池关闭时等待所有任务完成
await-termination-period: 10s # 调度线程关闭前最大等待时间,确保最后一定关闭整合邮件
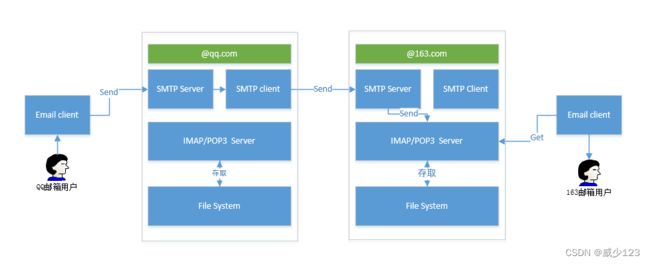
- SMTP(Simple Mail Transfer Protocol):简单邮件传输协议,用于发送电子邮件的传输协议
- POP3(Post Office Protocol - Version 3):用于接收电子邮件的标准协议
- IMAP(Internet Mail Access Protocol):互联网消息协议,是POP3的替代协议
步骤:1、导入坐标2、配置JavaMail3、 实现发邮件接口
spring:
  mail:
    host: smtp.126.com
    username: [email protected]
    password: test
@Service
public class SendMailServiceImpl2 implements SendMailService {
@Autowired
private JavaMailSender javaMailSender;
private String from = "[email protected]";//发送人
private String to = "[email protected]";//接收人
private String subject = "测试邮件";//标题
private String context = " 点开有惊喜";//正文
@Override
public void sendMail() {
try {
MimeMessage message = javaMailSender.createMimeMessage();
MimeMessageHelper helper = new MimeMessageHelper(message,true);
helper.setFrom(to+"(小甜甜)");
helper.setTo(from);
helper.setSubject(subject);
helper.setText(context,true);
//添加附件
File f1 = new File("D:\\workspace\\SNAPSHOT.jar");
helper.addAttachment(f1.getName(),f1);
javaMailSender.send(message);
} catch (Exception e) {
e.printStackTrace();
}
点开有惊喜";//正文
@Override
public void sendMail() {
try {
MimeMessage message = javaMailSender.createMimeMessage();
MimeMessageHelper helper = new MimeMessageHelper(message,true);
helper.setFrom(to+"(小甜甜)");
helper.setTo(from);
helper.setSubject(subject);
helper.setText(context,true);
//添加附件
File f1 = new File("D:\\workspace\\SNAPSHOT.jar");
helper.addAttachment(f1.getName(),f1);
javaMailSender.send(message);
} catch (Exception e) {
e.printStackTrace();
}整合消息
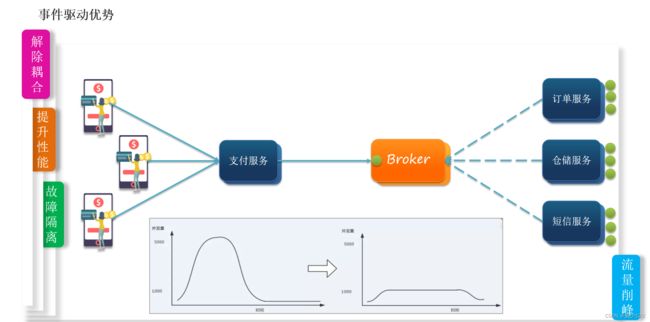
通常发送消息的一方称为消息的生产者,接收消息的一方称为消息的消费者;还可以将消息划分成两种模式,同步消费与异步消息。所谓同步消息就是生产者发送完消息,等待消费者处理,消费者处理完将结果告知生产者,然后生产者继续向下执行业务。这种模式过于卡生产者的业务执行连续性,异步消息就是生产者发送完消息,无需等待消费者处理完毕,生产者继续向下执行其他动作,这样生产者的业务执行效率就会大幅度提升。并且可以通过添加多个消费者来处理同一个生产者发送的消息来提高系统的高并发性,改善系统工作效率,提高用户体验。一旦某一个消费者由于各种问题宕机了,也不会对业务产生影响,提高了系统的高可用性。
- 异步通信的优点: 耦合度低 吞吐量提升 故障隔离 流量削峰
- 异步通信的缺点: 依赖于Broker的可靠性、安全性、吞吐能力 ;架构复杂了,业务没有明显的流程线,不好追踪管理
消息处理规范共三大类:
- JMS(Java Message Service),这是一个规范,作用等同于JDBC规范,提供了与消息服务相关的API接口,规范了点对点模型和发布订阅模型。
- AMQP(advanced message queuing protocol):一种协议(高级消息队列协议,也是消息代理规范),规范了网络交换的数据格式,兼容JMS操作。 具有跨平台性,服务器供应商,生产者,消费者可以使用不同的语言来实现。
- MQTT(Message Queueing Telemetry Transport)消息队列遥测传输,专为小设备设计,是物联网(IOT)生态系统中主要成分之一。
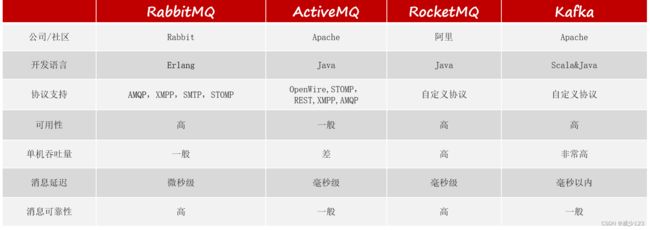
- Kafka,一种高吞吐量的分布式发布订阅消息系统,提供实时消息功能。Kafka技术并不是作为消息中间件为主要功能的产品,但是其拥有发布订阅的工作模式,也可以充当消息中间件来使用,而且目前企业级开发中其身影也不少见。
常见的具体实现技术包括以下几种:
ActiveMQ是MQ产品中的元老级产品,早期标准MQ产品之一,在AMQP协议没有出现之前,占据了消息中间件市场的绝大部分份额,后期因为AMQP系列产品的出现,迅速走弱,目前仅在一些线上运行的产品中出现,新产品开发较少采用。整合方式也是加坐标,做配置,调接口
    org.springframework.boot
    spring-boot-starter-activemq
spring:
  activemq:
    broker-url: tcp://localhost:61616
@Service
public class MessageServiceActivemqImpl implements MessageService {
@Autowired
private JmsMessagingTemplate messagingTemplate;
@Override
public void sendMessage(String id) {
System.out.println("待发送短信的订单已纳入处理队列,id:"+id);
messagingTemplate.convertAndSend("order.queue.id",id);
}
@Override
public String doMessage() {
String id = messagingTemplate.receiveAndConvert("order.queue.id",String.class);
System.out.println("已完成短信发送业务,id:"+id);
return id;
}
}@Component
public class MessageListener {
@JmsListener(destination = "order.queue.id")//使用消息监听器在服务器启动后,监听指定位置,当消息出现后,立即消费消息
@SendTo("order.other.queue.id")
public String receive(String id){
System.out.println("已完成短信发送业务,id:"+id);
return "new:"+id;
}
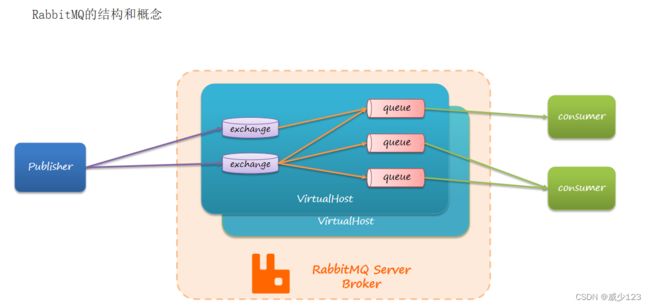
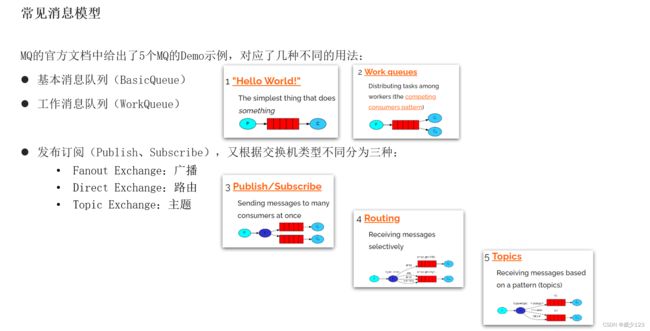
}RabbitMQ是MQ产品中的目前较为流行的产品之一,它遵从AMQP协议。RabbitMQ的底层实现语言使用的是Erlang,默认端口5672,RabbitMQ有5种消息模型,使用的队列相同,但是交换机不同。交换机不同,对应的消息进入的策略也不同,架构如下:
//导入springboot整合amqp的starter,amqp协议默认实现为rabbitmq方案

    org.springframework.boot
    spring-boot-starter-amqp
//配置RabbitMQ的服务器地址
spring:
  rabbitmq:
    host: localhost
    port: 5672
//由于RabbitMQ不同模型要使用不同的交换机,因此需要先初始化RabbitMQ相关的对象,例如队列,交换机等
@Configuration
public class RabbitConfigDirect {
@Bean
public Queue directQueue(){
return new Queue("direct_queue");//创建队列
}
@Bean
public DirectExchange directExchange(){
return new DirectExchange("directExchange");//创建交换机
}
@Bean
public Binding bindingDirect(){
//绑定他们之间的关系,就可以通过交换机操作对应队列。
return BindingBuilder.bind(directQueue()).to(directExchange()).with("direct");
}
}//使用消息监听器在服务器启动后,监听指定位置,当消息出现后,立即消费消息
@Component
public class MessageListener {
@RabbitListener(queues = "direct_queue")
public void receive(String id){
System.out.println("已完成短信发送业务(rabbitmq direct),id:"+id);
}
}RocketMQ由阿里研发,后捐赠给apache基金会,目前是apache基金会顶级项目之一,也是目前市面上的MQ产品中较为流行的产品之一,它遵从AMQP协议。
    org.apache.rocketmq
    rocketmq-spring-boot-starter
    2.2.1
rocketmq:
  name-server: localhost:9876
  producer:
    group: group_rocketmq
@Service
public class MessageServiceRocketmqImpl implements MessageService {
@Autowired
private RocketMQTemplate rocketMQTemplate;
@Override
public void sendMessage(String id) {
System.out.println("待发送短信的订单已纳入处理队列(rocketmq),id:"+id);
SendCallback callback = new SendCallback() {
@Override
public void onSuccess(SendResult sendResult) {
System.out.println("消息发送成功");
}
@Override
public void onException(Throwable e) {
System.out.println("消息发送失败!!!!!");
}
};
rocketMQTemplate.asyncSend("order_id",id,callback);
}
}
//设置监听器使用注解@RocketMQMessageListener
@Component
@RocketMQMessageListener(topic = "order_id",consumerGroup = "group_rocketmq")
public class MessageListener implements RocketMQListener {
    @Override
    public void onMessage(String id) {
        System.out.println("已完成短信发送业务(rocketmq),id:"+id);
    }
} kafka服务器的功能相当于RocketMQ中的broker,kafka运行还需要一个类似于命名服务器的服务。在kafka安装目录中自带一个类似于命名服务器的工具,叫做zookeeper,它的作用是注册中心 。
zookeeper-server-start.bat ..\..\config\zookeeper.properties		# 启动zookeeper
kafka-server-start.bat ..\..\config\server.properties				# 启动kafka
# 创建topic
kafka-topics.bat --create --zookeeper localhost:2181 --replication-factor 1 --partitions 1 --topic itheima
# 查询topic
kafka-topics.bat --zookeeper 127.0.0.1:2181 --list
# 删除topic
kafka-topics.bat --delete --zookeeper localhost:2181 --topic itheima
# 测试生产消息
kafka-console-producer.bat --broker-list localhost:9092 --topic itheima
# 测试消息消费
kafka-console-consumer.bat --bootstrap-server localhost:9092 --topic itheima --from-beginning
    org.springframework.kafka
    spring-kafka
spring:
  kafka:
    bootstrap-servers: localhost:9092
    consumer:
      group-id: order
@Service
public class MessageServiceKafkaImpl implements MessageService {
@Autowired
private KafkaTemplate kafkaTemplate;
@Override
public void sendMessage(String id) {
System.out.println("待发送短信的订单已纳入处理队列(kafka),id:"+id);
kafkaTemplate.send("itheima2022",id);
}
} //接收到的消息封装在对象ConsumerRecord中,获取数据从ConsumerRecord对象中获取即可
@Component
public class MessageListener {
@KafkaListener(topics = "itheima2022")
public void onMessage(ConsumerRecord record){
System.out.println("已完成短信发送业务(kafka),id:"+record.value());
}
} 监控
监控就是展示另一个软件的运行情况,通过各种各样的指标数据集中统一展示反馈给监控人员。例如服务状态(是否宕机)、服务运行指标、程序运行日志、网络是否顺畅、程序的功能是否能够整百分百运行成功。监控程序需要主动上报自己被监控,同时要设置哪些指标被监控。Spring Boot Admin,是一个开源社区项目,用于管理和监控SpringBoot应用程序。
服务端制作:
        org.springframework.boot
        spring-boot-starter-parent
        2.5.4


    de.codecentric
    spring-boot-admin-starter-server
    2.5.4


    org.springframework.boot
    spring-boot-starter-web
//在引导类上添加注解@EnableAdminServer,声明当前应用启动后作为SpringBootAdmin的服务器使用
@SpringBootApplication
@EnableAdminServer
public class Springboot25AdminServerApplication {
    public static void main(String[] args) {
        SpringApplication.run(Springboot25AdminServerApplication.class, args);
    }
}
客户端制作:
    de.codecentric
    spring-boot-admin-starter-client
    2.5.4


    org.springframework.boot
    spring-boot-starter-web
#设置当前客户端将信息上传到哪个服务器上
spring:
  boot:
    admin:
      client:
        url: http://localhost:8080
management:
  endpoint:             # 具体端点的配置
    health:             #端点名称
      show-details: always
    info:
      enabled: true    # 是否开放

  endpoints:           # 全部端点的配置
    enabled-by-default: true # 是否开启默认端点,默认值true
    web:                     #开启通过HTTP请求查询的端点名称
      exposure:
        include: "*"
客户端还可以自定义指标和端点,有以下2种方式:
- 配置形式
info:
  appName: @project.artifactId@
  version: @project.version@
  company: 阿里巴巴
author: 陈咬金- 编程形式
//自定义指标
@Component
public class InfoConfig implements InfoContributor {
    @Override
    public void contribute(Info.Builder builder) {
        builder.withDetail("runTime",System.currentTimeMillis());  //添加单个信息
        Map infoMap = new HashMap();
        infoMap.put("buildTime","2022");
        builder.withDetails(infoMap);         //添加一组信息
    }
}
//自定义端点
@Component
@Endpoint(id="pay",enableByDefault = true)
public class PayEndpoint {
@ReadOperation
public Object getPay(){
Map payMap = new HashMap();
payMap.put("level 1","300");
payMap.put("level 2","291");
payMap.put("level 3","666");
return payMap;
}
}