使用霍夫曼编码的图像压缩二
继续前面章节的介绍
为什么要使用两个结构数组?
最初,struct array pix_freq以及 struct array huffcodes将仅包含 Huffman Tree 中所有叶节点的信息。
结构数组pix_freq将用于存储霍夫曼树的所有节点,数组huffcodes将用作更新(和排序)树。
请记住,每次迭代中只会对huffcodes进行排序,而不是pix_freq
通过组合最低频率的两个节点创建的新节点,在每次迭代中,将附加到pix_freq数组的末尾,也附加到huffcodes数组。
但是数组huffcodes在加入新节点后,会按照出现的概率重新排序。
数组pix_freq中新节点的位置将存储在struct huffcode的arrloc字段中。将指针分配给新节点的左右子节点时将使用arrloc字段。
第 4 步继续……
现在,如果有N 个叶子节点,则整个哈夫曼树的节点总数将等于2N-1
并且在两个节点合并并被新的父节点替换后,节点的数量在每次迭代中减少1 。因此,数组huffcodes有一定长度的节点就足够了,这些节点将用作更新和排序的霍夫曼节点。
int totalnodes = 2 * nodes - 1;
pix_freq = (struct pixfreq*)malloc(sizeof(struct pixfreq) * totalnodes);
huffcodes = (struct huffcode*)malloc(sizeof(struct huffcode) * nodes);
步骤 5用叶节点的信息
初始化两个数组pix_freq和huffcodes 。
j = 0;
int totpix = height * width;
float tempprob;
for (i = 0; i < 256; i++)
{
    if (hist[i] != 0)
    {

        // pixel intensity value
        huffcodes[j].pix = i;
        pix_freq[j].pix = i;

        // location of the node
        // in the pix_freq array
        huffcodes[j].arrloc = j;

        // probability of occurrence
        tempprob = (float)hist[i] / (float)totpix;
        pix_freq[j].freq = tempprob;
        huffcodes[j].freq = tempprob;

        // Declaring the child of
        // leaf node as NULL pointer
        pix_freq[j].left = NULL;
        pix_freq[j].right = NULL;

        // initializing the code
        // word as end of line
        pix_freq[j].code[0] = '\0';
        j++;
    }
}
Step 6根据像素强度值出现的概率对huffcodes
数组进行排序
请注意,有必要对huffcodes数组进行排序,而不是pix_freq数组,因为我们已经将像素值的位置存储在huffcodes数组的arrloc字段中。
// Sorting the histogram
struct huffcode temphuff;

// Sorting w.r.t probability
// of occurrence
for (i = 0; i < nodes; i++)
 {
    for (j = i + 1; j < nodes; j++)
{
        if (huffcodes[i].freq < huffcodes[j].freq)
{
            temphuff = huffcodes[i];
            huffcodes[i] = huffcodes[j];
            huffcodes[j] = temphuff;
        }
    }
}
第 7 步
构建哈夫曼树
我们首先组合出现概率最低的两个节点,然后用新节点替换这两个节点。这个过程一直持续到我们有一个根节点。形成的第一个父节点将存储在数组pix_freq中的索引节点,后续获得的父节点将存储在索引值较高的位置。
// Building Huffman Tree

float sumprob;
int sumpix;
int n = 0, k = 0;
int nextnode = nodes;

// Since total number of
// nodes in Huffman Tree
// is 2*nodes-1
while (n < nodes - 1)
{

    // Adding the lowest
    // two probabilities
    sumprob = huffcodes[nodes - n - 1].freq + huffcodes[nodes - n - 2].freq;
    sumpix = huffcodes[nodes - n - 1].pix + huffcodes[nodes - n - 2].pix;

    // Appending to the pix_freq Array
    pix_freq[nextnode].pix = sumpix;
    pix_freq[nextnode].freq = sumprob;
    pix_freq[nextnode].left = &pix_freq[huffcodes[nodes - n - 2].arrloc];

    // arrloc points to the location
    // of the child node in the
    // pix_freq array
    pix_freq[nextnode].right = &pix_freq[huffcodes[nodes - n - 1].arrloc];
    pix_freq[nextnode].code[0] = '\0';

    // Using sum of the pixel values as
    // new representation for the new node
    // since unlike strings, we cannot
    // concatenate because the pixel values
    // are stored as integers. However, if we
    // store the pixel values as strings
    // we can use the concatenated string as
    // a representation of the new node.
    i = 0;

    // Sorting and Updating the huffcodes
    // array simultaneously New position
    // of the combined node
    while (sumprob <= huffcodes[i].freq)
        i++;

    // Inserting the new node in
    // the huffcodes array
    for (k = nnz; k >= 0; k--)
    {
        if (k == i)
        {
            huffcodes[k].pix = sumpix;
            huffcodes[k].freq = sumprob;
            huffcodes[k].arrloc = nextnode;
        }
        else if (k > i)

            // Shifting the nodes below
            // the new node by 1
            // For inserting the new node
            // at the updated position k
            huffcodes[k] = huffcodes[k - 1];
    }
    n += 1;
    nextnode += 1;
}
这段代码是如何工作的?
让我们看一个例子:
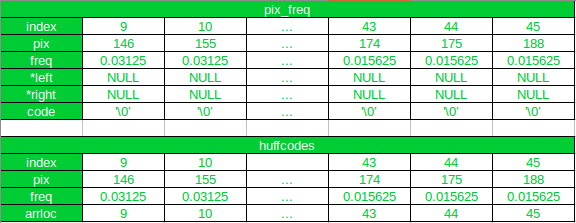
最初
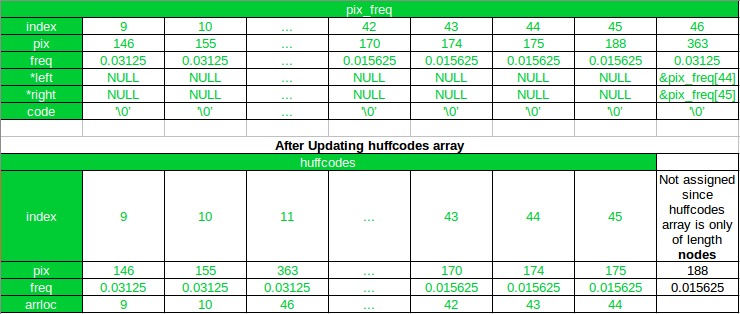
第一次迭代后
如您所见,在第一次迭代后,新节点已附加到pix_freq数组,其索引为 46。在 huffcode 中,新节点已在排序后添加到其新位置,arrloc指向索引pix_freq数组中的新节点。另外,请注意, huffcodes数组中新节点(索引 11 处)之后的所有数组元素都已移动 1,并且像素值为 188 的数组元素被排除在更新后的数组中。
现在,在下一次(第 2 次)迭代中,170 和 174 将被合并,因为 175 和 188 已经合并。
根据变量节点和n的最低两个节点的索引是
left_child_index=(nodes-n-2)
和
right_child_index=(nodes-n-1)
在第二次迭代中,n 的值为 1(因为 n 从 0 开始)。
对于值为 170 的节点
left_child_index=46-1-2=43
对于值为 174 的节点
right_child_index=46-1-1=44
因此,即使 175 仍然是更新数组的最后一个元素,它也会被排除在外。
在此代码中要注意的另一件事是,如果在任何后续迭代中,在第一次迭代中形成的新节点是另一个新节点的子节点,则可以使用访问在第一次迭代中获得的指向新节点的指针arrloc存储在huffcodes数组中,就像在这行代码中所做的那样
|
|

