- STM32中的计时与延时
lupinjia
STM32stm32单片机
前言在裸机开发中,延时作为一种规定循环周期的方式经常被使用,其中尤以HAL库官方提供的HAL_Delay为甚。刚入门的小白可能会觉得既然有官方提供的延时函数,而且精度也还挺好,为什么不用呢?实际上HAL_Delay中有不少坑,而这些也只是HAL库中无数坑的其中一些。想从坑里跳出来还是得加强外设原理的学习和理解,切不可只依赖HAL库。除了延时之外,我们在开发中有时也会想要确定某段程序的耗时,这就需要
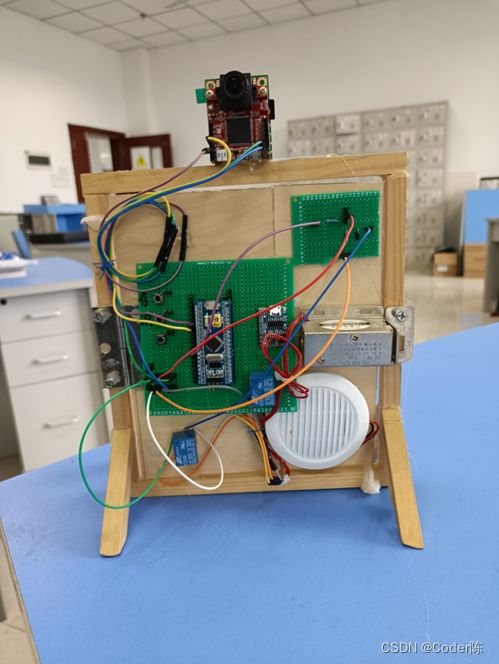
- 基于STM32与Qt的自动平衡机器人:从控制到人机交互的的详细设计流程
极客小张
stm32qt机器人物联网人机交互毕业设计c语言
一、项目概述目标和用途本项目旨在开发一款基于STM32控制的自动平衡机器人,结合步进电机和陀螺仪传感器,实现对平衡机器人的精确控制。该机器人可以用于教育、科研、娱乐等多个领域,帮助用户了解自动控制、机器人运动学等相关知识。技术栈关键词STM32单片机步进电机陀螺仪传感器AD采集电路Qt人机界面实时数据监控二、系统架构系统架构设计本项目的系统架构设计包括以下主要组件:控制单元:STM32单片机传感器
- 基于STM32的汽车仪表显示系统:集成CAN、UART与I2C总线设计流程
极客小张
stm32汽车嵌入式硬件物联网单片机c语言
一、项目概述项目目标与用途本项目旨在设计和实现一个基于STM32微控制器的汽车仪表显示系统。该系统能够实时显示汽车的速度、转速、油量等关键信息,并通过CAN总线与其他汽车控制单元进行通信。这种仪表显示系统不仅提高了驾驶的安全性和便捷性,还能为汽车提供更智能的用户体验。技术栈关键词微控制器:STM32显示技术:TFTLCD/OLED传感器:速度传感器、温度传感器、油量传感器通信协议:CAN总线、UA
- 51单片机——I2C总线存储器24C02的应用
老侯(Old monkey)
51单片机嵌入式硬件单片机
目标实现功能单片机先向24C02写入256个字节的数据,再从24C02中一次读取2个字节的数据、并在数码管上动态显示,直至读完24C02中256个字节的数据。1.I2C总线简介I2C总线有两根双向的信号线,一根是数据线SDA,另一根是时钟线SCL。I2C总线通过上拉电阻接正电源,因此,当总线空闲时为高电平。2.I2C通信协议起始信号、停止信号由主机发出。在数据传送时,当时钟线为高电平时,数据线上的
- 嵌入式单片机中数码管基本实现方法
嵌入式开发星球
单片机项目实战操作之优秀单片机
1.点亮数码管本节课利用已经学习的LED知识去控制一个8位数码管。本节的原理比较简单。不需要多少时间讲。更多时间是跟大家一起编码调试,从中学习一些编码思路和学习方法。1.1.什么是数码管数码管是什么?下图就是一个数码管从硬件上个看,其实就是8个LED组合在一起。8个LED应该有16个引脚,但是数码管上只有10个引脚。为什么呢?请看下图:1个LED有两个引脚,要控制LED,1个引脚接控制信号,另外一
- 基于STM32的简易RTOS分析-预备知识
騏威
嵌入式
写下这篇文章的主要目的是对自己学习RTOS的历程做一个记录和总结,方便以后回忆翻看。以下内容主要来自宋岩先生翻译的《Cortex-M3权威指南》。目录一、Cortex-M3寄存器简介二、堆栈操作简介三、汇编指令简介LDR和STR指令STMDB和LDMIA指令B、BX、BL、BLX指令MRS和MSR指令四、中断简介中断响应过程简介SVC和PensSV中断简介软件中断五、汇编基础一、Cortex-M3
- 15-自编写rtos-结合stm32实际调试(ladylolo-os)
Ladylolo-lsm
stm32嵌入式硬件单片机
一、任务调度:1.理解:任务切换,用堆栈指针SP保存即将要切换的任务的前后文,然后是用PendSV来执行这些操作的;由于是基于优先级的调度策略,所以每次“心跳”都会看有没有优先级更高的出现,如果有就用PendSV进行上下文切换。2.编写部分:①每个任务自己的属性统称为TCB任务控制块。②任务就绪表有设置优先级(设置的时候变量或上优先级的变量让某个位数等于1),从任务就绪表中删除(删除时用与来得等于
- 小米嵌入式面试题目RTOS面试题目 嵌入式面试题目
好家伙VCC
面试杂谈杂谈面试职场和发展
第一章-非RTOSbootloader工作流程MCU启动流程通信协议,SPIIICMCU怎么选型,STM32F1和F4有什么区别外部RAM和内部RAM区别,怎么分配外部总线和内部总线区别MCU上的固件,数据是怎么分配的MCU启动流程IAP是怎么升级的,突然断电怎么办挑了麦轮项目(因为大疆RM也是麦轮,面试官看样子比较感兴趣)为什么用的CAN总线你说一下spi和i2c和UART的各自的工作方式优缺点
- 基于STM32F103C8T6定时器的PWM通道的重映射
—你的鼬先生
stm32嵌入式硬件单片机
在我们平时的的使用中,我们最常使用的是TIM2和TIM3的PWM通道,但是由于C8T6的IO口有限,所以可能会出现PWM通道的资源不够的情况,从而我们可能会使用PWM4的PWM通道,但是TIM4的PWM通道并不能直接使用,它需要进行一个重映射,不然可能会导致PWM波不能正常发送。以下就是对PWM4的PWM通道进行一个重映射#include"stm32f10x.h"//Deviceheadervoi
- 【STM32系统】基于STM32设计的锂电池电量/电压检测报警器系统——文末完整资料下载(程序源码/电路原理图/电路PCB/设计文档/模块资料/元器件清单/实物图/答辩问题技巧/PPT模版等)
阿齐Archie
单片机嵌入式项目stm32嵌入式硬件单片机
基于STM32设计的锂电池电量/电压检测报警器系统系统视频:摘要:本设计旨在研究一个基于STM32F103C8T6微控制器的锂电池电量/电压检测报警器系统,应用于便携式电子设备电池管理。系统通过STM32的ADC模块对锂电池电压进行采集,利用LCD1602显示模块实时显示电池电压,当检测到电池电量不足或电压异常时,蜂鸣器报警模块会发出警报提醒用户。系统采用简单的硬件结构和优化的软件架构,通过对实际
- 使用STM32实现简单的智能温控系统
棂梓知识
stm32单片机嵌入式硬件
智能温控系统是一种能够根据环境温度实时调整设备的工作状态的系统。在本篇文章中,我们将使用STM32微控制器来实现一个简单的智能温控系统。该系统将会有以下功能:实时监测环境温度,并显示在LCD屏幕上。当环境温度超过设定的阈值时,自动开启风扇。当环境温度恢复正常时,自动关闭风扇。通过按键模拟调节设定的阈值。系统设计首先,我们需要准备一些硬件设备。具体而言,我们需要以下组件:STM32F103C8T6开
- STM32 HAL freertos零基础(九)任务通知
啥也不会的小白研究生
零基础学习Freertosstm32嵌入式硬件单片机
1、任务通知任务通知用于任务之间同步和通信。任务通知允许一个任务向另一个任务发送一个32位的值,并可以选择是否唤醒正在等待通知的任务。这使得任务之间的同步更加简单和灵活。任务通知功能:发送通知:一个任务可以向另一个任务发送一个32位的值。接收通知:接收任务可以根据接收到的通知来决定何时执行某些操作。通知状态:可以检查任务的当前通知状态。2、相关APIxTaskNotify()//发送通知,带有通知
- 4×4矩阵键盘详解(STM32)
辰哥单片机设计
STM32传感器教学矩阵计算机外设stm32嵌入式硬件单片机传感器
目录一、介绍二、传感器原理1.原理图2.工作原理介绍三、程序设计main.c文件button4_4.h文件button4_4.c文件四、实验效果五、资料获取项目分享一、介绍矩阵键盘,又称为行列式键盘,是用4条I/O线作为行线,4条I/O线作为列线组成的键盘。在行线和列线的每一个交叉点上设置一个按键,因此键盘中按键的个数是4×4个。这种行列式键盘结构能够有效地提高单片机系统中I/O口的利用率,节约单
- STM32的寄存器深度解析
千千道
STM32stm32单片机物联网
目录一、STM32寄存器概述二、寄存器的定义与作用三、寄存器分类1.内核寄存器2.外设寄存器四、重要寄存器详解1.GPIO相关寄存器2.定时器相关寄存器3.中断相关寄存器4.RCC相关寄存器五、寄存器操作方法1.直接操作寄存器2.使用库函数操作寄存器六、总结在嵌入式系统开发中,STM32微控制器以其强大的性能和丰富的功能而备受青睐。而理解和掌握STM32的寄存器是深入学习和开发STM32的关键。本
- STM32 如何生成随机数
千千道
STM32stm32单片机物联网
目录一、引言二、STM32随机数发生器概述三、工作原理1.噪声源2.线性反馈移位寄存器(LFSR)3.数据寄存器(RNG_DR)4.监控和检测电路:5.控制和状态寄存器6.生成流程四、使用方法1.使能随机数发生器2.读取随机数3.错误处理五、注意事项1.随机数的质量2.安全性3.性能考虑六、总结一、引言在嵌入式系统开发中,随机数的生成常常是一个重要的需求。无论是用于加密、模拟、游戏还是其他需要不确
- STM32——看门狗通俗解析
百里与司空
stm32嵌入式硬件单片机门控循环单元
笔者在学习看门狗的视频后,对看门狗仍然是一知半解,后面在实际应用中发现它是一个很好用的检测或者调试工具。所以总结一下笔者作为初学小白对看门狗的理解。主函数初始化阶段、循环阶段和复位众所周知,程序的运行一般是这样的:程序在进入循环阶段之前,会在初始化阶段将每个寄存器或者某些变量赋值。初始化阶段的代码执行一次后,就不再执行了。而循环阶段的代码会执行很多次,一直循环反复的执行下去。这时,如果进行了复位,
- STM32 的 RTC(实时时钟)详解
千千道
STM32stm32物联网单片机
目录一、引言二、RTC概述三、RTC的工作原理1.时钟源2.计数器3.闹钟功能4.备份寄存器四、RTC寄存器1.RTC_TR(TimeRegister,时间寄存器)2.RTC_DR(DateRegister,日期寄存器)3.RTC_SSR(SubsecondRegister,亚秒寄存器)4.RTC_PRER(PrescalerRegister,预分频器寄存器)5.RTC_CR(ControlReg
- 学单片机怎么在3-5个月内找到工作?
无际单片机编程
单片机嵌入式开发物联网stm32c语言
每个初学者,都如履薄冰,10几年前,我自学单片机时,也一样。想通过学习,找一份体面点的工作,又害怕辛辛苦苦学出来,找不到工作。好在,当初执行力,还算可以,自学java没成功,后面自学单片机,成功入行了。转眼间,毕业到现在有13年了,马上也到了奔4的年纪。这13年一直在跟单片机打交道,打过工,创过业,对行业,对企业,都有一定的认知,坚持看完这篇内容,相信能帮你少走几个月弯路。有些老铁,加了我很久,时
- 51单片机:P3.3口输入/P 1口输出实验
li星野
单片机
51单片机:P3.3口输入/P1口输出实验一、实验内容1P3.3口做输入口,外接一脉冲,每输入一个脉冲,P1口按十六进制除2(乘2)。2.P1口做输出口,P1口接的8个发光二极管L1—L8按十六进制除2(乘2)方式点亮。二、仿真图三、代码实现C语言实现:#include#includesbitKEY=P3^3;voiddelay10ms(void);voidmain(){charnum=0xfe;
- 2020-11-12 写单片机内存的脚本 nc openocd 事务自动测试
linuxScripter
这是写单片机内存的脚本:z@z-ThinkPad-T400:~/zworkT400/EDA_heiche/zREPOgit/simple-gcc-stm32-project$catz.wholeRun.oneCase.cmdcattmp6.toWrite|awk'{system("echomwb"$1""$2"|nclocalhost4444");}'catUSER/DEBUG/debug.h|g
- 单片机中断
woainizhongguo.
STM32单片机原理解析篇单片机嵌入式硬件
**在51单片机中,中断向量表的地址是如何被设置的?**在51单片机中,中断向量表的设置是中断系统的核心部分,它定义了中断服务程序的入口地址。以下是中断向量表的设置方法:中断向量表的位置:51单片机的中断向量表通常位于程序存储器的起始位置,即地址0x0000到0x000F(对于双字节的中断向量,实际占用0x0000到0x001F)。这些地址是固定的,由单片机的硬件设计决定。中断向量的分配:每个中断
- arm-none-eabi-gcc 不识别__attribute__((at(xxx))命令如何将数据定义到外部SDAM(已验证)
梓默
#C
提示:文章写完后,目录可以自动生成,如何生成可参考右边的帮助文档文章目录可以利用__attribute__((section(".xxx")))实现同样的效果步骤:1.在linker链接文件中添加指定SDRAM加偏移地址2.添加SDRAM自定义section3.将数据定义到自定义区可以利用__attribute__((section(".xxx")))实现同样的效果步骤:从STM32H7xx参考手
- 基于STC12C5A60S2单片机的LED汉字显示系统的设计
lantiandianzi
单片机嵌入式硬件
本设计基于单片机的LED汉字显示装置,该设计以STC12C5A60S2单片机为核心,利用最小系统和多个模块完成设计,包括点阵驱动模块、时钟模块、串口通信模块、红外线接收模块以及LED点阵屏。其中,点阵驱动模块采用74HC245芯片设计完成,结合DS1302时钟芯片完成LED点阵显示屏的汉字与时间显示,使用按键、串口、红外线遥控可以完成时间的实时更新、自定义汉字显示、改变汉字显示颜色、改变汉字滚动方
- 51单片机-AT24C02-实验2-秒表实验(可参考上一节)
Whappy001
51单片机嵌入式硬件单片机
利用定时器去对按键和数码管进行扫描(Whappy)main.c#include#include"LCD1602.h"#include"AT24C02.h"#include"Delay.h"#include"Timer0.h"#include"Nixie.h"#include"Key.h"unsignedcharKeyNum;unsignedcharMin,Sec,MiniSec;unsignedc
- 单片机在医疗设备中的应用实例教程
kkchenjj
单片机单片机嵌入式硬件
单片机在医疗设备中的应用实例教程单片机基础单片机概述单片机,全称为单片微型计算机(Single-ChipMicrocomputer),是一种将中央处理器(CPU)、存储器、输入输出接口等主要计算机部件集成在一块芯片上的微型计算机系统。它具有体积小、功耗低、成本低廉、控制功能强大等特点,广泛应用于工业控制、家用电器、汽车电子、医疗设备等多个领域。特点集成度高:单片机将计算机的主要部件集成在一块芯片上
- 单片机与传感器接口技术应用实例教程
kkchenjj
单片机单片机nosql嵌入式硬件
单片机与传感器接口技术应用实例教程单片机基础单片机概述单片机,全称为单片微型计算机(Single-ChipMicrocomputer),是一种将中央处理器(CPU)、存储器、输入输出接口等主要计算机部件集成在一块芯片上的微型计算机系统。它具有体积小、功耗低、成本低廉、控制功能强大等特点,广泛应用于工业控制、家用电器、汽车电子、通信设备、医疗器械等领域。特点集成度高:单片机将计算机的主要部件集成在一
- Error: No STM32 target found! If your product embeds Debug Authentication, please perform a discover
BABA8891
stm32嵌入式硬件单片机
这个错误信息“Error:NoSTM32targetfound!IfyourproductembedsDebugAuthentication,pleaseperformadiscoveryusingDebugAuthentication”通常出现在使用STM32微控制器的开发过程中,尤其是在尝试通过调试接口(如SWD或JTAG)与设备通信时。这个错误表明调试器或开发工具无法识别或连接到STM32目
- 【OpenHarmony嵌入式硬件开发】基于OpenHarmony标准系统的C++公共基础类库案例2:SafeMap
青少年编程作品集
嵌入式硬件c++javasqlharmonyos华为华为云
1、程序简介该程序是基于OpenHarmony的C++公共基础类库的安全关联容器:SafeMap。OpenHarmony提供了一个线程安全的map实现。SafeMap在STLmap基础上封装互斥锁,以确保对map的操作安全。本案例主要完成如下工作:创建1个子线程,负责每秒调用EnsureInsert()插入元素;创建1个子线程,负责每秒调用Insert()插入元素;创建1个子线程,负责每秒调用Er
- 掌握单片机,其实并不难
培林将军
单片机嵌入式硬件
Fearwillbeyourenemy恐惧将会是你的敌人单片机的学习绝不仅仅是对一项知识的掌握。想要学好单片机,需要从硬件结构、内部资源、外设应用等几个方面多方位入手。而要想成为一名嵌入式工程师,就要对单片机的基础非常熟悉,并且掌握C语言当中各个功能的初始化、启动、停止各类函数的编写调试。那么想要掌握单片机需要从哪几个方面入手呢?数字I/O的应用在大多数的单片机实验中,跑马灯实验正是数字I/O的典
- STM32与ESP8266的使用
每天的积累
嵌入式学习日记stm32stm32单片机嵌入式硬件
串口透传“透传”通常指的是数据的透明传输,意思是在不对数据进行任何处理或修改的情况下,将数据从一个接口转发到另一个接口。值得注意的是要避免串口之间无限制的透明,可以采用互斥锁的方式进行限制使用方法对USART1和USART3(用他俩举例)的模式都是设置为Asynchronous,并开启对应的中断。RCC的HighSPeedCLock模式设置为Crystal/Ceramic配置对应的时钟为64Mhz
- apache ftpserver-CentOS config
gengzg
apache
<server xmlns="http://mina.apache.org/ftpserver/spring/v1"
xmlns:xsi="http://www.w3.org/2001/XMLSchema-instance"
xsi:schemaLocation="
http://mina.apache.o
- 优化MySQL数据库性能的八种方法
AILIKES
sqlmysql
1、选取最适用的字段属性 MySQL可以很好的支持大数据量的存取,但是一般说来,数据库中的表越小,在它上面执行的查询也就会越快。因此,在创建表的时候,为了获得更好的 性能,我们可以将表中字段的宽度设得尽可能小。例如,在定义邮政编码这个字段时,如果将其设置为CHAR(255),显然给数据库增加了不必要的空间,甚至使用VARCHAR这种类型也是多余的,因为CHAR(6)就可以很
- JeeSite 企业信息化快速开发平台
Kai_Ge
JeeSite
JeeSite 企业信息化快速开发平台
平台简介
JeeSite是基于多个优秀的开源项目,高度整合封装而成的高效,高性能,强安全性的开源Java EE快速开发平台。
JeeSite本身是以Spring Framework为核心容器,Spring MVC为模型视图控制器,MyBatis为数据访问层, Apache Shiro为权限授权层,Ehcahe对常用数据进行缓存,Activit为工作流
- 通过Spring Mail Api发送邮件
120153216
邮件main
原文地址:http://www.open-open.com/lib/view/open1346857871615.html
使用Java Mail API来发送邮件也很容易实现,但是最近公司一个同事封装的邮件API实在让我无法接受,于是便打算改用Spring Mail API来发送邮件,顺便记录下这篇文章。 【Spring Mail API】
Spring Mail API都在org.spri
- Pysvn 程序员使用指南
2002wmj
SVN
源文件:http://ju.outofmemory.cn/entry/35762
这是一篇关于pysvn模块的指南.
完整和详细的API请参考 http://pysvn.tigris.org/docs/pysvn_prog_ref.html.
pysvn是操作Subversion版本控制的Python接口模块. 这个API接口可以管理一个工作副本, 查询档案库, 和同步两个.
该
- 在SQLSERVER中查找被阻塞和正在被阻塞的SQL
357029540
SQL Server
SELECT R.session_id AS BlockedSessionID ,
S.session_id AS BlockingSessionID ,
Q1.text AS Block
- Intent 常用的用法备忘
7454103
.netandroidGoogleBlogF#
Intent
应该算是Android中特有的东西。你可以在Intent中指定程序 要执行的动作(比如:view,edit,dial),以及程序执行到该动作时所需要的资料 。都指定好后,只要调用startActivity(),Android系统 会自动寻找最符合你指定要求的应用 程序,并执行该程序。
下面列出几种Intent 的用法
显示网页:
- Spring定时器时间配置
adminjun
spring时间配置定时器
红圈中的值由6个数字组成,中间用空格分隔。第一个数字表示定时任务执行时间的秒,第二个数字表示分钟,第三个数字表示小时,后面三个数字表示日,月,年,< xmlnamespace prefix ="o" ns ="urn:schemas-microsoft-com:office:office" />
测试的时候,由于是每天定时执行,所以后面三个数
- POJ 2421 Constructing Roads 最小生成树
aijuans
最小生成树
来源:http://poj.org/problem?id=2421
题意:还是给你n个点,然后求最小生成树。特殊之处在于有一些点之间已经连上了边。
思路:对于已经有边的点,特殊标记一下,加边的时候把这些边的权值赋值为0即可。这样就可以既保证这些边一定存在,又保证了所求的结果正确。
代码:
#include <iostream>
#include <cstdio>
- 重构笔记——提取方法(Extract Method)
ayaoxinchao
java重构提炼函数局部变量提取方法
提取方法(Extract Method)是最常用的重构手法之一。当看到一个方法过长或者方法很难让人理解其意图的时候,这时候就可以用提取方法这种重构手法。
下面是我学习这个重构手法的笔记:
提取方法看起来好像仅仅是将被提取方法中的一段代码,放到目标方法中。其实,当方法足够复杂的时候,提取方法也会变得复杂。当然,如果提取方法这种重构手法无法进行时,就可能需要选择其他
- 为UILabel添加点击事件
bewithme
UILabel
默认情况下UILabel是不支持点击事件的,网上查了查居然没有一个是完整的答案,现在我提供一个完整的代码。
UILabel *l = [[UILabel alloc] initWithFrame:CGRectMake(60, 0, listV.frame.size.width - 60, listV.frame.size.height)]
- NoSQL数据库之Redis数据库管理(PHP-REDIS实例)
bijian1013
redis数据库NoSQL
一.redis.php
<?php
//实例化
$redis = new Redis();
//连接服务器
$redis->connect("localhost");
//授权
$redis->auth("lamplijie");
//相关操
- SecureCRT使用备注
bingyingao
secureCRT每页行数
SecureCRT日志和卷屏行数设置
一、使用securecrt时,设置自动日志记录功能。
1、在C:\Program Files\SecureCRT\下新建一个文件夹(也就是你的CRT可执行文件的路径),命名为Logs;
2、点击Options -> Global Options -> Default Session -> Edite Default Sett
- 【Scala九】Scala核心三:泛型
bit1129
scala
泛型类
package spark.examples.scala.generics
class GenericClass[K, V](val k: K, val v: V) {
def print() {
println(k + "," + v)
}
}
object GenericClass {
def main(args: Arr
- 素数与音乐
bookjovi
素数数学haskell
由于一直在看haskell,不可避免的接触到了很多数学知识,其中数论最多,如素数,斐波那契数列等,很多在学生时代无法理解的数学现在似乎也能领悟到那么一点。
闲暇之余,从图书馆找了<<The music of primes>>和<<世界数学通史>>读了几遍。其中素数的音乐这本书与软件界熟知的&l
- Java-Collections Framework学习与总结-IdentityHashMap
BrokenDreams
Collections
这篇总结一下java.util.IdentityHashMap。从类名上可以猜到,这个类本质应该还是一个散列表,只是前面有Identity修饰,是一种特殊的HashMap。
简单的说,IdentityHashMap和HashM
- 读《研磨设计模式》-代码笔记-享元模式-Flyweight
bylijinnan
java设计模式
声明: 本文只为方便我个人查阅和理解,详细的分析以及源代码请移步 原作者的博客http://chjavach.iteye.com/
import java.util.ArrayList;
import java.util.Collection;
import java.util.HashMap;
import java.util.List;
import java
- PS人像润饰&调色教程集锦
cherishLC
PS
1、仿制图章沿轮廓润饰——柔化图像,凸显轮廓
http://www.howzhi.com/course/retouching/
新建一个透明图层,使用仿制图章不断Alt+鼠标左键选点,设置透明度为21%,大小为修饰区域的1/3左右(比如胳膊宽度的1/3),再沿纹理方向(比如胳膊方向)进行修饰。
所有修饰完成后,对该润饰图层添加噪声,噪声大小应该和
- 更新多个字段的UPDATE语句
crabdave
update
更新多个字段的UPDATE语句
update tableA a
set (a.v1, a.v2, a.v3, a.v4) = --使用括号确定更新的字段范围
- hive实例讲解实现in和not in子句
daizj
hivenot inin
本文转自:http://www.cnblogs.com/ggjucheng/archive/2013/01/03/2842855.html
当前hive不支持 in或not in 中包含查询子句的语法,所以只能通过left join实现。
假设有一个登陆表login(当天登陆记录,只有一个uid),和一个用户注册表regusers(当天注册用户,字段只有一个uid),这两个表都包含
- 一道24点的10+种非人类解法(2,3,10,10)
dsjt
算法
这是人类算24点的方法?!!!
事件缘由:今天晚上突然看到一条24点状态,当时惊为天人,这NM叫人啊?以下是那条状态
朱明西 : 24点,算2 3 10 10,我LX炮狗等面对四张牌痛不欲生,结果跑跑同学扫了一眼说,算出来了,2的10次方减10的3次方。。我草这是人类的算24点啊。。
然后么。。。我就在深夜很得瑟的问室友求室友算
刚出完题,文哥的暴走之旅开始了
5秒后
- 关于YII的菜单插件 CMenu和面包末breadcrumbs路径管理插件的一些使用问题
dcj3sjt126com
yiiframework
在使用 YIi的路径管理工具时,发现了一个问题。 <?php
- 对象与关系之间的矛盾:“阻抗失配”效应[转]
come_for_dream
对象
概述
“阻抗失配”这一词组通常用来描述面向对象应用向传统的关系数据库(RDBMS)存放数据时所遇到的数据表述不一致问题。C++程序员已经被这个问题困扰了好多年,而现在的Java程序员和其它面向对象开发人员也对这个问题深感头痛。
“阻抗失配”产生的原因是因为对象模型与关系模型之间缺乏固有的亲合力。“阻抗失配”所带来的问题包括:类的层次关系必须绑定为关系模式(将对象
- 学习编程那点事
gcq511120594
编程互联网
一年前的夏天,我还在纠结要不要改行,要不要去学php?能学到真本事吗?改行能成功吗?太多的问题,我终于不顾一切,下定决心,辞去了工作,来到传说中的帝都。老师给的乘车方式还算有效,很顺利的就到了学校,赶巧了,正好学校搬到了新校区。先安顿了下来,过了个轻松的周末,第一次到帝都,逛逛吧!
接下来的周一,是我噩梦的开始,学习内容对我这个零基础的人来说,除了勉强完成老师布置的作业外,我已经没有时间和精力去
- Reverse Linked List II
hcx2013
list
Reverse a linked list from position m to n. Do it in-place and in one-pass.
For example:Given 1->2->3->4->5->NULL, m = 2 and n = 4,
return
- Spring4.1新特性——页面自动化测试框架Spring MVC Test HtmlUnit简介
jinnianshilongnian
spring 4.1
目录
Spring4.1新特性——综述
Spring4.1新特性——Spring核心部分及其他
Spring4.1新特性——Spring缓存框架增强
Spring4.1新特性——异步调用和事件机制的异常处理
Spring4.1新特性——数据库集成测试脚本初始化
Spring4.1新特性——Spring MVC增强
Spring4.1新特性——页面自动化测试框架Spring MVC T
- Hadoop集群工具distcp
liyonghui160com
1. 环境描述
两个集群:rock 和 stone
rock无kerberos权限认证,stone有要求认证。
1. 从rock复制到stone,采用hdfs
Hadoop distcp -i hdfs://rock-nn:8020/user/cxz/input hdfs://stone-nn:8020/user/cxz/运行在rock端,即源端问题:报版本
- 一个备份MySQL数据库的简单Shell脚本
pda158
mysql脚本
主脚本(用于备份mysql数据库): 该Shell脚本可以自动备份
数据库。只要复制粘贴本脚本到文本编辑器中,输入数据库用户名、密码以及数据库名即可。我备份数据库使用的是mysqlump 命令。后面会对每行脚本命令进行说明。
1. 分别建立目录“backup”和“oldbackup” #mkdir /backup #mkdir /oldbackup
- 300个涵盖IT各方面的免费资源(中)——设计与编码篇
shoothao
IT资源图标库图片库色彩板字体
A. 免费的设计资源
Freebbble:来自于Dribbble的免费的高质量作品。
Dribbble:Dribbble上“免费”的搜索结果——这是巨大的宝藏。
Graphic Burger:每个像素点都做得很细的绝佳的设计资源。
Pixel Buddha:免费和优质资源的专业社区。
Premium Pixels:为那些有创意的人提供免费的素材。
- thrift总结 - 跨语言服务开发
uule
thrift
官网
官网JAVA例子
thrift入门介绍
IBM-Apache Thrift - 可伸缩的跨语言服务开发框架
Thrift入门及Java实例演示
thrift的使用介绍
RPC
POM:
<dependency>
<groupId>org.apache.thrift</groupId>