【Vue实战】自定义父子组件数据传递以及组件动态切换实例(内附超详细代码解析!!!)
父子组件数据传递及组件动态切换实例(内附超详细代码解析!!!)
1.效果图篇

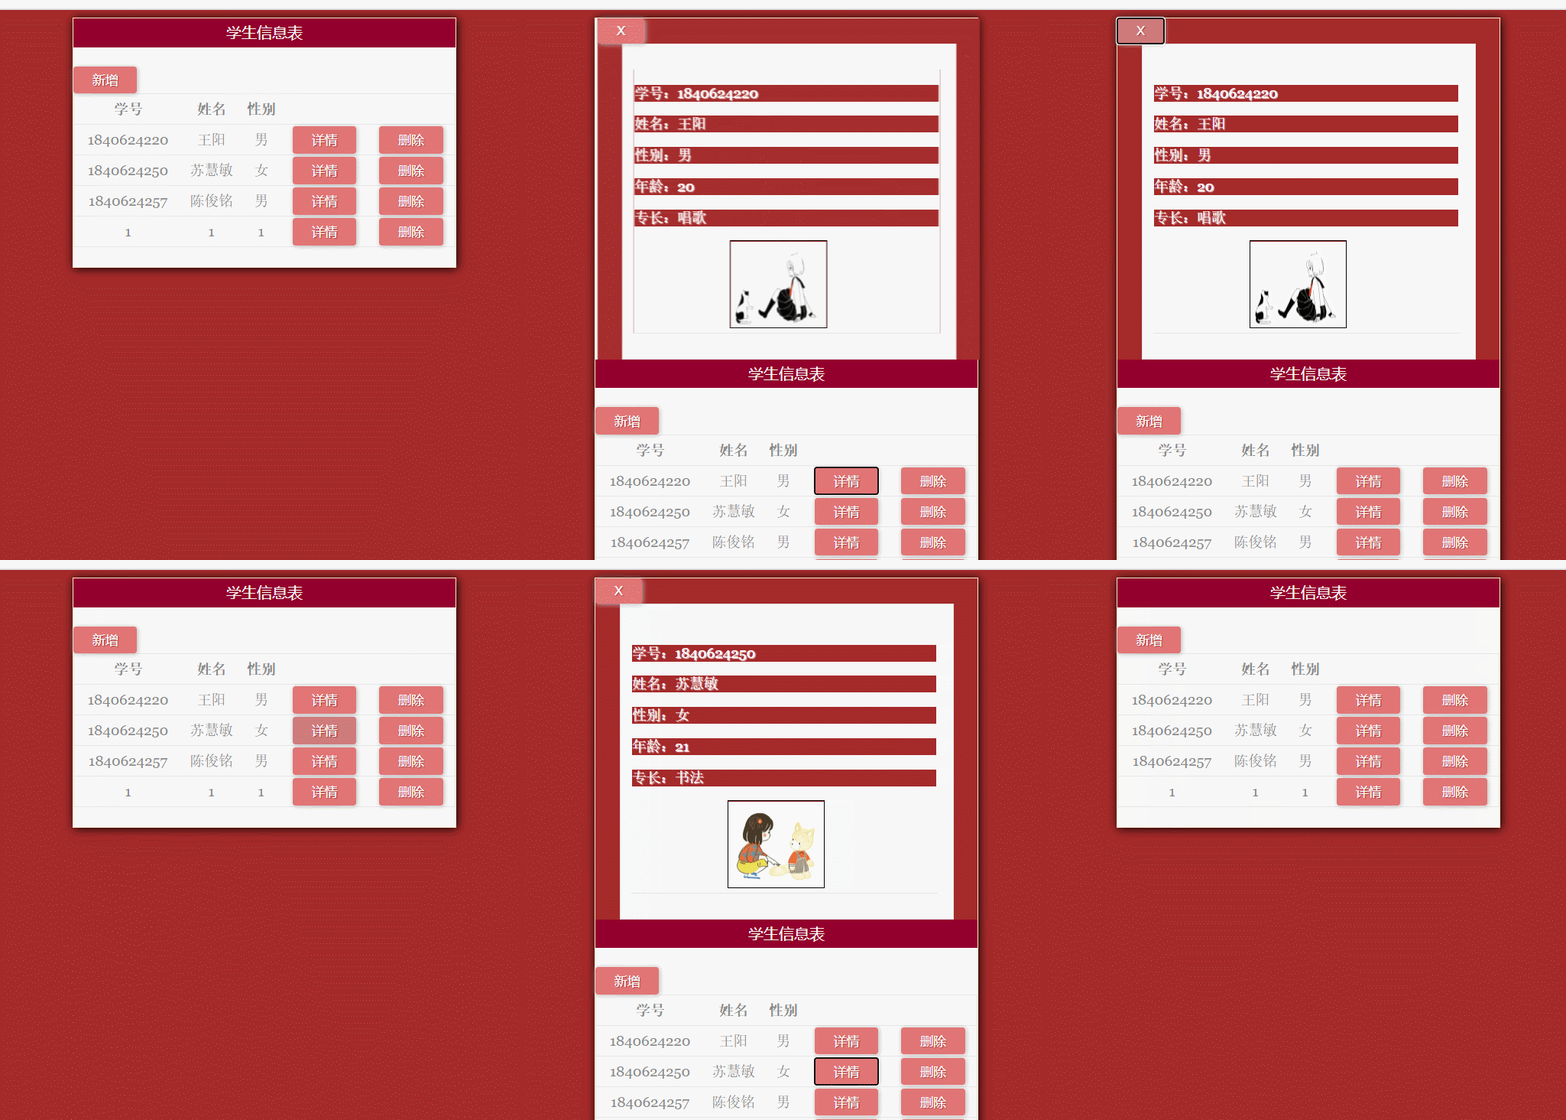
图解:点击【新增】按钮跳转个人信息填写页面=>点击【提交】按钮=>在学生信息表显示刚所输入的信息

图解:点击【详情】按钮=>跳转学生信息详情页面
2.HTML代码篇
解析:
Part1:
此例子组件由一个父组件和两个子组件组成,父组件负责渲染学生信息表页面;
子组件1mycomponent1负责渲染用户点击【新增】按钮后跳转的用户输入信息页面;
子组件2mycomponent2负责渲染用户点击【详情】按钮后跳转的学生信息详情页面。
Part2:
不同组件的动态切换通过 v-bind:is=“组件名” 来改变挂载的组件
Part3:
父传子的数据传递:props:[]
a.定义:在子组件定义props:[] (相当于开辟一块地方来存父组件即将要传过来的值)
b.绑定:用v-bind将动态props绑定到父组件的数据。
c.使用:在子组件所在模板中直接使用从父组件传过来的数据。
注意:在子组件中定义props时,使用了camelCase命名法。由于HTML特性不区分大小写,camelCase的prop用于特性时,需要转为 kebab-case(短横线隔开)。例如,在props中定义的myPerson,在用作特性时需要转换为my-person。
子传父的数据传递:通过$emit()自定义事件触发父组件改值
    <div id="app">
        <div class="container">


            <transition>
            <component v-bind:is="add_show" v-on:func="show" v-bind:my-person="person">component>
            transition>


            <div class="content">学生信息表div>

            <button v-on:click="addperson('first')">新增button>


            <table rules="rows" frame="hsides" bordercolor="black" width="400px" class="content">
                <tr class="line">
                    <td>学号td>
                    <td>姓名td>
                    <td>性别td>
                    <td>td>
                    <td>td>
                tr>
                <tbody>
                <tr v-for="(person,index) in persons " align="center" >
                    <td>{{person.num}}td>
                    <td>{{person.name}}td>
                    <td>{{person.sex}}td>
                    <td><button @click="showdetail(index,'second')">详情button>td>
                    <td><button type="button" @click="deleteperson(index)">删除button>td>
                tr>
            tbody>
            table>
        div>
 div>


     <template id="mycomponent">
        <div class="mycomponent1">
                <div><button type="button" v-on:click="guanbi()">Xbutton>div>
                    <div class="container">
                        <div class="content">个人信息填写div>
                        <div class="inputcontainer">
                            <div class="label-style">
                                <label for="">学号label>
                                <input type="text" v-model="person.num" >
                            div>
                            <div class="label-style">
                                <label for="">姓名label>
                                <input type="text" v-model="person.name" >
                            div>
                            <div class="label-style">
                                <label for="">性别label>
                                <input type="text" v-model="person.sex"  >
                            div>
                            <div class="label-style">
                                <label for="">年龄label>
                                <input type="text" v-model="person.age" >
                            div>
                            <div class="label-style">
                                <label for="">专长label>
                                <textarea type="text" v-model="person.hobby" >textarea>
                            div>

                            <div class="label-style">

                                选择头像:<select v-model="person.imgsrc">

                                    <option value="image/1.jpg">1option>
                                    <option value="image/2.jpg">2option>
                                    <option value="image/3.jpg">3option>
                                    <option value="image/4.jpg">4option>
                                select>
                                <br>
                                <span><img class="img-style"  v-bind:src="person.imgsrc">span>
                            div>
                            <br>
                                <button v-on:click="add()" >提交button>
                            div>
                    div>
                div>
    template>


     <template id="mycomponent2">
        <div>
                <div><button  type="button" v-on:click="guanbia()">Xbutton>div>
                <div>
                    <div>
                        <table class="secondcontainer">
                            <tr>
                                <td colspan="15">
                                    <div class="p-content">
                                        <p>学号:{{myPerson.num}}p>
                                        <p>姓名:{{myPerson.name}}p>
                                        <p>性别:{{myPerson.sex}}p>
                                        <p>年龄:{{myPerson.age}}p>
                                        <p>专长:{{myPerson.hobby}}p>
                                    div>
                                    <img v-bind:src="myPerson.imgsrc" class="myPersonImg" >
                                td>
                            tr>
                        table>
                    div>
                div>
        div>
    template>


    <script>
        var vm = new Vue({
            el:'#app',
            data:{
                add_show:"",
                person:{},

                persons:[
                {
                    num:1840624220,
                    name:'王阳',
                    sex:'男',
                    age:20,
                    hobby:'唱歌',
                    imgsrc:'image/1.jpg'
                },
                {
                    num:1840624250,
                    name:'苏慧敏',
                    sex:'女',
                    age:21,
                    hobby:'书法',
                    imgsrc:'image/2.jpg'
                },
                {
                    num:1840624257,
                    name:'陈俊铭',
                    sex:'男',
                    age:22,
                    hobby:'B-box',
                    imgsrc:'image/3.jpg'
                },
                ]
            },

            methods: {
                addperson: function (componentsName) {//点击新增,切换first组件
                  this.add_show=componentsName;
                },
                showdetail: function (index,componentsName) {//点击详情,切换second组件
                    this.person = this.persons[index];
                    this.add_show=componentsName;
                },
                show: function (data) {//用emit方法来展示数据在父组件
                    this.persons.push(data);
                    //在父组件的data中push添加用户所输入的信息
                },
                deleteperson:function(index){
                    this.persons.splice(index,1);
                    for(var i=0; i<this.persons.length; i++){
                        this.persons[i].id=i+1;
                        console.log(i);
                    };
                }
            },
            components: {
                first: {//第一个子组件
                    template: '#mycomponent',
                    data: function () {
                        return {
                            person: {
                                num:'',
                                name: '',
                                sex: '',
                                age: '',
                                hobby: '',
                                imgsrc: 'image/1.jpg',
                            }
                        }
                    },
                    methods: {
                        guanbi: function () {
                            this.$parent.add_show = "";
                            // $parent 用来访问当前组件实例的父实例
                        },

                        add: function () {
                            this.$parent.add_show = "";
                            //在点击提交的同时也会实现组件的切换跳转
                            this.$emit('func', this.person)
                            //this.person指的是第一个组件中用户所填入的那些信息(也是一个数组)
                            // $emit()方法用来触发事件。通过调用子组件的add方法来触发emit方法,目的是将子组件的值传到父组件,即在子组件:输入input内容
                            //在学生信息表页面(父组件)会加载出来,达到传值的效果
                        }
                    }
                },
                second: {//第二个子组件
                    template: '#mycomponent2',
                    props: ["myPerson"],
                    methods: {
                        guanbia: function () {
                            this.$parent.add_show= "";
                        }
                    }
                }
            }

        })
    script>
3.CSS代码篇
*{
    background-color:brown;
}

.container{
    border:1px solid blanchedalmond ;
    box-shadow: 1px 1px 10px black;
    width: 400px;
    background: #F7F7F7;
    margin-left:auto;
    margin-right:auto;
}

.content{
    background-color: #94002d;
    text-align: center;
    color:white;
    margin-bottom: 10px;
    height: 30px;
    line-height: 30px;
}

table{
    margin-left:auto;

    margin-right:auto;

    max-width: 500px;

    background: #F7F7F7;

    padding: 25px 15px 25px 10px;

    font: 20px Georgia, "Times New Roman", Times, serif;

    color: rgb(0, 0, 0);

    text-shadow: 1px 1px 1px #FFF;

    border:1px solid #E4E4E4;

}


td{

    font-size: 15px;

    border-bottom:1px solid #E4E4E4;

    color: #888;

    background: #F7F7F7;

}
.line{
    font-weight: bold;
}

.img-style{
    /* margin-top: 20px; */
    width: 100px;
    height: 100px;
    border: 1px solid black;
    display: block;
    margin: 20px  auto;
}

.container{
    border:1px solid blanchedalmond ;
    box-shadow: 1px 1px 10px black;
    width: 400px;
    background: #F7F7F7;
    margin-left:auto;
    margin-right:auto;
}

.content{
    background-color: #94002d;
    text-align: center;
    color:white;
    margin-bottom: 20px;
    height: 30px;
    line-height: 30px;
}

.inputcontainer{

    /* max-width: 500px; */

    background: #F7F7F7;

    /* padding: 25px 15px 25px 10px; */

    font: 20px Georgia, "Times New Roman", Times, serif;

    color: rgb(0, 0, 0);

    text-shadow: 1px 1px 1px #FFF;

    border:1px solid #E4E4E4;

}


input,.label-style,label,select{

    font-size: 15px;

    color: rgb(0, 0, 0);

    background: #F7F7F7;

    line-height: 20px;

    margin-top: 10px;

    text-align: center;


}

textarea{
    width: 200px;

    font-size: 15px;

    color: rgb(0, 0, 0);

    background: #F7F7F7;

    line-height: 20px;

    margin-top: 10px;

    text-align: center;
}

button {

    background: #E27575;

    border: none;

    padding: 5px 20px 5px 20px;
    text-align: center;

    color: #FFF;

    box-shadow: 1px 1px 5px #B6B6B6;

    border-radius: 3px;

    text-shadow: 1px 1px 1px #9E3F3F;

    cursor: pointer;

}
button:hover {

    background: #CF7A7A

}

/*v-enter 是进入之前,元素的起始状态*/
        /*v-leave-to 离开之后动画的终止状态*/
        .v-enter,.v-leave-to{
            opacity:  0;/*透明度*/
            transform: translateX(150px);
        }
         /*入场(离场)动画的时间段   */
        .v-enter-active,.v-leave-active{
            transition: all 0.1s ease;

        }


        .my-enter,.my-leave-to{
            opacity:  0;/*透明度*/
            transform: translateY(70px);
        }
        .my-enter-active,.my-leave-active{
            transition: all 0.1s ease;

        }

        /* 第二个子组件模板样式 */
.secondcontainer{
    width:350px;
    color: black;
}

.myPersonImg{
    margin-left: 100px;
    width: 100px;
    height: 90px;
    border: 1px solid black;

}

.p-content{
    color: white;
    background-color: #f7f7f7;

}
.mycomponet1{
    position: absolute;
    z-index: 100;
}
第一次撰写博客,如有不足请评论区提出批评指正!多多指教!!
今后会继续分享关于Vue.js、Node.js等知识干货,大家一起交流学习~