uni-app 超详细教程(二)(从菜鸟到大佬)
本文中保函 uni - app 的 vuex,常用api,常用组件,自定义组件,第三方插件运用 等内容!
一, uniapp中使用vuex
1、uniapp中有自带vuex插件,直接引用即可
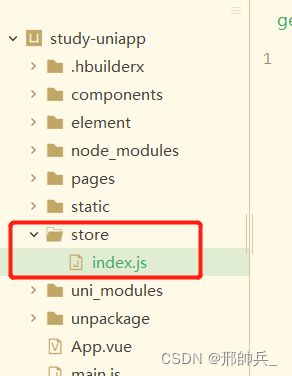
2、在项目中新建文件夹store,在main.js中导入
2.1,store/index.js
import Vue from 'vue'

import Vuex from 'vuex'

Vue.use(Vuex)

const store = new Vuex.Store({
    state: {
		//公共的变量,这里的变量不能随便修改,只能通过触发mutations的方法才能改变
	},
    mutations: {
		//相当于同步的操作
	},
    actions: {
		//相当于异步的操作,不能直接改变state的值,只能通过触发mutations的方法才能改变
	}
})
export default store
2.2,在main.js中导入挂载vuex
import App from './App'

// #ifndef VUE3
import Vue from 'vue'
Vue.config.productionTip = false
App.mpType = 'app'
const app = new Vue({
	...App
})
app.$mount()
// #endif

// #ifdef VUE3
import {
	createSSRApp
} from 'vue'
export function createApp() {
	const app = createSSRApp(App)
	return {
		app
	}
}
// #endif

//导入vuex 导入定义全局$store
import store from '.ore/index.js'
Vue.prototype.$store = store;
3,使用
第一种方式:this.$store直接操作
例如当取值:直接在页面中使用this.$store.state.变量名
第二种方法:mapState, mapGetters, mapActions, mapMutations
1, store/index.js
//导入vuex
import Vuex from 'vuex';
//导入vue
import Vue from 'vue';

//使用Vuex
Vue.use(Vuex);
//导出Vuex
export default new Vuex.Store({
	state: {
		gTitle: {
			text: "你好vuex",
			color: "#000",
			fontSize: "24px",
			background: "#f70"
		},
		joks: [],
	},
	mutations: {
		setJoks(state, data) {
			state.joks = data;
		},
		setSize(state, data) {
			state.gTitle.fontSize = data + "px";
		},
		SetBackgroundColor(state, data) {
			state.gTitle.background = data;
		}
	},
	actions: {
		//和后端交互,异步操作都会放在actions中
		getJok(context, data) {
			uni.request({
				url: "http://520mg.com/mi/list.php",
				method: 'get',
				data: data,
				//axios get 请求参数用params,post用data
				//uni.request post和get传参都用data
				//根据content-type,如果是application/json,那么data是json,如果是urlencoded data是url编码形式
				success: (res) => {
					console.log(res);
					context.commit('setJoks', res.data.result);
				}
			})
		}
	},
	//内部计算
	getters: {
		//计算所有笑话的字数总和
		"totalLen": function(state) {
			var count = 0;
			for (var i = 0; i < state.joks.length; i++) {
				count += state.joks[i].summary.length;
			}
			return count;
		}
	},
	modules: {},
})
2,新建glodal页面
<template>
	<view>
		<view class="title">vuex数据</view>
		<!--  -->
		<view :style="$store.state.gTitle">
			{{$store.state.gTitle.text}}--简写前
		</view>
		<view :style="gTitle">{{gTitle.text}}--简写后</view>
		<navigator url="./fontSize">修改文本大小</navigator>
		<navigator url="./backgroundColor">修改背景颜色</navigator>
		<br>
		<view>
			总{{$store.state.joks.length}}条笑话
		</view>
		<view>{{totalLen}}字</view>
		<view>
			<view class="item" v-for="item in $store.state.joks">
				{{item.summary}}
			</view>
		</view>
	</view>

</template>

<script>
	//state的简写
	import {mapState,mapActions,mapGetters} from 'vuex'
	export default{
		computed:{
			//把全局的vuex数据转换为组件计算出来的只读的
			...mapState(["gTitle"]),
			...mapGetters(['totalLen'])
		},
		onLoad() {
			//调用getJok方法,并传入参数
			// this.$store.dispatch("getJok",{page:1})
			this.getJok({page:1});
		},
		methods:{
			...mapActions(["getJok"])
		}
	}
</script>

<style lang="scss">
	.item{
		margin-top: 40rpx;
	}
</style>
自行复制代码运行,查看
Vuex的奥妙,知识面广,详细内容可阅读官方文档!
二、uni-app常用api
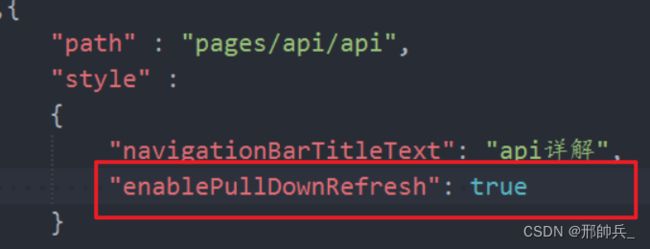
下拉刷新
上传和下载 uni.upload uni.download
		<button @click="onuploadphoto">图片上传</button>
		<button @click="ondownload">下载</button>
		<image :src="downloadfile" style="width: 300rpx;height: 270rpx;" mode="aspectFill"></image>

		data() {
			return {
				downloadfile:''
			}
		},

		onuploadphoto(){
				uni.chooseImage({
					count:1,
					sizeType:[],
					sourceType:[],
					success: (res) => {
						console.log(JSON.stringify(res));
					},
					fail: () => {
						console.log(JSON.stringify(err));
					}
				})
			},
			ondownload(){
				uni.downloadFile({
					url:'https://img2.baidu.com/it/u=190271553,1135687029&fm=253&fmt=auto&app=138&f=JPEG?w=640&h=452',
					timeout:30000,
					success: (res) => {
						console.log(JSON.stringify(res));
						this.downloadfile = res.tempFilePath;    //显示图片
					},
					fail: (err)=>{
						console.log(JSON.stringify(err));
					}
				})
			}
图片
<!-- 循环显示选中多张图片 -->
		<view style="display: flex;">
		<view v-for="(item,index) in picpaths" :key="index">
			<image :src="item" style="width: 300rpx;height: 400rpx;" mode="aspectFill"></image>
		</view>
		</view>
		<image :src="picpath" style="width: 300rpx;height: 250rpx;" mode="aspectFill"></image> <!-- 显示图片 -->

return {
				picpath:'',
				picpaths:[]
			}

onchooseimg(){
				let that = this;   //外部定义this
				uni.chooseImage({
					count:3,
					sizeType:[],
					success: (res) => {    //base6写法 不用外部定义this
						console.log(JSON.stringify(res));
						//回调显示图片
						that.picpath = res.tempFilePaths[0];
						that.picpaths = res.tempFilePaths;
						console.log(that.picpath);
					}
				})
			}
uni.previewImage 预览图片
<button @click="onpreimg">预览图片</button>

onpreimg(){
				uni.previewImage({
					loop:false,
					indicator:'default',
					count:this.picpre.length,   //存入图片列表长度
					current:'',
					urls:this.picpre,   //关键参数
					success: (res) => {
						console.log(JSON.stringify(res));
					},
					fail: (err) => {
						console.log(err);
					}
				})
			}
uni.getImageInfo 获取图片信息 长宽 用于瀑布流(耗性能,不推荐
<!-- 动态显示图片,结合图片信息api -->
		<image :style="{width: imgwidth+'rpx',height: imgheight+'rpx'}" src="../../static/logo.png"></image>
		onLoad() {
			//页面加载获取本地图片
			uni.getImageInfo({
				src:'../../static/logo.png',
				success: (res) => {
					console.log(res);
					//动态获取真实图片宽高
					this.imgwidth = res.width;
					this.imgheight = res.height;
				}
			})
		},
uni.saveImageToPhotosAlbum 保存图片到系统相册
//条件编译  放到onload页面周期内
			// #ifndef H5
			let url = 'https://img2.baidu.com/it/u=297478628,2059211344&fm=253&fmt=auto&app=138&f=JPEG?w=500&h=278';
			uni.downloadFile({
				url:url,
				success: (res) => {
					console.log(res);
					let file = res.tempFilePath;
					//保存到相册api  不支持h5 条件编译
					uni.saveImageToPhotosAlbum({
						filePath:file,
						success: (re) => {
							console.log(re);
						},
						fail: (err) => {
							console.log(err);
						}
					})
				}
			})
			// #endif
设备
系统信息
uni.getSystemInfo获取系统信息 经常用 屏幕宽度,高度
- 屏幕高度 = 原生NavigationBar高度(含状态栏高度)+ 可使用窗口高度 + 原生TabBar高度
- windowHeight不包含NavigationBar和TabBar的高度
- H5端,windowTop等于NavigationBar高度,windowBottom等于TabBar高度
- App端,windowTop等于透明状态NavigationBar高度,windowBottom等于透明状态TabBar高度
- 高度相关信息,要放在 onReady 里获取
//onloaad生命周期
//同步操作会有等待 当建一个异步处理 可以用同步处理
			let sync = uni.getSystemInfoSync();
			new Promise((resolve,refuse)=>{
				let sync1 = uni.getSystemInfoSync();
				let sync2 = uni.getSystemInfoSync();
				resolve && resolve();
			}).then(res=>{

			}).catch(err=>{

			})

			uni.getSystemInfo({
				success: (res) => {
					console.log(JSON.stringify(res));
				}
			})
uni.canIUse 判断应用的 API,回调,参数,组件等是否在当前版本可用
三,uni - app组件
1,uni-app常用组件(uni-app内部组件)
消息提示
最全的toast:
	 uni.showToast({
		title:"请输入用户名密码!" ,
		icon: 'none',
		mask: true,
		duration: 2000
	})
icon值:
默认success。
(1)none:没有图标
(2)error:错误图标
(3)loading:加载 (
4)success:成功
如果只是最简单的,超过7个字会显示不完全。
	 uni.showToast({
		title:"请输入用户名密码!"
	})
成功信息:
uni.showToast({
title: '提交成功',
duration: 2000
});
失败信息:
uni.showToast({
title: '提交失败',
icon: 'error',
duration: 2000
});
用户交互点击
 uni.showModal({
       title: '哦,答错了',
       content: '是否加入错题本?',
       success: function (res) {
         if (res.confirm) {
             console.log('用户点击确定');
         } else if (res.cancel) {
              console.log('用户点击取消');
         }
    }
});
存储本地缓存
存储:
uni.setStorageSync('token', 'hello');
取值:
uni.getStorageSync('token');
表单组件
文本域
textarea值得注意的是默认限制输入长度140,如果打破这个限制,将其设置为-1
<textarea class="input-val" v-model="form.content" maxlength="-1" auto-height placeholder="请输入句子内容"/>
2,uni-app实现自定义组件
2.1、首先我们要先创建一个与page平级的component页面,然后再在里面创建一个自己的组件名称相同的页面:
2.2,然后去pages.json将刚刚创建的页面删除。将红色部分删除!
2.3、在组件中写props属性用于接收值(若不进行值传递可以不写)。我是从父文件传递过来一个对象使用,所以我这里props内接收的是一个对象。
2.4、一定要写name属性,这是导出的组件名称:
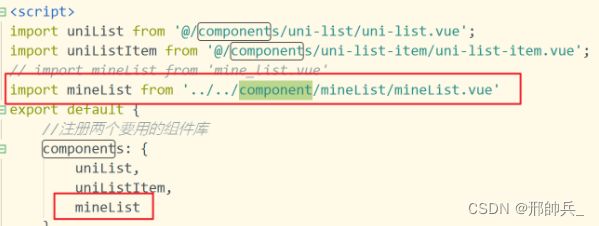
2.5,此时我们来到使用组件的页面,导入并且注册组件,如果是按照我的逻辑创建的目录,则直接将名字改成你自己的组件名称即可。
2.6, 5、此时就可以直接引用使用啦:
四,uni-app第三方ui组件推荐&&引入的方法
1,ui组件推荐
1.1,Muse-UI
介绍:
- Muse UI 是一套 Material Design 风格开源组件库,旨在快速搭建页面。它基于 Vue 2.0
开发,并提供了自定义主题,充分满足可定制化的需求。 - material-design-icons 是谷歌定义的一套icon
- typeface 是谷歌定义的一套字体
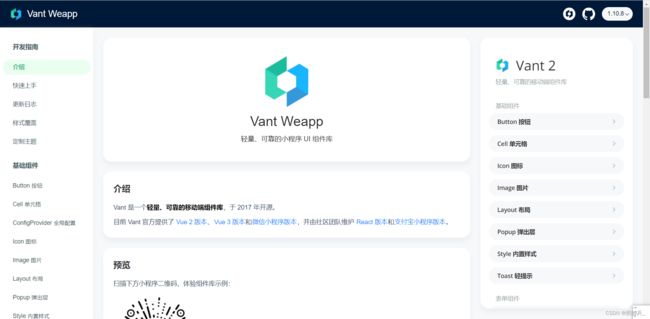
1.2,Vant Weapp
介绍:
- Vant 是一个轻量、可靠的移动端组件库,于 2017 年开源。
- 目前 Vant 官方提供了 Vue 2 版本、Vue 3 版本和微信小程序版本,并由社区团队维护 React 版本和支付宝小程序版本。
1.3,uView
介绍:
- uView2.0是继1.0以来的一次重大更新,2.0已全面兼容nvue,为了这个最初的梦想,我们曾日以夜继,挑灯夜战,闻鸡起舞。您能看到屏幕上的字,却看不到我们洒在键盘上的泪。
- uView来源于社区,也回归到社区,正是有一群热爱uni-app生态的同学推着它前行,而我们也一如既往的承诺,uView永久开源,永远免费。
- 关于uView的取名来由,首字母u来自于uni-app首字母,uni-app是基于Vue.js,Vue和View(延伸为UI、视图之意)同音,同时view组件是uni-app中
最基础,最重要的组件,故取名uView,表达源于uni-app和Vue之意,同时在此也对它们表示感谢。
1.4,ThorUI
介绍:
- 简约而不简单一直是ThorUI的追求。ThorUI目前有微信小程序原生版本 (opens new window)和uni-app版本
(opens new window),后续会扩展到其他原生版本,扩大生态。
除了组件库ThorUI还会陆续发布一些常用模板,使开发更加高效。 - 目前组件与模板默认支持App端(IOS和Android)、H5、微信小程序、QQ小程序。
2,使用的方法
2.1,引入
引入的方法大多在官方文档里就有,这里写一下我的引入方法
既然是
uni项目引入的ui组件 你应该要了解easycom,传统vue组件,需要安装、引用、注册,三个步骤后才能使用组件。easycom将其精简为一步。
uView
官方文档u-View的引入非常简单
// 安装
npm install uview-ui@2.0.31

//然后配置easycom组件模式
// pages.json
{
	"easycom": {
		"^u-(.*)": "uview-ui/components/u-$1/u-$1.vue"
	},

	// 此为本身已有的内容
	"pages": [
		// ......
	]
}
但是我引入后不生效,是因为缺少了前面的css样式文件
- 引入uView主JS库
在项目根目录中的main.js中,引入并使用uView的JS库,注意这两行要放在import Vue之后。
// main.js
import uView from "uview-ui";
Vue.use(uView);
- 在引入uView的全局SCSS主题文件
在项目根目录的uni.scss中引入此文件。
/* uni.scss */
@import 'uview-ui/theme.scss';
- 引入
uView基础样式
在App.vue中首行的位置引入,注意给style标签加入lang="scss"属性
<style lang="scss">
	/* 注意要写在第一行,同时给style标签加入lang="scss"属性 */
	@import "uview-ui/index.scss";
</style>
vant weapp
vantweapp 官方文档给出的只有引入微信开发者工具的,没有引入uni项目的
我依然使用easycom引入uni项目,步骤如下:
第一步
下载源文件:https://github.com/youzan/vant-weapp/releases
第二步
- 下载解压
- uni项目根目录新建wxcomponents(必须是这个名字)
- 把dist复制到wxcomponents里,dist改名vant
第三步
- 使用easycom自动批量移入组件
easycom:只要组件安装在项目的components目录下,并符合components/组件名称/组件名称.vue目录结构。就可以不用引用、注册,直接在页面中使用
// pages.json-globalStyle同级下添加
"easycom": {
      "autoscan": true, // 是否开启自动扫描
      "custom": {
        "^u-(.*)": "uview-ui/components/u-$1/u-$1.vue", // 这个是上面引入的uView
			"van-(.*)": "@/wxcomponents/vant/$1/index"
      }
    }
正则表达式解释
“van-(.*)”-----指的是你用的标签,这种@/wxcomponents/vant/$1/index.vue------前面一段是正常路径,$1表示匹配vant下的所有文件夹,index.vue是目标文件,一开始是没有的,编译后会出现
当然使用在pages.json文件添加usingComponents也可以(你不嫌烦的话)
"globalStyle": {
		...
		"usingComponents": {
			"van-button": "/wxcomponents/vant/button/index", // 以 Button 组件为例
			"van-notice-bar": "/wxcomponents/vant/notice-bar/index"
		}
	},
问:为什么vant weapp不使用npm来安装到uni项目呢?而且相对轻便、快捷
答: 按理说 【npm i @vant/weapp -S --production 】后使用正则【“van-(.*)”:
“@vant/weapp/dist/$1/index”】引入到easycom是没错的,但是编译小程序后就是会有各种各样的报错,所以放弃了
温馨提示,官方文本教程最全,可以仔细阅读

