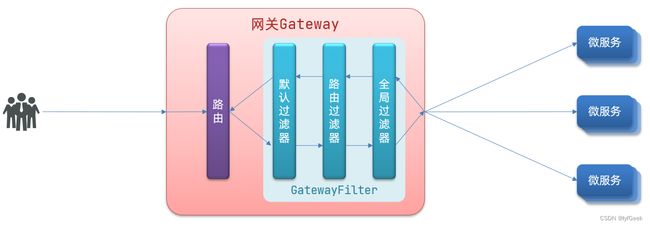
微服务 ~ 从入门到入坑。
Spring Cloud ~ 从入门到入坑。
文章目录
-
- Spring Cloud ~ 从入门到入坑。
-
- 1. 认识微服务。
-
-
- 1.0. 学习目标。
- 1.1. 单体架构。
- 1.2. 分布式架构。
- 1.3. 微服务。
- 1.4. SpringCloud。
- 1.5. 总结。
- 微服务技术对比。
-
- 2. 服务拆分和远程调用。
-
-
- 2.1. 服务拆分原则。
- 2.2. 服务拆分示例。
-
- 2.2.1. 导入 Sql 语句。
- 2.2.2. 导入 demo 工程。
- 2.3. 实现远程调用案例。
-
- 2.3.1. 案例需求。
- 2.3.2. 注册 RestTemplate。
- 2.3.3. 实现远程调用。
- 2.4. 提供者与消费者。
-
- 3. Eureka 注册中心。
-
-
- 3.1. Eureka 的结构和作用。
- 3.2. 搭建 eureka-server。
-
- 3.2.1. 创建 eureka-server 服务。
- 3.2.2. 引入 eureka 依赖。
- 3.2.3. 编写启动类。
- 3.2.4. 编写配置文件
- 3.2.5. 启动服务。
- 3.3. 服务注册。
-
- 1)引入依赖。
- 2)配置文件。
- 3)启动多个 user-service 实例。
- 3.4. 服务发现。
-
- 1)引入依赖。
- 2)配置文件。
- 3)服务拉取和负载均衡。
-
- 4. Ribbon 负载均衡。
-
-
- 4.1. 负载均衡原理。
- 4.2. 源码跟踪。
-
- 1)LoadBalancerInterceptor。
- 2)LoadBalancerClient。
- 3)负载均衡策略 IRule。
- 4)总结。
- 4.3. 负载均衡策略。
-
- 4.3.1. 负载均衡策略。
- 4.3.2. 自定义负载均衡策略。
- 4.4. 饥饿加载。
-
- 5. Nacos 注册中心。
-
-
- 5.1. 认识和安装 Nacos。
- 5.2.服务注册到 Nacos。
-
- 1)引入依赖。
- 2)配置 Nacos 地址。
- 3)重启。
- 5.3. 服务分级存储模型。
-
- 5.3.1. 给 user-service 配置集群。
- 5.3.2. 同集群优先的负载均衡。
- 5.4. 权重配置。
- 5.5. 环境隔离。
-
- 5.5.1. 创建 namespace。
- 5.5.2. 给微服务配置 namespace。
- 5.6. Nacos 与 Eureka 的区别。
-
- SpringCloud 实用篇。
-
- 0. 学习目标。
- 1. Nacos 配置管理。
-
-
- 1.1. 统一配置管理。
-
- 1.1.1. 在 Nacos 中添加配置文件。
- 1.1.2. 从微服务拉取配置。
- 1.2. 配置热更新。
-
- 1.2.1.方式一 ~ @Value ~ @RefreshScope。
- 1.2.2. 方式二 ~ @ConfigurationProperties。
- 1.3. 配置共享。
-
- 1)添加一个环境共享配置。
- 3)运行两个 UserApplication,使用不同的 profile。
- 4)配置共享的优先级。
- 1.4. 搭建 Nacos 集群。
-
- 1.4.1. 搭建集群。
- 1.4.2. 初始化数据库。
- 1.4.2. 下载 nacos。
- 1.4.3. 配置 Nacos。
- 1.4.4. 启动。
- 1.4.5. Nginx 反向代理。
- 1.5. 优化。
-
- 2. Feign 远程调用。
-
-
-
- 2.1. Feign 替代 RestTemplate。
- 1)引入依赖。
- 2)添加注解。
- 3)编写 Feign 的客户端。
- 4)测试。
- 5)总结。
- 2.2. 自定义配置。
-
- 2.2.1.配置文件方式
- 2.2.2. Java 代码方式。
- 2.3. Feign 使用优化。
- 2.4. 最佳实践。
-
- 2.4.1. 继承方式。
- 2.4.2. 抽取方式。
- 2.4.3. 实现基于抽取的最佳实践。
- # 1)抽取。
- 2)在 order-service 中使用 feign-api。
- 3)重启测试。
- 4)解决扫描包问题。
-
-
- 3. Gateway 服务网关。
-
-
- 3.1. 为什么需要网关。
- 3.2. gateway 快速入门。
-
- 1)创建 gateway 服务,引入依赖。
- 2)编写启动类。
- 3)编写基础配置和路由规则。
- 4)重启测试。
- 5)网关路由的流程图。
- 3.3. 路由断言工厂 Predicate Factory。
- 3.4. 路由过滤器工厂。
-
- 3.4.1. 路由过滤器的种类。
- 3.4.2. 请求头过滤器。
- 3.4.3. 默认过滤器。
- 3.4.4. 总结。
- 3.5. 全局过滤器。
-
- 3.5.1. 全局过滤器作用。
- 3.5.2. 自定义全局过滤器。
- 3.5.3. 过滤器执行顺序。
- 3.6. 跨域问题。
-
- 3.6.1. 什么是跨域问题。
- 3.6.2. 模拟跨域问题。
- 3.6.3. 解决跨域问题。
-
1. 认识微服务。
随着互联网行业的发展,对服务的要求也越来越高,服务架构也从单体架构逐渐演变为现在流行的微服务架构。这些架构之间有怎样的差别呢?
1.0. 学习目标。
了解微服务架构的优缺点。
1.1. 单体架构。
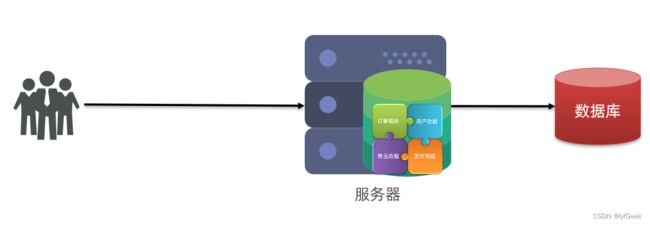
单体架构:将业务的所有功能集中在一个项目中开发,打成一个包部署。
优点。
-
架构简单。
-
部署成本低。
缺点。
- 耦合度高(维护困难、升级困难)。
1.2. 分布式架构。
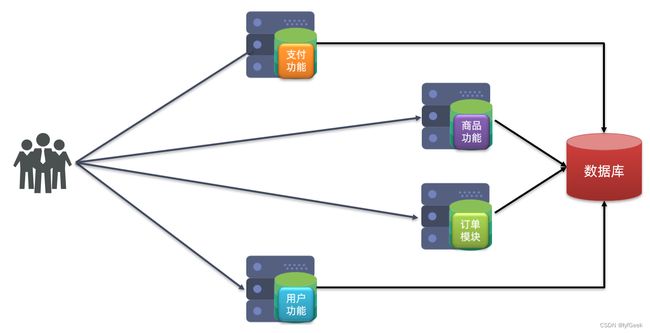
分布式架构:根据业务功能对系统做拆分,每个业务功能模块作为独立项目开发,称为一个服务。
优点。
-
降低服务耦合。
-
有利于服务升级和拓展。
缺点。
- 服务调用关系错综复杂。
分布式架构虽然降低了服务耦合,但是服务拆分时也有很多问题需要思考。
-
服务拆分的粒度如何界定?
-
服务之间如何调用?
-
服务的调用关系如何管理?
人们需要制定一套行之有效的标准来约束分布式架构。
1.3. 微服务。
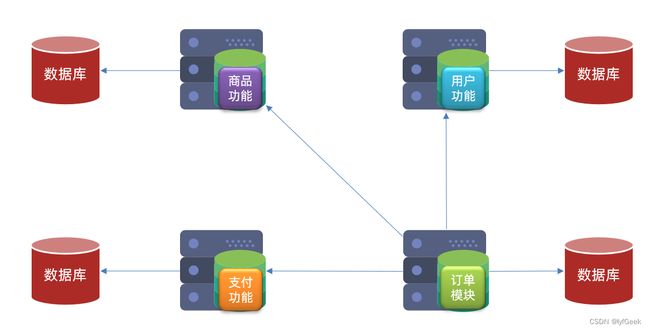
微服务是一种经过良好架构设计的分布式架构方案。
微服务的架构特征。
-
单一职责:微服务拆分粒度更小,每一个服务都对应唯一的业务能力,做到单一职责。
-
自治:团队独立、技术独立、数据独立,独立部署和交付。
-
面向服务:服务提供统一标准的接口,与语言和技术无关。
-
隔离性强:服务调用做好隔离、容错、降级,避免出现级联问题。
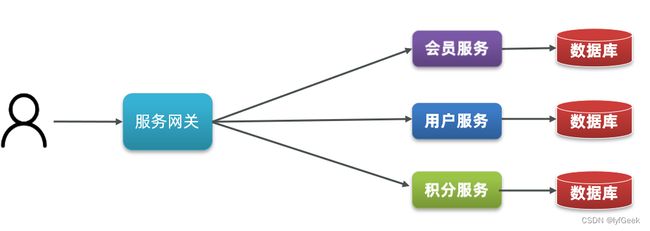
微服务的上述特性其实是在给分布式架构制定一个标准,进一步降低服务之间的耦合度,提供服务的独立性和灵活性。做到高内聚,低耦合。
因此,可以认为微服务是一种经过良好架构设计的分布式架构方案 。
但方案该怎么落地?选用什么样的技术栈?全球的互联网公司都在积极尝试自己的微服务落地方案。
其中在 Java 领域最引人注目的就是 SpringCloud 提供的方案了。
1.4. SpringCloud。
SpringCloud 是目前国内使用最广泛的微服务框架。官网地址:https://spring.io/projects/spring-cloud。
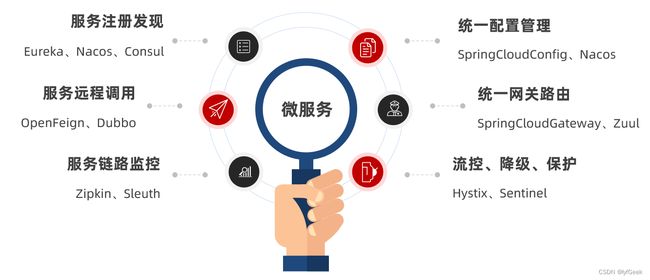
SpringCloud 集成了各种微服务功能组件,并基于 SpringBoot 实现了这些组件的自动装配,从而提供了良好的开箱即用体验。
其中常见的组件包括
另外,SpringCloud 底层是依赖于 SpringBoot 的,并且有版本的兼容关系,如下
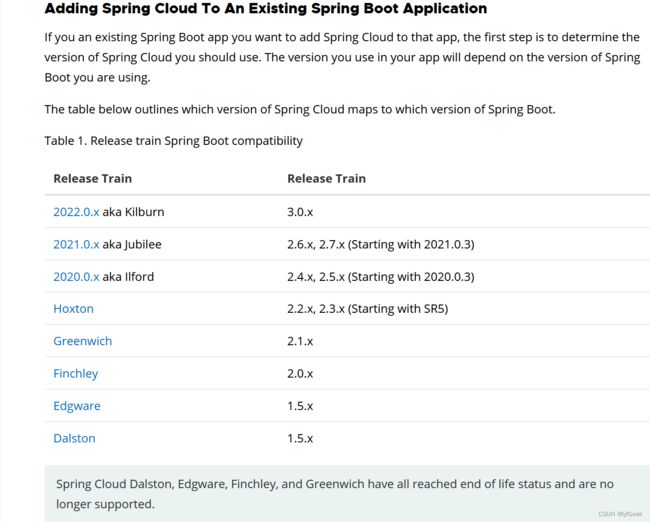
我们课堂学习的版本是 Hoxton.SR10,因此对应的 SpringBoot 版本是 2.3.x 版本。
1.5. 总结。
-
单体架构:简单方便,高度耦合,扩展性差,适合小型项目。例如:学生管理系统。
-
分布式架构:松耦合,扩展性好,但架构复杂,难度大。适合大型互联网项目,例如:京东、淘宝。
-
微服务:一种良好的分布式架构方案。
优点:拆分粒度更小、服务更独立、耦合度更低。
缺点:架构非常复杂,运维、监控、部署难度提高。
- SpringCloud 是微服务架构的一站式解决方案,集成了各种优秀微服务功能组件。
微服务技术对比。
| * | Dubbo | SpringCloud | SpringCloudAlibaba |
|---|---|---|---|
| 注册中心 | zookeeper、Redis | Eureka、Consul | Nacos、Eureka |
| 服务远程调用 | Dubbo 协议 | Feign(http 协议) | Dubbo、Feign |
| 配置中心 | 无 | SpringCloudConfig | SpringCloudConfig、Nacos |
| 服务网关 | 无 | SpringCloudGateway、Zuul | SpringCloudGateway、Zuul |
| 服务监控和保护 | dubbo-admin,功能弱 | Hystrix | Sentinel |
企业需求。
- SpringCloud + Feign。
使用 SpringCloud 技术栈。
服务接口采用 Restful 风格。
服务调用采用 Feign 方式。
- SpringCloudAlibaba + Feign。
使用 SpringCloudAlibaba 技术栈。
服务接口采用 Restful 风格。
服务调用采用 Feign 方式。
- SpringCloudAlibaba + Dubbo。
使用 SpringCloudAlibaba 技术栈。
服务接口采用 Dubbo 协议标准。
服务调用采用 Dubbo 方式。
- Dubbo 原始模式。
采用 Dubbo 老旧技术体系。
服务接口采用 Dubbo 协议标准。
服务调用采用 Dubbo 方式。
2. 服务拆分和远程调用。
任何分布式架构都离不开服务的拆分,微服务也是一样。
2.1. 服务拆分原则。
这里我总结了微服务拆分时的几个原则。
-
不同微服务,不要重复开发相同业务。
-
微服务数据独立,不要访问其它微服务的数据库。
-
微服务可以将自己的业务暴露为接口,供其它微服务调用。
2.2. 服务拆分示例。
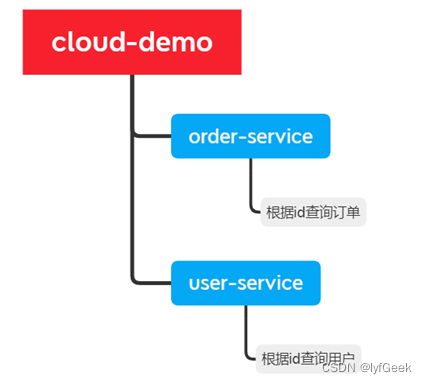
以课前资料中的微服务 cloud-demo 为例,其结构如下。
cloud-demo:父工程,管理依赖。
-
order-service:订单微服务,负责订单相关业务。
-
user-service:用户微服务,负责用户相关业务。
要求。
-
订单微服务和用户微服务都必须有各自的数据库,相互独立。
-
订单服务和用户服务都对外暴露 Restful 的接口。
-
订单服务如果需要查询用户信息,只能调用用户服务的 Restful 接口,不能查询用户数据库。
2.2.1. 导入 Sql 语句。
首先,将 cloud-order.sql 和 cloud-user.sql 导入到 MySQL 中。
CREATE SCHEMA `cloud_user` DEFAULT CHARACTER SET utf8mb4 ;

CREATE TABLE `cloud_user`.`user` (
  `id` BIGINT NOT NULL AUTO_INCREMENT COMMENT '用户 id。',
  `username` VARCHAR(45) NULL COMMENT '用户名。',
  `address` VARCHAR(255) NULL COMMENT '地址。',
  PRIMARY KEY (`id`),
  UNIQUE INDEX `username_UNIQUE` (`username` ASC))
ENGINE = InnoDB
DEFAULT CHARACTER SET = utf8mb4
COMMENT = '用户。';

INSERT INTO `cloud_user`.`user` (`username`, `address`) VALUES ('柳岩', '湖南省衡阳市');
INSERT INTO `cloud_user`.`user` (`username`, `address`) VALUES ('文二狗', '陕西省西安市');
INSERT INTO `cloud_user`.`user` (`username`, `address`) VALUES ('华沉鱼', '湖北省十堰市');
INSERT INTO `cloud_user`.`user` (`username`, `address`) VALUES ('张必沉', '天津市');
INSERT INTO `cloud_user`.`user` (`username`, `address`) VALUES ('郑爽爽', '辽宁省沈阳市大东区');
INSERT INTO `cloud_user`.`user` (`username`, `address`) VALUES ('范兵兵', '山东省青岛市');
CREATE SCHEMA `cloud_order` DEFAULT CHARACTER SET utf8mb4 ;

CREATE TABLE `cloud_order`.`order` (
  `id` BIGINT NOT NULL AUTO_INCREMENT COMMENT '订单 id。',
  `user_id` BIGINT NOT NULL COMMENT '用户 id。',
  `name` VARCHAR(45) NULL COMMENT '商品名称。',
  `price` BIGINT NULL COMMENT '商品价格。',
  `num` INT NULL COMMENT '商品适量。',
  PRIMARY KEY (`id`))
ENGINE = InnoDB
DEFAULT CHARACTER SET = utf8mb4
COMMENT = '订单。';

INSERT INTO `cloud_order`.`order` (`user_id`, `name`, `price`, `num`) VALUES ('1', 'Apple 苹果 iPhone 13', '699900', '1');
INSERT INTO `cloud_order`.`order` (`user_id`, `name`, `price`, `num`) VALUES ('2', '雅迪 Yadea 国标电动车', '209900', '1');
INSERT INTO `cloud_order`.`order` (`user_id`, `name`, `price`, `num`) VALUES ('3', '骆驼 Camel 休闲运动鞋女', '43900', '1');
INSERT INTO `cloud_order`.`order` (`user_id`, `name`, `price`, `num`) VALUES ('4', '小米 10 双模 5G 骁龙 865', '359900', '1');
INSERT INTO `cloud_order`.`order` (`user_id`, `name`, `price`, `num`) VALUES ('5', 'OPPO Reno 3 双模 5G 视频双防抖', '299900', '1');
INSERT INTO `cloud_order`.`order` (`user_id`, `name`, `price`, `num`) VALUES ('6', '美的 Midea 新能效 冷静星 II', '544900', '1');
INSERT INTO `cloud_order`.`order` (`user_id`, `name`, `price`, `num`) VALUES ('2', '西昊 SIHOO 人体工学电脑椅', '79900', '1');
INSERT INTO `cloud_order`.`order` (`user_id`, `name`, `price`, `num`) VALUES ('3', '梵班 FAMDVANN 休闲男鞋', '31900', '1');
cloud-order 表中持有 cloud-user 表中的 id 字段。
2.2.2. 导入 demo 工程。
用 IDEA 导入课前资料提供的 Demo。
项目结构如下。
![]()
导入后,会在 IDEA 右下角出现弹窗。
点击 Use Services。
会出现这样的菜单。
![]()
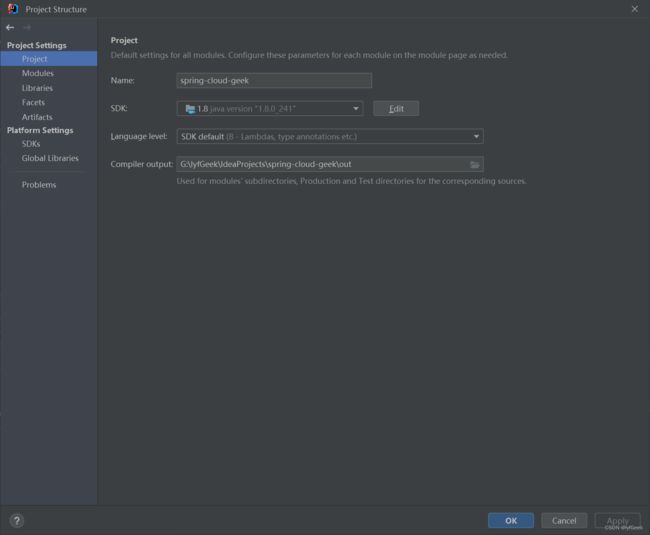
配置项目使用的 JDK。
2.3. 实现远程调用案例。
package com.geek;

import org.mybatis.spring.annotation.MapperScan;
import org.springframework.boot.SpringApplication;
import org.springframework.boot.autoconfigure.SpringBootApplication;
import org.springframework.context.annotation.Bean;
import org.springframework.web.client.RestTemplate;

/**
 * @author geek
 */
@MapperScan("com.geek.order.mapper")
@SpringBootApplication
public class OrderApplication {

    public static void main(String[] args) {
        SpringApplication.run(OrderApplication.class, args);
    }

    @Bean
    public RestTemplate restTemplate() {
        return new RestTemplate();
    }

}
在 order-service 服务中,有一个根据 id 查询订单的接口。
package com.geek.order.controller;

import com.geek.order.pojo.Order;
import com.geek.order.pojo.User;
import com.geek.order.service.IOrderService;
import lombok.extern.slf4j.Slf4j;
import org.springframework.beans.factory.annotation.Autowired;
import org.springframework.web.bind.annotation.PathVariable;
import org.springframework.web.bind.annotation.RequestMapping;
import org.springframework.web.bind.annotation.RestController;
import org.springframework.web.client.RestTemplate;

/**
 * @author geek
 */
@Slf4j
@RestController
@RequestMapping("/order")
public class OrderController {

    @Autowired
    private IOrderService orderService;

    @Autowired
    private RestTemplate restTemplate;

    @RequestMapping("/{orderId}")
    public Order getById(@PathVariable("orderId") Long orderId) {
        // 查订单。
        Order order = this.orderService.getById(orderId);
        return order;
    }

}
根据 id 查询订单,返回值是 Order 对象,如图。
{
  "id": 1,
  "price": 699900,
  "name": "Apple 苹果 iPhone 13",
  "num": 1,
  "userId": 1,
  "user": null
}
其中的 user 为 null。
在 user-service 中有一个根据 id 查询用户的接口。
package com.geek.user.controller;

import com.geek.user.pojo.User;
import com.geek.user.service.IUserService;
import lombok.extern.slf4j.Slf4j;
import org.springframework.beans.factory.annotation.Autowired;
import org.springframework.web.bind.annotation.PathVariable;
import org.springframework.web.bind.annotation.RequestMapping;
import org.springframework.web.bind.annotation.RestController;

/**
 * @author geek
 */
@Slf4j
@RestController
@RequestMapping("/user")
public class UserController {

    @Autowired
    private IUserService userService;

    @RequestMapping("/{userId}")
    public User getById(@PathVariable("userId") Long userId) {
        return this.userService.getById(userId);
    }

}
查询的结果如图。
{
  "id": 1,
  "username": "柳岩",
  "address": "湖南省衡阳市"
}
2.3.1. 案例需求。
修改 order-service 中的根据 id 查询订单业务,要求在查询订单的同时,根据订单中包含的 userId 查询出用户信息,一起返回。
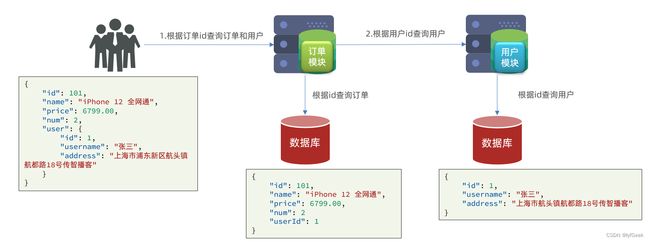
因此,我们需要在 order-service 中 向 user-service 发起一个 http 的请求,调用 http://localhost:8081/user/{userId} 这个接口。
大概的步骤是这样的。
-
注册一个 RestTemplate 的实例到 Spring 容器。
-
修改 order-service 服务中的 OrderService 类中的 queryOrderById 方法,根据 Order 对象中的 userId 查询 User。
-
将查询的 User 填充到 Order 对象,一起返回。
2.3.2. 注册 RestTemplate。
首先,我们在 order-service 服务中的 OrderApplication 启动类中,注册 RestTemplate 实例。
package com.geek;

import org.mybatis.spring.annotation.MapperScan;
import org.springframework.boot.SpringApplication;
import org.springframework.boot.autoconfigure.SpringBootApplication;
import org.springframework.context.annotation.Bean;
import org.springframework.web.client.RestTemplate;

/**
 * @author geek
 */
@MapperScan("com.geek.order.mapper")
@SpringBootApplication
public class OrderApplication {

    public static void main(String[] args) {
        SpringApplication.run(OrderApplication.class, args);
    }

    @Bean
    public RestTemplate restTemplate() {
        return new RestTemplate();
    }

}
2.3.3. 实现远程调用。
修改 order-service 服务中的 cn.itcast.order.service 包下的 OrderService 类中的 queryOrderById 方法。
package com.geek.order.service.impl;

import com.geek.order.mapper.IOrderMapper;
import com.geek.order.pojo.Order;
import com.geek.order.service.IOrderService;
import org.springframework.beans.factory.annotation.Autowired;
import org.springframework.stereotype.Service;

/**
 * @author geek
 */
@Service
public class OrderServiceImpl implements IOrderService {

    @Autowired
    private IOrderMapper orderMapper;

    @Override
    public Order getById(Long id) {
        return this.orderMapper.selectById(id);
    }

}
2.4. 提供者与消费者。
在服务调用关系中,会有两个不同的角色。
服务提供者:一次业务中,被其它微服务调用的服务。(提供接口给其它微服务)。
服务消费者:一次业务中,调用其它微服务的服务。(调用其它微服务提供的接口)。

但是,服务提供者与服务消费者的角色并不是绝对的,而是相对于业务而言。
如果服务 A 调用了服务 B,而服务 B 又调用了服务 C,服务 B 的角色是什么?
-
对于 A 调用 B 的业务而言:A 是服务消费者,B 是服务提供者。
-
对于 B 调用 C 的业务而言:B 是服务消费者,C 是服务提供者。
因此,服务 B 既可以是服务提供者,也可以是服务消费者。
3. Eureka 注册中心。
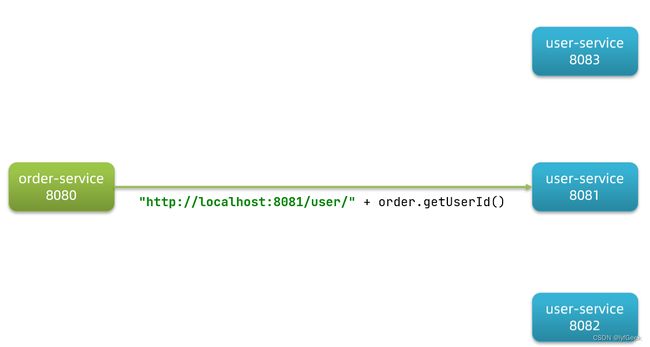
假如我们的服务提供者 user-service 部署了多个实例,如图
-
order-service 在发起远程调用的时候,该如何得知 user-service 实例的 ip 地址和端口?
-
有多个 user-service 实例地址,order-service 调用时该如何选择?
-
order-service 如何得知某个 user-service 实例是否依然健康,是不是已经宕机?
3.1. Eureka 的结构和作用。
这些问题都需要利用 SpringCloud 中的注册中心来解决,其中最广为人知的注册中心就是 Eureka,其结构如下。
![]()
回答之前的各个问题。
问题 1:order-service 如何得知 user-service 实例地址?
获取地址信息的流程如下。
-
user-service 服务实例启动后,将自己的信息注册到 eureka-server(Eureka 服务端)。这个叫服务注册。
-
eureka-server 保存服务名称到服务实例地址列表的映射关系。
-
order-service 根据服务名称,拉取实例地址列表。这个叫服务发现或服务拉取。
问题 2:order-service 如何从多个 user-service 实例中选择具体的实例?
-
order-service 从实例列表中利用负载均衡算法选中一个实例地址。
-
向该实例地址发起远程调用。
问题 3:order-service 如何得知某个 user-service 实例是否依然健康,是不是已经宕机?
-
user-service 会每隔一段时间(默认 30 秒)向 eureka-server 发起请求,报告自己状态,称为心跳。
-
当超过一定时间没有发送心跳时,eureka-server 会认为微服务实例故障,将该实例从服务列表中剔除。
-
order-service 拉取服务时,就能将故障实例排除了。
注意:一个微服务,既可以是服务提供者,又可以是服务消费者,因此 eureka 将服务注册、服务发现等功能统一封装到了 eureka-client 端。
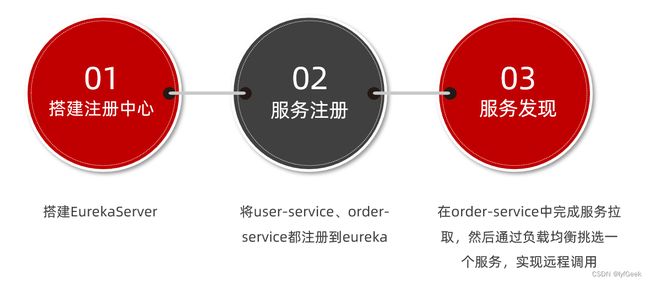
因此,接下来我们动手实践的步骤包括。
3.2. 搭建 eureka-server。
首先大家注册中心服务端:eureka-server,这必须是一个独立的微服务。
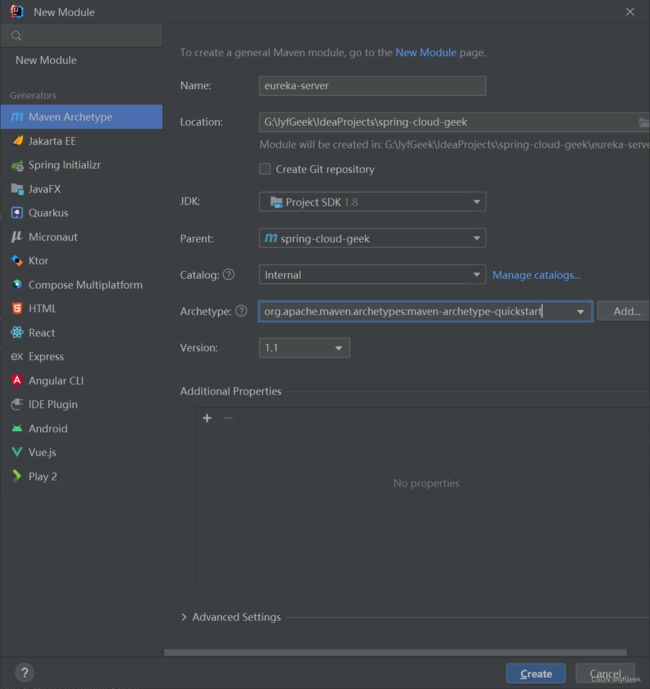
3.2.1. 创建 eureka-server 服务。
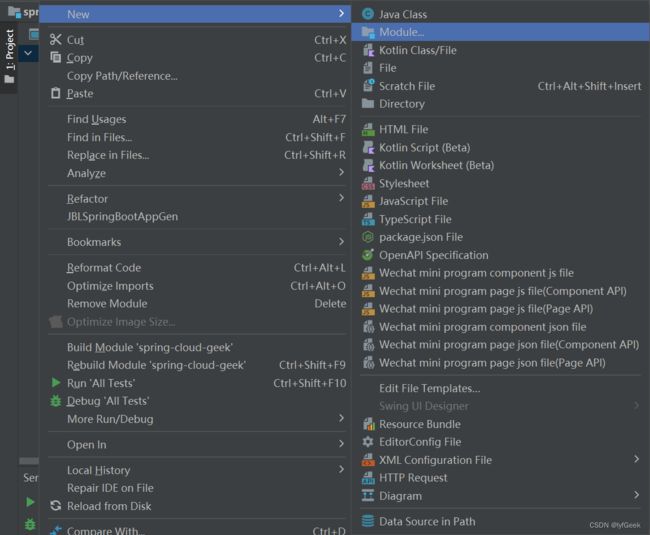
在 cloud-demo 父工程下,创建一个子模块。
3.2.2. 引入 eureka 依赖。
引入 SpringCloud 为 eureka 提供的 starter 依赖。
        <dependency>
            <groupId>org.springframework.cloudgroupId>
            <artifactId>spring-cloud-starter-netflix-eureka-serverartifactId>
        dependency>
3.2.3. 编写启动类。
给 eureka-server 服务编写一个启动类,一定要添加一个@EnableEurekaServer 注解,开启 eureka 的注册中心功能。
package com.geek;

import org.springframework.boot.SpringApplication;
import org.springframework.boot.autoconfigure.SpringBootApplication;
import org.springframework.cloud.netflix.eureka.server.EnableEurekaServer;

/**
 * @author geek
 */
@EnableEurekaServer
@SpringBootApplication
public class EurekaApplication {

    public static void main(String[] args) {
        SpringApplication.run(EurekaApplication.class, args);
    }

}
3.2.4. 编写配置文件
编写一个 application.yml 文件,内容如下。
server:
  port: 10086  # 服务端口。
spring:
  application:
    name: eureka-server  # Eureka 的服务名称。
eureka:
  client:
    service-url: # Eureka 的地址信息。
      defaultZone: http://127.0.0.1:10086/eureka
3.2.5. 启动服务。
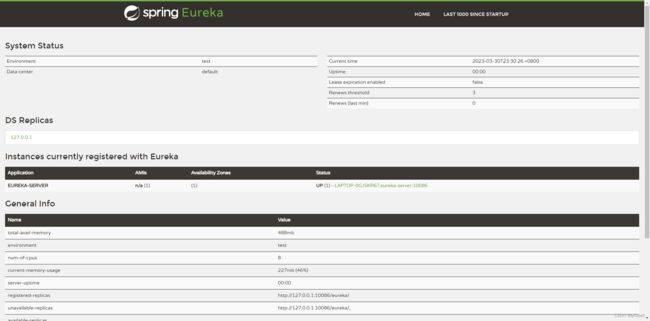
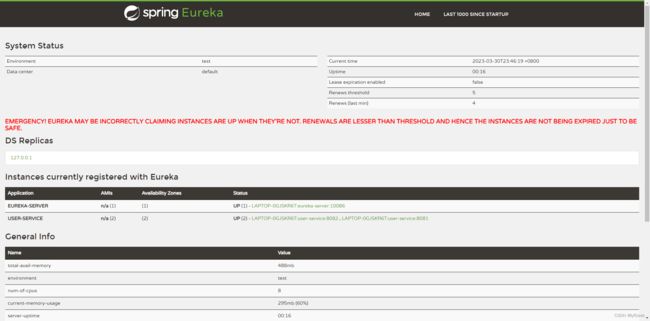
启动微服务,然后在浏览器访问:http://127.0.0.1:10086
看到下面结果应该是成功了。
3.3. 服务注册。
下面,我们将 user-service 注册到 eureka-server 中去。
1)引入依赖。
在 user-service 的 pom 文件中,引入下面的 eureka-client 依赖:
<dependency>
    <groupId>org.springframework.cloudgroupId>
    <artifactId>spring-cloud-starter-netflix-eureka-clientartifactId>
dependency>
2)配置文件。
在 user-service 中,修改 application.yml 文件,添加服务名称、eureka 地址。
spring:
  application:
    name: user-service
eureka:
  client:
    service-url:  # Eureka 的地址信息。
      defaultZone: http://127.0.0.1:10086/eureka
3)启动多个 user-service 实例。
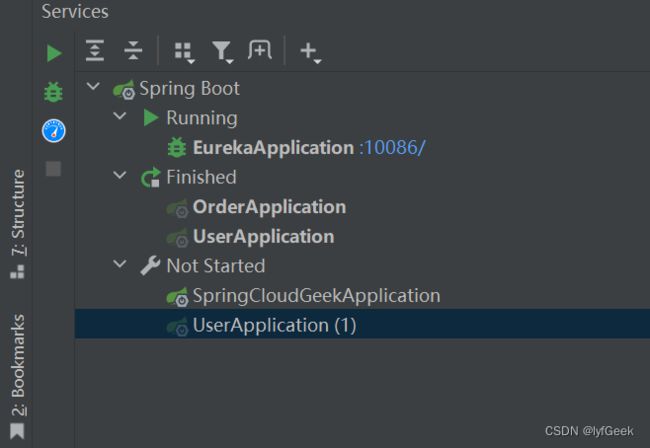
为了演示一个服务有多个实例的场景,我们添加一个 SpringBoot 的启动配置,再启动一个 user-service。
首先,复制原来的 user-service 启动配置。
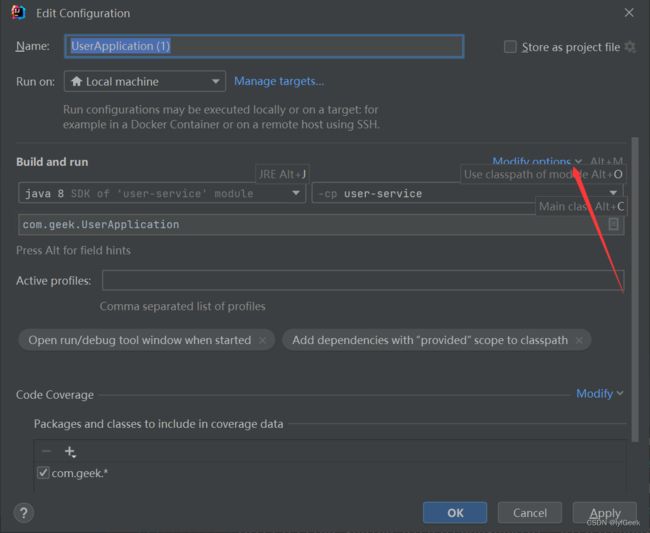
![]()
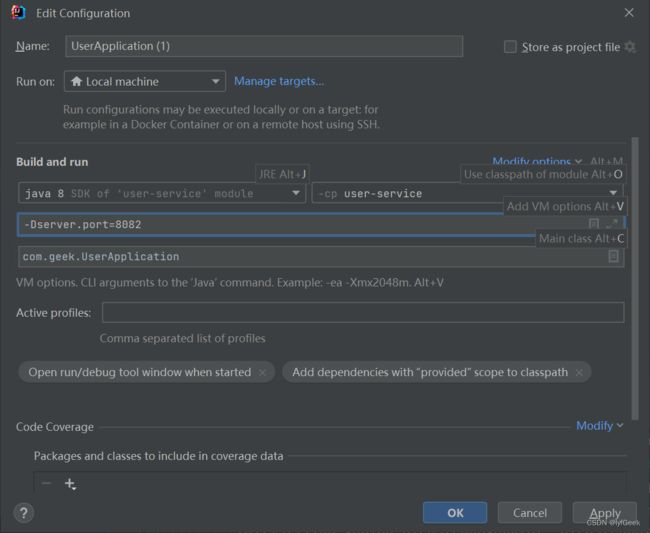
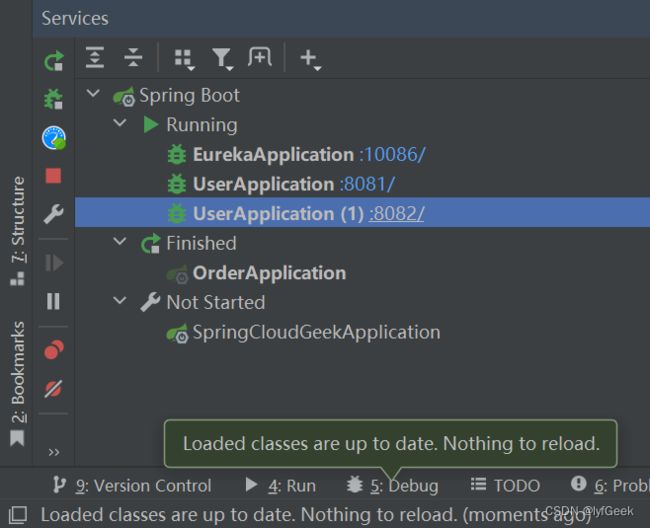
现在,SpringBoot 窗口会出现两个 user-service 启动配置。
启动两个 user-service 实例。
3.4. 服务发现。
下面,我们将 order-service 的逻辑修改:向 eureka-server 拉取 user-service 的信息,实现服务发现。
1)引入依赖。
之前说过,服务发现、服务注册统一都封装在 eureka-client 依赖,因此这一步与服务注册时一致。
在 order-service 的 pom 文件中,引入下面的 eureka-client 依赖:
<dependency>
    <groupId>org.springframework.cloudgroupId>
    <artifactId>spring-cloud-starter-netflix-eureka-clientartifactId>
dependency>
2)配置文件。
服务发现也需要知道 eureka 地址,因此第二步与服务注册一致,都是配置 eureka 信息。
在 order-service 中,修改 application.yml 文件,添加服务名称、eureka 地址。
spring:
  application:
    name: order-service
eureka:
  client:
    service-url:  # Eureka 的地址信息。
      defaultZone: http://127.0.0.1:10086/eureka
3)服务拉取和负载均衡。
最后,我们要去 eureka-server 中拉取 user-service 服务的实例列表,并且实现负载均衡。
不过这些动作不用我们去做,只需要添加一些注解即可。
在 order-service 的 OrderApplication 中,给 RestTemplate 这个 Bean 添加一个 @LoadBalanced 注解。
package com.geek;

import org.mybatis.spring.annotation.MapperScan;
import org.springframework.boot.SpringApplication;
import org.springframework.boot.autoconfigure.SpringBootApplication;
import org.springframework.cloud.client.loadbalancer.LoadBalanced;
import org.springframework.context.annotation.Bean;
import org.springframework.web.client.RestTemplate;

/**
 * @author geek
 */
@MapperScan("com.geek.user.mapper")
@SpringBootApplication
public class UserApplication {

    public static void main(String[] args) {
        SpringApplication.run(UserApplication.class, args);
    }

    @LoadBalanced
    @Bean
    public RestTemplate restTemplate() {
        return new RestTemplate();
    }

}
修改 order-service 服务中的 cn.itcast.order.service 包下的 OrderService 类中的 queryOrderById 方法。修改访问的 url 路径,用服务名代替 ip、端口:
package com.geek.order.controller;

import com.geek.order.pojo.Order;
import com.geek.order.pojo.User;
import com.geek.order.service.IOrderService;
import lombok.extern.slf4j.Slf4j;
import org.springframework.beans.factory.annotation.Autowired;
import org.springframework.web.bind.annotation.PathVariable;
import org.springframework.web.bind.annotation.RequestMapping;
import org.springframework.web.bind.annotation.RestController;
import org.springframework.web.client.RestTemplate;

/**
 * @author geek
 */
@Slf4j
@RestController
@RequestMapping("/order")
public class OrderController {

    @Autowired
    private IOrderService orderService;

    @Autowired
    private RestTemplate restTemplate;

    @RequestMapping("/{orderId}")
    public Order getById(@PathVariable("orderId") Long orderId) {
        // 查订单。
        Order order = this.orderService.getById(orderId);
        // 利用 RestTemplate 发起 http 请求,查询用户。
        // url 路径。
//        String url = "http://localhost:8081/user/" + order.getUserId();
        String url = "http://user-service/user/" + order.getUserId();
        // 发送 http 请求,实现远程调用。
        User user = this.restTemplate.getForObject(url, User.class);
        // 封装 user 对象到 order。
        order.setUser(user);
        return order;
    }

}
spring 会自动帮助我们从 eureka-server 端,根据 userservice 这个服务名称,获取实例列表,而后完成负载均衡。
4. Ribbon 负载均衡。
上一节中,我们添加了@LoadBalanced 注解,即可实现负载均衡功能,这是什么原理呢?
4.1. 负载均衡原理。
SpringCloud 底层其实是利用了一个名为 Ribbon 的组件,来实现负载均衡功能的。

那么我们发出的请求明明是 http://userservice/user/1,怎么变成了 http://localhost:8081 的呢?
4.2. 源码跟踪。
为什么我们只输入了 service 名称就可以访问了呢?之前还要获取 ip 和端口。
显然有人帮我们根据 service 名称,获取到了服务实例的 ip 和端口。ta 就是 LoadBalancerInterceptor,这个类会在对 RestTemplate 的请求进行拦截,然后从 Eureka 根据服务 id 获取服务列表,随后利用负载均衡算法得到真实的服务地址信息,替换服务 id。
我们进行源码跟踪。
1)LoadBalancerInterceptor。
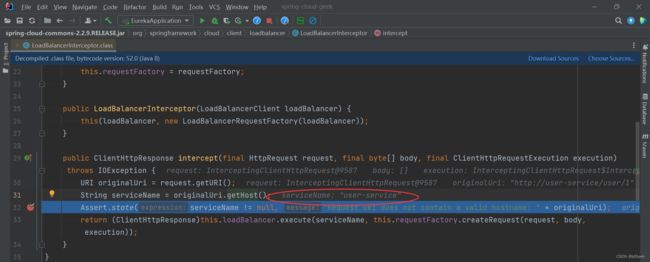
可以看到这里的 intercept 方法,拦截了用户的 HttpRequest 请求,然后做了几件事。
-
request.getURI():获取请求 uri,本例中就是 http://user-service/user/1。 -
originalUri.getHost():获取 uri 路径的主机名,其实就是服务 id,user-service。 -
this.loadBalancer.execute():处理服务 id,和用户请求。
这里的 this.loadBalancer 是 LoadBalancerClient 类型,我们继续跟入。
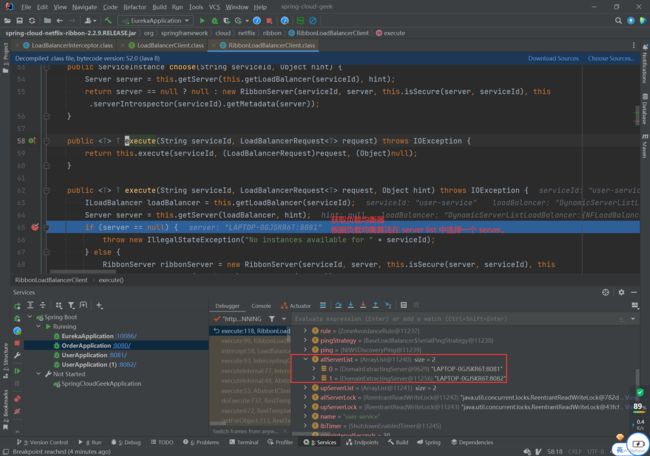
2)LoadBalancerClient。
继续跟入 execute 方法。
-
getLoadBalancer(serviceId):根据服务 id 获取 ILoadBalancer,而 ILoadBalancer 会拿着服务 id 去 eureka 中获取服务列表并保存起来。
-
getServer(loadBalancer):利用内置的负载均衡算法,从服务列表中选择一个。本例中,可以看到获取了 8082 端口的服务。
放行后,再次访问并跟踪,发现获取的是 8082。
3)负载均衡策略 IRule。
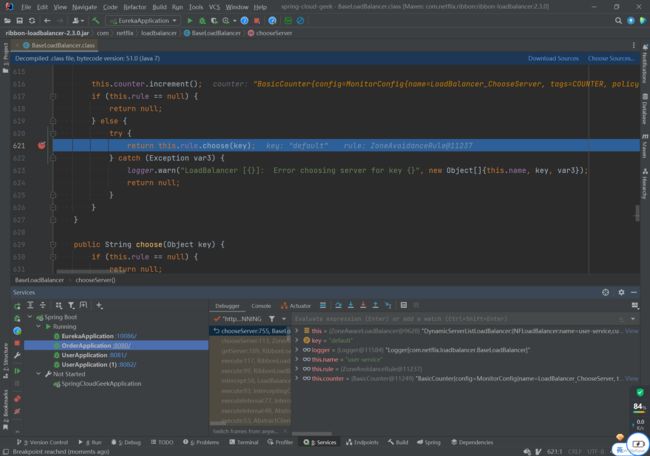
在刚才的代码中,可以看到获取服务使通过一个 getServer 方法来做负载均衡。
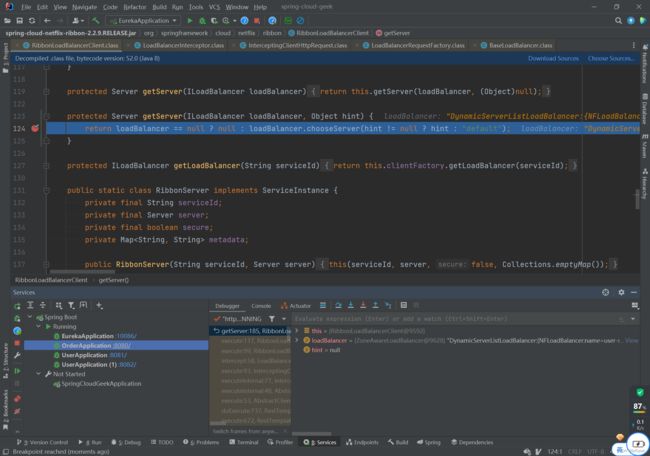
继续跟踪源码 chooseServer 方法,发现这么一段代码。
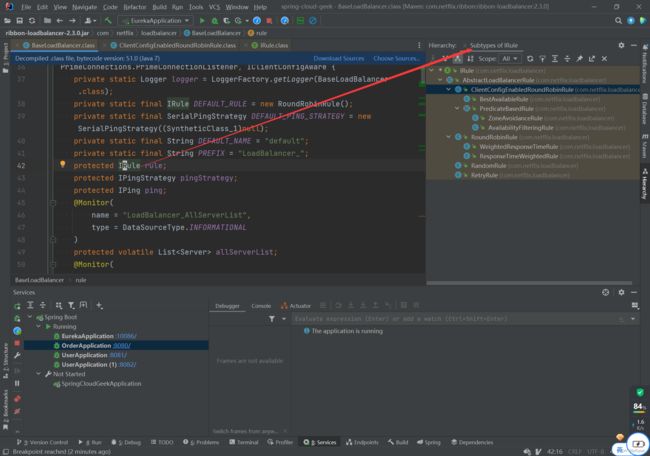
这里的 rule 默认值是一个RoundRobinRule,看类的介绍。
这不就是轮询的意思嘛。
到这里,整个负载均衡的流程我们就清楚了。
4)总结。
SpringCloudRibbon 的底层采用了一个拦截器,拦截了 RestTemplate 发出的请求,对地址做了修改。用一幅图来总结一下。
-
拦截我们的 RestTemplate 请求 http://userservice/user/1。
-
RibbonLoadBalancerClient 会从请求 url 中获取服务名称,也就是 user-service。
-
DynamicServerListLoadBalancer 根据 user-service 到 eureka 拉取服务列表。
-
eureka 返回列表,localhost:8081、localhost:8082。
-
IRule 利用内置负载均衡规则,从列表中选择一个,例如 localhost:8081。
-
RibbonLoadBalancerClient 修改请求地址,用 localhost:8081替代 userservice,得到 http://localhost:8081/user/1,发起真实请求。
4.3. 负载均衡策略。
4.3.1. 负载均衡策略。
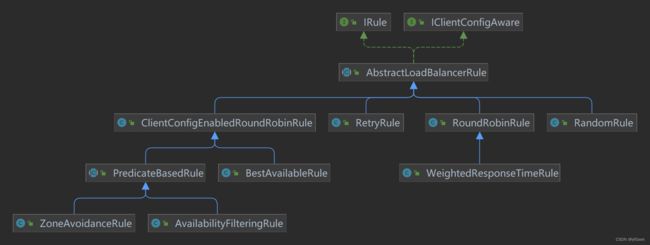
负载均衡的规则都定义在 IRule 接口中,而 IRule 有很多不同的实现类。
| 内置负载均衡规则类 | 规则描述 |
|---|---|
| RoundRobinRule | 简单轮询服务列表来选择服务器。它是 Ribbon 默认的负载均衡规则。 |
| AvailabilityFilteringRule | 对以下两种服务器进行忽略:(1)在默认情况下,这台服务器如果 3 次连接失败,这台服务器就会被设置为“短路”状态。短路状态将持续 30 秒,如果再次连接失败,短路的持续时间就会几何级地增加。(2)并发数过高的服务器。如果一个服务器的并发连接数过高,配置了 AvailabilityFilteringRule 规则的客户端也会将其忽略。并发连接数的上限,可以由客户端的 |
| WeightedResponseTimeRule | 为每一个服务器赋予一个权重值。服务器响应时间越长,这个服务器的权重就越小。这个规则会随机选择服务器,这个权重值会影响服务器的选择。 |
| ZoneAvoidanceRule | 以区域可用的服务器为基础进行服务器的选择。使用 Zone 对服务器进行分类,这个 Zone 可以理解为一个机房、一个机架等。而后再对 Zone 内的多个服务做轮询。 |
| BestAvailableRule | 忽略那些短路的服务器,并选择并发数较低的服务器。 |
| RandomRule | 随机选择一个可用的服务器。 |
| RetryRule | 重试机制的选择逻辑。 |
默认的实现就是 ZoneAvoidanceRule,是一种轮询方案。
4.3.2. 自定义负载均衡策略。
通过定义 IRule 实现可以修改负载均衡规则,有两种方式。
- 代码方式:在 order-service 中的 OrderApplication 类中,定义一个新的 IRule。
    @Bean
    public IRule randomRule() {
        return new RandomRule();
    }
- 配置文件方式:在 order-service 的 application.yml 文件中,添加新的配置也可以修改规则。
# 给某个微服务配置负载均衡规则,这里是 user-service 服务。
user-service:  # 服务名称。
  ribbon:
    NFLoadBalancerRuleClassName: com.netflix.loadbalancer.RandomRule  # 负载均衡规则。
server:
  port: 8080
spring:
  application:
    name: order-service
  datasource:
    driver-class-name: com.mysql.jdbc.Driver
    username: root
    password: root
    url: jdbc:mysql://192.168.142.161:3307/cloud_order
mybatis:
  type-aliases-package: com.geek.order.pojo
  configuration:
    map-underscore-to-camel-case: true
logging:
  level:
    com.geek: debug
  pattern:
    dateformat: yyyy-MM-dd HH:mm:ss:SSS
eureka:
  client:
    service-url: # Eureka 的地址信息。
      defaultZone: http://127.0.0.1:10086/eureka
# 给某个微服务配置负载均衡规则,这里是 user-service 服务。
user-service: # 服务名称。
  ribbon:
    NFLoadBalancerRuleClassName: com.netflix.loadbalancer.RandomRule  # 负载均衡规则。
注意,一般用默认的负载均衡规则,不做修改。
4.4. 饥饿加载。
Ribbon 默认是采用懒加载,即第一次访问时才会去创建 LoadBalanceClient,请求时间会很长。

而饥饿加载则会在项目启动时创建,降低第一次访问的耗时,通过下面配置开启饥饿加载。
ribbon:
  eager-load:
    enabled: true  # 开启饥饿加载。
    clients: user-service  # 指定饥饿加载的服务名称。
#    clients:
#      - user-service
#      - xx-service
5. Nacos 注册中心。
国内公司一般都推崇阿里巴巴的技术,比如注册中心,SpringCloudAlibaba 也推出了一个名为 Nacos 的注册中心。
5.1. 认识和安装 Nacos。
Nacos是阿里巴巴的产品,现在是SpringCloud中的一个组件。相比Eureka功能更加丰富,在国内受欢迎程度较高。
https://blog.csdn.net/lyfGeek/article/details/108895519
5.2.服务注册到 Nacos。
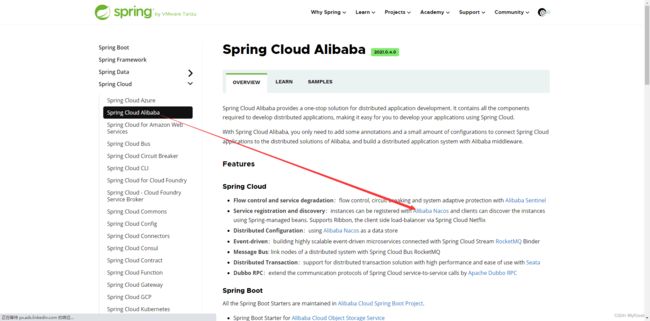
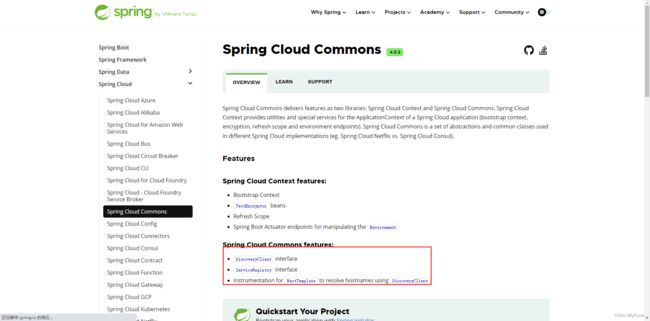
Nacos 是 SpringCloudAlibaba 的组件,而 SpringCloudAlibaba 也遵循 SpringCloud 中定义的服务注册、服务发现规范。因此使用 Nacos 和使用 Eureka 对于微服务来说,并没有太大区别。
主要差异在于。
-
依赖不同。
-
服务地址不同。
1)引入依赖。
在 cloud-demo 父工程的 pom 文件中的
https://spring.io/projects/spring-cloud-alibaba
2.2.9.RELEASE
<dependency>
    <groupId>com.alibaba.cloudgroupId>
    <artifactId>spring-cloud-alibaba-dependenciesartifactId>
    <version>{project-version}version>
    <type>pomtype>
    <scope>importscope>
dependency>
然后在 user-service 和 order-service 中的 pom 文件中引入 Nacos-discovery 依赖。
<dependency>
    <groupId>com.alibaba.cloudgroupId>
    <artifactId>spring-cloud-starter-alibaba-nacos-discoveryartifactId>
dependency>
注意:不要忘了注释掉 eureka 的依赖。
2)配置 Nacos 地址。
在 user-service 和 order-service 的 application.yml 中添加 Nacos 地址。
spring:
  cloud:
    nacos:
      server-addr: localhost:8848
注意:不要忘了注释掉 eureka 的地址。
server:
  port: 8080
spring:
  application:
    name: order-service
  datasource:
    driver-class-name: com.mysql.jdbc.Driver
    username: root
    password: root
    url: jdbc:mysql://192.168.142.161:3307/cloud_order
  cloud:
    nacos:
      server-addr: localhost:8848  # nacos 服务地址。
mybatis:
  type-aliases-package: com.geek.order.pojo
  configuration:
    map-underscore-to-camel-case: true
logging:
  level:
    com.geek: debug
  pattern:
    dateformat: yyyy-MM-dd HH:mm:ss:SSS
#eureka:
#  client:
#    service-url: # Eureka 的地址信息。
#      defaultZone: http://127.0.0.1:10086/eureka
# 给某个微服务配置负载均衡规则,这里是 user-service 服务。
user-service: # 服务名称。
  ribbon:
    NFLoadBalancerRuleClassName: com.netflix.loadbalancer.RandomRule  # 负载均衡规则。
ribbon:
  eager-load:
    enabled: true  # 开启饥饿加载。
    clients: user-service  # 指定饥饿加载的服务名称。
#    clients:
#      - user-service
#      - xx-service
3)重启。
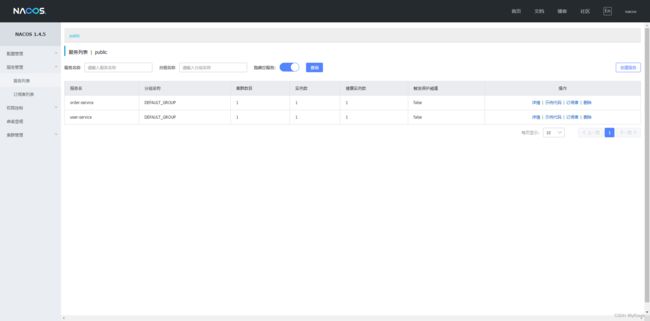
重启微服务后,登录 Nacos 管理页面,可以看到微服务信息。
5.3. 服务分级存储模型。
一个服务可以有多个实例,例如我们的 user-service,可以有。
-
127.0.0.1:8081
-
127.0.0.1:8082
-
127.0.0.1:8083
假如这些实例分布于全国各地的不同机房,例如。
-
127.0.0.1:8081,在上海机房。
-
127.0.0.1:8082,在上海机房。
-
127.0.0.1:8083,在杭州机房。
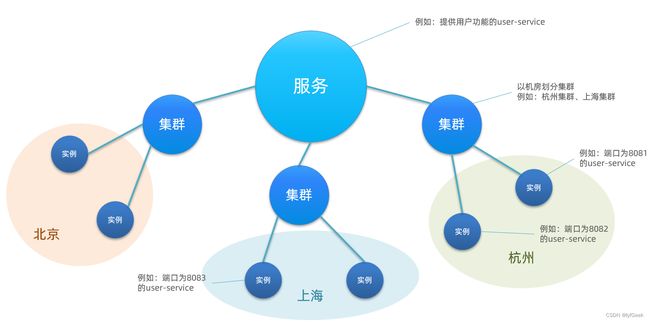
Nacos 就将同一机房内的实例划分为一个集群。
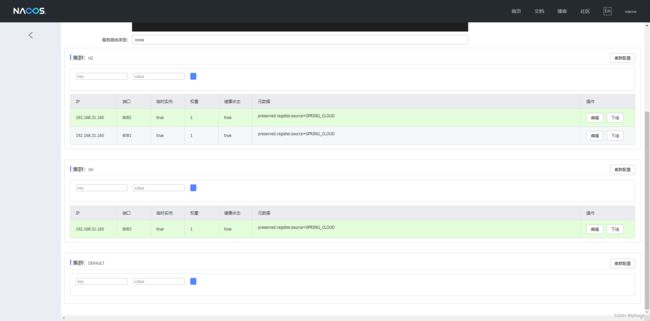
也就是说,user-service 是服务,一个服务可以包含多个集群,如杭州、上海,每个集群下可以有多个实例,形成分级模型,如图
微服务互相访问时,应该尽可能访问同集群实例,因为本地访问速度更快。当本集群内不可用时,才访问其它集群。例如
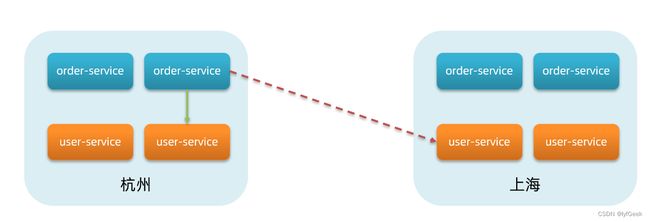
杭州机房内的 order-service 应该优先访问同机房的 user-service。
5.3.1. 给 user-service 配置集群。
修改 user-service 的 application.yml 文件,添加集群配置。
spring:
  application:
    name: user-service
  cloud:
    nacos:
      server-addr: localhost:8848
      discovery:
        cluster-name: HZ  # 集群名称。
spring:
  application:
    name: user-service
  cloud:
    nacos:
      server-addr: localhost:8848
      discovery:
        cluster-name: SH  # 集群名称。
重启两个 user-service 实例后,我们可以在 Nacos 控制台看到下面结果。
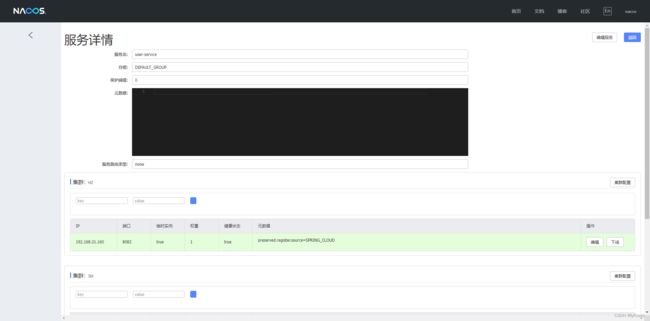
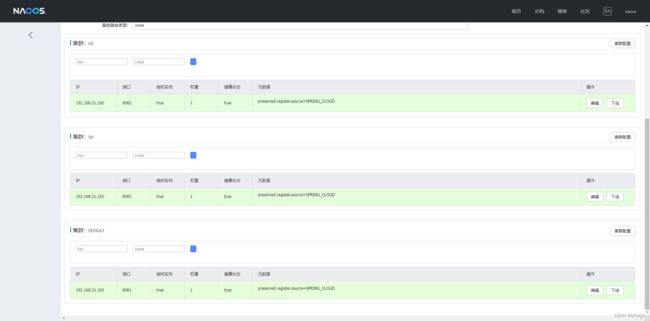
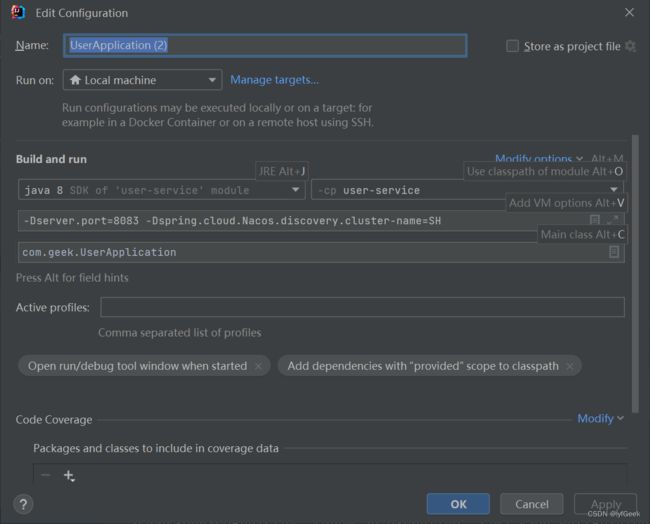
或者我们再次复制一个 user-service 启动配置,添加属性。
-Dserver.port=8083
-Dspring.cloud.Nacos.discovery.cluster-name=SH
配置如图所示。
启动 UserApplication2 后再次查看 Nacos 控制台。
5.3.2. 同集群优先的负载均衡。
默认的 ZoneAvoidanceRule 并不能实现根据同集群优先来实现负载均衡。
因此 Nacos 中提供了一个 NacosRule 的实现,可以优先从同集群中挑选实例。
1)给 order-service 配置集群信息。
修改 order-service 的 application.yml 文件,添加集群配置。
spring:
  cloud:
    nacos:
      server-addr: localhost:8848  # nacos 服务地址。
      discovery:
        cluster-name: HZ  # 集群名称。
2)修改负载均衡规则。
修改 order-service 的 application.yml 文件,修改负载均衡规则。
user-service:
  ribbon:
    NFLoadBalancerRuleClassName: com.alibaba.cloud.Nacos.ribbon.NacosRule  # 负载均衡规则 。
注意将 user-service 的权重都设置为 1。
请求 5 次 http://localhost:8080/order/1,可以发现 5 次请求都到了 8082 机器。
关掉 8082 机器,再次请求。
会出现警告日志 ~ cross-sluster 跨集群请求。
WARN 19068 — [nio-8080-exec-7] c.alibaba.cloud.nacos.ribbon.NacosRule : A cross-cluster call occurs,name = user-service, clusterName = HZ, instance = [Instance{instanceId=‘192.168.31.160#8083#SH#DEFAULT_GROUP@@user-service’, ip=‘192.168.31.160’, port=8083, weight=1.0, healthy=true, enabled=true, ephemeral=true, clusterName=‘SH’, serviceName=‘DEFAULT_GROUP@@user-service’, metadata={preserved.register.source=SPRING_CLOUD}}, Instance{instanceId=‘192.168.31.160#8081#DEFAULT#DEFAULT_GROUP@@user-service’, ip=‘192.168.31.160’, port=8081, weight=1.0, healthy=true, enabled=true, ephemeral=true, clusterName=‘DEFAULT’, serviceName=‘DEFAULT_GROUP@@user-service’, metadata={preserved.register.source=SPRING_CLOUD}}]
5.4. 权重配置。
实际部署中会出现这样的场景。
服务器设备性能有差异,部分实例所在机器性能较好,另一些较差,我们希望性能好的机器承担更多的用户请求。
但默认情况下 NacosRule 是同集群内随机挑选,不会考虑机器的性能问题。
因此,Nacos 提供了权重配置来控制访问频率,权重越大则访问频率越高。
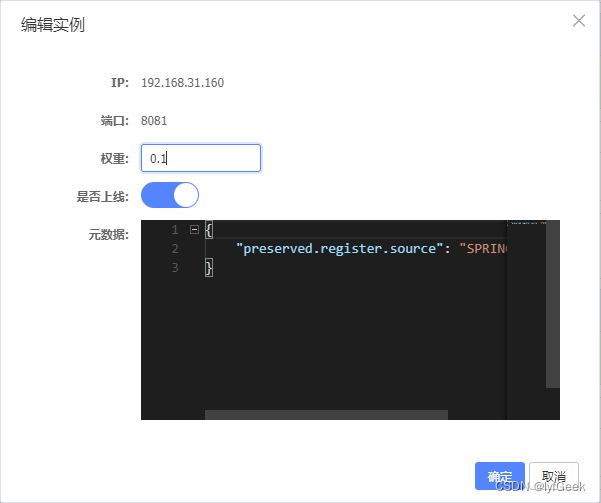
在 Nacos 控制台,找到 user-service 的实例列表,点击编辑,即可修改权重。
注意:如果权重修改为 0,则该实例永远不会被访问。
灰度发布或服务器升级。
5.5. 环境隔离。
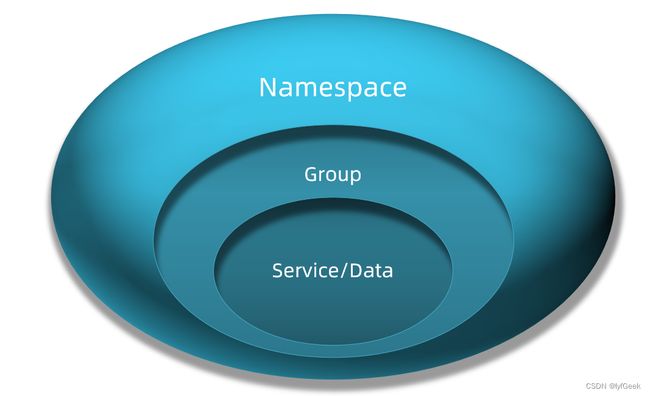
Nacos 提供了 namespace 来实现环境隔离功能。
-
Nacos 中可以有多个 namespace。
-
namespace 下可以有 group、service 等。
-
不同 namespace 之间相互隔离,例如不同 namespace 的服务互相不可见。
5.5.1. 创建 namespace。
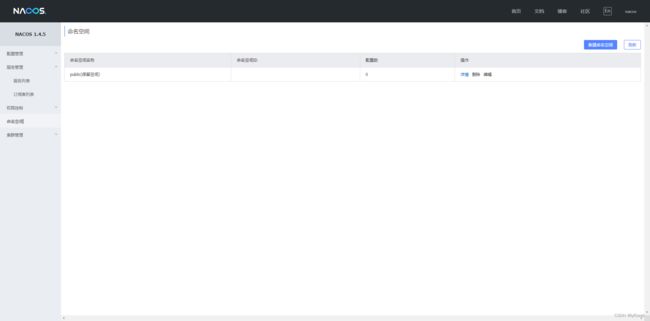
默认情况下,所有 service、data、group 都在同一个 namespace,名为 public。
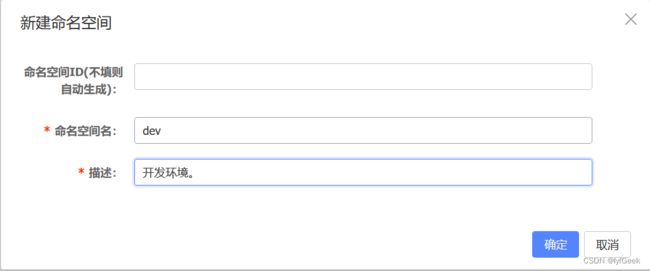
然后,填写表单。
5.5.2. 给微服务配置 namespace。
给微服务配置 namespace 只能通过修改配置来实现。
例如,修改 order-service 的 application.yml 文件:
spring:
  application:
    name: order-service
  cloud:
    nacos:
      server-addr: localhost:8848  # nacos 服务地址。
      discovery:
        cluster-name: HZ  # 集群名称。
        namespace: a16d565f-a123-42ec-97b9-3f11e433d758  # 命名空间,id。
重启 order-service 后,访问控制台,可以看到下面的结果。

此时访问 order-service,因为 namespace 不同,会导致找不到 userservice,控制台会报错。页面 500。
ERROR 21092 — [nio-8080-exec-1] o.a.c.c.C.[.[.[/].[dispatcherServlet] : Servlet.service() for servlet [dispatcherServlet] in context with path [] threw exception [Request processing failed; nested exception is java.lang.IllegalStateException: No instances available for user-service] with root cause
5.6. Nacos 与 Eureka 的区别。
Nacos 的服务实例分为两种类型。
-
临时实例:如果实例宕机超过一定时间,会从服务列表剔除,默认的类型。
-
非临时实例:如果实例宕机,不会从服务列表剔除,也可以叫永久实例。
配置一个服务实例为永久实例。
spring:
  cloud:
    Nacos:
      discovery:
        ephemeral: false  # 设置为非临时实例。
Nacos 和 Eureka 整体结构类似,服务注册、服务拉取、心跳等待,但是也存在一些差异。
![]()
Nacos 与 eureka 的共同点。
-
都支持服务注册和服务拉取。
-
都支持服务提供者心跳方式做健康检测。
Nacos 与 Eureka 的区别。
-
Nacos 支持服务端主动检测提供者状态:临时实例采用心跳模式,非临时实例采用主动检测模式。
-
临时实例心跳不正常会被剔除,非临时实例则不会被剔除。
-
Nacos 支持服务列表变更的消息推送模式,服务列表更新更及时。
-
Nacos 集群默认采用 AP 方式,当集群中存在非临时实例时,采用 CP 模式;Eureka 采用 AP 方式。
SpringCloud 实用篇。
0. 学习目标。
1. Nacos 配置管理。
Nacos 除了可以做注册中心,同样可以做配置管理来使用。
1.1. 统一配置管理。
当微服务部署的实例越来越多,达到数十、数百时,逐个修改微服务配置就会让人抓狂,而且很容易出错。我们需要一种统一配置管理方案,可以集中管理所有实例的配置。
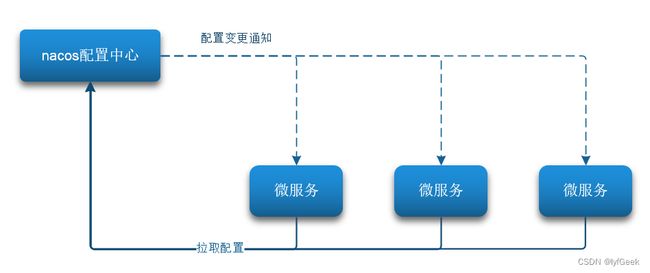
Nacos 一方面可以将配置集中管理,另一方可以在配置变更时,及时通知微服务,实现配置的热更新。
1.1.1. 在 Nacos 中添加配置文件。
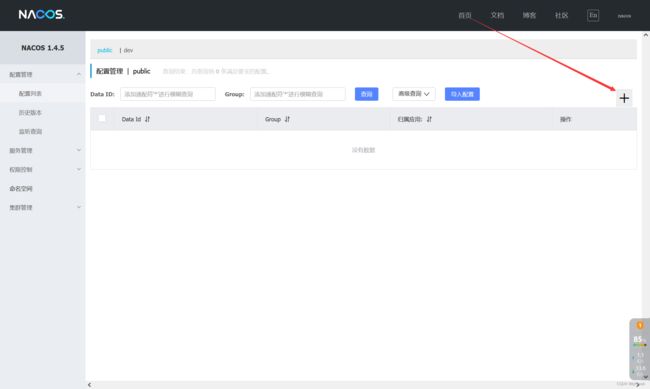
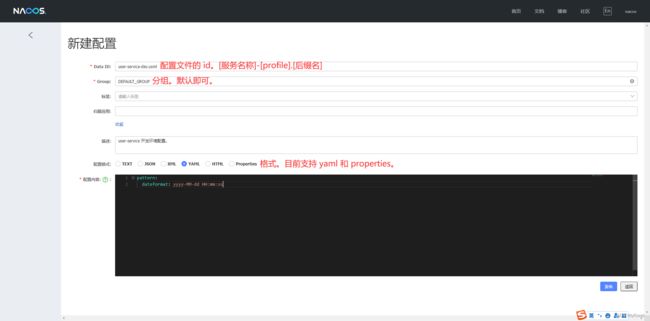
如何在 Nacos 中管理配置呢?
注意:项目的核心配置,需要热更新的配置才有放到 Nacos 管理的必要。基本不会变更的一些配置还是保存在微服务本地比较好。
1.1.2. 从微服务拉取配置。
微服务要拉取 Nacos 中管理的配置,并且与本地的 application.yml 配置合并,才能完成项目启动。
但如果尚未读取 application.yml,又如何得知 Nacos 地址呢?
因此 spring 引入了一种新的配置文件:bootstrap.yaml 文件,会在 application.yml 之前被读取,流程如下。
首先,在 user-service 服务中,引入 nacos-config 的客户端依赖。
<dependency>
    <groupId>com.alibaba.cloudgroupId>
    <artifactId>spring-cloud-starter-alibaba-nacos-configartifactId>
dependency>
2)添加 bootstrap.yaml。
然后,在 user-service 中添加一个 bootstrap.yaml 文件,内容如下。
spring:
  application:
    name: user-service  # 服务名称。
  profiles:
    active: dev  # 开发环境,这里是 dev。
  cloud:
    nacos:
      server-addr: localhost:8848  # Nacos 地址。
      config:
        file-extension: yaml  # 文件后缀名。
这里会根据 spring.cloud.nacos.server-addr 获取 Nacos 地址,再根据 ${spring.application.name}-${spring.profiles.active}.${spring.cloud.nacos.config.file-extension} 作为文件 id,来读取配置。
本例中,就是去读取userservice-dev.yaml。
在 user-service 中的 UserController 中添加业务逻辑,读取 pattern.dateformat 配置。
package com.geek.user.controller;

import com.geek.user.pojo.User;
import com.geek.user.service.IUserService;
import lombok.extern.slf4j.Slf4j;
import org.springframework.beans.factory.annotation.Autowired;
import org.springframework.beans.factory.annotation.Value;
import org.springframework.web.bind.annotation.PathVariable;
import org.springframework.web.bind.annotation.RequestMapping;
import org.springframework.web.bind.annotation.RestController;

import java.time.LocalDateTime;
import java.time.format.DateTimeFormatter;

/**
 * @author geek
 */
@Slf4j
@RestController
@RequestMapping("/user")
public class UserController {

    @Autowired
    private IUserService userService;

    @Value("${pattern.dateformat}")
    private String dateFormat;

    @RequestMapping("/now")
    public String now() {
        return LocalDateTime.now().format(DateTimeFormatter.ofPattern(this.dateFormat));
    }

    @RequestMapping("/{userId}")
    public User getById(@PathVariable("userId") Long userId) {
        return this.userService.getById(userId);
    }

}
1.2. 配置热更新。
我们最终的目的,是修改 Nacos 中的配置后,微服务中无需重启即可让配置生效,也就是配置热更新。
要实现配置热更新,可以使用两种方式。
1.2.1.方式一 ~ @Value ~ @RefreshScope。
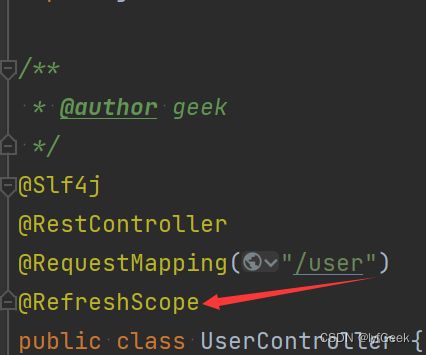
在 @Value 注入的变量所在类上添加注解 @RefreshScope。
1.2.2. 方式二 ~ @ConfigurationProperties。
使用 @ConfigurationProperties 注解代替 @Value 注解。
在 user-service 服务中,添加一个类,读取 patterrn.dateformat 属性。
package com.geek.user.config;

import lombok.Data;
import org.springframework.boot.context.properties.ConfigurationProperties;
import org.springframework.stereotype.Component;

/**
 * @author geek
 */
@Data
// Not registered via @EnableConfigurationProperties, marked as Spring component, or scanned via @ConfigurationPropertiesScan
@Component
@ConfigurationProperties(prefix = "pattern")
public class PatternProperties {

    private String dateformat;

}
在 UserController 中使用这个类代替 @Value。
/**
 * @author geek
 */
@Slf4j
@RestController
@RequestMapping("/user")
@RefreshScope
public class UserController {

    @Autowired
    private PatternProperties patternProperties;

    @RequestMapping("/now")
    public String now() {
//        return LocalDateTime.now().format(DateTimeFormatter.ofPattern(this.dateFormat));
        return LocalDateTime.now().format(DateTimeFormatter.ofPattern(this.patternProperties.getDateformat()));
    }

}
1.3. 配置共享。
其实微服务启动时,会去 Nacos 读取多个配置文件,eg.
-
[spring.application.name]-[spring.profiles.active].yaml,eg. user-service-dev.yaml。 -
[spring.application.name].yaml,eg. user-service.yaml。
而 [spring.application.name].yaml 不包含环境,因此可以被多个环境共享。
下面我们通过案例来测试配置共享。
1)添加一个环境共享配置。
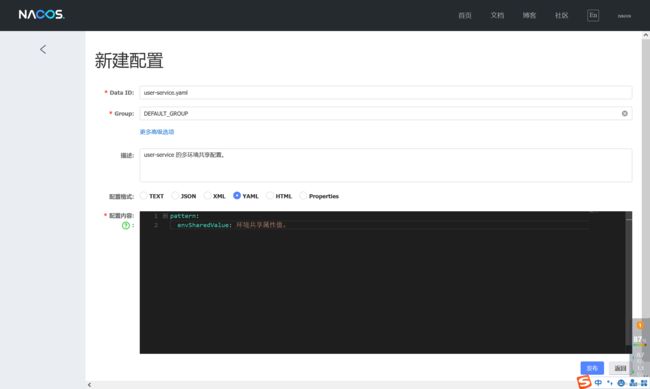
我们在 Nacos 中添加一个 user-service.yaml 文件。
####### 2)在 user-service 中读取共享配置。
在 user-service 服务中,修改 PatternProperties 类,读取新添加的属性。
package com.geek.user.config;

import lombok.Data;
import org.springframework.boot.context.properties.ConfigurationProperties;
import org.springframework.stereotype.Component;

/**
 * @author geek
 */
@Data
// Not registered via @EnableConfigurationProperties, marked as Spring component, or scanned via @ConfigurationPropertiesScan
@Component
@ConfigurationProperties(prefix = "pattern")
public class PatternProperties {

    private String dateformat;

    private String envSharedValue;

}
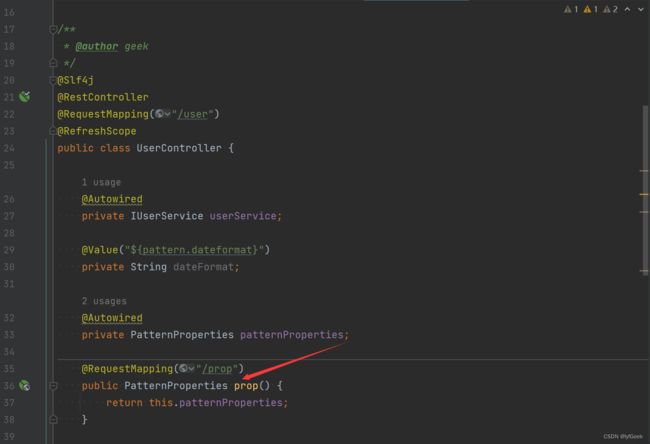
在 user-service 服务中,修改 UserController,添加一个方法。
3)运行两个 UserApplication,使用不同的 profile。
修改 UserApplication2 这个启动项,改变其 profile 值。

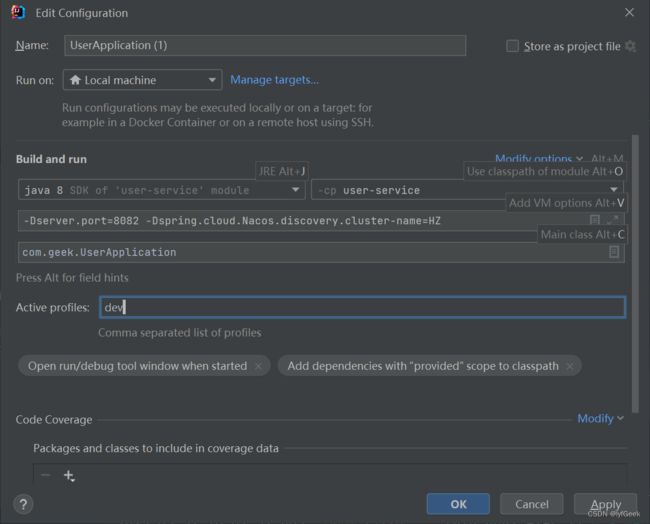
这样,UserApplication(8081)使用的 profile 是 dev,UserApplication2(8082)使用的 profile 是 test。
启动 UserApplication 和 UserApplication2。
可以看出来,不管是 dev,还是 test 环境,都读取到了 envSharedValue 这个属性的值。
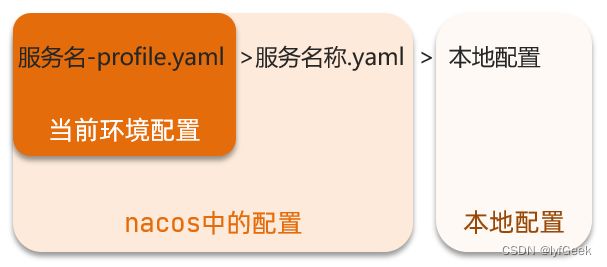
4)配置共享的优先级。
当 Nacos、服务本地同时出现相同属性时,优先级有高低之分。
1.4. 搭建 Nacos 集群。
https://nacos.io/zh-cn/docs/v2/guide/admin/cluster-mode-quick-start.html
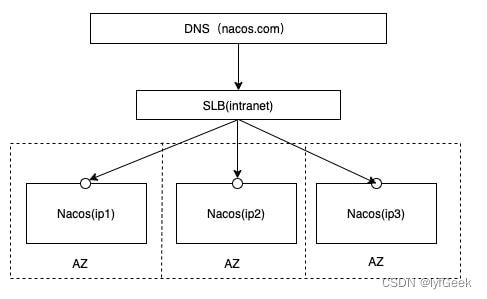
其中包含 3 个 nacos 节点,然后一个负载均衡器代理 3 个 Nacos。这里负载均衡器可以使用 Nginx。
三个 Nacos 节点的地址。
| 节点 | ip | port |
|---|---|---|
| nacos1 | 192.168.150.1 | 8845 |
| nacos2 | 192.168.150.1 | 8846 |
| nacos3 | 192.168.150.1 | 8847 |
1.4.1. 搭建集群。
搭建集群的基本步骤。
- 搭建数据库,初始化数据库表结构。
- 下载 nacos 安装包。
- 配置 nacos。
- 启动 nacos 集群。
- nginx 反向代理。
1.4.2. 初始化数据库。
Nacos 默认数据存储在内嵌数据库 Derby 中,不属于生产可用的数据库。
官方推荐的最佳实践是使用带有主从的高可用数据库集群。
这里我们以单点的数据库为例来讲解。
首先新建一个数据库,命名为 nacos,而后导入下面的 SQL。
https://github.com/alibaba/nacos/blob/master/distribution/conf/mysql-schema.sql
CREATE SCHEMA `nacos` DEFAULT CHARACTER SET utf8mb4 ;

/*
 * Copyright 1999-2018 Alibaba Group Holding Ltd.
 *
 * Licensed under the Apache License, Version 2.0 (the "License");
 * you may not use this file except in compliance with the License.
 * You may obtain a copy of the License at
 *
 *      http://www.apache.org/licenses/LICENSE-2.0
 *
 * Unless required by applicable law or agreed to in writing, software
 * distributed under the License is distributed on an "AS IS" BASIS,
 * WITHOUT WARRANTIES OR CONDITIONS OF ANY KIND, either express or implied.
 * See the License for the specific language governing permissions and
 * limitations under the License.
 */

/******************************************/
/*   数据库全名 = nacos_config   */
/*   表名称 = config_info   */
/******************************************/
CREATE TABLE `config_info` (
  `id` bigint(20) NOT NULL AUTO_INCREMENT COMMENT 'id',
  `data_id` varchar(255) NOT NULL COMMENT 'data_id',
  `group_id` varchar(128) DEFAULT NULL,
  `content` longtext NOT NULL COMMENT 'content',
  `md5` varchar(32) DEFAULT NULL COMMENT 'md5',
  `gmt_create` datetime NOT NULL DEFAULT CURRENT_TIMESTAMP COMMENT '创建时间',
  `gmt_modified` datetime NOT NULL DEFAULT CURRENT_TIMESTAMP COMMENT '修改时间',
  `src_user` text COMMENT 'source user',
  `src_ip` varchar(50) DEFAULT NULL COMMENT 'source ip',
  `app_name` varchar(128) DEFAULT NULL,
  `tenant_id` varchar(128) DEFAULT '' COMMENT '租户字段',
  `c_desc` varchar(256) DEFAULT NULL,
  `c_use` varchar(64) DEFAULT NULL,
  `effect` varchar(64) DEFAULT NULL,
  `type` varchar(64) DEFAULT NULL,
  `c_schema` text,
  `encrypted_data_key` text NOT NULL COMMENT '秘钥',
  PRIMARY KEY (`id`),
  UNIQUE KEY `uk_configinfo_datagrouptenant` (`data_id`,`group_id`,`tenant_id`)
) ENGINE=InnoDB DEFAULT CHARSET=utf8 COLLATE=utf8_bin COMMENT='config_info';

/******************************************/
/*   数据库全名 = nacos_config   */
/*   表名称 = config_info_aggr   */
/******************************************/
CREATE TABLE `config_info_aggr` (
  `id` bigint(20) NOT NULL AUTO_INCREMENT COMMENT 'id',
  `data_id` varchar(255) NOT NULL COMMENT 'data_id',
  `group_id` varchar(128) NOT NULL COMMENT 'group_id',
  `datum_id` varchar(255) NOT NULL COMMENT 'datum_id',
  `content` longtext NOT NULL COMMENT '内容',
  `gmt_modified` datetime NOT NULL COMMENT '修改时间',
  `app_name` varchar(128) DEFAULT NULL,
  `tenant_id` varchar(128) DEFAULT '' COMMENT '租户字段',
  PRIMARY KEY (`id`),
  UNIQUE KEY `uk_configinfoaggr_datagrouptenantdatum` (`data_id`,`group_id`,`tenant_id`,`datum_id`)
) ENGINE=InnoDB DEFAULT CHARSET=utf8 COLLATE=utf8_bin COMMENT='增加租户字段';


/******************************************/
/*   数据库全名 = nacos_config   */
/*   表名称 = config_info_beta   */
/******************************************/
CREATE TABLE `config_info_beta` (
  `id` bigint(20) NOT NULL AUTO_INCREMENT COMMENT 'id',
  `data_id` varchar(255) NOT NULL COMMENT 'data_id',
  `group_id` varchar(128) NOT NULL COMMENT 'group_id',
  `app_name` varchar(128) DEFAULT NULL COMMENT 'app_name',
  `content` longtext NOT NULL COMMENT 'content',
  `beta_ips` varchar(1024) DEFAULT NULL COMMENT 'betaIps',
  `md5` varchar(32) DEFAULT NULL COMMENT 'md5',
  `gmt_create` datetime NOT NULL DEFAULT CURRENT_TIMESTAMP COMMENT '创建时间',
  `gmt_modified` datetime NOT NULL DEFAULT CURRENT_TIMESTAMP COMMENT '修改时间',
  `src_user` text COMMENT 'source user',
  `src_ip` varchar(50) DEFAULT NULL COMMENT 'source ip',
  `tenant_id` varchar(128) DEFAULT '' COMMENT '租户字段',
  `encrypted_data_key` text NOT NULL COMMENT '秘钥',
  PRIMARY KEY (`id`),
  UNIQUE KEY `uk_configinfobeta_datagrouptenant` (`data_id`,`group_id`,`tenant_id`)
) ENGINE=InnoDB DEFAULT CHARSET=utf8 COLLATE=utf8_bin COMMENT='config_info_beta';

/******************************************/
/*   数据库全名 = nacos_config   */
/*   表名称 = config_info_tag   */
/******************************************/
CREATE TABLE `config_info_tag` (
  `id` bigint(20) NOT NULL AUTO_INCREMENT COMMENT 'id',
  `data_id` varchar(255) NOT NULL COMMENT 'data_id',
  `group_id` varchar(128) NOT NULL COMMENT 'group_id',
  `tenant_id` varchar(128) DEFAULT '' COMMENT 'tenant_id',
  `tag_id` varchar(128) NOT NULL COMMENT 'tag_id',
  `app_name` varchar(128) DEFAULT NULL COMMENT 'app_name',
  `content` longtext NOT NULL COMMENT 'content',
  `md5` varchar(32) DEFAULT NULL COMMENT 'md5',
  `gmt_create` datetime NOT NULL DEFAULT CURRENT_TIMESTAMP COMMENT '创建时间',
  `gmt_modified` datetime NOT NULL DEFAULT CURRENT_TIMESTAMP COMMENT '修改时间',
  `src_user` text COMMENT 'source user',
  `src_ip` varchar(50) DEFAULT NULL COMMENT 'source ip',
  PRIMARY KEY (`id`),
  UNIQUE KEY `uk_configinfotag_datagrouptenanttag` (`data_id`,`group_id`,`tenant_id`,`tag_id`)
) ENGINE=InnoDB DEFAULT CHARSET=utf8 COLLATE=utf8_bin COMMENT='config_info_tag';

/******************************************/
/*   数据库全名 = nacos_config   */
/*   表名称 = config_tags_relation   */
/******************************************/
CREATE TABLE `config_tags_relation` (
  `id` bigint(20) NOT NULL COMMENT 'id',
  `tag_name` varchar(128) NOT NULL COMMENT 'tag_name',
  `tag_type` varchar(64) DEFAULT NULL COMMENT 'tag_type',
  `data_id` varchar(255) NOT NULL COMMENT 'data_id',
  `group_id` varchar(128) NOT NULL COMMENT 'group_id',
  `tenant_id` varchar(128) DEFAULT '' COMMENT 'tenant_id',
  `nid` bigint(20) NOT NULL AUTO_INCREMENT,
  PRIMARY KEY (`nid`),
  UNIQUE KEY `uk_configtagrelation_configidtag` (`id`,`tag_name`,`tag_type`),
  KEY `idx_tenant_id` (`tenant_id`)
) ENGINE=InnoDB DEFAULT CHARSET=utf8 COLLATE=utf8_bin COMMENT='config_tag_relation';

/******************************************/
/*   数据库全名 = nacos_config   */
/*   表名称 = group_capacity   */
/******************************************/
CREATE TABLE `group_capacity` (
  `id` bigint(20) unsigned NOT NULL AUTO_INCREMENT COMMENT '主键ID',
  `group_id` varchar(128) NOT NULL DEFAULT '' COMMENT 'Group ID,空字符表示整个集群',
  `quota` int(10) unsigned NOT NULL DEFAULT '0' COMMENT '配额,0表示使用默认值',
  `usage` int(10) unsigned NOT NULL DEFAULT '0' COMMENT '使用量',
  `max_size` int(10) unsigned NOT NULL DEFAULT '0' COMMENT '单个配置大小上限,单位为字节,0表示使用默认值',
  `max_aggr_count` int(10) unsigned NOT NULL DEFAULT '0' COMMENT '聚合子配置最大个数,,0表示使用默认值',
  `max_aggr_size` int(10) unsigned NOT NULL DEFAULT '0' COMMENT '单个聚合数据的子配置大小上限,单位为字节,0表示使用默认值',
  `max_history_count` int(10) unsigned NOT NULL DEFAULT '0' COMMENT '最大变更历史数量',
  `gmt_create` datetime NOT NULL DEFAULT CURRENT_TIMESTAMP COMMENT '创建时间',
  `gmt_modified` datetime NOT NULL DEFAULT CURRENT_TIMESTAMP COMMENT '修改时间',
  PRIMARY KEY (`id`),
  UNIQUE KEY `uk_group_id` (`group_id`)
) ENGINE=InnoDB DEFAULT CHARSET=utf8 COLLATE=utf8_bin COMMENT='集群、各Group容量信息表';

/******************************************/
/*   数据库全名 = nacos_config   */
/*   表名称 = his_config_info   */
/******************************************/
CREATE TABLE `his_config_info` (
  `id` bigint(20) unsigned NOT NULL,
  `nid` bigint(20) unsigned NOT NULL AUTO_INCREMENT,
  `data_id` varchar(255) NOT NULL,
  `group_id` varchar(128) NOT NULL,
  `app_name` varchar(128) DEFAULT NULL COMMENT 'app_name',
  `content` longtext NOT NULL,
  `md5` varchar(32) DEFAULT NULL,
  `gmt_create` datetime NOT NULL DEFAULT CURRENT_TIMESTAMP,
  `gmt_modified` datetime NOT NULL DEFAULT CURRENT_TIMESTAMP,
  `src_user` text,
  `src_ip` varchar(50) DEFAULT NULL,
  `op_type` char(10) DEFAULT NULL,
  `tenant_id` varchar(128) DEFAULT '' COMMENT '租户字段',
  `encrypted_data_key` text NOT NULL COMMENT '秘钥',
  PRIMARY KEY (`nid`),
  KEY `idx_gmt_create` (`gmt_create`),
  KEY `idx_gmt_modified` (`gmt_modified`),
  KEY `idx_did` (`data_id`)
) ENGINE=InnoDB DEFAULT CHARSET=utf8 COLLATE=utf8_bin COMMENT='多租户改造';


/******************************************/
/*   数据库全名 = nacos_config   */
/*   表名称 = tenant_capacity   */
/******************************************/
CREATE TABLE `tenant_capacity` (
  `id` bigint(20) unsigned NOT NULL AUTO_INCREMENT COMMENT '主键ID',
  `tenant_id` varchar(128) NOT NULL DEFAULT '' COMMENT 'Tenant ID',
  `quota` int(10) unsigned NOT NULL DEFAULT '0' COMMENT '配额,0表示使用默认值',
  `usage` int(10) unsigned NOT NULL DEFAULT '0' COMMENT '使用量',
  `max_size` int(10) unsigned NOT NULL DEFAULT '0' COMMENT '单个配置大小上限,单位为字节,0表示使用默认值',
  `max_aggr_count` int(10) unsigned NOT NULL DEFAULT '0' COMMENT '聚合子配置最大个数',
  `max_aggr_size` int(10) unsigned NOT NULL DEFAULT '0' COMMENT '单个聚合数据的子配置大小上限,单位为字节,0表示使用默认值',
  `max_history_count` int(10) unsigned NOT NULL DEFAULT '0' COMMENT '最大变更历史数量',
  `gmt_create` datetime NOT NULL DEFAULT CURRENT_TIMESTAMP COMMENT '创建时间',
  `gmt_modified` datetime NOT NULL DEFAULT CURRENT_TIMESTAMP COMMENT '修改时间',
  PRIMARY KEY (`id`),
  UNIQUE KEY `uk_tenant_id` (`tenant_id`)
) ENGINE=InnoDB DEFAULT CHARSET=utf8 COLLATE=utf8_bin COMMENT='租户容量信息表';


CREATE TABLE `tenant_info` (
  `id` bigint(20) NOT NULL AUTO_INCREMENT COMMENT 'id',
  `kp` varchar(128) NOT NULL COMMENT 'kp',
  `tenant_id` varchar(128) default '' COMMENT 'tenant_id',
  `tenant_name` varchar(128) default '' COMMENT 'tenant_name',
  `tenant_desc` varchar(256) DEFAULT NULL COMMENT 'tenant_desc',
  `create_source` varchar(32) DEFAULT NULL COMMENT 'create_source',
  `gmt_create` bigint(20) NOT NULL COMMENT '创建时间',
  `gmt_modified` bigint(20) NOT NULL COMMENT '修改时间',
  PRIMARY KEY (`id`),
  UNIQUE KEY `uk_tenant_info_kptenantid` (`kp`,`tenant_id`),
  KEY `idx_tenant_id` (`tenant_id`)
) ENGINE=InnoDB DEFAULT CHARSET=utf8 COLLATE=utf8_bin COMMENT='tenant_info';

CREATE TABLE `users` (
	`username` varchar(50) NOT NULL PRIMARY KEY,
	`password` varchar(500) NOT NULL,
	`enabled` boolean NOT NULL
);

CREATE TABLE `roles` (
	`username` varchar(50) NOT NULL,
	`role` varchar(50) NOT NULL,
	UNIQUE INDEX `idx_user_role` (`username` ASC, `role` ASC) USING BTREE
);

CREATE TABLE `permissions` (
    `role` varchar(50) NOT NULL,
    `resource` varchar(255) NOT NULL,
    `action` varchar(8) NOT NULL,
    UNIQUE INDEX `uk_role_permission` (`role`,`resource`,`action`) USING BTREE
);

INSERT INTO users (username, password, enabled) VALUES ('nacos', '$2a$10$EuWPZHzz32dJN7jexM34MOeYirDdFAZm2kuWj7VEOJhhZkDrxfvUu', TRUE);

INSERT INTO roles (username, role) VALUES ('nacos', 'ROLE_ADMIN');
1.4.2. 下载 nacos。
1.4.3. 配置 Nacos。
将这个包解压到任意非中文目录下。
目录说明。
- bin:启动脚本。
- conf:配置文件。
进入 nacos 的 conf 目录,修改配置文件 cluster.conf.example,重命名为 cluster.conf。
然后添加内容。
127.0.0.1:8849
127.0.0.1.8850
127.0.0.1.8851
然后修改 application.properties 文件,添加数据库配置。
#*************** Config Module Related Configurations ***************#
### If use MySQL as datasource:
# spring.datasource.platform=mysql
pring.datasource.platform=mysql

### Count of DB:
# db.num=1
db.num=1


### Connect URL of DB:
# db.url.0=jdbc:mysql://127.0.0.1:3306/nacos?characterEncoding=utf8&connectTimeout=1000&socketTimeout=3000&autoReconnect=true&useUnicode=true&useSSL=false&serverTimezone=UTC
# db.user.0=nacos
# db.password.0=nacos
db.url.0=jdbc:mysql://192.168.142.161:3307/nacos?characterEncoding=utf8&connectTimeout=1000&socketTimeout=3000&autoReconnect=true&useUnicode=true&useSSL=false&serverTimezone=UTC
db.user.0=root
db.password.0=root
1.4.4. 启动。
将 nacos 文件夹复制三份,分别命名为:nacos1、nacos2、nacos3。
然后分别修改三个文件夹中的 application.properties,
nacos1:
server.port=8849
nacos2:
server.port=8850
nacos3:
server.port=8851
然后分别启动三个 nacos 节点:
startup.cmd
1.4.5. Nginx 反向代理。
解压到任意非中文目录下。
修改 conf/nginx.conf 文件,配置如下,在 http {} 块中加入。
upstream nacos-cluster {
	server 127.0.0.1:8849;
	server 127.0.0.1:8850;
	server 127.0.0.1:8851;
}

server {
	listen 80;
	server_name localhost;

	location /nacos {
		proxy_pass http://nacos-cluster;
	}
}
而后在浏览器访问:http://localhost/nacos 即可。
代码中 application.yml 文件配置如下。
spring:
  cloud:
    nacos:
      server-addr: localhost:80  # Nacos 地址。
1.5. 优化。
-
实际部署时,需要给做反向代理的 nginx 服务器设置一个域名,这样后续如果有服务器迁移 nacos 的客户端也无需更改配置。
-
Nacos 的各个节点应该部署到多个不同服务器,做好容灾和隔离。
2. Feign 远程调用。
先来看我们以前利用 RestTemplate 发起远程调用的代码。
String url = "http://user-service/user/" + order.getUserId();
User user = this.restTemplate.getForObject(url, User.class);
存在下面的问题。
-
代码可读性差,编程体验不统一。
-
参数复杂 URL 难以维护。
Feign 是一个声明式的 http 客户端,官方地址:https://github.com/OpenFeign/feign。
其作用就是帮助我们优雅的实现 http 请求的发送,解决上面提到的问题。
2.1. Feign 替代 RestTemplate。
Fegin 的使用步骤如下。
1)引入依赖。
我们在 order-service 服务的 pom 文件中引入 feign 的依赖。
<dependency>
    <groupId>org.springframework.cloudgroupId>
    <artifactId>spring-cloud-starter-openfeignartifactId>
dependency>
2)添加注解。
在 order-service 的启动类添加注解开启 Feign 的功能。
package com.geek;

import org.mybatis.spring.annotation.MapperScan;
import org.springframework.boot.SpringApplication;
import org.springframework.boot.autoconfigure.SpringBootApplication;
import org.springframework.cloud.client.loadbalancer.LoadBalanced;
import org.springframework.cloud.openfeign.EnableFeignClients;
import org.springframework.context.annotation.Bean;
import org.springframework.web.client.RestTemplate;

/**
 * @author geek
 */
@EnableFeignClients
@MapperScan("com.geek.order.mapper")
@SpringBootApplication
public class OrderApplication {

    public static void main(String[] args) {
        SpringApplication.run(OrderApplication.class, args);
    }

    @LoadBalanced
    @Bean
    public RestTemplate restTemplate() {
        return new RestTemplate();
    }
//
//    @Bean
//    public IRule randomRule() {
//        return new RandomRule();
//    }

}
3)编写 Feign 的客户端。
在 order-service 中新建一个接口,内容如下。
package com.geek.order.client;

import com.geek.order.pojo.User;
import org.springframework.cloud.openfeign.FeignClient;
import org.springframework.web.bind.annotation.GetMapping;
import org.springframework.web.bind.annotation.PathVariable;

/**
 * @author geek
 */
@FeignClient("user-service")
public interface IUserClient {

    @GetMapping("/user/{id}")
    User getById(@PathVariable("id") Long id);

}
这个客户端主要是基于 SpringMVC 的注解来声明远程调用的信息,比如。
-
服务名称:user-service
-
请求方式:GET
-
请求路径:/user/{id}
-
请求参数:Long id
-
返回值类型:User
这样,Feign 就可以帮助我们发送 http 请求,无需自己使用 RestTemplate 来发送了。
4)测试。
修改 order-service 中的 OrderService 类中的 queryOrderById 方法,使用 Feign 客户端代替 RestTemplate。
package com.geek.order.service.impl;

import com.geek.order.client.IUserClient;
import com.geek.order.mapper.IOrderMapper;
import com.geek.order.pojo.Order;
import com.geek.order.pojo.User;
import com.geek.order.service.IOrderService;
import org.springframework.beans.factory.annotation.Autowired;
import org.springframework.stereotype.Service;

/**
 * @author geek
 */
@Service
public class OrderServiceImpl implements IOrderService {

    @Autowired
    private IUserClient userClient;

    @Autowired
    private IOrderMapper orderMapper;

    @Override
    public Order getById(Long id) {
        Order order = this.orderMapper.selectById(id);
        // 利用 feign 远程调用。
        User user = this.userClient.getById(id);
        // 封装 user 对象到 order。
        order.setUser(user);
        return order;
    }

}
是不是看起来优雅多了。
5)总结。
使用 Feign 的步骤。
① 引入依赖。
② 添加 @EnableFeignClients 注解。
③ 编写 FeignClient 接口。
④ 使用 FeignClient 中定义的方法代替 RestTemplate。
2.2. 自定义配置。
Feign 可以支持很多的自定义配置,如下表所示。
| 类型 | 作用 | 说明 |
|---|---|---|
| feign.Logger.Level | 修改日志级别 | 包含四种不同的级别:NONE、BASIC、HEADERS、FULL。 |
| feign.codec.Decoder | 响应结果的解析器 | http 远程调用的结果做解析,例如解析 json 字符串为 Java 对象。 |
| feign.codec.Encoder | 请求参数编码 | 将请求参数编码,便于通过 http 请求发送。 |
| feign.Contract | 支持的注解格式 | 默认是 SpringMVC 的注解。 |
| feign.Retryer | 失败重试机制 | 请求失败的重试机制,默认是没有,不过会使用 Ribbon 的重试。 |
一般情况下,默认值就能满足我们使用,如果要自定义时,只需要创建自定义的 @Bean 覆盖默认 Bean 即可。
下面以日志为例来演示如何自定义配置。
2.2.1.配置文件方式
基于配置文件修改 feign 的日志级别可以针对单个服务。
feign:
  client:
    config:
      user-service: # 针对某个微服务的配置。
        loggerLevel: FULL  # 日志级别。
2023-03-31 20:10:38:306 DEBUG 20748 --- [nio-8080-exec-6] com.geek.order.client.IUserClient        : [IUserClient#getById] ---> GET http://user-service/user/1 HTTP/1.1
2023-03-31 20:10:38:306 DEBUG 20748 --- [nio-8080-exec-6] com.geek.order.client.IUserClient        : [IUserClient#getById] ---> END HTTP (0-byte body)
2023-03-31 20:10:40:016 DEBUG 20748 --- [nio-8080-exec-6] com.geek.order.client.IUserClient        : [IUserClient#getById] <--- HTTP/1.1 200 (1701ms)
2023-03-31 20:10:40:017 DEBUG 20748 --- [nio-8080-exec-6] com.geek.order.client.IUserClient        : [IUserClient#getById] connection: keep-alive
2023-03-31 20:10:40:017 DEBUG 20748 --- [nio-8080-exec-6] com.geek.order.client.IUserClient        : [IUserClient#getById] content-type: application/json
2023-03-31 20:10:40:017 DEBUG 20748 --- [nio-8080-exec-6] com.geek.order.client.IUserClient        : [IUserClient#getById] date: Fri, 31 Mar 2023 12:10:39 GMT
2023-03-31 20:10:40:017 DEBUG 20748 --- [nio-8080-exec-6] com.geek.order.client.IUserClient        : [IUserClient#getById] keep-alive: timeout=60
2023-03-31 20:10:40:017 DEBUG 20748 --- [nio-8080-exec-6] com.geek.order.client.IUserClient        : [IUserClient#getById] transfer-encoding: chunked
2023-03-31 20:10:40:017 DEBUG 20748 --- [nio-8080-exec-6] com.geek.order.client.IUserClient        : [IUserClient#getById]
2023-03-31 20:10:40:018 DEBUG 20748 --- [nio-8080-exec-6] com.geek.order.client.IUserClient        : [IUserClient#getById] {"id":1,"username":"柳岩","address":"湖南省衡阳市"}
2023-03-31 20:10:40:018 DEBUG 20748 --- [nio-8080-exec-6] com.geek.order.client.IUserClient        : [IUserClient#getById] <--- END HTTP (59-byte body)
也可以针对所有服务。
feign:
  client:
    config:
      default:  # 这里用 default 就是全局配置,如果是写服务名称,则是针对某个微服务的配置。
        loggerLevel: FULL  # 日志级别。
而日志的级别分为四种。
-
NONE:不记录任何日志信息,这是默认值。
-
BASIC:仅记录请求的方法,URL 以及响应状态码和执行时间。
-
HEADERS:在 BASIC 的基础上,额外记录了请求和响应的头信息。
-
FULL:记录所有请求和响应的明细,包括头信息、请求体、元数据。
2.2.2. Java 代码方式。
也可以基于 Java 代码来修改日志级别,先声明一个类,然后声明一个 Logger.Level 的对象。
package com.geek.order.config;

import feign.Logger;
import org.springframework.context.annotation.Bean;

/**
 * @author geek
 */
public class MyDefaultFeignConfiguration{

    @Bean
    public Logger.Level feignLogLevel() {
        // 日志级别为 BASIC。
        return Logger.Level.BASIC;
        //         NONE,
        //        BASIC,
        //        HEADERS,
        //        FULL;
    }

}
如果要全局生效,将其放到启动类的 @EnableFeignClients 这个注解中。
package com.geek;

import com.geek.order.config.MyDefaultFeignConfiguration;
import org.mybatis.spring.annotation.MapperScan;
import org.springframework.boot.SpringApplication;
import org.springframework.boot.autoconfigure.SpringBootApplication;
import org.springframework.cloud.client.loadbalancer.LoadBalanced;
import org.springframework.cloud.openfeign.EnableFeignClients;
import org.springframework.context.annotation.Bean;
import org.springframework.web.client.RestTemplate;

/**
 * @author geek
 */
@MapperScan("com.geek.order.mapper")
@SpringBootApplication
@EnableFeignClients(defaultConfiguration = MyDefaultFeignConfiguration.class)
public class OrderApplication {

    public static void main(String[] args) {
        SpringApplication.run(OrderApplication.class, args);
    }

    @LoadBalanced
    @Bean
    public RestTemplate restTemplate() {
        return new RestTemplate();
    }
//
//    @Bean
//    public IRule randomRule() {
//        return new RandomRule();
//    }

}
如果是局部生效,则把它放到对应的 @FeignClient 这个注解中。
package com.geek.order.client;

import com.geek.order.config.MyDefaultFeignConfiguration;
import com.geek.order.pojo.User;
import org.springframework.cloud.openfeign.FeignClient;
import org.springframework.web.bind.annotation.GetMapping;
import org.springframework.web.bind.annotation.PathVariable;

/**
 * @author geek
 */
@FeignClient(value = "user-service", configuration = MyDefaultFeignConfiguration.class)
public interface IUserClient {

    @GetMapping("/user/{id}")
    User getById(@PathVariable("id") Long id);

}
2.3. Feign 使用优化。
Feign 底层发起 http 请求,依赖于其它的框架。其底层客户端实现包括。
-
URLConnection:默认实现,不支持连接池。
-
Apache HttpClient:支持连接池。
-
OKHttp:支持连接池。
因此提高 Feign 的性能主要手段
-
使用连接池代替默认的 URLConnection。
-
日志级别,最好使用 basic 或 none。
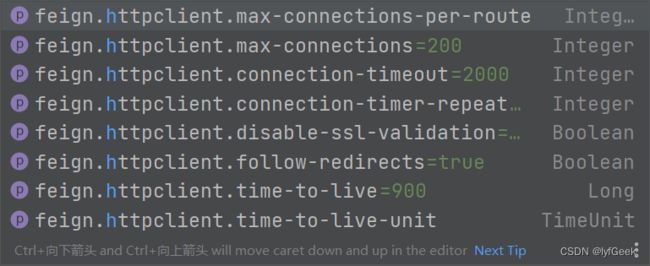
这里我们用 Apache 的 HttpClient 来演示。
1)引入依赖。
在 order-service 的 pom 文件中引入 Apache 的 HttpClient 依赖。
        <dependency>
            <groupId>io.github.openfeigngroupId>
            <artifactId>feign-httpclientartifactId>
        dependency>
2)配置连接池。
在 order-service 的 application.yml 中添加配置。
feign:
  client:
    config:
      user-service: # 针对某个微服务的配置。
        loggerLevel: FULL  # 日志级别。
  httpclient:
    enabled: true  # 开启 feign 对 HttpClient 的支持。
    max-connections: 200  # 最大连接数。
    max-connections-per-route: 50  # 每个路径的最大连接数。
2.4. 最佳实践。
所谓最近实践,就是使用过程中总结的经验,最好的一种使用方式。
自习观察可以发现,Feign 的客户端与服务提供者的 controller 代码非常相似。
feign 客户端。
package com.geek.order.client;

import com.geek.order.config.MyDefaultFeignConfiguration;
import com.geek.order.pojo.User;
import org.springframework.cloud.openfeign.FeignClient;
import org.springframework.web.bind.annotation.GetMapping;
import org.springframework.web.bind.annotation.PathVariable;

/**
 * @author geek
 */
@FeignClient(value = "user-service", configuration = MyDefaultFeignConfiguration.class)
public interface IUserClient {

    @GetMapping("/user/{id}")
    User getById(@PathVariable("id") Long id);

}
UserController。
package com.geek.user.controller;

import com.geek.config.PatternProperties;
import com.geek.user.pojo.User;
import com.geek.user.service.IUserService;
import lombok.extern.slf4j.Slf4j;
import org.springframework.beans.factory.annotation.Autowired;
import org.springframework.beans.factory.annotation.Value;
import org.springframework.cloud.context.config.annotation.RefreshScope;
import org.springframework.web.bind.annotation.PathVariable;
import org.springframework.web.bind.annotation.RequestMapping;
import org.springframework.web.bind.annotation.RestController;

import java.time.LocalDateTime;
import java.time.format.DateTimeFormatter;

/**
 * @author geek
 */
@Slf4j
@RestController
@RequestMapping("/user")
@RefreshScope
public class UserController {

    @Autowired
    private IUserService userService;

    @Value("${pattern.dateformat}")
    private String dateFormat;

    @Autowired
    private PatternProperties patternProperties;

    @RequestMapping("/prop")
    public PatternProperties prop() {
        return this.patternProperties;
    }

    @RequestMapping("/now")
    public String now() {
//        return LocalDateTime.now().format(DateTimeFormatter.ofPattern(this.dateFormat));
        return LocalDateTime.now().format(DateTimeFormatter.ofPattern(this.patternProperties.getDateformat()));
    }

    @RequestMapping("/{userId}")
    public User getById(@PathVariable("userId") Long userId) {
        return this.userService.getById(userId);
    }

}
有没有一种办法简化这种重复的代码编写呢?
2.4.1. 继承方式。
一样的代码可以通过继承来共享。
1)定义一个 API 接口,利用定义方法,并基于 SpringMVC 注解做声明。
2)Feign 客户端和 Controller 都集成改接口。
-
简单。
-
实现了代码共享。
缺点。
-
服务提供方、服务消费方紧耦合。
-
参数列表中的注解映射并不会继承,因此 Controller 中必须再次声明方法、参数列表、注解。
It is generally not advisable to share an interface between a server and a client. It introduces tight coupling, and also actually doesn’t work with Spring MVC in its current form (method parameter mapping is not inherited).
2.4.2. 抽取方式。
将 Feign 的 Client 抽取为独立模块,并且把接口有关的 POJO、默认的 Feign 配置都放到这个模块中,提供给所有消费者使用。
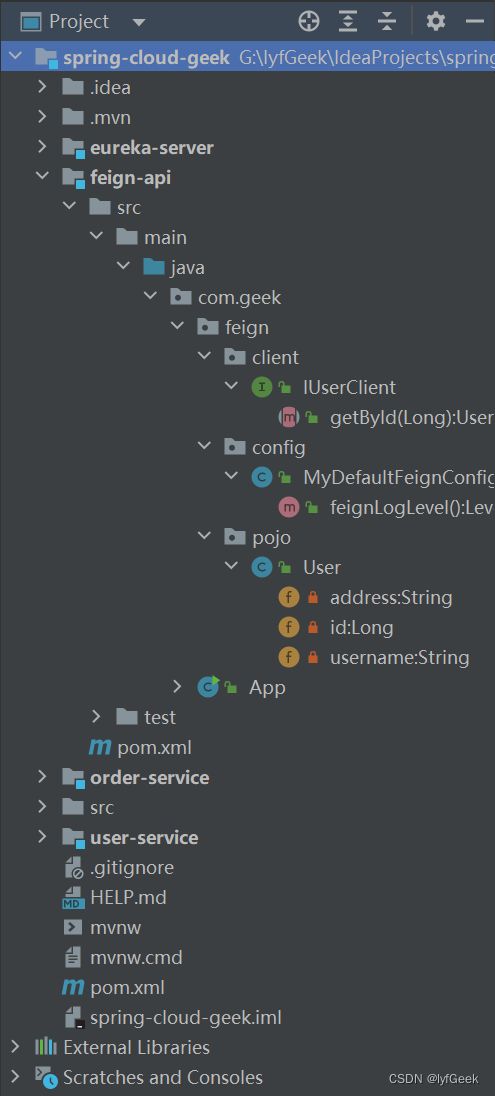
例如,将 UserClient、User、Feign 的默认配置都抽取到一个 feign-api 包中,所有微服务引用该依赖包,即可直接使用。
2.4.3. 实现基于抽取的最佳实践。
# 1)抽取。
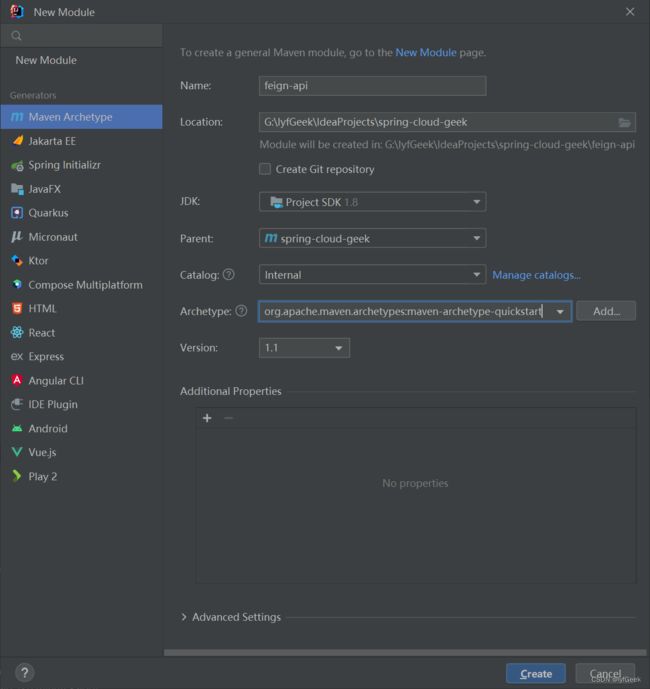
首先创建一个 module,命名为 feign-api。
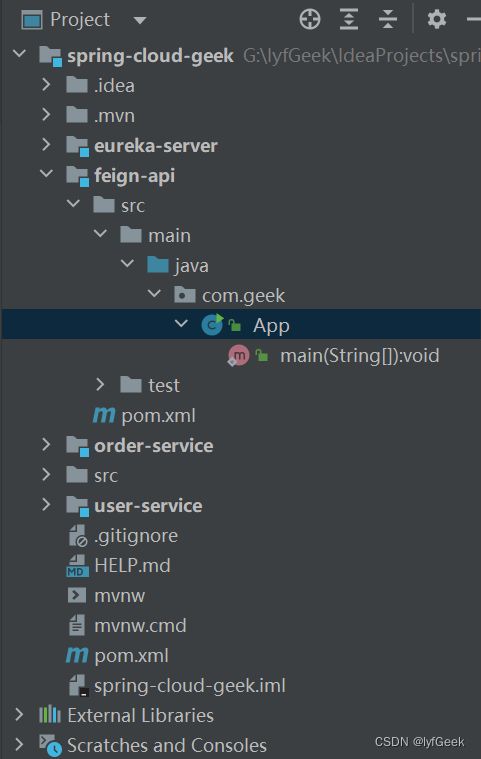
在 feign-api 中然后引入 feign 的 starter 依赖。
<dependency>
    <groupId>org.springframework.cloudgroupId>
    <artifactId>spring-cloud-starter-openfeignartifactId>
dependency>
然后,order-service 中编写的 UserClient、User、DefaultFeignConfiguration 都复制到 feign-api 项目中。
2)在 order-service 中使用 feign-api。
首先,删除 order-service 中的 UserClient、User、DefaultFeignConfiguration 等类或接口。
在 order-service 的 pom 文件中中引入 feign-api 的依赖。
<dependency>
    <groupId>cn.itcast.demogroupId>
    <artifactId>feign-apiartifactId>
    <version>1.0version>
dependency>
修改 order-service 中的所有与上述三个组件有关的导包部分,改成导入 feign-api 中的包。
3)重启测试。
重启后,发现服务报错了。
com.netflix.client.ClientException: Load balancer does not have available server for client: user-service
这是因为 UserClient 现在在 com.geek.feign.clients 包下。
而 order-service 的 @EnableFeignClients 注解是在 com.geek.order 包下,不在同一个包,无法扫描到 IUserClient。
4)解决扫描包问题。
方式一。
指定 Feign 应该扫描的包。
@EnableFeignClients(basePackages = "com.geek.feign.client")
方式二。
指定需要加载的 Client 接口。
@EnableFeignClients(clients = {IUserClient.class})
3. Gateway 服务网关。
Spring Cloud Gateway 是 Spring Cloud 的一个全新项目,该项目是基于 Spring 5.0,Spring Boot 2.0 和 Project Reactor 等响应式编程和事件流技术开发的网关,它旨在为微服务架构提供一种简单有效的统一的 API 路由管理方式。
3.1. 为什么需要网关。
Gateway 网关是我们服务的守门神,所有微服务的统一入口。
网关的核心功能特性。
-
请求路由。
-
权限控制。
-
限流。
架构图。
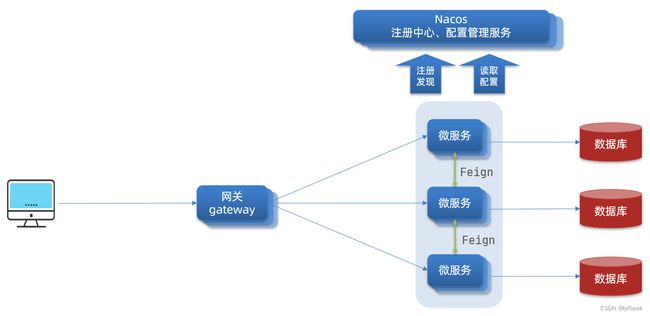
权限控制:网关作为微服务入口,需要校验用户是是否有请求资格,如果没有则进行拦截。
路由和负载均衡:一切请求都必须先经过 gateway,但网关不处理业务,而是根据某种规则,把请求转发到某个微服务,这个过程叫做路由。当然路由的目标服务有多个时,还需要做负载均衡。
限流:当请求流量过高时,在网关中按照下流的微服务能够接受的速度来放行请求,避免服务压力过大。
在 SpringCloud 中网关的实现包括两种。
-
gateway。
-
zuul。
Zuul 是基于 Servlet 的实现,属于阻塞式编程。而 SpringCloud Gateway 则是基于 Spring5 中提供的 WebFlux,属于响应式编程的实现,具备更好的性能。
3.2. gateway 快速入门。
下面,我们就演示下网关的基本路由功能。基本步骤如下。
-
创建 SpringBoot 工程 gateway,引入网关依赖。
-
编写启动类。
-
编写基础配置和路由规则。
-
启动网关服务进行测试。
1)创建 gateway 服务,引入依赖。
创建服务。
<dependency>
    <groupId>org.springframework.cloudgroupId>
    <artifactId>spring-cloud-starter-gatewayartifactId>
dependency>

<dependency>
    <groupId>com.alibaba.cloudgroupId>
    <artifactId>spring-cloud-starter-alibaba-nacos-discoveryartifactId>
dependency>
2)编写启动类。
package com.geek.gateway;

import org.springframework.boot.SpringApplication;
import org.springframework.boot.autoconfigure.SpringBootApplication;

/**
 * @author geek
 */
@SpringBootApplication
public class GatewayApplication {

    public static void main(String[] args) {
        SpringApplication.run(GatewayApplication.class, args);
    }

}
3)编写基础配置和路由规则。
创建 application.yml 文件,内容如下。
server:
  port: 10010  # 网关端口。
spring:
  application:
    name: gateway  # 服务名称。
  cloud:
    nacos:
      server-addr: localhost:8848  # Nacos 地址。
    gateway:
      routes: # 网关路由配置。
        - id: user-service  # 路由 id,自定义,只要唯一即可。
          # uri: http://127.0.0.1:8081  # 路由的目标地址 http 就是固定地址。
          uri: lb://user-service  # 路由的目标地址 lb 就是负载均衡,后面跟服务名称。
          predicates: # 路由断言,也就是判断请求是否符合路由规则的条件。
            - Path=/user/**  # 这个是按照路径匹配,只要以 /user/ 开头就符合要求。
我们将符合 Path 规则的一切请求,都代理到 uri 参数指定的地址。
本例中,我们将 /user/** 开头的请求,代理到 lb://userservice,lb 是负载均衡,根据服务名拉取服务列表,实现负载均衡。
4)重启测试。
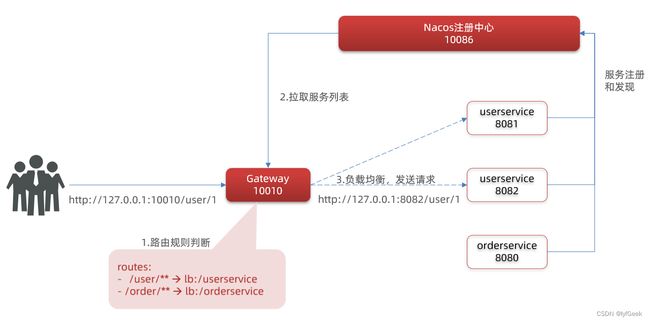
重启网关,访问 http://localhost:10010/user/1 时,符合 /user/** 规则,请求转发到 uri:http://userservice/user/1,得到了结果。
5)网关路由的流程图。
整个访问的流程如下。
网关搭建步骤。
-
创建项目,引入 Nacos 服务发现和 gateway 依赖。
-
配置 application.yml,包括服务基本信息、Nacos 地址、路由。
路由配置包括:
-
路由 id:路由的唯一标示。
-
路由目标(uri):路由的目标地址,http 代表固定地址,lb 代表根据服务名负载均衡。
-
路由断言(predicates):判断路由的规则。
-
路由过滤器(filters):对请求或响应做处理。
接下来,就重点来学习路由断言和路由过滤器的详细知识。
3.3. 路由断言工厂 Predicate Factory。
我们在配置文件中写的断言规则只是字符串,这些字符串会被 Predicate Factory 读取并处理,转变为路由判断的条件。
例如 Path=/user/** 是按照路径匹配,这个规则是由 org.springframework.cloud.gateway.handler.predicate.PathRoutePredicateFactory 类来处理的,像这样的断言工厂在 SpringCloudGateway 还有十几个。
| 名称 | 说明 | 示例 |
|---|---|---|
| After | 是某个时间点后的请求 | -After=2037-01-20T17:42:47.789-07:00[America/Denver] |
| Before | 是某个时间点之前的请求 | -Before=2031-04-13T15:14:47.433+08:00[Asia/Shanghai] |
| Between | 是某两个时间点之前的请求 | -Between=2037-01-20T17:42:47.789-07:00[America/Denver], 2037-01-21T17:42:47.789-07:00[America/Denver] |
| Cookie | 请求必须包含某些 cookie | -Cookie=chocolate, ch.p |
| Header | 请求必须包含某些 header | -Header=X-Request-Id, \d+ |
| Host | 请求必须是访问某个 host(域名) | -Host=.somehost.org,.anotherhost.org |
| Method | 请求方式必须是指定方式 | -Method=GET,POST |
| Path | 请求路径必须符合指定规则 | -Path=/red/{segment},/blue/** |
| Query | 请求参数必须包含指定参数 | -Query=name, Jack 或者- Query=name |
| RemoteAddr | 请求者的 ip 必须是指定范围 | -RemoteAddr=192.168.1.1/24 |
| Weight | 权重处理 |
我们只需要掌握 Path 这种路由工程就可以了。
https://docs.spring.io/spring-cloud-gateway/docs/current/reference/html/#the-after-route-predicate-factory
spring:
  cloud:
    gateway:
      routes:
      - id: after_route
        uri: https://example.org
        predicates:
        - After=2017-01-20T17:42:47.789-07:00[America/Denver]
3.4. 路由过滤器工厂。
GatewayFilter 是网关中提供的一种过滤器,可以对进入网关的请求和微服务返回的响应做处理。
3.4.1. 路由过滤器的种类。
https://docs.spring.io/spring-cloud-gateway/docs/current/reference/html/#gatewayfilter-factories
Spring 提供了 31 种不同的路由过滤器工厂。例如。
| 名称 | 说明 |
|---|---|
| AddRequestHeader | 给当前请求添加一个请求头。 |
| RemoveRequestHeader | 移除请求中的一个请求头。 |
| AddResponseHeader | 给响应结果中添加一个响应头。 |
| RemoveResponseHeader | 从响应结果中移除有一个响应头。 |
| RequestRateLimiter | 限制请求的流量。 |
3.4.2. 请求头过滤器。
下面我们以 AddRequestHeader 为例来讲解。
需求:给所有进入 userservice 的请求添加一个请求头:Truth=geek is freaking awesome!
只需要修改 gateway 服务的 application.yml 文件,添加路由过滤即可。
spring:
  cloud:
    gateway:
      routes:
      - id: user-service
        uri: lb://userservice
        predicates:
        - Path=/user/**
        filters:  # 过滤器。
        - AddRequestHeader=Truth, geek is freaking awesome!  # 添加请求头。
当前过滤器写在 userservice 路由下,因此仅仅对访问 userservice 的请求有效。
3.4.3. 默认过滤器。
如果要对所有的路由都生效,则可以将过滤器工厂写到 default 下。格式如下。
spring:
  cloud:
    gateway:
      routes:
      - id: user-service
        uri: lb://userservice
        predicates:
        - Path=/user/**
      default-filters:  # 默认过滤项。
      - AddRequestHeader=Truth, geek is freaking awesome!
/**
 * @author geek
 */
@Slf4j
@RestController
@RequestMapping("/user")
@RefreshScope
public class UserController {

    @RequestMapping("/header")
    public String header(@RequestHeader("Thruth") String truth) {
        return truth;
    }

}
spring:
  application:
    name: gateway  # 服务名称。
  cloud:
    nacos:
      server-addr: localhost:8848  # Nacos 地址。
    gateway:
      routes: # 网关路由配置。
        - id: user-service  # 路由 id,自定义,只要唯一即可。
          # uri: http://127.0.0.1:8081  # 路由的目标地址 http 就是固定地址。
          uri: lb://user-service  # 路由的目标地址 lb 就是负载均衡,后面跟服务名称。
          predicates: # 路由断言,也就是判断请求是否符合路由规则的条件。
            - Path=/user/**  # 这个是按照路径匹配,只要以 /user/ 开头就符合要求。
          filters: # 过滤器。
            - AddRequestHeader=Truth, geek is freaking awesome!  # 添加请求头。
        - id: order-service  # 路由 id,自定义,只要唯一即可。
          # uri: http://127.0.0.1:8081  # 路由的目标地址 http 就是固定地址。
          uri: lb://order-service  # 路由的目标地址 lb 就是负载均衡,后面跟服务名称。
          predicates: # 路由断言,也就是判断请求是否符合路由规则的条件。
            - Path=/order/**  # 这个是按照路径匹配,只要以 /order/ 开头就符合要求。
            - After=2027-01-20T17:42:47.789-07:00[America/Denver]
      default-filters: # 默认过滤器,对所有路由请求都生效。
        - AddRequestHeader=Truth, geek is freaking awesome!  # 添加请求头。
3.4.4. 总结。
过滤器的作用是什么?
① 对路由的请求或响应做加工处理,比如添加请求头。
② 配置在路由下的过滤器只对当前路由的请求生效。
defaultFilters 的作用是什么?
① 对所有路由都生效的过滤器。
3.5. 全局过滤器。
上一节学习的过滤器,网关提供了 31 种,但每一种过滤器的作用都是固定的。如果我们希望拦截请求,做自己的业务逻辑则没办法实现。
3.5.1. 全局过滤器作用。
全局过滤器的作用也是处理一切进入网关的请求和微服务响应,与 GatewayFilter 的作用一样。区别在于 GatewayFilter 通过配置定义,处理逻辑是固定的;而 GlobalFilter 的逻辑需要自己写代码实现。
定义方式是实现 GlobalFilter 接口。
public interface GlobalFilter {

    /**
     * 处理当前请求,有必要的话通过 {@link GatewayFilterChain} 将请求交给下一个过滤器处理。
     *
     * @param exchange 请求上下文,里面可以获取 Request、Response 等信息。
     * @param chain    用来把请求委托给下一个过滤器。
     * @return {@code Mono} 返回标示当前过滤器业务结束。
     */
    Mono<Void> filter(ServerWebExchange exchange, GatewayFilterChain chain);

}
在 filter 中编写自定义逻辑,可以实现下列功能。
-
登录状态判断。
-
权限校验。
-
请求限流等。
3.5.2. 自定义全局过滤器。
需求:定义全局过滤器,拦截请求,判断请求的参数是否满足下面条件。
-
参数中是否有 authorization。
-
authorization 参数值是否为 admin。
如果同时满足则放行,否则拦截。
实现。
在 gateway 中定义一个过滤器。
package com.geek.gateway.filters;

import org.springframework.cloud.gateway.filter.GatewayFilterChain;
import org.springframework.cloud.gateway.filter.GlobalFilter;
import org.springframework.core.Ordered;
import org.springframework.core.annotation.Order;
import org.springframework.http.HttpStatus;
import org.springframework.http.server.reactive.ServerHttpRequest;
import org.springframework.stereotype.Component;
import org.springframework.util.MultiValueMap;
import org.springframework.web.server.ServerWebExchange;
import reactor.core.publisher.Mono;

/**
 * @author geek
 */
@Order(-1)
@Component
public class AuthorizeFilter implements GlobalFilter, Ordered {

    /**
     * @param exchange
     * @param chain
     * @return
     */
    @Override
    public Mono<Void> filter(ServerWebExchange exchange, GatewayFilterChain chain) {
        // 获取请求参数。
        ServerHttpRequest serverHttpRequest = exchange.getRequest();
        MultiValueMap<String, String> queryParams = serverHttpRequest.getQueryParams();
        // 获取 authorization 参数。
        String auth = queryParams.getFirst("authorization");
        // 校验。
        if ("admin".equals(auth)) {
            // 放行。
            return chain.filter(exchange);
        }
        // 拦截。
        // 禁止访问,设置状态码。
        exchange.getResponse().setStatusCode(HttpStatus.FORBIDDEN);
        // 结束处理。
        return exchange.getResponse().setComplete();
    }

    /**
     * @return
     */
    @Override
    public int getOrder() {
        return -1;
    }

}
3.5.3. 过滤器执行顺序。
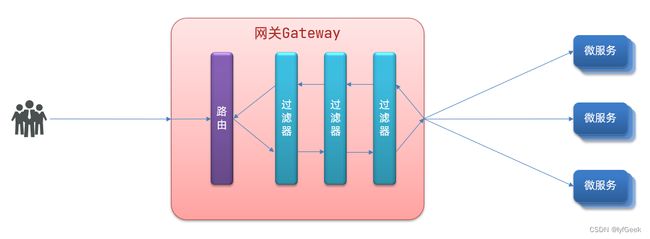
请求进入网关会碰到三类过滤器:当前路由的过滤器、DefaultFilter、GlobalFilter。
请求路由后,会将当前路由过滤器和 DefaultFilter、GlobalFilter,合并到一个过滤器链(集合)中,排序后依次执行每个过滤器。
-
每一个过滤器都必须指定一个 int 类型的 order 值,order 值越小,优先级越高,执行顺序越靠前。
-
GlobalFilter 通过实现 Ordered 接口,或者添加 @Order 注解来指定 order 值,由我们自己指定。
-
路由过滤器和 defaultFilter 的 order 由 Spring 指定,默认是按照声明顺序从 1 递增。
-
当过滤器的 order 值一样时,会按照 defaultFilter > 路由过滤器 > GlobalFilter 的顺序执行。
详细内容,可以查看源码:
org.springframework.cloud.gateway.route.RouteDefinitionRouteLocator#getFilters() 方法是先加载 defaultFilters,然后再加载某个 route 的 filters,然后合并。
org.springframework.cloud.gateway.handler.FilteringWebHandler#handle() 方法会加载全局过滤器,与前面的过滤器合并后根据 order 排序,组织过滤器链。
3.6. 跨域问题。
3.6.1. 什么是跨域问题。
跨域:域名不一致就是跨域,主要包括。
-
域名不同:www.taobao.com & www.taobao.org 和 www.jd.com & miaosha.jd.com。
-
域名相同,端口不同:localhost:8080 和 localhost8081。
跨域问题:浏览器禁止请求的发起者与服务端发生跨域 ajax 请求,请求被浏览器拦截的问题。
解决方案:CORS。
3.6.2. 模拟跨域问题。
页面文件。
放入 tomcat 或者 nginx 这样的 web 服务器中,启动并访问。
可以在浏览器控制台看到下面的错误。
从 localhost:8090 访问 localhost:10010,端口不同,显然是跨域的请求。
3.6.3. 解决跨域问题。
在 gateway 服务的 application.yml 文件中,添加下面的配置。
spring:
  cloud:
    gateway:
      globalcors: # 全局的跨域处理。
        add-to-simple-url-handler-mapping: true  # 解决 options 请求被拦截问题。
        corsConfigurations:
          '[/**]':
            allowedOrigins: # 允许哪些网站的跨域请求 。
              - "http://localhost:8090"
            allowedMethods: # 允许的跨域 ajax 的请求方式。
              - "GET"
              - "POST"
              - "DELETE"
              - "PUT"
              - "OPTIONS"
            allowedHeaders: "*"  # 允许在请求中携带的头信息。
            allowCredentials: true  # 是否允许携带 cookie。
            maxAge: 360000  # 这次跨域检测的有效期。
