Stable Diffusion 准确绘制人物动作及手脚细节(需ControlNet扩展)
目前AI绘图还是比较像开盲盒,虽然能根据语义提供惊艳的图片,但是与设计师所构思的目标还是有一定距离。
那像我们这种没有绘画功底的程序员想要制作出心中的人物(尤其手脚)姿态,该怎样减少随机开盒的次数呢?
本文提供几种精确控制人物动作的方法。
- 如果要了解如何安装sd,可参考《Windows安装Stable Diffusion WebUI及问题解决记录》;
- 如果要了解各种模型及配置参数,可参考《Stable Diffusion 个人推荐的各种模型及设置参数、扩展应用等合集》;
- 如果遇到运行使用时的问题,可参考《Windows使用Stable Diffusion时遇到的各种问题整理》。
注意:正式使用前请先确认你的Stable Diffusion Webui中已经安装了ControlNet扩展和OpenPose Editor插件,ControlNet扩展所需的模型candy、depth、openpose(建议全给装了)也部署到位。
不会安装的同学参考:《Stable Diffusion中ControlNet和OpenPose的安装教程》
流程整理:无论那种方法,操作思路都差不多
- 参考图:摆pose出参考图,尽量表达到位;
- 分析调试:将参考图提供给controlnet使用并进行微调;
- 出图:Stable Diffusion开盲盒出图(期间需若干参数调整)。
一、在线人偶摆pose法
准备
大都大同小异,具体摆pose方法我就不写了,多调调就能掌握的。
网址:
https://app.posemy.art/
https://webapp.magicposer.com/
https://www.anyposes.com/
参考图
摆好相机位置,清除背景,生成pose参考图。

分析调试
将图片放入controlnet,分析openpose,得到结构图(重要),深度图和边缘图看需要,注意权重、介入和退出的时机。


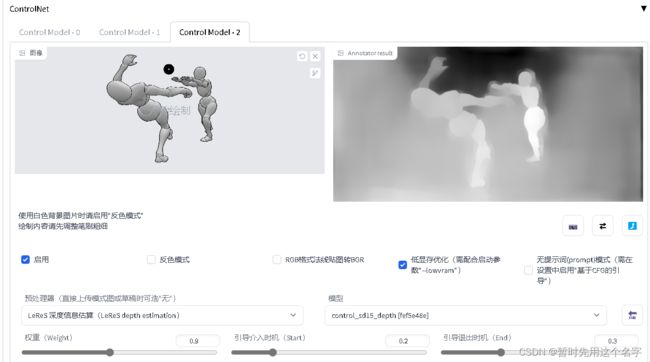
越白越亮表示离观看者越近,本案例中右侧的人物更亮更白,这说明controlnet的深度图分析错了。
生图
本节参考图中的人物细节有重合的部分,因此将容易混淆的部分用文字描述来约束。
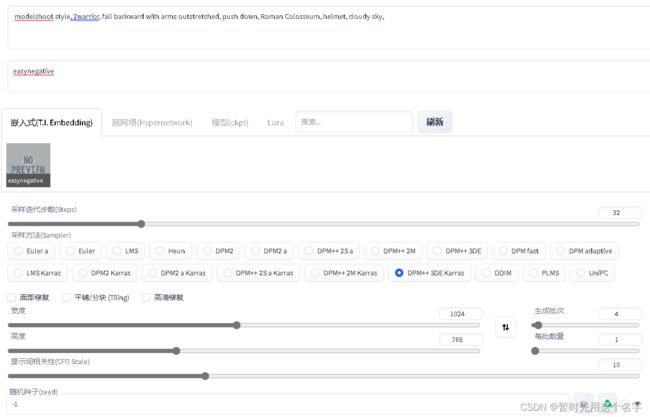
Generation Data:
modelshoot style, 2warrior, fall backward with arms outstretched, push down, Roman Colosseum, helmet, cloudy sky,
Negative prompt:  easynegative
Seed: -1, Steps: 32, Sampler: DPM++ SDE Karras, CFG scale: 10
二、OPENPOSE自画法
准备
- 安装
OpenPose Editor教程:
https://github.com/fkunn1326/openpose-editor/blob/master/README.zh-cn.md - 重启Stable Diffusion WebUI
参考图
通过 OpenPose Editor 编辑一下人物形态。

分析调试
发送到 >>>文生图,并且配置参数

生图
随便写点适合的东西。

Generation Data:
modelshoot style, (extremely detailed CG unity 8k wallpaper), full shot body photo of the most beautiful artwork in the world, beautiful women, (1dancer:1.5),(2hands:1.5)
Negative prompt:  easynegative, canvas frame, cartoon, 3d, ((disfigured)), ((bad art)), ((deformed)),((extra limbs)),((close up)),((b&w)), wierd colors, blurry, (((duplicate))), ((morbid)), ((mutilated)), [out of frame], extra fingers, mutated hands, ((poorly drawn hands)), ((poorly drawn face)), (((mutation))), (((deformed))), ((ugly)), blurry, ((bad anatomy)), (((bad proportions))), ((extra limbs)), cloned face, (((disfigured))), out of frame, ugly, extra limbs, (bad anatomy), gross proportions, (malformed limbs), ((missing arms)), ((missing legs)), (((extra arms))), (((extra legs))), mutated hands, (fused fingers), (too many fingers), (((long neck))), Photoshop, video game, ugly, tiling, poorly drawn hands, poorly drawn feet, poorly drawn face, out of frame, mutation, mutated, extra limbs, extra legs, extra arms, disfigured, deformed, cross-eye, body out of frame, blurry, bad art, bad anatomy, 3d render
Seed: -1, Steps: 32, Sampler: DPM++ SDE Karras, CFG scale: 10
单纯使用本方法的话,目前没法产生深度图和边缘图。
三、Blender三维建模方式
本方法可以提供深度图、结构图~~~
准备
- 下载blender并安装
https://www.blender.org/
- 下载3D模型(目前最新版本为5.0)
https://toyxyz.gumroad.com/l/ciojz
- 如果无法打开该页面的话,可下载:
https://download.csdn.net/download/snans/87581401
参考图
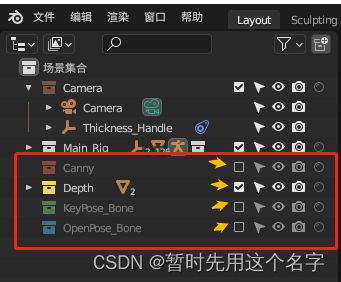
用blender打开下载的模型,调整人物的姿势,如图:

调整分辨率

分别打勾depth、canny、pose后渲染图形就能得到controlnet所需的图片


出图方法如下:
-
深度图
如上图选中depth,渲染出深度图另存即可

-
边缘图
选中canny后根据下图配置完compositing,再渲染保存就是canny图
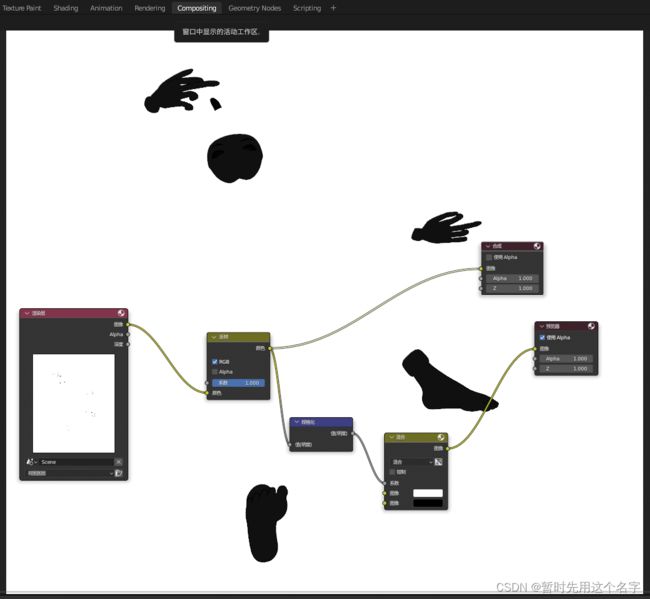
-
骨骼图
取消canny图中所设置的反转颜色,否则出图不正确

选中openpose后渲染图形

分析调试
将三张图分别导入controlnet中,参考方案一。
生图
写一下关键字生图。
stable diffusion似乎在这个机位角度对身形的分析并不好,这小粗腿。-_-!
四、常用图片识别法
准备
真人摆pose照一张
参考图
本文用安娜·谢尔巴科娃的照片~~

分析调试
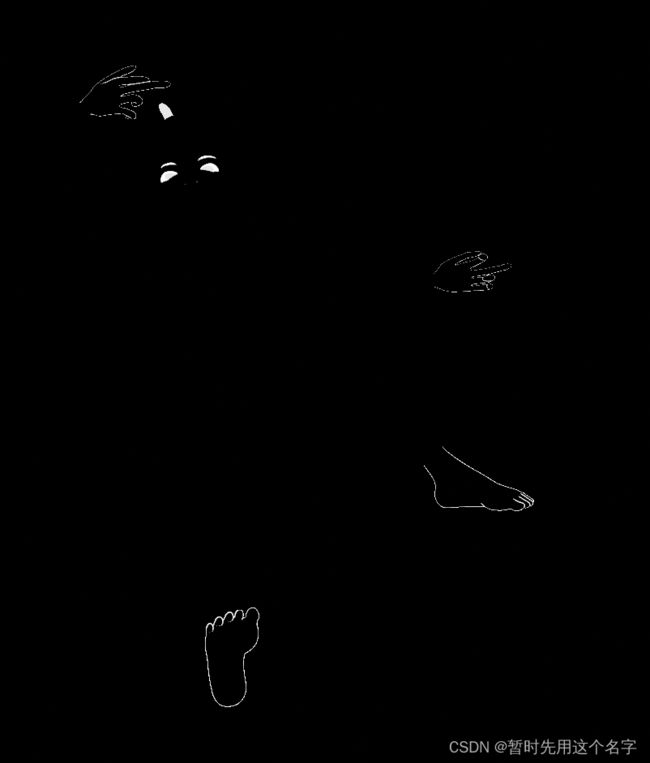
controlnet分析绘制出边缘图、骨骼图和深度图。


这种干净单一的画面,controlnet分析出的结果是比较准确的,所以如果真的用于生产制作,那么绿幕或干净的背景还是有一定必要的。
生图
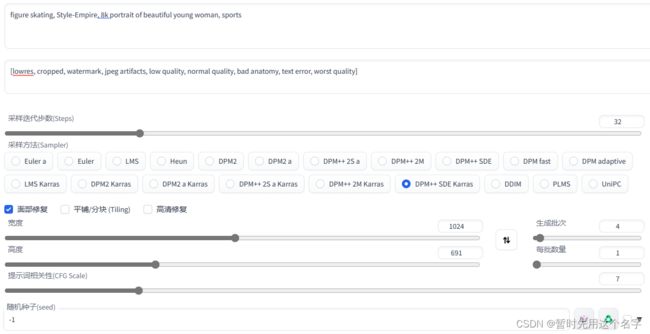
figure skating, Style-Empire, 8k portrait of beautiful young woman, sports
Negative prompt: [lowres, cropped, watermark, jpeg artifacts, low quality, normal quality, bad anatomy, text error, worst quality]
Size: 1024x691, Seed: -1, Steps: 32, Sampler: DPM++ SDE Karras, CFG scale: 5,
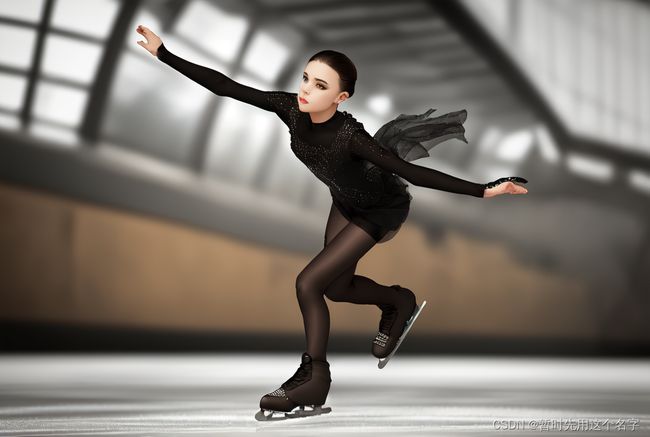

如果降低controlnet的约束参数,很可能生图生出双人滑冰~~

简单易用,以后想作图自己做动作就行了。
五、PS修补法
这是针对图样出完以后的细节修改方法。
准备
- 准备好PHOTOSHOP等图片编辑软件
- 准备一张待修改的图片
- 寻找一张手图

参考图
- 在photoshop中,将手放在合适的位置并且将色彩尽可能调一致,这涉及到phososhop的部分知识。
分析调试
生成参考图导入Stable Diffusion的 图生图>>>局部重绘
画笔涂抹需修改的对象(此处为手)后,配置参数(需多次调整)生图,直到满意为止。
其间可能除了修改主要对象外,对对象周围的部分也可能以涂抹方式修改。

生图
手的光影色彩协调了(其实错了),但细节丢失了。

像这种小修小改的,绘画专业的人员用传统方式改动可能更快更细腻更准确。