【06】卷积
1. 卷积原理
① Conv1d代表一维卷积,Conv2d代表二维卷积,Conv3d代表三维卷积。
② kernel_size在训练过程中不断调整,定义为3就是3 * 3的卷积核,实际我们在训练神经网络过程中其实就是对kernel_size不断调整。
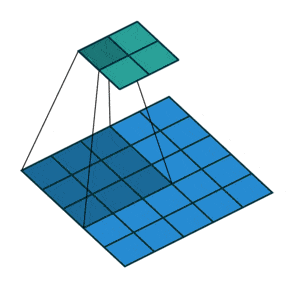
③ 可以根据输入的参数获得输出的情况,如下图所示。

① 卷积核不停的在原图上进行滑动,对应元素相乘再相加。
② 下图为每次滑动移动1格,然后再利用原图与卷积核上的数值进行计算得到缩略图矩阵的数据,如下图右所示。

import torch
import torch.nn.functional as F

input = torch.tensor([[1, 2, 0, 3, 1],
                      [0, 1, 2, 3, 1],
                      [1, 2, 1, 0, 0],
                      [5, 2, 3, 1, 1],
                      [2, 1, 0, 1, 1]])

kernel = torch.tensor([[1, 2, 1],
                       [0, 1, 0],
                       [2, 1, 0]])

print(input.shape)
print(kernel.shape)
input = torch.reshape(input, (1,1,5,5))
kernel = torch.reshape(kernel, (1,1,3,3))
print(input.shape)
print(kernel.shape)

output = F.conv2d(input, kernel, stride=1)
print(output)

'''
torch.Size([5, 5])
torch.Size([3, 3])

torch.Size([1, 1, 5, 5])
torch.Size([1, 1, 3, 3])

tensor([[[[10, 12, 12],
          [18, 16, 16],
          [13,  9,  3]]]])
'''
ps.reshape可以将一个张量的形状更改为另一个形状,以适应不同的计算需要。reshape()需要两个参数。
- 第一个参数:被重新塑性的张量
- 第二个参数:目标形状的元组
例:y=torch。=.reshape(x,(3,4))————将张量x更改为3x4的新张量。
除了torch.reshape外,还可以使用torch.view()函数,也可以将张量形状重塑为任何形状。
import torch
a=torch.tensor([[[1,2,3],[4,5,6]],
                [[7,8,9],[10,11,12]]])

print("a的shape:",a.shape)

b=torch.reshape(a,((4,3,1)))
print("b:",b)
print("b的shape:",b.shape)

c=a.view(2,6)
print("c的shape:",c.shape)

'''
a的shape: torch.Size([2, 2, 3])
b: tensor([[[ 1],
         [ 2],
         [ 3]],

        [[ 4],
         [ 5],
         [ 6]],

        [[ 7],
         [ 8],
         [ 9]],

        [[10],
         [11],
         [12]]])
b的shape: torch.Size([4, 3, 1])

c的shape:tensor([[1,2,3,4,5,6],
                [7,8,9,10,11,12]])
'''
1.2 设置步伐stride
步幅:卷积核经过输入特征图的采样间隔。
设置步幅的目的:希望减小输入参数的数目,减少计算量。
import torch
import torch.nn.functional as F
input = torch.tensor([[1, 2, 0, 3, 1],
[0, 1, 2, 3, 1],
[1, 2, 1, 0, 0],
[5, 2, 3, 1, 1],
[2, 1, 0, 1, 1]])
kernel = torch.tensor([[1, 2, 1],
[0, 1, 0],
[2, 1, 0]])
print(input.shape)
print(kernel.shape)
input = torch.reshape(input, (1,1,5,5))
kernel = torch.reshape(kernel, (1,1,3,3))
print(input.shape)
print(kernel.shape)
output2 = F.conv2d(input, kernel, stride=2) # 步伐为2
print(output2)
'''
torch.Size([5, 5])
torch.Size([3, 3])
torch.Size([1, 1, 5, 5])
torch.Size([1, 1, 3, 3])
tensor([[[[10, 12],
[13, 3]]]])
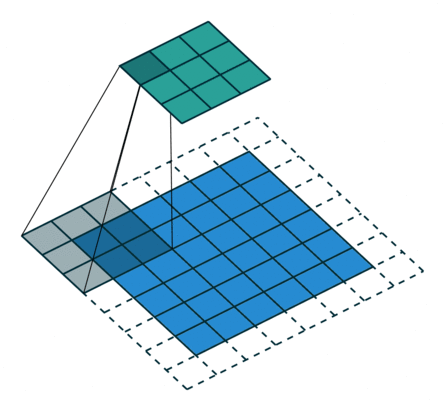
'''1.3 设置padding
填充:在输入特征图的每一边添加一定数目的行列。
设置填充的目的:希望每个输入方块都能作为卷积窗口的中心,或使得输出的特征图的长、宽 = 输入的特征图的长、宽。
import torch
import torch.nn.functional as F

input = torch.tensor([[1, 2, 0, 3, 1],
                      [0, 1, 2, 3, 1],
                      [1, 2, 1, 0, 0],
                      [5, 2, 3, 1, 1],
                      [2, 1, 0, 1, 1]])

kernel = torch.tensor([[1, 2, 1],
                       [0, 1, 0],
                       [2, 1, 0]])

print(input.shape)
print(kernel.shape)
input = torch.reshape(input, (1,1,5,5))
kernel = torch.reshape(kernel, (1,1,3,3))
print(input.shape)
print(kernel.shape)

output3 = F.conv2d(input, kernel, stride=1, padding=1)  # 周围只填充一层
print(output3)


'''
torch.Size([5, 5])
torch.Size([3, 3])
torch.Size([1, 1, 5, 5])
torch.Size([1, 1, 3, 3])
tensor([[[[ 1,  3,  4, 10,  8],
          [ 5, 10, 12, 12,  6],
          [ 7, 18, 16, 16,  8],
          [11, 13,  9,  3,  4],
          [14, 13,  9,  7,  4]]]])
'''
例子1:一个特征图尺寸为4 * 4的输入,使用3 * 3的卷积核,步幅=1,填充=0,输出的尺寸=(4 - 3)/1 + 1 = 2。

例子2: 一个特征图尺寸为5 * 5的输入,使用3 * 3的卷积核,步幅=1,填充=1,输出的尺寸=(5 + 2 * 1 - 3)/1 + 1 = 5。

例子3:一个特征图尺寸为5 * 5的输入, 使用3 * 3的卷积核,步幅=2,填充=0,输出的尺寸=(5-3)/2 + 1 = 2。
例子4:一个特征图尺寸为6 * 6的输入, 使用3 * 3的卷积核,步幅=2,填充=1,输出的尺寸=(6 + 2 * 1 - 3)/2 + 1 = 2.5 + 1 = 3.5 向下取整=3(降采样:边长减少1/2)。
2. 搭建卷积层
import torch
from torch import nn
import torchvision
from torch.nn import Conv2d
from torch.utils.data import DataLoader

dataset = torchvision.datasets.CIFAR10("./dataset",train=False,transform=torchvision.transforms.ToTensor(),download=True)
dataloader = DataLoader(dataset, batch_size=64)
class Tudui(nn.Module):
    def __init__(self):
        super(Tudui, self).__init__()
        self.conv1 = Conv2d(in_channels=3,out_channels=6,kernel_size=3,stride=1,padding=0)
# 彩色图像输入为3层,我们想让它的输出为6层,选3 * 3 的卷积

    def forward(self,x):
        x = self.conv1(x)
        return x

tudui = Tudui()
print(tudui)

'''
Files already downloaded and verified
Tudui(
  (conv1): Conv2d(3, 6, kernel_size=(3, 3), stride=(1, 1))
)
'''
3. 卷积层处理图片
import torch
import torchvision
from torch import nn
from torch.nn import Conv2d
from torch.utils.data import DataLoader

dataset = torchvision.datasets.CIFAR10("./dataset",train=False,transform=torchvision.transforms.ToTensor(),download=True)
dataloader = DataLoader(dataset, batch_size=64)
class Tudui(nn.Module):
    def __init__(self):
        super(Tudui, self).__init__()
        self.conv1 = Conv2d(in_channels=3,out_channels=6,kernel_size=3,stride=1,padding=0) # 彩色图像输入为3层,我们想让它的输出为6层,选3 * 3 的卷积

    def forward(self,x):
        x = self.conv1(x)
        return x

tudui = Tudui()
for data in dataloader:
    imgs, targets = data
    output = tudui(imgs)
    print(imgs.shape)   # 输入为3通道32×32的64张图片
    print(output.shape) # 输出为6通道30×30的64张图片
4.3. Tensorboard显示
import torch
import torchvision
from torch import nn
from torch.nn import Conv2d
from torch.utils.data import DataLoader
from torch.utils.tensorboard import SummaryWriter

dataset = torchvision.datasets.CIFAR10("./dataset",train=False,transform=torchvision.transforms.ToTensor(),download=True)
dataloader = DataLoader(dataset, batch_size=64)
class Tudui(nn.Module):
    def __init__(self):
        super(Tudui, self).__init__()
        self.conv1 = Conv2d(in_channels=3,out_channels=6,kernel_size=3,stride=1,padding=0) # 彩色图像输入为3层,我们想让它的输出为6层,选3 * 3 的卷积

    def forward(self,x):
        x = self.conv1(x)
        return x

tudui = Tudui()
writer = SummaryWriter("logs")
step = 0
for data in dataloader:
    imgs, targets = data
    output = tudui(imgs)
    print(imgs.shape)
    print(output.shape)
    writer.add_images("input", imgs, step)
    output = torch.reshape(output,(-1,3,30,30)) # 把原来6个通道拉为3个通道,为了保证所有维度总数不变,其余的分量分到第一个维度中
    writer.add_images("output", output, step)
    step = step + 1
① 在 Anaconda 终端里面,激活py3.6.3环境,再输入 tensorboard --logdir=C:\Users\wangy\Desktop\03CV\logs 命令,将网址赋值浏览器的网址栏,回车,即可查看tensorboard显示日志情况。
