OAuth2.0从入门到实战(附github地址)
OAuth2.0
文章目录
- OAuth2.0
-
- OAuth2.0的含义与思想
-
- [快递员的例子]([OAuth 2.0 的一个简单解释 - 阮一峰的网络日志 (ruanyifeng.com)](https://www.ruanyifeng.com/blog/2019/04/oauth_design.html))
- 互联网的例子
- 令牌与密码
- OAuth2.0的四种授权方式
-
- RFC 6749
- 一、授权码(前后端分离)
- 二、隐藏式(纯前端应用)
- 三、密码式
- 四、凭证式(命令行应用)
- 令牌的使用
- 更新令牌
- OAuth2.0 客户端实例
-
- 需求描述
- 环境准备
- 演示Demo
- 查看Github在我们应用中的注册信息
- 查看获取到的AccessToken
- 通过AccessToken请求Github API
- OAuth2.0 授权码实例
-
- 搭建授权服务器
- 搭建资源服务器
- 第三方应用搭建
- 案例分析与优化
-
- 令牌的存储位置
- 客户端信息存储
- 第三方应用优化
- OAuth2.0 单点登录实例
-
- 认证与资源中心配置
- 客户端服务创建
- 单点登录测试
OAuth2.0的含义与思想
OAuth 是一个开放标准,该标准允许用户让第三方应用访问该用户在某一网站上存储的私密资源(如头像、照片、视频等),而在这个过程中无需将用户名和密码提供给第三方应用。实现这一功能是通过提供一个令牌(token),而不是用户名和密码来访问他们存放在特定服务提供者的数据。采用令牌(token)的方式可以让用户灵活的对第三方应用授权或者收回权限。
OAuth2 是 OAuth 协议的下一版本,但不向下兼容 OAuth 1.0。传统的 Web 开发登录认证一般都是基于 session 的,但是在前后端分离的架构中继续使用 session 就会有许多不便,因为移动端(Android、iOS、微信小程序等)要么不支持 cookie(微信小程序),要么使用非常不便,对于这些问题,使用 OAuth2 认证都能解决。
对于大家而言,我们在互联网应用中最常见的 OAuth2 应该就是各种第三方登录了,例如 QQ 授权登录、微信授权登录、微博授权登录、GitHub 授权登录等等。
[快递员的例子](OAuth 2.0 的一个简单解释 - 阮一峰的网络日志 (ruanyifeng.com))
我住在一个大型的居民小区。

小区有门禁系统。
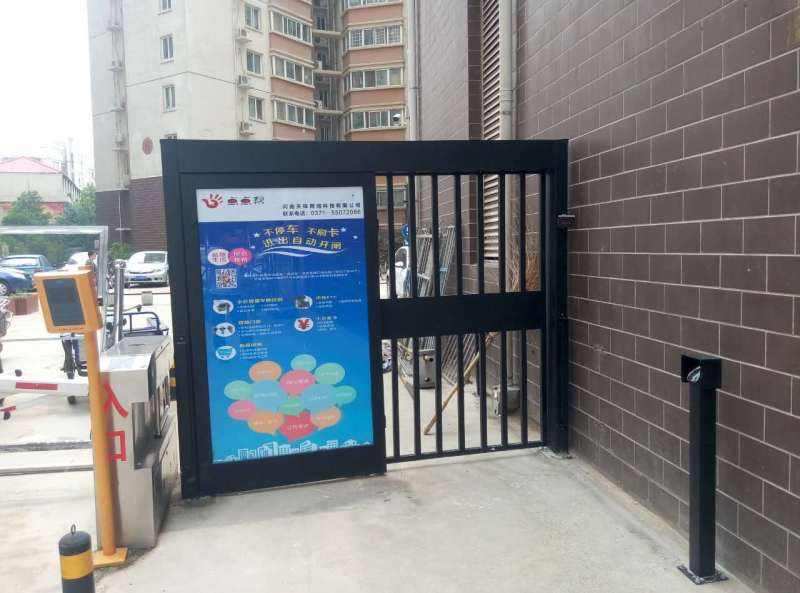
进入的时候需要输入密码。
我经常网购和外卖,每天都有快递员来送货。我必须找到一个办法,让快递员通过门禁系统,进入小区。

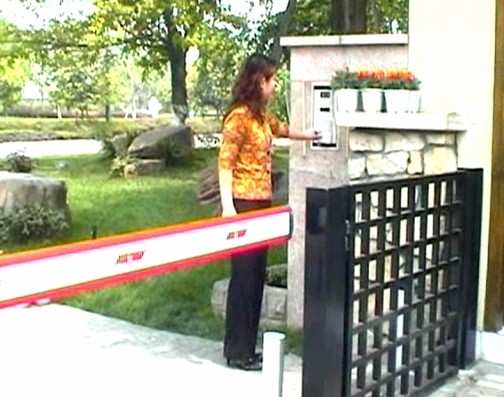
如果我把自己的密码,告诉快递员,他就拥有了与我同样的权限,这样好像不太合适。万一我想取消他进入小区的权力,也很麻烦,我自己的密码也得跟着改了,还得通知其他的快递员。
有没有一种办法,让快递员能够自由进入小区,又不必知道小区居民的密码,而且他的唯一权限就是送货,其他需要密码的场合,他都没有权限?
于是,我设计了一套授权机制:

- 第一步,门禁系统的密码输入器下面,增加一个按钮,叫做**“获取授权”**。快递员需要首先按这个按钮,去申请授权。
- 第二步,他按下按钮以后,屋主(也就是我)的手机就会跳出对话框:有人正在要求授权。系统还会显示该快递员的姓名、工号和所属的快递公司。
- 我确认请求属实,就点击按钮,告诉门禁系统,我同意给予他进入小区的授权。
- 第三步,门禁系统得到我的确认以后,向快递员显示一个进入小区的令牌(access token)。令牌就是类似密码的一串数字,只在短期内(比如七天)有效。
- 第四步,快递员向门禁系统输入令牌,进入小区。
有人可能会问,为什么不是远程为快递员开门,而要为他单独生成一个令牌?这是因为快递员可能每天都会来送货,第二天他还可以复用这个令牌。另外,有的小区有多重门禁,快递员可以使用同一个令牌通过它们。
互联网的例子
例如我们有一个“云打印”的网站,可以将用户存储在Google的照片,打印出来。用户为了使用该服务,需要让“云打印”这个网站访问自己存储在Google的照片。
❓ 如何获得用户的授权呢?
传统方案是将用户将自己的Google账号密码告诉“云打印”网站。但是这种方案会有很多缺点:
云打印存储Google密码,不安全- Google必须有密码登录的功能
云打印拥有了获取用户Google资源的权力,但是用户无法限制云打印获得授权的范围和有效期- 用户只有修改密码,才可以收回赋予的权利,但是这样严重影响其它应用
- 只要有一个第三方应用被破解,密码就会泄漏
OAuth就是为了解决上面这些问题而诞生的。
用OAuth的方案:云打印请求获取授权,用户同意给云打印授权,云打印使用上一步的授权码向Google的认证服务器申请令牌,然后云打印使用令牌向Google的资源服务器申请资源,Google的资源服务器确认令牌并开放资源。
简单说,OAuth 就是一种授权机制。数据的所有者告诉系统,同意授权第三方应用进入系统,获取这些数据。系统从而产生一个短期的进入令牌(token),用来代替密码,供第三方应用使用。
令牌与密码
令牌(token)与密码(password)的作用是一样的,都可以进入系统,但是有三点差异。
- 令牌是短期的,到期会自动失效,用户自己无法修改。密码一般长期有效,用户不修改,就不会发生变化。
- 令牌可以被数据所有者撤销,会立即失效。以上例而言,屋主可以随时取消快递员的令牌。密码一般不允许被他人撤销。
- 令牌有权限范围(scope),比如只能进小区的二号门。对于网络服务来说,只读令牌就比读写令牌更安全。密码一般是完整权限。
上面这些设计,保证了令牌既可以让第三方应用获得权限,同时又随时可控,不会危及系统安全。这就是 OAuth 2.0 的优点。
OAuth2.0的四种授权方式
用户如何给与第三方应用权限,从而第三方可以根据此授权获取令牌?
RFC 6749
OAuth 2.0 的标准是 RFC 6749 文件。该文件先解释了 OAuth 是什么。
OAuth 引入了一个授权层,用来分离两种不同的角色:客户端和资源所有者。…资源所有者同意以后,资源服务器可以向客户端颁发令牌。客户端通过令牌,去请求数据。
这段话的意思就是,**OAuth 的核心就是向第三方应用颁发令牌。**然后,RFC 6749 接着写道:
(由于互联网有多种场景,)本标准定义了获得令牌的四种授权方式(authorization grant )。
也就是说,**OAuth 2.0 规定了四种获得令牌的流程。你可以选择最适合自己的那一种,向第三方应用颁发令牌。**下面就是这四种授权方式。
- 授权码(authorization-code)
- 隐藏式(implicit)
- 密码式(password):
- 客户端凭证(client credentials)
注意,不管哪一种授权方式,第三方应用申请令牌之前,都必须先到系统备案,说明自己的身份,然后会拿到两个身份识别码:客户端 ID(client ID)和客户端密钥(client secret)。这是为了防止令牌被滥用,没有备案过的第三方应用,是不会拿到令牌的。
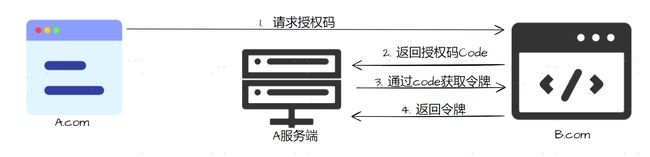
一、授权码(前后端分离)
授权码(authorization code)方式,指的是第三方应用先申请一个授权码,然后再用该码获取令牌。
这种方式是最常用的流程,安全性也最高,它适用于那些有后端的 Web 应用。授权码通过前端传送,令牌则是储存在后端,而且所有与资源服务器的通信都在后端完成。这样的前后端分离,可以避免令牌泄漏。
A网站要获取B网站的授权
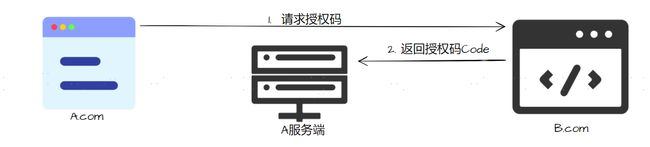
1️⃣ 第一步,A 网站(云打印)提供一个链接,用户点击后就会跳转到 B (Google)网站,授权用户数据给 A 网站使用。下面就是 A 网站跳转 B 网站的一个示意链接。
https://b.com/oauth/authorize?
  response_type=code&
  client_id=CLIENT_ID&
  redirect_uri=CALLBACK_URL&
  scope=read
上面 URL 中,response_type参数表示要求返回授权码(code),client_id参数让 B 知道是谁在请求,redirect_uri参数是 B 接受或拒绝请求后的跳转网址,scope参数表示要求的授权范围(这里是只读)。
2️⃣ 第二步,用户跳转后,B 网站会要求用户登录,然后询问是否同意给予 A 网站授权。用户表示同意,这时 B 网站就会跳回redirect_uri参数指定的网址。跳转时,会传回一个授权码,就像下面这样。
https://a.com/callback?code=AUTHORIZATION_CODE
3️⃣ 第三步,A 网站拿到授权码以后,就可以在后端,向 B 网站请求令牌。
https://b.com/oauth/token?
 client_id=CLIENT_ID&
 client_secret=CLIENT_SECRET&
 grant_type=authorization_code&
 code=AUTHORIZATION_CODE&
 redirect_uri=CALLBACK_URL
上面 URL 中,client_id参数和client_secret参数用来让 B 确认 A 的身份(client_secret参数是保密的,因此只能在后端发请求),grant_type参数的值是AUTHORIZATION_CODE,表示采用的授权方式是授权码,code参数是上一步拿到的授权码,redirect_uri参数是令牌颁发后的回调网址。
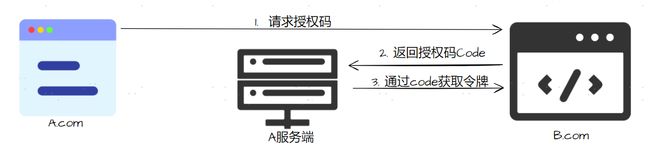
4️⃣ 第四步,B 网站收到请求以后,就会颁发令牌。具体做法是向redirect_uri指定的网址,发送一段 JSON 数据。
{
  "access_token":"ACCESS_TOKEN",
  "token_type":"bearer",
  "expires_in":2592000,
  "refresh_token":"REFRESH_TOKEN",
  "scope":"read",
  "uid":100101,
  "info":{...}
}
上面 JSON 数据中,access_token字段就是令牌,A 网站在后端拿到了。
最后A网站就可以通过令牌来访问B网站的资源了。
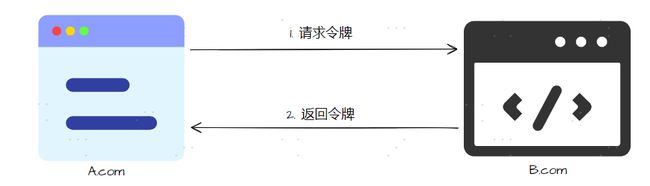
二、隐藏式(纯前端应用)
有些 Web 应用是纯前端应用,没有后端。这时就不能用上面的方式了,必须将令牌储存在前端。RFC 6749 就规定了第二种方式,允许直接向前端颁发令牌。这种方式没有授权码这个中间步骤,所以称为(授权码)“隐藏式”(implicit)。
1️⃣ 第一步,A 网站提供一个链接,要求用户跳转到 B 网站,授权用户数据给 A 网站使用。
https://b.com/oauth/authorize?
  response_type=token&
  client_id=CLIENT_ID&
  redirect_uri=CALLBACK_URL&
  scope=read
上面 URL 中,response_type参数为token,表示要求直接返回令牌。
2️⃣ 第二步,用户跳转到 B 网站,登录后同意给予 A 网站授权。这时,B 网站就会跳回redirect_uri参数指定的跳转网址,并且把令牌作为 URL 参数,传给 A 网站。
https://a.com/callback#token=ACCESS_TOKEN
上面 URL 中,token参数就是令牌,A 网站因此直接在前端拿到令牌。
这种方式把令牌直接传给前端,是很不安全的。因此,只能用于一些安全要求不高的场景,并且令牌的有效期必须非常短,通常就是会话期间(session)有效,浏览器关掉,令牌就失效了。
三、密码式
如果你高度信任某个应用,RFC 6749 也允许用户把用户名和密码,直接告诉该应用。该应用就使用你的密码,申请令牌,这种方式称为"密码式"(password)。
第一步,A 网站要求用户提供 B 网站的用户名和密码。拿到以后,A 就直接向 B 请求令牌。
https://oauth.b.com/token?
  grant_type=password&
  username=USERNAME&
  password=PASSWORD&
  client_id=CLIENT_ID
上面 URL 中,grant_type参数是授权方式,这里的password表示"密码式",username和password是 B 的用户名和密码。
第二步,B 网站验证身份通过后,直接给出令牌。注意,这时不需要跳转,而是把令牌放在 JSON 数据里面,作为 HTTP 回应,A 因此拿到令牌。
这种方式需要用户给出自己的用户名/密码,显然风险很大,因此只适用于其他授权方式都无法采用的情况,而且必须是用户高度信任的应用。
四、凭证式(命令行应用)
最后一种方式是凭证式(client credentials),适用于没有前端的命令行应用,即在命令行下请求令牌。
第一步,A 应用在命令行向 B 发出请求。
https://oauth.b.com/token?
  grant_type=client_credentials&
  client_id=CLIENT_ID&
  client_secret=CLIENT_SECRET
上面 URL 中,grant_type参数等于client_credentials表示采用凭证式,client_id和client_secret用来让 B 确认 A 的身份。
第二步,B 网站验证通过以后,直接返回令牌。
这种方式给出的令牌,是针对第三方应用的,而不是针对用户的,即有可能多个用户共享同一个令牌。
令牌的使用
A 网站拿到令牌以后,就可以向 B 网站的 API 请求数据了。
此时,每个发到 API 的请求,都必须带有令牌。具体做法是在请求的头信息,加上一个Authorization字段,令牌就放在这个字段里面。
curl -H "Authorization: Bearer ACCESS_TOKEN" \
"https://api.b.com"
上面命令中,ACCESS_TOKEN就是拿到的令牌。
更新令牌
令牌的有效期到了,如果让用户重新走一遍上面的流程,再申请一个新的令牌,很可能体验不好,而且也没有必要。OAuth 2.0 允许用户自动更新令牌。
具体方法是,B 网站颁发令牌的时候,一次性颁发两个令牌,一个用于获取数据,另一个用于获取新的令牌(refresh token 字段)。令牌到期前,用户使用 refresh token 发一个请求,去更新令牌。
https://b.com/oauth/token?
  grant_type=refresh_token&
  client_id=CLIENT_ID&
  client_secret=CLIENT_SECRET&
  refresh_token=REFRESH_TOKEN
上面 URL 中,grant_type参数为refresh_token表示要求更新令牌,client_id参数和client_secret参数用于确认身份,refresh_token参数就是用于更新令牌的令牌。
B 网站验证通过以后,就会颁发新的令牌。
OAuth2.0 客户端实例
需求描述
我们这里将会演示将我们的应用作为一个OAuth2.0客户端来集成Github登录,并实现对Github资源的访问。
环境准备
1️⃣ 在Github注册一个应用,生成 client-id , client-secret

2️⃣ SpringSecurity的集成,SpringSecurity 本身提供了 GOOGLE GITHUB FACEBOOK OKTA 的 OAuth2.0 接入支持,具体源码在枚举类 CommonOAuth2Provider 中。
        <dependency>
            <groupId>org.springframework.bootgroupId>
            <artifactId>spring-boot-starter-oauth2-clientartifactId>
        dependency>
        <dependency>
            <groupId>org.springframework.bootgroupId>
            <artifactId>spring-boot-starter-securityartifactId>
        dependency>
演示Demo
1️⃣首先将Github的Client-Id等信息配置到yml文件:
server:
  port: 8888
spring:
  security:
    oauth2:
      client:
        registration:
          github:
            client-id: XXXXXXXXXXXXXXX
            client-secret: XXXXXXXXXXXXXXXXXXXX
2️⃣ 提供一个home页面Controller
    @GetMapping(value = "/")
    public String index() {
        log.info(SecurityContextHolder.getContext().getAuthentication().toString());
        return "Welcome " + SecurityContextHolder.getContext().getAuthentication();
    }
3️⃣ 访问localhost:8888/login

点击通过Github登录:
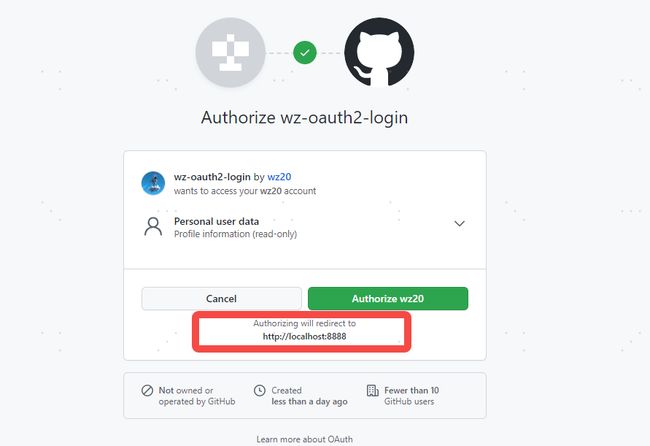
我们授权登录后,页面会重定向到我们配置的home页面:

借助 SpringSecurity 对 OAuth2.0 的支持,我们几乎不用写什么代码就实现了 Github 登录集成。下面再通过几个例子来了解更多的细节。
查看Github在我们应用中的注册信息
    @GetMapping(value = "/user/reg")
    public String registration() {
        ClientRegistration githubRegistration = this.clientRegistrationRepository.findByRegistrationId("github");
        log.info(githubRegistration.toString());
        return githubRegistration.toString();
    }
访问之后会返回 registration 信息,其中包含了 clientId , clientSecret , authorizationGrantType , redirectUri , scopes 等。

查看获取到的AccessToken
    @GetMapping(value = "/user/token")
    public OAuth2AccessToken accessToken(OAuth2AuthenticationToken authentication) {
        OAuth2AuthorizedClient authorizedClient = this.authorizedClientService.loadAuthorizedClient(
                authentication.getAuthorizedClientRegistrationId(), authentication.getName());
        OAuth2AccessToken accessToken = authorizedClient.getAccessToken();
        return accessToken;
    }
请求接口我们可以获取到对应的token信息:
{
    "tokenValue":"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",
    "issuedAt":"2023-02-08T06:05:05.107Z",
    "expiresAt":"2023-02-08T06:05:06.107Z",
    "tokenType":{
        "value":"Bearer"
    },
    "scopes":[
        "read:user"
    ]
}
通过AccessToken请求Github API
定义抽象 API 绑定类,通过拦截器将获取到的 AccessToken 设置到后续请求头中,通过 RestTemplate 实现对 API 的请求:
资料: 用户 - GitHub 文档
1️⃣ 封装Api Binding 为RestTemplate绑定请求头
/**
 * @Description: 绑定请求头Authorization
 * @Author: Ze WANG
 **/
public abstract class ApiBinding {
    protected RestTemplate restTemplate;

    public ApiBinding(String accessToken) {
        this.restTemplate = new RestTemplate();
        if (accessToken != null) {
            this.restTemplate.getInterceptors().add(getBearerTokenInterceptor(accessToken));
        } else {
            this.restTemplate.getInterceptors().add(getNoTokenInterceptor());
        }
    }

    private ClientHttpRequestInterceptor getBearerTokenInterceptor(String accessToken) {
        return new ClientHttpRequestInterceptor() {
            @Override
            public ClientHttpResponse intercept(HttpRequest request, byte[] bytes, ClientHttpRequestExecution execution) throws IOException {
                request.getHeaders().add("Authorization", "Bearer " + accessToken);
                return execution.execute(request, bytes);
            }
        };
    }

    private ClientHttpRequestInterceptor getNoTokenInterceptor() {
        return new ClientHttpRequestInterceptor() {
            @Override
            public ClientHttpResponse intercept(HttpRequest request, byte[] bytes, ClientHttpRequestExecution execution) throws IOException {
                throw new IllegalStateException("Can't access the Github API without an access token");
            }
        };
    }
}
/**
 * @Description: Github请求
 * @Author: Ze WANG
 **/
public class Github extends ApiBinding {
    private static final String BASE_URL = "https://api.github.com";

    public Github(String accessToken) {
        super(accessToken);
    }
    public String getProfile() {
        return restTemplate.getForObject(BASE_URL + "/user", String.class);
    }
}
2️⃣ 封装获取accessToken的过程
/**
 * @Description: 封装获取accessToken的过程
 * @Author: Ze WANG
 **/
@Configuration
@Slf4j
public class SocialConfig {
    @Bean
    @RequestScope
    public Github github(OAuth2AuthorizedClientService clientService) {
        Authentication authentication = SecurityContextHolder.getContext().getAuthentication();
        String accessToken = null;
        if (authentication.getClass().isAssignableFrom(OAuth2AuthenticationToken.class)) {
            OAuth2AuthenticationToken oauthToken = (OAuth2AuthenticationToken) authentication;
            String clientRegistrationId = oauthToken.getAuthorizedClientRegistrationId();
            if (clientRegistrationId.equals("github")) {
                OAuth2AuthorizedClient client = clientService.loadAuthorizedClient(clientRegistrationId, oauthToken.getName());
                if (client != null) {
                    accessToken = client.getAccessToken().getTokenValue();
                }
                log.info(accessToken);
            }
        }
        return new Github(accessToken);
    }
}
3️⃣ Controller
@GetMapping(value = "/user/info")
public String info() {
    String profile = github.getProfile();
    log.info(github.getProfile());
    return profile;
}
4️⃣ 测试请求

OAuth2.0 授权码实例
上一章节我们仅仅是模拟了第三方应用如何通过OAuth2.0来实现Github的授权登录,这一章节,我们能将通过一个完整的Demo来梳理OAuth2.0的授权码模式。
在这个案例中,主要包括如下服务:
- 第三方应用
- 授权服务器
- 资源服务器
- 用户
| 项目 | 端口 | 备注 |
|---|---|---|
| auth-server | 8081 | 授权服务器 |
| user-server | 8082 | 资源服务器 |
| client-app | 8083 | 第三方应用 |
搭建授权服务器
    <dependencies>
        <dependency>
            <groupId>org.springframework.cloudgroupId>
            <artifactId>spring-cloud-starter-oauth2artifactId>
            <version>2.2.5.RELEASEversion>
        dependency>
        <dependency>
            <groupId>org.springframework.cloudgroupId>
            <artifactId>spring-cloud-starter-securityartifactId>
            <version>2.2.5.RELEASEversion>
        dependency>

        <dependency>
            <groupId>org.springframework.bootgroupId>
            <artifactId>spring-boot-starter-webartifactId>
        dependency>

        <dependency>
            <groupId>org.springframework.bootgroupId>
            <artifactId>spring-boot-starter-testartifactId>
            <scope>testscope>
        dependency>
        <dependency>
            <groupId>org.springframework.securitygroupId>
            <artifactId>spring-security-testartifactId>
            <scope>testscope>
        dependency>
    dependencies>
1️⃣ 首先配置SpringSecurity的基础配置:这段配置的目的,实际上就是配置用户。
/**
 * @Description: SpringSecurity的基本配置
 * @Author: Ze WANG
 **/
@Configuration
public class SecurityConfig extends WebSecurityConfigurerAdapter {
    @Bean
    PasswordEncoder passwordEncoder() {
        return new BCryptPasswordEncoder();
    }

    /**
     * 创建两个用户绑定角色
     */
    @Override
    protected void configure(AuthenticationManagerBuilder auth) throws Exception {
        auth.inMemoryAuthentication()
                .withUser("admin")
                .password(new BCryptPasswordEncoder().encode("123"))
                .roles("admin")
                .and()
                .withUser("wangze")
                .password(new BCryptPasswordEncoder().encode("123"))
                .roles("user");
    }

    /**
     * 配置表单登录
     */
    @Override
    protected void configure(HttpSecurity http) throws Exception {
        http.csrf().disable().formLogin();
    }
}
2️⃣ 配置授权服务器
首先我们提供了一个 TokenStore 的实例,这个是指你生成的 Token 要往哪里存储,我们可以存在 Redis 中,也可以存在内存中,也可以结合 JWT 等等,这里,我们就先把它存在内存中,所以提供一个 InMemoryTokenStore 的实例即可。
/**
 * @Description: Token存储位置
 * @Author: Ze WANG
 **/
@Configuration
public class AccessTokenConfig {
    @Bean
    TokenStore tokenStore() {
        return new InMemoryTokenStore();
    }
}
/**
 * @Description: 授权服务
 * @Author: Ze WANG
 **/
//@EnableAuthorizationServer 注解,表示开启授权服务器的自动化配置。
@EnableAuthorizationServer
@Configuration
public class AuthorizationServer extends AuthorizationServerConfigurerAdapter {
    @Autowired
    TokenStore tokenStore;
    @Autowired
    ClientDetailsService clientDetailsService;

    /**
     * 主要用来配置 Token 的一些基本信息,例如 Token 是否支持刷新、Token 的存储位置、Token 的有效期以及刷新 Token 的有效期等等。
     */
    @Bean
    AuthorizationServerTokenServices tokenServices() {
        DefaultTokenServices services = new DefaultTokenServices();
        //设置客户端详细信息服务
        services.setClientDetailsService(clientDetailsService);
        //设置支持刷新令牌
        services.setSupportRefreshToken(true);
        //设置支持刷新令牌
        services.setTokenStore(tokenStore);
        //设置访问令牌有效期秒数
        services.setAccessTokenValiditySeconds(60 * 60 * 2);
        //设置刷新令牌有效期秒数
        services.setRefreshTokenValiditySeconds(60 * 60 * 24 * 3);
        return services;
    }


    /**
     * 用来配置令牌端点的安全约束,也就是这个端点谁能访问,谁不能访问。
     */
    @Override
    public void configure(AuthorizationServerSecurityConfigurer security) throws Exception {
        security.checkTokenAccess("permitAll()")
                .allowFormAuthenticationForClients();
    }

    /**
     * 第三方应用(客户端)详细信息服务配置,此处类似与github上注册应用
     */
    @Override
    public void configure(ClientDetailsServiceConfigurer clients) throws Exception {
        clients.inMemory()
                .withClient("wz-app")
                .secret(new BCryptPasswordEncoder().encode("123"))
                .resourceIds("res1")
                .authorizedGrantTypes("authorization_code","refresh_token")
                .scopes("all")
                .redirectUris("http://localhost:8083/index.html");
    }

    /**
     * 用来配置令牌的访问端点和令牌服务
     */
    @Override
    public void configure(AuthorizationServerEndpointsConfigurer endpoints) throws Exception {
        //authorizationCodeServices用来配置授权码(Code)的存储,这里我们是存在在内存中
        endpoints.authorizationCodeServices(authorizationCodeServices())
                //tokenServices 用来配置令牌的存储,即 access_token 的存储位置,这里我们也先存储在内存中
                .tokenServices(tokenServices());
    }
    @Bean
    AuthorizationCodeServices authorizationCodeServices() {
        return new InMemoryAuthorizationCodeServices();
    }
}
搭建资源服务器
/**
 * @Description: 资源服务器配置
 * @Author: Ze WANG
 **/
@Configuration
@EnableResourceServer
public class ResourceServerConfig extends ResourceServerConfigurerAdapter {

    /**
     * RemoteTokenServices 中我们配置了 access_token 的校验地址、client_id、client_secret 这三个信息,
     */
    @Bean
    RemoteTokenServices tokenServices() {
        RemoteTokenServices services = new RemoteTokenServices();
        //Spring Security 默认校验地址
        services.setCheckTokenEndpointUrl("http://localhost:8081/oauth/check_token");
        services.setClientId("wz-app");
        services.setClientSecret("123");
        return services;
    }

    /**
     * 当用户来资源服务器请求资源时,会携带上一个 access_token,通过这里的配置,就能够校验出 token 是否正确等。
     */
    @Override
    public void configure(ResourceServerSecurityConfigurer resources) throws Exception {
        resources.resourceId("res1").tokenServices(tokenServices());
    }

    /**
     * 配置一下资源的拦截规则,admin的资源需要有admin的权限
     */
    @Override
    public void configure(HttpSecurity http) throws Exception {
        http.authorizeRequests()
                .antMatchers("/admin/**").hasRole("admin")
                .anyRequest().authenticated();
    }
}
资源:
/**
 * @Description: 测试接口
 * @Author: Ze WANG
 **/
@RestController
public class ResController {

    @GetMapping("/res")
    public String hello() {
        return "====普通资源====";
    }
    @GetMapping("/admin/res")
    public String admin() {
        return "====admin资源====";
    }
}
第三方应用搭建
为了简单的演示,此处使用Thymeleaf来写少量简单的前端代码:在resources/template目录下,创建index.html
DOCTYPE html>
<html lang="en" xmlns:th="http://www.thymeleaf.org">
<head>
  <meta charset="UTF-8">
  <title>wz-apptitle>
head>
<body>
<h1>Hello!  WZ-APPh1>

<hr>
登录:
<a href="http://localhost:8081/oauth/authorize?client_id=wz-app&response_type=code&scope=all&redirect_uri=http://localhost:8083/index.html">第三方登录a>
<br>
<h3 th:text="${token}">h3>
<h1 th:text="${res}">h1>


body>
html>
然后提供一个测试Controller:
@Controller
public class HelloController {

    @Autowired
    private RestTemplate restTemplate;

    @GetMapping("/index.html")
    public String hello(String code, Model model) {
        if (code != null) {
            MultiValueMap<String, String> map = new LinkedMultiValueMap<>();
            map.add("code", code);
            map.add("client_id", "wz-app");
            map.add("client_secret", "123");
            map.add("redirect_uri", "http://localhost:8083/index.html");
            map.add("grant_type", "authorization_code");
            //获取令牌
            Map<String,String> resp = restTemplate.postForObject("http://localhost:8081/oauth/token", map, Map.class);
            String access_token = resp.get("access_token");

            //请求资源
            System.out.println("令牌: "+access_token);
            HttpHeaders headers = new HttpHeaders();
            headers.add("Authorization", "Bearer " + access_token);
            HttpEntity<Object> httpEntity = new HttpEntity<>(headers);
            ResponseEntity<String> entity = restTemplate.exchange("http://localhost:8082/admin/res", HttpMethod.GET, httpEntity, String.class);
            model.addAttribute("token","令牌:"+access_token);
            model.addAttribute("res", "资源"+entity.getBody());
        }
        return "index";
    }
}
下面我们先分析一下预期的流程,然后再来测试看是否符合预期:

下面通过测试来走一遍流程:
首先进入第三方应用首页:

点击第三方登录:通过admin账号 登录

授权:

授权后我们可以看到会url上会带有code,并且获得了令牌和资源:

这里仅仅是一个简单的例子,为了方便熟悉OAuth2.0的授权码模式全流程。access_token通常会通过一个定时任务来维护,不需要每次请求页面都去获取,定期更新即可。
案例分析与优化
通过上边的例子,我们发现我们大部分的存储都是在内存中做的。我们可以从以下几个方面进行简单的优化:
- 令牌的存储位置
- 客户端信息入库
- 第三方应用优化
令牌的存储位置
在我们配置授权码的时候,将授权码和令牌都存储在了内存中,我们可以看看TokenStroe的类图:

InMemoryTokenStore,这是我们之前使用的,也是系统默认的,就是将 access_token 存到内存中,单机应用这个没有问题,但是在分布式环境下不推荐。JdbcTokenStore,看名字就知道,这种方式令牌会被保存到数据中,这样就可以方便的和其他应用共享令牌信息。JwtTokenStore,这个其实不是存储,因为使用了 jwt 之后,在生成的 jwt 中就有用户的所有信息,服务端不需要保存,这也是无状态登录。RedisTokenStore,这个很明显就是将 access_token 存到 redis 中。JwkTokenStore,将 access_token 保存到 JSON Web Key。
虽然这里支持的方案比较多,但是我们常用的实际上主要是两个,RedisTokenStore 和 JwtTokenStore
客户端信息存储
客户端也就是第三方app的信息,之前我们也是直接写在内存中,同样我们可以通过ClientDetailsService的类图发现其提供的存储方法:
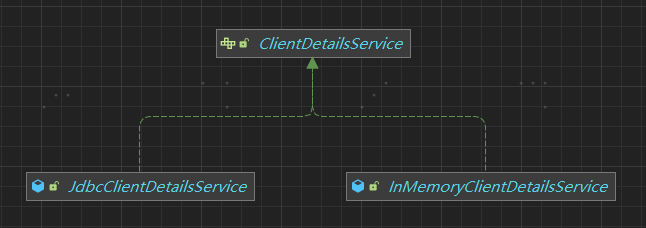
除了内存的方式,只有额外数据库的存储的方式,通过源码可以分析出数据库的结构:
DROP TABLE IF EXISTS `oauth_client_details`;
CREATE TABLE `oauth_client_details` (
  `client_id` varchar(48) NOT NULL,
  `resource_ids` varchar(256) DEFAULT NULL,
  `client_secret` varchar(256) DEFAULT NULL,
  `scope` varchar(256) DEFAULT NULL,
  `authorized_grant_types` varchar(256) DEFAULT NULL,
  `web_server_redirect_uri` varchar(256) DEFAULT NULL,
  `authorities` varchar(256) DEFAULT NULL,
  `access_token_validity` int(11) DEFAULT NULL,
  `refresh_token_validity` int(11) DEFAULT NULL,
  `additional_information` varchar(4096) DEFAULT NULL,
  `autoapprove` varchar(256) DEFAULT NULL,
  PRIMARY KEY (`client_id`)
) ENGINE=InnoDB DEFAULT CHARSET=utf8;
第三方应用优化
我们上面分析了,demo中的令牌不能自动续期,我们可以通过一个TokenTask来管理Token:
    @GetMapping("/index.html")
    public String res(String code, Model model) {
        model.addAttribute("res", tokenTask.getData(code));
        return "index";
    }
@Component
@Slf4j
public class TokenTask {
    @Autowired
    RestTemplate restTemplate;
    public String access_token = "";
    public String refresh_token = "";

    public String getData(String code) {
        if ("".equals(access_token) && code != null) {
            MultiValueMap<String, String> map = new LinkedMultiValueMap<>();
            map.add("code", code);
            map.add("client_id", "wz-app");
            map.add("client_secret", "123");
            map.add("redirect_uri", "http://localhost:8083/index.html");
            map.add("grant_type", "authorization_code");
            Map<String, String> resp = restTemplate.postForObject("http://localhost:8081/oauth/token", map, Map.class);
            access_token = resp.get("access_token");
            refresh_token = resp.get("refresh_token");
            return loadDataFromResServer();
        } else {
            return loadDataFromResServer();
        }
    }

    private String loadDataFromResServer() {
        try {
            HttpHeaders headers = new HttpHeaders();
            headers.add("Authorization", "Bearer " + access_token);
            HttpEntity<Object> httpEntity = new HttpEntity<>(headers);
            ResponseEntity<String> entity = restTemplate.exchange("http://localhost:8082/admin/res", HttpMethod.GET, httpEntity, String.class);
            log.info("资源数据为=={}",entity.getBody());
            return entity.getBody();
        } catch (RestClientException e) {
            return "未加载";
        }
    }

    @Scheduled(cron = "0 55 0/1 * * ?")
    public void tokenTask() {
        MultiValueMap<String, String> map = new LinkedMultiValueMap<>();
        map.add("client_id", "wz-app");
        map.add("client_secret", "123");
        map.add("refresh_token", refresh_token);
        map.add("grant_type", "refresh_token");
        Map<String, String> resp = restTemplate.postForObject("http://localhost:8081/oauth/token", map, Map.class);
        log.debug("定时任务获取的data=={}",resp);
        access_token = resp.get("access_token");
        refresh_token = resp.get("refresh_token");
    }
}
OAuth2.0 单点登录实例
单点登录是我们在分布式系统中很常见的一个需求。
分布式系统由多个不同的子系统组成,而我们在使用系统的时候,只需要登录一次即可,这样其他系统都认为用户已经登录了,不用再去登录。
下面的例子通过 Spring Boot+OAuth2 做单点登录,利用 @EnableOAuth2Sso 注解快速实现单点登录功能。
我们要实现单点登录,需要我们再提供多个客户端,并且当这个客户端登录成功后,其它客户端不需要再登录。
认证与资源服务依旧采用上个例子中的服务。我们再来开发两个客户端来实现单点登录的效果。
| 项目 | 端口 | 备注 |
|---|---|---|
| auth-res-server | 8086 | 鉴权与资源中心 |
| client1 | 8084 | 第三方应用client1 |
| client2 | 8085 | 第三方应用client2 |
认证与资源中心配置
这里为了简便,采用认证与资源使用一个服务的方式。
依赖:
        <dependency>
            <groupId>org.springframework.cloudgroupId>
            <artifactId>spring-cloud-starter-oauth2artifactId>
            <version>2.2.5.RELEASEversion>
        dependency>
        <dependency>
            <groupId>org.springframework.cloudgroupId>
            <artifactId>spring-cloud-starter-securityartifactId>
            <version>2.2.5.RELEASEversion>
        dependency>
项目创建成功之后,这个模块由于要扮演授权服务器+资源服务器的角色,所以我们先在这个项目的启动类上添加 @EnableResourceServer 注解,表示这是一个资源服务器:
@SpringBootApplication
@EnableResourceServer
public class AuthResServerApplication {

    public static void main(String[] args) {
        SpringApplication.run(AuthResServerApplication.class, args);
    }

}
接下来我们进行授权服务器的配置,由于资源服务器和授权服务器合并在一起,因此授权服务器的配置要省事很多:
@Configuration
@EnableAuthorizationServer
public class AuthServerConfig extends AuthorizationServerConfigurerAdapter {
    @Autowired
    PasswordEncoder passwordEncoder;

    @Override
    public void configure(ClientDetailsServiceConfigurer clients) throws Exception {
        clients.inMemory()
                .withClient("sso")
                .secret(passwordEncoder.encode("123"))
                .autoApprove(true)//自动授权
                .redirectUris("http://localhost:8084/login", "http://localhost:8085/login")
                .scopes("user")
                .accessTokenValiditySeconds(7200)
                .authorizedGrantTypes("authorization_code");

    }
}
接下来我们再来配置 Spring Security:
@Configuration
@Order(1)
public class SecurityConfig extends WebSecurityConfigurerAdapter {
    @Bean
    PasswordEncoder passwordEncoder() {
        return new BCryptPasswordEncoder();
    }
    @Override
    public void configure(WebSecurity web) throws Exception {
        web.ignoring().antMatchers("/login.html", "/css/**", "/js/**", "/images/**");
    }

    @Override
    protected void configure(HttpSecurity http) throws Exception {
        http.requestMatchers()
                .antMatchers("/login")
                .antMatchers("/oauth/authorize")
                .and()
                .authorizeRequests().anyRequest().authenticated()
                .and()
                .formLogin()
                .loginPage("/login.html") //自定义的一个登录页面
                .loginProcessingUrl("/login")
                .permitAll()
                .and()
                .csrf().disable();
    }

    @Override
    protected void configure(AuthenticationManagerBuilder auth) throws Exception {
        auth.inMemoryAuthentication()
                .withUser("wz")
                .password(passwordEncoder().encode("123"))
                .roles("admin");
    }
}
添加一个暴露用户信息的资源接口:
 @GetMapping("/user")
    public Principal getCurrentUser(Principal principal) {
        return principal;
    }
客户端服务创建
我们需要创建两个客户端,名字分别为
client1和client2。都添加Spring Security + Oauth2的依赖。
        <dependency>
            <groupId>org.springframework.cloudgroupId>
            <artifactId>spring-cloud-starter-oauth2artifactId>
            <version>2.2.5.RELEASEversion>
        dependency>
        <dependency>
            <groupId>org.springframework.cloudgroupId>
            <artifactId>spring-cloud-starter-securityartifactId>
            <version>2.2.5.RELEASEversion>
        dependency>
然后我们配置以下客户端的Spring Security:
/**
 * @Description: SecurityConfig,client中的所有接口都需要认证之后才能访问
 * @Author: Ze WANG
 **/
@Configuration
@EnableOAuth2Sso //开启单点登录的功能
public class SecurityConfig extends WebSecurityConfigurerAdapter {
    @Override
    protected void configure(HttpSecurity http) throws Exception {
        http.authorizeRequests().anyRequest().authenticated().and().csrf().disable();
    }
}
提供测试接口:
/**
 * @Description: UserController,返回当前登录的用户的姓名和角色信息
 * @Author: Ze WANG
 **/
@RestController
public class UserController {
    @GetMapping("/user")
    public String user() {
        Authentication authentication = SecurityContextHolder.getContext().getAuthentication();
        return authentication.getName() + Arrays.toString(authentication.getAuthorities().toArray());
    }
}
配置OAuth2的相关信息:
# client-secret
security.oauth2.client.client-secret=123
# client-id
security.oauth2.client.client-id=sso
# get user authorize
security.oauth2.client.user-authorization-uri=http://localhost:8086/oauth/authorize
# get token
security.oauth2.client.access-token-uri=http://localhost:8086/oauth/token
# user info
security.oauth2.resource.user-info-uri=http://localhost:8086/user

#port
server.port=8084

#cookie-name
server.servlet.session.cookie.name=client1_cookie
单点登录测试
-
直接访问
client1的/user接口,会要求我们登录,重定向到client1的/login,由于我们配置了@EnableOAuth2Sso所以这个操作会被拦截下来,根据我们的配置自动发起请求去获取授权码。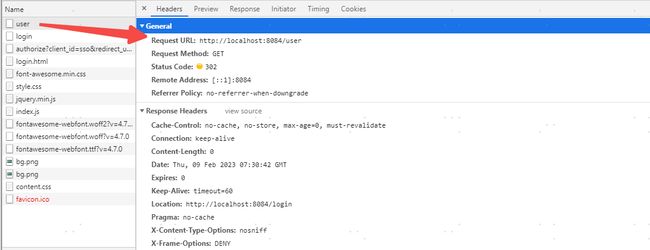
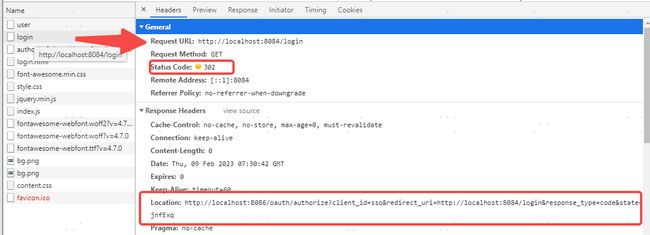
-
跳转到鉴权中心的
/oauth/authorize,需要先登录,登录之后,授权,授权后获得授权码。

-
获取到授权码之后,这个时候会重定向到我们 client1 的 login 页面,但是实际上我们的 client1 其实是没有登录页面的,所以这个操作依然会被拦截,此时拦截到的地址包含有授权码,拿着授权码,在
OAuth2ClientAuthenticationProcessingFilter类中向鉴权中心发起请求,就能拿到 access_token 了。 -
拿到
access_token之后,接下来在向我们配置的user-info-uri地址发送请求,获取登录用户信息。
-
这时候在请求client2的
/user接口,不需要手动再次登录。
github地址:Oauth2-sso-demo
参考:
[1].OAuth 2.0 的一个简单解释 - 阮一峰的网络日志 (ruanyifeng.com)
[2].OAuth 2.0 的四种方式 - 阮一峰的网络日志 (ruanyifeng.com)