JupyterLab 插件开发教程
简介
JupyterLab是 Jupyter 项目的下一代基于Web的应用,用于交互开发和展示数据科学项目,写python的算法开发者们用的多。
notebook 将代码及其输出集成到单个文档中,该文档结合了可视化、叙述性文本、数学公式和其他富媒体。它是一个单独的文档,您可以在其中运行代码、显示输出,还可以添加解释、公式、图表,并使您的工作更加透明、可理解、可重复和可共享。
现在基本使用最新的JupyterLab了,内含notebook的功能,单独的notebook只是一个单独的编辑页面,JupyterLab有资源管理,插件等增强的功能。
前提条件
- 编程基础,前端开发者 或 python开发者 上手会更快
- nodejs开发环境
- python开发环境
- anaconda(推荐,安装了这个内置了好几百个库,包括Jupyter Notebook 和 JupyterLab,我是用这个的)
知识基础
Widget
Widget 可以理解为所有组件的父类,如果要自定义一个视图或者按钮,包括项目中的一些视图按钮等,都是继承这个类,有一些公用的方法。比如可以通过 widget.children() 返回子节点,同样是 Widget 类型。
import { Widget } from '@lumino/widgets';
Widget trackers
通常,扩展需要与其他扩展创建的文档和活动交互。例如,扩展可能想要将一些文本注入到笔记本单元格中,或设置自定义快捷键映射,或关闭特定类型的所有文档。这样的操作通常是由widget trackers完成的。扩展模块在WidgetTracker中跟踪其活动的实例,然后将其作为token提供,以便其他扩展模块可以请求它们。比如INotebookTracker ,就可以跟踪notebook的操作,增删等。
Layout 布局
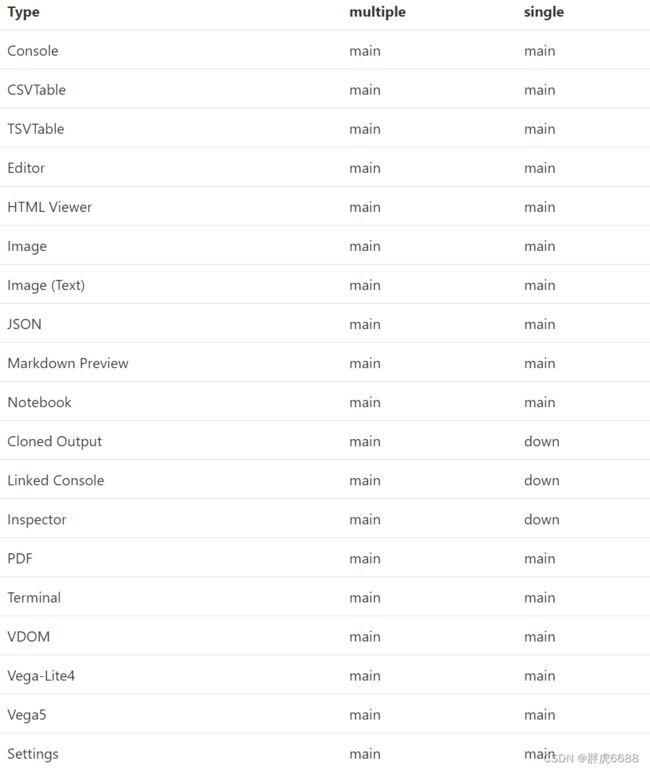
JupyterLab 有两种模式,单文档模式(single)和多文档(multiple)模式,所有的widgets被放到4个区域,就是 left(左边侧边栏)、right(右边侧边栏)、main(主工作区)、down区域,可以通过基于widgets类型的设置来覆盖widgets的默认位置,在JupyterLab Shell设置。下边是所有的功能(widgets)所在的区域。

commands
可以理解为命令,就是一些封装好的功能,在某个场景触发,然后执行某些操作,比较右键执行某个操作,或者在菜单点击,实现某个操作。比如新建一个tab页,打开terminal等。
palette
可使用快捷键盘 ctrl + shift + c 打开,或者菜单 view => active command palette 打开,就是一堆commands的集合。
setting 界面和功能的设置
jupyterlab的 widget 的设置,包含菜单、toolbar等,都可以三种方式设置。
方法1 :菜单-> setting-> Advanced Settings Editor,点击右上角的JSON Settings Editor,可以用户直接修改json的方式来配置界面项目的新增、修改、删除等。
方法2 :开发者定义,定义schema,在插件项目里,新增 schema/plugin.json,在json文件里定义,可以在代码中的 settingRegistry.schema 拿到配置。
方法3 : 开发者定义,在代码里定义。
kernel(内核)
在Jupyter体系结构中,内核是由服务器启动的单独进程,这些进程在不同的编程语言和环境中运行代码。JupyterLab能够将任何打开的文本文件连接到代码控制台和内核,可以轻松地在内核中交互地运行文本文件中的代码。
toolbars(重要)
同样可使用3种方式来设置,第一种比较简单。可以定制toolbar的地方有,具体设置字段可以在setting菜单中查看详细字段
Cell: Cell Toolbar -> toolbar
CSV Viewer: CSV Viewer -> toolbar
File Browser: File Browser Widget -> toolbar
HTML Viewer: HTML Viewer -> toolbar
Notebook panel: Notebook Panel -> toolbar
Text Editor: Text Editor -> toolbar
TSV Viewer: TSV Viewer -> toolbar
下边为在插件中定位的json数据/schema/plugin.json, 设置 disabled 是 true 就是隐藏
  "jupyter.lab.toolbars": {
    "Notebook": [
      { "name": "save", "rank": 10},
      { "name": "insert", "command": "notebook:insert-cell-below", "rank": 20, "disabled": true},
      { "name": "cut", "command": "notebook:cut-cell", "rank": 21, "disabled": true },
      { "name": "copy", "command": "notebook:copy-cell", "rank": 22,"disabled": true  },
      { "name": "paste", "command": "notebook:paste-cell-below", "rank": 23,"disabled": true  },
      { "name": "run", "command": "runmenu:run", "rank": 30 },
      { "name": "interrupt", "command": "kernelmenu:interrupt", "rank": 31 },
      { "name": "restart", "command": "kernelmenu:restart", "rank": 32 },
      { "name": "restart-and-run", "command": "notebook:restart-run-all", "rank": 33},
      { "name": "cellType", "rank": 40 },
      { "name": "spacer", "type": "spacer", "rank": 100 },
      { "name": "kernelName", "rank": 1000 },
      { "name": "kernelStatus", "rank": 1001 }
    ]
  },
jupyterlab的数据管理
应用程序目录:JupyterLab存储JupyterLab的主构建以及相关数据,包括构建到JupyterLab中的扩展。
用户设置目录:JupyterLab存储JupyterLab扩展的用户级别设置的目录。
工作区目录:JupyterLab存储工作区的位置
通过 jupyter lab path 命令可以得到3个路径的值。

JupyterLab还支持来自Jupyter路径层次结构中Jupyter配置目录的LabConfig子目录中的配置数据的LabConfig目录。
此外,JupyterLab可以从Jupyter数据目录的LabExtensions子目录加载动态联合(预构建)扩展,即绑定其依赖项的扩展。
插件
JupyterLab插件是JupyterLab中可扩展性的基本单位。JupyterLab支持几种类型的插件:
应用程序插件:应用程序插件是JupyterLab功能的基本构建块。应用程序插件通过需要由其他插件提供的服务来与JupyterLab和其他插件交互,并可选地向系统提供它们自己的服务。核心JupyterLab中的应用程序插件包括主菜单系统、文件浏览器以及笔记本、控制台和文件编辑器组件。
MIME渲染器插件:MIME呈现器插件是扩展JupyterLab以在笔记本和文件中定制渲染MIME数据的简化、受限的方式。这些插件在加载时会被JupyterLab自动转换为等价的应用程序插件。核心JupyterLab中的MIME渲染器插件的例子有pdf查看器、JSON查看器和Vega查看器。
主题插件:主题插件提供了一种定制JupyterLab外观的方法,方法是更改可主题值(即,css变量值),并向JupyterLab提供额外的字体和图形。JupyterLab带有明暗主题插件。
插件开发流程
-
创建环境
conda create -n jupyterlab-ext --override-channels --strict-channel-priority -c conda-forge -c nodefaults jupyterlab=3 cookiecutter nodejs jupyter-packaging git -
激活环境
conda activate jupyterlab-ext -
生成项目
cookiecutter https://github.com/jupyterlab/extension-cookiecutter-ts -
安装依赖 前端安装好之后
pip install -ve . // 运行以下命令来安装初始项目依赖项,并将扩展安装到JupyterLab环境中。 // 上面的命令将扩展的前端部分复制到JupyterLab中。我们可以在每次进行更改时再次运行此pip安装命令,以将更改复制到JupyterLab中。 // 或者直接链接过去 jupyter labextension develop --overwrite . -
运行JupyterLab
jupyter lab // 注意,在哪个目录运行,就会加载哪个目录的文件

jupyter lab --notebook-dir=D:/myapp // 指定目录启动
对前端来说,jlpm 是JupyterLab内置的类似yarn的东西。
写完代码后,要生效,就立马运行npm run build,当然可以运行 watch 命令。 -
发布开发的插件
-
也可以跟着原文链接来
功能1 - 添加一个 command
import {
  JupyterFrontEnd,
  JupyterFrontEndPlugin,
} from '@jupyterlab/application';
import { ICommandPalette } from '@jupyterlab/apputils';
import { Widget } from '@lumino/widgets';

const extension: JupyterFrontEndPlugin<void> = {
  id: 'widgets-example',
  autoStart: true,
  requires: [ICommandPalette],
  activate: (app: JupyterFrontEnd, palette: ICommandPalette) => {
    const { commands, shell } = app;
    const command = 'widgets:open-tab';
    // 使用command打开一个tab页
    commands.addCommand(command, {
      label: 'Open a Tab Widget',
      caption: 'Open the Widgets Example Tab',
      execute: () => {
        const widget = new ExampleWidget();
        shell.add(widget, 'main');
      },
    });
    palette.addItem({ command, category: 'Extension Examples' });
  },
};

export default extension;

class ExampleWidget extends Widget {
  constructor() {
    super();
    this.addClass('jp-example-view');
    this.id = 'simple-widget-example';
    // tab页的标题
    this.title.label = 'Widget Example View';
    this.title.closable = true;
  }
}
功能2 - 增加菜单
- 在package.json里,增加 schemaDir字段,指向我们定义的设置目录
  "jupyterlab": {
    "extension": true,
    "outputDir": "jupyterlab_examples_main_menu/labextension",
    "schemaDir": "schema"
  }
- 项目新建schema目录(如果没有),新建 plugin.json,增加内容,通过id识别是新建菜单,还是用原来的菜单,如果是在 文件下 增加 id 就是
jp-mainmenu-file,详情内容看官网
{
  "title": "Main Menu Example",
  "description": "Main Menu Example settings.",
  "jupyter.lab.menus": {
    "main": [
      {
        "id": "jp-mainmenu-example-menu",
        "label": "Main Menu Example",
        "rank": 80,
        "items": [
          {
            "command": "jlab-examples:main-menu",
            "args": {
              "origin": "from the menu"
            }
          }
        ]
      }
    ]
  },
  "additionalProperties": false,
  "type": "object"
}
- 配置 command
import {
  JupyterFrontEnd,
  JupyterFrontEndPlugin,
} from '@jupyterlab/application';

import { ICommandPalette } from '@jupyterlab/apputils';

const extension: JupyterFrontEndPlugin<void> = {
  id: 'main-menu',
  autoStart: true,
  requires: [ICommandPalette],
  activate: (app: JupyterFrontEnd, palette: ICommandPalette) => {
    const { commands } = app;

    const command = 'jlab-examples:main-menu';
    commands.addCommand(command, {
      label: 'Execute jlab-examples:main-menu Command',
      caption: 'Execute jlab-examples:main-menu Command',
      execute: (args: any) => {
        console.log(
          `jlab-examples:main-menu has been called ${args['origin']}.`
        );
        window.alert(
          `jlab-examples:main-menu has been called ${args['origin']}.`
        );
      },
    });

    const category = 'Extension Examples';
    palette.addItem({
      command,
      category,
      args: { origin: 'from the palette' },
    });
  },
};

export default extension;
功能3 - 增加tab,左右中间

import { Widget} from '@lumino/widgets';

class ExampleWidget extends Widget {
  constructor() {
    super();
    this.addClass('jp-example-view');
    this.id = 'simple-widget-example';
    this.title.label = 'halo';
    this.title.closable = true;
  }
}

// 往右边增加内容
const widget = new ExampleWidget();
app.shell.add(widget, 'right');
功能4 - 使用react
首先,自行安装好 react ,如下然后就可以当做正常widget使用了
import React from "react"
import { ReactWidget} from '@jupyterlab/apputils';
class MyComponent extends React.Component {

  click = (): void => {
    console.log(1111)
  }

  render(): React.ReactNode {
    return (
      <div>
        <button onClick={this.click}>hello</button>
      </div>
    )
  }
}

const myWidget: Widget = ReactWidget.create(<MyComponent />);
功能5 - 添加一个类似插件的效果,左边增加tab和内容
import { LabIcon } from "@jupyterlab/ui-components";
// 某段svg的代码
const pySvg =""
const pyIcon = new LabIcon({
  name: "py",
  svgstr: pySvg
});

// 定义这个要添加的组件
class ExampleWidget extends Widget {
  constructor() {
    super();
    this.addClass('jp-example-view');
    this.id = 'simple-widget-example';
    this.title.label = '';
    // 定义图标
    this.title.icon = pyIcon;
    this.title.caption = 'Python';
    this.title.closable = true;
    this.node.textContent = "this is tab content"
  }
}

const plugin: JupyterFrontEndPlugin<void> = {
  id: 'cybercube:plugin',
  autoStart: true,
  activate: (app: JupyterFrontEnd) => {
    console.log('JupyterLab extension cybercube is activated!');
    const widget: any = new ExampleWidget();
    app.shell.add(widget, 'left');
  }
};
功能6 - 在notebook上边的头部,就是一排操作按钮下,增加一个自定义的header
import { IDisposable, DisposableDelegate } from '@lumino/disposable';

import { Widget } from '@lumino/widgets';

import {
  JupyterFrontEnd,
  JupyterFrontEndPlugin
} from '@jupyterlab/application';

import {
  DocumentRegistry
} from '@jupyterlab/docregistry';

import { NotebookPanel, INotebookModel } from '@jupyterlab/notebook';

const plugin: JupyterFrontEndPlugin<void> = {
  activate,
  id: 'my-extension-name:widgetPlugin',
  autoStart: true
};

export class WidgetExtension  implements DocumentRegistry.IWidgetExtension<NotebookPanel, INotebookModel>{
  createNew(
    panel: NotebookPanel,
    context: DocumentRegistry.IContext<INotebookModel>
  ): IDisposable {
    const widget = new Widget({ node: Private.createNode() });
    widget.addClass('jp-myextension-myheader');
    panel.contentHeader.insertWidget(0, widget);
    return new DisposableDelegate(() => {
      widget.dispose();
    });
  }
}

function activate(app: JupyterFrontEnd): void {
  app.docRegistry.addWidgetExtension('Notebook', new WidgetExtension());
}
export default plugin;

namespace Private {
  export function createNode(): HTMLElement {
    const span = document.createElement('span');
    span.textContent = 'My custom header';
    return span;
  }
}
css的样式
.jp-myextension-myheader {
  min-height: 20px;
  background-color: lightsalmon;
}
功能7 - 在启动页,增加一个入口功能
import {JupyterFrontEnd,JupyterFrontEndPlugin,} from '@jupyterlab/application';
import { MainAreaWidget } from '@jupyterlab/apputils';
import { ILauncher } from '@jupyterlab/launcher';
import { reactIcon } from '@jupyterlab/ui-components';
import { ReactWidget } from "@jupyterlab/apputils";
import React, { useState } from "react";
namespace CommandIDs {
  export const create = 'create-react-widget';
}
const CounterComponent = (): JSX.Element => {
  const [counter, setCounter] = useState(0);

  return (
    <div>
      <p>You clicked {counter} times!</p>
      <button
        onClick={(): void => {
          setCounter(counter + 1);
        }}
      >
        Increment
      </button>
    </div>
  );
};

class CounterWidget extends ReactWidget {
  constructor() {
    super();
    this.addClass("jp-ReactWidget");
  }
  render(): JSX.Element {
    return <CounterComponent />;
  }
}


const extension: JupyterFrontEndPlugin<void> = {
  id: 'react-widget',
  autoStart: true,
  optional: [ILauncher],
  activate: (app: JupyterFrontEnd, launcher: ILauncher) => {
    const { commands } = app;
    const command = CommandIDs.create;
    commands.addCommand(command, {
      caption: 'Create a new React Widget',
      label: 'React Widget',
      // @ts-ignore
      icon: (args) => (args['isPalette'] ? null : reactIcon),
      execute: () => {
        const content = new CounterWidget();
        const widget = new MainAreaWidget<CounterWidget>({ content });
        widget.title.label = 'React Widget';
        widget.title.icon = reactIcon;
        app.shell.add(widget, 'main');
      },
    });
    if (launcher) {
      launcher.add({
        command,
      });
    }
  },
};
export default extension;
功能8 - 启动某个功能(比如左边栏或者右边栏的功能)
// 通过组件功能的id来启动即可
const plugin: JupyterFrontEndPlugin<void> = {
  id: 'demo:plugin',
  autoStart: true,
  requires: [ILayoutRestorer],
  activate: (
    app: JupyterFrontEnd,
    restorer: ILayoutRestorer,
  ) => {
    app.shell.activateById("widget-model-info-libs");
  }
};
常用各个组件库、基本的使用方法、注释
import React from "react"
import {
ILayoutRestorer,
JupyterFrontEnd,
JupyterFrontEndPlugin,
ILabStatus
// IConnectionLost,
// IInfo
// IRouter
} from '@jupyterlab/application';
import { Widget} from '@lumino/widgets';
// import { requestAPI } from './handler';
import {
ICommandPalette,
ISplashScreen,
IThemeManager,
IToolbarWidgetRegistry,
MainAreaWidget,
WidgetTracker,
ReactWidget
} from '@jupyterlab/apputils';
import {IDocumentManager} from "@jupyterlab/docmanager"
// @jupyterlab/filebrowser已废弃,更新为@jupyterlab/docmanager
import {IFileBrowserFactory} from "@jupyterlab/filebrowser"
import {IEditorTracker} from "@jupyterlab/fileeditor"
import {IHTMLViewerTracker} from "@jupyterlab/htmlviewer"
import {ILauncher} from "@jupyterlab/launcher"
import {IMainMenu} from "@jupyterlab/mainmenu"
import {ISettingEditorTracker} from "@jupyterlab/settingeditor"
import {ISettingRegistry} from "@jupyterlab/settingregistry"
import {IStateDB} from "@jupyterlab/statedb"
import {IStatusBar} from "@jupyterlab/statusbar"
import {ITerminalTracker} from "@jupyterlab/terminal"
import {ITooltipManager} from "@jupyterlab/tooltip"
import {INotebookTools, INotebookTracker, INotebookWidgetFactory} from "@jupyterlab/notebook"
interface APODResponse {
copyright: string;
date: string;
explanation: string;
media_type: 'video' | 'image';
title: string;
url: string;
}
/**
* Initialization data for the cybercube extension.
*/
const plugin: JupyterFrontEndPlugin<void> = {
id: 'cybercube:plugin',
autoStart: true,
requires: [
ICommandPalette,
ISplashScreen,
IThemeManager,
IToolbarWidgetRegistry,
IDocumentManager,
IFileBrowserFactory,
IEditorTracker,
IHTMLViewerTracker,
ILauncher,
IMainMenu,
INotebookTools,
INotebookTracker,
INotebookWidgetFactory,
ISettingEditorTracker,
ISettingRegistry,
IStateDB,
IStatusBar,
ITerminalTracker,
ITooltipManager,
ILabStatus
],
optional: [ILayoutRestorer],
activate
};
export default plugin;
// @ts-ignore
// @ts-ignore
function activate(
app: JupyterFrontEnd,
palette: ICommandPalette,
splashScreen: ISplashScreen,
themeManager: IThemeManager,
// 工具栏小部件的注册表,如果要从数据定义(例如存储在设置中)动态生成工具栏,则需要此选项
toolbarWidgetRegistry: IToolbarWidgetRegistry,
// 操作文件系统,文件增删
documentManager: IDocumentManager,
// 可以自定义文件浏览器
fileBrowserFactory: IFileBrowserFactory,
// 如果希望能够循环访问由应用程序创建的文件编辑器并与之交互,请使用此选项
editorTracker: IEditorTracker,
// 处理HTML documents的交互
htmlViewerTracker: IHTMLViewerTracker,
// 添加东西到launcher
launcher: ILauncher,
mainMenu: IMainMenu,
// 在右侧边栏中notebook工具面板的服务。使用此选项可将您自己的功能添加到面板。
notebookTools: INotebookTools,
// 一种用于notebook的部件跟踪器。如果您希望能够循环访问应用程序创建的notebook并与之交互,请使用此选项。
notebookTracker: INotebookTracker,
// @ts-ignore 可以自行创建notebook
notebookWidgetFactory: INotebookWidgetFactory,
// 处理编辑器设置
settingEditorTracker:ISettingEditorTracker,
// jupyterlab 设置系统,可以存储应用的存储设置
settingRegistry: ISettingRegistry,
// jupyterlab的状态数据库
stateDB: IStateDB,
// 状态栏的操作
statusBar: IStatusBar,
// 控制台的操作
terminalTracker: ITerminalTracker,
tooltipManager: ITooltipManager,
labStatus: ILabStatus,
restorer: ILayoutRestorer | null
) {
console.log('JupyterLab extension jupyterlab_apod is activated!');
// Declare a widget variable
let widget: any;
// console.log(app);
// console.log(splashScreen);
// console.log(themeManager);
// splashScreen.show(true)
// toolbarWidgetRegistry.createWidget
// console.log(documentManager)
/**
* @title 添加普通节点到 文件浏览器 toolbar
*/
// const t = fileBrowserFactory.defaultBrowser.toolbar;
// const w: any = new Widget();
// w.node.textContent = "haha"
// t.addItem("haha", w);
/**
* @title 添加react节点到 文件浏览器 toolbar
*/
// const t = fileBrowserFactory.defaultBrowser.toolbar;
// class MyComponent extends React.Component {
// click = (): void => {
// console.log(1111)
// }
// render(): React.ReactNode {
// return (
//
//
//
// )
// }
// }
// // @ts-ignore
// const myWidget: Widget = ReactWidget.create(相关链接
- How to Use Jupyter Notebook: A Beginner’s Tutorial
- 开发者指南
- jupyter-notebook 官网
- Jupyter Notebook介绍、安装及使用教程
- Anaconda介绍、安装及使用教程
- anaconda官网
- 插件生成 extension-cookiecutter-ts
- JupyterLab API Documentation
- 扩展例子包
- lumino
- conda-forge
- 技术论坛 Jupyter Discourse Forum
- 全部扩展开发接口文档