Java前端Vue-9(Vue多表案例)
1.准备数据
1 数据库
在表中创建表:
# 创建分类表 t_category , 主键,主表(1表)
CREATE TABLE t_category(
  cid INT PRIMARY KEY AUTO_INCREMENT,
  cname VARCHAR(50)
);
# 创建书籍表 t_book , 外键,从表(多表)
CREATE TABLE t_book(
  bid INT PRIMARY KEY AUTO_INCREMENT,
  title VARCHAR(50),
  price DOUBLE(6,2),	#9999.99
  category_id INT 	#外键
);

# 使用主外键约束,描述一对多关系
ALTER TABLE t_book ADD CONSTRAINT FOREIGN KEY(category_id) REFERENCES t_category (cid);

# 插入若干条书籍
INSERT INTO t_category(cid,cname) VALUES(1,'小说');
INSERT INTO t_category(cid,cname) VALUES(2,'玄幻');
INSERT INTO t_category(cid,cname) VALUES(3,'人物传记');
INSERT INTO t_book(bid,title,price,category_id) VALUES(1,'坏蛋是怎么练成的',99.9,1);
INSERT INTO t_book(bid,title,price,category_id) VALUES(2,'武将是怎么练成的',99.9,1);
INSERT INTO t_book(bid,title,price,category_id) VALUES(3,'斗破苍穹',99.9,2);
INSERT INTO t_book(bid,title,price,category_id) VALUES(4,'凡人修仙传',99.9,2);
INSERT INTO t_book(bid,title,price,category_id) VALUES(5,'仙逆',99.9,2);
INSERT INTO t_book(bid,title,price,category_id) VALUES(6,'了不起的张焰烽',99.9,3);
INSERT INTO t_book(bid,title,price,category_id) VALUES(7,'田企锐那些年',99.9,3);
INSERT INTO t_book(bid,title,price,category_id) VALUES(8,'谢明安幸福生活III',99.9,3);
2 后端:环境搭建
1 创建项目
- 步骤一:使用Spring脚手架创建maven项目
2 项目配置
- 修改pom.xml文件,添加依赖
<?xml version="1.0" encoding="UTF-8"?>
<project xmlns="http://maven.apache.org/POM/4.0.0" xmlns:xsi="http://www.w3.org/2001/XMLSchema-instance"
         xsi:schemaLocation="http://maven.apache.org/POM/4.0.0 https://maven.apache.org/xsd/maven-4.0.0.xsd">
    <modelVersion>4.0.0</modelVersion>
    <parent>
        <groupId>org.springframework.boot</groupId>
        <artifactId>spring-boot-starter-parent</artifactId>
        <version>2.2.0.RELEASE</version>
        <relativePath/> <!-- lookup parent from repository -->
    </parent>
    <groupId>com.czxy</groupId>
    <artifactId>book_project</artifactId>
    <version>0.0.1-SNAPSHOT</version>
    <name>book_project</name>


    <!-- 统一版本维护 -->
    <properties>
        <project.build.sourceEncoding>UTF-8</project.build.sourceEncoding>
        <project.reporting.outputEncoding>UTF-8</project.reporting.outputEncoding>
        <java.version>1.8</java.version>
        <mybatis.starter.version>1.3.2</mybatis.starter.version>
        <mapper.starter.version>2.0.2</mapper.starter.version>
        <mysql.version>5.1.32</mysql.version>
        <pageHelper.starter.version>1.2.5</pageHelper.starter.version>
        <durid.starter.version>1.1.10</durid.starter.version>
    </properties>

    <dependencies>
        <!-- SpringBoot整合SpringMVC的启动器 -->
        <dependency>
            <groupId>org.springframework.boot</groupId>
            <artifactId>spring-boot-starter-web</artifactId>
        </dependency>
        <!-- SpringBoot整合jdbc和事务的启动器 -->
        <dependency>
            <groupId>org.springframework.boot</groupId>
            <artifactId>spring-boot-starter-jdbc</artifactId>
        </dependency>
        <!-- mybatis启动器 -->
        <dependency>
            <groupId>org.mybatis.spring.boot</groupId>
            <artifactId>mybatis-spring-boot-starter</artifactId>
            <version>${mybatis.starter.version}</version>
        </dependency>
        <!-- 通用Mapper启动器 -->
        <dependency>
            <groupId>tk.mybatis</groupId>
            <artifactId>mapper-spring-boot-starter</artifactId>
            <version>${mapper.starter.version}</version>
        </dependency>
        <!-- 分页助手启动器 -->
        <dependency>
            <groupId>com.github.pagehelper</groupId>
            <artifactId>pagehelper-spring-boot-starter</artifactId>
            <version>${pageHelper.starter.version}</version>
        </dependency>
        <!-- mysql驱动 -->
        <dependency>
            <groupId>mysql</groupId>
            <artifactId>mysql-connector-java</artifactId>
            <version>${mysql.version}</version>
        </dependency>
        <!-- Druid连接池 -->
        <dependency>
            <groupId>com.alibaba</groupId>
            <artifactId>druid-spring-boot-starter</artifactId>
            <version>${durid.starter.version}</version>
        </dependency>

    </dependencies>
</project>
- 创建 application.properties文件,配置数据库
#Tomcat
server.port=8090
#DB configuration
spring.datasource.driverClassName=com.mysql.jdbc.Driver
spring.datasource.url=jdbc:mysql://127.0.0.1:3306/vue2?useUnicode=true&characterEncoding=utf8
spring.datasource.username=root
spring.datasource.password=root
#druid
spring.datasource.driver-class-name=com.mysql.jdbc.Driver
spring.datasource.druid.initial-size=1
spring.datasource.druid.min-idle=1
spring.datasource.druid.max-active=20
spring.datasource.druid.test-on-borrow=true
spring.datasource.druid.stat-view-servlet.allow=true
3 工具类
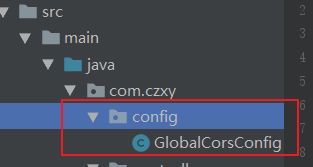
package com.czxy.config;

import org.springframework.context.annotation.Bean;
import org.springframework.context.annotation.Configuration;
import org.springframework.web.cors.CorsConfiguration;
import org.springframework.web.cors.UrlBasedCorsConfigurationSource;
import org.springframework.web.filter.CorsFilter;


/**  全局跨域配置类
 */
@Configuration
public class GlobalCorsConfig {
    @Bean
    public CorsFilter corsFilter() {
        //1.添加CORS配置信息
        CorsConfiguration config = new CorsConfiguration();
        //放行哪些原始域
        config.addAllowedOrigin("http://localhost:8090");
        //是否发送Cookie信息
        config.setAllowCredentials(true);
        //放行哪些原始域(请求方式)
        config.addAllowedMethod("OPTIONS");
        config.addAllowedMethod("HEAD");
        config.addAllowedMethod("GET");     //get
        config.addAllowedMethod("PUT");     //put
        config.addAllowedMethod("POST");    //post
        config.addAllowedMethod("DELETE");  //delete
        config.addAllowedMethod("PATCH");
        config.addAllowedHeader("*");

        //2.添加映射路径
        UrlBasedCorsConfigurationSource configSource = new UrlBasedCorsConfigurationSource();
        configSource.registerCorsConfiguration("/**", config);

        //3.返回新的CorsFilter.
        return new CorsFilter(configSource);
    }
}
3 分类模块:基本架构
- 创建 Category:
@Table(name="t_category")
public class Category {
    @Id
    private Integer cid;
    private String cname;

    private List<Book> list;
- 创建CategoryMapper
package com.czxy.mapper;

import com.czxy.domain.Category;
import org.apache.ibatis.annotations.Many;
import org.apache.ibatis.annotations.Result;
import org.apache.ibatis.annotations.Results;
import org.apache.ibatis.annotations.Select;
import tk.mybatis.mapper.common.Mapper;

import java.util.List;

@org.apache.ibatis.annotations.Mapper
public interface CategoryMapper extends Mapper<Category> {

}
- 步骤三:创建CategoryService
package com.czxy.service;

import com.czxy.domain.Category;
import com.czxy.mapper.CategoryMapper;
import org.springframework.stereotype.Service;
import org.springframework.transaction.annotation.Transactional;
import javax.annotation.Resource;
import java.util.List;

@Service
@Transactional
public class CategoryService {

    @Resource
    CategoryMapper categoryMapper;

}
- 创建 CategoryController
package com.czxy.controller;

import com.czxy.domain.Category;
import com.czxy.service.CategoryService;
import org.springframework.http.HttpStatus;
import org.springframework.http.ResponseEntity;
import org.springframework.web.bind.annotation.*;
import javax.annotation.Resource;
import java.util.List;

@RestController
@RequestMapping("/category")
public class CategoryController {

    @Resource
    CategoryService categoryService;

    }
}
4 书籍模块:基本架构
- 创建 Book
package com.czxy.domain;

import javax.persistence.Column;
import javax.persistence.Id;
import javax.persistence.Table;

@Table(name="t_book")
public class Book {
    @Id
    private Integer bid;
    private String title;
    private Double price;
    @Column(name="category_id")
    private Integer categoryId;

	private Category category;
- 创建 BookMapper
package com.czxy.mapper;

import com.czxy.domain.Book;
import org.apache.ibatis.annotations.Param;
import org.apache.ibatis.annotations.Select;
import tk.mybatis.mapper.common.Mapper;
import java.util.List;

@org.apache.ibatis.annotations.Mapper
public interface BookMapper extends Mapper<Book> {

}
- 创建 BookService
package com.czxy.service;

import com.czxy.domain.Book;
import com.czxy.mapper.BookMapper;
import com.czxy.mapper.CategoryMapper;
import org.springframework.stereotype.Service;
import org.springframework.transaction.annotation.Transactional;
import javax.annotation.Resource;
import java.util.List;

@Service
@Transactional
public class BookService {

    @Resource
    BookMapper bookMapper;

}
- 创建 BookController
package com.czxy.controller;

import com.czxy.service.BookService;
import org.springframework.web.bind.annotation.*;
import javax.annotation.Resource;

@RestController
@RequestMapping("/book")
public class BookController {

    @Resource
    private BookService bookService;

}
5 前端:环境搭建
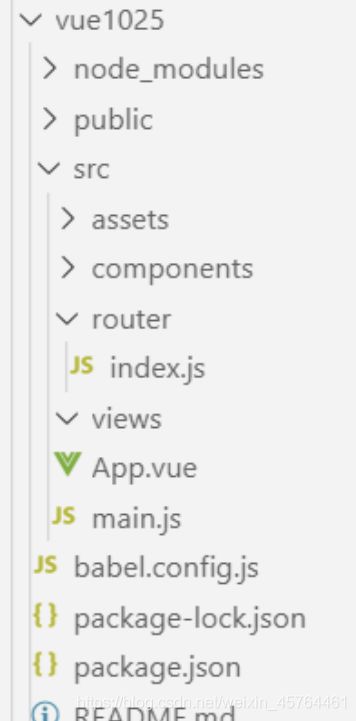
1 构建项目
- 创建项目
vue create vue1025
2 布局
修改App.vue文件,完成页面布局
<template>
<div id="app">
<router-link to="/categoryList">分类管理</router-link>
<router-link to="/bookList">书籍管理</router-link>
<hr/>
<!-- 组件显示位置 -->
<router-view/>
</div>
</template>
2 分类模块
1 查询所有
后端
- 步骤一:修改 CategoryService
package com.czxy.service;

import com.czxy.domain.Category;
import com.czxy.mapper.CategoryMapper;
import org.springframework.stereotype.Service;
import org.springframework.transaction.annotation.Transactional;
import javax.annotation.Resource;
import java.util.List;

@Service
@Transactional
public class CategoryService {

    @Resource
    CategoryMapper categoryMapper;

    public List<Category> findAll(){
        return categoryMapper.selectAll();
    }

}
- 步骤二:修改 CategoryController
package com.czxy.controller;

import com.czxy.domain.Category;
import com.czxy.service.CategoryService;
import org.springframework.http.HttpStatus;
import org.springframework.http.ResponseEntity;
import org.springframework.web.bind.annotation.*;
import javax.annotation.Resource;
import java.util.List;

@RestController
@RequestMapping("/category")
public class CategoryController {

    @Resource
    CategoryService categoryService;

    /**
     * 查询所有
     * @return
     */
    @GetMapping
    private ResponseEntity<List<Category>> findAll(){
        List<Category> categoryList = categoryService.findAll();
        return ResponseEntity.ok(categoryList);
    }

}
前端
- 前提:安装axios
npm install axios
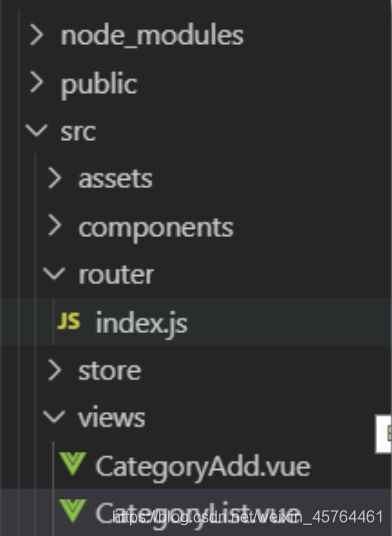
const routes = [
  {
    path: '/categoryList',
    component: () => import('../views/CategoryList.vue')
  }
]
- 步骤三:修改CategoryList.vue,页面加载成功,发送ajax查询所有分类
script>
import axios from 'axios'
axios.defaults.baseURL = "http://localhost:8080"

export default {
  data() {
    return {
      categorys:[]
    }
  },
  created() {
    axios.get("/category").then(res => {
      this.categorys = res.data
    })
  },
}
</script>
<style scoped>

</style>
- 步骤四:修改CategoryList.vue,data区域存放数据,展示数据
<template>
  <div>
    <table border="1">
      <tr>
        <th>编号</th>
        <th>分类名字</th>
        <th>操作</th>
      </tr>
      <tr v-for="(category,index) in categorys" :key="index">
        <td>{{category.cid}}</td>
        <td>{{category.cname}}</td>
        <td>
          新增
          修改
          删除
        </td>
      </tr>
    </table>
  </div>
</template>
2 添加分类
后端
- 步骤一:修改CategoryService,添加save方法
public void addCategory(Category category){
    categoryMapper.insert(category);
}
- 步骤二:修改CategoryController,添加save方法
@PostMapping
public ResponseEntity<Void> addCategory(@RequestBody Category category){
    categoryService.addCategory(category);
    return new ResponseEntity<Void>(HttpStatus.OK);
}
前端
- 步骤一:修改CategoryList.vue页面,添加“新增”按钮
<template>
  <div>
    <table border="1">
      <tr>
        <th>编号</th>
        <th>分类名字</th>
        <th>操作</th>
      </tr>
      <tr v-for="(category,index) in categorys" :key="index">
        <td>{{category.cid}}</td>
        <td>{{category.cname}}</td>
        <td>
          <router-link to="/categoryAdd">新增</router-link>
          修改
          删除
        </td>
      </tr>
    </table>
  </div>
</template>
{
    path: '/categoryAdd',
    name: 'categoryAdd',

    component: () => import('../views/CategoryAdd.vue')
  }
- 步骤四:修改CategoryAdd.vue页面,提供表单,并绑定对象
<template>
  <div>
    <table>
      <tr>
        <td>分类名字</td>
        <td><input type="text" v-model="category.cname"></td>
      </tr>
      <tr>
        <td colspan="2"><input type="button" value="新增" ></td>
      </tr>
    </table>
  </div>
</template>
<script>
import axios from 'axios'
axios.defaults.baseURL = "http://localhost:8080"
export default {
  data() {
    return {
      category:{}
    }
  }
}
</script>
<style scoped>

</style>
- 步骤五:修改CategoryAdd.vue页面,点击“添加”按钮发送ajax请求
<template>
  <div>
    <table>
      <tr>
        <td>分类名字</td>
        <td><input type="text" v-model="category.cname"></td>
      </tr>
      <tr>
        <td colspan="2"><input type="button" value="新增" @click="categoryAdd()"></td>
      </tr>
    </table>
  </div>
</template>
<script>
import axios from 'axios'
axios.defaults.baseURL = "http://localhost:8080"
export default {
  data() {
    return {
      category:{}
    }
  },
  methods: {
    categoryAdd(){
      axios.post("/category",this.category).then(res => {
        alert("新增成功")
        this.$router.push("/categoryList")
      })
    }
  },
}
</script>
<style scoped>

</style>
3 修改分类
后端
- 步骤一:修改CategoryService,添加update方法
    public Category categoryById(Integer id){
        return categoryMapper.selectByPrimaryKey(id);
    }

    public void updateCategory(Category category){
        categoryMapper.selectByPrimaryKey(category);
    }
- 步骤二:修改CategoryController,添加update方法
@GetMapping("/{cid}")
    public ResponseEntity<Category> findById(@PathVariable("cid") Integer cid){
        Category category = categoryService.findById(cid);
        return ResponseEntity.ok(category);
    }

    @PutMapping
    public ResponseEntity<String> update(@RequestBody Category category){
        categoryService.update(category);
        return ResponseEntity.ok("更新成功");
    }
前端
- 步骤一:修改CategoryList.vue页面,给“修改”添加路径
<router-link :to="'/categoryUpdate/' + category.cid">修改</router-link>
{
    path: '/categoryUpdate/:cid',
    component: () => import('../views/CategoryUpdate.vue')
  }
- 步骤四:修改CategoryUpdate.vue 文件,页面加载成功后,查询详情
<template>
  <div>
      <table border="1">
          <tr>
              <td>分类名称</td>
              <td><input type="text" v-model="category.cname"></td>
          </tr>
          <tr>
              <td></td>
              <td><input type="button" value="更新"></td>
          </tr>
      </table>
  </div>
</template>

<script>
// 1.1 导入axios组件
import axios from 'axios'
// 1.2 设置基本路径
axios.defaults.baseURL='http://localhost:8080'
export default {
    data() {
        return {
            category: {}
        }
    },
    created() {
        let cid = this.$route.params.cid
        axios.get('/category/' + cid).then( response => {
            this.category = response.data
            console.info(response.data)
        })
    },
}
</script>
<style>
</style>
- 步骤五:修改CategoryUpdate.vue 文件,完成更新操作
<template>
  <div>
      <table border="1">
          <tr>
              <td>分类名称</td>
              <td><input type="text" v-model="category.cname"></td>
          </tr>
          <tr>
              <td></td>
              <td><input type="button" value="更新" @click="categoryUpdate"></td>
          </tr>
      </table>
  </div>
</template>

<script>
// 1.1 导入axios组件
import axios from 'axios'
// 1.2 设置基本路径
axios.defaults.baseURL='http://localhost:8080'
export default {
    data() {
        return {
            category: {}
        }
    },
    methods: {
        categoryUpdate(){
            // 1.3 发送ajax
            axios.put('/category', this.category).then( response => {
                alert(response.data)
                this.$router.push('/categoryList')
            }).catch( error => {
                console.info(error)
            })
        }
    },
    created() {
        let cid = this.$route.params.cid
        axios.get('/category/' + cid).then( response => {
            this.category = response.data
            console.info(response.data)
        })
    },
}
</script>
<style>
</style>
4 删除分类
后端
- 步骤一:修改CategoryService
 public void  deleteCategory(Integer id){
        categoryMapper.deleteByPrimaryKey(id);
    }
- 步骤二:修改CategoryController,添加delete方法
	/**
     * 删除数据
     * @param id
     * @return
     */
    @DeleteMapping("{id}")
    public ResponseEntity<Void> deleteCategory(@PathVariable Integer id){
        categoryService.deleteCategory(id);
        return new ResponseEntity<>(HttpStatus.OK);
    }
前端
- 步骤一:修改CategoryList.vue,编写categoryDelete完成删除操作
<template>
  <div>
    <table border="1">
      <tr>
        <td>编号</td>
        <td>类名</td>
        <td>操作</td>
      </tr>
      <tr v-for="(category,index) in categorys" :key="index">
        <td>{{category.cid}}</td>
        <td>{{category.cname}}</td>
        <td>
          <router-link to="/categoryAdd">新增</router-link> |
          <router-link :to="'/categoryUpdate/'+category.cid">修改</router-link> |
          <a href="#" @click.prevent="deleteCategory(category.cid)">删除</a>
        </td>
      </tr>
    </table>
  </div>
</template>
<script>
import axios from 'axios';
axios.defaults.baseURL="http://localhost:8090"
export default {
  data(){
    return{
      categorys:[]
    }
  },
  created(){
      this.findAll()
  },
  methods:{
    findAll(){
      axios.get("/category").then(res=>{
      this.categorys=res.data
      })
    },
    deleteCategory(cid){
      axios.delete("/category/"+cid).then(res=>{
        alert("删除成功")
        this.findAll()
      })
    },
  }
}
</script>
<style scoped>

</style>
3 书籍管理
1 查询所有书籍
后端
- 查询所有的书籍,同时查询每一本书籍对应的分类信息。
- 步骤三:修改BookService,调用方法
package com.czxy.service;

import com.czxy.domain.Book;
import com.czxy.mapper.BookMapper;
import com.czxy.mapper.CategoryMapper;
import org.springframework.stereotype.Service;
import org.springframework.transaction.annotation.Transactional;
import javax.annotation.Resource;
import java.util.List;

@Service
@Transactional
public class BookService {

    @Resource
    BookMapper bookMapper;

    @Resource
    CategoryMapper categoryMapper;

    // 写法二:先查出BookList,然后便利booklist,查询分类
    public  List<Book> findAll(){
        // 查出所有图书
        List<Book> bookList = bookMapper.selectAll();
        // 比哪里图书
        for (Book b : bookList) {
            // 根据每本书的分类id查找分类信息,并设置到实体类中
            b.setCategory(categoryMapper.selectByPrimaryKey(b.getCategoryId()));
        }
        return bookList;
    }

}
- 步骤三:修改BookController,实现方法
package com.czxy.controller;

import com.czxy.domain.Book;
import com.czxy.service.BookService;
import org.springframework.http.HttpStatus;
import org.springframework.http.ResponseEntity;
import org.springframework.web.bind.annotation.*;
import javax.annotation.Resource;
import java.util.List;

@RestController
@RequestMapping("/book")
public class BookController {

    @Resource
    BookService bookService;

    @GetMapping
    public ResponseEntity<List<Book>> findAll(){
        List<Book> bookList = bookService.findAll();
        return ResponseEntity.ok(bookList);
    }

}
前端
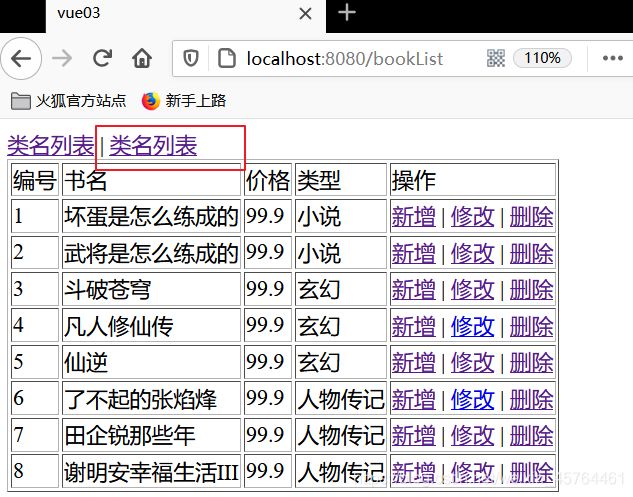
- 步骤一:修改路由,修改router/index.js页面,添加 /booklist 对应的路由信息
{
    path: '/bookList',
    component: () => import('../views/BookList.vue')
  }
<script>
import axios from 'axios'
axios.defaults.baseURL = "http://localhost:8090"
export default {
  data() {
    return {
      books:[]
    }
  },
  created() {
    axios.get("/book").then(res => {
      this.books = res.data
    })
  },
}
</script>
- 步骤四:遍历书籍,显示结果
<template>
  <div>
      <table border="1">
        <tr>
          <th>编号</th>
          <th>书名</th>
          <th>价格</th>
          <th>分类名称</th>
          <th>操作</th>
        </tr>
        <tr v-for="(book,index) in books" :key="index">
          <td>{{book.bid}}</td>
          <td>{{book.title}}</td>
          <td>{{book.price}}</td>
          <td>{{book.category.cname}}</td>
          <td>
            新增
            修改
            删除

          </td>
        </tr>
      </table>
  </div>
</template>
- 完整版:
<template>
  <div>
      <table border="1">
        <tr>
          <th>编号</th>
          <th>书名</th>
          <th>价格</th>
          <th>分类名称</th>
          <th>操作</th>
        </tr>
        <tr v-for="(book,index) in books" :key="index">
          <td>{{book.bid}}</td>
          <td>{{book.title}}</td>
          <td>{{book.price}}</td>
          <td>{{book.category.cname}}</td>
          <td>
            新增
            修改
            删除
          </td>
        </tr>
      </table>
  </div>
</template>
<script>
import axios from 'axios'
axios.defaults.baseURL = "http://localhost:8090"
export default {
  data() {
    return {
      books:[]
    }
  },
  created() {
    axios.get("/book").then(res => {
      this.books = res.data
    })
  },
}
</script>
<style scoped>
</style>
2 添加书籍
后端
- 步骤一:修改BookService,添加save方法
public void addBook(Book book){
    bookMapper.insert(book);
}
- 步骤二:修改BookController类,编写save方法
@PostMapping
public ResponseEntity<Void> addBook(@RequestBody Book book){
    bookService.addBook(book);
    return new ResponseEntity<Void>(HttpStatus.OK);
}
前端
- 步骤一:修改 BookList.vue 组件,添加“添加书籍”连接
<router-link to="/bookAdd">添加书籍</router-link>
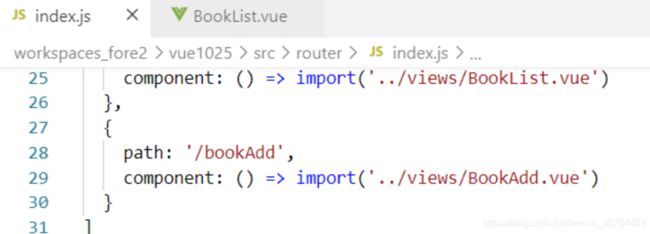
- 步骤二:配置路由,修改router/index.js文件
{
    path: '/bookAdd',
    component: () => import('../views/BookAdd.vue')
  }
<script>
import axios from 'axios'
axios.defaults.baseURL = "http://localhost:8090"
export default {
    data() {
        return {
            book:{},
            categorys:[] // 下拉列表框中的值
        }
    },
    methods: {

    },
    created() {
        axios.get("/category").then(res => {
            this.categorys = res.data
        })
    },
}
</script>
- 步骤五:表单数据绑定
<template>
    <div>
        <table>
            <tr>
                <td>书名</td>
                <td><input type="text" v-model="book.title"></td>
            </tr>
            <tr>
                <td>价格</td>
                <td><input type="text" v-model="book.price"></td>
            </tr>
            <tr>
                <td>分类</td>
                <td>
                   <select v-model="book.categoryId">
                       <option v-for="(category,index) in categorys" :key="index" :value="category.cid">{{category.cname}}</option>
                   </select>
                </td>
            </tr>
            <tr>
                <td colspan="2"><input type="button" value="新增" @click="addUser()"></td>
            </tr>
        </table>
    </div>
</template>
- 步骤6:绑定事件,给“添加”按钮绑定事件,发送ajax进行添加操作
<template>
    <div>
        <table>
            <tr>
                <td>书名</td>
                <td><input type="text" v-model="book.title"></td>
            </tr>
            <tr>
                <td>价格</td>
                <td><input type="text" v-model="book.price"></td>
            </tr>
            <tr>
                <td>分类</td>
                <td>
                   <select v-model="book.categoryId">
                       <option v-for="(category,index) in categorys" :key="index" :value="category.cid">{{category.cname}}</option>
                   </select>
                </td>
            </tr>
            <tr>
                <td colspan="2"><input type="button" value="新增" @click="addUser()"></td>
            </tr>
        </table>
    </div>
</template>
<script>
import axios from 'axios'
axios.defaults.baseURL = "http://localhost:8090"
export default {
    data() {
        return {
            book:{},
            categorys:[] // 下拉列表框中的值
        }
    },
    methods: {
        addUser(){
            axios.post("/book",this.book).then(res =>{
                alert("新增成功")
                this.$router.push("/bookList")
            })
        }
    },
    created() {
        axios.get("/category").then(res => {
            this.categorys = res.data
        })
    },
}
</script>
<style scoped>

</style>
3 修改书籍
后端
- 步骤一:编写BookService,实现findById 和update方法
public Book findById(Integer id){
    return bookMapper.selectByPrimaryKey(id);
}

public void updateBook(Book book){
    bookMapper.updateByPrimaryKey(book);
}
- 步骤三:修改BookController,编写findById和update方法
GetMapping("/{id}")
public ResponseEntity<Book> findById(@PathVariable("id") Integer id){
    Book book = bookService.findById(id);
    return ResponseEntity.ok(book);
}

@PutMapping
public ResponseEntity<Void> updateBook(@RequestBody Book book){
    bookService.updateBook(book);
    return new ResponseEntity<Void>(HttpStatus.OK);
}
前端
-
点击“修改”,跳转到更新页面,页面加载成功查询所有分类和当前书籍,回显所有数据,更改数据,并提交更改后的数据
-
步骤一:修改 BookList.vue 组件,/book/100
<router-link :to="'/bookUpdate/' + book.bid">修改</router-link>
- 步骤二:配置路径,修改router/index.js
{
    path: '/bookUpdate/:bid',
    component: () => import('../views/BookUpdate.vue')
  }
- 步骤三:创建BookUpdate.vue组件,并编写表单
<template>
    <div>
        <table>
            <tr>
                <td>书名</td>
                <td><input type="text" v-model="book.title"></td>
            </tr>
            <tr>
                <td>价格</td>
                <td><input type="text" v-model="book.price"></td>
            </tr>
            <tr>
                <td>分类</td>
                <td>
                   <select v-model="book.categoryId">
                       <option v-for="(category,index) in categorys" :key="index" :value="category.cid">{{category.cname}}</option>
                   </select>
                </td>
            </tr>
            <tr>
                <td colspan="2"><input type="button" value="修改" @click="updateUser()"></td>
            </tr>
        </table>
    </div>
</template>
<script>
import axios from 'axios'
axios.defaults.baseURL = "http://localhost:8090"
export default {
    data() {
        return {
            book:{},
            categorys:[]
        }
    },
    methods: {
        updateUser(){
            axios.put("/book",this.book).then(res => {
                alert("修改成功")
                this.$router.push("/bookList")
            })
        }
    },
    created() {
        //1 获取 图书信息

        // 获取地址栏id
        let bid  = this.$route.params.bid
        axios.get("/book/"+bid).then(res => {
            this.book = res.data
        })
        //2 获取分类信息
        axios.get("/category").then(res =>{
            this.categorys = res.data
        })
    },

}
</script>
<style scoped>

</style>
删除书籍
后端
- 修改BookService,添加delete方法
  public void deleteById(Integer id){
        bookMapper.deleteByPrimaryKey(id);
    }
- 修改BookController,实现delete方法
/**
     * 删除数据
     * @param id
     * @return
     */
    @DeleteMapping("{id}")
    public ResponseEntity<Void> deleteCategory(@PathVariable Integer id){
        categoryService.deleteCategory(id);
        return new ResponseEntity<>(HttpStatus.OK);
    }
前端
创建a标签,写方法
<template>
    <div>
        <table border="1">
            <tr>
                <td>编号</td>
                <td>书名</td>
                <td>价格</td>
                <td>类型</td>
                <td>操作</td>
            </tr>
            <tr v-for="(book,index) in books" :key="index">
                <td>{{book.bid}}</td>
                <td>{{book.title}}</td>
                <td>{{book.price}}</td>
                <td>{{book.category.cname}}</td>
                <td>
                    <router-link to="/bookAdd">新增</router-link> |
                    <router-link :to="'/bookUpdate/'+book.bid">修改</router-link> |
                    <a href="#" @click.prevent="deleteBook(book.bid)">删除</a>
                </td>
            </tr>
        </table>
    </div>
</template>
<script>
import axios from 'axios';
axios.defaults.baseURL="http://localhost:8090"
export default {
    data(){
        return{
            category:{},
            books:[]
        }
    },
    created(){
        this.findAll()
    },
    methods:{
        findAll(){
            axios.get("/book").then(res=>{
                this.books=res.data
            })
        },
        deleteBook(bid){
            axios.delete("/book/"+bid).then(res=>{
                alert("删除成功")
                this.findAll()
            })
        }
    },

}
</script>
<style scoped>

</style>
