01.夜莺监控简介及安装
夜莺监控系统介绍
夜莺监控( Nightingale )是一款国产、开源云原生监控分析系统,采用 All-In-One 的设计,集数据采集、可视化、监控告警、数据分析于一体。于 2020 年 3 月 20 日,在 github 上发布 v1 版本,已累计迭代 60 多个版本。从 v5 版本开始与 Prometheus、VictoriaMetrics、Grafana、Telegraf、Datadog 等生态紧密协同集成,提供开箱即用的企业级监控分析和告警能力,已有众多企业选择将 Prometheus + AlertManager + Grafana 的组合方案升级为使用夜莺监控。夜莺监控,由滴滴开发和开源,并于 2022 年 5 月 11 日,捐赠予中国计算机学会开源发展委员会(CCF ODC),为 CCF ODC 成立后接受捐赠的第一个开源项目。夜莺监控的核心开发团队,也是Open-Falcon项目原核心研发人员。
产品介绍
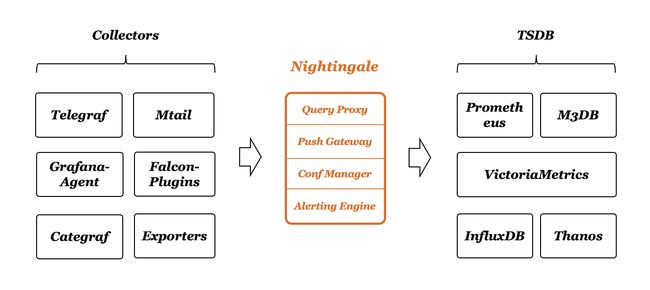
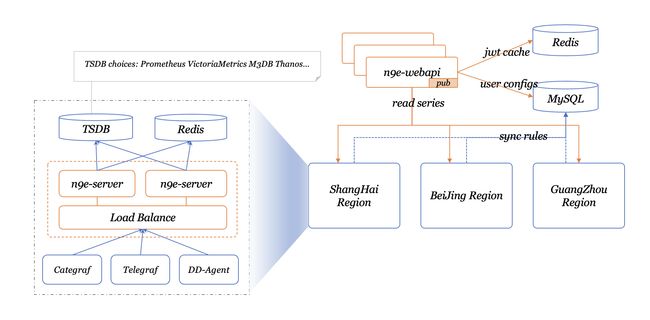
系统架构
安装部署
Server端安装部署架构: Prometheus + MySQL + redis + n9e server + n9e webapi
采集端:categraf
1. 关闭防火墙和安全机制
systemctl stop firewalld.service
systemctl disable firewalld.service
setenforce 0
2. 安装普罗米修斯
#下载普罗米修斯
wget https://s3-gz01.didistatic.com/n9e-pub/prome/prometheus-2.28.0.linux-amd64.tar.gz -O prometheus-2.28.0.linux-amd64.tar.gz
#解压
tar xzvf prometheus-2.28.0.linux-amd64.tar.gz -C /usr/local
#改名
mv /usr/local/prometheus-2.28.0.linux-amd64 /usr/local/prometheus
#prometheus配置成系统服务
cat </etc/systemd/system/prometheus.service
[Unit]
Description="prometheus"
Documentation=https://prometheus.io/
After=network.target

[Service]
Type=simple

ExecStart=/usr/local/prometheus/prometheus  --config.file=/usr/local/prometheus/prometheus.yml --storage.tsdb.path=/usr/local/prometheus/data --web.enable-lifecycle --enable-feature=remote-write-receiver --query.lookback-delta=2m

Restart=on-failure
SuccessExitStatus=0
LimitNOFILE=65536
StandardOutput=syslog
StandardError=syslog
SyslogIdentifier=prometheus


[Install]
WantedBy=multi-user.target
EOF

#重启daemon
systemctl daemon-reload
#prometheus加入开机自启
systemctl enable prometheus
#重启prometheus
systemctl restart prometheus
#查看prometheus状态
systemctl status prometheus
3. 安装MySQL
#下载mysql安装包
wget https://dev.mysql.com/get/Downloads/MySQL-8.0/mysql-8.0.28-1.el7.x86_64.rpm-bundle.tar
#创建MySQL目录
mkdir /usr/local/mysql
#解压MySQL安装包
tar xf mysql-8.0.28-1.el7.x86_64.rpm-bundle.tar -C /usr/local/mysql
#移动到mysql目录
cd /usr/local/mysql/
#RPM方式安装MySQL
rpm -ivh mysql-community-* --force --nodeps
#启动MySQL
systemctl start mysqld
#MySQL加入开启自启
systemctl enable mysqld
#以下三种方法,均可(建议都看一遍)
systemctl status mysqld.service
netstat -anptu |grep mysql
ps -ef |grep mysql
3.1 修改MySQL密码
#启动mysql后会初始化 查找mysql密码
cat /var/log/mysqld.log | grep password
2022-06-23T16:15:31.370137Z 6 [Note] [MY-010454] [Server] A temporary password is generated for root@localhost: Dfo5Dm-!fVZG
#密码为:Dfo5Dm-!fVZG

#由于MySQL8.0 有密码验证组件,若希望设置简单的密码,需要修改服务验证条件
# 密码检查等级,0/LOW、1/MEDIUM、2/STRONG
set global validate_password.policy=0;
# 密码的最短长度
set global validate_password.length=6;
# 密码至少要包含的小写字母个数和大写字母个数
set global validate_password.mixed_case_count=0;
# 设置密码
mysql -uroot -p
ALTER USER 'root'@'localhost' IDENTIFIED BY 'Likun@123';
3.2 也可以直接安装mariadb(MySQL和Mariadb选取一个)
#安装mariadb
yum -y install mariadb*
#mariadb加入开机自启
systemctl enable mariadb
#启动mariadb
systemctl restart mariadb
#修改密码
mysql -e "SET PASSWORD FOR 'root'@'localhost' = PASSWORD('Likun@123');"
4. 安装redis
#环境准备
yum -y install gcc
#创建redis目录
mkdir /usr/local/redis
#下载redis:
wget https://download.redis.io/redis-stable.tar.gz
#解压redis:
tar xf redis-stable.tar.gz -C /usr/local/redis/
#编译
cd /usr/local/redis/redis-stable/
make && make install
#初始化redis
cd /usr/local/redis/redis-stable/utils/
#注释文件中几行内容(不注释会运行报错)
vim install_server.sh
注释如下行
 77# _pid_1_exe="$(readlink -f /proc/1/exe)"
 78 #if [ "${_pid_1_exe##*/}" = systemd ]
 79 #then
 80 #        echo "This systems seems to use systemd."
 81 #        echo "Please take a look at the provided example service unit files in this directory, and adapt and install them. Sorry!"
 82 #       exit 1
 83 #fi
4.1 初始化安装redis
./install_server.sh
会有如下的提示信息,直接默认就好了
Welcome to the redis service installer
This script will help you easily set up a running redis server

Please select the redis port for this instance: [6379]
Selecting default: 6379
Please select the redis config file name [/etc/redis/6379.conf]
Selected default - /etc/redis/6379.conf
Please select the redis log file name [/var/log/redis_6379.log]
Selected default - /var/log/redis_6379.log
Please select the data directory for this instance [/var/lib/redis/6379]
Selected default - /var/lib/redis/6379
Please select the redis executable path [/usr/local/bin/redis-server]
Selected config:
Port           : 6379
Config file    : /etc/redis/6379.conf
Log file       : /var/log/redis_6379.log
Data dir       : /var/lib/redis/6379
Executable     : /usr/local/bin/redis-server
Cli Executable : /usr/local/bin/redis-cli
Is this ok? Then press ENTER to go on or Ctrl-C to abort.
Copied /tmp/6379.conf => /etc/init.d/redis_6379
Installing service...
Successfully added to chkconfig!
Successfully added to runlevels 345!
Starting Redis server...
Installation successful!

#看到 successful! 安装完成
此时,已经默认帮我们启动了redis了,查看下redis的状态,可以看到redis真的已经启动了
#检查进程
ps -ef |grep redis
root      15825      1  0 14:12 ?        00:00:00 /usr/local/bin/redis-server 127.0.0.1:6379
root      15864  10374  0 14:15 pts/0    00:00:00 grep --color=auto redis

#检查端口
netstat -anptu |grep redis
tcp        0      0 127.0.0.1:6379          0.0.0.0:*               LISTEN      15825/redis-server
tcp6       0      0 ::1:6379                :::*                    LISTEN      15825/redis-server
5. 安装夜莺
夜莺的安装包从哪里搞?大家可以自行编译,后端代码在上文提到了,前端代码在:https://github.com/n9e/fe-v5
也提供编译好的二进制,不过只有 linux-amd64 的版本,可以从两个地方下载:
github:https://github.com/ccfos/nightingale/releases
 gitlink:https://www.gitlink.org.cn/ccfos/nightingale/releases
#创建夜莺目录
mkdir  /usr/local/n9e
#解压安装包
tar xzvf n9e-v5.10.0-linux-amd64.tar.gz -C /usr/local/n9e/
#导入数据库
mysql -uroot -pLikun@123< /usr/local/n9e/docker/initsql/a-n9e.sql
#修改server配置文件中MySQL连接密码
vim /usr/local/n9e/etc/server.conf
133 DSN="root:1234@tcp(127.0.0.1:3306)/n9e_v5?charset=utf8mb4&parseTime=True&loc=Local&allowNativePasswords=true"
改为
133 DSN="root:Likun@123@tcp(127.0.0.1:3306)/n9e_v5?charset=utf8mb4&parseTime=True&loc=Local&allowNativePasswords=true"
#修改webapi配置文件中MySQL连接密码
vim /usr/local/n9e/etc/webaip.conf
165 DSN="root:1234@tcp(127.0.0.1:3306)/n9e_v5?charset=utf8mb4&parseTime=True&loc=Local&allowNativePasswords=true"
改为
165 DSN="root:Likun@123@tcp(127.0.0.1:3306)/n9e_v5?charset=utf8mb4&parseTime=True&loc=Local&allowNativePasswords=true"
#启动server
cd /usr/local/n9e/
nohup ./n9e server &> server.log &
#启动webapi
nohup ./n9e webapi &> webapi.log &
如果启动成功,server 默认会监听在 19000 端口,webapi 会监听在 18000 端口,且日志没有报错。此时浏览器请求 18000 端口,就可以体验了
