Java学习笔记:进阶语法
文章目录
-
-
-
- 一、对象内存管理:
-
- ①堆内存:
- ②垃圾回收机制:
- ③栈:
- ④方法区:
- 二、Debug调试:
- 三、API文档:
-
- ①JDK API:
- ②文件注释规范:
- ③导出项目的JavaDoc文档:
- 四、字符串String类:
-
- ①String是不变对象:
- ②修改字符串的性能问题:
- ③String类中的常用函数:
- 五、正则表达式:
-
- ①正则表达式简介:
- ②String类中有关于正则表达式的方法:
- 六、Object:
-
- ①重写toString方法:
- ②重写equal方法:
- 七、包装类:
-
- ①包装类概述:
- ②基本类型转换为包装类:
- ③包装类转换为基本类型:
- ④包装类中的属性:
- ⑤包装类用于字符串到基本类型数据的转换:
- ⑥自动拆装箱:
- 八、File:
-
- ①file创建删除文件:
- ②file创建删除目录:
- 九、FileFilter文件过滤器:
- 十、RandomAccessFile读写文件数据:
-
- ①基本介绍:
- ②写字节操作:
- ③读字节操作:
- ④块读写操作:
- ⑤写字符串操作:
- ⑥读字符串操作:
- ⑦读写基本类型数据:
- 十一、JavaIO:
-
- ①IS与OS:
- ②文件流:
- ③缓冲流:
- ④对象流:
- ⑤序列化相关关键字介绍:
- ⑥字符流Reader和Writer:
- 十二、异常处理机制:
-
- ①基本介绍:
- ②try_catch:
- ③finally:
- ④异常抛出:
- ⑤Exception常用API:
- ⑥自定义异常:
- 未完待续……
-
-
一、对象内存管理:
- 编译好的Java程序需要运行在JVM中。
- 程序,无论是代码还是数据,都需要存储在内存中。JVM为Java程序提供并管理所需要的内存空间。
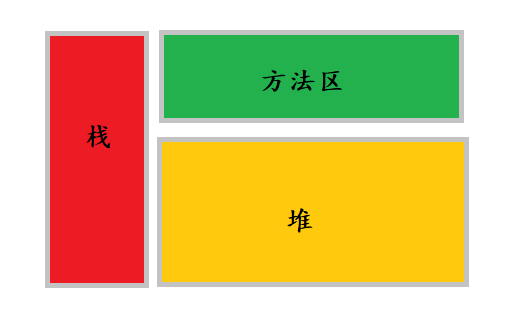
- JVM内存分为“堆”、“栈”和“方法区”三个区域,分别用于存储不同的数据。
①堆内存:
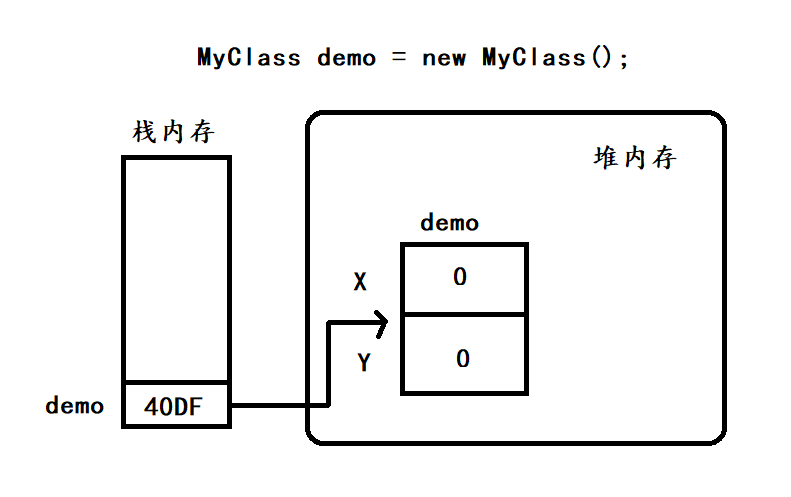
- JVM在其内存空间开辟了一个称为“堆”的存储空间;
- 这部分空间用于存储使用使用new关键字所创建的对象。
- 成员变量的生命周期:
- 访问对象需要依靠引用变量。
- 当一个对象没有任何引用时,会被GC(垃圾回收器)进行回收,该对象中的所有成员变量也随之被回收。
- 成员变量的生命周期为:从对象在堆中创建开始到对象被GC回收结束。
②垃圾回收机制:
-
垃圾回收器(Garbage Collection,简称GC)是JVM自带的一个线程(自动运行着的程序),用于回收没有任何引用指向的对象。
-
Java程序员不用担心内存管理,因为垃圾回收器会自动进行内存回首。
-
Java程序的内存泄漏问题:
- 内存泄漏是指——不再使用的内存没有被及时的回收。严重的内存泄漏会因为过多的内存被占用而导致程序的崩溃。
- GC线程判断对象是否可以回收的依据是该对象是否有引用指向,因此,当确定该对象不再使用时,应该及时将其引用设置为null.
-
System.gc()方法:
- GC的回收对于程序员来说是不可见的,并不一定一发现有无引用的对象就立即回收。
- 一般情况下,当我们需要GC线程即刻回收无用对象时,我们可以调用System.gc()方法。
- System.gc()方法用于建议(不一定执行)虚拟机马上调度GC线程回收资源,具体的实现策略取决于不同的JVM系统。
③栈:
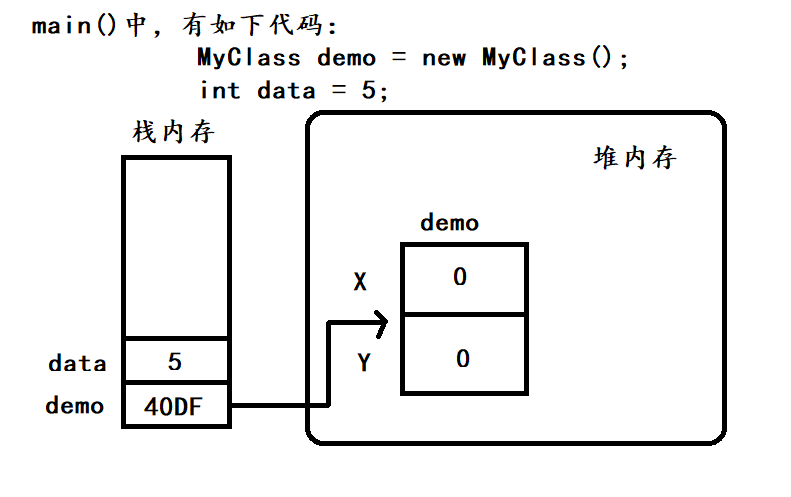
- 栈用于存放方法中声明的所有局部变量。
package MyTest;

public class Test{
    int a;
    public static void main(String[] args) {
        Test t = new Test();
        t.show(2);
    }
    public void show(int b){
        int c;
        System.out.println(a);
        System.out.println(b);
        System.out.println(c);
    }
}
//error:Variable 'c' might not have been initialized
-
分析:一个变量在使用之前必须提前声明并且初始化,对于上面中的实例变量a,会自动初始化为0,所以不用担心;对于变量b,在调用相关函数show时,一定会传入一个参数用于变量b的初始化,所以也不用担心;但是对于变量c来说,仅仅对其进行了声明,并未对其初始化,所以会报错!
-
局部变量的生命周期:
- 一个运行的Java程序从开始到结束会有多次方法的调用。JVM会为每一个方法的调用在栈中分配一个对应的空间,这个空间我们称之为该方法的栈帧。
- 一个栈帧对应一个正在调用中的方法,栈帧中存储了该方法的参数、局部变量等数据。当某一个方法调用完成之后,其对应的栈帧将会被清除,局部变量失效。
-
成员变量与局部变量:
- 局部变量:
- 定义在方法中。
- 没有默认值,必须自己设定初始值。
- 方法被调用时,存在栈中,方法调用结束,从栈中清除。
- 成员变量:
- 定义在类中,方法外。
- 有初始默认值,可以不显式初始化。
- 所有类在被实例化后,存在堆中,对象回收时,成员变量失效。
- 局部变量:
④方法区:
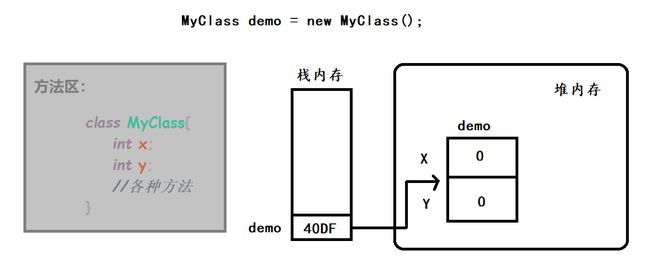
- 方法区用于存放类的信息:
- Java程序运行时,首先会通过类装载器载入类文件的字节码信息,经过解析后将其装入方法区,==类的各种信息(包括方法)==都在方法区中存储。
- 方法只有一份:
- 当类的信息被加载到方法区时,除了类的类型信息之外,同时在类内的方法定义也被加载到方法区。
- 类在实例化对象时,多个对象会拥有各自在堆中的空间,但是所有实例化对象是共用在方法区中的一份方法定义的。
二、Debug调试:
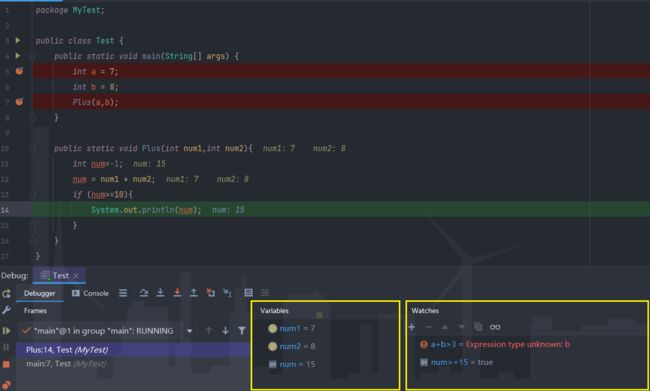
- 主要使用四个按键
| 功能 | Eclipse | Idea |
|---|---|---|
| 单步调试,会进入到方法中。 | F5 | F7 |
| 单步调试,不会进入到方法中。 | F6 | F8 |
| 结束方法的调试,返回。 | F7 | shift+F8 |
| 直接跳到下一个断点,若无断点则调试结束。 | F8 | shift+F8 |
- 主要观看两个窗口:
Variables窗口:用于观看相关变量的值。
Watchers窗口:用于添加相关的逻辑表达式,用于判断真假。
三、API文档:
①JDK API:
-
什么是JDK API?
- JDK中包含大量的API类库,所谓的API(应用程序编程接口)就是一些已写好、可供直接调用的功能(在java中这些功能以类的形式封装)。
- JDK API包含的类库功能强大,经常使用的有:字符串操作、集合操作、文件操作、输入输出操作、网络操作、多线程等。
-
JDK包结构:
-
为了便于使用和维护,JDK类库按照包结构划分,不同功能的类划分在不同的包中。
-
经常使用的包有:
包 功能 java.lang Java程序的基础类,如字符串、多线程等,该包中的类的使用频率非常的高,不需要import,可以直接使用。 java.util 常用工具类,如集合、随机数产生器、日历、时钟等 java.io 文件操作、输入/输出操作 java.net 网络操作 java.math 数学运算相关操作 java.security 安全相关操作 java.sql 数据库访问 java.net 处理文字、日期、数字、信息的格式
-
②文件注释规范:
文档注释主要只在三个地方出现:类上面、方法上面、变量上面。
/**
 * 这是用于测试功能的一个测试用例!  //类功能说明
 * @author YiWen Wan           //作者
 * @version 1.204,06/09/06     //版本
 * @see java.lang.StringBuffer //参见
 * @since JDK 1.0              //始于JDK版本
 * ……
 */
- 实际使用样例:
package MyTest;

/**
 * 这是用于测试功能的一个测试用例!  //类功能说明
 * @author YiWen Wan           //作者
 * @version 1.204,06/09/06     //版本
 * @see java.lang.StringBuffer //参见
 * @since JDK 1.0              //始于JDK版本
 */
public class Test {
    /**
     * 用于输出提示性话语的一个String变量!
     */
    public static String string = "Hello World!";
    /**
     * 主函数
     * @param args
     */
    public static void main(String[] args) {
        int a = 7;
        int b = 8;
        System.out.println(string);
        Plus(a,b);
    }

    /**
     * 用于计算两数加法运算,并限制其输出的一个函数。
     * @param num1:参与加法运算的其中一个参数
     * @param num2:参与加法运算的另一参数
     */
    public static void Plus(int num1,int num2){
        int num=-1;
        num = num1 + num2;
        if (num>=10){
            System.out.println(num);
        }
    }
}
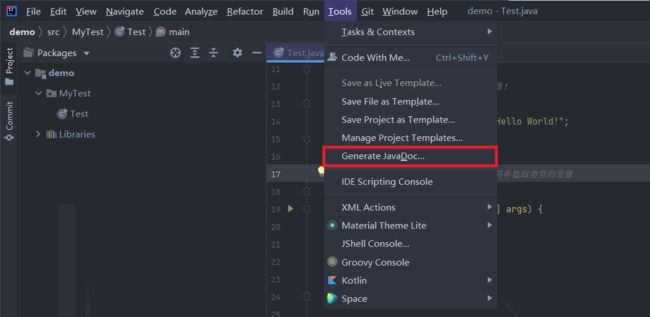
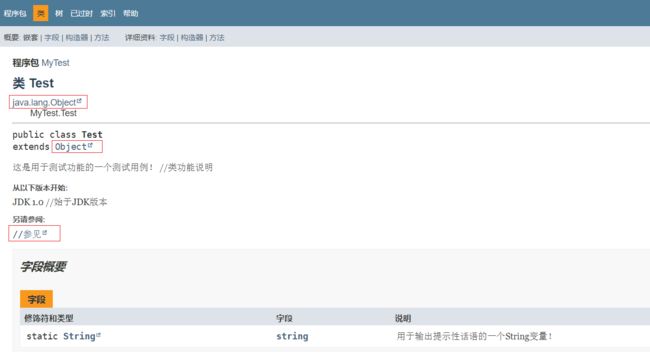
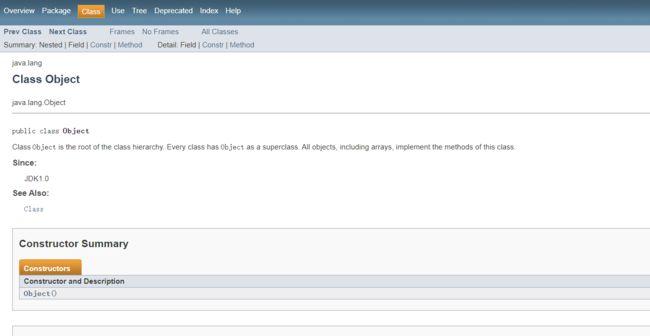
③导出项目的JavaDoc文档:
-
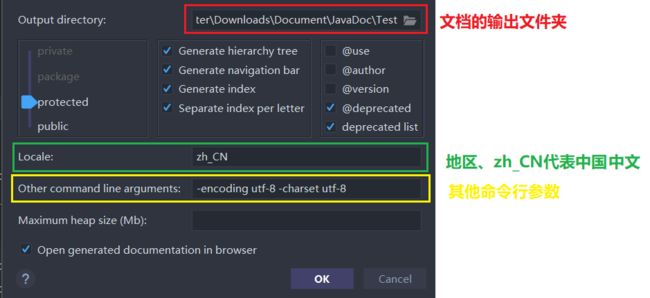
下一步
-encoding utf-8 -charset utf-8- 这里有的教程会让你写:
-encoding UTF-8 -charset UTF-8 -windowtitle "你的文档在浏览器窗口标题栏显示的内容" -link http://docs.Oracle.com/javase/7/docs/api两者的区别就在于,有没有和java官方的文档“联动起来”。
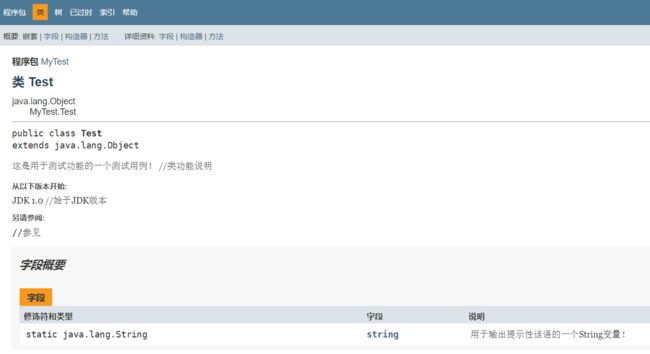
- 第一种:
- 第二种:
当你点击java语言中已存在的类时,他会跳转到官方文档!
四、字符串String类:
①String是不变对象:
- java.lang.String使用了final进行修饰,所以不能被继承。
- 字符串底层封装了字符数组以及针对字符数组的操作算法。
- 字符串一旦创建,对象就永运无法改变,但是字符串引用可以重新赋值。
- Java字符串在内存中采用了Unicode编码方式,任何一个字符对应着两个字节的定长编码。
- String基本使用特性进行代码验证:
/**
 * String是不变对象,JVM对其做了一个优化,在内存中开辟了一段区域作为常量池,
 * 凡是通过“字面量”(直接量)形式创建的字符串对象都会缓存并且重用。因为会重用
 * 对象,所以该对象内容不可以改变!
 * @author YiWen Wan
 */
public class StringDemo {
    public static void main(String[] args) {
        String str1 = "Hello World!";
        String str2 = "Hello World!";
        System.out.println("Java重用了这一个字符串直接量!true or false?");
        //直接比较引用是否相等,来进一步说明是否指向了同一片内存区域!
        System.out.println(str1==str2);
    }
}
//Java重用了这一个字符串直接量!true or false?
//true
- String不变对象的特性进行代码验证:
/**
 * 一个有趣的现象!
 * 因为对象的内容是不可变的,所以修改原指向的值本质上是重新创建了一个新的字符串,
 * 原字符串还保留着,防止引起原同一引用的值发生改变!
 * @author YiWen Wan
 */
public class StringDemo {
    public static void main(String[] args) {
        String str1 = "Hello";
       String str2 = "Hello";
        //原本str1和str2是指向同一块内存区域的,现在改变str1的值!
        str1 = str1+"!";
        System.out.println(str1);
        System.out.println(str2);

    }
}
//Hello!
//Hello
- 当使用new语句创建String对象时,无论内容是否相等,都会强制创建一个新的对象!
/**
 * 使用new创建新的String对象时,无论之前是否有一样内容的String对象,
 * 都会强制创建一个新的对象!
 * @author YiWen Wan
 */
public class StringDemo {
    public static void main(String[] args) {
        String str1 = "Hello";
        String str2 = "Hello";
        String str3 = new String("Hello");
        System.out.println(str1==str2);
        System.out.println(str1==str3);
        System.out.println("分割线:--------------");
        System.out.println(str1.equals(str3));
    }
}
//true
//false
//true
-
所以当比较两个String类型的对象是否相等时,利用equal函数进行判断更为准确,因为不是指向同一对象的String引用也可能内容相等!
-
对String对象进行拼接之后产生的新对象的特性:
/**
 * 测试分割重组的String对象的一些特性!
 * @author YiWen Wan
 */
public class StringDemo {
    public static void main(String[] args) {
        String str1 = "HelloWorld";

        /*这里是一个编译器的一个优化措施,编译器在编译源代码时,发现计算表达式的所有参数都是“字面量”,在编译之后就直接会将这些“字面量”直接计算了,并将结果编译到class文件中,所以在执行该条语句的时候相当于:
                    String str2 = "HelloWorld";
        所以后续输出才会是true,这已经不是String的特性了!
         */
        String str2 = "Hello" + "World";
        System.out.println(str1==str2);

        //计算表达式有一方是变量时,就一定会创建一个新的对象,所以才会输出false!
        String s = "Hello";
        String str3 = s + "World";
        System.out.println(str1==str3);

    }
}
//true
//false
②修改字符串的性能问题:
- 当字符串频繁进行修改时:
- 此时就会频繁的新建字符串,效率就会大幅度降低,内存使用不高效,性能降低,垃圾回收器来不及收!
/**
 * 用于测试String中函数特性!
 * @author YiWen Wan
 */
public class StringTest {
    public static void main(String[] args) {
        String str = "a";
        for (int i=0;i<100000000;i++)
            str = str + "a";
        System.out.println("Game Over!");
    }
}
//结果出不来,一直卡着!
-
所以Java中String是不变对象,目的就是提高了重用性,但是对于频繁修改String对象就考虑的不是很完备,“一刀切”思想!
-
StringBuilder类:
- 为了针对修改字符串的情况,Java提供了StringBuilder类(增、删、改、插)进行处理!
- StringBuilder封装可变的字符串,对象创建之后可以通过调用方法改变其封装的字符序列。
/**
 * 用于测试StringBuilder中函数特性!
 * @author YiWen Wan
 */
public class StringTest {
    public static void main(String[] args) {
       String str = "好好学习 ";

       //当使用无参数的构造方法时,默认生成的是一个空字符串,可以用来以后加东西!
       StringBuilder sb = new StringBuilder();
       StringBuilder stringBuilder = new StringBuilder(str);

       //①增——append()函数,拼接字符串!
        System.out.println(stringBuilder.append("天天向上!").toString());
       //②改——replace()函数,用于替代指定范围内的字符串内容!表示范围时注意含头不含尾!
        System.out.println(stringBuilder.replace(8,9,"后").toString());
       //③删——delete()函数,用于删除指定位置的字符串内容!表示范围时注意含头不含尾!
        System.out.println(stringBuilder.delete(0,5).toString());
       //④插——insert()函数,用于将指定字符串插入到原字符串指定的范围内!
        System.out.println(stringBuilder.insert(2,"向上、向下、向左、向右、向前、"));
        System.out.println(stringBuilder.reverse());//反转
    }
}
//        好好学习 天天向上!
//        好好学习 天天向后!
//        天天向后!
//        天天向上、向下、向左、向右、向前、向后!
- 针对上上面代码的改进版:
/**
 * 用于测试StringBuilder中函数特性!
 * @author YiWen Wan
 */
public class StringTest {
    public static void main(String[] args) {
        StringBuilder stringBuilder = new StringBuilder("a");
        for (int i=0;i<10000000;i++)
            stringBuilder.append("a");
        System.out.println("Game Over!");
    }
}
//    Game Over!
- StringBuilder总结:
-
Java中字符串的连接过程就是利用StringBuilder实现的。
- String str = “Hello”; String str1 = str+" World!";
- 实际上:String str1 = new StringBuilder(str).append(" World!");
-
StringBuilder与StringBuffer:
- StringBuffer是线程安全的,同步处理的,性能稍慢。
- StringBuilder是线程非安全的,并发处理的,性能稍快。
-
③String类中的常用函数:
- indexof函数:
- 返回给定字符串位于当前字符串的位置(首位置),如果找不到则返回-1。
/**
 * 用于测试String中函数特性!
 * @author YiWen Wan
 */
public class StringTest {
    public static void main(String[] args) {
        String str = "HelloWorld!";
        System.out.println("Length:"+str.length());
        System.out.println("位置是:"+str.indexOf("Hello"));
        System.out.println("位置是:"+str.indexOf("WYW"));

        //验证一下indexof的其他重载函数!
        System.out.println("位置是:"+str.indexOf("o"));
        //从指定位置开始查找:
        System.out.println("位置是:"+str.indexOf("o",5));
        //查找最后一次出现的位置:
        System.out.println("位置是:"+str.lastIndexOf("o"));
    }
}
//        Length:11
//        位置是:0
//        位置是:-1
//        位置是:4
//        位置是:6
//        位置是:6
- substring函数:
- 截取指定范围内的字符串。
- 注意:Java API有一个特点——通常使用两个数字表示的范围都是 “含头不含尾” 的!
/**
 * 用于测试String中函数特性!
 * @author YiWen Wan
 */
public class StringTest {
    public static void main(String[] args) {
        String str = "HelloWorld";
        System.out.println("截取的字符串为:"+str.substring(0,5));
        //当参数变成一个的时候,就变成了一刀切了!
        System.out.println("截取的字符串为:"+str.substring(5));
    }
}
//截取的字符串为:Hello
//截取的字符串为:World
- trim函数:
- 去掉字符串的前后的空格。
/**
 * 用于测试String中函数特性!
 * @author YiWen Wan
 */
public class StringTest {
    public static void main(String[] args) {
        String str = "     HelloWorld!     ";
        System.out.println("去掉之前的效果是:"+str);
        System.out.println("去掉之后的效果是:"+str.trim());
    }
}
//        去掉之前的效果是:     HelloWorld!
//        去掉之后的效果是:HelloWorld!
- charAt函数:
- 返回字符串指定位置的字符。
/**
 * 用于测试String中函数特性!
 * @author YiWen Wan
 */
public class StringTest {
    public static void main(String[] args) {
        String str = "HelloWorld";
        System.out.println("第6个字符是:"+str.charAt(5));
    }
}
//第6个字符是:W
- startsWith函数和endsWith函数:
- 检测一个字符串是否以指定的字符串开始或结尾。
/**
 * 用于测试String中函数特性!
 * @author YiWen Wan
 */
public class StringTest {
    public static void main(String[] args) {
        String str = "HelloWorld";
        if (str.startsWith("Hello"))
            System.out.println("该字符串是以Hello开始的!");
        if (str.endsWith("World"))
            System.out.println("该字符串是以World结尾的!");

    }
}
//该字符串是以Hello开始的!
//该字符串是以World结尾的!
- toUpperCase函数和toLowerCase函数:
- 将原字符串扎转化为全大写或者全小写!
/**
 * 用于测试String中函数特性!
 * @author YiWen Wan
 */
public class StringTest {
    public static void main(String[] args) {
        String str = "HelloWorld";
        System.out.println(str.toUpperCase());
        System.out.println(str.toLowerCase());
    }
}
//HELLOWORLD
//helloworld
- String.valueOf函数:
- 一组重载的静态方法,将给定的内容转化为字符串。
/**
 * 用于测试String中函数特性!
 * @author YiWen Wan
 */
public class StringTest {
    public static void main(String[] args) {
        int a = 10;
        double b = 3.14;
        char c = 'c';
        float d = 3.145f;
        System.out.println(String.valueOf(a));
        System.out.println(String.valueOf(b));
        System.out.println(String .valueOf(c));
        System.out.println(String.valueOf(d));
        //更加简单的方法,但是效率不高
        String str = 10+"";
        System.out.println("更加简单的方法:"+str);
        //一个小测试
        System.out.print("测试结果为:");
        System.out.println(1+2);
        System.out.print("测试结果为:");
        System.out.println(1+"2");
    }
}
//        10
//        3.14
//        c
//        3.145
//        更加简单的方法:10
//        测试结果为:3
//        测试结果为:12
五、正则表达式:
①正则表达式简介:
-
在实际开发中,经常需要对字符串数据进行一些复杂的匹配、查找、替换等操作。通过正则表达式可以方便的实现字符串的复杂操作。
-
正则表达式是一串特定字符,组成的一个“规则字符串”,这个“规则字符串”是描绘文本规则的工具。正则表达式就是记录文本规则的代码。
-
字符集合:
- [ ]表示一个字符,具体表示什么,要看里面的内容。
| 正则表达式 | 说明 |
|---|---|
| [abc] | a、b、c中的任意一个字符 |
| [^abc] | 除了a、b、c的任意一个字符 |
| [a-z] | a、b、c、……、z中的任意一个字符 |
| [a-zA-Z0-9] | a ~ z、A ~ Z、0 ~ 9中的任意一个字符 |
| [a-z &&[ ^ bc]] | a ~ z中除了b和c以外的任意一个字符,其中&&表示“与”的关系 |
- 预定义字符:
- 类似于Java中的转义字符。
| 正则表达式 | 说明 |
|---|---|
| · | 任意一个字符 |
| \d | 任意一个数字字符,相当于[0-9] |
| \w | 单词字符,相当于[a-zA-Z0-9] |
| \s | 空白字符,相当于[\t\n\x0B\f\r] |
| \D | 非数字字符 |
| \W | 非单词字符 |
| \S | 非空白字符 |
- 数量词:
| 正则表达式 | 说明 |
|---|---|
| X? | 表示0个或1个X |
| X* | 表示0个或任意个X |
| X+ | 表示1个到任意个X |
| X{n} | 表示n个X |
| X{n,} | 表示n个到任意个X |
| X{n,m} | 表示n个到m个X |
-
分组“()”:
- ()圆括号表示分组,可以将一系列的正则表达式看作一个整体,分组时可以使用 “|” 表示 “或” 的关系。
- 例如:abcabcabc = (abc){3};将abc看做一个整体进行重复。
- 例如:匹配收集号码前面的区号:(\ +86|0086)?\s?\d{11},圆括号表示这里需要出现“+86”或者“0086”。
- ()圆括号表示分组,可以将一系列的正则表达式看作一个整体,分组时可以使用 “|” 表示 “或” 的关系。
-
" ^ “和” $ ":
- 没有这两个边界字符时,正则表达式是部分匹配。
- 没有这两个边界字符时,正则表达式是部分匹配,部分字符串满足条件就行;单独的" ^ “只看开头是否匹配,单独的” $ "只看结尾是否匹配;当两个一起使用时,才是完全匹配。
- **例如:**匹配用户名规则——从头到尾连续8~10个单词字符
- \w{8,10}
- 如果使用这种写法,则“abcd1234_abcd”是可以验证通过的。
- ^\w{8,10}$
- 如果使用这种写法,需要待检验字符串需要完全匹配,此时“abcd1234_abcd”是无法验证通过的。
- \w{8,10}
- 但是在Java中,就算你不写边界符号,也是会自动加上去的,所以Java默认是全匹配!
- 没有这两个边界字符时,正则表达式是部分匹配。
②String类中有关于正则表达式的方法:
- matches方法:
-
判断当前字符串是否符合提供的正则表达式!matches方法指定的正则表达式就算不指定边界匹配符,也是做全匹配验证的!
-
boolean matches(String regex)
-
/**
 * 用于验证Java中正则表达式的使用!
 * @author YiWen Wan
 */
public class StringTest {
    public static void main(String[] args) {
        String email = "[email protected]";//书写输入数据
        /*
        原本的正则表达式是:\w+@\w+(\.[a-zA-z]+)+但是因为Java中表示转义字符也是使用‘\’来表示,但是式子中的‘\’并非表示Java中的转义;
        所以应该让Java看来是一个单纯的‘\’,所以在‘\’前面再加上一个‘\’用来表示!
         */
        String regex = "\\w+@\\w+(\\.[a-zA-z]+)+";//书写正则表达式
        //matches函数用于验证该字符串是否属于正则表达式!
        boolean b = email.matches(regex);
        if (b)
            System.out.println("这是一个邮箱地址!");
        else
            System.out.println("这不是一个邮箱地址!");
    }
}
//这是一个邮箱地址!
- split方法:
- 使用给定的正则表达式来拆分当前字符串,并且将拆分之后的内容以字符串数组的方法返回。
- String[ ] split(String regex)
/**
 * 用于验证Java中正则表达式的使用!
 * @author YiWen Wan
 */
public class StringTest {
    public static void main(String[] args) {
        String str = "WYW:007Hello123The456World78765867!";
        //正则表达式(以数字进行分割):[0-9]+或者\d+
        String regex = "\\d+";
        String[] array = str.split(regex);
        System.out.println(Arrays.toString(array));
    }
}
//[WYW:, Hello, The, World, !]
- 一个有意思的特性:当多次匹配到同一个正则表达式时,将会出现什么样的情况!
/**
 * 用于验证Java中正则表达式的使用!
 * @author YiWen Wan
 */
public class StringTest {
    public static void main(String[] args) {
        String str = "WYW:007Hello123The456World78765867";
        String regex = "\\d";//此时遇到一次数字拆分一次!
        String[] array = str.split(regex);
        System.out.println(Arrays.toString(array));
    }
}
//[WYW:, , , Hello, , , The, , , World]
- 会在中间出现"",一个空的字符串!而且如果在开始或者中间连续匹配时,就会出现空串;但是在末尾出现时,就不会出现空串!
/**
 * 用于验证Java中正则表达式的使用!
 * @author YiWen Wan
 */
public class StringTest {
    public static void main(String[] args) {
        String regex = "\\d";//此时遇到一次数字拆分一次!
        String str = "534534WYW007Hello123The456World7876";
        String[] array = str.split(regex);
        System.out.println(Arrays.toString(array));
    }
}
//[, , , , , , WYW, , , Hello, , , The, , , World]
- replaceAll方法:
- 将当前字符串中符合正则表达式要求部分的内容转换为给定内容!
- String replaceAll(String regex,String str)
/**
 * 用于验证Java中正则表达式的使用!
 * @author YiWen Wan
 */
public class StringTest {
    public static void main(String[] args) {
        String str = "abc123def456ghi789jkl000mno";
        String regex = "[0-9]+";
        System.out.println("之前的模样:"+str);
        System.out.println("现在的模样:"+str.replaceAll(regex,"¥"));
    }
}
//        之前的模样:abc123def456ghi789jkl000mno
//        现在的模样:abc¥def¥ghi¥jkl¥mno
个人体会:这些知识只是对于正则表达式的基础知识,在了解这些基础知识之后,要是构建更加复杂的正则表达式,你可网上查询、或者借助一些工具进行构建;没有必要花太多的时间深度学习!
-
介绍一个我常用的工具正则表达式在线测试 | 菜鸟工具 (runoob.com)
-
有时候写稿子需要批量修改某个词,我也用它写正则表达式来批量替换,挺好用的!
六、Object:
-
Java Object 类是所有类的父类,也就是说 Java 的所有类都继承了 Object,子类可以使用 Object 的所有方法。
-
Object 中比较常用的两个方法就是 toString方法和equal方法。
-
Java API提供的类,都对于toString方法和equal方法进行了妥善的重写,所以不用担心,直接使用就好了!(不信你看下面包装类Integer里面对于equal函数是直接使用的)所以只有你直接写的类才需要进行重写!
①重写toString方法:
/**
 * 测试object中的相关方法!
 * @author YiWen Wan
 */
public class StringTest {
    public static void main(String[] args) {
        Point p = new Point(1,2);
        System.out.println(p.toString());
        //当toString函数没有被重写时,输出:string.Point@568db2f2
        //@后面的这部分是表示句柄,即该对象在堆中的地址!
//    public String toString() {
//        return getClass().getName() + "@" + Integer.toHexString(hashCode());
//    }
        System.out.println(p);
        //toString函数我们一般不会直接使用它,但是有一些函数会在间接使用它,
        //譬如println函数!
    }
}
//输出:
//Point{x=1, y=2}
//Point{x=1, y=2}

public class Point {
    private int x;
    private int y;

    //构造函数
    public Point(int x,int y) {
        this.x = x;
        this.y = y;
    }

    //重写toString函数
    @Override
    public String toString() {
        return "Point{" +"x=" + x + ", y=" + y + '}';
    }
}
②重写equal方法:
/**
 * 测试object中的equal方法!
 * @author YiWen Wan
 */
public class StringTest {
    public static void main(String[] args) {
        Point point = new Point(1,2);
        Point point1 = new Point(1,2);
        System.out.println(point == point1);
        //equal函数要是不重写,就和上面的语句一样了,只会比较其引用值是否相等!
//        public boolean equals(Object obj) {
//            return (this == obj);
//        }
        System.out.println(point.equals(point1));
    }
}
//输出:
//false
//true

public class Point {
    private int x;
    private int y;

    //构造函数
    public Point(int x,int y) {
        this.x = x;
        this.y = y;
    }

    //重写equal函数
    @Override
    public boolean equals(Object o) {
        if (this == o) return true;
        if (o == null || getClass() != o.getClass()) return false;
        Point point = (Point) o;
        return x == point.x && y == point.y;
    }
}
七、包装类:
①包装类概述:
- 在进行类型转换的范畴内,有一种特殊的转换,需要将 int 这样的基本数据类型转换为对象;所有基本类型都有一个与之对应的类,即包装类。
- 基本数据类型是直接以值的形式进行存储。
包装类的出现是为了解决基本数据类型无法参与面向对象开发问题!
- 包装类是不可变类,在构造了包装类对象之后,不允许更改包装在其中的值;包装类是 final 类型的,不能定义他们的子类。
| 基本类型 | 包装类 | 父类 |
|---|---|---|
| int | Integer | java.lang.Number |
| long | Long | java.lang.Number |
| double | Double | java.lang.Number |
| short | Short | java.lang.Number |
| float | Float | java.lang.Number |
| byte | Byte | java.lang.Number |
| char | Character | java.lang.Object |
| boolean | Boolean | java.lang.Object |
②基本类型转换为包装类:
- 方式一:通过new关键字直接新建对象。
/**
 * 这是用于测试功能的一个测试用例!
 * @author YiWen Wan
 */
public class Test {
    public static void main(String[] args) {
        int data = 1;
        Integer i1 = new Integer(data);
        Integer i2 = new Integer(data);

        System.out.println(i1==i2);
        System.out.println(i1.equals(i2));
    }
}
//output:
//false
//true
- 方式二:通过valueof方法进行建立,重用了对象,建议使用下面的方式转换包装类。
/**
 * 这是用于测试功能的一个测试用例!
 * @author YiWen Wan
 */
public class Test {
    public static void main(String[] args) {
        int data = 1;
        Integer i1 = Integer.valueOf(data);
        Integer i2 = Integer.valueOf(data);

        System.out.println(i1==i2);
        System.out.println(i1.equals(i2));
    }
}
//output:
//true
//true
补充:
-
但是这种重用是有限制的,当数据的取值超过一定的范围时,就会新建一个对象。
- 譬如:当上述代码的 data 取值128时,对象就不会重用。
- 通过查看valueof方法的源代码,我们可以发现,自数据取值超过一定的范围,将会新建一个对象。
public static Integer valueOf(int i) { if (i >= IntegerCache.low && i <= IntegerCache.high) return IntegerCache.cache[i + (-IntegerCache.low)]; return new Integer(i); } -
不是所有的包装类的valueof都有这种对象重用的优化,譬如Double包装类就没有!
public static Double valueOf(double d) { return new Double(d); } -
Java还是推荐使用valueof方法来转化包装类,用得好可以重用优化,再不济和新建一个对象一样,怎么看都是稳赚不赔的买卖。
③包装类转换为基本类型:
/**
 * 这是用于测试功能的一个测试用例!
 * @author YiWen Wan
 */
public class Test {
    public static void main(String[] args) {
        Integer data = Integer.valueOf(128);
        int in = data.intValue();
        //或者转换为其他的类型也可以,注意由小变大没问题,由大变小可能会溢出!
        double dou = data.doubleValue();
        float flo = data.floatValue();

        byte by = data.byteValue();//溢出
        System.out.println(by);
    }
}
//output:
//-128
④包装类中的属性:
介绍两个常见的两个属性 Max_Value 和 Min_Value 用于表示该包装类对应的基本类型的取值范围。
/**
 * 这是用于测试功能的一个测试用例!
 * @author YiWen Wan
 */
public class Test {
    public static void main(String[] args) {
        System.out.println(Integer.MAX_VALUE);
        System.out.println(Integer.MIN_VALUE);
        System.out.println(Long.MAX_VALUE);
        System.out.println(Long.MIN_VALUE);
        System.out.println(Double.MAX_VALUE);
        System.out.println(Double.MIN_VALUE);
    }
}
//output:
// 2147483647
//-2147483648
//9223372036854775807
//-9223372036854775808
//1.7976931348623157E308
//4.9E-324
⑤包装类用于字符串到基本类型数据的转换:
包装类都提供了一个静态方法parseXXX(String str)可以将字符串解析为对应的基本类型数据,但是该字符串必须能正确的描述出对应基本类型,否则将会抛出异常!
/**
 * 这是用于测试功能的一个测试用例!
 * @author YiWen Wan
 */
public class Test {
    public static void main(String[] args) {
        String string = "111.1";
        int data = Integer.parseInt(string);
        //类型不匹配时就会报错,抛出NumberFormatException异常!
        System.out.println(data);
        double data1 = Double.parseDouble(string);
        System.out.println(data1);
    }
}
⑥自动拆装箱:
JDK 1.5版本推出时推出了一个特性——自动拆装箱,该特性是编译器认可的(不是JVM),当我们在基本类型和其对应的引用类型之间相互赋值时,编译器会自动补全代码,在两者之间转换!
/**
 * 这是用于测试功能的一个测试用例!
 * @author YiWen Wan
 */
public class Test {
    public static void main(String[] args) {
        int data = new Integer(12);
//      自动补全为:int data1 = new Integer(12).intValue();
        Integer integer = 4;
//      自动补全为:Integer integer1 = Integer.valueOf(4);
    }
}
八、File:
使用File可以:
-
访问其表示的文件或者目录的属性信息(名字,大小,访问权限等)。
-
操作文件或者目录(创建、删除)。
-
访问目录子项,但是不能访问文件数据。
import java.io.File;

public class TestForFile {
    public static void main(String[] args) {
        File file = new File("./demo.txt");
        System.out.println("文件名:"+file.getName());//文件名
        System.out.println("文件大小:"+file.length()+"bytes");//单位字节
        System.out.println("是否可写:"+file.canWrite());//可写
        System.out.println("是否可读:"+file.canRead());//可读
        System.out.println("是否隐藏:"+file.isHidden());
    }
}
//output:
//文件名:demo.txt
//文件大小:67bytes
//是否可写:true
//是否可读:true
//是否隐藏:false
①file创建删除文件:
-
创建文件:
createNewFile()
import java.io.File;
import java.io.IOException;

public class TestForFile {
    public static void main(String[] args) throws IOException {
        //使用File创建文件
        File file = new File("./demo.txt");
        System.out.println("原来是否已经存在该文件:"+file.exists());
        if (!file.exists()){//如果不存在,则创建一个新的文件
            file.createNewFile();
            System.out.println("文件已经创建!");
        }else{
            System.out.println("文件已经存在!");
        }
    }
}
//output:
//原来是否已经存在该文件:true
//文件已经存在!
-
删除文件:
delete()
import java.io.File;

public class TestForFile {
    public static void main(String[] args){
        //使用File创建文件
        File file = new File("./demo.txt");
        System.out.println("是否存在该文件:"+file.exists());
        if (file.exists()){
            file.delete();
            System.out.println("文件已经删除!");
        }else{
            System.out.println("文件不存在!");
        }
        System.out.println("是否存在该文件:"+file.exists());
    }
}
//output:
//是否存在该文件:true
//文件已经删除!
//是否存在该文件:false
②file创建删除目录:
-
创建目录:
mkdir()
mkdir函数创建目录的前提就是该目录上级目录存在,不存在的时候就要使用后面的 mkdirs 创建多级目录了.
import java.io.File;

public class TestForFile {
    public static void main(String[] args) {
        //使用File创建目录
        File dir = new File("./demo");
        if (!dir.exists()) {//目录不存在
            dir.mkdir();//创建目录
            System.out.println("目录已创建!");
        } else {
            System.out.println("目录已存在!");
        }
    }
}
//output:
//目录已创建!
-
创建多级目录:
mkdirs()
import java.io.File;

public class TestForFile {
    public static void main(String[] args){
        //创建一个多级目录
        File dir = new File("./A/B/test");
        if (!dir.exists()){//当目录不存在时
            dir.mkdirs();//创建多级目录时,使用mkdirs
            System.out.println("目录创建完毕!");
        }else{
            System.out.println("目录已经存在!");
        }
    }
}
//output:
//目录已创建!
-
删除目录:
delete()
delete方法删除目录的前提条件就是待删除目录下没有东西(空目录);所以只能逐级删除各个目录。
import java.io.File;

public class TestForFile {
    public static void main(String[] args){
        //删除当前目录下A目录下的B目录
        File dir = new File("./A/B");
        if (dir.exists())//当前目录存在
        {
            dir.delete();
            System.out.println("目录删除成功!");
        }else{
            System.out.println("当前目录不存在!");
        }
    }
}
//output:
//目录删除成功!
-
获取目录下的所有子项:
File[] listFiles()
import java.io.File;

public class TestForFile {
    public static void main(String[] args){
        //获取当前目录下的所有子项
        File dir = new File(".");//表示当前目录
        if (dir.isDirectory()){//判断是否是一个目录
            File[] subs = dir.listFiles();//获取当前目录下的所有子项
            if (subs != null) {
                for (File file:subs
                ) {
                    System.out.println(file.getName());
                }
            }else{
                System.out.println("当前目录下为空!");
            }
        }
    }
}
//output:
//.idea
//A
//out
//src
//Test.iml
- 递归删除目录:
import java.io.File;

public class TestForFile {
    public static void main(String[] args){
        //构造一个Delete方法,使之可以删除文件或目录。
        File file = new File("./A");
        Delete(file);
    }
    //使用了递归的思想!
    public static void Delete(File file){
        if (file.isDirectory()){//表示是一个目录,所以需要清空里面的东西
            File[] subs = file.listFiles();
            for (int i=0;i<subs.length;i++){
                File sub = subs[i];
                Delete(sub);
            }
        }
        file.delete();
    }
}
九、FileFilter文件过滤器:
ListFiles提供了一个重载的方法,可以指定一个文件过滤器(FileFilter),然后将满足所给过滤器要求的子项返回。
import java.io.File;
import java.io.FileFilter;
import java.util.Objects;

public class TestForFile {
    public static void main(String[] args) {
        File file = new File(".");//绝对路径
        MyFilter filter = new MyFilter();
        File[] subs = file.listFiles(filter);
        for (int i = 0; i< Objects.requireNonNull(subs).length; i++)
            System.out.println(subs[i]);
    }
}

/**
 * 判断文件名称是否是以 . 开始。
 */
class MyFilter implements FileFilter {
    public boolean accept(File pathname) {
        //该函数每次都会执行一次判断文件是否符合要求!
        String name = pathname.getName();
        System.out.println("正在过滤:"+name);
        return name.startsWith(".");
    }
}
//output:
//正在过滤:.idea
//正在过滤:out
//正在过滤:src
//正在过滤:Test.iml
//.\.idea
- 通过观察可以发现,MyFilter类被定义了之后只是被调用了一次,造成了浪费;因此我们可以使用匿名内部类实现该功能。
import java.io.File;
import java.io.FileFilter;
import java.util.Objects;

public class TestForFile {
    public static void main(String[] args) {
        File file = new File(".");//绝对路径
        FileFilter filter = new FileFilter(){
            @Override
            public boolean accept(File pathname) {
                return pathname.getName().startsWith(".");
            }
        };
        File[] subs = file.listFiles(filter);
        for (int i = 0; i< Objects.requireNonNull(subs).length; i++)
            System.out.println(subs[i]);
    }
}
//output:
// .\.idea
- 不使用中间变量进行过渡,直接将其定义为参数在函数中使用。
import java.io.File;
import java.io.FileFilter;
import java.util.Objects;

public class TestForFile {
    public static void main(String[] args) {
        File file = new File(".");//绝对路径
        File[] subs = file.listFiles(new FileFilter() {
            @Override
            public boolean accept(File pathname) {
                return pathname.getName().startsWith(".");
            }
        });
        for (int i = 0; i< Objects.requireNonNull(subs).length; i++)
            System.out.println(subs[i]);
    }
}
//output:
// .\.idea
- 使用lambda表达式(JDK8之后)来进一步精简匿名内部类的使用。
import java.io.File;
import java.io.FileFilter;
import java.util.Objects;

public class TestForFile {
    public static void main(String[] args) {
        File file = new File(".");//绝对路径
        File[] subs = file.listFiles((pathname -> pathname.getName().startsWith(".")));
        for (int i = 0; i< Objects.requireNonNull(subs).length; i++)
            System.out.println(subs[i]);
    }
}
//output:
// .\.idea
十、RandomAccessFile读写文件数据:
①基本介绍:
-
RandomAccessFile是专门用来读写文件数据的API。其基于指针对文件数据进行读写操作,可以灵活的编辑文件数据内容。
-
创建RandomAccessFile时可以指定对于该文件的权限,常见的有两种:①r-只读模式、②rw-读写模式。
②写字节操作:
import java.io.FileNotFoundException;
import java.io.IOException;
import java.io.RandomAccessFile;

public class TestForFile {
    public static void main(String[] args) throws IOException {
        //RandomAccessFile被赋予写权限时会检查该文件是否存在,不存在时将会创建一个,第二个参数表示了其权限!
        RandomAccessFile randomAccessFile = new RandomAccessFile("test.txt","rw");
        //相对路径中的"./"是可以不写的,因为在默认情况下就是从当前目录下开始的!
        randomAccessFile.write(66);
        //向文件中写入一个字节,写的是给定int值对应二进制的低八位。
        randomAccessFile.write('1');
        System.out.println("写入完毕!");
        randomAccessFile.close();//这是一定要写的!
    }
}
//output:
//写入完毕!
③读字节操作:
int read()
/*
 * int read()函数解释:
 * 每次读取一个字节的数据,以int形式返回,所以接收到的数据的低八位有效,
 * 返回值为-1时表示已经读到了文件的末尾!
 */
import java.io.IOException;
import java.io.RandomAccessFile;

public class TestForFile {
    public static void main(String[] args) throws IOException {
        RandomAccessFile randomAccessFile = new RandomAccessFile("test.txt","r");
        int data = -1;
        do {
            data = randomAccessFile.read();
            System.out.println(data);
        }while (data!=-1);
        randomAccessFile.close();
    }
}
//output:
//66
//49
//-1
- 文件复制:
import java.io.IOException;
import java.io.RandomAccessFile;

public class TestForFile {
    public static void main(String[] args) throws IOException {
        //作为源文件
        RandomAccessFile r1 = new RandomAccessFile("MyPicture.jpg","r");
        //作为目的文件
        RandomAccessFile r2 = new RandomAccessFile("MyPicture_copy.jpg","rw");
        int data = -1;
        while ((data = r1.read())!=-1){
            r2.write(data);
        }
        System.out.println("over!");
        r1.close();
        r2.close();
    }
}
//output:
// over!
如果希望提高读写效率,可以通过提高每一次实际读写的数据量,减少实际发生的读写操作来做到。(空间换时间)
-
随机读写——单字节读写。
-
块读写——一组字节读写。
④块读写操作:
RandomAccessFile提供的块读写操作的方法:
int read(byte[] data)
- 一次性读取给定的字节数组长度的字节量并存入到该数组中;返回值为实际读取到的字节量,若返回值为-1,表示本次读取是文件末尾(没有读取到任何字节)。
void write(byte[] data)
- 一次性写出给定字节数组中的所有字节。
void write(byte[] data,int start,int len)
- 一次性写出给定字节数组中从 start 开始的连续 len 个字节。
import java.io.IOException;
import java.io.RandomAccessFile;

public class TestForFile {
    public static void main(String[] args) throws IOException {
        //作为源文件
        RandomAccessFile r1 = new RandomAccessFile("Blueming.mkv","r");
        //作为目的文件
        RandomAccessFile r2 = new RandomAccessFile("Blueming_copy.mkv","rw");
        //记录每次实际读取到的字节量
        int len = -1;
        //每次要去读取的字节量
        byte[] data = new byte[1024*10];//10kb
        while ((len = r1.read(data))!=-1){
            r2.write(data,0,len);//文件大小不一定是10kb的整数倍
        }
        System.out.println("game over!");
        r1.close();
        r2.close();
    }
}
//output:
// game over!
⑤写字符串操作:
import java.io.IOException;
import java.io.RandomAccessFile;
import java.nio.charset.StandardCharsets;

public class TestForFile {
    public static void main(String[] args) throws IOException {
        RandomAccessFile randomAccessFile = new RandomAccessFile("test.txt","rw");
        String string = "Hello World!";
        byte[] data = string.getBytes(StandardCharsets.UTF_8);
        //将字符串转换为二进制,建议指定字符集,可移植性更好!
        randomAccessFile.write(data);
        System.out.println("写入完毕!");
        randomAccessFile.close();
    }
}
//output:
//写入完毕!
关键就在于使用getBytes方法将字符串转换为二进制形式的数据。
⑥读字符串操作:
import java.io.IOException;
import java.io.RandomAccessFile;
import java.nio.charset.StandardCharsets;

public class TestForFile {
    public static void main(String[] args) throws IOException {
        RandomAccessFile randomAccessFile = new RandomAccessFile("test.txt","r");
        byte[] data = new byte[(int) randomAccessFile.length()];
        randomAccessFile.read(data);//一步读取
        String string = new String(data,StandardCharsets.UTF_8);
        //利用String的构造函数转换为字符串,最好指定字符集(和写入保持一致),防止乱码
        System.out.println(string);
        randomAccessFile.close();
    }
}
//output:
//Hello World!
⑦读写基本类型数据:
import java.io.IOException;
import java.io.RandomAccessFile;

public class TestForFile {
    public static void main(String[] args) throws IOException {
        RandomAccessFile randomAccessFile = new RandomAccessFile("test.txt","rw");
        int max = Integer.MAX_VALUE;
        //因为一次传一个字节,所以通过位运算将int数据拆解送过去!
        randomAccessFile.write(max>>>24);
        randomAccessFile.write(max>>>16);
        randomAccessFile.write(max>>>8);
        randomAccessFile.write(max);

        System.out.println("写入完毕!");
        randomAccessFile.close();
    }
}
//output:
//写入完毕!
- RandomAccessFile 中提供了写入基本数据类型的相关方法,基本原理和上面的演示程序一样,都是利用移位操作,逐个字节将数据"送"进去。
public final void writeInt(int v) throws IOException {
    write((v >>> 24) & 0xFF);
    write((v >>> 16) & 0xFF);
    write((v >>>  8) & 0xFF);
    write((v >>>  0) & 0xFF);
    //written += 4;
}
其他基本类型数据也提供了对应的方法,writeLong、writeFloat……
- 接下来对于写入的基本类型数据进行相关的读操作!
import java.io.IOException;
import java.io.RandomAccessFile;

public class TestForFile {
    public static void main(String[] args) throws IOException {
        RandomAccessFile randomAccessFile = new RandomAccessFile("test.txt","rw");
        randomAccessFile.writeInt(Integer.MAX_VALUE);
        randomAccessFile.writeLong(123L);
        randomAccessFile.writeDouble(123.123);
        System.out.println("写入完毕!");

        int data = randomAccessFile.read();
        System.out.println(data);
        randomAccessFile.close();
    }
}
//output:
//写入完毕!
//-1
按照前面的原理分析,我们可以预测输出的值,应当为127,但是结果却是-1?这是因为RandomAccessFile是基于指针进行操作的。当我们完成写数据操作时,指针已经位于文件的末尾,所以最终才会返回-1。
- 我们可以通过下面的函数来查看指针所处的位置。
public long getFilePointer()
import java.io.IOException;
import java.io.RandomAccessFile;

public class TestForFile {
    public static void main(String[] args) throws IOException {
        RandomAccessFile randomAccessFile = new RandomAccessFile("test.txt","rw");
        System.out.println("指针位于:"+randomAccessFile.getFilePointer());
        randomAccessFile.writeInt(Integer.MAX_VALUE);
        System.out.println("指针位于:"+randomAccessFile.getFilePointer());
        randomAccessFile.writeLong(123L);
        System.out.println("指针位于:"+randomAccessFile.getFilePointer());
        randomAccessFile.writeDouble(123.123);
        System.out.println("指针位于:"+randomAccessFile.getFilePointer());
        System.out.println("写入完毕!");
        int data = randomAccessFile.read();
        System.out.println(data);
        randomAccessFile.close();
    }
}
//output:
//指针位于:0
//指针位于:4
//指针位于:12
//指针位于:20
//写入完毕!
//-1
- 知道了指针的位置后,我们可以通过将指针重新置于文件开始位置,就可以逐个读取文件中的数据了。
public void seek(long pos)//移动指针到指定位置
import java.io.IOException;
import java.io.RandomAccessFile;

public class TestForFile {
    public static void main(String[] args) throws IOException {
        RandomAccessFile randomAccessFile = new RandomAccessFile("test.txt","rw");
        randomAccessFile.writeInt(Integer.MAX_VALUE);
        randomAccessFile.writeLong(123L);
        randomAccessFile.writeDouble(123.123);
        System.out.println("写入完毕!");
        randomAccessFile.seek(0);//移动指针位置到文件开始的位置
        System.out.println(randomAccessFile.readInt());
        System.out.println(randomAccessFile.readLong());
        System.out.println(randomAccessFile.readDouble());
        randomAccessFile.close();
    }
}
//output:
//写入完毕!
//2147483647
//123
//123.123
十一、JavaIO:
①IS与OS:
- 基本介绍:
- java io(input、output)输入与输出,是我们程序与外界交换数据的方式。java提供了一种统一的标准方式与外界交换数据。java将流按照功能划分为读和写,并使用不同的方式来表示。
- 其中输入流(外界到程序的方向)用于读取数据,输出流用于写出数据。
- java将流划分为两大类:节点流与处理流。
- 节点流:也称为低级流,是实际链接程序与数据源的“管道”,负责实际搬运数据;读写一定是建立在节点流的基础上进行的。
- 处理流:也称为高级流,不能独立存在;必须链接在其他流上,目的是当数据流当前流时对这些数据做某些处理,这样可以简化我们对于数据的操作
- 在实际应用中,我们是链接若干高级流,并最终链接低级流,通过低级流读写数据,通过高级流对读写的数据进行某些加工处理,完成一个复杂的读写操作;这个过程称为——流链接。
- java io(input、output)输入与输出,是我们程序与外界交换数据的方式。java提供了一种统一的标准方式与外界交换数据。java将流按照功能划分为读和写,并使用不同的方式来表示。
按照流是否直接与特定的地方(如磁盘、内存、设备等)相连,分为节点流和处理流两类。
-
节点流与处理流:
- 节点流:可以从或向一个特定的地方(节点)读写数据。
- 通常节点流也称为低级流。
- 处理流:是对一个已存在的流的连接和封装,通过所封装的流的功能调用实现数据读写。
- 处理流的构造方法总是要带一个其他流对象做参数。一个流对象经过其他流的多次包装,称为流的链接。
- 通常处理流也称为高级流或过滤流。
- 节点流:可以从或向一个特定的地方(节点)读写数据。
-
IS和OS常用方法:
-
InputStream 是所有字节输入流的父类,其定义了基础的读取方法,常用的方法如下:
int read()- 读取一个字节,以 int 形式返回,该 int 值的“低八位”有效,若返回值为-1则表示EOF。
int read(byte[] d)- 尝试最多读取给定数组的 length 个字节并存入该数组,返回值为实际读取到的字节量。(使用特性类似于 RandomAccessFile 的 read 方法。)
-
②文件流:
-
文件流是一对低级流,用于读写文件;就功能而言与RandomAccessFile一致,但是底层的读写方式有着本质区别。
- RandomAccessFile是基于指针进行随机读写的,可以任意读写文件指定位置的数据;可以做到对于文件部分数据的编辑操作。
- 流是顺序读写方式,所以不能做到任意读写指定位置的数据,对此也无法做到对文件数据进行编辑的操作;但是配合高级流使用,可以更加轻松的读写数据。
-
文件输出流:
import java.io.FileOutputStream;
import java.io.IOException;
import java.nio.charset.StandardCharsets;

public class TestForIO {
    public static void main(String[] args) throws IOException {
        //使用文件流向文件中写入数据
        FileOutputStream fileOutputStream = new FileOutputStream("test.txt");
        String string = "你好吗!我很好!";
        fileOutputStream.write(string.getBytes(StandardCharsets.UTF_8));
        System.out.println("写入完毕!");
        fileOutputStream.close();
    }
}
//output:
//写入完毕!
-
FileOutputStream常用构造方法:
FileOutputStream(String path) FileOutputStream(File file)- 重写模式:以上两种方式创建时,默认覆盖写操作,即:若创建时发现该文件已存在,会先将该文件所有数据清除;然后通过当前流写出的内容作为该文件数据。
-
另外两种构造方法:
FileOutputStream(String path,boolean append) FileOutputStream(File file,boolean append)- 追加写模式,即:若指定的文件存在,文件上的数据全保留,该流写出的数据会被追加到文件原数据的后面。
-
文件输入流:
import java.io.FileInputStream;
import java.io.IOException;
import java.nio.charset.StandardCharsets;

public class TestForIO {
    public static void main(String[] args) throws IOException {
        FileInputStream fileInputStream = new FileInputStream("test.txt");
        byte[] data = new byte[200];
        int len = fileInputStream.read(data);
        System.out.println("实际读取了"+len+"个字节!");
        String str = new String(data,0,len,StandardCharsets.UTF_8);
        System.out.println(str);
        fileInputStream.close();
    }
}
//output:
//实际读取了48个字节!
//你好吗!我很好!你好吗!我很好!
使用起来和RandomAccessFile类似的!
- 文件复制操作:
import java.io.FileInputStream;
import java.io.FileOutputStream;
import java.io.IOException;
import java.nio.charset.StandardCharsets;

public class TestForIO {
    public static void main(String[] args) throws IOException {
        FileInputStream fileInputStream = new FileInputStream("Travel.mp3");
        FileOutputStream fileOutputStream = new FileOutputStream("Travel_copy.mp3");
        int len = -1;
        byte[] data = new byte[1024*10];//块读写一次10kb
        while((len=fileInputStream.read(data))!=-1){
            fileOutputStream.write(data,0,len);
        }
        System.out.println("复制完毕!");
        fileInputStream.close();
        fileOutputStream.close();
    }
}
//output:
//复制完毕!
使用起来和RandomAccessFile类似的!
③缓冲流:
缓冲流是一对高级流,功能是提高读写效率;链接之后,无论我们进行随机读写还是块读写,当经过缓冲流时都会转换为块读写操作。
java.io.BufferedInputStream;
java.io.BufferedOutputStream;
- 使用缓冲流来实现文件复制操作:
import java.io.*;

public class TestForIO {
    public static void main(String[] args) throws IOException {
        FileInputStream fileInputStream = new FileInputStream("Travel.mp3");
        //链接缓冲流
        BufferedInputStream bufferedInputStream = new BufferedInputStream(fileInputStream);
        FileOutputStream fileOutputStream = new FileOutputStream("Travel_copy2.mp3");
        //链接缓冲流
        BufferedOutputStream bufferedOutputStream = new BufferedOutputStream(fileOutputStream);
        int len = -1;
        long start = System.currentTimeMillis();
        while ((len = bufferedInputStream.read())!=-1){
            bufferedOutputStream.write(len);
        }
        long end = System.currentTimeMillis();
        System.out.println("复制完毕所花的时间为:"+(end-start)+"ms");
        bufferedInputStream.close();
        bufferedOutputStream.close();
    }
}
//output:
//复制完毕所花的时间为:29535ms(未使用缓冲流所用时间)
//复制完毕所花的时间为:149ms
当使用缓冲流链接低级流之后,其余的操作就要围绕着缓冲流来进行了,当操作完毕之后,close方法也是针对着缓冲流进行的。
- 缓冲流原理:
利用的块读写的原理,无论我们进行随机读写还是块读写,当经过缓冲流时都会转换为块读写操作。
- 在打开了 BufferedInputStream 和 BufferedOutputStream 的源代码之后可以发现,每个类中都有一个字节数组用于实现类似于块读写功能,并且其默认大小是 8192(8Kb)。
protected volatile byte[] buf;
-
缓冲流缓冲区介绍:
缓冲流的 write 方法并不是立即将数据写出,而是先将数据存入其内部的数组中(上面的buf),当数组装满时才会做一次真实写操作。(转换为块写操作)
- 进行一个代码测试:
import java.io.*;
import java.nio.charset.StandardCharsets;

public class TestForIO {
    public static void main(String[] args) throws IOException {
        FileOutputStream fileOutputStream = new FileOutputStream("test.txt");
        String string = "你好吗!我很好!";
        fileOutputStream.write(string.getBytes(StandardCharsets.UTF_8));
        System.out.println("game over!");
//        fileOutputStream.close();
    }
}
//output:game over!
当刻意把 close 方法注释掉,再执行代码;我们查看相关的文件可以发现,数据写进去了!
- 借助缓冲流实现上述操作之后:
import java.io.*;
import java.nio.charset.StandardCharsets;

public class TestForIO {
    public static void main(String[] args) throws IOException {
        FileOutputStream fileOutputStream = new FileOutputStream("test.txt");
        BufferedOutputStream bufferedOutputStream = new BufferedOutputStream(fileOutputStream);
        String string = "你好吗!我很好!";
        bufferedOutputStream.write(string.getBytes(StandardCharsets.UTF_8));
        System.out.println("game over!");
//        bufferedOutputStream.close();
    }
}
//output:game over!
当借助缓冲流(高级流)实现上述操作后,打开相关文件发现数据并没有写进去,此时数据还位于缓冲区中,没有写入到对应文件内。
- 我们可以使用 flush 方法,强制将缓冲区中的数据清空,写入到对应文件中。
import java.io.*;
import java.nio.charset.StandardCharsets;

public class TestForIO {
    public static void main(String[] args) throws IOException {
        FileOutputStream fileOutputStream = new FileOutputStream("test.txt");
        BufferedOutputStream bufferedOutputStream = new BufferedOutputStream(fileOutputStream);
        String string = "你好吗!我很好!";
        bufferedOutputStream.write(string.getBytes(StandardCharsets.UTF_8));
        System.out.println("game over!");
        bufferedOutputStream.flush();
//        bufferedOutputStream.close();
    }
}
//output:game over!
此时我们查看对应文件可以发现,数据已经写入了对应文件;我们打开 close 方法的源代码也可以发现其函数体中会调用 flush 方法。
try {
	flush();
	} catch (Throwable e) {
		flushException = e;
		throw e;
	}
// 截取的代码片段
flush 方法的意义是强制将缓冲流已经缓存的数据一次性写出。这样做可以让写出的数据有即时性,但是频繁调用会降低写效率。
④对象流:
对象流也是一对高级流,提供的功能是读写 Java 中的任何对象。
-
对象输出流:
java.io.ObjectOutputStream-
它可以将给定的 java 对象转换为一组字节,然后通过其他链接的流将这些字节写出。
- 当一个类的实例希望可以被对象流进行读写,那么该类必须实现 java.io.Serializable 接口。
import java.io.Serializable;
import java.io.Serial;

public class Test implements Serializable {
    @Serial
    private static final long serialVersionUID = 1L;
	……
}
当一个类实现了 Serializable 接口之后,要求应当定义一个常量 serialVersionUID ,即:序列化版本号。
-
序列化版本号影响反序列化是否成功。当对象输入流在进行对象反序列化时会检查该对象与当前类的版本是否一致,不一致则反序列化时会抛出异常导致反序列化失败。一致则可以进行反序列化,原则是对应的属性进行还原。
-
如果我们不定义该版本号,编译器会在编译当前类时根据结构生成一个版本号,一旦当前类发生改变,那么版本号一定会改变;这样以前的对象一定是不可以反序列化了。
-
实际举例:
import java.io.*; public class TestForIO { public static void main(String[] args) throws IOException { Test test = new Test("Tom",18); FileOutputStream fileOutputStream = new FileOutputStream("test.txt"); ObjectOutputStream objectOutputStream = new ObjectOutputStream(fileOutputStream); objectOutputStream.writeObject(test);//把一个对象写出去! System.out.println("game over!"); objectOutputStream.close(); } } import java.io.Serializable; import java.util.Objects; public class Test implements Serializable { private String name; private int age; Test(String name,int age){ this.name = name; this.age = age; } @Override public String toString() { return "Test{" + "name='" + name + '\'' + ", age=" + age + '}'; } @Override public boolean equals(Object o) { if (this == o) return true; if (o == null || getClass() != o.getClass()) return false; Test test = (Test) o; return age == test.age && Objects.equals(name, test.name); } @Override public int hashCode() { return Objects.hash(name, age); } public String getName() { return name; } public int getAge() { return age; } public void setName(String name) { this.name = name; } public void setAge(int age) { this.age = age; } } //output:game over!通过对象流写出对象的这个方法经历了两个步骤:
-
对象的序列化——对象流先将给定的对象转换为了一组字节,这组字节包含对象本身保存的数据信息,还包含该对象的结构信息;然后将这组字节通过其链接的流写出。
-
数据持久化——经过文件流时,文件流将这组字节写入到文件中。
-
-
对象输入流:
可以进行对象的反序列化操作;使用对象流读取的字节必须是通过对象输出流序列化的一组字节。
java.io.ObjectInputStream- 实际举例:
import java.io.*;

public class TestForIO {
    public static void main(String[] args) throws IOException, ClassNotFoundException {
        FileInputStream fileInputStream = new FileInputStream("test.txt");
        ObjectInputStream objectInputStream = new ObjectInputStream(fileInputStream);
        Test t = (Test) objectInputStream.readObject();
        System.out.println(t);
        objectInputStream.close();
    }
}
//output:
//Test{name='Tom', age=18}
⑤序列化相关关键字介绍:
transient
transient关键字修饰的属性在对象序列化时会被忽略;忽略不必要的属性可以达到对象“瘦身”的作用
public class Test implements Serializable {
    private transient String name;
    private int age;
    @Serial
    private static final long serialVersionUID = 1L;
    ……
}
- 当前类中所有引用类型的属性,他们对应的类也必须实现 Serializable 接口。(譬如上面的 String 类)
public final class String
    implements java.io.Serializable, Comparable<String>, CharSequence,
               Constable, ConstantDesc {
                   ……
               }
⑥字符流Reader和Writer:
- Java 将流按照读写单位又进行了一种划分方式——字节流与字符流。字节流的读写单位是字节,而字符流的读写单位是字符。所以字符流只适合读写文本数据。
java.io.Reader;
java.io.Writer;
这两个类也是抽象类,是所有字符输入流与字符输出流的父类,规定了所有读写字符的相关方法。
-
转换流:
java.io.InputStreamReader; java.io.OuputStreamWriter;他们是一对常用的字符流实现类,经常在我们做字符数据读写操作中使用;并且在流链接中是一个非常重要的一个环节;但我们很少直接对它做操作。
-
OuputStreamWriter使用举例:
import java.io.*;
import java.nio.charset.StandardCharsets;

public class TestForIO {
    public static void main(String[] args) throws IOException, ClassNotFoundException {
        FileOutputStream fileOutputStream = new FileOutputStream("test.txt");
        OutputStreamWriter outputStreamWriter = new OutputStreamWriter(fileOutputStream, StandardCharsets.UTF_8);
        outputStreamWriter.write("How are you?");
        outputStreamWriter.write(" I'm fine!");
        System.out.println("Game over!");
        outputStreamWriter.close();
    }
}
//output:
//Game over!
相比于前面的流,OutputStreamWriter 的好处就在于不用借助 String 的 getBytes方法转换为字节,更加方便快捷。
-
InputStreamReader使用举例:
//随机读写 import java.io.*; import java.nio.charset.StandardCharsets; public class Test { public static void main(String[] args) throws IOException { FileInputStream fileInputStream = new FileInputStream("test.txt"); InputStreamReader inputStreamReader = new InputStreamReader(fileInputStream, StandardCharsets.UTF_8); int data = -1; char c = ' '; while((data=inputStreamReader.read())!=-1){ c = (char) data; System.out.print(c); } inputStreamReader.close(); } } //output: //How are you? I'm fine!- read 方法时一次读取一个字符,实际读取的字节量要根据指定的字符集决定。但是当读取到该字符之后,在 Java 中都是以一个 char 形式保存(Unicode)占两个字节。
//read方法源代码 public int read() throws IOException { return sd.read(); }- read 方法返回值类型是 int 型数据,但是实际有效的是低两个字节的数据,又因为是字符流,所以使用 char 类型变量进行数据接收。
//块读写 import java.io.*; import java.nio.charset.StandardCharsets; public class Test { public static void main(String[] args) throws IOException { FileInputStream fileInputStream = new FileInputStream("test.txt"); InputStreamReader inputStreamReader = new InputStreamReader(fileInputStream, StandardCharsets.UTF_8); char[] data = new char[100]; int length = inputStreamReader.read(data);//获取实际读取到的字符个数 String string = new String(data,0,length);//限定范围,去除空格 System.out.println(string); inputStreamReader.close(); } } //output: //How are you? I'm fine! -
使用其他字符流(高级流)时,直接或间接地使用了 InputStreamReader 和 OuputStreamWriter 将字符流和字节流联系转换。这就是前面提到了为什么对这两个类很少直接对它们做操作。
-
-
PrintWriter缓冲字符输出流:
-
具有自动行刷新的缓冲字符输出流,开发中比较常用的字符高级流;可以按行写出字符串。
java.io.PrintWriter; -
PrintWriter 提供了专门针对于写文件的构造方法。
PrintWriter(String path); PrintWriter(File file); -
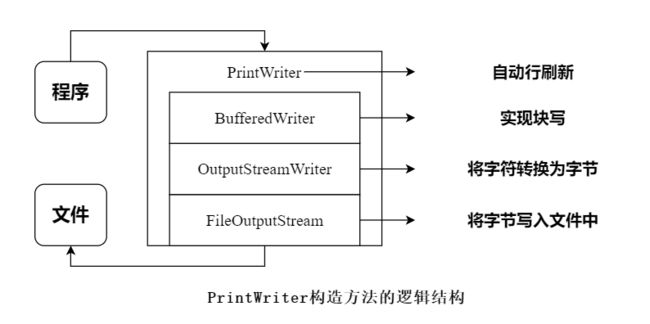
查看 PrintWriter 构造方法的源代码:
public PrintWriter(String fileName) throws FileNotFoundException {
	this(new BufferedWriter(new OutputStreamWriter(new FileOutputStream(fileName))),false);
}
通过观察,我们可以发现,构造方法中依次使用到了上图中的类,最终实现了 PrintWriter 作为自动行刷新的缓冲字符输出流的功能。
-
代码使用举例:
import java.io.*;
import java.nio.charset.StandardCharsets;

public class TestForIO {
    public static void main(String[] args) throws IOException, ClassNotFoundException {
        PrintWriter printWriter = new PrintWriter("test.txt",StandardCharsets.UTF_8);
        printWriter.println("这是一个用于测试PrintWriter写入数据功能的程序!");
        printWriter.print("测试是否能换行显示!");
        System.out.println("Game over!");
        printWriter.close();
    }
}
//output:
//Game over!
在创建了 printWriter 对象之后,我们可以使用两个方法(println 和 print)将数据写入到文件中,它们之间的区别在于前一个写入带换行,一个写入不带换行。
-
在流链接中使用PrintWriter:
import java.io.*; import java.nio.charset.StandardCharsets; public class TestForIO { public static void main(String[] args) throws IOException, ClassNotFoundException { FileOutputStream fileOutputStream = new FileOutputStream("test.txt"); OutputStreamWriter outputStreamWriter = new OutputStreamWriter(fileOutputStream,StandardCharsets.UTF_8); BufferedWriter bufferedWriter = new BufferedWriter(outputStreamWriter); PrintWriter printWriter = new PrintWriter(bufferedWriter); printWriter.println("Hello World!"); printWriter.close(); } } -
使用 PrintWriter 实现简易的记事本:(输入文件名,然后写入句子直到输入exit退出)
import java.io.*; import java.nio.charset.StandardCharsets; import java.util.Scanner; public class TestForIO { public static void main(String[] args) throws IOException, ClassNotFoundException { Scanner scanner = new Scanner(System.in); System.out.println("请输入文件名:"); String fileName = scanner.nextLine(); FileOutputStream fileOutputStream = new FileOutputStream(fileName); OutputStreamWriter outputStreamWriter = new OutputStreamWriter(fileOutputStream,StandardCharsets.UTF_8); BufferedWriter bufferedWriter = new BufferedWriter(outputStreamWriter); PrintWriter printWriter = new PrintWriter(bufferedWriter); while (!"exit".equals(fileName = scanner.nextLine())){ printWriter.println(fileName); } System.out.println("Game over!"); printWriter.close(); scanner.close(); } } //output: //Game over!- 但是这一个代码有一个小瑕疵,因为 PrintWriter 是具有缓冲区的,所以刚开始写入的句子一直是存储在缓冲区中的(除非装不下了),直到执行 close 方法时才会真正写入到对应文件中;那么我们要实现自动行刷新(写一句写进文件一句)的话,第一种方式是借助前面介绍过的 flush 方法(强制将缓冲区中的数据清空,写入到对应文件中);另一种方式是在创建 PrintWriter 对象时,借助构造方法相关参数设置,使其自动实现行刷新。
//相关构造方法源代码 public PrintWriter(Writer out,boolean autoFlush) { super(out); this.out = out; this.autoFlush = autoFlush; } //autoFlush取值为true时,PrintWriter对象就具有了自动行刷新功能!该构造方法中的参数流必须是字符流,所以上面的代码才整了一堆的流进行链接,没有直接使用 PrintWriter 的构造方法一步完成。
- 于是上面的实现代码只需要将 PrintWriter 对象的构造方法加一个true参数就可以了实现自动行刷新了!
PrintWriter printWriter = new PrintWriter(bufferedWriter,true);注意:当调用 println 方法写一行字符串时就会自动行刷新;print 方法是不会自动行刷新的。
-
-
BufferedReader缓冲字符输入流:
-
可以按行读取字符串。
java.io.BufferedReader; -
使用举例(输出该程序文件代码至控制台)
import java.io.*;
import java.nio.charset.StandardCharsets;

public class TestForIO {
    public static void main(String[] args) throws IOException, ClassNotFoundException {
        FileInputStream fileInputStream = new FileInputStream("src/MyTest/TestForIO.java");
        InputStreamReader inputStreamReader = new InputStreamReader(fileInputStream, StandardCharsets.UTF_8);
        BufferedReader bufferedReader = new BufferedReader(inputStreamReader);
        String string = null;
        while ((string = bufferedReader.readLine())!=null){
            System.out.println(string);
        }
        bufferedReader.close();
    }
}
//output:
//就是上面的代码!
String readLine()//读取一行字符串。- 顺序读取若干字符,当读取到了换行符时停止,并将换行符之前的字符组成一个字符串返回。返回的字符串中是不含有最右边的换行符的。
- 如果返回值时为null,则说明读取到了末尾。
-
十二、异常处理机制:
①基本介绍:
当程序中抛出一个异常后,程序从程序中导致异常的代码处跳出,java 虚拟机检测寻找和 try 关键字匹配的处理该异常的 catch 块,如果找到,将控制权交到 catch 块中的代码,然后继续往下执行程序,try块中发生异常的代码不会重新被执行。如果没有找到处理该异常的 catch 块,在所有的 finally 块代码被执行和当前线程所属的 ThreadGroup 的 uncaughtException 方法被调用后,遇到异常的当前线程被中止。
-
Throwable,Error和Exception:
Java 异常结构中定义有 Throwable 类,Exception 和 Error 是其派生的两个子类。其中 Exception 表示由于网络故障、文件损坏、设备错误、用户输入非法等情况导致的异常;而 Error 表示 Java 运行时环境出现的错误,例如: JVM 内存资源耗尽等。
②try_catch:
-
基本介绍:
- try{…}语句制指定了一段代码,该段代码就是一次捕获并处理例外的范围。
- 在执行过程中,该段代码可能会产生并抛出一种或几种类型的异常对象,它后面的 catch 语句分别对这些异常做相应的处理。
- 如果没有异常产生,所有的 catch 代码段都被略过不执行。
- 在 catch 语句块中是对异常进行处理的代码。
- 在 catch 中声明的异常对象(catch(SomeException e))封装了异常事件发生的信息,在 catch 语句块中可以使用这个对象的一些方法获取这些信息。
-
代码举例(未使用try-catch):
- Java 异常处理机制中的 try-catch;try 语句块用来包含可能出错的代码片段, catch 用来捕获这些错误并针对该错误进行处理。
public class TestForTryCatch { public static void main(String[] args) { System.out.println("Start!"); String string = null; System.out.println(string.length()); System.out.println("End!"); } }-
当 JVM 执行代码发现一个错误时,会根据错误实例化对应的异常实例,并将程序执行过程设置进去,然后将该异常在出错之后的语句位置抛出。
-
之后 JVM 会检查抛出异常的语句是否有被 try-catch 处理,若没有则认为出错的语句所在的方法没有解决异常的能力,随之将异常抛出到该方法外。
-
代码举例(使用try-catch):
public class TestForTryCatch { public static void main(String[] args) { System.out.println("Start!"); try{ // String string = null; String string = ""; System.out.println(string.length()); System.out.println(string.charAt(0)); System.out.println("!!!!!!");//try语句块中出错代码以下内容都不执行! }catch (NullPointerException e){ System.out.println("出现了空指针!"); }catch (StringIndexOutOfBoundsException e){ System.out.println("字符串下标越界了!"); }catch (Exception e){ System.out.println("出现了未知的错误!"); } System.out.println("End!"); } } //output: //Start! //0 //字符串下标越界了! //End!注意事项:
- try 语句块中出错代码以下内容都不执行(譬如上面代码中的**System.out.println("!!!");**语句)。
- try 语句块中代码要是没有出错时,catch 语句块都不会执行。
- 为了捕获多种类型的异常,catch 语句块是可以书写多个的。
- 应应当在当在最后一个 catch 处捕获 Exception ;尽量避免一个未捕获异常导致程序中断。
③finally:
finally 块是异常处理机制的最后一块,可以直接跟在 try 之后或者最后一个 catch 之后。finally 可以确保只要程序运行到 try 语句块中,那么无论是否抛出异常,finally 中的代码必定执行。
-
代码举例:
public class TestForTryCatch { public static void main(String[] args) { System.out.println("Start!"); try{ String string = "hhhh"; System.out.println(string.length()); }catch (NullPointerException e){ System.out.println("出现了空指针!"); }finally { System.out.println("finally!"); } System.out.println("End!"); } } //output: //Start! //4 //finally! //End!- 上面的代码中,将 finally 直接去除也能达到相同的效果;但是出现下面的情形就非 finally 不可了。
public class TestForTryCatch { public static void main(String[] args) { System.out.println("Start!"); try{ // String string = null; String string = "hhhh"; System.out.println(string.length()); return;//会先执行完finally语句块再return。 }catch (NullPointerException e){ System.out.println("出现了空指针!"); }finally { System.out.println("finally!"); } System.out.println("End!"); } } //output: //Start! //4 //finally! -
实际应用:
import java.io.FileNotFoundException; import java.io.FileOutputStream; import java.io.IOException; public class TestForTryCatch { public static void main(String[] args) { FileOutputStream fileOutputStream = null; try { fileOutputStream = new FileOutputStream("test.txt"); fileOutputStream.write('A'); // fileOutputStream.close();//原本的位置 } catch (FileNotFoundException e) { e.printStackTrace(); } catch (IOException e) { e.printStackTrace(); } finally{ try { if (fileOutputStream!=null) fileOutputStream.close(); } catch (IOException e) { e.printStackTrace(); } } } }-
FileOutputStream 对象的定义要放在 try 语句块的外面,在 try 语句块中定义的话,那么 finally 语句块中将因为变量作用权限的问题,无法识别该对象。
FileOutputStream fileOutputStream = null; -
通过观察 FileNotFoundException 的源代码,我们可以发现 该类是继承于 IOException 的,所以对于异常的捕获没有更加精细的要求的话,对于 FileNotFoundException 异常的捕获是可以省去的。
public class FileNotFoundException extends IOException{ …… } -
但是如果为了更加准确的捕获异常的信息,则派生类(子类)要在超类(父类)之前进行捕获判断。
catch (FileNotFoundException e) { e.printStackTrace(); } catch (IOException e) { e.printStackTrace(); }个人理解:就像下网捕鱼一样,一张大、小鱼都能捕获的网在前面,后面只能捕获小鱼的网怎么能抓到鱼。所以捕获的“层级”要逐步提升。
-
因为当 try 语句块中某一句程序报错被捕获之后,其后面的程序都不会被运行,所以为了保证文件流的关闭,需要借助 finally 语句块。
finally{
	try {
        if (fileOutputStream!=null)
            fileOutputStream.close();
        } catch (IOException e) {
            e.printStackTrace();
    }
}
之所以在 close 方法周围又来一个异常处理程序,是 java 为了 close 没有被正确执行所做的预防性策略。
-
-
针对上面代码的优化:
-
在 JDK1.7 之后推出了一个新的特性——autoclose;允许编译器在编译过程中自动处理诸如流的关闭工作。因此上面的代码可以改写为:
import java.io.FileOutputStream; import java.io.IOException; public class TestForTryCatch { public static void main(String[] args) { try(FileOutputStream fileOutputStream = new FileOutputStream("test.txt"); ){ fileOutputStream.write('B'); }catch (IOException e){ e.printStackTrace(); } } }-
需要关闭的对象,皆定义在“()”中,编译器会帮我们自动处理关闭工作,最终会将代码改变,在 finally 中将其关闭。那么什么是需要关闭的对象呢?
-
凡是实现了 AutoCloseable接口的类的对象才是需要关闭的对象。(譬如上面的 FileOutputStream )
public class FileOutputStream extends OutputStream{ …… } public abstract class OutputStream implements Closeable, Flushable { …… } public interface Closeable extends AutoCloseable { …… } -
常见的实现了 AutoCloseable接口的类有——JavaIO中的所有流、RandomAccessFile ……
-
-
-
final、finally、finalize之前的区别:
- final 修饰在类上不能被继承,修饰在方法上不能被重写,修饰在变量上不能被更改。
- finally 块是异常处理机制的最后一块,可以直接跟在 try 之后或者最后一个 catch 之后。finally 可以确保只要程序运行到 try 语句块中,那么无论是否抛出异常,finally 中的代码必定执行。
- 每个类中都有 finalize 方法,因为这个方法是在 object 中定义的方法;当一个对象被 GC 回收之前调用的最后一个方法。
-
一个笔试题:
public class TestForTryCatch { public static void main(String[] args) { System.out.println(test("0")+","+test(null)+","+test("")); } public static int test(String str){ try{ return str.charAt(0)-'0'; }catch (NullPointerException e){ return 1; }catch (Exception e){ return 2; }finally { return 3; } } } //output: //3,3,3- 因为要确保 finally 语句块中语句一定会执行,所以 try、catch 中的语句会执行,但是他们的 return 值会被 finally 语句块中的 return “洗掉”;所以最终 return 的是3。所以 finally 语句块中不推荐使用 return 语句,使用了会导致 try-catch 语句块中的 return 语句全部“没用”。
④异常抛出:
-
throw关键字:
-
当程序发生错误无法处理时,会抛出对应的异常对象,除此之外,在某些时刻,可能会想要自行抛出异常。例如在异常处理结束之后,再将异常抛出,让下一层异常处理块来捕捉,若想要自行抛出异常,可以使用 throw 关键字,并生成指定的异常对象后抛出。
public class Person { private int age; public int getAge() { return age; } public void setAge(int age) { if (age<0||age>100){ throw new RuntimeException("年龄数据不合理!"); } this.age = age; } } public class TestForTryCatch { public static void main(String[] args) { Person p = new Person(); //满足语法,但是不满足业务逻辑要求,这时setAge方法中可以当做异常抛出,要求被调用时处理。 p.setAge(10086); System.out.println(p.getAge()); } } //output: //Exception in thread "main" java.lang.RuntimeException: 年龄数据不合理! //at MyTest.Person.setAge(Person.java:12) //at MyTest.TestForTryCatch.main(TestForTryCatch.java:9)- 但是这里有一个弊端,虽然 setAge 方法当数据取值不合理时会抛出异常,但是我调用该方法的程序并不知道这个会抛出异常,也就不会设置相关的 try-catch 程序。所以为了解决这个弊端,我们需要使用到下面介绍的 throws 关键字。
-
-
throws关键字:
-
程序中会声明许多方法,这些方法中可能会因某些错误而引发异常,但不希望直接在这个方法中处理这些异常,而希望调用这个它的方法来统一处理,这个时候可以使用 throws 关键字来声明这个方法将会抛出异常。(换句话说就是通过 throws 来通知调用该方法的方法做好处理异常的准备,设置好 try-catch 程序。)
public class Person { private int age; public int getAge() { return age; } public void setAge(int age) throws Exception { if (age<0||age>100){ throw new Exception("年龄数据不合理!"); } this.age = age; } } public class TestForTryCatch { public static void main(String[] args) { Person p = new Person(); try { p.setAge(10086); } catch (Exception e) { e.printStackTrace(); } System.out.println(p.getAge()); } } //output: // java.lang.Exception: 年龄数据不合理! // at MyTest.Person.setAge(Person.java:10) // at MyTest.TestForTryCatch.main(TestForTryCatch.java:8) //0- 通常一个方法中使用 throw 抛出一个异常时,就要在方法声明时使用 throws 声明该异常的抛出以通知调用者解决该异常。
- 只有抛出 RuntimeException (运行时异常)及其子类型异常时可以不要求这样做。(后面会解释)
-
throws 小结:
- 当调用一个含有 throws 声明异常抛出的方法时,要求必须处理该异常;而处理方式有两种:
- 使用 try-catch 捕获并解决异常。
- 在当前方法上继续使用 throws 声明该异常的抛出。
- 当调用一个含有 throws 声明异常抛出的方法时,要求必须处理该异常;而处理方式有两种:
-
-
重写超类含有 throws 声明异常抛出的方法时对于 throws 的重写规则:
import java.awt.*; import java.io.FileNotFoundException; import java.io.IOException; import java.sql.SQLClientInfoException; public class Person { public void doSomething() throws IOException, AWTException{ } } class Son extends Person{ //可行方案 // public void doSomething() throws IOException, AWTException{ // //全部异常 // } // public void doSomething() throws AWTException { // //仅仅抛出部分异常 // } // public void doSomething(){ // //允许不抛出异常 // } // public void doSomething() throws FileNotFoundException { // //抛出超类方法抛出异常的子类型异常 // } //不可行方案: // public void doSomething() throws SQLClientInfoException { // //不允许抛出“额外”异常;和超类的异常类之间没有子类继承关系。 // } // public void doSomething() throws Exception { // //不允许抛出超类方法抛出异常的父类型异常。 // } } -
RuntimeException(运行时异常):
-
Java 异常可以分为可检测异常、非检测异常:
- 可检测异常——经过编译器验证,对于声明抛出异常的任何方法,编译器将强制执行处理或者声明规则,不捕获这个异常,编译器就不通过,不允许进行编译。
- 非检测异常——不遵循处理或者声明规则。在产生此类异常时,不一定是非要采用任何适当的操作,编译器不会检查是否已经解决了这样一个异常。
-
RuntimeException 类属于非检测异常,因为普通 JVM 操作引起的运行时异常随时可能发生,此类异常一般是由于特定操作引发的;但是这些操作在 java 应用程序中会频繁出现,因此它们不受编译器检查与处理或声明规则的限制。
通常一个方法中使用 throw 抛出一个异常时,就要在方法声明时使用 throws 声明该异常的抛出以通知调用者解决该异常。只有抛出 RuntimeException (运行时异常)及其子类型异常时可以不要求这样做。
-
常见的RuntimeException:
-
| 异常 | 说明 |
|---|---|
| IllegalArgumentException | 抛出的异常表明向方法传递了一个不合法或不正确的参数。 |
| NullPointerException | 当应用程序试图在需要对象的地方使用 null 时,抛出该异常。 |
| ArrayIndexOutOfBoundsException | 当使用的数组下标超过数组允许范围时,抛出该异常。 |
| ClassCastException | 当试图将对象强制转换为不是实例的子类时,抛出该异常。 |
| NumberFormatException | 当应用程序试图将字符串转换成一种数值类型,但该字符串不能转换为适当格式时,抛出该异常。 |
⑤Exception常用API:
-
printStackTrace 方法:输出错误信息。
public class TestForTryCatch { public static void main(String[] args) { try{ String string = "A"; System.out.println(Integer.parseInt(string)); }catch (Exception e){ e.printStackTrace();//输出错误信息 } } } //output: //java.lang.NumberFormatException: For input string: "A" // at java.base/java.lang.NumberFormatException.forInputString(NumberFormatException.java:68) // at java.base/java.lang.Integer.parseInt(Integer.java:652) // at java.base/java.lang.Integer.parseInt(Integer.java:770) // at MyTest.TestForTryCatch.main(TestForTryCatch.java:5) -
getMessage 方法:获取错误消息。
public class TestForTryCatch {
    public static void main(String[] args) {
        try{
            String string = "A";
            System.out.println(Integer.parseInt(string));
        }catch (Exception e){
            System.out.println(e.getMessage());//获取错误消息
        }
    }
}
//output:
//For input string: "A"
⑥自定义异常:
通常是用来说明当前项目的某个业务逻辑错误。
-
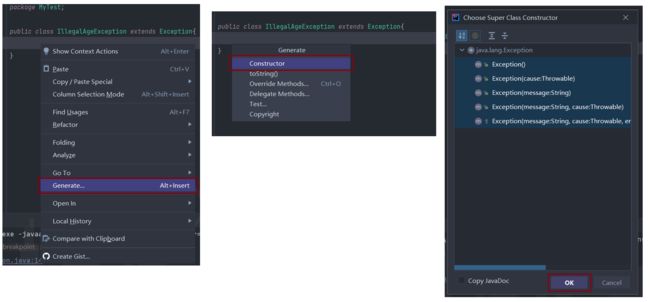
首先定义自定义异常时,需要将其继承现有的一个异常类。
public class IllegalAgeException extends Exception{ …… } -
然后自定义异常类中类体的声明可以借助编译器快捷实现。
-
最后使用时是和其他java给定的异常类一样使用的。
//异常类的定义:
public class IllegalAgeException extends Exception{
    public IllegalAgeException() {
    }

    public IllegalAgeException(String message) {
        super(message);
    }

    public IllegalAgeException(String message, Throwable cause) {
        super(message, cause);
    }

    public IllegalAgeException(Throwable cause) {
        super(cause);
    }

    public IllegalAgeException(String message, Throwable cause, boolean enableSuppression, boolean writableStackTrace) {
        super(message, cause, enableSuppression, writableStackTrace);
    }
}
//测试对象类的定义:
public class Person {
    private int age;

    public int getAge() {
        return age;
    }

    public void setAge(int age) throws IllegalAgeException {
        if (age<0||age>100){
            throw new IllegalAgeException("年龄不符合!");
        }
        this.age = age;
    }
}
//测试程序的设计:
public class TestForTryCatch {
    public static void main(String[] args) {
        Person p = new Person();
        try {
            p.setAge(10086);
        } catch (IllegalAgeException e) {
            e.printStackTrace();
        }
        System.out.println(p.getAge());
    }
}
//output:
// MyTest.IllegalAgeException: 年龄不符合!
//	at MyTest.Person.setAge(Person.java:14)
//	at MyTest.TestForTryCatch.main(TestForTryCatch.java:7)
