将项目部署到Linux系统上
目的是让我们的项目在linux上也能运行起来
有两种部署方式,手工部署或者是通过shell脚本自动部署
手工部署
准备工作:使用ifconfig指令查出服务器的ip地址:192.168.58.130
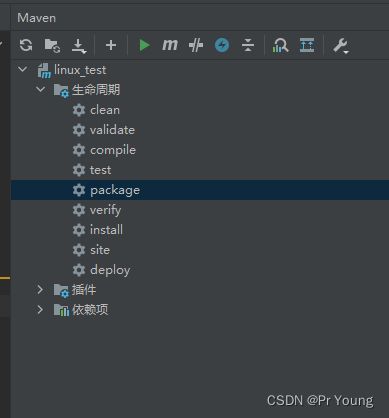
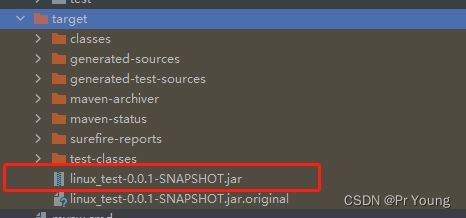
1.在本地Idea中开发一个springboot项目,并且打包成jar包,在maven里面点击package就可以进行打包 ,打成的包在target文件夹里面
这个简单小项目如下:
@RestController
@RequestMapping("/hello")
public class HelloController
{
    @GetMapping("")
    public String hello()
    {
        System.out.println("Hello  world");

        return  "ok";
    }
}
2.在/usr/local文件夹下创建一个app文件夹
cd  /usr/local
mkdir  app
cd  app
将jar包上传到这个文件夹
3.启动springboot项目
注意这一步由于使用了java指令,所以需要先安装jdk
而且如果你项目pom.xml里面jdk是1.7,但是linux服务器的jdk是1.8,也是无法成功运行的
[root@localhost ~]# cd /usr/local/app
[root@localhost app]# ls
linux_test-0.0.1-SNAPSHOT.jar
[root@localhost app]# java -jar linux_test-0.0.1-SNAPSHOT.jar

  .   ____          _            __ _ _
 /\\ / ___'_ __ _ _(_)_ __  __ _ \ \ \ \
( ( )\___ | '_ | '_| | '_ \/ _` | \ \ \ \
 \\/  ___)| |_)| | | | | || (_| |  ) ) ) )
  '  |____| .__|_| |_|_| |_\__, | / / / /
 =========|_|==============|___/=/_/_/_/
 :: Spring Boot ::                (v2.7.5)

2022-11-23 11:36:34.261  INFO 78186 --- [           main] c.e.linux_test.LinuxTestApplication      : Starting LinuxTestApplication v0.0.1-SNAPSHOT using Java 1.8.0_332 on localhost.localdomain with PID 78186 (/usr/local/app/linux_test-0.0.1-SNAPSHOT.jar started by root in /usr/local/app)
2022-11-23 11:36:34.275  INFO 78186 --- [           main] c.e.linux_test.LinuxTestApplication      : No active profile set, falling back to 1 default profile: "default"
2022-11-23 11:36:41.499  INFO 78186 --- [           main] o.s.b.w.embedded.tomcat.TomcatWebServer  : Tomcat initialized with port(s): 8080 (http)
2022-11-23 11:36:41.631  INFO 78186 --- [           main] o.apache.catalina.core.StandardService   : Starting service [Tomcat]
2022-11-23 11:36:41.631  INFO 78186 --- [           main] org.apache.catalina.core.StandardEngine  : Starting Servlet engine: [Apache Tomcat/9.0.68]
2022-11-23 11:36:43.748  INFO 78186 --- [           main] o.a.c.c.C.[Tomcat].[localhost].[/]       : Initializing Spring embedded WebApplicationContext
2022-11-23 11:36:43.748  INFO 78186 --- [           main] w.s.c.ServletWebServerApplicationContext : Root WebApplicationContext: initialization completed in 9297 ms
2022-11-23 11:36:45.758  INFO 78186 --- [           main] o.s.b.w.embedded.tomcat.TomcatWebServer  : Tomcat started on port(s): 8080 (http) with context path ''
2022-11-23 11:36:45.880  INFO 78186 --- [           main] c.e.linux_test.LinuxTestApplication      : Started LinuxTestApplication in 19.571 seconds (JVM running for 20.989)
4.检查服务器的防火墙,确保服务器的8080端口是对外开放的,这样浏览器才能成功访问到服务器上的springboot项目
Centos7 关闭防火墙,打开防火墙,开放某个端口,关闭某个端口_Pr Young的博客-CSDN博客
此时你在任意一台电脑上访问服务器的ip地址:http:192.168.58.130:8080/hello,都可以访问到我们的页面
将这个程序放在后台运行:即使退出终端也不会影响程序的运行
进入usr/local/app文件夹,输入nohup命令
[root@localhost app]# nohup java -jar linux_test-0.0.1-SNAPSHOT.jar &>hello.log &
[1] 80265
同时在这个文件夹下面会生成一个日志文件hello.log。,然后这个程序就在后台运行了,即使关掉终端窗口,也还是在继续运行
要停止这个后台程序,就只能通过杀进程的方式停止这个后台程序:
[root@localhost app]# ps -ef | grep java

root      80265  64801  2 13:51 pts/0    00:00:16 java -jar linux_test-0.0.1-SNAPSHOT.jar
root      80497  64801  0 14:01 pts/0    00:00:00 grep --color=auto java
可以看到 java -jar linux_test-0.0.1-SNAPSHOT.jar这个进程的id是80265,杀死这个进程即可
[root@localhost app]# kill -9 80265
通过shell脚本自动部署项目:
1.在linux上安装Git
yum list git
yum install git
2.上代码仓库把代码克隆下来
[root@localhost /]# cd usr
[root@localhost usr]# cd local
[root@localhost local]# git clone https://gitee.com/ouyangshuiming/linux_test
3.安装maven
解压:
root@localhost local]# tar -zxvf apache-maven-3.6.3-bin.tar.gz 配置环境变量:
进入vim /etc/profilevim ,按i进入编辑模式
export MAVEN_HOME=/usr/local/apache-maven-3.6.3
export PATH=$JAVA_HOME/bin:$MAVEN_HOME/bin:$Path
最后esc,冒号,wq
4.bootStar.sh文件上传到/usr/local/sh文件夹里面
5.更改bootStar.sh文件的权限
[root@localhost sh]# ll
总用量 4
-rw-r--r--. 1 root root 1437 11月 23 16:01 bootStart.sh
[root@localhost sh]# chmod 777 bootStart.sh
[root@localhost sh]# ll
总用量 4
-rwxrwxrwx. 1 root root 1437 11月 23 16:01 bootStart.sh
6.执行shell文件
[root@localhost sh]# ./bootStart.sh
=================================
自动化部署脚本启动
=================================
停止原来运行中的工程
Stop Success!
准备从Git仓库拉取最新代码
开始从Git仓库拉取最新代码
fatal: Not a git repository (or any of the parent directories): .git
代码拉取完成
开始打包
./bootStart.sh: 第 36 行:cd: target: 没有那个文件或目录
启动项目
项目启动完成
坏的解释器: 没有那个文件或目录 - 简书
如果出现坏的解释器问题,可以参考这篇博客vim

