Springboot 使用管道设计模式 , 实践案例玩一玩
前言
这段时间,学习群里大家讨论设计模式频率很高,可以看出来 日常搬砖 CRUD 已经让人从麻木到想脱离麻木,对代码有了些许追求。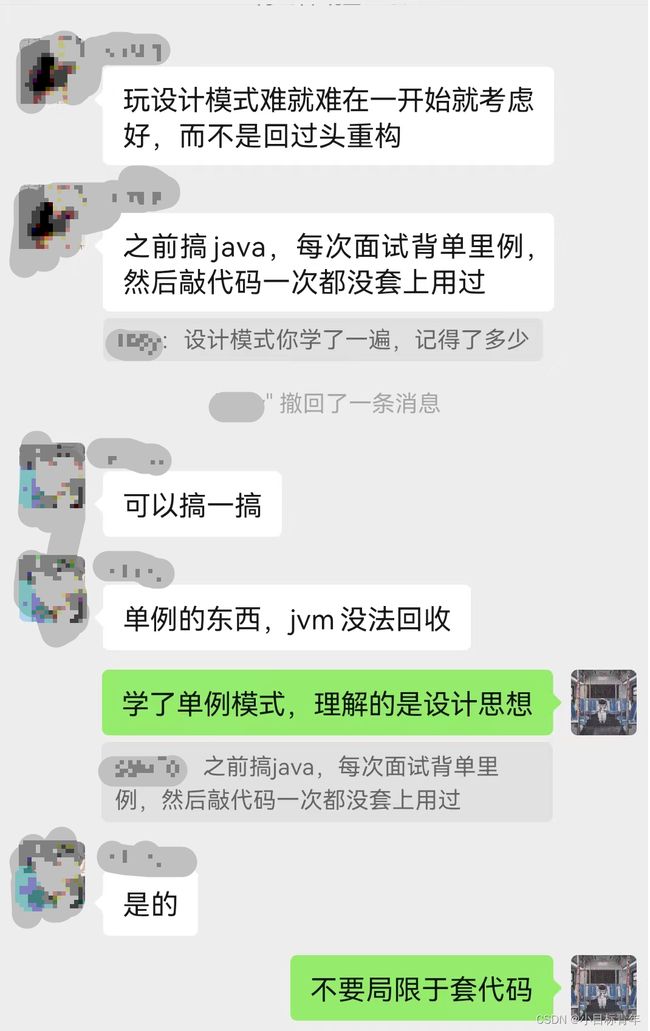
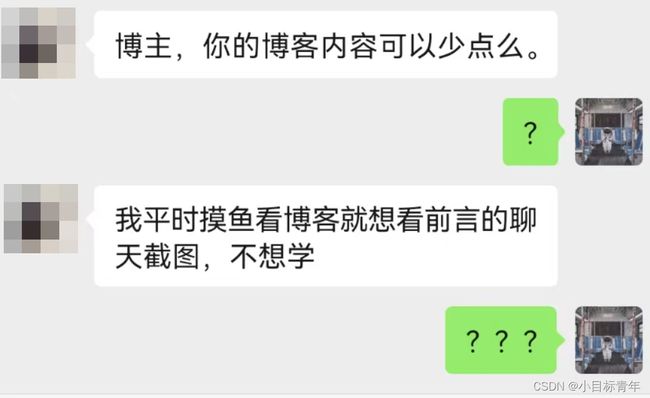
当然也有还没放开的小伙(N重打码照顾兄弟),不敢参与讨论,但是私下还是非常愿意学的:
继续啰嗦下:
还是那句话,学习是自己的事情,但是跟着我学未尝不可。
不局限于参与讨论,但是我个人推崇参与讨论。
因为在叙述一个idea,一个design ,或者是 一个 question 的时候 ,
可能你在叙述的过程中,你就发现了自己的 漏洞;
可能在与各位兄弟(姐妹)在思想碰撞的时候,无形中就成长了的。
???
开搞。
正文
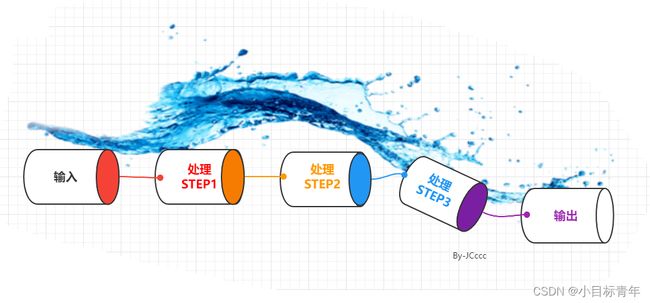
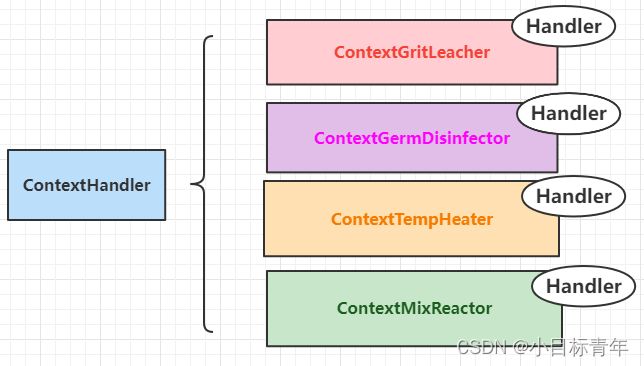
先看一个简图 :
再看一下大白话 :
管道 (Pipeline ) , 一节一节 管子 (Handler)组成
里面流通的 是 水 (Context)
而 每一节 管子, 直接连接的地方 ,叫 阀 (Boolean 阀值)(角阀、三角阀)
这个触发流程工艺, 我们交给一个 执行者负责 (Executor)
ps : 当然 你说你只有一节管子,当我没说,你现在就出去,不要再看这篇文章了。
补充简述 接下来实例内容:
管与阀的设计
从 第一节 管子Handler 流到 第二节 管子Handler ,能不能流过去, 我们可以在这俩 管子 之间的
阀 做设计。
简单举例 ,
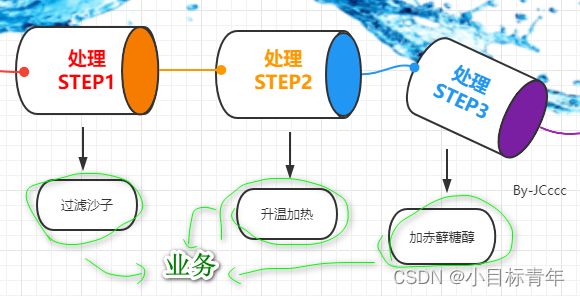
例如 必须在第一节管子 里面, 把水的沙子清除掉, 我这个阀能检测沙子占比, 不通过是不会让水流到第二节管子的。
所以第一节管子 Handler, 起个名字 叫 过滤沙子管Handler 。
然后同样, 第二节 管子, 是个加热管,升温到 100摄氏度, 因为能够流到第三节管子的阀 要求温度到100摄氏度 ,起个名字 叫 升温管Handler 。
最后一节管子的业务,那就 加点 赤藓糖醇吧 ,就叫 加点糖管Handler 吧。
有了这些管子, 顺序一旦被 阀 组合固定后, 就成了 固定顺序、固定步骤的 ‘责任链’。
看到这里,这管道模式的设计,似乎不咋滴啊 ?
且慢,还没说完。
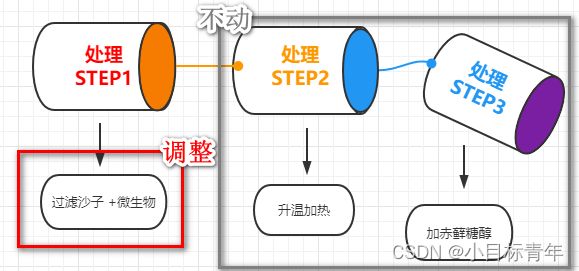
哪天,我们想调整某节管子的业务功能
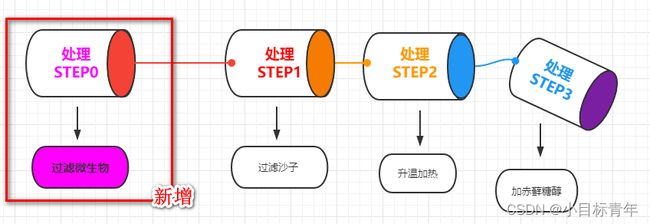
例如 过滤沙子 改成 过滤沙子 + 微生物, 我们只需要对某一节 管子的 业务功能做处理即可 :
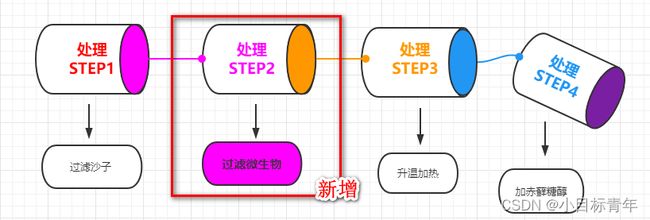
又比如说, 经过讨论, 认为 一块把沙子和 微生物 过滤 ,不行,需要分开,多一节管子 处理微生物, 不慌, 直接加一节管子 就行 (具体后面实战会教大家怎么玩,轻轻松松加管子):
当然,这节 过滤微生物管子Handler ,新增在哪,都是随随便便的 :
又假如有一天, 接到新的业务了 (产品又提需求了) ,
说之前的这个 加赤藓糖醇 水 就持续保留 。
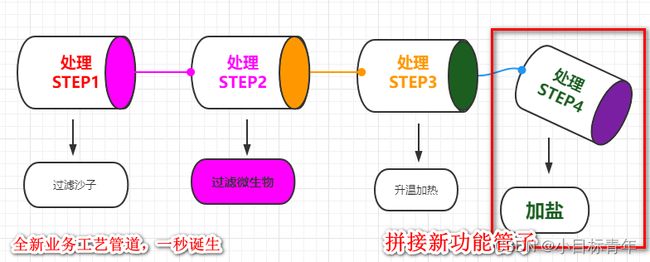
然后我们需要整 一种水 , 这个玩意啊, 前面也是 需要过滤沙子 ,也需要升温 ,不过最后不加糖,改成加盐!
一条新的工艺管道 , 执行者 还是 Executor , 但是这个新的工艺管道 组建起来,非常简单 。
- 职责单一分治
- 随意组合
- 拓展简易
- 新业务易克隆新生
- 角阀式固序,环环相扣
开始敲代码 。
①pom文件引入依赖:
            commons-collections
            commons-collections
            3.1


            org.springframework.boot
            spring-boot-starter-web


            org.projectlombok
            lombok
            true


            org.springframework.boot
            spring-boot-starter-test
            test
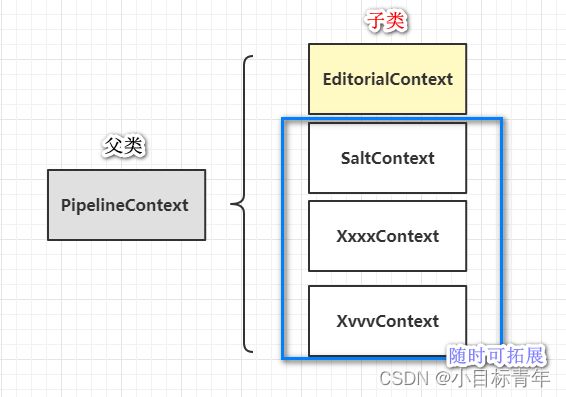
②创建一个 管道内容(父类),PipelineContext.java:
import lombok.Data;
import java.time.LocalDateTime;

/**
 * @Author: JCccc
 * @Date: 2022-09-06 11:24
 * @Description: 传递到管道的上下文
 */
@Data
public class PipelineContext {

    /**
     * 模型ID 管道内容
     */
    private Long modelId;

    /**
     * 故障信息
     */
    private String failureMsg;

    /**
     * 开始时间
     */
    private LocalDateTime beginTime;

    /**
     * 结束
     */
    private LocalDateTime endTime;

    /**
     * 获取模型名
     * @return
     */
    public String getModelName() {
        return this.getClass().getSimpleName();
    }
}
③ 第一个业务流程所需的 管道 Context , 赤藓糖醇工艺Context ,EditorialContext.java:
import com.jc.pipelinedemo.context.PipelineContext;
import lombok.Data;
import java.util.Map;

/**
 * @Author: JCccc
 * @Date: 2022-10-13 11:26
 * @Description: 加赤藓糖醇的工艺 Context
 */
@Data
public class EditorialContext extends PipelineContext {


    /**
     * 溯源ID 一次业务流程一个ID
     */
    private String traceId;

    /**
     * 操作人 ID
     */
    private long operatorId;

    /**
     * 业务输入参
     */
    private Map inputParams;


    //其他业务参数......

    @Override
    public String getModelName() {
        return "赤藓糖醇MODEL";
    }
}
④ 创建 context处理器 ,也就是每一节管子的处理能力(interface) ContextHandler.java :
/**
 * @Author: JCccc
 * @Date: 2022-08-17 11:26
 * @Description: 管道中的上下文处理器
 */
public interface ContextHandler {

    /**
     * 处理输入的上下文数据
     *
     * @param context 处理时的上下文数据
     * @return 返回 (阀值) true 则表示由下一个 ContextHandler 继续处理 ; 返回 false 则表示处理结束.
     */
    boolean handle(T context);
}
⑤ 创建 第一节管子 砂砾浸出器 (管道处理器) ContextGritLeacher.java :
import com.jc.pipelinedemo.context.mycontext.EditorialContext;
import com.jc.pipelinedemo.handler.ContextHandler;
import org.slf4j.Logger;
import org.slf4j.LoggerFactory;
import org.springframework.stereotype.Component;
import org.springframework.util.CollectionUtils;
import org.springframework.util.StringUtils;

import java.util.Map;

/**
 * @Author: JCccc
 * @Date: 2022-10-13 11:28
 * @Description: 砂砾浸出器  (管道处理器)
 */
@Component
public class ContextGritLeacher implements ContextHandler {

    private final Logger logger = LoggerFactory.getLogger(this.getClass());

    @Override
    public boolean handle(EditorialContext context) {
        Map formInput = context.getInputParams();

        if ((CollectionUtils.isEmpty(formInput))) {
            context.setFailureMsg("业务输入数据不能为空");
            return false;
        }
        //模拟 砂砾处理 业务逻辑

        String source = (String) formInput.get("source");
        if (StringUtils.isEmpty(source)) {
            context.setFailureMsg("材料必须存在来源地");
            return false;
        }

        //业务逻辑省略

        return true;
    }
}
⑥ 创建 第二节管子 微生物消杀器(管道处理器) ContextGermDisinfector.java :
import com.jc.pipelinedemo.context.mycontext.EditorialContext;
import com.jc.pipelinedemo.handler.ContextHandler;
import org.slf4j.Logger;
import org.slf4j.LoggerFactory;
import org.springframework.stereotype.Component;
import org.springframework.util.CollectionUtils;
import org.springframework.util.StringUtils;

import java.util.Map;

/**
 * @Author: JCccc
 * @Date: 2022-10-13 11:28
 * @Description: 微生物消杀器  (管道处理器)
 */
@Component
public class ContextGermDisinfector implements ContextHandler {

    private final Logger logger = LoggerFactory.getLogger(this.getClass());

    @Override
    public boolean handle(EditorialContext context) {
        Map formInput = context.getInputParams();

        if ((CollectionUtils.isEmpty(formInput))) {
            context.setFailureMsg("业务输入数据不能为空");
            return false;
        }
        //模拟 微生物处理 业务逻辑

        String disinfectantCode = (String) formInput.get("disinfectantCode");
        if (StringUtils.isEmpty(disinfectantCode)) {
            context.setFailureMsg("材料必须包含消毒挤编码");
            return false;
        }

        //业务逻辑省略

        return true;
    }
}
⑦ 创建 第三节管子 温度加热器 (管道处理器) ContextTempHeater.java :
import com.jc.pipelinedemo.context.mycontext.EditorialContext;
import com.jc.pipelinedemo.handler.ContextHandler;
import org.slf4j.Logger;
import org.slf4j.LoggerFactory;
import org.springframework.stereotype.Component;
import org.springframework.util.CollectionUtils;
import org.springframework.util.StringUtils;

import java.util.Map;

/**
 * @Author: JCccc
 * @Date: 2022-10-13 11:28
 * @Description: 温度加热器  (管道处理器)
 */
@Component
public class ContextTempHeater implements ContextHandler {

    private final Logger logger = LoggerFactory.getLogger(this.getClass());

    @Override
    public boolean handle(EditorialContext context) {
        Map formInput = context.getInputParams();

        if ((CollectionUtils.isEmpty(formInput))) {
            context.setFailureMsg("业务输入数据不能为空");
            return false;
        }
        //模拟 业务逻辑

        String tempRequire = (String) formInput.get("tempRequire");
        if (StringUtils.isEmpty(tempRequire)) {
            context.setFailureMsg("材料必须包含温度要求");
            return false;
        }

        //业务逻辑省略

        return true;
    }
}
⑧创建 第三节管子 配料反应器 (管道处理器) ContextMixReactor.java :
import com.jc.pipelinedemo.context.mycontext.EditorialContext;
import com.jc.pipelinedemo.handler.ContextHandler;
import org.slf4j.Logger;
import org.slf4j.LoggerFactory;
import org.springframework.stereotype.Component;
import org.springframework.util.CollectionUtils;
import org.springframework.util.StringUtils;

import java.util.Map;

/**
 * @Author: JCccc
 * @Date: 2022-10-13 11:28
 * @Description: 配料反应器  (管道处理器)
 */
@Component
public class ContextMixReactor implements ContextHandler {

    private final Logger logger = LoggerFactory.getLogger(this.getClass());

    @Override
    public boolean handle(EditorialContext context) {
        Map formInput = context.getInputParams();

        if ((CollectionUtils.isEmpty(formInput))) {
            context.setFailureMsg("业务输入数据不能为空");
            return false;
        }
        //模拟 配料添加 业务逻辑

        String mixtureScale = (String) formInput.get("mixtureScale");
        if (StringUtils.isEmpty(mixtureScale)) {
            context.setFailureMsg("材料必须包含配料比例");
            return false;
        }

        //业务逻辑省略

        return true;
    }
}
handler 处理器,也就是对应管道的每一节管子 :
现在是 有了 Context 和 Context 处理器, 还差 角阀 来把 这些管子 contextHandler 组合固序 。
⑨ 创建 PipelineRouteConfig.java :
import com.jc.pipelinedemo.context.PipelineContext;
import com.jc.pipelinedemo.context.mycontext.EditorialContext;
import com.jc.pipelinedemo.handler.ContextHandler;
import com.jc.pipelinedemo.handler.myhandler.editorial.ContextGermDisinfector;
import com.jc.pipelinedemo.handler.myhandler.editorial.ContextGritLeacher;
import com.jc.pipelinedemo.handler.myhandler.editorial.ContextMixReactor;
import com.jc.pipelinedemo.handler.myhandler.editorial.ContextTempHeater;
import org.springframework.beans.BeansException;
import org.springframework.context.ApplicationContext;
import org.springframework.context.ApplicationContextAware;
import org.springframework.context.annotation.Bean;
import org.springframework.context.annotation.Configuration;
import java.util.Arrays;
import java.util.HashMap;
import java.util.List;
import java.util.Map;
import java.util.stream.Collectors;


/**
 * @Author: JCccc
 * @Date: 2022-10-13 11:28
 * @Description: 管道每一节管子的路由顺序配置
 */
@Configuration
public class PipelineRouteConfig implements ApplicationContextAware {

    private static final
    Map,
            List>>> PIPELINE_ROUTE_MAP = new HashMap<>(4);


    static {
        PIPELINE_ROUTE_MAP.put(EditorialContext.class,
                Arrays.asList(
                        ContextGritLeacher.class,
                        ContextGermDisinfector.class,
                        ContextTempHeater.class,
                        ContextMixReactor.class
                ));


    }

    /**
     * 在 Spring 启动时,根据路由表生成对应的管道映射关系,
     * PipelineExecutor 从这里获取处理器列表
     */
    @Bean("pipelineRouteMap")
    public Map, List>> getHandlerPipelineMap() {
        return PIPELINE_ROUTE_MAP.entrySet()
                .stream()
                .collect(Collectors.toMap(Map.Entry::getKey, this::toPipeline));
    }

    /**
     * 根据给定的管道中 ContextHandler 的类型的列表,构建管道
     */
    private List> toPipeline(
            Map.Entry, List>>> entry) {
        return entry.getValue()
                .stream()
                .map(appContext::getBean)
                .collect(Collectors.toList());
    }

    private ApplicationContext appContext;

    @Override
    public void setApplicationContext(ApplicationContext applicationContext) throws BeansException {
        appContext = applicationContext;
    }
}
简述作用 :
spring启动, 把 Context作为key ,然后把相关的 管道每一节都按照我们想要的循序固定好丢到list里面,作为value , 放进 PIPELINE_ROUTE_MAP 里面去。
为什么要这样做的,其实就是 相当于把责任链的 责任序 做成配置化。
目前是通过static 代码块 实现, 其实可以改成从 数据库读取 简单设置一个sort, 然后这样可以更加动态地去变换顺序。
⑩ 最后就是我们的 管道负责者,执行器 , PipelineExecutor.java :
import com.jc.pipelinedemo.context.PipelineContext;
import com.jc.pipelinedemo.handler.ContextHandler;
import org.slf4j.Logger;
import org.slf4j.LoggerFactory;
import org.springframework.stereotype.Component;
import org.springframework.util.CollectionUtils;
import javax.annotation.Resource;
import java.util.List;
import java.util.Map;
import java.util.Objects;

/**
 * @Author: JCccc
 * @Date: 2022-10-13 13:39
 * @Description: 管道执行器
 */
@Component
public class PipelineExecutor {


    private final Logger logger = LoggerFactory.getLogger(this.getClass());
    /**
     * PipelineRouteConfig 中的 pipelineRouteMap
     */
    @Resource
    private Map,
                List>> pipelineRouteMap;

    /**
     * 同步处理输入的上下文数据

     * 如果处理时上下文数据流通到最后一个处理器且最后一个处理器返回 true,则返回 true,否则返回 false
     *
     * @param context 输入的上下文数据
     * @return 处理过程中管道是否畅通,畅通返回 true,不畅通返回 false
     */
    public boolean acceptSync(PipelineContext context) {
        Objects.requireNonNull(context, "上下文数据不能为 null");
        // 拿到context数据类型
        Class dataType = context.getClass();
        // 获取数据处理管道list (每一节)
        List> pipeline = pipelineRouteMap.get(dataType);
        if (CollectionUtils.isEmpty(pipeline)) {
            logger.error("{} 的管道为空", dataType.getSimpleName());
            return false;
        }
        // 管道是否畅通
        boolean lastSuccess = true;
        for (ContextHandler handler : pipeline) {
            try {
                lastSuccess = handler.handle(context);
            } catch (Throwable ex) {
                lastSuccess = false;
                logger.error("[{}] 处理异常,handler={}", context.getModelName(), handler.getClass().getSimpleName(), ex);
            }
            // 终止处理
            if (!lastSuccess) { break; }
        }
        return lastSuccess;
    }


}
最后就是 玩一下,简单示例写个调用service:
import javax.annotation.Resource;

/**
 * @Author: JCccc
 * @Date: 2022-10-13 13:43
 * @Description:
 */
@Service
public class DealService{
    private final Logger logger = LoggerFactory.getLogger(this.getClass());
    @Resource
    PipelineExecutor pipelineExecutor;

    public ResultResponse dealSync(InstanceBuildRequest request) {
        PipelineContext data = convertPipelineContext(request);
        if (Objects.isNull(data)) {
            return ResultResponse.returnFail("数据异常");
        }
        boolean success = pipelineExecutor.acceptSync(data);
        if (success) {
            return ResultResponse.returnSuccess(data.getModelId());
        }
        logger.error("管道处理失败:{}", data.getFailureMsg());
        return ResultResponse.returnFail(data.getFailureMsg());
    }

}
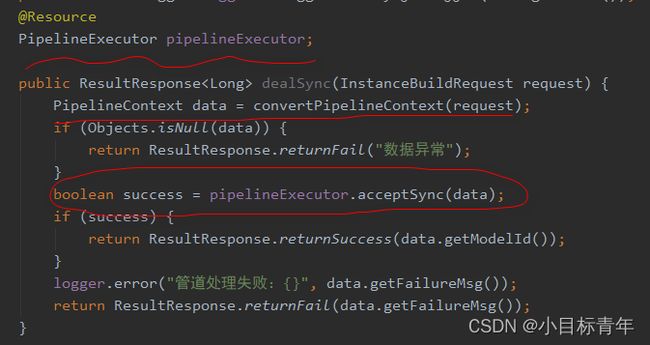
其实核心就是通过executor调用一下 :
看看执行效果 ,如果某个管道条件不符合,处理不了,直接终止: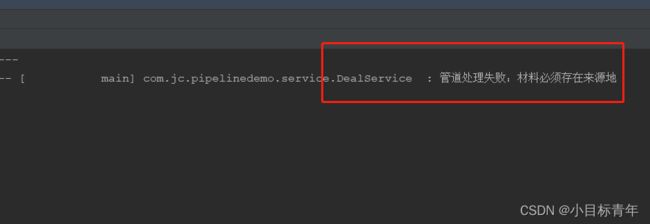
演变/变动:
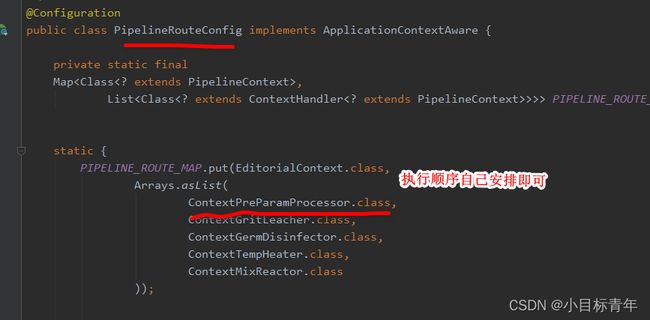
哪天需要新增某节管子 ,例如 参数预处理器 ContextPreParamProcessor
然后在配置路由类里面,安排上对应的管子即可:
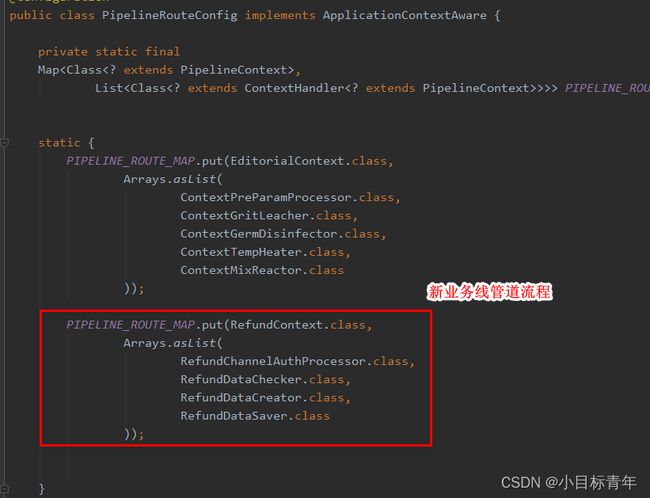
假如完全来了一个新的业务流程 , 那么直接在这里 简简单单配置起来相关的管道链即可 (当然如果有些管子的共用的,也是可以自由组合起来):
好的该篇就到这。

