Vue2.x、Vue3.x、Vite以及Webpack创建Vue项目,关联github版本管理
Vue2.x、Vue3.x、Vite以及Webpack创建Vue项目,关联github版本管理
- 前提条件
- 创建Vue2.x的项目
-
-
-
-
-
- 方式一:`vue init webpack projectname`
- 方式二:`vue create projectname`
-
-
-
-
- 创建Vue3.x的项目
-
-
-
-
-
- 方式一:`vue create projectname` 如上图默认创建
- 方式二:`npm init vite` 使用vite通过选择模板进行创建
- 方式三:`npm create vite@latest vite-vue-js-template -- --template vue` 使用vite指定模板进行创建
-
-
-
-
- 创建Webpack项目
-
- 使用webpack集成创建vue项目
-
-
-
-
- 创建项目文件夹:`md e:\worksapce\project_name`
- 初始化项目工程:`npm init -y`
- 安装项目构建依赖 :`npm i --save-dev webpack webpack-cli webpack-dev-server webpack-merge html-webpack-plugin`
- 创建修改webpack.config.js、webpack.config.dev.js、webpack.config.pro.js文件
- 安装项目构建编译基础依赖:`npm i --save-dev vue-loader clean-webpack-plugin babel-loader @babel/preset-env`
- 配置 webpack.config.js
- 安装项目构建编译开发环境依赖:`npm i --save-dev style-loader css-loader sass-loader sass`
- 配置webpack.config.dev.js
- 安装项目构建编译生产环境依赖:`npm i --save-dev mini-css-extract-plugin copy-webpack-plugin`
- 配置webpack.config.pro.js
- 修改package.json文件配置npm命令scripts脚本
- 安装vue全家桶,基于开发项目本身:`npm i vue-router vuex axios --save-dev`
-
-
-
- 初始化git仓库,关联远程分支
- 写在最后
前提条件
- 安装nodejs:Windows前端环境搭建Nodejs下载安装配置
- 安装VueCLI:
npm install -g @vue/cli - VueCLI >= 3 和旧版使用了相同的 vue 命令,所以 Vue CLI 2 (vue-cli) 被覆盖了。如果你仍然需要使用旧版本的 vue init 功能,你可以全局安装一个桥接工具:
npm install -g @vue/cli-init - 查看VueCLI版本:
vue -V注意大写的 V
创建Vue2.x的项目
方式一:vue init webpack projectname
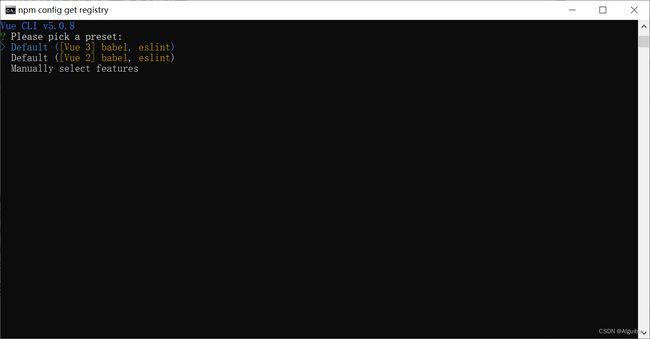
方式二:vue create projectname
方式二是要手动选择创建的项目使用的vue版本,默认Vue3.x
上下键:上下移动
空格键:切换选中
回车键:确认执行
---
(*) Choose Vue version //选择vue版本 2或者3
( ) Babel // 支持高阶语法转换
( ) TypeScript // 支持使用 TypeScript 书写源码
( ) Progressive Web App (PWA) Support // 支持PWA
( ) Router // 路由
( ) Vuex // store
( ) CSS Pre-processors // CSS 预处理器
( ) Linter / Formatter // 代码风格检查和格式化
( ) Unit Testing // 支持单元测试
( ) E2E Testing // 支持E2E测试

一般选择:Babel,Router,Vuex,CSS Pre-processors
创建Vue3.x的项目
方式一:vue create projectname 如上图默认创建
方式二:npm init vite 使用vite通过选择模板进行创建
方式三:npm create vite@latest vite-vue-js-template -- --template vue 使用vite指定模板进行创建

创建Webpack项目
使用webpack集成创建vue项目
创建项目文件夹:md e:\worksapce\project_name
初始化项目工程:npm init -y
安装项目构建依赖 :npm i --save-dev webpack webpack-cli webpack-dev-server webpack-merge html-webpack-plugin
webpack 构建项目工具包
webpack-cli 构建项目工具包+1
webpack-dev-server 开发环境本地服务器工具包
webpack-merge 开发环境、生产环境分离工具包
html-wepback-plugin 打包html文件的工具包
创建修改webpack.config.js、webpack.config.dev.js、webpack.config.pro.js文件
webpack.config.js 公共配置项
webpack.config.dev.js 开发环境的配置项
webpack.config.pro.js 生产环境的配置项
安装项目构建编译基础依赖:npm i --save-dev vue-loader clean-webpack-plugin babel-loader @babel/preset-env
配置 webpack.config.js
const path = require('path')
const { VueLoaderPlugin } = require('vue-loader')
const HtmlWebpackPlugin = require('html-webpack-plugin')
const { CleanWebpackPlugin } = require('clean-webpack-plugin');

module.exports = {
  entry: './src/main.js',
  output: {
    path: path.resolve(__dirname, 'dist'),
    filename: 'bundle.js',
  },
  resolve: {
    extensions: ['.js', '.vue'],
    alias: {
      '@': path.resolve(__dirname, 'src'),
    },
  },
  module: {
    rules: [
      {
        test: /\.vue$/,
        use: ['vue-loader']
      },
      {
        test: /\.(png|jpe?g|gif|svg|webp|ico)$/,
        type: 'asset/resource'
      },
      {
        test: /\/js$/,
        exclude: /node_modules/,
        use: {
          loader: 'babel-loader',
          options: {
            presets: ['@babel/preset-env'],
            cacheDirectory: true
          }
        }
      }
    ],
  },
  plugins: [
    new VueLoaderPlugin(),
    new HtmlWebpackPlugin({
      template: './public/index.html', // 这是html模板存放的地址
      filename: 'index.html',
    }),
    new CleanWebpackPlugin()
  ],
}
// entry、output项目打包入口和打包出口
// resolve便捷路径转义
// loader中配置了vue-loader、babel预处理器进行文件处理;
// plugins中配置了vue的插件、html模板编译、打包清空目录插件
安装项目构建编译开发环境依赖:npm i --save-dev style-loader css-loader sass-loader sass
配置webpack.config.dev.js
const path = require('path');
const { merge } = require('webpack-merge');
const baseConfig = require('./webpack.config.js');

module.exports = merge(baseConfig, {
  module: {
    rules: [
      {
        test: /\.css|scss|sass$/,
        use: ['style-loader', 'css-loader', 'sass-loader']
      },
    ]
  },
  devServer: {
    open: true,
    host: '127.0.0.1',
    port: 8080,
    client: {
      logging: 'none',
    },
    hot: true,
    historyApiFallback: true
  },
  mode: 'development',
  devtool: 'inline-source-map'
})
安装项目构建编译生产环境依赖:npm i --save-dev mini-css-extract-plugin copy-webpack-plugin
配置webpack.config.pro.js
const path = require('path');
const { merge } = require('webpack-merge');
const baseConfig = require('./webpack.config.js');
const TerserPlugin = require('terser-webpack-plugin');
const MiniCssExtractPlugin = require('mini-css-extract-plugin');
const CopyPlugin = require('copy-webpack-plugin');

module.exports = merge(baseConfig, {
  module: {
    rules: [
      {
        test: /\.css|scss|sass$/,
        use: [MiniCssExtractPlugin.loader, 'css-loader', 'sass-loader']
      },
    ]
  },
  plugins: [
    new CopyPlugin({
      patterns: [
        {
          from: path.resolve(__dirname, 'public', 'favicon.ico'),
          to: path.resolve(__dirname, 'dist/image/')
        }
      ]
    })
  ],
  optimization: {
    usedExports: true,
    minimize: true,
    minimizer: [
      new TerserPlugin(),
      new MiniCssExtractPlugin({
        filename: 'index-[contenthash:8].css',
        chunkFilename: '[id].css'
      })
    ]
  },
  cache: {
    type: 'filesystem',
  },
  mode: 'production',
  devtool: 'cheap-module-source-map'
})
// 样式预处理器采用 mini-css-extract-plugin 将所有样式抽离成一行;
// copy-webpack-plugin 将一些静态资源直接转移至dist目录,这里用Vue ico举例;
// optimization 进行了代码压缩,包括tree-shaking、js压缩、css压缩;
// cache 开启文件缓存,可以让我们的打包速度飞跃性的提升
修改package.json文件配置npm命令scripts脚本
scripts: {
 	"dev": "webpack-dev-server --mode=development --config webpack.config.dev.js",
    "build": "npx webpack --mode=production --config webpack.config.pro.js"
}
安装vue全家桶,基于开发项目本身:npm i vue-router vuex axios --save-dev
初始化git仓库,关联远程分支
git init
git remote add origin git@github.com:xxx/HelloWorldFrontend.git
git checkout --orphan branchName
git add .
git commit -m "init"
git push -u origin branchName || git push --set-upstream origin branchName
举个例子:
进入目录:cd E:/WorkSpace/HelloWorldFrontend
使用npm init vite命令,输入y
设置项目名称:aiguibin-protal-gateway
依次选择:vue、JavaScript创建的默认项目
执行:npm install
执行:npm run dev
VITE v4.0.4  ready in 678 ms

  ➜  Local:   http://localhost:5173/
  ➜  Network: use --host to expose
  ➜  press h to show help
访问:http://localhost:5173

然后,便可关联远程仓库
aiguibin@HighYieldRoad MINGW64 /e/WorkSpace/HelloWorldFrontend/aiguibin-protal-gateway
$ git init
Initialized empty Git repository in E:/WorkSpace/HelloWorldFrontend/aiguibin-protal-gateway/.git/

aiguibin@HighYieldRoad MINGW64 /e/WorkSpace/HelloWorldFrontend/aiguibin-protal-gateway (master)
$ git remote add origin [email protected]:AIguibin/HelloWorldFrontend.git

aiguibin@HighYieldRoad MINGW64 /e/WorkSpace/HelloWorldFrontend/aiguibin-protal-gateway (master)
$ git checkout --orphan aiguibin-protal-gateway
Switched to a new branch 'aiguibin-protal-gateway'

aiguibin@HighYieldRoad MINGW64 /e/WorkSpace/HelloWorldFrontend/aiguibin-protal-gateway (aiguibin-protal-gateway)
$ git add .
warning: in the working copy of '.gitignore', LF will be replaced by CRLF the next time Git touches it
...

aiguibin@HighYieldRoad MINGW64 /e/WorkSpace/HelloWorldFrontend/aiguibin-protal-gateway (aiguibin-protal-gateway)
$ git commit -m "init"
[aiguibin-protal-gateway (root-commit) a255003] init
 13 files changed, 1426 insertions(+)
 create mode 100644 .gitignore
 ...
 create mode 100644 vite.config.js

aiguibin@HighYieldRoad MINGW64 /e/WorkSpace/HelloWorldFrontend/aiguibin-protal-gateway (aiguibin-protal-gateway)
$ git push --set-upstream origin aiguibin-protal-gateway
...
remote: Create a pull request for 'aiguibin-protal-gateway' on GitHub by visiting:
remote:      https://github.com/AIguibin/HelloWorldFrontend/pull/new/aiguibin-protal-gateway
remote:
To github.com:AIguibin/HelloWorldFrontend.git
 * [new branch]      aiguibin-protal-gateway -> aiguibin-protal-gateway
branch 'aiguibin-protal-gateway' set up to track 'origin/aiguibin-protal-gateway'.
写在最后
如果不是为了学习webpack请使用Vue-Cli搭建项目,另外初始化git仓库,关联远程分支,请注意进入项目根目录按步骤执行上述命令。
更详细的配置可参考【威廉王子】:从 0 搭建 Vite 3 + Vue 3 前端工程化项目