NestJs使用MySQL关联查询
上一篇文章介绍了NestJs使用MySQL创建多个实体,接下来讲到的则是实体创建完毕之后,开始进行查询。里面可能涉及到nestjs使用语法,要是不知道的小伙伴可以先行了解,也可以模仿写,后面我会继续出nestjs的教程。也欢迎大家一起学习探讨。
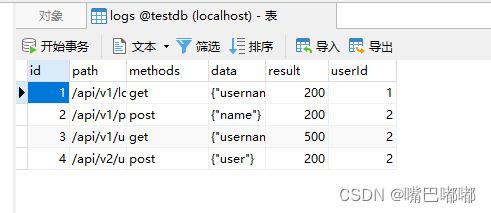
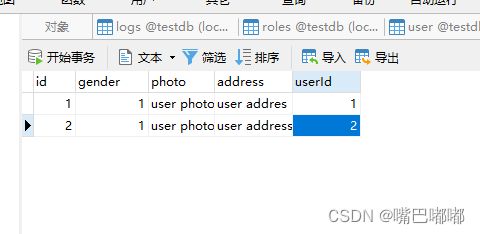
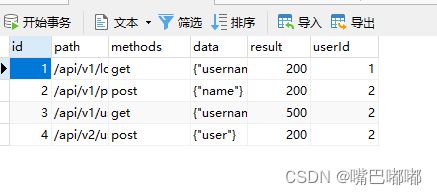
如果大家按照之前的步骤,那么接下来我们就可以直接在数据库中添加一些数据,如下:

数据增加完之后我们开始使用nesjs 实操查询功能。
首先我们应该在user.module.ts 加载对应的模块
import { Module } from '@nestjs/common';
import { UserController } from './user.controller';
import { UserService } from './user.service';
import { TypeOrmModule } from '@nestjs/typeorm';
import { User } from './user.entity';
import { Logs } from '../logs/logs.entity';

@Module({
  imports: [TypeOrmModule.forFeature([User, Logs])],
  controllers: [UserController],
  providers: [UserService],
})
export class UserModule {}
我使用的是TypeORM 自带的@nestjs/typeorm 查询方法
一对一查询
user.contorller.ts
import { Controller, Delete, Get, Patch, Post } from '@nestjs/common';
import { UserService } from './user.service';
import { ConfigService } from '@nestjs/config';
import { User } from './user.entity';
@Controller('user')
export class UserController {
constructor(
private userService: UserService,
private configService: ConfigService,
) {}
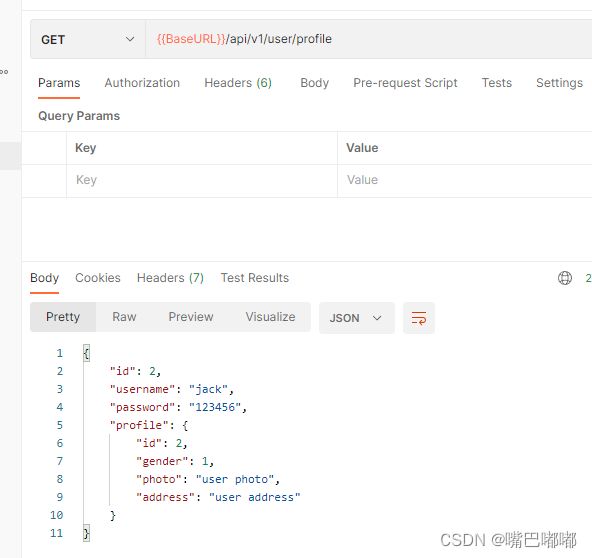
@Get('/profile')
getUserProfile(): any {
return this.userService.findProfile(2);
}
}
user.service.ts
import { Injectable } from '@nestjs/common';
import { InjectRepository } from '@nestjs/typeorm';
import { Repository } from 'typeorm';
import { User } from './user.entity';
@Injectable()
export class UserService {
  constructor(
    @InjectRepository(User) private readonly userRepository: Repository<User>
  ) {}
  findProfile(id: number) {
    return this.userRepository.findOne({
      where: {
        id,
      },
      relations: {
        profile: true,
      },
    });
  }
}
一对多关系
还是在user.contorller.ts 增加一个接口名称
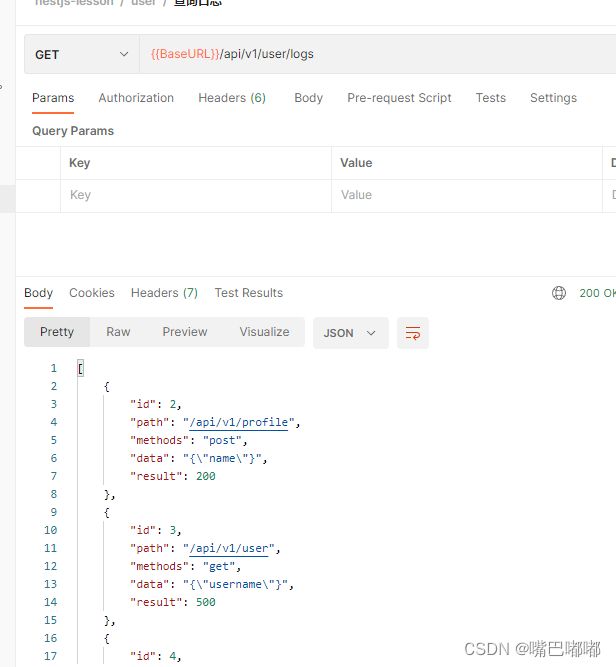
 @Get('/logs')
  getUserLogs(): any {
    return this.userService.findUserLogs(2);
  }
当然 我们 user.service.ts 的文件也应对应上
import { Injectable } from '@nestjs/common';
import { InjectRepository } from '@nestjs/typeorm';
import { Repository } from 'typeorm';
import { User } from './user.entity';
import { Logs } from '../logs/logs.entity';

@Injectable()
export class UserService {
  constructor(
    @InjectRepository(User) private readonly userRepository: Repository<User>,
    @InjectRepository(Logs) private readonly logsRepository: Repository<Logs>,
  ) {}
  findProfile(id: number) {
    return this.userRepository.findOne({
      where: {
        id,
      },
      relations: {
        profile: true,
      },
    });
  }

  async findUserLogs(id: number) {
    const user = await this.findOne(id);
    return this.logsRepository.find({
      where: {
        user,
      },
      // relations: {
      //   user: true,
      // },
    });
  }

}
到目前我们学会是一对一,一对多的查询,当然学到这里也是很不错的了,不过,在企业中往往是不够用了,我们还得继续学习多个表并且对数据进行聚合。
接下来介绍的是TypeORM 中一个非常强大的查询方式。 官网链接
什么是QueryBuilder
QueryBuilder是 TypeORM 最强大的功能之一 ,它允许你使用优雅便捷的语法构建 SQL 查询,执行并获得自动转换的实体。
QueryBuilder的简单示例:
const firstUser = await connection
  .getRepository(User)
  .createQueryBuilder("user")
  .where("user.id = :id", { id: 1 })
  .getOne();
它将生成以下 SQL 查询:
SELECT
    user.id as userId,
    user.firstName as userFirstName,
    user.lastName as userLastName
FROM users user
WHERE user.id = 1
然后返回一个 User 实例:
User {
    id: 1,
    firstName: "Timber",
    lastName: "Saw"
}
如何创建和使用QueryBuilder
接来我们用当前的项目进行实战,在logs表中我们想查询有多少数据时请求成功,又有多少数据时请求失败的小案例。
回到我们的代码中
继续在user.contorller.ts 新增代码
@Get('/logsByGroup')
  async getLogsByGroup(): Promise<any> {
    const res = await this.userService.findLogsByGroup(2);
    return res;
  }
user.serveice.ts
findLogsByGroup(id: number) {
     // 原生sql
    // SELECT logs.result as rest, COUNT(logs.result) as count from logs, user WHERE user.id = logs.userId AND user.id = 2 GROUP BY logs.result;
	// 友好的使用sql语句
    // return this.logsRepository.query(
    //   'SELECT logs.result as rest, COUNT(logs.result) as count from logs, user WHERE user.id = logs.userId AND user.id = 2 GROUP BY logs.result',
    // );
    // 链式
    return (
      this.logsRepository
        .createQueryBuilder('logs')
        .select('logs.result', 'result')
        .addSelect('COUNT("logs.result")', 'count')
        .leftJoinAndSelect('logs.user', 'user')
        .where('user.id = :id', { id })
        .groupBy('logs.result')
        .orderBy('count', 'DESC')
        .addOrderBy('result', 'DESC')
        .offset(1)
        .limit(3)
        // .orderBy('result', 'DESC')
        .getRawMany()
    );
  }

很多细心的同学看到了我们把用户的密码也暴露出来了,这边我先留一个坑,大家可以先想想怎么处理。
好了 文档到这里 已经介绍完 NestJs使用MySQL关联查询,一共三篇文章