安装GCC-9.3.0及其依赖研究C17-C++17特性
参考 安装GCC-8.3.0及其依赖 在 win10 + vmware15 + ubuntu16.04(gcc4.8.5) 环境下 成功安装 gcc9.3.0 以此研究C++17/C++20/C17的特性。注意:C17只是修复了C11中的bug,并未引入新的语言特性。
文章目录
-
- 1.前言
- 2. gcc源码 github镜像
- 3. GCC国内镜像下载地址
- 4. GCC的依赖库
-
- 4.1. gmp库
- 4.2. mpfr库
- 4.3. mpc库
- 4.4. m4编译工具
- 4.5. 安装源代码包
- 5.安装 M4
-
- 5.1 使用 apt install m4 安装
- 5.2 使用 m4 源码安装
- 安装 m4-1.4.18 出错
- 5. 编译安装gmp
- 6. 编译安装mpfr
- 7. 编译安装mpc
- 8. 设置LD_LIBRARY_PATH
- 9. 编译安装gcc
- 参考
- 附录
-
- 附1:cmake支持
- 附2:debug STL
- 附3:体验C++14
- 附4:体验C++17
- 附5:C++标准
- 附6:C++标准当前状态
1.前言
为体验C17和C++17特性,需安装更新版本的GCC编译器。
GCC官网为:https://gcc.gnu.org/,从这可下载最新版本的GCC。
本文在 ubuntu 中安装 gcc 9.3.0.
gcc 9.3.0 (发布于 2020.03.12 )安装于 2020.08.14,截至该日期最新版本为 gcc 10.2.

注意: ubuntu 20.04 默认自带的gcc版本就是 gcc 9.3.0.
2. gcc源码 github镜像
- https://github.com/gcc-mirror/gcc (gcc 官网原仓库)
- https://mirrors.tuna.tsinghua.edu.cn/git/gcc.git(清华大学开源镜像)
清华大学 gcc 开源镜像使用方法(如下),也可参考 官网帮助文档
特别注意:https://mirrors.tuna.tsinghua.edu.cn/git/gcc.git 此地址用 git 可以访问,但用浏览器不可以访问。
如需克隆 GCC 代码,使用
git clone https://mirrors.tuna.tsinghua.edu.cn/git/gcc.git
若要将 tuna mirror 加入已有代码库,可在已有仓库中运行
git remote add tuna https://mirrors.tuna.tsinghua.edu.cn/git/gcc.git
或运行
git remote set-url origin https://mirrors.tuna.tsinghua.edu.cn/git/gcc.git
将默认上游设置为 TUNA 镜像
3. GCC国内镜像下载地址
下载速度不一,请选择速度最快的:
- https://mirrors.tuna.tsinghua.edu.cn/gnu/gcc/gcc-9.3.0/ (清华大学开源镜像)
- https://mirrors.ustc.edu.cn/gnu/gcc/gcc-9.3.0/(中国科学技术大学开源软件镜像)
- https://mirrors.nju.edu.cn/gnu/gcc/gcc-9.3.0/ (南京大学开源镜像站)
- https://mirrors.huaweicloud.com/gnu/gcc/gcc-9.3.0/ (华为云开源镜像)
第4部分 gcc 的依赖库可在以上4个开源镜像的 `*/gnu/ 路径下下载,eg: 使用 清华大学开源镜像 下载 gmp、mpfr、mpc、m4 ,其下载链接如下:
https://mirrors.tuna.tsinghua.edu.cn/gnu/gmp/*
https://mirrors.tuna.tsinghua.edu.cn/gnu/mpfr/*
https://mirrors.tuna.tsinghua.edu.cn/gnu/mpc/*
https://mirrors.tuna.tsinghua.edu.cn/gnu/m4/*

* 指定下载的版本
4. GCC的依赖库
编译之前需先安装好GCC的依赖库:gmp、mpfr 和 mpc。编译还依赖 m4 等编译工具,如果没有,则在执行configue 时会报相应的错误,这时需要先安装好这些编译工具。
4.1. gmp库
GMP为“GNU MP Bignum Library”的缩写,是一个GNU开源数学运算库。本文选择的是最新版本gmp-6.2.0.
4.2. mpfr库
mpfr是一个GNU开源大数运算库,它依赖gmp。本文选择的是最新版本mpfr-4.0.2.
4.3. mpc库
mpc是GNU的开源复杂数字算法,它依赖gmp和mpfr。本文选择的是最新版本mpc-1.1.0.
4.4. m4编译工具
M4 是一个宏处理器.将输入拷贝到输出,同时将宏展开. 宏可以是内嵌的也可以是用户定义的. 除了可以展开宏,m4还有一些内建的函数,用来引用文件,执行Unix命令,整数运算,文本操作,循环等. m4既可以作为编译器的前端也可以单独作为一个宏处理器.
本文选择的是最新版本m4-1.4.16.
如果使用“–prefix”指定了安装目录,则在编译gmp等之前还需先设置好环境变量PATH,以便configure时能找到m4。
4.5. 安装源代码包
涉及到的所有安装源代码包:
m4-1.4.16.tar.gz (2011-03-01)
gcc-9.3.0.tar.gz (2020-03-12)
mpfr-4.0.2.tar.gz (2015-02-20)
gmp-6.2.0.tar.xz (2020-01-18)
mpc-1.1.0.tar.gz (2018-01-11)
GCC的依赖库间还互有依赖:mpfr依赖gmp、mpc依赖gmp和mpfr,所以GCC的编译安装顺序为:
- m4(如果需要)
- gmp
- mpfr
- mpc
- GCC
为了不污染已有的编译和运行环境,将GCC及依赖库均安装到/usr/local目录,并且最好以root用户完成下述所有操作。
5.安装 M4
5.1 使用 apt install m4 安装
sudo apt install m4
这种方式无需手动解决依赖库。
5.2 使用 m4 源码安装
这种方式可能需要手动解决依赖库。
m4 一般安装路径为/usr/bin/m4,如果系统没有安装m4, 需手动下载 从 “https://www.gnu.org/software/m4/” 下载安装。
预计所需编译时间:      0.1 SBU
预计所需硬盘空间:      3.0 MB
M4 安装依赖关系
M4 依赖于: Bash, Binutils, Coreutils, Diffutils, GCC, Gettext, Glibc, Grep, Make, Perl, Sed.
注意: 安装时系统必须预装 gcc 的某个版本(本文 gcc 4.8.5).
为编译 M4 做准备:
tar xzf m4-1.4.16.tar.gz
cd m4-1.4.16
./configure --prefix=/usr/local/m4-1.4.16
编译软件包:
make
本软件包自带测试套件,能执行一些测试,以确定它是否编译正确。如果你想运行测试套件,执行下面的命令:
make check
安装软件包:
make install
设置环境变量:
ln -s /usr/local/m4-1.4.16 /usr/local/m4
sudo gedit /etc/profile
# 在/etc/profile 最后添加以下内容,保存。
# 注销,重新登陆 或 重启ubuntu后环境变量生效
# 如果想在设置后,在当前打开的终端立即生效 执行 source /etc/profile
export PATH=/usr/local/m4/bin:$PATH
检查 M4 是否安装成功
m4 --version
安装 m4-1.4.18 出错
起初安装 m4-1.4.18 (发布于 2016-12-31)出现以下错误:
freadahead.c:92:3: error: #error "Please port gnulib freadahead.c to your platform! Look at the definition of fflush, fread, ungetc on your system, then report this to bug-gnulib."
   92 |  #error "Please port gnulib freadahead.c to your platform! Look at the definition of fflush, fread, ungetc on your system, then report this to bug-gnulib."
      |   ^~~~~
make[3]: *** [Makefile:1913: freadahead.o] Error 1
make[3]: Leaving directory '/tmp/soft-install/m4-1.4.18/lib'
make[2]: *** [Makefile:1674: all] Error 2
make[2]: Leaving directory '/tmp/soft-install/m4-1.4.18/lib'
make[1]: *** [Makefile:1572: all-recursive] Error 1
make[1]: Leaving directory '/tmp/soft-install/m4-1.4.18'
make: *** [Makefile:1528:all] 错误 2
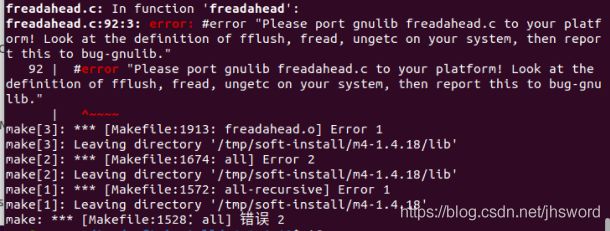
经查阅资料,确定原因为:M4版本兼容性问题,M4-1.4.18 版本太新,不兼容当前平台,最后将 M4 的版本替换为 M4-1.4.16 问题解决。
5. 编译安装gmp
执行 configure 生成Makefile时,需要用到m4,一般路径为/usr/bin/m4,如果没有则需要先安装,否则报错“no usable m4”错误。
具体安装步骤如下:
xz -d gmp-6.2.0.tar.xz
tar xf gmp-6.2.0.tar
cd gmp-6.2.0
./configure --prefix=/usr/local/gmp-6.2.0
make
make install
ln -s /usr/local/gmp-6.2.0 /usr/local/gmp
6. 编译安装mpfr
详细安装步骤如下:
tar xzf  mpfr-4.0.2.tar.gz
cd mpfr-4.0.2
./configure --prefix=/usr/local/mpfr-4.0.2 --with-gmp=/usr/local/gmp
make
make install
ln -s /usr/local/mpfr-4.0.2 /usr/local/mpfr
7. 编译安装mpc
tar xzf  mpc-1.1.0.tar.gz
cd mpc-1.1.0
./configure --prefix=/usr/local/mpc-1.1.0 --with-gmp=/usr/local/gmp --with-mpfr=/usr/local/mpfr
make
make install
ln -s /usr/local/mpc-1.1.0 /usr/local/mpc
8. 设置LD_LIBRARY_PATH
在编译GCC之前,如果不设置LD_LIBRARY_PATH(如果编译gmp时没有指定“–prefix”时安装,一般不用再显示设置),则可能编译时报 “error while loading shared libraries: libmpfr.so.6: cannot open shared object file: No such file or directory” 等错误。
export LD_LIBRARY_PATH=/usr/local/gmp/lib:/usr/local/mpfr/lib:/usr/local/mpc/lib:$LD_LIBRARY_PATH
9. 编译安装gcc
在执行make编译GCC时,有些费时需要2~4小时,编译GCC-9.3.0的GCC版本为4.8.5(64位)。
tar xzf gcc-9.3.0.tar.gz
cd gcc-9.3.0
./configure --prefix=/usr/local/gcc-9.3.0 --with-mpfr=/usr/local/mpfr --with-gmp=/usr/local/gmp --with-mpc=/usr/local/mpc
date;time make;date
make install
ln -s /usr/local/gcc-9.3.0 /usr/local/gcc
sudo gedit /etc/profile
# 在/etc/profile 最后添加以下内容,保存
export PATH=/usr/local/gcc/bin:$PATH
export LD_LIBRARY_PATH=/usr/local/gcc/lib64:$LD_LIBRARY_PATH
export MANPATH=/usr/local/gcc/share/man:$MANPATH
gcc --version
在执行configure时,如果遇到错误 “I suspect your system does not have 32-bit development libraries (libc and headers). If you have them, rerun configure with --enable-multilib. If you do not have them, and want to build a 64-bit-only compiler, rerun configure with --disable-multilib” ,表示系统不支持32位程序,这样在执行configure时需为它支持参数“–disable-multilib”,如:
./configure --prefix=/usr/local/gcc-9.3.0 --with-gmp=/usr/local/gmp --with-mpfr=/usr/local/mpfr --with-mpc=/usr/local/mpc --disable-multilib
如果make时遇到错误 “internal compiler error”,可能是因为内存不足,请换台内存更大的机器,或者更换GCC版本试试。
如果遇到错误 “C compiler cannot create executables”、“error while loading shared libraries: libmpfr.so.6: cannot open shared object file: No such file or directory”或 “cannot compute suffix of object files”,可尝试设置 LD_LIBRARY_PATH 后再试试:
export LD_LIBRARY_PATH=/usr/local/gmp/lib:/usr/local/mpfr/lib:/usr/local/mpc/lib:$LD_LIBRARY_PATH
make成功结束时的输出:
make[8]: 离开目录“/data/GCC/gcc-9.3.0/x86_64-pc-linux-gnu/32/libatomic”
make[7]: 离开目录“/data/GCC/gcc-9.3.0/x86_64-pc-linux-gnu/32/libatomic”
make[6]: 离开目录“/data/GCC/gcc-9.3.0/x86_64-pc-linux-gnu/32/libatomic”
make[5]: 离开目录“/data/GCC/gcc-9.3.0/x86_64-pc-linux-gnu/libatomic”
make[4]: 离开目录“/data/GCC/gcc-9.3.0/x86_64-pc-linux-gnu/libatomic”
make[3]: 离开目录“/data/GCC/gcc-9.3.0/x86_64-pc-linux-gnu/libatomic”
make[2]: 离开目录“/data/GCC/gcc-9.3.0/x86_64-pc-linux-gnu/libatomic”
make[1]: 离开目录“/data/GCC/gcc-9.3.0
在完成上列步骤后,检查新安装的GCC-9.3.0是否可用:gcc -v

参考
- https://www.cnblogs.com/aquester/p/10799125.html
- https://www.cnblogs.com/LeiFeng1000/p/12562211.html
- http://shouce.jb51.net/linux-from-scratch/chapter06/m4.html
附录
附1:cmake支持
在使用cmake前,需设置好下列所环境变量,否则cmake仍将使用默认目录下的gcc和g++,在CMakeFiles.txt文件中设置CMAKE_C_COMPILER和CMAKE_CXX_COMPILER不能解决这个问题。如果在此之前已经执行过cmake,则得先删除CMakeFiles目录和文件CMakeCache.txt,然后再重新执行cmake生成Makefile文件。
export CC=/usr/local/gcc/bin/gcc
export CXX=/usr/local/gcc/bin/g++
export PATH=/usr/local/gcc/bin:$PATH
export LD_LIBRARY_PATH=/usr/local/gcc/lib64:$LD_LIBRARY_PATH
export LD_LIBRARY_PATH=/usr/local/gmp/lib:/usr/local/mpfr/lib:/usr/local/mpc/lib:$LD_LIBRARY_PATH
附2:debug STL
有时需要debug STL中的容器等,正常情况下没法跟踪STL中的代码,只需要加上编译宏“_GLIBCXX_DEBUG”即可开启对STL的debug。注意这个并不是GCC编译器定义的,而是直接在STL源代码中定义的。细心点可发现在STL库头文件目录中有一个debug子目录,以4.8.5为例:
$ ls /usr/include/c++/4.8.5/debug
array    deque         functions.h  map         multiset.h       safe_iterator.tcc        safe_sequence.h        safe_unordered_container.h    set.h          unordered_set
bitset   formatter.h   list         map.h       safe_base.h      safe_local_iterator.h    safe_sequence.tcc      safe_unordered_container.tcc  string         vector
debug.h  forward_list  macros.h     multimap.h  safe_iterator.h  safe_local_iterator.tcc  safe_unordered_base.h  set                           unordered_map
查看正常的文件,即可看到“_GLIBCXX_DEBUG”:
$ vi /usr/include/c++/4.8.5/map
#ifdef _GLIBCXX_DEBUG
# include 附3:体验C++14
// C++14
#include 编译运行结果如下:
$g++ -o main *.cpp
main.cpp: In function ‘int main()’:
main.cpp:17:24: warning: ‘auto foo1()’ is deprecated [-Wdeprecated-declarations]
   const auto n1 = foo1();
                        ^
main.cpp:5:6: note: declared here
 auto foo1() {
      ^~~~
main.cpp:18:24: warning: ‘auto foo2()’ is deprecated: foo2 is deprecated [-Wdeprecated-declarations]
   const auto n2 = foo2();
                        ^
main.cpp:11:6: note: declared here
 auto foo2() {
      ^~~~
$main
n1: 2019
n2: 2020
如果在C++11上编译,会报语法错误:
main.cpp:5:11: error: 'foo1' function uses 'auto' type specifier without trailing return type
 auto foo1() {
           ^
main.cpp:5:11: note: deduced return type only available with -std=c++14 or -std=gnu++14
main.cpp:11:11: error: 'foo2' function uses 'auto' type specifier without trailing return type
 auto foo2() {
           ^
main.cpp:11:11: note: deduced return type only available with -std=c++14 or -std=gnu++14
main.cpp: In function 'int main()':
main.cpp:17:24: warning: 'auto foo1()' is deprecated [-Wdeprecated-declarations]
   const auto n1 = foo1();
                        ^
main.cpp:5:6: note: declared here
 auto foo1() {
      ^~~~
main.cpp:17:24: warning: 'auto foo1()' is deprecated [-Wdeprecated-declarations]
   const auto n1 = foo1();
                        ^
main.cpp:5:6: note: declared here
 auto foo1() {
      ^~~~
main.cpp:18:24: warning: 'auto foo2()' is deprecated: foo2 is deprecated [-Wdeprecated-declarations]
   const auto n2 = foo2();
                        ^
main.cpp:11:6: note: declared here
 auto foo2() {
      ^~~~
main.cpp:18:24: warning: 'auto foo2()' is deprecated: foo2 is deprecated [-Wdeprecated-declarations]
   const auto n2 = foo2();
                        ^
main.cpp:11:6: note: declared here
 auto foo2() {
      ^~~~
附4:体验C++17
// C++17
#include 编译运行结果如下:
foo return: 2019
i: 0
i: 2
i: 4
i: 6
i: 8
再体验一段来源于 http://www.modernescpp.com/index.php/functional-in-c-17-and-c-20 的C++17代码:
// foldExpression.cpp
#include 编译运行结果如下:
all(true): true
any(true): true
none(true): false

all(true, true, true, false): false
any(true, true, true, false): true
none(true, true, true, false): false

all(false, false, false, false): false
any(false, false, false, false): false
none(false, false, false, false): true
附5:C++标准
可浏览 https://en.cppreference.com/w/cpp/compiler_support 了解各编译器对C++标准的支持详情。C++标准官网:https://isocpp.org/。
| 年份 | C++标准 | 名称 | __cplusplus值 | 重大新特性 |
|---|---|---|---|---|
| 1998 | ISO/IEC 14882:1998 | C++98 | 199711L | 第一个C++标准 |
| 2003 | ISO/IEC 14882:2003 | C++03 | 199711L | 第二个C++标准 |
| 2011 | ISO/IEC 14882:2011 | C++11 | 201103L | 第三个C++标准 1) auto关键字 2) 右值引用 3) nullptr关键字 4) shared_ptr/unique_ptr/weak_ptr 5) long long 6) lambda(类似JS的闭包) 7) decltype 8) constexpr 9) delete/default 10) final/override 11) noexcept 12) std::tuple 13) std::move 14) 变长参数的模板 15) 模板“>>”(两个“>”间不再需空格) 16) 多线程并发支持:thread_local、std::atomic、std::thread等 |
| 2014 | ISO/IEC 14882:2014 | C++14 | 201402L | 第四个C++标准 1) 函数可返回auto(返回值类型推导) 2) 泛型lambda 3) deprecated属性 4) std::optional5) 二进制常量和数字分隔符 |
| 2017 | ISO/IEC 14882:2017 | C++17 | 201703L | 第五个C++标准 1) 删除三字符词(如“??=”、“??-”等) 2) if/switch语句内可定义和初始化变量 3) std::any/std::variant 4) 内联变量(可在头文件中定义变量) 5) __has_include 6) 并行STL 7) 折叠表达式(fold expression) 8) 构造函数的模板推导(class template deduction) 9) 结构化绑定(structured bindings) |
| 2020 | 暂未定 | C++20 | 第六个C++标准(暂未正式发布): 1) 协程(coroutines) 2) 模块化(modules) 3) Concepts(编译期模板) 4) Ranges |
|
| 未定 | C++23 | |||
| C++26 |
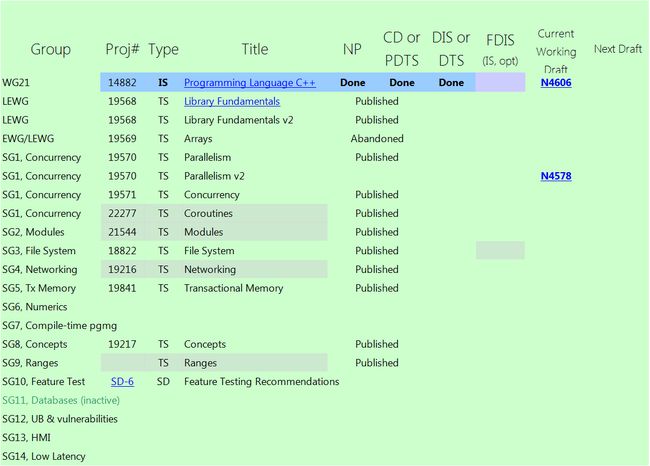
附6:C++标准当前状态
注:TS为“Technical Specifications”的缩写,IS为“International Standard”的缩写,TR为“Technical Report”的缩写。