PySimpleGUI教程
PySimpleGUI教程
- PySimpleGUI简介
- PySimpleGUI
-
- 弹出框Popup
- 代码结构
-
- import
- Layout
- Elements 元素/控件
-
- 可选项
- Windows
-
- 创建
- 响应 event,values = window.read()
- 关闭
- 更新
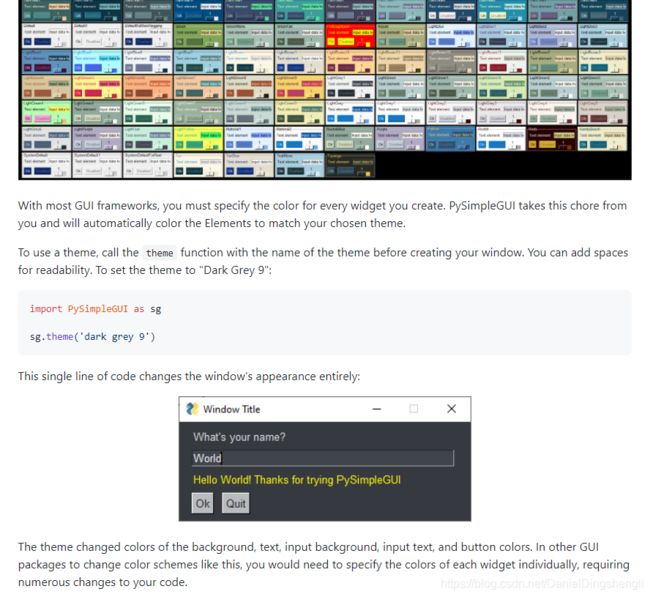
- 美观
- 布局的奇技淫巧
- 多个窗口
- Code
-
- Demo1
- Demo2
- Demo3
PySimpleGUI简介
PySimpleGUI的GitHub地址以及英文pdf入门教程
诞生于2018
设计宗旨:“Simplicity is the ultimate sophistication” (简单即美),
支持Win、Linux和树莓派等,与 tkinter, Qt, WxPython Web (Remi)提供接口。
PySimpleGUI
这部分内容只需要走马观花!!!
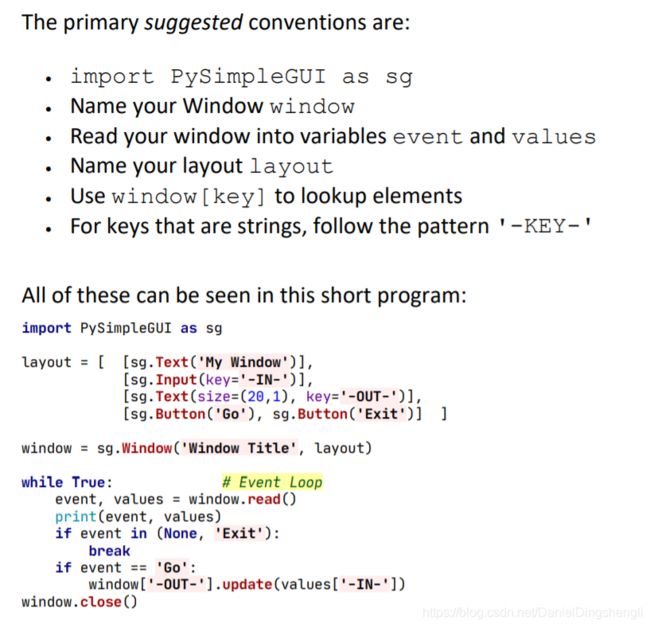
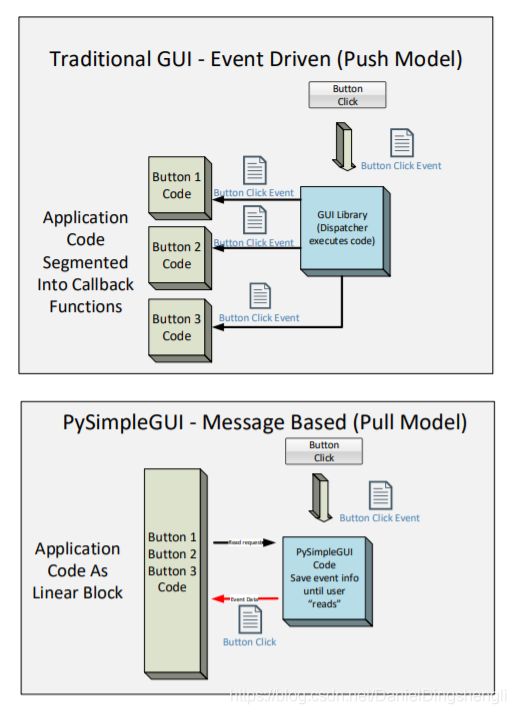
仔细看看下图就懂PySimpleGUI是怎么回事了,不难的。
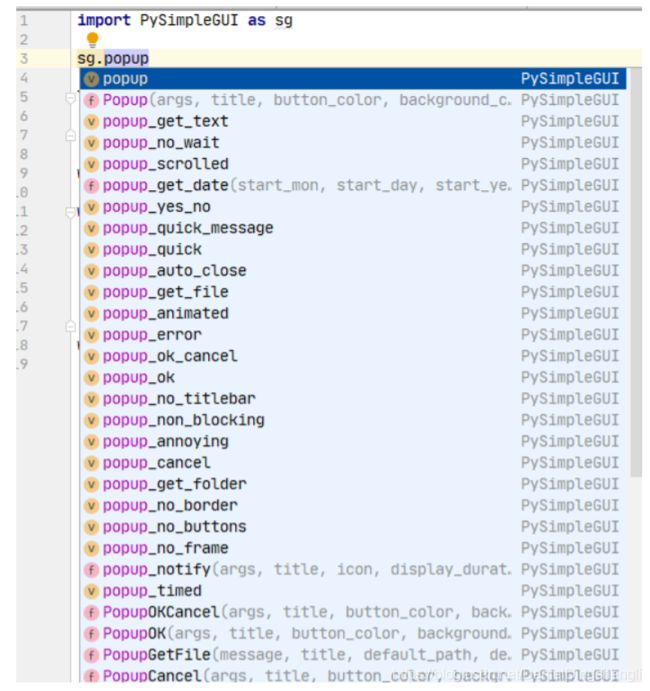
弹出框Popup
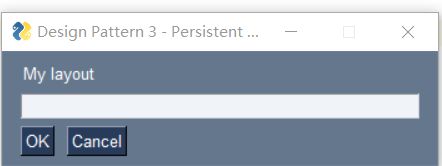
代码结构
1.import 库
2.layout UI布局
3.window 窗口显示
4.Event loop 事件循环,用户持续交互
5.close 关闭窗口
# 1 - The import
import PySimpleGUI as sg
# 2 - Layout definition
layout = [[sg.Text('My layout')],
    [sg.Input(key='-INPUT-')],
    [sg.Button('OK'), sg.Button('Cancel')] ]
# 3 - Create window
window = sg.Window('Design Pattern 3 - Persistent Window', layout)
# 4 - Event Loop
while True:
   event, values = window.read()
   if event in (None, 'Cancel'):
       break

# 5 - Close window
window.close()
import
支持四种库
import PySimpleGUI as sg  #支持最完整
import PySimpleGUIQt as sg
import PySimpleGUIWx as sg
import PySimpleGUIWeb as sg
Layout
1.布局是List[List[ ] ]形式
2.每个List[ ]代表窗口中的一行
3.设计界面可以用手绘,快速简单,人能看得懂就行

Elements 元素/控件
• Text 文本
• Single Line Input 单行输入
• Buttons (multiple “types”) 按钮
• ButtonMenu 菜单按钮
• Checkboxes 复选框
• Radio Buttons 单选按钮
• Listbox 列表框
• Slider 滑块
• Multi-line Text Input/Output 多行文本输入输出
• Multi-line Text Output (not on tkinter version)
• Scroll-able Output 可滚动输出
• Vertical Separator 垂直分离(分割布局)
• Progress Bar 进度条
• Option Menu 选项菜单
• Menu 菜单
• Graph 图表
• Image 图片
• Table 列表
• Tree 树
• StatusBar 状态栏
• Stretch (Qt only)
• Sizer (tkinter only)
• Containers
o o o Column
o o o Frame
o o o Tab, TabGroup
o o o Pane
可选项
• Size
• Key 相当于句柄/ID
• Font
• Pad
• Colors
• Enable Events
• Visibility
• Tooltip
• Metadata
• Right click menu (tkinter) 右击
对于Pycharm可以采用鼠标在控件名上悬停的方式获得参数列表。
Windows
创建
window = sg.Window('Window Title', layout) #layout是布局列表
Window有众多参数可以调整,请通过Pycharm具体查看。
icon = “ico文件名” 修改菜单栏左侧图标
element_justification=“center” 部件默认居中
响应 event,values = window.read()
while True:
    event, values = window.read()
    if event in (None, 'Exit'):
        break
None是点击Window右上角的X
关闭
window.close()
更新
window[key].update(‘New value’)
美观
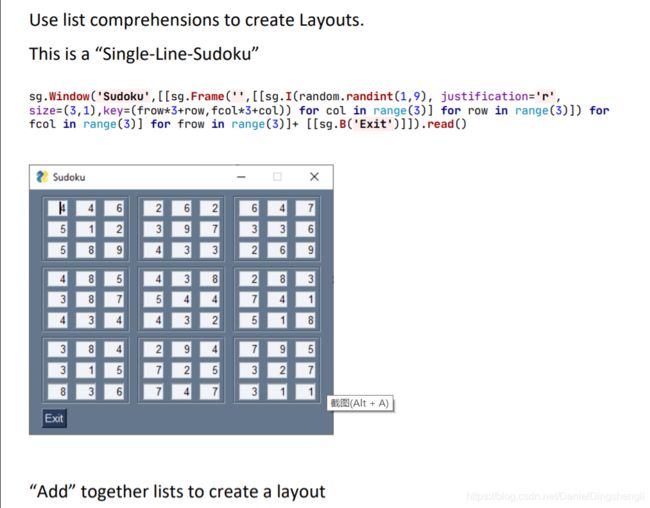
布局的奇技淫巧
多个窗口
import PySimpleGUI as sg

"""
    Design pattern multiple windows
    Using read_all_windows()

    Only 1 window at a time is visible/active on the screen.

    Window1 opens Window2
    When Window2 closes, Window1 reappears
    Program exits when Window1 is closed

    Copyright 2020 PySimpleGUI.org
"""


def make_window1():
    layout = [[sg.Text('Window 1'), ],
              [sg.Input(key='-IN-')],
              [sg.Text(size=(20, 1), key='-OUTPUT-')],
              [sg.Button('Launch 2'), sg.Button('Output')]]

    return sg.Window('Window 1', layout, finalize=True)

def make_window2():
    layout = [[sg.Text('Window 2')],
               [sg.Button('Exit')]]

    return sg.Window('Window 2', layout, finalize=True)


def main():
    # Design pattern 1 - First window does not remain active
    window2 = None
    window1 = make_window1()

    while True:
        window, event, values = sg.read_all_windows()
        if event == sg.WIN_CLOSED and window == window1:
            break

        if window == window1:
            window1['-OUTPUT-'].update(values['-IN-'])

        if event == 'Launch 2' and not window2:
            window1.hide()
            window2 = make_window2()

        if window == window2 and (event in (sg.WIN_CLOSED, 'Exit')):
            window2.close()
            window2 = None
            window1.un_hide()
    window1.close()


if __name__ == '__main__':
    main()
Code
Demo1
播放gif图片
from PIL import Image, ImageTk, ImageSequence
import PySimpleGUI as sg

"""
    Demo_Animated_GIFs_Using_PIL.py

    You'll find other animated GIF playback demos for PySimpleGUI that use the tkinter built-in GIF parser.
    That is how the built-in PySimpleGUI Image.update_animation is used.

    If you want to do the GIF file parsing yourself using PIL and update your Image element yourself, then
    this is one possible technique.
    This particular demo will loop playing the GIF file over and over.  To not loop, remove the while True statement.
    Copyright 2020 PySimpleGUI.org
"""

gif_filename = r'my_gif_file.gif'

layout = [[sg.Image(key='-IMAGE-')]]

window = sg.Window('Window Title', layout, element_justification='c', margins=(0,0), element_padding=(0,0), finalize=True)

sequence = [ImageTk.PhotoImage(img) for img in ImageSequence.Iterator(Image.open(gif_filename))]    # must has finalized to do this

interframe_duration = Image.open(gif_filename).info['duration']     # get how long to delay between frames

while True:
    for frame in sequence:
        event, values = window.read(timeout=interframe_duration)
        if event == sg.WIN_CLOSED:
            exit()
        window['-IMAGE-'].update(data=frame)
Demo2
# this one long import has the effect of making the code more compact as there is no 'sg.' prefix required for Elements
import PySimpleGUI as sg
from PySimpleGUI import InputCombo, Combo, Multiline, ML, MLine, Checkbox, CB, Check, Button, B, Btn, ButtonMenu, Canvas, Column, Col, Combo, Frame, Graph, Image, InputText, Input, In, Listbox, LBox, Menu, Multiline, ML, MLine, OptionMenu, Output, Pane, ProgressBar, Radio, Slider, Spin, StatusBar, Tab, TabGroup, Table, Text, Txt, T, Tree, TreeData,  VerticalSeparator, Window, Sizer

"""
    Demo Columns and Frames
    Demonstrates using mixture of Column and Frame elements to create a nice window layout.
    A couple of the concepts shown here include:
    * Using Columns and Frames with specific sizes on them
    * Importing all required classes so that "sg." is not required on any objects. This makes the code more compact and readable

    There are 3 columns.  Two are side by side at the top and the third is along the bottom
"""

sg.theme('GreenTan')

col2 = Column([[Frame('Accounts:', [[Column([[Listbox(['Account '+str(i) for i in range(1, 16)],
                                                      key='-ACCT-LIST-', size=(15, 20)), ]], size=(150, 400))]])]], pad=(0, 0))

col1 = Column([
    # Categories frame
    [Frame('Categories:', [[ Radio('Websites', 'radio1', default=True, key='-WEBSITES-', size=(10, 1)),
                            Radio('Software', 'radio1', key='-SOFTWARE-',  size=(10, 1))]],)],
    # Information frame
    [Frame('Information:', [[Text(), Column([[Text('Account:')],
                                     [Input(key='-ACCOUNT-IN-', size=(19, 1))],
                                     [Text('User Id:')],
                                     [Input(key='-USERID-IN-', size=(19, 1)),
                                      Button('Copy', key='-USERID-')],
                                     [Text('Password:')],
                                     [Input(key='-PW-IN-', size=(19, 1)),
                                      Button('Copy', key='-PASS-')],
                                     [Text('Location:')],
                                     [Input(key='-LOC-IN-', size=(19, 1)),
                                      Button('Copy', key='-LOC')],
                                     [Text('Notes:')],
                                     [Multiline(key='-NOTES-', size=(25, 5))],
                                     ], size=(235, 350), pad=(0, 0))]])], ], pad=(0, 0))

col3 = Column([[Frame('Actions:', [[Column([[Button('Save'), Button(
    'Clear'), Button('Delete'), ]], size=(450, 45), pad=(0, 0))]])]], pad=(0, 0))

layout = [[col1, col2], [col3]]

window = Window('Passwords', layout)

while True:
    event, values = window.read()
    print(event, values)
    if event == sg.WIN_CLOSED:
        break

window.close()
Demo3
#!/usr/bin/env python
import PySimpleGUI as sg
import time

"""
 Timer Desktop Widget Creates a floating timer that is always on top of other windows You move it by grabbing anywhere on the window Good example of how to do a non-blocking, polling program using PySimpleGUI
 Something like this can be used to poll hardware when running on a Pi
 While the timer ticks are being generated by PySimpleGUI's "timeout" mechanism, the actual value
  of the timer that is displayed comes from the system timer, time.time().  This guarantees an
  accurate time value is displayed regardless of the accuracy of the PySimpleGUI timer tick. If
  this design were not used, then the time value displayed would slowly drift by the amount of time
  it takes to execute the PySimpleGUI read and update calls (not good!)
"""


def time_as_int():
    return int(round(time.time() * 100))


# ----------------  Create Form  ----------------
sg.theme('Black')

layout = [[sg.Text('')],
          [sg.Text('', size=(8, 2), font=('Helvetica', 20),
                justification='center', key='text')],
          [sg.Button('Pause', key='-RUN-PAUSE-', button_color=('white', '#001480')),
           sg.Button('Reset', button_color=('white', '#007339'), key='-RESET-'),
           sg.Exit(button_color=('white', 'firebrick4'), key='Exit')]]

window = sg.Window('Running Timer', layout,
                   no_titlebar=True,
                   auto_size_buttons=False,
                   keep_on_top=True,
                   grab_anywhere=True,
                   element_padding=(0, 0))

current_time, paused_time, paused = 0, 0, False
start_time = time_as_int()

while True:
    # --------- Read and update window --------
    if not paused:
        event, values = window.read(timeout=10)
        current_time = time_as_int() - start_time
    else:
        event, values = window.read()
    # --------- Do Button Operations --------
    if event in (sg.WIN_CLOSED, 'Exit'):        # ALWAYS give a way out of program
        break
    if event == '-RESET-':
        paused_time = start_time = time_as_int()
        current_time = 0
    elif event == '-RUN-PAUSE-':
        paused = not paused
        if paused:
            paused_time = time_as_int()
        else:
            start_time = start_time + time_as_int() - paused_time
        # Change button's text
        window['-RUN-PAUSE-'].update('Run' if paused else 'Pause')

    # --------- Display timer in window --------
    window['text'].update('{:02d}:{:02d}.{:02d}'.format((current_time // 100) // 60,
                                                        (current_time // 100) % 60,
                                                        current_time % 100))
window.close()
