kickstart for Ubuntu/GPU server——GPU服务器环境配置
1. 防火墙设置
您可以通过运行以下命令来检查防火墙状态:
sudo ufw status
# 如果防火墙已启用,请通过运行以下命令来禁用它
sudo ufw disable
# 为了确保防火墙在下次启动时不会再次启用,请运行以下命令
systemctl disable ufw
systemctl stop ufw
2. 替换apt源
Google搜索thu ubuntu即可,如果是百度则搜索清华源 ubuntu。
选择对应版本,然后复制镜像地址。
cat > /etc/apt/sources.list <<-EOF
# 默认注释了源码镜像以提高 apt update 速度,如有需要可自行取消注释
deb https://mirrors.tuna.tsinghua.edu.cn/ubuntu/ jammy main restricted universe multiverse
# deb-src https://mirrors.tuna.tsinghua.edu.cn/ubuntu/ jammy main restricted universe multiverse
deb https://mirrors.tuna.tsinghua.edu.cn/ubuntu/ jammy-updates main restricted universe multiverse
# deb-src https://mirrors.tuna.tsinghua.edu.cn/ubuntu/ jammy-updates main restricted universe multiverse
deb https://mirrors.tuna.tsinghua.edu.cn/ubuntu/ jammy-backports main restricted universe multiverse
# deb-src https://mirrors.tuna.tsinghua.edu.cn/ubuntu/ jammy-backports main restricted universe multiverse

# deb https://mirrors.tuna.tsinghua.edu.cn/ubuntu/ jammy-security main restricted universe multiverse
# # deb-src https://mirrors.tuna.tsinghua.edu.cn/ubuntu/ jammy-security main restricted universe multiverse

deb http://security.ubuntu.com/ubuntu/ jammy-security main restricted universe multiverse
EOF
3. 设置代理
如果您需要使用代理服务器访问Internet,可以通过修改~/.bashrc和/etc/apt/apt.conf.d/99proxy文件来设置代理。
首先,将以下内容添加到~/.bashrc文件中以设置代理(~/.bashrc文件下的设置仅改用生效,/etc/bash.bashrc文件下设置则全部用户生效):
cat >> ~/.bashrc <<-EOF
set_proxy() {
  export http_proxy=http://192.168.131.76:7890
  export https_proxy=http://192.168.131.76:7890
  export all_proxy=socks5h://192.168.131.76:7890
}

set_proxy
EOF
# 第一行的EOF是一个结束标识符,它可以是任意字符串,只要确保它与重定向到文件的内容中不存在即可
# 使用这种方式来追加内容还可以避免缩进问题
# 最后的EOF标志着重定向到文件的内容已经彻底结束

source ~/.bashrc
# 将.bashrc中设置的环境变量导出到当前shell环境,`. ~/bashrc`也是等价的
# 此时,尝试`sudo apt update`查看apt是否成功使用环境变量
# apt需要使用socks5h协议的代理,h表示支持DNS解析
# > As the man page says, socks5h, not socks5,
# is supported by apt, which means socks5 proxy with DNS resolving ability.
然后,将以下内容添加到/etc/apt/apt.conf.d/99proxy文件中以在apt中设置代理:
cat >> /etc/apt/apt.conf.d/99proxy << EOF
Acquire::https::Verify-Peer "false";
// Do not verify that certificate name matches server name
Acquire::https::Verify-Host "false";
// proxy
Acquire::http::Proxy "socks5h://192.168.131.76:7890";
Acquire::https::Proxy "socks5h://192.168.131.76:7890";
EOF
4. 更新软件包
# 更新索引
sudo apt update
# 更新所有软件包
sudo apt upgrade
5. 安装GPU驱动程序
在正式安装CUDA之前,需要先安装Nvidia驱动,也可以直接下载对应驱动。
打开,选择Latest Production Branch Version即可,下载后sudo sh NVIDIA-Linux-x86_64-$DRIVER_VERSION.run即可(Runfile安装方式)。
或者尝试如下命令(包管理方式):
sudo ubuntu-drivers autoinstall
sudo apt search nvidia-driver
sudo apt install nvidia-driver-525-server -y
6. 安装CUDA
以 X86_64 的 Ubuntu 18.04 系统为例(版本查看cat /etc/*release),要安装 CUDA Toolkit,可以按照以下步骤进行操作:
- 访问 CUDA Toolkit Downloads 网页。
- 选择相应的操作系统、体系结构和发行版本。在此示例中,选择 Linux 操作系统、X86_64 架构和 Ubuntu 18.04 发行版本。
- 在页面下方,找到 “Installation Instructions” 部分,并复制提供的安装命令。
- 在终端窗口中粘贴复制的安装命令,并按照命令行提示进行操作。
运行以下命令以自动安装最新版本的GPU驱动程序:
wget https://developer.download.nvidia.com/compute/cuda/repos/ubuntu1804/x86_64/cuda-ubuntu1804.pin
sudo mv cuda-ubuntu1804.pin /etc/apt/preferences.d/cuda-repository-pin-600
wget https://developer.download.nvidia.com/compute/cuda/12.1.0/local_installers/cuda-repo-ubuntu1804-12-1-local_12.1.0-530.30.02-1_amd64.deb
sudo dpkg -i cuda-repo-ubuntu1804-12-1-local_12.1.0-530.30.02-1_amd64.deb
sudo cp /var/cuda-repo-ubuntu1804-12-1-local/cuda-*-keyring.gpg /usr/share/keyrings/
sudo apt-get update
sudo apt-get -y install cuda

# 如上命令为英伟达官方提供
# 安装完成后,可以尝试`sudo apt autoremove`清理已经需要的依赖包
# 尝试重启设备
sudo reboot
务必记得重新启动设备。
重启设备之后,尝试运行nvidia-smi测试驱动和CUDA是否安装成功。
nvidia-smi
7. conda安装
Google搜索thu conda即可,如果是百度则搜索清华源 conda选择清华大学开源软件镜像站。
优先下载Miniconda,进入如下页面,搜索合适的包(例如,搜索2023,选择合适的cpython版本和架构amd64/x86-64),并复制下载链接。
Miniconda 是一个 Anaconda 的轻量级替代,默认只包含了 python 和 conda,但是可以通过 pip 和 conda 来安装所需要的包。
wget https://mirrors.tuna.tsinghua.edu.cn/anaconda/miniconda/Miniconda3-py310_22.11.1-1-Linux-x86_64.sh
bash Miniconda3*.sh
# 安装过程中,需要明确回复yes同意licenses,并同意执行conda init·
# 安装完成之后,需要`bash`一下进入新的bash,确认自动激活conda环境
conda init命令是Anaconda/Miniconda软件包管理器中的一个命令,用于在Bash shell中初始化conda环境。它会修改Bash shell的配置文件,以确保在每次启动Bash时,conda环境变量和函数都能正确地加载到环境中。
对于不同的shell环境,需要执行其对应的init操作。比如,在windows的powershell环境中,需要执行conda init pwsh。
conda init之后都需要激活新的shell环境,比如bash一下,或者重新连接。
完成conda安装之后,需要配置conda源和pip源,这两个源是独立的。
conda源配置
参考即可完成.condarc的配置。
cat > ~/.condarc <<-EOF
channels:
  - defaults
show_channel_urls: true
default_channels:
  - https://mirrors.tuna.tsinghua.edu.cn/anaconda/pkgs/main
  - https://mirrors.tuna.tsinghua.edu.cn/anaconda/pkgs/r
  - https://mirrors.tuna.tsinghua.edu.cn/anaconda/pkgs/msys2
custom_channels:
  conda-forge: https://mirrors.tuna.tsinghua.edu.cn/anaconda/cloud
  msys2: https://mirrors.tuna.tsinghua.edu.cn/anaconda/cloud
  bioconda: https://mirrors.tuna.tsinghua.edu.cn/anaconda/cloud
  menpo: https://mirrors.tuna.tsinghua.edu.cn/anaconda/cloud
  pytorch: https://mirrors.tuna.tsinghua.edu.cn/anaconda/cloud
  pytorch-lts: https://mirrors.tuna.tsinghua.edu.cn/anaconda/cloud
  simpleitk: https://mirrors.tuna.tsinghua.edu.cn/anaconda/cloud
EOF
pip源配置
mkdir ~/.pip/
cat >> ~/.pip/pip.conf <<-EOF
[global]
index-url=http://mirrors.aliyun.com/pypi/simple/
[install]
trusted-host=mirrors.aliyun.com
EOF
创建虚拟环境
conda clean -i
conda create -n torch
# 如果需要指定python版本,则可以在创建环境时指定,conda create -n torch python=3.8
conda activate torch
Google搜索pytorch即可,点击Get Started,选择对应版本,复制命令并执行。

8. 配置ssh免密登录
SSH服务由服务端和客户端(常见的有SSH(Linux)/SecureCRT/Putty/Xshell)组成。默认情况下,SSH服务使用22端口提供服务,并支持两个不兼容的SSH协议版本:1.x和2.x。
SSH服务器端是一个守护进程,在后台运行并响应来自客户端的连接请求。该进程名为"SSHD",负责实时监听远程SSH客户端的连接请求,并进行处理。处理的内容通常包括公钥认证、密钥交换、对称密钥加密以及非安全连接等。该SSH服务是Linux基础系统优化中保留的开机自启动服务之一。
注意:Ubuntu通常不允许root远程登陆,需要修改/etc/ssh/sshd_config配置,修改#PermitRootLogin prohibit-password为PermitRootLogin yes。
从SSH客户端来看,SSH服务主要提供两种安全登录模式,具体如下。
1.基于口令的安全验证
基于口令的安全验证的方式只要知道服务器的SSH连接账号和口令(当然也要知道对应服务器的IP及开放的SSH端口,默认为22),就可以通过SSH客户端登录到这台远程主机。此时,联机过程中所有传输的数据都是加密的。

ssh -p22 user@ip
2.基于密钥的安全验证
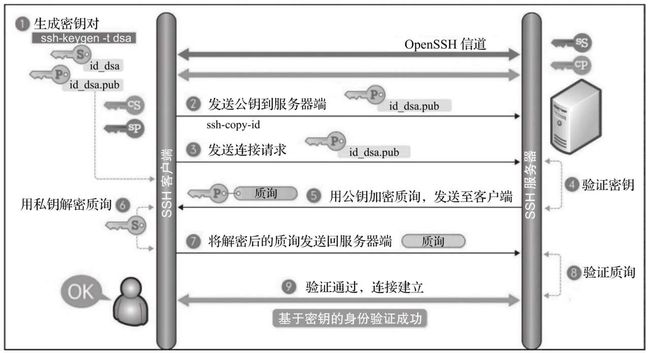
基于密钥的安全验证方式需要依靠密钥,也就是必须事先建立一个密钥对,然后把公钥(锁头)放在需要访问的目标服务器上,另外,还需要把私钥(钥匙)放到SSH的客户端或对应的客户端服务器上。

此时,如果要想连接到这个带有公钥的SSH服务器,客户端SSH软件或者客户端服务器就会向SSH服务器发出请求,请求用联机的用户密钥进行安全验证。SSH服务器收到请求之后,会先在该SSH服务器上连接的用户的家目录下寻找事先放上去的对应用户的公用密钥,然后把它和连接的SSH客户端发送过来的公钥进行比较。
如果两个密钥一致,SSH服务器就用公钥加密“质询”(Challenge)并把它发送给SSH客户端。SSH客户端收到“质询”之后就可以用自己的私匙解密,再把它发送给SSH服务器。使用这种方式,需要知道联机用户的密钥文件。与第一种基于口令验证的方式相比,第二种方式不需要在网络上传送口令密码,所以安全性更高了,这时我们也要注意保护我们的密钥文件,特别是私钥文件,一旦被黑客获取,危险就很大了。
如何配置免密登录?
dpkg -l | grep openssh-server
The user creates their key pair by running ssh-keygen(1). This stores the private key in ~/.ssh/id_dsa (DSA), ~/.ssh/id_ecdsa (ECDSA), ~/.ssh/id_ecdsa_sk (authenticator-hosted ECDSA), ~/.ssh/id_ed25519 (Ed25519), ~/.ssh/id_ed25519_sk (authenticator-hosted Ed25519), or ~/.ssh/id_rsa (RSA) and stores the public key in ~/.ssh/id_dsa.pub (DSA), ~/.ssh/id_ecdsa.pub (ECDSA), ~/.ssh/id_ecdsa_sk.pub (authenticator-hosted ECDSA), ~/.ssh/id_ed25519.pub (Ed25519), ~/.ssh/id_ed25519_sk.pub (authenticator-hosted Ed25519), or ~/.ssh/id_rsa.pub (RSA) in the user’s home directory. The user should then copy the public key to ~/.ssh/authorized_keys in their home directory on the remote machine. The authorized_keys file corresponds to the conventional ~/.rhosts file, and has one key per line, though the lines can be very long. After this, the user can log in without giving the password.
ssh登陆涉及的相关文件:
- ~/.ssh/config: This is the per-user configuration file. The file format and configuration options are described in ssh_config(5). Because of the potential for abuse, this file must have strict permissions: read/write for the user, and not writable by others. It may be group-writable provided that the group in question contains only the user.
- ~/.ssh/authorized_keys: Lists the public keys (DSA, ECDSA, Ed25519, RSA) that can be used for logging in as this user. The format of this file is described in the sshd(8) manual page. This file is not highly sensitive, but the recommended permissions are read/write for the user, and not accessible by others.
我们可以通过man ssh_config查看相关配置,常用配置如下:
Host done-qcloud
  HostName ip/doamin
  User user
  Port 12321
  PreferredAuthentications publickey
  IdentityFile ~/.ssh/id_rsa_login
其中,IdentityFile指定其对应私钥,端口非22时则标明Port ***,PreferredAuthentications publickey可省略。
具体步骤如下(参考):
ssh-keygen -t rsa生成公私钥对;ssh-copy-id -i ~/.ssh/id_rsa user@host拷贝公钥到主机,此时不需要表明.pub后缀,或者cat .ssh/id_ras.pub之后粘贴并复制到远程主机的~/.ssh/authorized_keys文件;- 配置本机的
~/.ssh/config文件,依据如上配置进行修改; - 通过
ssh done-qcloud进行测试。如果免密登录,则正确。