TensorFlow 1.x 深度学习秘籍:1~5
原文:TensorFlow 1.x Deep Learning Cookbook
协议:CC BY-NC-SA 4.0
译者:飞龙
本文来自【ApacheCN 深度学习 译文集】,采用译后编辑(MTPE)流程来尽可能提升效率。
不要担心自己的形象,只关心如何实现目标。——《原则》,生活原则 2.3.c
一、TensorFlow 简介
曾经尝试仅使用 NumPy 用 Python 编写用于神经网络的代码的任何人都知道它很繁琐。 为一个简单的单层前馈网络编写代码需要 40 条线,这增加了编写代码和执行时间方面的难度。
TensorFlow 使得一切变得更容易,更快捷,从而减少了实现想法与部署之间的时间。 在这本书中,您将学习如何发挥 TensorFlow 的功能来实现深度神经网络。
在本章中,我们将介绍以下主题:
- 安装 TensorFlow
- TensorFlow 中的 HelloWorld
- 了解 TensorFlow 程序结构
- 使用常量,变量和占位符
- 使用 TensorFlow 执行矩阵操作
- 使用数据流程图
- 从 0.x 迁移到 1.x
- 使用 XLA 增强计算性能
- 调用 CPU/GPU 设备
- 将 TensorFlow 用于深度学习
- 基于 DNN 的问题所需的不同 Python 包
介绍
TensorFlow 是 Google Brain 团队针对深层神经网络(DNN)开发的功能强大的开源软件库。 它于 2015 年 11 月首次在 Apache 2.x 许可下提供; 截止到今天,其 GitHub 存储库提交了超过 17,000 次提交,在短短两年内大约有 845 个贡献者。 这本身就是 TensorFlow 受欢迎程度和性能的衡量标准。 下图显示了流行的深度学习框架的比较,可以明显看出 TensorFlow 是其中的佼佼者:
该图是基于截至 2017 年 7 月 12 日的每个 Github 存储库中的数据。 每个气泡都有一个图例:(框架,贡献者)。
首先让我们了解 TensorFlow 到底是什么,以及为什么它在 DNN 研究人员和工程师中如此受欢迎。 TensorFlow 是开源深度学习库,它允许使用单个 TensorFlow API 在一个或多个 CPU,服务器,台式机或移动设备上的 GPU 上部署深度神经网络计算。 您可能会问,还有很多其他深度学习库,例如 Torch,Theano,Caffe 和 MxNet。 是什么让 TensorFlow 与众不同? TensorFlow 等大多数其他深度学习库具有自动微分功能,许多都是开源的,大多数都支持 CPU/GPU 选项,具有经过预训练的模型,并支持常用的 NN 架构,例如循环神经网络(RNN),卷积神经网络(CNN)和深度置信网络(DBN)。 那么,TensorFlow 还有什么呢? 让我们为您列出它们:
- 它适用于所有很酷的语言。 TensorFlow 适用于 Python,C++ ,Java,R 和 Go。
- TensorFlow 可在多个平台上运行,甚至可以移动和分布式。
- 所有云提供商(AWS,Google 和 Azure)都支持它。
- Keras 是高级神经网络 API,已与 TensorFlow 集成。
- 它具有更好的计算图可视化效果,因为它是本机的,而 Torch/Theano 中的等效视图看上去并不那么酷。
- TensorFlow 允许模型部署并易于在生产中使用。
- TensorFlow 具有很好的社区支持。
- TensorFlow 不仅仅是一个软件库; 它是一套包含 TensorFlow,TensorBoard 和 TensorServing 的软件。
Google 研究博客列出了世界各地使用 TensorFlow 进行的一些引人入胜的项目:
- Google 翻译正在使用 TensorFlow 和张量处理单元(TPU)
- 可以使用基于强化学习的模型生成旋律的 Magenta 项目采用 TensorFlow
- 澳大利亚海洋生物学家正在使用 TensorFlow 来发现和了解濒临灭绝的海牛
- 一位日本农民使用 TensorFlow 开发了一个应用,该应用使用大小和形状等物理参数对黄瓜进行分类
列表很长,使用 TensorFlow 的可能性更大。 本书旨在向您提供对应用于深度学习模型的 TensorFlow 的理解,以便您可以轻松地将它们适应于数据集并开发有用的应用。 每章都包含一组秘籍,涉及技术问题,依赖项,实际代码及其理解。 我们已经将这些秘籍彼此构建在一起,以便在每一章的最后,您都拥有一个功能齐全的深度学习模型。
安装 TensorFlow
在本秘籍中,您将学习如何在不同的 OS(Linux,Mac 和 Windows)上全新安装 TensorFlow 1.3。 我们将找到安装 TensorFlow 的必要要求。 TensorFlow 可以在 Ubuntu 和 macOS 上使用本机 PIP,Anaconda,Virtualenv 和 Docker 安装。 对于 Windows 操作系统,可以使用本机 PIP 或 Anaconda。
由于 Anaconda 可以在所有三个 OS 上工作,并且提供了一种简便的方法,不仅可以在同一系统上进行安装,还可以在同一系统上维护不同的项目环境,因此在本书中,我们将集中精力使用 Anaconda 安装 TensorFlow。 可从这里阅读有关 Anaconda 及其管理环境的更多详细信息。
本书中的代码已在以下平台上经过测试:
- Windows 10,Anaconda 3,Python 3.5,TensorFlow GPU,CUDA 工具包 8.0,cuDNN v5.1,NVDIA®GTX 1070
- Windows 10 / Ubuntu 14.04 / Ubuntu 16.04 / macOS Sierra,Anaconda3,Python 3.5,TensorFlow(CPU)
准备
TensorFlow 安装的前提条件是系统已安装 Python 2.5 或更高版本。 本书中的秘籍是为 Python 3.5(Anaconda 3 发行版)设计的。 要准备安装 TensorFlow,请首先确保已安装 Anaconda。 您可以从这里下载并安装适用于 Windows/macOS 或 Linux 的 Anaconda。
安装后,您可以在终端窗口中使用以下命令来验证安装:
conda --version
安装 Anaconda 后,我们将继续下一步,确定是安装 TensorFlow CPU 还是 GPU。 尽管几乎所有计算机都支持 TensorFlow CPU,但只有当计算机具有具有 CUDA 计算能力 3.0 或更高版本的 NVDIA®GPU 卡(台式机最低为 NVDIA®GTX 650)时,才能安装 TensorFlow GPU。
CPU versus GPU: Central Processing Unit (CPU) consists of a few cores (4-8) optimized for sequential serial processing. A Graphical Processing Unit (GPU) on the other hand has a massively parallel architecture consisting of thousands of smaller, more efficient cores (roughly in 1,000s) designed to handle multiple tasks simultaneously.
对于 TensorFlow GPU,必须安装 CUDA 工具包 7.0 或更高版本,安装正确的 NVDIA®驱动程序,并安装 cuDNN v3 或更高版本。 在 Windows 上,此外,需要某些 DLL 文件。 您可以下载所需的 DLL 文件,也可以安装 Visual Studio C++ 。 要记住的另一件事是 cuDNN 文件安装在另一个目录中。 需要确保目录位于系统路径中。 也可以选择将相关文件复制到相应文件夹中的 CUDA 库中。
操作步骤
我们按以下步骤进行:
- 在命令行中使用以下命令创建 conda 环境(如果使用 Windows,最好在命令行中以管理员身份进行操作):
conda create -n tensorflow python=3.5
- 激活 conda 环境:
# Windows
activate tensorflow
#Mac OS/ Ubuntu:
source activate tensorflow
- 该命令应更改提示符:
# Windows
(tensorflow)C:>
# Mac OS/Ubuntu
(tensorflow)$
- 接下来,根据要在 conda 环境中安装的 TensorFlow 版本,输入以下命令:
## Windows
# CPU Version only(tensorflow)C:>pip install --ignore-installed --upgrade https://storage.googleapis.com/tensorflow/windows/cpu/tensorflow-1.3.0cr2-cp35-cp35m-win_amd64.whl

# GPU Version
(tensorflow)C:>pip install --ignore-installed --upgrade https://storage.googleapis.com/tensorflow/windows/gpu/tensorflow_gpu-1.3.0cr2-cp35-cp35m-win_amd64.whl
## Mac OS
# CPU only Version
(tensorflow)$ pip install --ignore-installed --upgrade https://storage.googleapis.com/tensorflow/mac/cpu/tensorflow-1.3.0cr2-py3-none-any.whl# GPU version(tensorflow)$ pip install --ignore-installed --upgrade https://storage.googleapis.com/tensorflow/mac/gpu/tensorflow_gpu-1.3.0cr2-py3-none-any.whl
## Ubuntu# CPU only Version(tensorflow)$ pip install --ignore-installed --upgrade https://storage.googleapis.com/tensorflow/linux/cpu/tensorflow-1.3.0cr2-cp35-cp35m-linux_x86_64.whl# GPU Version
(tensorflow)$ pip install --ignore-installed --upgrade https://storage.googleapis.com/tensorflow/linux/gpu/tensorflow_gpu-1.3.0cr2-cp35-cp35m-linux_x86_64.whl
- 在命令行上,输入
python。 - 编写以下代码:
import tensorflow as tf
message = tf.constant('Welcome to the exciting world of Deep Neural Networks!')
with tf.Session() as sess:
    print(sess.run(message).decode())
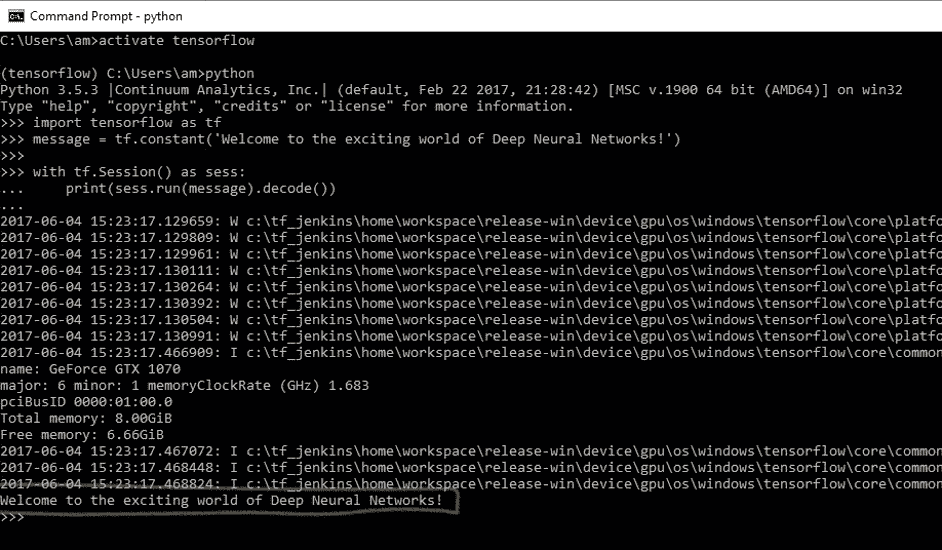
- 您将收到以下输出:
- 在 Windows 上使用命令
deactivate在 MAC/Ubuntu 上使用source deactivate在命令行上禁用 conda 环境。
工作原理
Google 使用 Wheels 标准分发 TensorFlow。 它是具有.whl扩展名的 ZIP 格式存档。 Anaconda 3 中的默认 Python 解释器 Python 3.6 没有安装轮子。 在撰写本书时,仅对 Linux/Ubuntu 支持 Python 3.6。 因此,在创建 TensorFlow 环境时,我们指定了 Python 3.5。 这将在名为tensorflow的 conda 环境中安装 PIP,python 和 wheel 以及其他一些包。
创建 conda 环境后,可使用source activate/activate命令激活该环境。 在激活的环境中,将pip install命令与适当的 TensorFlow-API URL 配合使用以安装所需的 TensorFlow。 尽管存在使用 Conda forge 安装 TensorFlow CPU 的 Anaconda 命令,但 TensorFlow 文档建议使用pip install。 在 conda 环境中安装 TensorFlow 之后,我们可以将其停用。 现在您可以执行第一个 TensorFlow 程序了。
程序运行时,您可能会看到一些警告(W)消息,一些信息(I)消息以及最后的代码输出:
Welcome to the exciting world of Deep Neural Networks!
恭喜您成功安装并执行了第一个 TensorFlow 代码! 在下一个秘籍中,我们将更深入地研究代码。
更多
此外,您还可以安装 Jupyter 笔记本:
- 如下安装
ipython:
conda install -c anaconda ipython
- 安装
nb_conda_kernels:
conda install -channel=conda-forge nb_conda_kernels
- 启动
Jupyter notebook:
jupyter notebook
This will result in the opening of a new browser window.
如果您的系统上已经安装了 TensorFlow,则可以使用pip install --upgrade tensorflow对其进行升级。
TensorFlow 中的 HelloWorld
您学习用任何计算机语言编写的第一个程序是 HelloWorld。 我们在本书中保持约定,并从 HelloWorld 程序开始。 我们在上一节中用于验证 TensorFlow 安装的代码如下:
import tensorflow as tf
message = tf.constant('Welcome to the exciting world of Deep Neural Networks!')
 with tf.Session() as sess:
     print(sess.run(message).decode())
让我们深入研究这个简单的代码。
操作步骤
- 导入
tensorflow会导入 TensorFlow 库,并允许您使用其出色的功能。
import tensorflow as tf
- 由于我们要打印的消息是一个常量字符串,因此我们使用
tf.constant:
message = tf.constant('Welcome to the exciting world of Deep Neural Networks!')
- 要执行图元素,我们需要使用
with定义Session并使用run运行会话:
with tf.Session() as sess:
     print(sess.run(message).decode())
- 根据您的计算机系统和操作系统,输出包含一系列警告消息(W),声称如果针对您的特定计算机进行编译,代码可以更快地运行:
The TensorFlow library wasn't compiled to use SSE instructions, but these are available on your machine and could speed up CPU computations.
The TensorFlow library wasn't compiled to use SSE2 instructions, but these are available on your machine and could speed up CPU computations.
The TensorFlow library wasn't compiled to use SSE3 instructions, but these are available on your machine and could speed up CPU computations.
The TensorFlow library wasn't compiled to use SSE4.1 instructions, but these are available on your machine and could speed up CPU computations.
The TensorFlow library wasn't compiled to use SSE4.2 instructions, but these are available on your machine and could speed up CPU computations.
The TensorFlow library wasn't compiled to use AVX instructions, but these are available on your machine and could speed up CPU computations.
The TensorFlow library wasn't compiled to use AVX2 instructions, but these are available on your machine and could speed up CPU computations.
The TensorFlow library wasn't compiled to use FMA instructions, but these are available on your machine and could speed up CPU computations.
- 如果您正在使用 TensorFlow GPU,则还会获得信息性消息列表(I),其中提供了所用设备的详细信息:
Found device 0 with properties:
name: GeForce GTX 1070
major: 6 minor: 1 memoryClockRate (GHz) 1.683
pciBusID 0000:01:00.0
Total memory: 8.00GiB
Free memory: 6.66GiB
DMA: 0
0:   Y
Creating TensorFlow device (/gpu:0) -> (device: 0, name: GeForce GTX 1070, pci bus id: 0000:01:00.0)
- 最后是我们要求在会话中打印的消息:
Welcome to the exciting world of Deep Neural Networks
工作原理
前面的代码分为三个主要部分。 导入块包含我们的代码将使用的所有库; 在当前代码中,我们仅使用 TensorFlow。 import tensorflow as tf语句使 Python 可以访问所有 TensorFlow 的类,方法和符号。 第二块包含图定义部分; 在这里,我们建立了所需的计算图。 在当前情况下,我们的图仅由一个节点组成,张量常数消息由字节字符串"Welcome to the exciting world of Deep Neural Networks"组成。 我们代码的第三部分是作为会话运行计算图; 我们使用with关键字创建了一个会话。 最后,在会话中,我们运行上面创建的图。
现在让我们了解输出。 收到的警告消息告诉您,TensorFlow 代码可能会以更高的速度运行,这可以通过从源代码安装 TensorFlow 来实现(我们将在本章稍后的内容中进行此操作)。 收到的信息消息会通知您有关用于计算的设备。 对它们而言,这两种消息都相当无害,但是如果您不希望看到它们,则添加以下两行代码即可解决问题:
import os
os.environ['TF_CPP_MIN_LOG_LEVEL']='2'
该代码将忽略直到级别 2 的所有消息。级别 1 用于提供信息,级别 2 用于警告,级别 3 用于错误消息。
程序将打印运行图的结果,该图是使用sess.run()语句运行的。 运行图的结果将馈送到print函数,可使用decode方法对其进行进一步修改。 sess.run求值消息中定义的张量。 print函数在stdout上打印求值结果:
b'Welcome to the exciting world of Deep Neural Networks'
这表示结果是byte string。 要删除字符串引号和b(用于字节),我们使用方法decode()。
了解 TensorFlow 程序结构
TensorFlow 与其他编程语言非常不同。 我们首先需要为要创建的任何神经网络构建一个蓝图。 这是通过将程序分为两个独立的部分来完成的,即计算图的定义及其执行。 首先,这对于常规程序员而言似乎很麻烦,但是执行图与图定义的这种分离赋予了 TensorFlow 强大的力量,即可以在多个平台上工作和并行执行的能力。
计算图:计算图是节点和边的网络。 在本节中,定义了所有要使用的数据,即张量对象(常量,变量和占位符)和所有要执行的计算,即操作对象(简称为ops)。 每个节点可以有零个或多个输入,但只有一个输出。 网络中的节点表示对象(张量和运算),边缘表示在运算之间流动的张量。 计算图定义了神经网络的蓝图,但其中的张量尚无与其关联的值。
为了构建计算图,我们定义了我们需要执行的所有常量,变量和操作。 常量,变量和占位符将在下一个秘籍中处理。 数学运算将在矩阵处理的秘籍中详细介绍。 在这里,我们使用一个简单的示例来描述结构,该示例定义并执行图以添加两个向量。
图的执行:使用会话对象执行图。 会话对象封装了求值张量和操作对象的环境。 这是实际计算和信息从一层传输到另一层的地方。 不同张量对象的值仅初始化,访问并保存在会话对象中。 到目前为止,张量对象仅仅是抽象的定义,在这里它们就变成了现实。
操作步骤
我们按以下步骤进行:
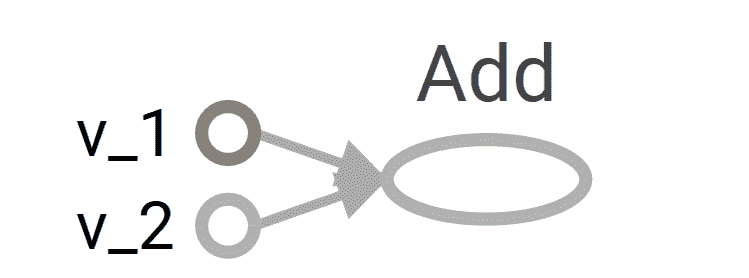
- 我们考虑一个简单的例子,将两个向量相加,我们有两个输入向量
v_1和v_2,它们将被作为Add操作的输入。 我们要构建的图如下:
- 定义计算图的相应代码如下:
v_1 = tf.constant([1,2,3,4])
v_2 = tf.constant([2,1,5,3])
v_add = tf.add(v_1,v_2)  # You can also write v_1 + v_2 instead
- 接下来,我们在会话中执行图:
with tf.Session() as sess:
    prin(sess.run(v_add))
上面的两个命令等效于以下代码。 使用with块的优点是不需要显式关闭会话。
sess = tf.Session()
print(ses.run(tv_add))
sess.close()
- 这导致打印两个向量的和:
[3 3 8 7]
请记住,每个会话都需要使用close()方法显式关闭,而with块在结束时会隐式关闭会话。
工作原理
计算图的构建非常简单; 您将继续添加变量和运算,并按照您逐层构建神经网络的顺序将它们传递(使张量流动)。 TensorFlow 还允许您使用with tf.device()将特定设备(CPU/GPU)与计算图的不同对象一起使用。 在我们的示例中,计算图由三个节点组成,v_1和v_2代表两个向量,Add是对其执行的操作。
现在,要使该图更生动,我们首先需要使用tf.Session()定义一个会话对象; 我们给会话对象起了名字sess。 接下来,我们使用 Session 类中定义的run方法运行它,如下所示:
run (fetches, feed_dict=None, options=None, run_metadata)
这将求值fetches中的张量; 我们的示例在提取中具有张量v_add。 run方法将执行导致v_add的图中的每个张量和每个操作。 如果您在提取中包含v_1而不是v_add,则结果将是向量v_1的值:
[1,2,3,4]
访存可以是单个张量/运算对象,也可以是多个张量/操作对象,例如,如果访存为[v_1, v_2, v_add],则输出将为以下内容:
[array([1, 2, 3, 4]), array([2, 1, 5, 3]), array([3, 3, 8, 7])]
在同一程序代码中,我们可以有许多会话对象。
更多
您一定想知道为什么我们必须编写这么多行代码才能进行简单的向量加法或打印一条小消息。 好吧,您可以很方便地以单线方式完成此工作:
print(tf.Session().run(tf.add(tf.constant([1,2,3,4]),tf.constant([2,1,5,3]))))
编写这种类型的代码不仅会影响计算图,而且在for循环中重复执行相同的操作(OP)时可能会占用大量内存。 养成显式定义所有张量和操作对象的习惯,不仅使代码更具可读性,而且还有助于您以更简洁的方式可视化计算图。
使用 TensorBoard 可视化图形是 TensorFlow 最有用的功能之一,尤其是在构建复杂的神经网络时。 可以在图对象的帮助下查看我们构建的计算图。
如果您正在使用 Jupyter 笔记本或 Python Shell,则使用tf.InteractiveSession代替tf.Session更为方便。 InteractiveSession使其成为默认会话,因此您可以使用eval()直接调用运行张量对象,而无需显式调用该会话,如以下示例代码中所述:
sess = tf.InteractiveSession()

v_1 = tf.constant([1,2,3,4])
v_2 = tf.constant([2,1,5,3])

v_add = tf.add(v_1,v_2)

print(v_add.eval())

sess.close()
使用常量,变量和占位符
用最简单的术语讲,TensorFlow 提供了一个库来定义和执行带有张量的不同数学运算。 张量基本上是 n 维矩阵。 所有类型的数据,即标量,向量和矩阵都是张量的特殊类型:
| 数据类型 | 张量 | 形状 |
|---|---|---|
| 标量 | 0 维张量 | [] |
| 向量 | 一维张量 | [D0] |
| 矩阵 | 二维张量 | [D0, D1] |
| 张量 | ND 张量 | [D0, D1, D[n-1]] |
TensorFlow 支持三种类型的张量:
- 常量
- 变量
- 占位符
常量:常数是无法更改其值的张量。
变量:当值需要在会话中更新时,我们使用变量张量。 例如,在神经网络的情况下,需要在训练期间更新权重,这是通过将权重声明为变量来实现的。 在使用之前,需要对变量进行显式初始化。 另一个要注意的重要事项是常量存储在计算图定义中。 每次加载图时都会加载它们。 换句话说,它们是昂贵的内存。 另一方面,变量是分开存储的。 它们可以存在于参数服务器上。
占位符:这些占位符用于将值输入 TensorFlow 图。 它们与feed_dict一起用于输入数据。 它们通常用于在训练神经网络时提供新的训练示例。 在会话中运行图时,我们为占位符分配一个值。 它们使我们无需数据即可创建操作并构建计算图。 需要注意的重要一点是,占位符不包含任何数据,因此也无需初始化它们。
操作步骤
让我们从常量开始:
- 我们可以声明一个常量标量:
t_1 = tf.constant(4)
- 形状为
[1,3]的常数向量可以声明如下:
t_2 = tf.constant([4, 3, 2])
- 为了创建一个所有元素都为零的张量,我们使用
tf.zeros()。 该语句创建一个形状为[M,N]和dtype的零矩阵(int32,float32等):
tf.zeros([M,N],tf.dtype)
让我们举个例子:
zero_t = tf.zeros([2,3],tf.int32)
# Results in an 2×3 array of zeros: [[0 0 0], [0 0 0]]
- 我们还可以创建与现有 Numpy 数组形状相同的张量常数或张量常数,如下所示:
tf.zeros_like(t_2)
# Create a zero matrix of same shape as t_2
tf.ones_like(t_2)
# Creates a ones matrix of same shape as t_2
- 我们可以将所有元素设置为一个来创建张量; 在这里,我们创建一个形状为
[M,N]的 1 矩阵:
tf.ones([M,N],tf.dtype)
让我们举个例子:
ones_t = tf.ones([2,3],tf.int32)
# Results in an 2×3 array of ones:[[1 1 1], [1 1 1]]
让我们继续序列:
- 我们可以在总的
num值内生成从开始到结束的一系列均匀间隔的向量:
tf.linspace(start, stop, num)
- 相应的值相差
(stop-start)/(num-1)。 - 让我们举个例子:
range_t = tf.linspace(2.0,5.0,5)
# We get: [ 2\.    2.75  3.5   4.25  5\.  ]
- 从头开始生成一系列数字(默认值为 0),以增量递增(默认值为 1),直到但不包括限制:
tf.range(start,limit,delta)
这是一个例子:
range_t = tf.range(10)
# Result: [0 1 2 3 4 5 6 7 8 9]
TensorFlow 允许创建具有不同分布的随机张量:
- 要根据形状为
[M,N]的正态分布创建随机值,其中均值(默认值为 0.0),标准差(默认值为 1.0),种子,我们可以使用以下方法:
t_random = tf.random_normal([2,3], mean=2.0, stddev=4, seed=12)

# Result: [[ 0.25347459  5.37990952  1.95276058], [-1.53760314  1.2588985   2.84780669]]
- 要从形状为
[M,N]的截断正态分布(带有平均值(默认值为 0.0)和标准差(默认值为 1.0))创建随机值,我们可以使用以下方法:
t_random = tf.truncated_normal([1,5], stddev=2, seed=12)
# Result: [[-0.8732627 1.68995488 -0.02361972 -1.76880157 -3.87749004]]
- 要根据给定的形状
[M,N]的伽玛分布在[minval (default=0), maxval]范围内创建带有种子的随机值,请执行以下操作:
t_random = tf.random_uniform([2,3], maxval=4, seed=12)

# Result: [[ 2.54461002  3.69636583  2.70510912], [ 2.00850058  3.84459829  3.54268885]]
- 要将给定张量随机裁剪为指定大小,请执行以下操作:
tf.random_crop(t_random, [2,5],seed=12)
在这里,t_random是已经定义的张量。 这将导致从张量t_random中随机裁剪出[2,5]张量。
很多时候,我们需要以随机顺序展示训练样本; 我们可以使用tf.random_shuffle()沿其第一维随机调整张量。 如果t_random是我们想要改组的张量,那么我们使用以下代码:
tf.random_shuffle(t_random)
- 随机生成的张量受初始种子值的影响。 为了在多个运行或会话中获得相同的随机数,应将种子设置为恒定值。 当使用大量随机张量时,我们可以使用
tf.set_random_seed()为所有随机生成的张量设置种子。 以下命令将所有会话的随机张量的种子设置为54:
tf.set_random_seed(54)
Seed can have only integer value.
现在转到变量:
- 它们是使用变量类创建的。 变量的定义还包括应从中初始化变量的常数/随机值。 在下面的代码中,我们创建两个不同的张量变量
t_a和t_b。 都将初始化为形状为[50, 50],minval=0和maxval=10的随机均匀分布:
rand_t = tf.random_uniform([50,50], 0, 10, seed=0)
t_a = tf.Variable(rand_t)
t_b = tf.Variable(rand_t)
变量通常用于表示神经网络中的权重和偏置。
- 在下面的代码中,我们定义了两个变量权重和偏差。 权重变量使用正态分布随机初始化,均值为零,标准差为 2,权重的大小为
100×100。 偏差由 100 个元素组成,每个元素都初始化为零。 在这里,我们还使用了可选的参数名称来为计算图中定义的变量命名。
weights = tf.Variable(tf.random_normal([100,100],stddev=2))
bias = tf.Variable(tf.zeros[100], name = 'biases')
- 在所有前面的示例中,变量的初始化源都是某个常量。 我们还可以指定一个要从另一个变量初始化的变量。 以下语句将从先前定义的权重中初始化
weight2:
weight2=tf.Variable(weights.initialized_value(), name='w2')
- 变量的定义指定如何初始化变量,但是我们必须显式初始化所有声明的变量。 在计算图的定义中,我们通过声明一个初始化操作对象来实现:
intial_op = tf.global_variables_initializer().
- 在运行图中,还可以使用
tf.Variable.initializer分别初始化每个变量:
bias = tf.Variable(tf.zeros([100,100]))
 with tf.Session() as sess:
     sess.run(bias.initializer)
- 保存变量:我们可以使用
Saver类保存变量。 为此,我们定义一个saver操作对象:
saver = tf.train.Saver()
- 在常量和变量之后,我们来到最重要的元素占位符,它们用于将数据馈入图。 我们可以使用以下内容定义占位符:
tf.placeholder(dtype, shape=None, name=None)
dtype指定占位符的数据类型,并且在声明占位符时必须指定。 在这里,我们为x定义一个占位符,并使用feed_dict为随机4×5矩阵计算y = 2 * x:
x = tf.placeholder("float")
y = 2 * x
data = tf.random_uniform([4,5],10)
with tf.Session() as sess:
     x_data = sess.run(data)
     print(sess.run(y, feed_dict = {x:x_data}))
工作原理
所有常量,变量和占位符都将在代码的计算图部分中定义。 如果在定义部分中使用print语句,我们将仅获得有关张量类型的信息,而不是张量的值。
为了找出该值,我们需要创建会话图,并显式使用run命令,并将所需的张量值设为fetches:
print(sess.run(t_1))
# Will print the value of t_1 defined in step 1
更多
很多时候,我们将需要恒定的大尺寸张量对象。 在这种情况下,为了优化内存,最好将它们声明为具有可训练标志设置为False的变量:
t_large = tf.Variable(large_array, trainable = False)
TensorFlow 的设计可完美地与 Numpy 配合使用,因此所有 TensorFlow 数据类型均基于 Numpy 的数据类型。 使用tf.convert_to_tensor(),我们可以将给定值转换为张量类型,并将其与 TensorFlow 函数和运算符一起使用。 该函数接受 Numpy 数组,Python 列表和 Python 标量,并允许与张量对象互操作。
下表列出了一些常见的 TensorFlow 支持的数据类型(摘自 TensorFlow.org ):
| 数据类型 | TensorFlow 类型 |
|---|---|
DT_FLOAT |
tf.float32 |
DT_DOUBLE |
tf.float64 |
DT_INT8 |
tf.int8 |
DT_UINT8 |
tf.uint8 |
DT_STRING |
tf.string |
DT_BOOL |
tf.bool |
DT_COMPLEX64 |
tf.complex64 |
DT_QINT32 |
tf.qint32 |
请注意,与 Python/Numpy 序列不同,TensorFlow 序列不可迭代。 尝试以下代码:
for i in tf.range(10)
您会得到一个错误:
#TypeError("'Tensor' object is not iterable.")
使用 TensorFlow 执行矩阵操作
矩阵运算(例如执行乘法,加法和减法)是任何神经网络中信号传播中的重要运算。 通常在计算中,我们需要随机,零,一或恒等矩阵。
本秘籍将向您展示如何获取不同类型的矩阵以及如何对它们执行不同的矩阵操作。
操作步骤
我们按以下步骤进行:
- 我们开始一个交互式会话,以便可以轻松求值结果:
import tensorflow as tf

#Start an Interactive Session
sess = tf.InteractiveSession()

#Define a 5x5 Identity matrix
I_matrix = tf.eye(5)
print(I_matrix.eval())
# This will print a 5x5 Identity matrix

#Define a Variable initialized to a 10x10 identity matrix
X = tf.Variable(tf.eye(10))
X.initializer.run()  # Initialize the Variable
print(X.eval())
# Evaluate the Variable and print the result

#Create a random 5x10 matrix
A = tf.Variable(tf.random_normal([5,10]))
A.initializer.run()

#Multiply two matrices
product = tf.matmul(A, X)
print(product.eval())

#create a random matrix of 1s and 0s, size 5x10
b = tf.Variable(tf.random_uniform([5,10], 0, 2, dtype= tf.int32))
b.initializer.run()
print(b.eval())
b_new = tf.cast(b, dtype=tf.float32)
#Cast to float32 data type

# Add the two matrices
t_sum = tf.add(product, b_new)
t_sub = product - b_new
print("A*X _b\n", t_sum.eval())
print("A*X - b\n", t_sub.eval())
- 可以按以下方式执行其他一些有用的矩阵操作,例如按元素进行乘法,与标量相乘,按元素进行除法,按元素进行除法的余数:
import tensorflow as tf

# Create two random matrices
a = tf.Variable(tf.random_normal([4,5], stddev=2))
b = tf.Variable(tf.random_normal([4,5], stddev=2))

#Element Wise Multiplication
A = a * b

#Multiplication with a scalar 2
B = tf.scalar_mul(2, A)

# Elementwise division, its result is
C = tf.div(a,b)

#Element Wise remainder of division
D = tf.mod(a,b)

init_op = tf.global_variables_initializer()
with tf.Session() as sess:
     sess.run(init_op)
     writer = tf.summary.FileWriter('graphs', sess.graph)
     a,b,A_R, B_R, C_R, D_R = sess.run([a , b, A, B, C, D])
     print("a\n",a,"\nb\n",b, "a*b\n", A_R, "\n2*a*b\n", B_R, "\na/b\n", C_R, "\na%b\n", D_R)

writer.close()
tf.div returns a tensor of the same type as the first argument.
工作原理
矩阵的所有算术运算(例如加,乘,除,乘(元素乘),模和叉)都要求两个张量矩阵的数据类型相同。 如果不是这样,它们将产生错误。 我们可以使用tf.cast()将张量从一种数据类型转换为另一种数据类型。
更多
如果我们要在整数张量之间进行除法,最好使用tf.truediv(a,b),因为它首先将整数张量强制转换为浮点,然后执行逐元素除法。
使用数据流程图
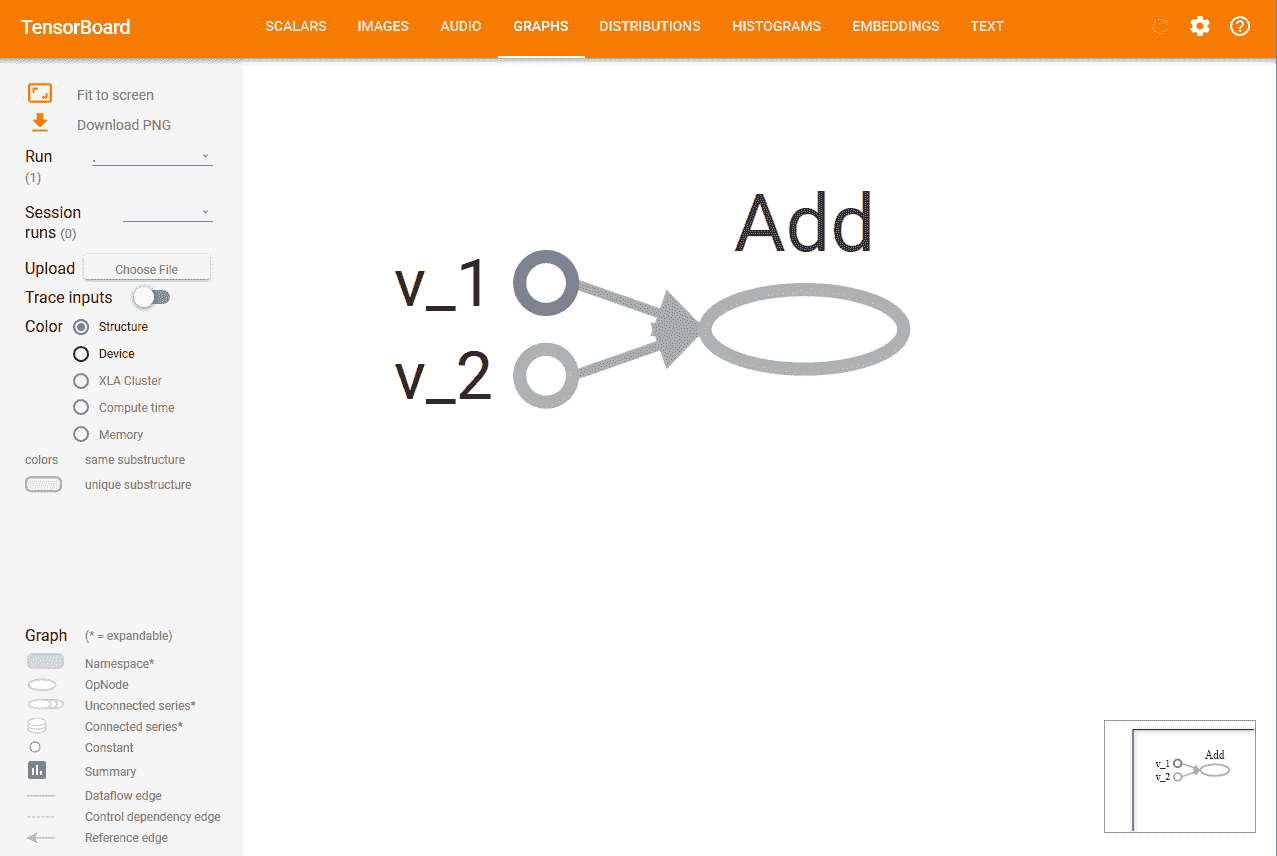
TensorFlow 使用 TensorBoard 提供计算图的图形图像。 这使得理解,调试和优化复杂的神经网络程序变得很方便。 TensorBoard 还可以提供有关网络执行情况的定量指标。 它读取 TensorFlow 事件文件,其中包含您在运行 TensorFlow 会话时生成的摘要数据。
操作步骤
- 使用 TensorBoard 的第一步是确定您想要的 OP 摘要。 对于 DNN,习惯上要知道损耗项(目标函数)如何随时间变化。 在自适应学习率的情况下,学习率本身随时间变化。 我们可以在
tf.summary.scalarOP 的帮助下获得所需项的摘要。 假设变量损失定义了误差项,并且我们想知道它是如何随时间变化的,那么我们可以这样做,如下所示:
loss = tf...
tf.summary.scalar('loss', loss)
- 您还可以使用
tf.summary.histogram可视化特定层的梯度,权重甚至输出的分布:
output_tensor  = tf.matmul(input_tensor, weights) + biases
tf.summary.histogram('output', output_tensor)
- 摘要将在会话期间生成。 您可以在计算图中定义
tf.merge_all_summariesOP,而不用单独执行每个摘要操作,以便一次运行即可获得所有摘要。 - 然后需要使用
tf.summary.Filewriter将生成的摘要写入事件文件:
writer = tf.summary.Filewriter('summary_dir', sess.graph)
- 这会将所有摘要和图写入
'summary_dir'目录。 - 现在,要可视化摘要,您需要从命令行调用 TensorBoard:
tensorboard --logdir=summary_dir
- 接下来,打开浏览器并输入地址
http://localhost:6006/(或运行 TensorBoard 命令后收到的链接)。 - 您将看到类似以下的内容,顶部带有许多选项卡。 图表标签会显示图表:
从 0.x 迁移到 1.x
TensorFlow 1.x 不提供向后兼容性。 这意味着适用于 TensorFlow 0.x 的代码可能不适用于 TensorFlow 1.0。 因此,如果您有适用于 TensorFlow 0.x 的代码,则需要对其进行升级(旧的 GitHub 存储库或您自己的代码)。 本秘籍将指出 TensorFlow 0.x 和 TensorFlow 1.0 之间的主要区别,并向您展示如何使用脚本tf_upgrade.py自动升级 TensorFlow 1.0 的代码。
操作步骤
这是我们进行秘籍的方法:
- 首先,从这里下载
tf_upgrade.py。 - 如果要将一个文件从 TensorFlow 0.x 转换为 TensorFlow 1.0,请在命令行中使用以下命令:
python tf_upgrade.py --infile old_file.py --outfile upgraded_file.py
- 例如,如果您有一个名为
test.py的 TensorFlow 程序文件,则将使用以下命令,如下所示:
python tf_upgrade.py --infile test.py --outfile test_1.0.py
- 这将导致创建一个名为
test_1.0.py的新文件。 - 如果要迁移目录的所有文件,请在命令行中使用以下命令:
python tf_upgrade.py --intree InputDIr --outtree OutputDir
 # For example, if you have a directory located at /home/user/my_dir you can migrate all the python files in the directory located at /home/user/my-dir_1p0 using the above command as:
python tf_upgrade.py --intree /home/user/my_dir --outtree /home/user/my_dir_1p0
- 在大多数情况下,该目录还包含数据集文件。 您可以使用以下方法确保将非 Python 文件也复制到新目录(上例中为
my-dir_1p0):
python tf_upgrade.py --intree /home/user/my_dir --outtree /home/user/my_dir_1p0 -copyotherfiles True
- 在所有这些情况下,都会生成一个
report.txt文件。 该文件包含转换的详细信息以及过程中的任何错误。 - 读取
report.txt文件,然后手动升级脚本无法更新的部分代码。
更多
tf_upgrade.py具有某些限制:
- 它不能更改
tf.reverse()的参数:您将必须手动修复它 - 对于参数列表重新排序的方法,例如
tf.split()和tf.reverse_split(),它将尝试引入关键字参数,但实际上无法对其重新排序 - 您将必须手动将
tf.get.variable_scope().reuse_variables()之类的结构替换为以下内容:
with tf.variable_scope(tf.get_variable_scope(), resuse=True):
使用 XLA 增强计算性能
加速线性代数(XLA)是线性代数的特定领域编译器。 根据这个页面的说法,它仍处于实验阶段,可用于优化 TensorFlow 计算。 它可以提高服务器和移动平台上的执行速度,内存使用率和可移植性。 它提供双向 JIT(即时)编译或 AoT(预先)编译。 使用 XLA,您可以生成平台相关的二进制文件(适用于 x64,ARM 等大量平台),可以针对内存和速度进行优化。
准备
目前,XLA 不包含在 TensorFlow 的二进制发行版中。 需要从源代码构建它。 要从源代码构建 TensorFlow,需要具备 LLVM 和 Bazel 以及 TensorFlow 的知识。 TensorFlow.org 仅在 MacOS 和 Ubuntu 中支持从源代码构建。 从源代码构建 TensorFlow 所需的步骤如下:
- 确定要安装的 TensorFlow-仅具有 CPU 支持的 TensorFlow 或具有 GPU 支持的 TensorFlow。
- 克隆 TensorFlow 存储库:
git clone https://github.com/tensorflow/tensorflow
cd tensorflow
git checkout Branch #where Branch is the desired branch
-
安装以下依赖项:
-
配置安装。 在此步骤中,您需要选择不同的选项,例如 XLA,Cuda 支持,动词等等:
./configure
- 接下来,使用
bazel-build: - 对于仅 CPU 版本,请使用:
bazel build --config=opt //tensorflow/tools/pip_package:build_pip_package
- 如果您有兼容的 GPU 设备,并且需要 GPU 支持,请使用:
bazel build --config=opt --config=cuda //tensorflow/tools/pip_package:build_pip_package
- 成功运行后,您将获得一个脚本
build_pip_package。 - 如下运行此脚本以构建
whl文件:
bazel-bin/tensorflow/tools/pip_package/build_pip_package /tmp/tensorflow_pkg
- 安装
pip包:
sudo pip install /tmp/tensorflow_pkg/tensorflow-1.1.0-py2-none-any.whl
现在您可以开始了。
操作步骤
TensorFlow 生成 TensorFlow 图。 借助 XLA,可以在任何新型设备上运行 TensorFlow 图。
- JIT 编译:这将在会话级别打开 JIT 编译:
# Config to turn on JIT compilation
 config = tf.ConfigProto()
 config.graph_options.optimizer_options.global_jit_level = tf.OptimizerOptions.ON_1

 sess = tf.Session(config=config)
- 这是为了手动打开 JIT 编译:
jit_scope = tf.contrib.compiler.jit.experimental_jit_scope

x = tf.placeholder(np.float32)
with jit_scope():
   y = tf.add(x, x)  # The "add" will be compiled with XLA.
- 我们还可以通过将运算符放在特定的 XLA 设备
XLA_CPU或XLA_GPU上,通过 XLA 运行计算:
with tf.device \ ("/job:localhost/replica:0/task:0/device:XLA_GPU:0"):
   output = tf.add(input1, input2)
AoT 编译:在这里,我们将 tfcompile 作为独立版本将 TensorFlow 图转换为适用于不同设备(移动设备)的可执行代码。
TensorFlow.org 讲述了 tfcompile:
tfcompile 接受一个由 TensorFlow 概念的提要和获取标识的子图,并生成实现该子图的函数。 提要是函数的输入参数,而提取是函数的输出参数。 提要必须完全指定所有输入; 结果修剪后的子图不能包含占位符或变量节点。 通常将所有占位符和变量指定为提要,以确保结果子图不再包含这些节点。 生成的函数打包为 cc_library,带有导出函数签名的头文件和包含实现的目标文件。 用户编写代码以适当地调用生成的函数。
有关执行此操作的高级步骤,可以参考这里。
调用 CPU/GPU 设备
TensorFlow 支持 CPU 和 GPU。 它还支持分布式计算。 我们可以在一台或多台计算机系统中的多个设备上使用 TensorFlow。 TensorFlow 将支持的设备命名为 CPU 设备的"/device:CPU:0"(或"/cpu:0"),将第i个 GPU 的设备命名为"/device:GPU:I"(或"/gpu:I")。
如前所述,GPU 比 CPU 快得多,因为它们具有许多小型内核。 但是,就计算速度而言,将 GPU 用于所有类型的计算并不总是一个优势。 与 GPU 相关的开销有时可能比 GPU 提供的并行计算的优势在计算上更为昂贵。 为了解决这个问题,TensorFlow 规定将计算放在特定的设备上。 默认情况下,如果同时存在 CPU 和 GPU,则 TensorFlow 会优先考虑 GPU。
操作步骤
TensorFlow 将设备表示为字符串。 在这里,我们将向您展示如何在 TensorFlow 中手动分配用于矩阵乘法的设备。 为了验证 TensorFlow 确实在使用指定的设备(CPU 或 GPU),我们使用log_device_placement标志设置为True,即config=tf.ConfigProto(log_device_placement=True)创建会话:
- 如果您不确定设备并希望 TensorFlow 选择现有和受支持的设备,则可以将
allow_soft_placement标志设置为True:
config=tf.ConfigProto(allow_soft_placement=True, log_device_placement=True)
- 手动选择 CPU 进行操作:
with tf.device('/cpu:0'):
    rand_t = tf.random_uniform([50,50], 0, 10, dtype=tf.float32, seed=0)
    a = tf.Variable(rand_t)
    b = tf.Variable(rand_t)
    c = tf.matmul(a,b)
    init = tf.global_variables_initializer()

sess = tf.Session(config)
sess.run(init)
print(sess.run(c))
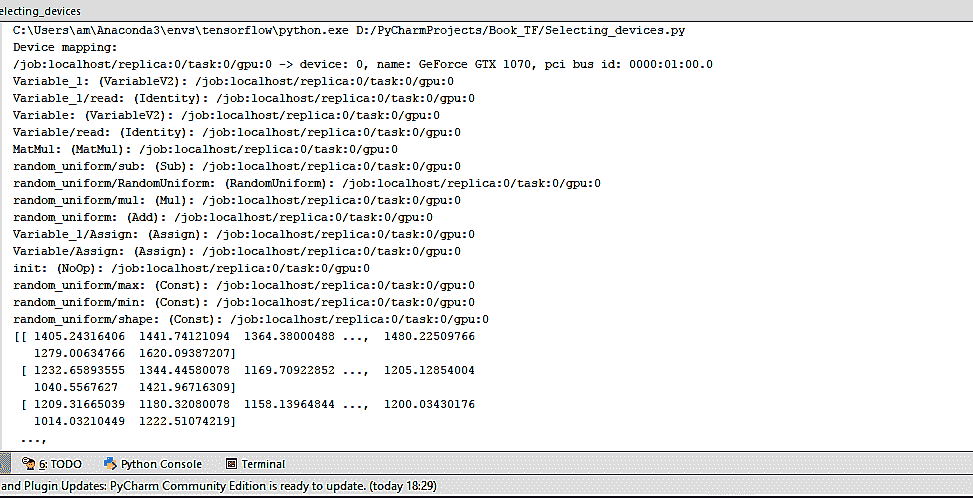
- 我们得到以下输出:
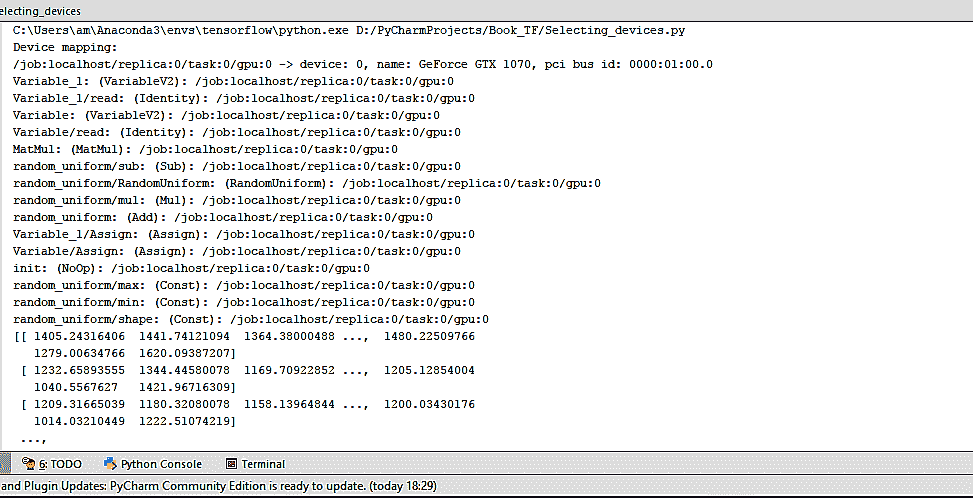
我们可以看到,在这种情况下,所有设备都是'/cpu:0'。
- 手动选择单个 GPU 进行操作:
with tf.device('/gpu:0'):
    rand_t = tf.random_uniform([50,50], 0, 10, dtype=tf.float32, seed=0)
    a = tf.Variable(rand_t)
    b = tf.Variable(rand_t)
    c = tf.matmul(a,b)
    init = tf.global_variables_initializer()

sess = tf.Session(config=tf.ConfigProto(log_device_placement=True))
sess.run(init)
print(sess.run(c))
- 现在,输出更改为以下内容:
- 每次操作后的
'/cpu:0'现在由'/gpu:0'代替。 - 手动选择多个 GPU:
c=[]
for d in ['/gpu:1','/gpu:2']:
     with tf.device(d):
         rand_t = tf.random_uniform([50, 50], 0, 10, dtype=tf.float32, seed=0)
         a = tf.Variable(rand_t)
         b = tf.Variable(rand_t)
         c.append(tf.matmul(a,b))
         init = tf.global_variables_initializer()

sess = tf.Session(config=tf.ConfigProto(allow_soft_placement=True,log_device_placement=True))
sess.run(init)
print(sess.run(c))
sess.close()
- 在这种情况下,如果系统具有三个 GPU 设备,则第一组乘法将由
'/gpu:1'进行,第二组乘法将由'/gpu:2'进行。
工作原理
tf.device()参数选择设备(CPU 或 GPU)。 with块确保选择设备的操作。 with块中定义的所有变量,常量和操作都将使用tf.device()中选择的设备。 会话配置使用tf.ConfigProto控制。 通过设置allow_soft_placement和log_device_placement标志,我们告诉 TensorFlow 在指定设备不可用的情况下自动选择可用设备,并在执行会话时提供日志消息作为输出,描述设备的分配。
将 TensorFlow 用于深度学习
今天的 DNN 是 AI 社区的流行语。 使用 DNN 的候选人最近赢得了许多数据科学/凝视竞赛。 自 1962 年 Rosenblat 提出感知机以来,就一直使用 DNN 的概念,而 1986 年 Rumelhart,Hinton 和 Williams 发明了梯度下降算法后,DNN 就变得可行了。 直到最近,DNN 才成为 AI/ML 爱好者和全世界工程师的最爱。
造成这种情况的主要原因是现代计算功能的可用性,例如 GPU 和 TensorFlow 之类的工具,这些功能使只需几行代码即可更轻松地访问 GPU 并构建复杂的神经网络。
作为机器学习爱好者,您必须已经熟悉神经网络和深度学习的概念,但是为了完整起见,我们将在此处介绍基础知识并探索 TensorFlow 的哪些功能使其成为深度学习的热门选择。
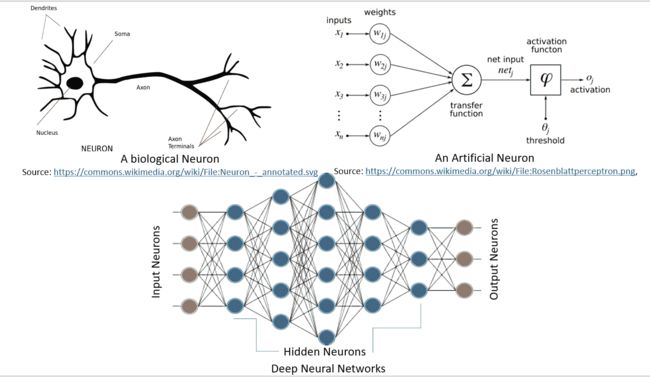
神经网络是一种受生物学启发的模型,用于计算和学习。 像生物神经元一样,它们从其他单元(神经元或环境)中获取加权输入。 该加权输入经过一个处理元素,并产生可以是二进制(触发或不触发)或连续(概率,预测)的输出。 人工神经网络(ANN)是这些神经元的网络,可以随机分布或以分层结构排列。 这些神经元通过一组权重和与之相关的偏置来学习。
下图很好地说明了生物学中的神经网络与人工神经网络的相似性:
由 Hinton 等人定义的深度学习,由包含多个处理层(隐藏层)的计算模型组成。 层数的增加导致学习时间的增加。 由于数据集很大,因此学习时间进一步增加,正如当今的 CNN 或生成对抗网络(GAN)的标准一样。 因此,要实际实现 DNN,我们需要很高的计算能力。 NVDIA®的 GPU 的出现使其变得可行,然后 Google 的 TensorFlow 使得无需复杂的数学细节即可实现复杂的 DNN 结构成为可能,并且大型数据集的可用性为 DNN 提供了必要的条件。 TensorFlow 是最受欢迎的深度学习库,其原因如下:
- TensorFlow 是一个强大的库,用于执行大规模的数值计算,例如矩阵乘法或自动微分。 这两个计算对于实现和训练 DNN 是必需的。
- TensorFlow 在后端使用 C/C++,这使其计算速度更快。
- TensorFlow 具有高级的机器学习 API(
tf.contrib.learn),使配置,训练和评估大量机器学习模型变得更加容易。 - 在 TensorFlow 之上,可以使用高级深度学习库 Keras。 Keras 非常易于使用,可以轻松快速地制作原型。 它支持各种 DNN,例如 RNN,CNN,甚至是两者的组合。
操作步骤
任何深度学习网络都包含四个重要组成部分:数据集,定义模型(网络结构),训练/学习和预测/评估。 我们可以在 TensorFlow 中完成所有这些操作; 让我们看看如何:
-
数据集:DNN 依赖于大量数据。 可以收集或生成数据,或者也可以使用可用的标准数据集。 TensorFlow 支持三种主要方法来读取数据。 有不同的数据集。 我们将用来训练本书中构建的模型的一些数据集如下:
-
MNIST:这是最大的手写数字数据库(0-9)。 它由 60,000 个示例的训练集和 10,000 个示例的测试集组成。 数据集保存在 Yann LeCun 的主页中。 数据集包含在
tensorflow.examples.tutorials.mnist中的 TensorFlow 库中。 -
CIFAR10:此数据集包含 10 类 60,000 张
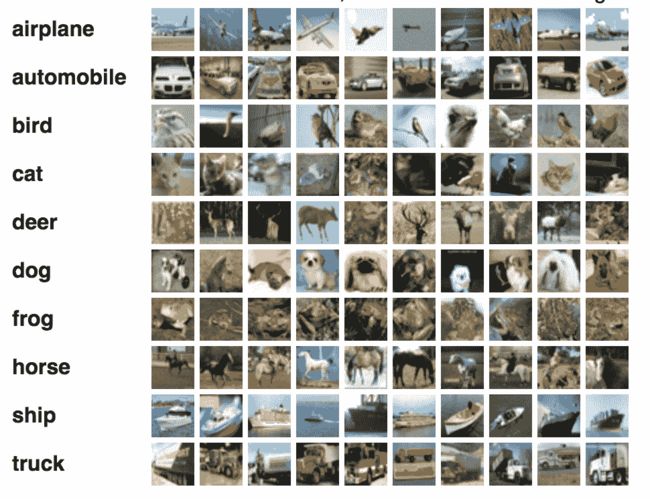
32 x 32彩色图像,每类 6,000 张图像。 训练集包含 50,000 张图像和测试数据集 10,000 张图像。 数据集的十类是:飞机,汽车,鸟,猫,鹿,狗,青蛙,马,船和卡车。 数据由多伦多大学计算机科学系维护。 -
WORDNET:这是英语的词汇数据库。 它包含名词,动词,副词和形容词,它们被分组为认知同义词(同义词集),也就是说,代表相同概念的单词(例如,关闭和关闭或汽车和汽车)被分组为无序集合。 它包含 155,287 个单词,按 117,659 个同义词集进行组织,总计 206,941 个单词感对。 数据由普林斯顿大学维护。
-
ImageNET:这是根据 WORDNET 层次结构组织的图像数据集(目前仅名词)。 每个有意义的概念(同义词集)由多个单词或单词短语描述。 每个同义词集平均由 1,000 张图像表示。 目前,它具有 21,841 个同义词集和总共 14,197,122 张图像。 自 2010 年以来,每年组织一次 ImageNet 大规模视觉识别挑战赛(ILSVRC),以将图像分类为 1,000 个对象类别之一。 这项工作由普林斯顿大学,斯坦福大学,A9 和 Google 赞助。
-
YouTube-8M:这是一个大规模的标记视频数据集,包含数百万个 YouTube 视频。 它有大约 700 万个 YouTube 视频 URL,分为 4716 个类别,分为 24 个顶级类别。 它还提供了预处理支持和帧级功能。 该数据集由 Google Research维护。
读取数据:在 TensorFlow 中可以通过三种方式读取数据:通过feed_dict馈送,从文件读取以及使用预加载的数据。 我们将在整本书中使用本秘籍中描述的组件来阅读和提供数据。 在接下来的步骤中,您将学习每个步骤。
- 馈送:在这种情况下,使用
run()或eval()函数调用中的feed_dict参数在运行每个步骤时提供数据。 这是在占位符的帮助下完成的,该方法使我们可以传递 Numpy 数据数组。 考虑使用 TensorFlow 的以下代码部分:
...
y = tf.placeholder(tf.float32)
x = tf.placeholder(tf.float32).
...
with tf.Session as sess:
   X_Array = some Numpy Array
   Y_Array = other Numpy Array
   loss= ...
sess.run(loss,feed_dict = {x: X_Array, y: Y_Array}).
...
这里,x和y是占位符; 使用它们,我们在feed_dict的帮助下传递包含X值的数组和包含Y值的数组。
- 从文件中读取:当数据集非常大时,可以使用此方法来确保并非所有数据都一次占用内存(想象 60 GB YouTube-8m 数据集)。 从文件读取的过程可以按照以下步骤完成:
filename_queue = tf.train.string_input_producer(files)
# where files is the list of filenames created above
此函数还提供了随机播放和设置最大周期数的选项。 文件名的整个列表将添加到每个周期的队列中。 如果选择了改组选项(shuffle=True),则文件名将在每个周期被改组。
reader = tf.TextLineReader()
key, value = reader.read(filename_queue)
record_defaults = [[1], [1], [1]]
col1, col2, col3 = tf.decode_csv(value, record_defaults=record_defaults)
- 预加载数据:当数据集较小且可以完全加载到内存中时使用。 为此,我们可以将数据存储为常量或变量。 在使用变量时,我们需要将可训练标记设置为
False,以便在训练期间数据不会更改。 作为 TensorFlow 常量:
# Preloaded data as constant
training_data = ...
training_labels = ...
with tf.Session as sess:
   x_data = tf.Constant(training_data)
   y_data = tf.Constant(training_labels)
...
# Preloaded data as Variables
training_data = ...
training_labels = ...
with tf.Session as sess:
   data_x = tf.placeholder(dtype=training_data.dtype, shape=training_data.shape)
   data_y = tf.placeholder(dtype=training_label.dtype, shape=training_label.shape)
   x_data = tf.Variable(data_x, trainable=False, collections[])
   y_data = tf.Variable(data_y, trainable=False, collections[])
...
按照惯例,数据分为三部分-训练数据,验证数据和测试数据。
-
定义模型:建立一个描述网络结构的计算图。 它涉及指定超参数,变量和占位符序列,其中信息从一组神经元流向另一组神经元,并传递损失/误差函数。 您将在本章的后续部分中了解有关计算图的更多信息。
-
训练/学习:DNN 中的学习通常基于梯度下降算法,(将在第 2 章,“回归”中详细介绍) 目的是找到训练变量(权重/偏差),以使误差或损失(由用户在步骤 2 中定义)最小。 这是通过初始化变量并使用
run()实现的:
with tf.Session as sess:
   ....
   sess.run(...)
   ...
- 评估模型:训练完网络后,我们将使用
predict()对验证数据和测试数据进行评估。 通过评估,我们可以估计出模型对数据集的拟合程度。 因此,我们可以避免过拟合或拟合不足的常见错误。 对模型满意后,便可以将其部署到生产中。
还有更多
在 TensorFlow 1.3 中,添加了一个称为 TensorFlow 估计器的新功能。 TensorFlow 估计器使创建神经网络模型的任务变得更加容易,它是一个高级 API,封装了训练,评估,预测和服务的过程。 它提供了使用预建估计器的选项,也可以编写自己的自定义估计器。 有了预建的估计器,就不再需要担心构建计算或创建会话,它就可以处理所有这些。
目前,TensorFlow 估计器有六个预建的估计器。 使用 TensorFlow 预建的估计器的另一个优势是,它本身也可以创建可在 TensorBoard 上可视化的摘要。 有关估计器的更多详细信息,请访问这里。
基于 DNN 的问题所需的不同 Python 包
TensorFlow 负责大多数神经网络的实现。 但是,这还不够。 对于预处理任务,序列化甚至是绘图,我们需要更多的 Python 包。
操作步骤
以下列出了一些常用的 Python 包:
- Numpy:这是使用 Python 进行科学计算的基本包。 它支持 n 维数组和矩阵。 它还具有大量的高级数学函数。 它是 TensorFlow 所需的必需包,因此,如果尚未安装
pip install tensorflow,则将其安装。 - Matplolib:这是 Python 2D 绘图库。 只需几行代码,您就可以使用它来创建图表,直方图,条形图,误差图,散点图和功率谱。 可以使用
pip:安装
pip install matplotlib
# or using Anaconda
conda install -c conda-forge matplotlib
-
OS:这是基本 Python 安装中包含的内容。 它提供了一种使用与操作系统相关的函数(如读取,写入和更改文件和目录)的简便方法。
-
Pandas:这提供了各种数据结构和数据分析工具。 使用 Pandas,您可以在内存数据结构和不同格式之间读取和写入数据。 我们可以读取
.csv和文本文件。 可以使用pip install或conda install进行安装。 -
Seaborn:这是基于 Matplotlib 构建的专门统计数据可视化工具。
-
H5fs:H5fs是适用于 Linux 的文件系统(也是具有 FUSE 实现的其他操作系统,例如 MacOSX),可以在 HDFS (分层数据格式文件系统)上运行 。
-
PythonMagick:它是
ImageMagick库的 Python 绑定。 它是显示,转换和编辑光栅图像和向量图像文件的库。 它支持 200 多种图像文件格式。 可以使用ImageMagick.提供的源代码版本进行安装。某些.whl格式也可用于方便的pip install。 -
TFlearn:TFlearn 是建立在 TensorFlow 之上的模块化透明的深度学习库。 它为 TensorFlow 提供了更高级别的 API,以促进并加速实验。 它目前支持大多数最新的深度学习模型,例如卷积,LSTM,BatchNorm,BiRNN,PReLU,残差网络和生成网络。 它仅适用于 TensorFlow 1.0 或更高版本。 要安装,请使用
pip install tflearn。 -
Keras:Keras 也是神经网络的高级 API,它使用 TensorFlow 作为其后端。 它也可以在 Theano 和 CNTK 之上运行。 这是非常用户友好的,添加层只是一项工作。 可以使用
pip install keras安装。
另见
您可以在下面找到一些 Web 链接以获取有关 TensorFlow 安装的更多信息
- https://www.tensorflow.org/install/
- https://www.tensorflow.org/install/install_sources
- http://llvm.org/
- https://bazel.build/
二、回归
本章说明如何使用 TensorFlow 进行回归。 在本章中,我们将介绍以下主题:
- 选择损失函数
- TensorFlow 中的优化器
- 从 CSV 文件读取和预处理数据
- 房价估计 – 简单线性回归
- 房价估计 – 多元线性回归
- MNIST 数据集上的逻辑回归
介绍
回归是用于数学建模,分类和预测的最古老但功能非常强大的工具之一。 回归在工程,物理科学,生物学,金融市场到社会科学等各个领域都有应用。 它是数据科学家手中的基本工具。
回归通常是机器学习中人们使用的第一个算法。 它使我们能够通过学习因变量和自变量之间的关系来根据数据进行预测。 例如,在房价估计的情况下,我们确定房屋面积(自变量)与其价格(因变量)之间的关系; 然后,可以使用这种关系来预测给定房屋面积的任何房屋的价格。 我们可以有多个影响因变量的自变量。 因此,回归有两个重要的组成部分:自变量和因变量之间的关系,以及不同自变量对因变量的影响强度。
有多种可用的回归方法:
- 线性回归:这是最广泛使用的建模技术之一。 它已有 200 多年的历史,几乎从所有可能的角度进行了探索。 线性回归假设输入变量(
X)和单个输出变量(Y)之间存在线性关系。 它涉及寻找以下形式的预测值Y的线性方程:
在这里,X = (x[1], x[2], ..., x[n])是n个输入变量和W = (w[1], w[2], ... w[n])是线性系数,以b为偏差项。 目标是找到系数W的最佳估计,以使预测Y的误差最小。 线性系数W使用最小二乘法估计,即最小化预测值(Y_hat)和值(Y)之间的平方差之和。因此,我们尝试最小化损失函数:
在这里,总和是所有训练样本的总和。 根据输入变量X的数量和类型,可以使用不同类型的线性回归:简单线性回归(一个输入变量,一个输出变量),多个线性回归(许多独立输入变量,一个输出变量) )或多元线性回归(许多独立的输入变量和多个输出变量)。 有关线性回归的更多信息,请参考这个页面。
- Logistic 回归:用于确定事件的概率。 按照惯例,事件表示为分类因变量。 使用
logit函数(sigmoid函数)表示事件的可能性:
现在的目标是估计权重W = (w1, w2, ... wn)和偏差项b。 在逻辑回归中,使用最大似然估计器或随机梯度下降法估计系数。 通常将损耗定义为互熵项,如下所示:
Logistic 回归用于分类问题,例如,给定医学数据,我们可以使用 Logistic 回归对一个人是否患有癌症进行分类。 如果输出分类变量具有两个或多个级别,则可以使用多项逻辑回归。 用于两个或多个输出变量的另一种常用技术是“一对多”。 对于多类逻辑回归,对交叉熵损失函数的修改如下:
在此, K是类别的总数。 有关逻辑回归的更多信息,请参见这个页面。
这是两种常用的回归技术。
- 正则化:当存在大量输入特征时,需要进行正则化以确保预测的模型不复杂。 正则化有助于防止数据过拟合。 它还可以用于获得凸的损失函数。 有两种类型的正则化,L1 和 L2 正则化,在以下几点中进行了描述:
在希腊字母上方,lambda(λ)是正则化参数。
选择损失函数
如前所述,在回归中,我们定义loss函数或目标函数,目的是找到使损失最小的系数。 在本秘籍中,您将学习如何在 TensorFlow 中定义loss函数,并根据眼前的问题选择合适的loss函数。
准备
声明loss函数需要将系数定义为变量,将数据集定义为占位符。 一个人可以具有恒定的学习率或变化的学习率和正则化常数。 在以下代码中,令m为样本数,n为特征数,P为类数。 我们应该在代码之前定义以下全局参数:
m = 1000
n = 15
P = 2
操作步骤
现在让我们看一下如何进行秘籍:
- 在标准线性回归的情况下,我们只有一个输入变量和一个输出变量:
# Placeholder for the Training Data
X = tf.placeholder(tf.float32, name='X')
Y = tf.placeholder(tf.float32, name='Y')

# Variables for coefficients initialized to 0
w0 = tf.Variable(0.0)
w1 = tf.Variable(0.0)

# The Linear Regression Model
Y_hat = X*w1 + w0

# Loss function
loss = tf.square(Y - Y_hat, name='loss')
- 在多元线性回归的情况下,输入变量大于 1,而输出变量保持为 1。 现在,您可以定义形状为
[m, n]的X占位符,其中m是样本数,n是特征数,然后代码如下:
# Placeholder for the Training DataX = tf.placeholder(tf.float32, name='X', shape=[m,n])
Y = tf.placeholder(tf.float32, name='Y')

# Variables for coefficients initialized to 0w0 = tf.Variable(0.0)
w1 = tf.Variable(tf.random_normal([n,1]))

# The Linear Regression ModelY_hat = tf.matmul(X, w1) + w0

# Multiple linear regression loss functionloss = tf.reduce_mean(tf.square(Y - Y_hat, name='loss')
- 在逻辑回归的情况下,
loss函数由交叉熵定义。 现在,输出Y的尺寸将等于训练数据集中的类数。 通过P个类,我们将具有以下内容:
# Placeholder for the Training DataX = tf.placeholder(tf.float32, name='X', shape=[m,n])
Y = tf.placeholder(tf.float32, name='Y', shape=[m,P])

# Variables for coefficients initialized to 0w0 = tf.Variable(tf.zeros([1,P]), name=’bias’)
w1 = tf.Variable(tf.random_normal([n,1]), name=’weights’)
# The Linear Regression ModelY_hat = tf.matmul(X, w1) + w0

# Loss functionentropy = tf.nn.softmax_cross_entropy_with_logits(Y_hat,Y)
loss = tf.reduce_mean(entropy)
- 如果我们要对损失添加 L1 正则化,则代码如下:
lamda = tf.constant(0.8)  # regularization parameter
regularization_param = lamda*tf.reduce_sum(tf.abs(W1))

# New loss
loss += regularization_param
- 对于 L2 正则化,我们可以使用以下代码:
lamda = tf.constant(0.8)  # regularization parameter
regularization_param = lamda*tf.nn.l2_loss(W1)

# New loss
loss += regularization_param
工作原理
您学习了如何实现不同类型的loss函数。 根据手头的回归任务,您可以选择相应的loss函数或自行设计。 也可以在损耗项中组合 L1 和 L2 正则化。
更多
loss函数应为凸形以确保收敛。 平滑,可微凸的loss函数可提供更好的收敛性。 随着学习的进行,loss函数的值应减小并最终变得稳定。
TensorFlow 中的优化器
从中学数学开始,您必须知道函数的一阶导数的最大值和最小值为零。 梯度下降算法基于相同的原理-调整系数(权重和偏差),以使loss函数的梯度减小。 在回归中,我们使用梯度下降来优化loss函数并获得系数。 在本秘籍中,您将学习如何使用 TensorFlow 的梯度下降优化器及其某些变体。
准备
系数(W和b)的更新与loss函数的梯度的负值成比例地完成。 根据训练样本的大小,梯度下降有三种变化:
- 普通梯度下降:在普通梯度下降(有时也称为全量梯度下降)中,为每个周期的整个训练集计算
loss函数的梯度。 对于非常大的数据集,此过程可能很慢且难以处理。 对于凸loss函数,可以保证收敛到全局最小值,但是对于非凸loss函数,可以收敛到局部最小值。 - 随机梯度下降:在随机梯度下降中,一次显示一个训练样本,权重和偏差得到更新,以使
loss函数的梯度减小,然后我们移至下一个训练样本 。 重复整个过程许多周期。 由于它一次执行一次更新,因此它比普通更新要快,但是同时,由于频繁更新,loss函数可能会有很大差异。 - 小批量梯度下降:结合了前两种产品的最佳质量; 在这里,为一批训练样本更新了参数。
操作步骤
我们按以下步骤进行:
- 我们决定的第一件事是我们想要的优化器。 TensorFlow 为您提供了各种各样的优化器。 我们从最流行,最简单的梯度下降优化器开始:
tf.train.GradientDescentOptimizer(learning_rate)
GradientDescentOptimizer的learning_rate参数可以是常数或张量。 其值可以在 0 到 1 之间。- 必须告知优化器要优化的函数。 这是使用其方法来完成的,最小化。 该方法计算梯度并将梯度应用于学习系数。 TensorFlow 文档中定义的函数如下:
minimize(
     loss,
     global_step=None,
     var_list=None,
     gate_gradients=GATE_OP,
     aggregation_method=None,
     colocate_gradients_with_ops=False,
     name=None,
     grad_loss=None
 )
- 结合所有这些,我们定义计算图:
 ...
optimizer = tf.train.GradientDescentOptimizer(learning_rate=0.01)
train_step = optimizer.minimize(loss)
...

#Execution Graph
with tf.Session() as sess:
    ...
    sess.run(train_step, feed_dict = {X:X_data, Y:Y_data})
    ...
-
馈送到
feed_dict的X和Y数据可以是单个X和Y点(随机梯度),整个训练集(普通)或批次。 -
梯度下降的另一个变化是增加了动量项(我们将在第 3 章“神经网络感知机”中找到更多相关信息)。 为此,我们使用优化器
tf.train.MomentumOptimizer()。 它同时将learning_rate和momentum作为init参数:
optimizer = tf.train.MomentumOtimizer(learning_rate=0.01, momentum=0.5).minimize(loss)
- 如果使用
tf.train.AdadeltaOptimizer(),则可以自适应地单调降低学习率,它使用两个init自变量learning_rate和衰减因子rho:
optimizer = tf.train.AdadeltaOptimizer(learning_rate=0.8, rho=0.95).minimize(loss)
- TensorFlow 还支持 Hinton 的 RMSprop,其工作方式类似于 Adadelta –
tf.train.RMSpropOptimizer():
optimizer = tf.train.RMSpropOptimizer(learning_rate=0.01, decay=0.8, momentum=0.1).minimize(loss)
Adadelta 和 RMSprop 之间有一些细微的差异。 要了解有关它们的更多信息,可以参考这里和这里。
- TensorFlow 支持的另一种流行的优化器是 Adam 优化器。 该方法使用第一个和第二个梯度矩的估计来计算不同系数的个体自适应学习率:
optimizer = tf.train.AdamOptimizer().minimize(loss)
- 除了这些,TensorFlow 还提供以下优化器:
tf.train.AdagradOptimizer  #Adagrad Optimizer
tf.train.AdagradDAOptimizer #Adagrad Dual Averaging optimizer
tf.train.FtrlOptimizer #Follow the regularized leader optimizer
tf.train.ProximalGradientDescentOptimizer #Proximal GD optimizer
tf.train.ProximalAdagradOptimizer # Proximal Adagrad optimizer
更多
通常建议您从较高的学习率值入手,并随着学习的进行逐渐降低。 这有助于对训练进行微调。 我们可以使用 TensorFlow tf.train.exponential_decay方法来实现。 根据 TensorFlow 文档:
训练模型时,通常建议随着训练的进行降低学习率。 此函数将指数衰减函数应用于提供的初始学习率。 它需要一个global_step值来计算衰减的学习率。 您可以只传递一个 TensorFlow 变量,该变量在每个训练步骤中都会递增。该函数返回递减的学习率。
参数:
learning_rate:float32或float64标量张量或 Python 数字。 初始学习率。global_step:float32或float64标量张量或 Python 数字。 用于衰减计算的全局步长。 不能为负。decay_steps:float32或float64标量张量或 Python 数字。 必须是正的。 请参阅前面介绍的衰减计算。decay_rate:float32或float64标量张量或 Python 数字。 衰减率。staircase: 布尔值。 如果True,在离散时间间隔衰减学习率。name: 字符串。 操作的可选名称。 默认为'ExponentialDecay'。
返回值:
与learning_rate类型相同的标量张量。 学习率衰减。
要实现指数衰减的学习率,请考虑以下代码示例:
global_step = tf.Variable(0, trainable = false)
initial_learning_rate = 0.2
learning_rate = tf.train.exponential_decay(initial_learning_rate, global_step, decay_steps=100000, decay_rate=0.95, staircase=True)
# Pass this learning rate to optimizer as before.
另见
以下是一些针对不同优化器的良好链接:
- Arxiv 1609.04747 :该白皮书很好地概述了各种优化算法。
- 这是 TensorFlow.org 链接,其中详细介绍了如何使用 TensorFlow 中包含的不同优化器。
- Arxiv 1412.6980:有关 Adam 优化器的论文。
从 CSV 文件读取和预处理数据
你们大多数人已经熟悉 Pandas 及其在处理大型数据集文件中的实用性。 TensorFlow 还提供了读取文件的方法。 在第一章中,我们介绍了从 TensorFlow 中读取文件的方法。 在本秘籍中,我们将重点介绍如何在训练之前从 CSV 文件读取和预处理数据。
准备
我们将考虑 Harrison 和 Rubinfield 在 1978 年收集的波士顿住房价格数据集。该数据集包含 506 个样本案例。 每个房屋都有 14 个属性:
CRIM:按城镇划分的人均犯罪率ZN:已划定 25,000 平方英尺以上土地的居住用地比例INDIA:每个城镇的非零售营业面积比例CHAS:查尔斯河虚拟变量(如果束缚河,则为 1;否则为 0)NOX:一氧化氮浓度(百万分之几)RM:每个住宅的平均房间数AGE:1940 年之前建造的自有住房的比例DIS:到五个波士顿就业中心的加权距离RAD:径向公路的可达性指数TAX:每 10,000 美元的全值财产税率PTRATIO:按城镇划分的师生比率B:1000(Bk-0.63)^2,其中Bk是按城镇划分的黑人比例LSTAT:人口状况降低的百分比MEDV:自有住房的中位数价值,单位为 1,000 美元
操作步骤
我们按以下步骤进行:
- 导入所需的模块并声明全局变量:
import tensorflow as tf

# Global parameters
DATA_FILE = 'boston_housing.csv' BATCH_SIZE = 10
NUM_FEATURES = 14
- 接下来,我们定义一个函数,该函数将文件名作为参数,并以等于
BATCH_SIZE的大小批量返回张量:
defdata_generator(filename):
    """
    Generates Tensors in batches of size Batch_SIZE.
    Args: String Tensor
    Filename from which data is to be read
    Returns: Tensors
    feature_batch and label_batch
    """
- 定义文件名
f_queue和reader:
f_queue = tf.train.string_input_producer(filename)
reader = tf.TextLineReader(skip_header_lines=1)
# Skips the first line
_, value = reader.read(f_queue)
- 我们指定了数据缺失时要使用的数据。 解码
.csv并选择我们需要的特征。 对于示例,我们选择RM,PTRATIO和LSTAT:
record_defaults = [ [0.0] for _ in range(NUM_FEATURES)]
data = tf.decode_csv(value, record_defaults=record_defaults)
features = tf.stack(tf.gather_nd(data,[[5],[10],[12]]))
label = data[-1]
- 定义参数以生成批量,并使用
tf.train.shuffle_batch()随机调整张量。 函数返回张量-feature_batch和label_batch:
# minimum number elements in the queue after a dequeuemin_after_dequeue = 10 * BATCH_SIZE

# the maximum number of elements in the queue capacity = 20 * BATCH_SIZE

# shuffle the data to generate BATCH_SIZE sample pairs feature_batch, label_batch = tf.train.shuffle_batch([features, label], batch_size=BATCH_SIZE,
                                                 capacity=capacity, min_after_dequeue=min_after_dequeue)

return feature_batch, label_batch
- 我们定义了另一个函数来在会话中生成批量:
def generate_data(feature_batch, label_batch):
    with tf.Session() as sess:
        # intialize the queue threads
        coord = tf.train.Coordinator()
        threads = tf.train.start_queue_runners(coord=coord)
        for _ in range(5):
            # Generate 5 batches
            features, labels = sess.run([feature_batch, label_batch])
            print (features, "HI")
        coord.request_stop()
        coord.join(threads)
- 现在,我们可以使用这两个函数来批量获取数据。 在这里,我们只是打印数据。 学习时,我们将在此时执行优化步骤:
if __name__ =='__main__':
    feature_batch, label_batch = data_generator([DATA_FILE])
    generate_data(feature_batch, label_batch)
更多
我们可以使用第一章中介绍的 TensorFlow 控件操作和张量操作来预处理数据。 例如,在波士顿房价的情况下,大约有 16 个数据行,其中MEDV为50.0。 这些数据点最有可能包含缺失或审查的值,建议不要在训练中考虑它们。 我们可以使用以下代码将它们从训练数据集中删除:
condition = tf.equal(data[13], tf.constant(50.0))
data = tf.where(condition, tf.zeros(NUM_FEATURES), data[:])
在这里,我们首先定义一个张量布尔条件,如果MEDV等于50.0,则为真。 然后,如果条件为真,则使用 TensorFlow tf.where()操作分配全零。
房价估计 – 简单线性回归
在此秘籍中,我们将基于波士顿房价数据集上的房间数(RM)执行简单的线性回归。
准备
我们的目标是预测最后一栏(MEDV)中给出的房价。 在此秘籍中,我们直接从 TensorFlow Contrib 数据集中加载数据集。 我们使用随机梯度下降优化器优化单个训练样本的系数。
操作步骤
我们按以下步骤进行:
- 第一步是导入我们需要的所有包:
import tensorflow as tf
import numpy as np
import matplotlib.pyplot as plt
- 在神经网络中,所有输入都线性相加以产生活动。 为了进行有效的训练,应该对输入进行标准化,因此我们定义了对输入数据进行标准化的函数:
def normalize(X):
    """ Normalizes the array X"""
    mean = np.mean(X)
    std = np.std(X)
    X = (X - mean)/std
    return X
- 现在,我们使用 TensorFlow
contrib数据集加载波士顿房价数据集,并将其分为X_train和Y_train。 我们可以选择在此处标准化数据:
# Data
boston = tf.contrib.learn.datasets.load_dataset('boston')
X_train, Y_train = boston.data[:,5], boston.target
#X_train = normalize(X_train)  # This step is optional here
n_samples = len(X_train)
- 我们为训练数据声明 TensorFlow 占位符:
# Placeholder for the Training Data
X = tf.placeholder(tf.float32, name='X')
Y = tf.placeholder(tf.float32, name='Y')
- 我们为权重和偏差创建 TensorFlow 变量,初始值为零:
# Variables for coefficients initialized to 0
b = tf.Variable(0.0)
w = tf.Variable(0.0)
- 我们定义了用于预测的线性回归模型:
# The Linear Regression Model
Y_hat = X * w + b
- 定义
loss函数:
# Loss function
loss = tf.square(Y - Y_hat, name='loss')
- 我们选择梯度下降优化器:
# Gradient Descent with learning rate of 0.01 to minimize loss
optimizer = tf.train.GradientDescentOptimizer(learning_rate=0.01).minimize(loss)
- 声明初始化操作:
# Initializing Variables
init_op = tf.global_variables_initializer()
total = []
- 现在,我们开始计算图。 我们进行了 100 个周期的训练:
# Computation Graph
with tf.Session() as sess:
    # Initialize variables
    sess.run(init_op)
    writer = tf.summary.FileWriter('graphs', sess.graph)
    # train the model for 100 epochs
    for i in range(100):
        total_loss = 0
        for x,y in zip(X_train,Y_train):
            _, l = sess.run ([optimizer, loss],            feed_dict={X:x, Y:y})
            total_loss += l
        total.append(total_loss / n_samples)
        print('Epoch {0}: Loss {1}'.format(i, total_loss/n_samples))
     writer.close()
     b_value, w_value = sess.run([b,w])
- 查看结果:
Y_pred = X_train * w_value + b_value
print('Done')
# Plot the result
plt.plot(X_train, Y_train, 'bo', label='Real Data')
plt.plot(X_train,Y_pred,  'r', label='Predicted Data')
plt.legend()
plt.show()
plt.plot(total)
plt.show()
工作原理
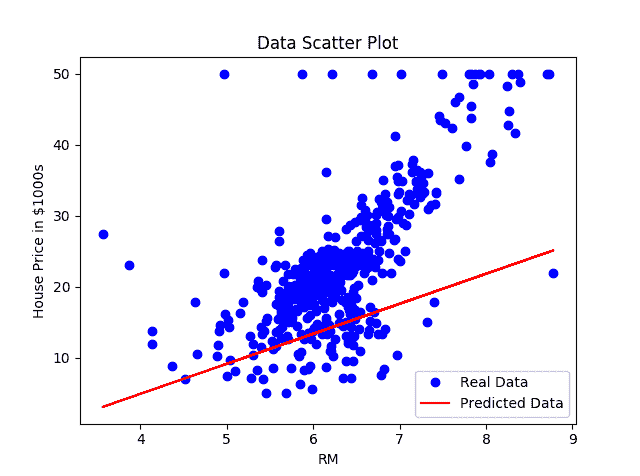
从图中可以看出,我们的简单线性回归器试图将线性线拟合到给定的数据集:
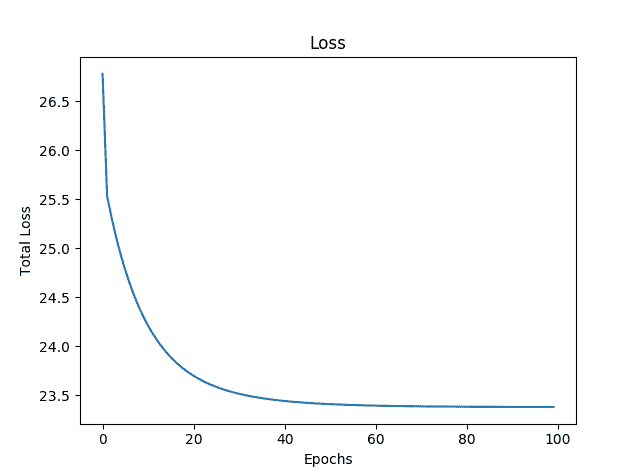
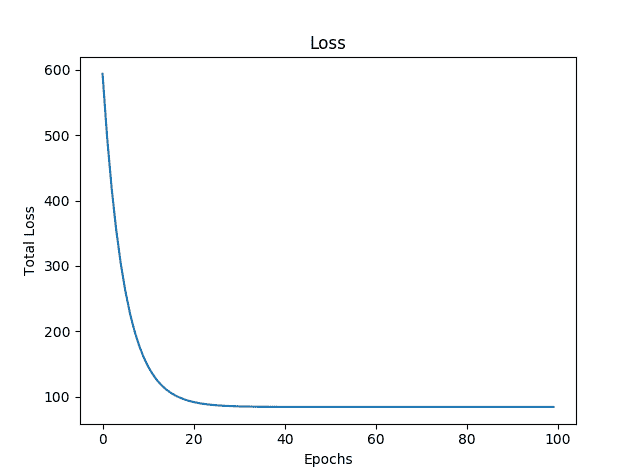
在下图中,我们可以看到,随着我们的模型学习到数据,loss函数如预期的那样下降:
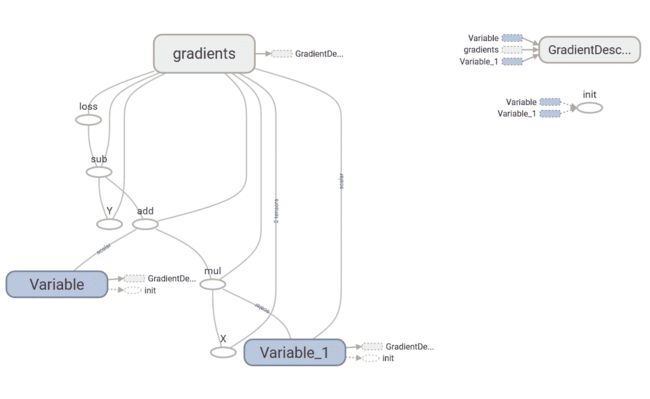
以下是我们的简单线性回归器的 TensorBoard 图:
该图具有两个名称作用域节点,即Variable和Variable_1,它们是分别表示偏差和权重的高级节点。 名为gradient的节点也是高级节点。 扩展节点,我们可以看到它接受了七个输入并计算了gradient,然后GradientDescentOptimizer使用了这些梯度来计算权重和偏差并应用更新:
更多
好吧,我们执行了简单的线性回归,但是如何找出模型的表现呢? 有多种方法可以做到这一点。 从统计上讲,我们可以计算 R 方或将我们的数据分为训练和交叉验证集,并检查验证集的准确率(损失项)。
房价估计 – 多元线性回归
我们可以通过对权重和占位符的声明进行一些修改来对同一数据进行多元线性回归。 在多元线性回归的情况下,由于每个特征都有不同的值范围,因此规范化必不可少。 这是使用所有 13 种输入特征对波士顿房价数据集进行多元线性回归的代码。
操作步骤
这是我们进行秘籍的方法:
- 第一步是导入我们需要的所有包:
import tensorflow as tf
 import numpy as np
 import matplotlib.pyplot as plt
- 由于所有特征的数据范围都不同,因此我们需要对特征数据进行规范化。 我们为其定义了归一化函数。 同样,在这里,我们通过添加总是固定为一个值的另一输入来将偏差与权重相结合。 为此,我们定义函数
append_bias_reshape()。 有时会使用此技术来简化编程:
def normalize(X)
    """ Normalizes the array X """
    mean = np.mean(X)
    std = np.std(X)
    X = (X - mean)/std
    return X

def append_bias_reshape(features,labels):
    m = features.shape[0]
    n = features.shape[1]
    x = np.reshape(np.c_[np.ones(m),features],[m,n + 1])
    y = np.reshape(labels,[m,1])
    return x, y
- 现在,我们使用 TensorFlow contrib 数据集加载波士顿房价数据集,并将其分为
X_train和Y_train。 观察到这次X_train包含所有特征。 我们可以在此处选择对数据进行规范化,也可以使用附加偏差并为网络重塑数据:
# Data
boston = tf.contrib.learn.datasets.load_dataset('boston')
X_train, Y_train = boston.data, boston.target
X_train = normalize(X_train)
X_train, Y_train = append_bias_reshape(X_train, Y_train)
m = len(X_train)
#Number of training examples
n = 13 + 1
# Number of features + bias
- 声明 TensorFlow 占位符以获取训练数据。 观察
X占位符形状的变化。
# Placeholder for the Training Data
X = tf.placeholder(tf.float32, name='X', shape=[m,n])
Y = tf.placeholder(tf.float32, name='Y')
- 我们为权重和偏差创建 TensorFlow 变量。 这次,权重用随机数初始化:
# Variables for coefficients
w = tf.Variable(tf.random_normal([n,1]))
- 定义要用于预测的线性回归模型。 现在我们需要矩阵乘法来完成任务:
# The Linear Regression Model
Y_hat = tf.matmul(X, w)
- 为了更好的区分,我们定义
loss函数:
# Loss function
loss = tf.reduce_mean(tf.square(Y - Y_hat, name='loss'))
- 选择合适的优化器:
# Gradient Descent with learning rate of 0.01 to minimize loss
optimizer = tf.train.GradientDescentOptimizer(learning_rate=0.01).minimize(loss)
- 定义初始化操作:
# Initializing Variables
init_op = tf.global_variables_initializer()
total = []
- 启动计算图:
with tf.Session() as sess:
    # Initialize variables
    sess.run(init_op)
    writer = tf.summary.FileWriter('graphs', sess.graph)
    # train the model for 100 epcohs
    for i in range(100):
       _, l = sess.run([optimizer, loss], feed_dict={X: X_train, Y: Y_train})
       total.append(l)
       print('Epoch {0}: Loss {1}'.format(i, l))
     writer.close()
     w_value, b_value = sess.run([w, b])
- 绘制
loss函数:
plt.plot(total)
plt.show()
同样在这里,我们发现损失随着训练的进行而减少:
工作原理
在此秘籍中,我们使用了所有 13 个特征来训练模型。 简单线性回归和多元线性回归之间的重要区别在于权重,系数的数量始终等于输入特征的数量。 以下是我们构建的多元线性回归模型的 TensorBoard 图:
更多
我们现在可以使用从模型中学到的系数来预测房价:
N= 500
X_new = X_train [N,:]
Y_pred =  (np.matmul(X_new, w_value) + b_value).round(1)
print('Predicted value: ${0}  Actual value: / ${1}'.format(Y_pred[0]*1000, Y_train[N]*1000) , '\nDone')
MNIST 数据集上的逻辑回归
此秘籍基于这个页面提供的 MNIST 的逻辑回归,但我们将添加一些 TensorBoard 摘要以更好地理解它。 你们大多数人必须已经熟悉 MNIST 数据集-就像机器学习的 ABC 一样。 它包含手写数字的图像和每个图像的标签,说明它是哪个数字。
对于逻辑回归,我们对输出 Y 使用一热编码。因此,我们有 10 位代表输出; 每个位可以具有 0 或 1 的值,并且为 1 热点意味着对于标签 Y 中的每个图像,10 个位中只有 1 个位的值为 1,其余为 0。 在这里,您可以看到手写数字 8 的图像及其热编码值[0 0 0 0 0 0 0 0 0 1 0]:
操作步骤
这是我们进行秘籍的方法:
- 与往常一样,第一步是导入所需的模块:
import tensorflow as tf
import matplotlib.pyplot as plt,  matplotlib.image as mpimg
- 我们从模块
input_data中给出的 TensorFlow 示例中获取 MNIST 的输入数据。one_hot标志设置为True以启用标签的one_hot编码。 这导致生成两个张量,形状为[55000, 784]的mnist.train.images和形状为[55000, 10]的mnist.train.labels。mnist.train.images的每个条目都是像素强度,其值在 0 到 1 之间:
from tensorflow.examples.tutorials.mnist import input_data
mnist = input_data.read_data_sets("MNIST_data/", one_hot=True)
- 为训练数据集输入
x创建占位符,并在 TensorFlow 图上标记y:
x = tf.placeholder(tf.float32, [None, 784], name='X')
y = tf.placeholder(tf.float32, [None, 10],name='Y')
- 创建学习变量,权重和偏置:
W = tf.Variable(tf.zeros([784, 10]), name='W')
b = tf.Variable(tf.zeros([10]), name='b')
- 创建逻辑回归模型。 TensorFlow OP 被赋予
name_scope("wx_b"):
with tf.name_scope("wx_b") as scope:
    y_hat = tf.nn.softmax(tf.matmul(x,W) + b)
- 添加摘要 OP,以在训练时收集数据。 我们使用直方图摘要,以便我们可以看到权重和偏差随时间相对于彼此的值如何变化。 我们将可以在 TensorBoard 直方图选项卡中看到以下内容:
w_h = tf.summary.histogram("weights", W)
b_h = tf.summary.histogram("biases", b)
- 定义
cross-entropy和loss函数,并添加名称范围和摘要以更好地可视化。 在这里,我们使用标量汇总来获取loss函数随时间的变化。 标量摘要在“事件”选项卡下可见:
with tf.name_scope('cross-entropy') as scope:
    loss = tf.reduce_mean(tf.nn.softmax_cross_entropy_with_logits(labels=y, logits=y_hat)
    tf.summary.scalar('cross-entropy', loss)
- 使用具有学习率
0.01的 TensorFlowGradientDescentOptimizer。 再次,为了更好地可视化,我们定义了name_scope:
with tf.name_scope('Train') as scope:
    optimizer = tf.train.GradientDescentOptimizer(0.01).minimize(loss)
- 声明变量的初始化操作:
# Initializing the variables
init = tf.global_variables_initializer()
- 我们结合了所有汇总操作:
merged_summary_op = tf.summary.merge_all()
- 现在,我们定义会话并将摘要存储在定义的文件夹中:
with tf.Session() as sess:
    sess.run(init)  # initialize all variables
    summary_writer = tf.summary.FileWriter('graphs', sess.graph)  # Create an event file
    # Training
    for epoch in range(max_epochs):
        loss_avg = 0
        num_of_batch = int(mnist.train.num_examples/batch_size)
        for i in range(num_of_batch):
            batch_xs, batch_ys = mnist.train.next_batch(100)  # get the next batch of data
            _, l, summary_str = sess.run([optimizer,loss, merged_summary_op], feed_dict={x: batch_xs, y: batch_ys})  # Run the optimizer
           loss_avg += l
           summary_writer.add_summary(summary_str, epoch*num_of_batch + i)  # Add all summaries per batch
        loss_avg = loss_avg/num_of_batch
        print('Epoch {0}: Loss {1}'.format(epoch, loss_avg))
    print('Done')
    print(sess.run(accuracy, feed_dict={x: mnist.test.images,y: mnist.test.labels}))
- 在 30 个周期后,我们的准确率为 86.5%,在 50 个周期后为 89.36%,在 100 个周期后,准确率提高到 90.91%。
工作原理
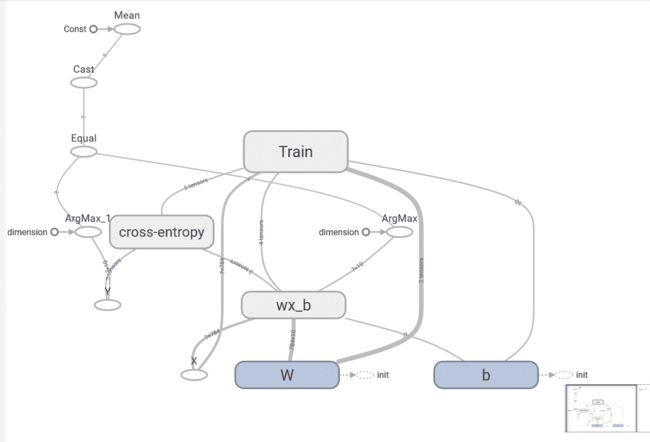
我们使用张量tensorboard --logdir=garphs启动 TensorBoard。 在浏览器中,导航到网址localhost:6006,以查看 TensorBoard。 先前模型的图形如下:
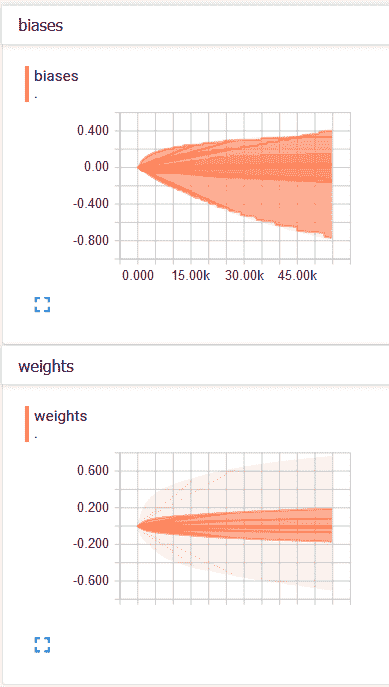
在“直方图”标签下,我们可以看到权重和偏置的直方图:
权重和偏置的分布如下:
我们可以看到,随着时间的推移,偏差和权重都发生了变化。 从我们的案例来看,偏差更大,从 TensorBoard 中的分布可以看出。
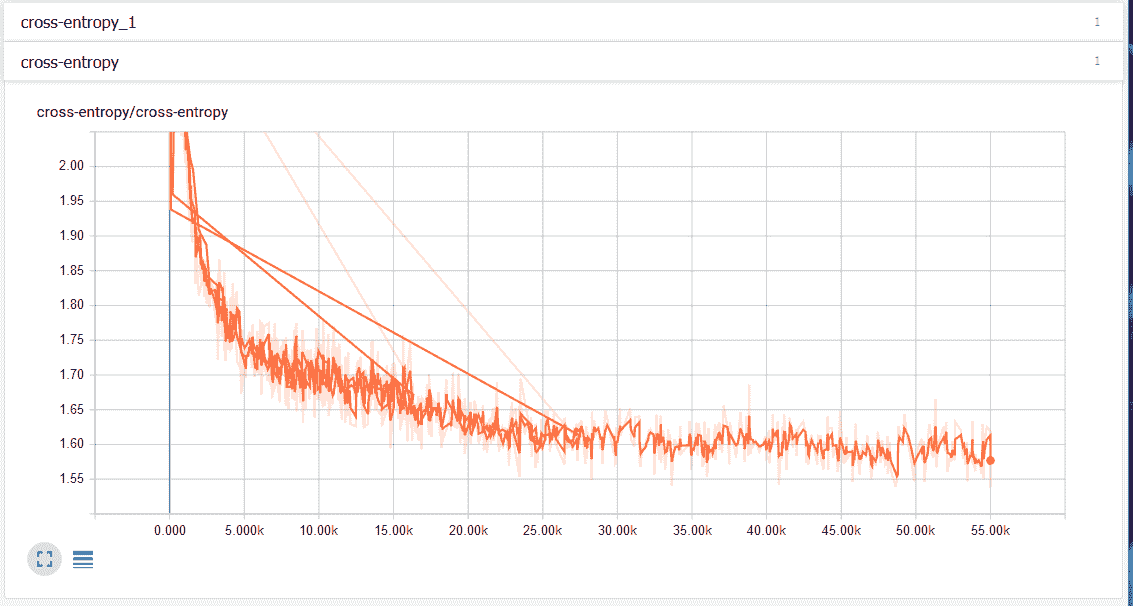
在“事件”选项卡下,我们可以看到标量摘要,在这种情况下为交叉熵。 下图显示交叉熵损失随时间减少:
另见
如果您有兴趣了解更多信息,这些是一些很好的资源:
- 关于 TensorBoard 和可视化
- 这是一门有关统计和概率的很好的课程
- 有关回归的更多详细信息
三、神经网络:感知机
自最近十年以来,神经网络一直处于机器学习研究和应用的最前沿。 深层神经网络(DNN),传递学习以及计算效率高的 GPU 的可用性已帮助在图像识别,语音识别甚至文本生成领域取得了重大进展。 在本章中,我们将专注于基本的神经网络感知机,即人工神经元的完全连接的分层架构。 本章将包括以下秘籍:
- 激活函数
- 单层感知机
- 反向传播算法的梯度计算
- 使用 MLP 的 MNIST 分类器
- 使用 MLP 进行函数逼近-预测波士顿房价
- 调整超参数
- 更高级别的 API – Keras
介绍
神经网络,通常也称为连接器模型,是受人脑启发的。 像人的大脑一样,神经网络是通过称为权重的突触强度相互连接的大量人工神经元的集合。 正如我们通过长辈提供给我们的示例进行学习一样,人工神经网络也可以通过作为训练数据集提供给他们的示例进行学习。 有了足够数量的训练数据集,人工神经网络可以概括信息,然后也可以将其用于看不见的数据。 太棒了,它们听起来像魔术!
神经网络并不是什么新鲜事物。 第一个神经网络模型由 McCulloch Pitts(MCP)最早在 1943 年提出。 建造了第一台计算机!)该模型可以执行 AND/OR/NOT 之类的逻辑运算。 MCP 模型具有固定的权重和偏差; 没有学习的可能。 几年后,Frank Rosenblatt 在 1958 年解决了这个问题。 他提出了第一个学习神经网络,称为感知机。
从那时起,众所周知,添加多层神经元并建立一个深而密集的网络将有助于神经网络解决复杂的任务。 正如母亲为孩子的成就感到自豪一样,科学家和工程师对使用神经网络(NN)。 这些声明不是虚假的,但是由于硬件计算的限制和复杂的网络结构,当时根本不可能实现它们。 这导致了 1970 年代和 1980 年代的 AI 寒冬。 在这些寒战中,由于很少或几乎没有对基于 AI 的项目提供资金,因此该领域的进展放缓了。
随着 DNN 和 GPU 的出现,情况发生了变化。 今天,我们拥有的网络可以在较少的调整参数的情况下实现更好的表现,诸如丢弃和迁移学习之类的技术可以进一步减少训练时间,最后,硬件公司正在提出专门的硬件芯片来执行基于 NN 的快速计算。
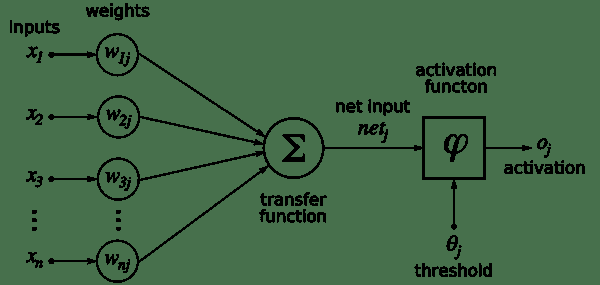
人工神经元是所有神经网络的核心。 它由两个主要部分组成-加法器(对加权后的神经元的所有输入求和),以及处理单元,对加权后的总和进行加权,并基于称为激活函数的预定义函数生成输出。 。 每个人工神经元都有其自己的一组权重和阈值(偏差)。 它通过不同的学习算法来学习这些权重和阈值:
来源
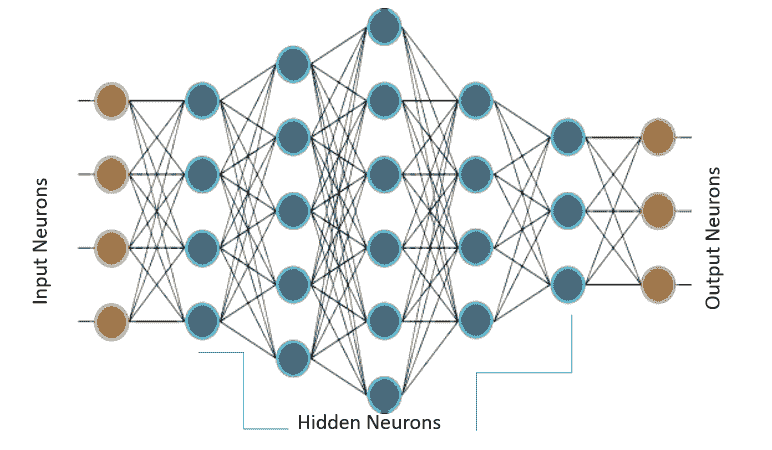
当仅存在此类神经元的一层时,它称为感知机。 输入层称为第零层,因为它仅缓冲输入。 存在的唯一神经元层形成输出层。 输出层的每个神经元都有自己的权重和阈值。 当存在许多这样的层时,该网络称为多层感知机(MLP)。 一个 MLP 具有一个或多个隐藏层。 这些隐藏层具有不同数量的隐藏神经元。 每个隐藏层的神经元具有相同的激活函数:
上图显示了一个 MLP,它具有四个输入,五个隐藏层,每个隐藏层分别具有 4、5、6、4 和 3 个神经元,而在输出层中具有三个神经元。 在 MLP 中,下层的所有神经元都与其上一层的所有神经元相连。 因此,MLP 也称为全连接层。 MLP 中的信息流始终是从输入到输出。 由于没有反馈或跳跃,因此这些网络也称为前馈网络。
使用梯度下降算法训练感知机。 在第 2 章“回归”中,您了解了梯度下降; 在这里,我们对其进行更深入的研究。 感知机通过有监督的学习算法进行学习,也就是说,网络由训练数据集中存在的所有输入的期望输出提供。 在输出中,我们定义一个误差函数或目标函数J(W),这样,当网络完全学习了所有训练数据时,目标函数将最小。
更新输出层和隐藏层的权重,以使目标函数的梯度减小:
为了更好地理解它,请对山丘,高原和坑坑洼洼的景观进行可视化处理。 目的是扎根(目标函数的全局最小值)。 如果您站在山顶上而必须下山,那么很明显的选择是,您将沿着山下坡,即向负坡度(或负坡度)移动。 以相同的方式,感知机中的权重与目标函数的梯度的负值成比例地变化。
梯度值越高,权重值的变化越大,反之亦然。 现在,这一切都很好,但是当梯度达到零,因此权重没有变化时,我们到达高原时就会遇到问题。 当我们进入一个小坑(局部极小值)时,我们也可能遇到问题,因为当我们尝试移动到任一侧时,坡度将增加,从而迫使网络停留在坑中。
如第 2 章,“回归”中所讨论的,梯度下降有多种变体,旨在提高收敛性,避免了陷入局部极小值或高原的问题(增加动量,可变学习率)。
TensorFlow 借助不同的优化器自动计算这些梯度。 但是,需要注意的重要一点是,由于 TensorFlow 将计算梯度,而梯度也将涉及激活函数的导数,因此重要的是,您选择的激活函数是可微的,并且在整个训练场景中最好具有非零梯度 。
感知机梯度下降的主要方法之一不同于第 2 章,“回归”,应用是为输出层定义目标函数,但可用于查找目标层,以及隐藏层的神经元的权重变化。 这是使用反向传播(BPN)算法完成的,其中输出端的误差会向后传播到隐藏层,并用于确定权重变化。 您将很快了解更多信息。
激活函数
每个神经元必须具有激活函数。 它们使神经元具有建模复杂非线性数据集所需的非线性特性。 该函数获取所有输入的加权和,并生成一个输出信号。 您可以将其视为输入和输出之间的转换。 使用适当的激活函数,我们可以将输出值限制在定义的范围内。
如果x[j]是第j个输入,则W[j]的第j行输入到我们的神经元,并且b是我们神经元的偏置,即神经元的输出(从生物学的角度来说,是神经元的发射) 通过激活函数,在数学上表示为:
在此, g表示激活函数。 激活函数∑(W[j]x[j]) + b的参数称为神经元的激活。
准备
我们对给定输入刺激的反应受神经元激活函数的控制。 有时我们的回答是二进制的是或否。 例如,当开个玩笑时,我们要么笑要么不笑。 在其他时间,响应似乎是线性的,例如由于疼痛而哭泣。 有时,响应似乎在一定范围内。
模仿类似的行为,人工神经元使用了许多不同的激活函数。 在本秘籍中,您将学习如何在 TensorFlow 中定义和使用一些常见的激活函数。
操作步骤
我们继续执行激活函数,如下所示:
- 阈值激活函数:这是最简单的激活函数。 在此,如果神经元的活动性大于零,则神经元会触发;否则,神经元会触发。 否则,它不会触发。 这是阈值激活函数随神经元活动变化而变化的图,以及在 TensorFlow 中实现阈值激活函数的代码:
import tensorflow as tf
import numpy as np
import matplotlib.pyplot as plt

# Threshold Activation function
def threshold (x):
    cond = tf.less(x, tf.zeros(tf.shape(x), dtype = x.dtype))
    out = tf.where(cond, tf.zeros(tf.shape(x)), tf.ones(tf.shape(x)))
    return out
# Plotting Threshold Activation Function
h = np.linspace(-1,1,50)
out = threshold(h)
init = tf.global_variables_initializer()
with tf.Session() as sess:
     sess.run(init)
     y = sess.run(out)
     plt.xlabel('Activity of Neuron')
     plt.ylabel('Output of Neuron')
     plt.title('Threshold Activation Function')
     plt.plot(h, y)
以下是上述代码的输出:
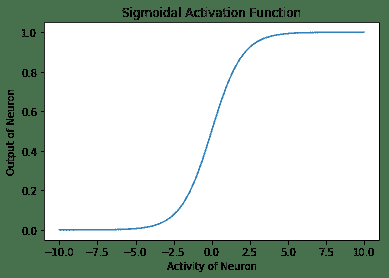
- Sigmoid 激活函数:在这种情况下,神经元的输出由函数
g(x) = 1 / (1 + exp(-x))指定。 在 TensorFlow 中,有一种方法tf.sigmoid,它提供了 Sigmoid 激活。 此函数的范围在 0 到 1 之间。形状上看起来像字母 S ,因此名称为 Sigmoid:
# Plotting Sigmoidal Activation function
h = np.linspace(-10,10,50)
out = tf.sigmoid(h)
init = tf.global_variables_initializer()
with tf.Session() as sess:
    sess.run(init)
    y = sess.run(out)
    plt.xlabel('Activity of Neuron')
    plt.ylabel('Output of Neuron')
    plt.title('Sigmoidal Activation Function')
    plt.plot(h, y)
以下是以下代码的输出:
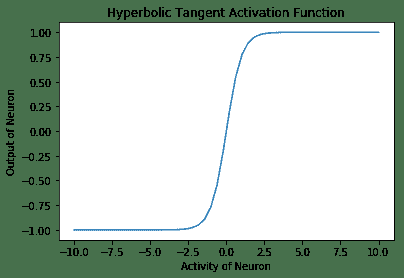
- 双曲正切激活函数:在数学上,它是
(1 - exp(-2x) / (1 + exp(-2x))。在形状上,它类似于 Sigmoid 函数,但是它以 0 为中心,范围为 -1 至 1。TensorFlow 具有内置函数tf.tanh,用于双曲正切激活函数:
# Plotting Hyperbolic Tangent Activation function
h = np.linspace(-10,10,50)
out = tf.tanh(h)
init = tf.global_variables_initializer()
with tf.Session() as sess:
    sess.run(init)
    y = sess.run(out)
    plt.xlabel('Activity of Neuron')
    plt.ylabel('Output of Neuron')
    plt.title('Hyperbolic Tangent Activation Function')
    plt.plot(h, y)
以下是上述代码的输出:
- 线性激活函数:在这种情况下,神经元的输出与神经元的活动相同。 此函数不受任何限制:
# Linear Activation Function
b = tf.Variable(tf.random_normal([1,1], stddev=2))
w = tf.Variable(tf.random_normal([3,1], stddev=2))
linear_out = tf.matmul(X_in, w) + b
init = tf.global_variables_initializer()
with tf.Session() as sess:
    sess.run(init)
    out = sess.run(linear_out)

print(out)
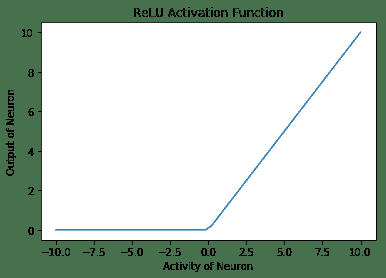
- 整流线性单元(ReLU)激活函数再次内置在 TensorFlow 库中。 激活函数类似于线性激活函数,但有一个大变化-对于活动的负值,神经元不触发(零输出),对于活动的正值,神经元的输出与给定的活动相同:
# Plotting ReLU Activation function
h = np.linspace(-10,10,50)
out = tf.nn.relu(h)
init = tf.global_variables_initializer()
with tf.Session() as sess:
    sess.run(init)
    y = sess.run(out)
plt.xlabel('Activity of Neuron')
plt.ylabel('Output of Neuron')
plt.title('ReLU Activation Function')
plt.plot(h, y)
以下是 ReLu 激活函数的输出:
- Softmax 激活函数是归一化的指数函数。 一个神经元的输出不仅取决于其自身的活动,还取决于该层中存在的所有其他神经元的活动总和。 这样的一个优点是,它使神经元的输出保持较小,因此梯度不会爆炸。 数学上,它是
y[i] = exp(x[i]) / ∑j exp(x[j]):
# Plotting Softmax Activation function
h = np.linspace(-5,5,50)
out = tf.nn.softmax(h)
init = tf.global_variables_initializer()
with tf.Session() as sess:
    sess.run(init)
    y = sess.run(out)
    plt.xlabel('Activity of Neuron')
    plt.ylabel('Output of Neuron')
    plt.title('Softmax Activation Function')
    plt.plot(h, y)
以下是上述代码的输出:
工作原理
以下是函数的说明:
- 门控激活函数由 McCulloch Pitts Neuron 和初始感知机使用。 它不可微且在
x = 0处不连续。 因此,不可能使用此激活函数来使用梯度下降或其变体进行训练。 - Sigmoid 激活函数曾经非常流行。 如果看曲线,它看起来像是阈值激活函数的连续版本。 它具有消失的梯度问题,即,函数的梯度在两个边缘附近变为零。 这使得训练和优化变得困难。
- 双曲正切激活函数再次和 Sigmoid 类似,并具有非线性特性。 该函数以零为中心,并且与 Sigmoid 曲线相比具有更陡峭的导数。 像 Sigmoid 一样,这也遭受消失的梯度问题的困扰。
- 线性激活函数顾名思义是线性的。 该函数从两侧都是无界的
[-inf, inf]。 其线性是其主要问题。 线性函数的总和将是线性函数,线性函数的线性函数也将是线性函数。 因此,使用此函数,无法掌握复杂数据集中存在的非线性。 - ReLU 激活函数是线性激活函数的整流版本,当在多层中使用时,此整流可以捕获非线性。 使用 ReLU 的主要优点之一是它导致稀疏激活。 在任何时候,所有具有负活动的神经元都不会放电。 这使网络在计算方面更轻便。 ReLU 神经元患有垂死的 ReLU 问题,也就是说,不激发的神经元的梯度将变为零,因此将无法进行任何训练并保持静止(死)。 尽管存在这个问题,如今的 ReLU 还是隐藏层最常用的激活函数之一。
- Softmax 激活函数通常用作输出层的激活函数。 该函数的范围为
[0, 1]。 它用于表示多类分类问题中某类的概率。 所有单元的输出总和将始终为 1。
更多
神经网络已用于各种任务。 这些任务可以大致分为两类:函数逼近(回归)和分类。 根据手头的任务,一个激活函数可能会优于另一个。 通常,最好将 ReLU 神经元用于隐藏层。 对于分类任务,softmax 通常是更好的选择,对于回归问题,最好使用 Sigmoid 或双曲正切。
另见
- 该链接提供了 TensorFlow 中定义的激活函数及其使用方法的详细信息
- 关于激活函数的不错总结
单层感知机
简单的感知机是单层神经网络。 它使用阈值激活函数,并且正如 Marvin Minsky 论文所证明的那样,只能解决线性可分离的问题。 尽管这将单层感知机的应用限制为仅是线性可分离的问题,但看到它学习仍然总是令人惊奇。
准备
由于感知机使用阈值激活函数,因此我们无法使用 TensorFlow 优化器来更新权重。 我们将不得不使用权重更新规则:
![]()
这是学习率。 为了简化编程,可以将偏置作为附加权重添加,输入固定为 +1。 然后,前面的等式可用于同时更新权重和偏差。
操作步骤
这是我们处理单层感知机的方法:
- 导入所需的模块:
import tensorflow as tf
import numpy as np
- 定义要使用的超参数:
# Hyper parameters
eta = 0.4  # learning rate parameter
epsilon = 1e-03 # minimum accepted error
max_epochs = 100 # Maximum Epochs
- 定义
threshold函数:
# Threshold Activation function
def threshold (x):
    cond = tf.less(x, tf.zeros(tf.shape(x), dtype = x.dtype))
    out = tf.where(cond, tf.zeros(tf.shape(x)), tf.ones(tf.shape(x)))
    return out
- 指定训练数据。 在此示例中,我们采用三个输入神经元(
A,B和C)并对其进行训练以学习逻辑AB + BC:
# Training Data  Y = AB + BC, sum of two linear functions.
T, F = 1., 0\.
X_in = [
    [T, T, T, T],
    [T, T, F, T],
    [T, F, T, T],
    [T, F, F, T],
    [F, T, T, T],
    [F, T, F, T],
    [F, F, T, T],
    [F, F, F, T],
    ]
Y = [
    [T],
    [T],
    [F],
    [F],
    [T],
    [F],
    [F],
    [F]
]
- 定义要使用的变量,计算图以计算更新,最后执行计算图:
W = tf.Variable(tf.random_normal([4,1], stddev=2, seed = 0))
h = tf.matmul(X_in, W)
Y_hat = threshold(h)
error = Y - Y_hat
mean_error = tf.reduce_mean(tf.square(error))
dW =  eta * tf.matmul(X_in, error, transpose_a=True)
train = tf.assign(W, W+dW)
init = tf.global_variables_initializer()
err = 1
epoch = 0
with tf.Session() as sess:
    sess.run(init)
    while err > epsilon and epoch < max_epochs:
        epoch += 1
        err, _ = sess.run([mean_error, train])
        print('epoch: {0}  mean error: {1}'.format(epoch, err))

    print('Training complete')
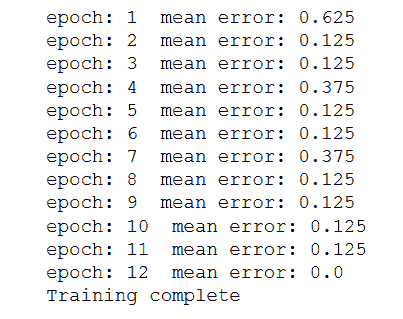
以下是上述代码的输出:
更多
如果我们使用 Sigmoid 激活函数代替阈值激活函数,您会怎么办?
你猜对了; 首先,我们可以使用 TensorFlow 优化器来更新权重。 其次,网络的行为类似于逻辑回归器。
反向传播算法的梯度计算
BPN 算法是神经网络中研究最多的算法之一。 它用于将误差从输出层传播到隐藏层的神经元,然后将其用于更新权重。 整个学习可以分为两阶段-前向阶段和后向阶段。
向前传递:输入被馈送到网络,信号从输入层通过隐藏层传播,最后传播到输出层。 在输出层,计算误差和loss函数。
向后传递:在向后传递中,首先为输出层神经元然后为隐藏层神经元计算loss函数的梯度。 然后使用梯度更新权重。
重复两次遍历,直到达到收敛为止。
准备
首先为网络呈现M个训练对(X, Y),并以X作为输入, Y为所需的输出。 输入通过激活函数g(h)从输入传播到隐藏层,直到输出层。 输出Y_hat是网络的输出,误差为Y - Y_hat。
loss函数J(W)如下:
在此, i在输出层(1 到 N)的所有神经元上变化。 W[ij]的权重变化,将输出层第i个神经元连接到隐藏层第j个神经元,然后可以使用J(W)的梯度并使用链规则进行区分来确定隐藏层神经元:
此处, O[j]是隐藏层神经元的输出, j和h表示活动。 这很容易,但是现在我们如何找到W[jk],它连接第n个隐藏层的神经元k和第n+1隐藏层的神经元j?流程是相同的,我们将使用loss函数的梯度和链规则进行微分,但是这次我们将针对W[jk]进行计算:
现在方程式就位了,让我们看看如何在 TensorFlow 中做到这一点。 在本秘籍中,我们使用相同的旧 MNIST 数据集。
操作步骤
现在让我们开始学习反向传播算法:
- 导入模块:
import tensorflow as tf
from tensorflow.examples.tutorials.mnist import input_data
- 加载数据集; 我们通过设置
one_hot = True使用一键编码标签:
mnist = input_data.read_data_sets("MNIST_data/", one_hot=True)
- 定义超参数和其他常量。 在这里,每个手写数字的大小为
28 x 28 = 784像素。 数据集分为 10 类,因为数字可以是 0 到 9 之间的任何数字。这两个是固定的。 学习率,最大周期数,要训练的迷你批次的批次大小以及隐藏层中神经元的数量都是超参数。 可以与他们一起玩耍,看看它们如何影响网络行为:
# Data specific constants
 n_input = 784 # MNIST data input (img shape: 28*28)
 n_classes = 10 # MNIST total classes (0-9 digits)

 # Hyperparameters
 max_epochs = 10000
 learning_rate = 0.5
 batch_size = 10
 seed = 0
 n_hidden = 30  # Number of neurons in the hidden layer
- 我们将需要
sigmoid函数的导数进行权重更新,因此我们对其进行定义:
def sigmaprime(x):
     return tf.multiply(tf.sigmoid(x), tf.subtract(tf.constant(1.0), tf.sigmoid(x)))
- 为训练数据创建占位符:
x_in = tf.placeholder(tf.float32, [None, n_input])
y = tf.placeholder(tf.float32, [None, n_classes])
- 创建模型:
def multilayer_perceptron(x, weights, biases):
     # Hidden layer with RELU activation
     h_layer_1 = tf.add(tf.matmul(x, weights['h1']), biases['h1'])
     out_layer_1 = tf.sigmoid(h_layer_1)
     # Output layer with linear activation
     h_out = tf.matmul(out_layer_1, weights['out']) + biases['out']
     return tf.sigmoid(h_out), h_out, out_layer_1, h_layer_1
- 定义
weights和biases的变量:
weights = {
     'h1': tf.Variable(tf.random_normal([n_input, n_hidden], seed = seed)),
     'out': tf.Variable(tf.random_normal([n_hidden, n_classes], seed = seed)) }

 biases = {
     'h1': tf.Variable(tf.random_normal([1, n_hidden], seed = seed)),
     'out': tf.Variable(tf.random_normal([1, n_classes], seed = seed))}
- 创建用于向前通过,误差,梯度和更新计算的计算图:
# Forward Pass
 y_hat, h_2, o_1, h_1 = multilayer_perceptron(x_in, weights, biases)

 # Error
 err = y_hat - y

 # Backward Pass
 delta_2 = tf.multiply(err, sigmaprime(h_2))
 delta_w_2 = tf.matmul(tf.transpose(o_1), delta_2)

 wtd_error = tf.matmul(delta_2, tf.transpose(weights['out']))
 delta_1 = tf.multiply(wtd_error, sigmaprime(h_1))
 delta_w_1 = tf.matmul(tf.transpose(x_in), delta_1)

 eta = tf.constant(learning_rate)

 # Update weights
 step = [
     tf.assign(weights['h1'],tf.subtract(weights['h1'], tf.multiply(eta, delta_w_1)))
   , tf.assign(biases['h1'],tf.subtract(biases['h1'], tf.multiply(eta, tf.reduce_mean(delta_1, axis=[0]))))
   , tf.assign(weights['out'], tf.subtract(weights['out'], tf.multiply(eta, delta_w_2)))
   , tf.assign(biases['out'], tf.subtract(biases['out'], tf.multiply(eta,tf.reduce_mean(delta_2, axis=[0]))))
 ]
- 为
accuracy定义操作:
acct_mat = tf.equal(tf.argmax(y_hat, 1), tf.argmax(y, 1))
accuracy = tf.reduce_sum(tf.cast(acct_mat, tf.float32))
- 初始化变量:
init = tf.global_variables_initializer()
- 执行图:
with tf.Session() as sess:
     sess.run(init)
     for epoch in range(max_epochs):
         batch_xs, batch_ys = mnist.train.next_batch(batch_size)
         sess.run(step, feed_dict = {x_in: batch_xs, y : batch_ys})
         if epoch % 1000 == 0:
             acc_test = sess.run(accuracy, feed_dict =
                        {x_in: mnist.test.images,
                         y : mnist.test.labels})
             acc_train = sess.run(accuracy, feed_dict=
             {x_in: mnist.train.images,
              y: mnist.train.labels})
             print('Epoch: {0}  Accuracy Train%: {1}  Accuracy Test%: {2}'
                   .format(epoch,acc_train/600,(acc_test/100)))
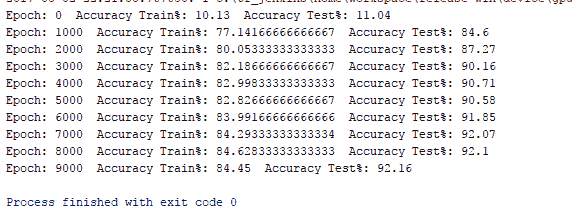
结果如下:
工作原理
在这里,我们正在以 10 的批量大小训练网络。如果增加它,网络表现就会下降。 同样,在测试数据上检查训练网络的准确率; 对其进行测试的测试数据的大小为 1,000。
更多
我们的一个隐藏层多层感知机在训练数据上的准确率为 84.45,在测试数据上的准确率为 92.1。 很好,但还不够好。 MNIST 数据库用作机器学习中分类问题的基准。 接下来,我们了解使用 TensorFlow 的内置优化器如何影响网络表现。
另见
- MNIST 数据库
- 反向传播算法的简化解释
- 反向传播算法的另一种直观解释
- 关于反向传播算法的另一种方法,它提供了详细信息,以及推导以及如何将其应用于不同的 neyworks
使用 MLP 的 MNIST 分类器
TensorFlow 支持自动分化; 我们可以使用 TensorFlow 优化器来计算和应用梯度。 它使用梯度自动更新定义为变量的张量。 在此秘籍中,我们将使用 TensorFlow 优化器来训练网络。
准备
在反向传播算法秘籍中,我们定义了层,权重,损耗,梯度,并手动通过梯度进行更新。 为了更好地理解,手动使用方程式进行操作是一个好主意,但是随着网络中层数的增加,这可能会非常麻烦。
在本秘籍中,我们将使用强大的 TensorFlow 功能(例如 Contrib(层))来定义神经网络层,并使用 TensorFlow 自己的优化器来计算和应用梯度。 我们在第 2 章和“回归”中了解了如何使用不同的 TensorFlow 优化器。 contrib 可用于向神经网络模型添加各种层,例如添加构建块。 我们在这里使用的一种方法是tf.contrib.layers.fully_connected,在 TensorFlow 文档中定义如下:
fully_connected(
     inputs,
     num_outputs,
     activation_fn=tf.nn.relu,
     normalizer_fn=None,
     normalizer_params=None,
     weights_initializer=initializers.xavier_initializer(),
     weights_regularizer=None,
     biases_initializer=tf.zeros_initializer(),
     biases_regularizer=None,
     reuse=None,
     variables_collections=None,
     outputs_collections=None,
     trainable=True,
     scope=None
 )
这将添加一个完全连接的层。
fully_connected creates a variable called weights, representing a fully connected weight matrix, which is multiplied by the inputs to produce a tensor of hidden units. If a normalizer_fn is provided (such as batch_norm), it is then applied. Otherwise, if normalizer_fn is None and a biases_initializer is provided then a biases variable would be created and added to the hidden units. Finally, if activation_fn is not None, it is applied to the hidden units as well.
操作步骤
我们按以下步骤进行:
- 第一步是更改
loss函数; 尽管对于分类,最好使用交叉熵loss函数。 我们目前继续均方误差(MSE):
loss = tf.reduce_mean(tf.square(y - y_hat, name='loss'))
- 接下来,我们使用
GradientDescentOptimizer:
optimizer = tf.train.GradientDescentOptimizer(learning_rate= learning_rate)
 train = optimizer.minimize(loss)
- 仅通过这两个更改,对于同一组超参数,测试数据集的准确率仅为 61.3%。 增加
max_epoch,我们可以提高精度,但这将不是 TensorFlow 功能的有效利用。 - 这是一个分类问题,因此最好使用交叉熵损失,用于隐藏层的 ReLU 激活函数以及用于输出层的 softmax。 进行所需的更改,完整代码如下:
import tensorflow as tf
 import tensorflow.contrib.layers as layers

 from tensorflow.python import debug as tf_debug

 # Network Parameters
 n_hidden = 30
 n_classes = 10
 n_input = 784

 # Hyperparameters
 batch_size = 200
 eta = 0.001
 max_epoch = 10

 # MNIST input data
 from tensorflow.examples.tutorials.mnist import input_data
 mnist = input_data.read_data_sets("/tmp/data/", one_hot=True)

 def multilayer_perceptron(x):
     fc1 = layers.fully_connected(x, n_hidden, activation_fn=tf.nn.relu, scope='fc1')
     #fc2 = layers.fully_connected(fc1, 256, activation_fn=tf.nn.relu, scope='fc2')
     out = layers.fully_connected(fc1, n_classes, activation_fn=None, scope='out')
     return out

 # build model, loss, and train op
 x = tf.placeholder(tf.float32, [None, n_input], name='placeholder_x')
 y = tf.placeholder(tf.float32, [None, n_classes], name='placeholder_y')
 y_hat = multilayer_perceptron(x)

 loss = tf.reduce_mean(tf.nn.softmax_cross_entropy_with_logits(logits=y_hat, labels=y))
 train = tf.train.AdamOptimizer(learning_rate= eta).minimize(loss)
 init = tf.global_variables_initializer()

 with tf.Session() as sess:
     sess.run(init)
     for epoch in range(10):
         epoch_loss = 0.0
         batch_steps = int(mnist.train.num_examples / batch_size)
         for i in range(batch_steps):
             batch_x, batch_y = mnist.train.next_batch(batch_size)
             _, c = sess.run([train, loss],
                                feed_dict={x: batch_x, y: batch_y})
             epoch_loss += c / batch_steps
         print ('Epoch %02d, Loss = %.6f' % (epoch, epoch_loss))

     # Test model
     correct_prediction = tf.equal(tf.argmax(y_hat, 1), tf.argmax(y, 1))
     accuracy = tf.reduce_mean(tf.cast(correct_prediction, tf.float32))
     print ("Accuracy%:", accuracy.eval({x: mnist.test.images, y: mnist.test.labels}))
工作原理
改进的 MNIST MLP 分类器在测试数据集上的准确率达到了 96%,只有一个隐藏层并且在 10 个周期内。 仅在几行代码中我们就获得了约 96% 的准确率,这就是 TensorFlow 的强大功能:
[外链图片转存失败,源站可能有防盗链机制,建议将图片保存下来直接上传(img-vIeOBXAk-1681565141622)(https://gitcode.net/apachecn/apachecn-dl-zh/-/raw/master/docs/tf-1x-dl-cookbook/img/d915165d-a180-4e7b-9fd9-552b65d2e667.png)]
使用 MLP 预测波士顿房价的函数近似
Hornik 等人的工作证明了以下:
“multilayer feedforward networks with as few as one hidden layer are indeed capable of universal approximation in a very precise and satisfactory sense.”
在本秘籍中,我们将向您展示如何使用 MLP 进行函数逼近; 具体来说,我们将预测波士顿的房价。 我们已经熟悉了数据集; 在第 2 章,“回归”中,我们使用回归技术进行房价预测,现在我们将使用 MLP 进行相同的操作。
准备
对于函数逼近,loss函数应为 MSE。 输入应该标准化,而隐藏层可以是 ReLU,而输出层则最好是 Sigmoid 。
操作步骤
这是我们从使用 MLP 进行函数逼近开始的方法:
- 导入所需的模块-
sklearn用于数据集,预处理数据,并将其拆分为训练和测试; Pandas 用于了解数据集;matplotlib和seaborn用于可视化:
import tensorflow as tf
import tensorflow.contrib.layers as layers
from sklearn import datasets
import matplotlib.pyplot as plt
from sklearn.model_selection  import train_test_split
from sklearn.preprocessing import MinMaxScaler
import pandas as pd
import seaborn as sns
%matplotlib inline
- 加载数据集并创建一个 Pandas 数据帧以了解数据:
# Data
boston = datasets.load_boston()
df = pd.DataFrame(boston.data, columns=boston.feature_names)
df['target'] = boston.target
- 让我们获取有关数据的一些详细信息:
#Understanding Data
df.describe()
下图很好地说明了这一概念:
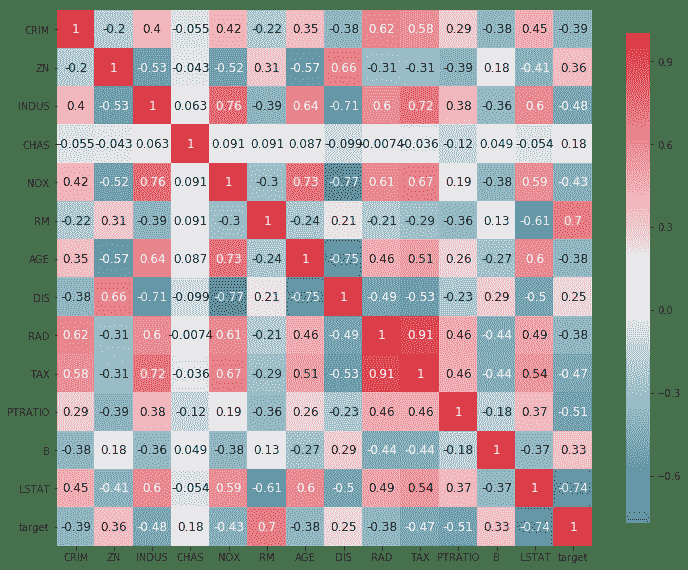
- 查找不同输入特征和目标之间的关联:
# Plotting correlation
color map _ , ax = plt.subplots( figsize =( 12 , 10 ) )
corr = df.corr(method='pearson')
cmap = sns.diverging_palette( 220 , 10 , as_cmap = True )
_ = sns.heatmap( corr, cmap = cmap, square=True, cbar_kws={ 'shrink' : .9 }, ax=ax, annot = True, annot_kws = { 'fontsize' : 12 })
以下是上述代码的输出:
- 从前面的代码中,我们可以看到
RM,PTRATIO和LSTAT这三个参数的相关性在大小上大于 0.5。 我们选择它们进行训练。 将数据集拆分为训练和测试数据集。 我们还使用MinMaxScaler归一化我们的数据集。 需要注意的一个重要变化是,由于我们的神经网络使用了 Sigmoid 激活函数(Sigmoid 的输出只能在 0-1 之间),因此我们也必须将目标值Y标准化:
# Create Test Train Split
X_train, X_test, y_train, y_test = train_test_split(df [['RM', 'LSTAT', 'PTRATIO']], df[['target']], test_size=0.3, random_state=0)
# Normalize data
X_train = MinMaxScaler().fit_transform(X_train)
y_train = MinMaxScaler().fit_transform(y_train)
X_test = MinMaxScaler().fit_transform(X_test)
y_test = MinMaxScaler().fit_transform(y_test)
- 定义常量和超参数:
#Network Parameters
m = len(X_train)
n = 3 # Number of features
n_hidden = 20 # Number of hidden neurons
# Hyperparameters
batch_size = 200
eta = 0.01
max_epoch = 1000
- 创建具有一个隐藏层的多层感知机模型:
def multilayer_perceptron(x):
    fc1 = layers.fully_connected(x, n_hidden, activation_fn=tf.nn.relu, scope='fc1')
    out = layers.fully_connected(fc1, 1, activation_fn=tf.sigmoid, scope='out')
    return out
- 声明训练数据的占位符,并定义损失和优化器:
# build model, loss, and train op
x = tf.placeholder(tf.float32, name='X', shape=[m,n])
y = tf.placeholder(tf.float32, name='Y')
y_hat = multilayer_perceptron(x)
correct_prediction = tf.square(y - y_hat)
mse = tf.reduce_mean(tf.cast(correct_prediction, "float"))
train = tf.train.AdamOptimizer(learning_rate= eta).minimize(mse)
init = tf.global_variables_initializer()
- 执行计算图:
# Computation Graph
with tf.Session() as sess: # Initialize variables
     sess.run(init) writer = tf.summary.FileWriter('graphs', sess.graph)
# train the model for 100 epcohs
    for i in range(max_epoch):
        _, l, p = sess.run([train, loss, y_hat], feed_dict={x: X_train, y: y_train})
        if i%100 == 0:
            print('Epoch {0}: Loss {1}'.format(i, l))
    print("Training Done")
print("Optimization Finished!")
# Test model correct_prediction = tf.square(y - y_hat)
# Calculate accuracy
accuracy = tf.reduce_mean(tf.cast(correct_prediction, "float"))
print(" Mean Error:", accuracy.eval({x: X_train, y: y_train})) plt.scatter(y_train, p)
writer.close()
工作原理
该模型只有一个隐藏层,因此可以预测训练数据集的价格,平均误差为 0.0071。 下图显示了房屋的估计价格与实际价格之间的关系:
更多
在这里,我们使用 TensorFlow ops Layers(Contrib)来构建神经网络层。 由于避免了分别声明每一层的权重和偏差,因此使我们的工作稍微容易一些。 如果我们使用像 Keras 这样的 API,可以进一步简化工作。 这是在 Keras 中使用 TensorFlow 作为后端的相同代码:
#Network Parameters
m = len(X_train)
n = 3 # Number of features
n_hidden = 20 # Number of hidden neurons

# Hyperparameters
batch = 20
eta = 0.01
max_epoch = 100
# Build Model
model = Sequential()
model.add(Dense(n_hidden,
model.add(Dense(1, activation='sigmoid'))
model.summary()
# Summarize the model
#Compile model
model.compile(loss='mean_squared_error', optimizer='adam')
#Fit the model
model.fit(X_train, y_train, validation_data=(X_test, y_test),epochs=max_epoch, batch_size=batch, verbose=1)
#Predict the values and calculate RMSE and R2 score
y_test_pred = model.predict(X_test)
y_train_pred = model.predict(X_train)
r2 = r2_score( y_test, y_test_pred )
rmse = mean_squared_error( y_test, y_test_pred )
print( "Performance Metrics R2 : {0:f}, RMSE : {1:f}".format( r2, rmse ) )
前面的代码在预测值和实际值之间给出了以下结果。 我们可以看到,通过消除异常值可以改善结果(某些房屋的最高价格与其他参数无关,位于最右边的点):
调整超参数
正如您现在必须已经观察到的那样,神经网络的表现在很大程度上取决于超参数。 因此,重要的是要了解这些参数如何影响网络。 超参数的常见示例是学习率,正则化器,正则化系数,隐藏层的尺寸,初始权重值,甚至是为优化权重和偏差而选择的优化器。
操作步骤
这是我们进行秘籍的方法:
- 调整超参数的第一步是构建模型。 完全按照我们以前的方式在 TensorFlow 中构建模型。
- 添加一种将模型保存在
model_file中的方法。 在 TensorFlow 中,可以使用Saver对象完成此操作。 然后将其保存在会话中:
... saver = tf.train.Saver() ... with tf.Session() as sess: ... #Do the training steps ... save_path = saver.save(sess, "/tmp/model.ckpt") print("Model saved in file: %s" % save_path)
- 接下来,确定要调整的超参数。
- 为超参数选择可能的值。 在这里,您可以进行随机选择,等距选择或手动选择。 这三个分别称为随机搜索,网格搜索或用于优化超参数的手动搜索。 例如,这是针对学习率的:
# Random Choice: generate 5 random values of learning rate
# lying between 0 and 1
learning_rate =
#Grid Search: generate 5 values starting from 0, separated by
# 0.2
learning_rate = [i for i in np.arange(0,1,0.2)]
#Manual Search: give any values you seem plausible manually learning_rate = [0.5, 0.6, 0.32, 0.7, 0.01]
- 我们选择对我们选择的
loss函数具有最佳响应的参数。 因此,我们可以在开始时将loss函数的最大值定义为best_loss(在精度的情况下,您将从模型中选择所需的最小精度):
best_loss = 2
# It can be any number, but it would be better if you keep it same as the loss you achieved from your base model defined in steps 1 and 2
- 将模型包装在
for循环中以提高学习率; 然后保存任何可以更好地估计损失的模型:
... # Load and preprocess data
... # Hyperparameters
Tuning epochs = [50, 60, 70]
batches = [5, 10, 20]
rmse_min = 0.04
for epoch in epochs:
    for batch in batches:
        model = get_model()
        model.compile(loss='mean_squared_error', optimizer='adam')
        model.fit(X_train, y_train, validation_data=(X_test, y_test),epochs=epoch, batch_size=batch, verbose=1)
        y_test_pred = model.predict(X_test)
        rmse = mean_squared_error( y_test, y_test_pred )
        if rmse < rmse_min:
            rmse_min = rmse
            # serialize model to JSON
            model_json = model.to_json()
            with open("model.json", "w") as json_file:
                json_file.write(model_json)
                # serialize weights to HDF5
                model.save_weights("model.hdf5")
                print("Saved model to disk")
更多
还有另一种称为贝叶斯优化的方法,该方法也可以用于调整超参数。 在其中,我们定义了一个采集函数以及一个高斯过程。 高斯过程使用一组先前评估的参数以及由此产生的精度来假设大约未观测到的参数。 使用此信息的采集功能建议使用下一组参数。 有一个包装程序甚至可用于基于梯度的超参数优化。
另见
- 两个用于超级参数优化的出色开源包的很好介绍:Hyperopt 和 scikit-optimize
- 另一个有关 Hyperopt 的内容
- Bengio 和其他人撰写的有关超参数优化各种算法的详细论文
更高级别的 API – Keras
Keras 是将 TensorFlow 作为后端使用的高级 API。 向其添加层就像添加一行代码一样容易。 在建立模型架构之后,您可以使用一行代码来编译和拟合模型。 以后,它可以用于预测。 变量,占位符甚至会话的声明均由 API 管理。
操作步骤
我们对 Keras 进行如下操作:
- 第一步,我们定义模型的类型。 Keras 提供了两种类型的模型:顺序模型 API 和模型类 API。 Keras 提供了各种类型的神经网络层:
# Import the model and layers needed
from keras.model import Sequential
from keras.layers import Dense

model = Sequential()
- 借助
model.add()将层添加到模型中。 Keras 为密集连接的神经网络layer Dense(units, activation=None, use_bias=True, kernel_initializer='glorot_uniform', bias_initializer='zeros', kernel_regularizer=None, bias_regularizer=None, activity_regularizer=None, kernel_constraint=None, bias_constraint=None)提供了一个密集层的选项。 根据 Keras 文档:
Dense implements the operation: output = activation(dot(input, kernel) + bias) where activation is the element-wise activation function passed as the activation argument, kernel is a weights matrix created by the layer, and bias is a bias vector created by the layer (only applicable if use_bias is True).
- 我们可以使用它来添加任意数量的层,每个隐藏的层都由上一层提供。 我们只需要为第一层指定输入尺寸:
#This will add a fully connected neural network layer with 32 neurons, each taking 13 inputs, and with activation function ReLU
mode.add(Dense(32, input_dim=13, activation='relu')) ))
model.add(10, activation='sigmoid')
- 定义模型后,我们需要选择
loss函数和优化器。 Keras 提供了多种loss_functions:mean_squared_error,mean_absolute_error,mean_absolute_percentage_error,categorical_crossentropy; 和优化程序:SGD,RMSprop,Adagrad,Adadelta,Adam 等。 决定了这两个条件后,我们可以使用compile(self, optimizer, loss, metrics=None, sample_weight_mode=None)配置学习过程:
model.compile(optimizer='rmsprop',
          loss='categorical_crossentropy',
          metrics=['accuracy'])
- 接下来,使用
fit方法训练模型:
model.fit(data, labels, epochs=10, batch_size=32)
- 最后,可以借助
predict方法predict(self, x, batch_size=32, verbose=0)进行预测:
model.predict(test_data, batch_size=10)
更多
Keras 提供了添加卷积层,池化层,循环层甚至本地连接层的选项。 Keras 文档中提供了每种方法的详细说明。
另见
McCulloch, Warren S., and Walter Pitts. A logical calculus of the ideas immanent in nervous activity The bulletin of mathematical biophysics 5.4 (1943): 115-133. http://vordenker.de/ggphilosophy/mcculloch_a-logical-calculus.pdf

Rosenblatt, Frank (1957), The Perceptron--a perceiving and recognizing automaton. Report 85-460-1, Cornell Aeronautical Laboratory. https://blogs.umass.edu/brain-wars/files/2016/03/rosenblatt-1957.pdf

The Thinking Machine, CBS Broadcast https://www.youtube.com/watch?v=jPHUlQiwD9Y
四、卷积神经网络
卷积神经网络(CNN 或有时称为 ConvNets)令人着迷。 在短时间内,它们成为一种破坏性技术,打破了从文本,视频到语音的多个领域中的所有最新技术成果,远远超出了最初用于图像处理的范围。 在本章中,我们将介绍一些方法,如下所示:
- 创建一个卷积网络对手写 MNIST 编号进行分类
- 创建一个卷积网络对 CIFAR-10 进行分类
- 使用 VGG19 迁移风格用于图像重绘
- 使用预训练的 VGG16 网络进行迁移学习
- 创建 DeepDream 网络
介绍
CNN 由许多神经网络层组成。 卷积和池化两种不同类型的层通常是交替的。 网络中每个过滤器的深度从左到右增加。 最后一级通常由一个或多个完全连接的层组成:
如图所示,卷积神经网络的一个示例。
卷积网络背后有三个主要的直觉:局部接受域,共享权重和池化。 让我们一起回顾一下。
局部接受域
如果我们要保留通常在图像中发现的空间信息,则使用像素矩阵表示每个图像会很方便。 然后,编码局部结构的一种简单方法是将相邻输入神经元的子矩阵连接到属于下一层的单个隐藏神经元中。 单个隐藏的神经元代表一个局部感受野。 请注意,此操作名为卷积,它为这种类型的网络提供了名称。
当然,我们可以通过重叠子矩阵来编码更多信息。 例如,假设每个子矩阵的大小为5 x 5,并且这些子矩阵用于28 x 28像素的 MNIST 图像。 然后,我们将能够在下一个隐藏层中生成23 x 23个局部感受野神经元。 实际上,在触摸图像的边界之前,可以仅将子矩阵滑动 23 个位置。
让我们定义从一层到另一层的特征图。 当然,我们可以有多个可以从每个隐藏层中独立学习的特征图。 例如,我们可以从28 x 28个输入神经元开始处理 MNIST 图像,然后在下一个隐藏的区域中调用k个特征图,每个特征图的大小为23 x 23神经元(步幅为5 x 5)。
权重和偏置
假设我们想通过获得独立于输入图像中放置同一特征的能力来摆脱原始像素表示的困扰。 一个简单的直觉是对隐藏层中的所有神经元使用相同的权重和偏差集。 这样,每一层将学习从图像派生的一组位置无关的潜在特征。
一个数学示例
一种了解卷积的简单方法是考虑应用于矩阵的滑动窗口函数。 在下面的示例中,给定输入矩阵I和内核K,我们得到了卷积输出。 将3 x 3内核K(有时称为过滤器或特征检测器)与输入矩阵逐元素相乘,得到输出卷积矩阵中的一个单元格。 通过在I上滑动窗口即可获得所有其他单元格:
卷积运算的一个示例:用粗体显示计算中涉及的单元
在此示例中,我们决定在触摸I的边界后立即停止滑动窗口(因此输出为3 x 3)。 或者,我们可以选择用零填充输入(以便输出为5 x 5)。 该决定与所采用的填充选择有关。
另一个选择是关于步幅,这与我们的滑动窗口采用的移位类型有关。 这可以是一个或多个。 较大的跨度将生成较少的内核应用,并且较小的输出大小,而较小的跨度将生成更多的输出并保留更多信息。
过滤器的大小,步幅和填充类型是超参数,可以在网络训练期间进行微调。
TensorFlow 中的卷积网络
在 TensorFlow 中,如果要添加卷积层,我们将编写以下内容:
tf.nn.conv2d(input, filter, strides, padding, use_cudnn_on_gpu=None, data_format=None, name=None)
以下是参数:
input:张量必须为以下类型之一:float32和float64。filter:张量必须与输入具有相同的类型。strides:整数列表。 长度为 1 的 4D。输入每个维度的滑动窗口的步幅。 必须与格式指定的尺寸顺序相同。padding:来自SAME,VALID的字符串。 要使用的填充算法的类型。use_cudnn_on_gpu:可选的布尔值。 默认为True。data_format:来自NHWC和NCHW的可选字符串。 默认为NHWC。 指定输入和输出数据的数据格式。 使用默认格式NHWC时,数据按以下顺序存储:[batch,in_height,in_width和in_channels]。 或者,格式可以是NCHW,数据存储顺序为:[batch,in_channels,in_height, in_width]。name:操作的名称(可选)。
下图提供了卷积的示例:
卷积运算的一个例子
汇聚层
假设我们要总结特征图的输出。 同样,我们可以使用从单个特征图生成的输出的空间连续性,并将子矩阵的值聚合为一个单个输出值,以综合方式描述与该物理区域相关的含义。
最大池
一个简单而常见的选择是所谓的最大池化运算符,它仅输出在该区域中观察到的最大激活。 在 TensorFlow 中,如果要定义大小为2 x 2的最大池化层,我们将编写以下内容:
tf.nn.max_pool(value, ksize, strides, padding, data_format='NHWC', name=None)
这些是参数:
value:形状为[batch,height,width,channels]且类型为tf.float32的 4-D 张量。ksize:长度>= 4的整数的列表。输入张量每个维度的窗口大小。strides:长度>= 4的整数的列表。输入张量每个维度的滑动窗口的步幅。padding:VALID或SAME的字符串。data_format:字符串。 支持NHWC和NCHW。name:操作的可选名称。
下图给出了最大池化操作的示例:
池化操作示例
平均池化
另一个选择是“平均池化”,它可以将一个区域简单地汇总为在该区域中观察到的激活平均值。
TensorFlow 实现了大量池化层,可在线获取完整列表。简而言之,所有池化操作仅是对给定区域的汇总操作。
卷积网络摘要
CNN 基本上是卷积的几层,具有非线性激活函数,并且池化层应用于结果。 每层应用不同的过滤器(数百或数千)。 要理解的主要观察结果是未预先分配滤波器,而是在训练阶段以最小化合适损失函数的方式来学习滤波器。 已经观察到,较低的层将学会检测基本特征,而较高的层将逐渐检测更复杂的特征,例如形状或面部。 请注意,得益于合并,后一层中的单个神经元可以看到更多的原始图像,因此它们能够组成在前几层中学习的基本特征。
到目前为止,我们已经描述了 ConvNets 的基本概念。 CNN 在沿时间维度的一维中对音频和文本数据应用卷积和池化操作,在沿(高度 x 宽度)维的图像中对二维图像应用卷积和池化操作,对于沿(高度 x 宽度 x 时间)维的视频中的三个维度应用卷积和池化操作。 对于图像,在输入体积上滑动过滤器会生成一个贴图,该贴图为每个空间位置提供过滤器的响应。
换句话说,卷积网络具有堆叠在一起的多个过滤器,这些过滤器学会了独立于图像中的位置来识别特定的视觉特征。 这些视觉特征在网络的初始层很简单,然后在网络的更深层越来越复杂。g操作
创建一个卷积网络对手写 MNIST 编号进行分类
在本秘籍中,您将学习如何创建一个简单的三层卷积网络来预测 MNIST 数字。 深度网络由具有 ReLU 和最大池化的两个卷积层以及两个完全连接的最终层组成。
准备
MNIST 是一组 60,000 张代表手写数字的图像。 本秘籍的目的是高精度地识别这些数字。
操作步骤
让我们从秘籍开始:
- 导入
tensorflow,matplotlib,random和numpy。 然后,导入minst数据并执行一键编码。 请注意,TensorFlow 具有一些内置库来处理MNIST,我们将使用它们:
from __future__ import  division, print_function
import tensorflow as tf
import matplotlib.pyplot as plt
import numpy as np
# Import MNIST data
from tensorflow.examples.tutorials.mnist import input_data
mnist = input_data.read_data_sets("MNIST_data/", one_hot=True)
- 内省一些数据以了解
MNIST是什么。 这使我们知道了训练数据集中有多少张图像,测试数据集中有多少张图像。 我们还将可视化一些数字,只是为了理解它们的表示方式。 多单元输出可以使我们直观地认识到即使对于人类来说,识别手写数字也有多困难。
def train_size(num):
    print ('Total Training Images in Dataset = ' + str(mnist.train.images.shape))
    print ('--------------------------------------------------')
    x_train = mnist.train.images[:num,:]
    print ('x_train Examples Loaded = ' + str(x_train.shape))
    y_train = mnist.train.labels[:num,:]
    print ('y_train Examples Loaded = ' + str(y_train.shape))
    print('')
    return x_train, y_train
def test_size(num):
    print ('Total Test Examples in Dataset = ' + str(mnist.test.images.shape))
    print ('--------------------------------------------------')
    x_test = mnist.test.images[:num,:]
    print ('x_test Examples Loaded = ' + str(x_test.shape))
    y_test = mnist.test.labels[:num,:]
    print ('y_test Examples Loaded = ' + str(y_test.shape))
    return x_test, y_test
def display_digit(num):
    print(y_train[num])
    label = y_train[num].argmax(axis=0)
    image = x_train[num].reshape([28,28])
    plt.title('Example: %d  Label: %d' % (num, label))
    plt.imshow(image, cmap=plt.get_cmap('gray_r'))
    plt.show()
def display_mult_flat(start, stop):
    images = x_train[start].reshape([1,784])
    for i in range(start+1,stop):
        images = np.concatenate((images, x_train[i].reshape([1,784])))
    plt.imshow(images, cmap=plt.get_cmap('gray_r'))
    plt.show()
x_train, y_train = train_size(55000)
display_digit(np.random.randint(0, x_train.shape[0]))
display_mult_flat(0,400)
让我们看一下前面代码的输出:
[外链图片转存失败,源站可能有防盗链机制,建议将图片保存下来直接上传(img-AoOLSLqe-1681565141624)(https://gitcode.net/apachecn/apachecn-dl-zh/-/raw/master/docs/tf-1x-dl-cookbook/img/46324985-e137-4450-a6dd-61604fb54b9b.png)]
MNIST 手写数字的示例
- 设置学习参数
batch_size和display_step。 另外,假设 MNIST 图像共享28 x 28像素,请设置n_input = 784,表示输出数字[0-9]的输出n_classes = 10,且丢弃概率= 0.85:
# Parameters
learning_rate = 0.001
training_iters = 500
batch_size = 128
display_step = 10
# Network Parameters
n_input = 784
# MNIST data input (img shape: 28*28)
n_classes = 10
# MNIST total classes (0-9 digits)
dropout = 0.85
# Dropout, probability to keep units
- 设置 TensorFlow 计算图输入。 让我们定义两个占位符以存储预测和真实标签:
x = tf.placeholder(tf.float32, [None, n_input])
y = tf.placeholder(tf.float32, [None, n_classes])
keep_prob = tf.placeholder(tf.float32)
- 使用输入
x,权重W,偏差b和给定的步幅定义卷积层。 激活函数为 ReLU,填充为SAME:
def conv2d(x, W, b, strides=1):
    x = tf.nn.conv2d(x, W, strides=[1, strides, strides, 1], padding='SAME')
    x = tf.nn.bias_add(x, b)
    return tf.nn.relu(x)
- 使用输入
x,ksize和SAME填充定义一个最大池化层:
def maxpool2d(x, k=2):
    return tf.nn.max_pool(x, ksize=[1, k, k, 1], strides=[1, k, k, 1], padding='SAME')
- 用两个卷积层定义一个卷积网络,然后是一个完全连接的层,一个退出层和一个最终输出层:
def conv_net(x, weights, biases, dropout):
    # reshape the input picture
    x = tf.reshape(x, shape=[-1, 28, 28, 1])
    # First convolution layer
    conv1 = conv2d(x, weights['wc1'], biases['bc1'])
    # Max Pooling used for downsampling
    conv1 = maxpool2d(conv1, k=2)
    # Second convolution layer
    conv2 = conv2d(conv1, weights['wc2'], biases['bc2'])
    # Max Pooling used for downsampling
    conv2 = maxpool2d(conv2, k=2)
    # Reshape conv2 output to match the input of fully connected layer
    fc1 = tf.reshape(conv2, [-1, weights['wd1'].get_shape().as_list()[0]])
    # Fully connected layer
    fc1 = tf.add(tf.matmul(fc1, weights['wd1']), biases['bd1'])
    fc1 = tf.nn.relu(fc1)
    # Dropout
    fc1 = tf.nn.dropout(fc1, dropout)
    # Output the class prediction
    out = tf.add(tf.matmul(fc1, weights['out']), biases['out'])
    return out
- 定义层权重和偏差。 第一转换层具有
5 x 5卷积,1 个输入和 32 个输出。 第二个卷积层具有5 x 5卷积,32 个输入和 64 个输出。 全连接层具有7 x 7 x 64输入和 1,024 输出,而第二层具有 1,024 输入和 10 输出,对应于最终数字类别。 所有权重和偏差均使用randon_normal分布进行初始化:
weights = {
    # 5x5 conv, 1 input, and 32 outputs
    'wc1': tf.Variable(tf.random_normal([5, 5, 1, 32])),
    # 5x5 conv, 32 inputs, and 64 outputs
    'wc2': tf.Variable(tf.random_normal([5, 5, 32, 64])),
    # fully connected, 7*7*64 inputs, and 1024 outputs
    'wd1': tf.Variable(tf.random_normal([7*7*64, 1024])),
    # 1024 inputs, 10 outputs for class digits
    'out': tf.Variable(tf.random_normal([1024, n_classes]))
}
biases = {
    'bc1': tf.Variable(tf.random_normal([32])),
    'bc2': tf.Variable(tf.random_normal([64])),
    'bd1': tf.Variable(tf.random_normal([1024])),
    'out': tf.Variable(tf.random_normal([n_classes]))
}
- 使用给定的权重和偏差构建卷积网络。 基于
cross_entropy和logits定义loss函数,并使用 Adam 优化器来最小化成本。 优化后,计算精度:
pred = conv_net(x, weights, biases, keep_prob)
cost = tf.reduce_mean(tf.nn.softmax_cross_entropy_with_logits(logits=pred, labels=y))
optimizer = tf.train.AdamOptimizer(learning_rate=learning_rate).minimize(cost)
correct_prediction = tf.equal(tf.argmax(pred, 1), tf.argmax(y, 1))
accuracy = tf.reduce_mean(tf.cast(correct_prediction, tf.float32))
init = tf.global_variables_initializer()
- 启动图并迭代
training_iterats次,每次在输入中输入batch_size来运行优化器。 请注意,我们使用mnist.train数据进行训练,该数据与minst分开。 每个display_step都会计算出当前的部分精度。 最后,在 2,048 张测试图像上计算精度,没有丢弃。
train_loss = []
train_acc = []
test_acc = []
with tf.Session() as sess:
    sess.run(init)
    step = 1
    while step <= training_iters:
        batch_x, batch_y = mnist.train.next_batch(batch_size)
        sess.run(optimizer, feed_dict={x: batch_x, y: batch_y,
                                       keep_prob: dropout})
        if step % display_step == 0:
            loss_train, acc_train = sess.run([cost, accuracy],
                                             feed_dict={x: batch_x,
                                                        y: batch_y,
                                                        keep_prob: 1.})
            print "Iter " + str(step) + ", Minibatch Loss= " + \
                  "{:.2f}".format(loss_train) + ", Training Accuracy= " + \
                  "{:.2f}".format(acc_train)
            # Calculate accuracy for 2048 mnist test images.
            # Note that in this case no dropout
            acc_test = sess.run(accuracy,
                                feed_dict={x: mnist.test.images,
                                      y: mnist.test.labels,
                                      keep_prob: 1.})
            print "Testing Accuracy:" + \
               "{:.2f}".format(acc_train)
            train_loss.append(loss_train)
            train_acc.append(acc_train)
            test_acc.append(acc_test)
        step += 1
- 绘制每次迭代的 Softmax 损失以及训练和测试精度:
eval_indices = range(0, training_iters, display_step)
# Plot loss over time
plt.plot(eval_indices, train_loss, 'k-')
plt.title('Softmax Loss per iteration')
plt.xlabel('Iteration')
plt.ylabel('Softmax Loss')
plt.show()
# Plot train and test accuracy
plt.plot(eval_indices, train_acc, 'k-', label='Train Set Accuracy')
plt.plot(eval_indices, test_acc, 'r--', label='Test Set Accuracy')
plt.title('Train and Test Accuracy')
plt.xlabel('Generation')
plt.ylabel('Accuracy')
plt.legend(loc='lower right')
plt.show()
以下是前面代码的输出。 我们首先看一下每次迭代的 Softmax:
损失减少的一个例子
接下来我们看一下训练和文本的准确率:
训练和测试准确率提高的示例
工作原理
使用卷积网络,我们将 MNIST 数据集的表现提高了近 95%。 我们的卷积网络由两层组成,分别是卷积,ReLU 和最大池化,然后是两个完全连接的带有丢弃的层。 训练以 Adam 为优化器,以 128 的大小批量进行,学习率为 0.001,最大迭代次数为 500。
创建一个卷积网络对 CIFAR-10 进行分类
在本秘籍中,您将学习如何对从 CIFAR-10 拍摄的图像进行分类。 CIFAR-10 数据集由 10 类 60,000 张32 x 32彩色图像组成,每类 6,000 张图像。 有 50,000 张训练图像和 10,000 张测试图像。 下图取自这里:
CIFAR 图像示例
准备
在本秘籍中,我们使用tflearn-一个更高级别的框架-抽象了一些 TensorFlow 内部结构,使我们可以专注于深度网络的定义。 TFLearn 可从这里获得,该代码是标准发行版的一部分。
操作步骤
我们按以下步骤进行:
- 为卷积网络,
dropout,fully_connected和max_pool导入一些utils和核心层。 此外,导入一些对图像处理和图像增强有用的模块。 请注意,TFLearn 为卷积网络提供了一些已经定义的更高层,这使我们可以专注于代码的定义:
from __future__ import division, print_function, absolute_import
import tflearn
from tflearn.data_utils import shuffle, to_categorical
from tflearn.layers.core import input_data, dropout, fully_connected
from tflearn.layers.conv import conv_2d, max_pool_2d
from tflearn.layers.estimator import regression
from tflearn.data_preprocessing import ImagePreprocessing
from tflearn.data_augmentation import ImageAugmentation
- 加载 CIFAR-10 数据,并将其分为
X列数据,Y列标签,用于测试的X_test和用于测试标签的Y_test。 随机排列X和Y可能会很有用,以避免取决于特定的数据配置。 最后一步是对X和Y进行一次热编码:
# Data loading and preprocessing
from tflearn.datasets import cifar10
(X, Y), (X_test, Y_test) = cifar10.load_data()
X, Y = shuffle(X, Y)
Y = to_categorical(Y, 10)
Y_test = to_categorical(Y_test, 10)
- 将
ImagePreprocessing()用于零中心(在整个数据集上计算平均值)和 STD 归一化(在整个数据集上计算 std)。 TFLearn 数据流旨在通过在 GPU 执行模型训练时在 CPU 上预处理数据来加快训练速度。
# Real-time data preprocessing
img_prep = ImagePreprocessing()
img_prep.add_featurewise_zero_center()
img_prep.add_featurewise_stdnorm()
- 通过左右随机执行以及随机旋转来增强数据集。 此步骤是一个简单的技巧,用于增加可用于训练的数据:
# Real-time data augmentation
img_aug = ImageAugmentation()
img_aug.add_random_flip_leftright()
img_aug.add_random_rotation(max_angle=25.)
- 使用先前定义的图像准备和扩充来创建卷积网络。 网络由三个卷积层组成。 第一个使用 32 个卷积滤波器,滤波器的大小为 3,激活函数为 ReLU。 之后,有一个
max_pool层用于缩小尺寸。 然后有两个级联的卷积滤波器与 64 个卷积滤波器,滤波器的大小为 3,激活函数为 ReLU。 之后,有一个用于缩小规模的max_pool,一个具有 512 个神经元且具有激活函数 ReLU 的全连接网络,其次是丢弃的可能性为 50%。 最后一层是具有 10 个神经元和激活函数softmax的完全连接的网络,用于确定手写数字的类别。 请注意,已知这种特定类型的卷积网络对于 CIFAR-10 非常有效。 在这种特殊情况下,我们将 Adam 优化器与categorical_crossentropy和学习率0.001结合使用:
# Convolutional network building
network = input_data(shape=[None, 32, 32, 3],
                     data_preprocessing=img_prep,
                     data_augmentation=img_aug)
network = conv_2d(network, 32, 3, activation='relu')
network = max_pool_2d(network, 2)
network = conv_2d(network, 64, 3, activation='relu')
network = conv_2d(network, 64, 3, activation='relu')
network = max_pool_2d(network, 2)
network = fully_connected(network, 512, activation='relu')
network = dropout(network, 0.5)
network = fully_connected(network, 10, activation='softmax')
network = regression(network, optimizer='adam',
                     loss='categorical_crossentropy',
                     learning_rate=0.001)
- 实例化卷积网络并使用
batch_size=96将训练运行 50 个周期:
# Train using classifier
model = tflearn.DNN(network, tensorboard_verbose=0)
model.fit(X, Y, n_epoch=50, shuffle=True, validation_set=(X_test, Y_test),
          show_metric=True, batch_size=96, run_id='cifar10_cnn')
工作原理
TFLearn 隐藏了 TensorFlow 公开的许多实现细节,并且在许多情况下,它使我们可以专注于具有更高抽象级别的卷积网络的定义。 我们的管道在 50 次迭代中达到了 88% 的精度。 下图是 Jupyter 笔记本中执行的快照:
Jupyter 执行 CIFAR10 分类的示例
更多
要安装 TFLearn,请参阅《安装指南》,如果您想查看更多示例,可以在线获取一长串久经考验的解决方案。
使用 VGG19 迁移风格用于图像重绘
在本秘籍中,您将教计算机如何绘画。 关键思想是拥有绘画模型图像,神经网络可以从该图像推断绘画风格。 然后,此风格将迁移到另一张图片,并相应地重新粉刷。 该秘籍是对log0开发的代码的修改,可以在线获取。
准备
我们将实现在论文《一种艺术风格的神经算法》中描述的算法,作者是 Leon A. Gatys,亚历山大 S. Ecker 和 Matthias Bethge。 因此,最好先阅读该论文。 此秘籍将重复使用在线提供的预训练模型 VGG19,该模型应在本地下载。 我们的风格图片将是一幅可在线获得的梵高著名画作,而我们的内容图片则是从维基百科下载的玛丽莲梦露的照片。 内容图像将根据梵高的风格重新绘制。
操作步骤
让我们从秘籍开始:
- 导入一些模块,例如
numpy,scipy,tensorflow和matplotlib。 然后导入PIL来处理图像。 请注意,由于此代码在 Jupyter 笔记本上运行,您可以从网上下载该片段,因此添加了片段%matplotlib inline:
import os
import sys
import numpy as np
import scipy.io
import scipy.misc
import tensorflow as tf
import matplotlib.pyplot as plt
from matplotlib.pyplot
import imshow
from PIL
import Image %matplotlib inline from __future__
import division
- 然后,设置用于学习风格的图像的输入路径,并根据风格设置要重绘的内容图像的输入路径:
OUTPUT_DIR = 'output/'
# Style image
STYLE_IMAGE = 'data/StarryNight.jpg'
# Content image to be repainted
CONTENT_IMAGE = 'data/Marilyn_Monroe_in_1952.jpg'
- 然后,我们设置图像生成过程中使用的噪声比,以及在重画内容图像时要强调的内容损失和风格损失。 除此之外,我们存储通向预训练的 VGG 模型的路径和在 VGG 预训练期间计算的平均值。 这个平均值是已知的,可以从 VGG 模型的输入中减去:
# how much noise is in the image
NOISE_RATIO = 0.6
# How much emphasis on content loss.
BETA = 5
# How much emphasis on style loss.
ALPHA = 100
# the VGG 19-layer pre-trained model
VGG_MODEL = 'data/imagenet-vgg-verydeep-19.mat'
# The mean used when the VGG was trained
# It is subtracted from the input to the VGG model. MEAN_VALUES = np.array([123.68, 116.779, 103.939]).reshape((1,1,1,3))
- 显示内容图像只是为了了解它的样子:
content_image = scipy.misc.imread(CONTENT_IMAGE) imshow(content_image)
这是前面代码的输出(请注意,此图像位于这个页面中):
- 调整风格图像的大小并显示它只是为了了解它的状态。 请注意,内容图像和风格图像现在具有相同的大小和相同数量的颜色通道:
style_image = scipy.misc.imread(STYLE_IMAGE)
# Get shape of target and make the style image the same
target_shape = content_image.shape
print "target_shape=", target_shape
print "style_shape=", style_image.shape
#ratio = target_shape[1] / style_image.shape[1]
#print "resize ratio=", ratio
style_image = scipy.misc.imresize(style_image, target_shape)
scipy.misc.imsave(STYLE_IMAGE, style_image)
imshow(style_image)
这是前面代码的输出:
文森特·梵高画作的一个例子
- 下一步是按照原始论文中的描述定义 VGG 模型。 请注意,深度学习网络相当复杂,因为它结合了具有 ReLU 激活函数和最大池的多个卷积网络层。 另外需要注意的是,在原始论文《风格迁移》(Leon A. Gatys,Alexander S. Ecker 和 Matthias Bethge 撰写的《一种艺术风格的神经算法》)中,许多实验表明,平均合并实际上优于最大池化。 因此,我们将改用平均池:
def load_vgg_model(path, image_height, image_width, color_channels):
   """
   Returns the VGG model as defined in the paper
       0 is conv1_1 (3, 3, 3, 64)
       1 is relu
       2 is conv1_2 (3, 3, 64, 64)
       3 is relu
       4 is maxpool
       5 is conv2_1 (3, 3, 64, 128)
       6 is relu
       7 is conv2_2 (3, 3, 128, 128)
       8 is relu
       9 is maxpool
       10 is conv3_1 (3, 3, 128, 256)
       11 is relu
       12 is conv3_2 (3, 3, 256, 256)
       13 is relu
       14 is conv3_3 (3, 3, 256, 256)
       15 is relu
       16 is conv3_4 (3, 3, 256, 256)
       17 is relu
       18 is maxpool
       19 is conv4_1 (3, 3, 256, 512)
       20 is relu
       21 is conv4_2 (3, 3, 512, 512)
       22 is relu
       23 is conv4_3 (3, 3, 512, 512)
       24 is relu
       25 is conv4_4 (3, 3, 512, 512)
       26 is relu
       27 is maxpool
       28 is conv5_1 (3, 3, 512, 512)
       29 is relu
       30 is conv5_2 (3, 3, 512, 512)
       31 is relu
       32 is conv5_3 (3, 3, 512, 512)
       33 is relu
       34 is conv5_4 (3, 3, 512, 512)
       35 is relu
       36 is maxpool
       37 is fullyconnected (7, 7, 512, 4096)       38 is relu
       39 is fullyconnected (1, 1, 4096, 4096)
       40 is relu
       41 is fullyconnected (1, 1, 4096, 1000)
       42 is softmax
   """
   vgg = scipy.io.loadmat(path)
   vgg_layers = vgg['layers']

   def _weights(layer, expected_layer_name):
       """       Return the weights and bias from the VGG model for a given layer.
"""
       W = vgg_layers[0][layer][0][0][0][0][0]
       b = vgg_layers[0][layer][0][0][0][0][1]
       layer_name = vgg_layers[0][layer][0][0][-2]
       assert layer_name == expected_layer_name
       return W, b

   def _relu(conv2d_layer):
       """
       Return the RELU function wrapped over a TensorFlow layer. Expects a
       Conv2d layer input.
       """
       return tf.nn.relu(conv2d_layer)

   def _conv2d(prev_layer, layer, layer_name):
       """
       Return the Conv2D layer using the weights, biases from the VGG
       model at 'layer'.
       """
       W, b = _weights(layer, layer_name)
       W = tf.constant(W)
       b = tf.constant(np.reshape(b, (b.size)))
       return tf.nn.conv2d(
           prev_layer, filter=W, strides=[1, 1, 1, 1], padding='SAME') + b

   def _conv2d_relu(prev_layer, layer, layer_name):
       """
       Return the Conv2D + RELU layer using the weights, biases from the VGG
       model at 'layer'.
       """
       return _relu(_conv2d(prev_layer, layer, layer_name))

   def _avgpool(prev_layer):
       """
       Return the AveragePooling layer.
       """
       return tf.nn.avg_pool(prev_layer, ksize=[1, 2, 2, 1], strides=[1, 2, 2, 1], padding='SAME')

   # Constructs the graph model.
   graph = {}
   graph['input']   = tf.Variable(np.zeros((1,
                                            image_height, image_width, color_channels)),
                                  dtype = 'float32')
   graph['conv1_1']  = _conv2d_relu(graph['input'], 0, 'conv1_1')
   graph['conv1_2']  = _conv2d_relu(graph['conv1_1'], 2, 'conv1_2')
   graph['avgpool1'] = _avgpool(graph['conv1_2'])
   graph['conv2_1']  = _conv2d_relu(graph['avgpool1'], 5, 'conv2_1')
   graph['conv2_2']  = _conv2d_relu(graph['conv2_1'], 7, 'conv2_2')
   graph['avgpool2'] = _avgpool(graph['conv2_2'])
   graph['conv3_1']  = _conv2d_relu(graph['avgpool2'], 10, 'conv3_1')
   graph['conv3_2']  = _conv2d_relu(graph['conv3_1'], 12, 'conv3_2')
   graph['conv3_3']  = _conv2d_relu(graph['conv3_2'], 14, 'conv3_3')
   graph['conv3_4']  = _conv2d_relu(graph['conv3_3'], 16, 'conv3_4')
   graph['avgpool3'] = _avgpool(graph['conv3_4'])
   graph['conv4_1']  = _conv2d_relu(graph['avgpool3'], 19, 'conv4_1')
   graph['conv4_2']  = _conv2d_relu(graph['conv4_1'], 21, 'conv4_2')
   graph['conv4_3']  = _conv2d_relu(graph['conv4_2'], 23, 'conv4_3')
   graph['conv4_4']  = _conv2d_relu(graph['conv4_3'], 25, 'conv4_4')
   graph['avgpool4'] = _avgpool(graph['conv4_4'])
   graph['conv5_1']  = _conv2d_relu(graph['avgpool4'], 28, 'conv5_1')
   graph['conv5_2']  = _conv2d_relu(graph['conv5_1'], 30, 'conv5_2')
   graph['conv5_3']  = _conv2d_relu(graph['conv5_2'], 32, 'conv5_3')
   graph['conv5_4']  = _conv2d_relu(graph['conv5_3'], 34, 'conv5_4')
   graph['avgpool5'] = _avgpool(graph['conv5_4'])
   return graph
- 定义内容
loss函数,如原始论文中所述:
def content_loss_func(sess, model):
""" Content loss function as defined in the paper. """

def _content_loss(p, x):
# N is the number of filters (at layer l).
N = p.shape[3]
# M is the height times the width of the feature map (at layer l).
M = p.shape[1] * p.shape[2] return (1 / (4 * N * M)) * tf.reduce_sum(tf.pow(x - p, 2))
return _content_loss(sess.run(model['conv4_2']), model['conv4_2'])
- 定义我们要重用的 VGG 层。 如果我们希望具有更柔和的特征,则需要增加较高层的权重(
conv5_1)和降低较低层的权重(conv1_1)。 如果我们想拥有更难的特征,我们需要做相反的事情:
STYLE_LAYERS = [
('conv1_1', 0.5),
('conv2_1', 1.0),
('conv3_1', 1.5),
('conv4_1', 3.0),
('conv5_1', 4.0),
]
- 定义风格损失函数,如原始论文中所述:
def style_loss_func(sess, model):
   """
   Style loss function as defined in the paper.
   """

   def _gram_matrix(F, N, M):
    """
       The gram matrix G.
       """
       Ft = tf.reshape(F, (M, N))
       return tf.matmul(tf.transpose(Ft), Ft)

   def _style_loss(a, x):
       """
       The style loss calculation.
       """
       # N is the number of filters (at layer l).
       N = a.shape[3]
       # M is the height times the width of the feature map (at layer l).
       M = a.shape[1] * a.shape[2]
       # A is the style representation of the original image (at layer l).
       A = _gram_matrix(a, N, M)
       # G is the style representation of the generated image (at layer l).
       G = _gram_matrix(x, N, M)
       result = (1 / (4 * N**2 * M**2)) * tf.reduce_sum(tf.pow(G - A, 2))
       return result
       E = [_style_loss(sess.run(model[layer_name]), model[layer_name])
           for layer_name, _ in STYLE_LAYERS]
       W = [w for _, w in STYLE_LAYERS]
       loss = sum([W[l] * E[l] for l in range(len(STYLE_LAYERS))])
   return loss
- 定义一个函数以生成噪声图像,并将其与内容图像按给定比例混合。 定义两种辅助方法来预处理和保存图像:
def generate_noise_image(content_image, noise_ratio = NOISE_RATIO):
 """   Returns a noise image intermixed with the content image at a certain ratio.
"""
   noise_image = np.random.uniform(
           -20, 20,
           (1,
            content_image[0].shape[0],
            content_image[0].shape[1],
            content_image[0].shape[2])).astype('float32')
   # White noise image from the content representation. Take a weighted average
   # of the values
   input_image = noise_image * noise_ratio + content_image * (1 - noise_ratio)
   return input_image

def process_image(image):
   # Resize the image for convnet input, there is no change but just
   # add an extra dimension.
   image = np.reshape(image, ((1,) + image.shape))
   # Input to the VGG model expects the mean to be subtracted.
   image = image - MEAN_VALUES
   return image

def save_image(path, image):
   # Output should add back the mean.
   image = image + MEAN_VALUES
   # Get rid of the first useless dimension, what remains is the image.
   image = image[0]
   image = np.clip(image, 0, 255).astype('uint8')
   scipy.misc.imsave(path, image)
- 开始一个 TensorFlow 交互式会话:
sess = tf.InteractiveSession()
- 加载处理后的内容图像并显示:
content_image = load_image(CONTENT_IMAGE) imshow(content_image[0])
我们得到以下代码的输出(请注意,我们使用了来自这里的图像):
- 加载处理后的风格图像并显示它:
style_image = load_image(STYLE_IMAGE) imshow(style_image[0])
内容如下:
- 加载
model并显示:
model = load_vgg_model(VGG_MODEL, style_image[0].shape[0], style_image[0].shape[1], style_image[0].shape[2]) print(model)
- 生成用于启动重新绘制的随机噪声图像:
input_image = generate_noise_image(content_image) imshow(input_image[0])
- 运行 TensorFlow 会话:
sess.run(tf.initialize_all_variables())
- 用相应的图像构造
content_loss和sytle_loss:
# Construct content_loss using content_image. sess.run(model['input'].assign(content_image))
content_loss = content_loss_func(sess, model)
# Construct style_loss using style_image. sess.run(model['input'].assign(style_image))
style_loss = style_loss_func(sess, model)
- 将
total_loss构造为content_loss和sytle_loss的加权组合:
# Construct total_loss as weighted combination of content_loss and sytle_loss
total_loss = BETA * content_loss + ALPHA * style_loss
- 建立一个优化器以最大程度地减少总损失。 在这种情况下,我们采用 Adam 优化器:
# The content is built from one layer, while the style is from five
# layers. Then we minimize the total_loss
optimizer = tf.train.AdamOptimizer(2.0)
train_step = optimizer.minimize(total_loss)
- 使用输入图像启动网络:
sess.run(tf.initialize_all_variables()) sess.run(model['input'].assign(input_image))
- 对模型运行固定的迭代次数,并生成中间的重绘图像:
sess.run(tf.initialize_all_variables())
sess.run(model['input'].assign(input_image))
print "started iteration"
for it in range(ITERATIONS):
   sess.run(train_step)
   print it , " "
   if it%100 == 0:
       # Print every 100 iteration.
       mixed_image = sess.run(model['input'])
       print('Iteration %d' % (it))
       print('sum : ',
sess.run(tf.reduce_sum(mixed_image)))
       print('cost: ', sess.run(total_loss))
       if not os.path.exists(OUTPUT_DIR):
           os.mkdir(OUTPUT_DIR)
       filename = 'output/%d.png' % (it)
       save_image(filename, mixed_image)
- 在此图像中,我们显示了在 200、400 和 600 次迭代后如何重新绘制内容图像:
![]()
风格迁移的例子
工作原理
在本秘籍中,我们已经看到了如何使用风格转换来重绘内容图像。 风格图像已作为神经网络的输入提供,该网络学习了定义画家采用的风格的关键方面。 这些方面已用于将风格迁移到内容图像。
更多
自 2015 年提出原始建议以来,风格转换一直是活跃的研究领域。已经提出了许多新想法来加速计算并将风格转换扩展到视频分析。 其中有两个结果值得一提
这篇文章是 Logan Engstrom 的快速风格转换,介绍了一种非常快速的实现,该实现也可以与视频一起使用。
通过 deepart 网站,您可以播放自己的图像,并以自己喜欢的艺术家的风格重新绘制图片。 还提供了 Android 应用,iPhone 应用和 Web 应用。
将预训练的 VGG16 网络用于迁移学习
在本秘籍中,我们将讨论迁移学习,这是一种非常强大的深度学习技术,在不同领域中都有许多应用。 直觉非常简单,可以用类推来解释。 假设您想学习一种新的语言,例如西班牙语,那么从另一种语言(例如英语)已经知道的内容开始可能会很有用。
按照这种思路,计算机视觉研究人员现在通常使用经过预训练的 CNN 来生成新颖任务的表示形式,其中数据集可能不足以从头训练整个 CNN。 另一个常见的策略是采用经过预先训练的 ImageNet 网络,然后将整个网络微调到新颖的任务。 此处提出的示例的灵感来自 Francois Chollet 在 Keras 的著名博客文章。
准备
想法是使用在大型数据集(如 ImageNet)上预训练的 VGG16 网络。 请注意,训练在计算上可能会相当昂贵,因此可以重用已经预先训练的网络:
A VGG16 Network
那么,如何使用 VGG16? Keras 使该库变得容易,因为该库具有可作为库使用的标准 VGG16 应用,并且自动下载了预先计算的权重。 请注意,我们明确省略了最后一层,并用我们的自定义层替换了它,这将在预构建的 VGG16 的顶部进行微调。 在此示例中,您将学习如何对 Kaggle 提供的猫狗图像进行分类。
操作步骤
我们按以下步骤进行:
- 从 Kaggle(https://www.kaggle.com/c/dogs-vs-cats/data)下载猫狗数据,并创建一个包含两个子目录的数据目录,
train和validation,每个子目录都有两个附加子目录, 狗和猫。 - 导入 Keras 模块,这些模块将在以后的计算中使用,并保存一些有用的常量:
from keras import applications
from keras.preprocessing.image import ImageDataGenerator
from keras import optimizers
from keras.models import Sequential, Model
from keras.layers import Dropout, Flatten, Dense
from keras import optimizers
img_width, img_height = 256, 256
batch_size = 16
epochs = 50
train_data_dir = 'data/dogs_and_cats/train'
validation_data_dir = 'data/dogs_and_cats/validation'
#OUT CATEGORIES
OUT_CATEGORIES=1
#number of train, validation samples
nb_train_samples = 2000
nb_validation_samples =
- 将预训练的图像加载到 ImageNet VGG16 网络上,并省略最后一层,因为我们将在预构建的 VGG16 的顶部添加自定义分类网络并替换最后的分类层:
# load the VGG16 model pretrained on imagenet
base_model = applications.VGG16(weights = "imagenet", include_top=False, input_shape = (img_width, img_height, 3))
base_model.summary()
这是前面代码的输出:
- 冻结一定数量的较低层用于预训练的 VGG16 网络。 在这种情况下,我们决定冻结最初的 15 层:
# Freeze the 15 lower layers for layer in base_model.layers[:15]: layer.trainable = False
- 添加一组自定义的顶层用于分类:
# Add custom to layers # build a classifier model to put on top of the convolutional model top_model = Sequential() top_model.add(Flatten(input_shape=base_model.output_shape[1:]))
top_model.add(Dense(256, activation='relu')) top_model.add(Dropout(0.5)) top_model.add(Dense(OUT_CATEGORIES, activation='sigmoid'))
- 定制网络应单独进行预训练,在这里,为简单起见,我们省略了这一部分,将这一任务留给了读者:
#top_model.load_weights(top_model_weights_path)
- 创建一个新网络,该网络与预训练的 VGG16 网络和我们的预训练的自定义网络并置:
# creating the final model, a composition of
# pre-trained and
model = Model(inputs=base_model.input, outputs=top_model(base_model.output))
# compile the model
model.compile(loss = "binary_crossentropy", optimizer = optimizers.SGD(lr=0.0001, momentum=0.9), metrics=["accuracy"])
- 重新训练并列的新模型,仍将 VGG16 的最低 15 层冻结。 在这个特定的例子中,我们还使用图像增幅器来增加训练集:
# Initiate the train and test generators with data Augumentation
train_datagen = ImageDataGenerator(
rescale = 1./255,
horizontal_flip = True)
test_datagen = ImageDataGenerator(rescale=1\. / 255)
train_generator = train_datagen.flow_from_directory(
   train_data_dir,
   target_size=(img_height, img_width),
   batch_size=batch_size,
   class_mode='binary')
validation_generator = test_datagen.flow_from_directory(
   validation_data_dir,
   target_size=(img_height, img_width),
   batch_size=batch_size,
   class_mode='binary', shuffle=False)
model.fit_generator(
   train_generator,
   steps_per_epoch=nb_train_samples // batch_size,
   epochs=epochs,
   validation_data=validation_generator,
   validation_steps=nb_validation_samples // batch_size,
   verbose=2, workers=12)
- 在并置的网络上评估结果:
score = model.evaluate_generator(validation_generator, nb_validation_samples/batch_size)
scores = model.predict_generator(validation_generator, nb_validation_samples/batch_size)
工作原理
标准的 VGG16 网络已经在整个 ImageNet 上进行了预训练,并具有从互联网下载的预先计算的权重。 然后,将该网络与也已单独训练的自定义网络并置。 然后,并列的网络作为一个整体进行了重新训练,使 VGG16 的 15 个较低层保持冻结。
这种组合非常有效。 通过对网络在 ImageNet 上学到的知识进行迁移学习,将其应用于我们的新特定领域,从而执行微调分类任务,它可以节省大量的计算能力,并重复使用已为 VGG16 执行的工作。
更多
根据特定的分类任务,需要考虑一些经验法则:
- 如果新数据集很小并且类似于 ImageNet 数据集,那么我们可以冻结所有 VGG16 网络并仅重新训练自定义网络。 通过这种方式,我们还将并置网络的过拟合风险降至最低:
#冻结base_model.layers中所有较低的层:layer.trainable = False
- 如果新数据集很大且类似于 ImageNet 数据集,则我们可以重新训练整个并列的网络。 我们仍然将预先计算的权重作为起点,并进行一些迭代以进行微调:
#取消冻结model.layers中所有较低层的层:layer.trainable = True
- 如果新数据集与 ImageNet 数据集非常不同,则在实践中,使用预训练模型中的权重进行初始化可能仍然很好。 在这种情况下,我们将有足够的数据和信心来调整整个网络。 可以在这里在线找到更多信息。
创建 DeepDream 网络
Google 于 2014 年训练了神经网络以应对 ImageNet 大规模视觉识别挑战(ILSVRC),并于 2015 年 7 月将其开源。“深入了解卷积”中介绍了原始算法。 网络学会了每个图像的表示。 较低的层学习诸如线条和边缘之类的底层特征,而较高的层则学习诸如眼睛,鼻子,嘴等更复杂的图案。 因此,如果尝试在网络中代表更高的级别,我们将看到从原始 ImageNet 提取的各种不同特征的混合,例如鸟的眼睛和狗的嘴巴。 考虑到这一点,如果我们拍摄一张新图像并尝试使与网络上层的相似性最大化,那么结果就是一张新的有远见的图像。 在这个有远见的图像中,较高层学习的某些模式在原始图像中被梦到(例如,想象中)。 这是此类有远见的图像的示例:
如以下所示的 Google DeepDreams 示例
准备
从网上下载预训练的 Inception 模型。
操作步骤
我们按以下步骤进行操作:
- 导入
numpy进行数值计算,导入functools定义已填充一个或多个参数的部分函数,导入 Pillow 进行图像处理,并导入matplotlib呈现图像:
import numpy as np from functools
import partial import PIL.Image
import tensorflow as tf
import matplotlib.pyplot as plt
- 设置内容图像和预训练模型的路径。 从只是随机噪声的种子图像开始:
content_image = 'data/gulli.jpg'
# start with a gray image with a little noise
img_noise = np.random.uniform(size=(224,224,3)) + 100.0
model_fn = 'data/tensorflow_inception_graph.pb'
- 在图表中加载从互联网下载的 Inception 网络。 初始化 TensorFlow 会话,使用
FastGFile(..)加载图,然后使用ParseFromstring(..)解析图。 之后,使用placeholder(..)方法创建一个输入作为占位符。imagenet_mean是一个预先计算的常数,将从我们的内容图像中删除以标准化数据。 实际上,这是在训练过程中观察到的平均值,归一化可以更快地收敛。 该值将从输入中减去,并存储在t_preprocessed变量中,该变量然后用于加载图定义:
# load the graph
graph = tf.Graph()
sess = tf.InteractiveSession(graph=graph)
with tf.gfile.FastGFile(model_fn, 'rb') as f:
       graph_def = tf.GraphDef()
       graph_def.ParseFromString(f.read())
t_input = tf.placeholder(np.float32, name='input') # define
the input tensor
imagenet_mean = 117.0
t_preprocessed = tf.expand_dims(t_input-imagenet_mean, 0)
tf.import_graph_def(graph_def, {'input':t_preprocessed})
- 定义一些
util函数以可视化图像并将 TF-graph 生成函数转换为常规 Python 函数(请参见以下示例以调整大小):
# helper
#pylint: disable=unused-variable
def showarray(a):
   a = np.uint8(np.clip(a, 0, 1)*255)
   plt.imshow(a)
   plt.show()
def visstd(a, s=0.1):
   '''Normalize the image range for visualization'''
   return (a-a.mean())/max(a.std(), 1e-4)*s + 0.5

def T(layer):
   '''Helper for getting layer output tensor'''
   return graph.get_tensor_by_name("import/%s:0"%layer)

def tffunc(*argtypes):
   '''Helper that transforms TF-graph generating function into a regular one.
   See "resize" function below.
   '''
   placeholders = list(map(tf.placeholder, argtypes))
   def wrap(f):
       out = f(*placeholders)
       def wrapper(*args, **kw):
           return out.eval(dict(zip(placeholders, args)), session=kw.get('session'))
       return wrapper
   return wrap

def resize(img, size):
   img = tf.expand_dims(img, 0)
   return tf.image.resize_bilinear(img, size)[0,:,:,:]
resize = tffunc(np.float32, np.int32)(resize)
- 计算图像上的梯度上升。 为了提高效率,请应用分块计算,其中在不同分块上计算单独的梯度上升。 将随机移位应用于图像,以在多次迭代中模糊图块边界:
def calc_grad_tiled(img, t_grad, tile_size=512):
   '''Compute the value of tensor t_grad over the image in a tiled way.
   Random shifts are applied to the image to blur tile boundaries over
   multiple iterations.'''
   sz = tile_size
   h, w = img.shape[:2]
   sx, sy = np.random.randint(sz, size=2)
   img_shift = np.roll(np.roll(img, sx, 1), sy, 0)
   grad = np.zeros_like(img)
   for y in range(0, max(h-sz//2, sz),sz):
       for x in range(0, max(w-sz//2, sz),sz):
           sub = img_shift[y:y+sz,x:x+sz]
           g = sess.run(t_grad, {t_input:sub})
           grad[y:y+sz,x:x+sz] = g

   return np.roll(np.roll(grad, -sx, 1), -sy, 0)
- 定义优化对象以减少输入层的均值。
gradient函数允许我们通过考虑输入张量来计算优化张量的符号梯度。 为了提高效率,将图像分成多个八度,然后调整大小并添加到八度数组中。 然后,对于每个八度,我们使用calc_grad_tiled函数:
def render_deepdream(t_obj, img0=img_noise,
                        iter_n=10, step=1.5, octave_n=4, octave_scale=1.4):
   t_score = tf.reduce_mean(t_obj) # defining the optimization objective
 t_grad = tf.gradients(t_score, t_input)[0] # behold the power of automatic differentiation!

   # split the image into a number of octaves
   img = img0
   octaves = []
   for _ in range(octave_n-1):
       hw = img.shape[:2]
       lo = resize(img,
np.int32(np.float32(hw)/octave_scale))
       hi = img-resize(lo, hw)
       img = lo
       octaves.append(hi)
# generate details octave by octave
   for octave in range(octave_n):
       if octave>0:
           hi = octaves[-octave]
           img = resize(img, hi.shape[:2])+hi
       for _ in range(iter_n):
           g = calc_grad_tiled(img, t_grad)
           img += g*(step / (np.abs(g).mean()+1e-7))

           #this will usually be like 3 or 4 octaves
           #Step 5 output deep dream image via matplotlib
       showarray(https://gitcode.net/apachecn/apachecn-dl-zh/-/raw/master/docs/tf-1x-dl-cookbook/img/255.0)
- 加载特定的内容图像并开始做梦。 在此示例中,作者的面孔已转变为类似于狼的事物:
DeepDream 转换的示例。 其中一位作家变成了狼
工作原理
神经网络存储训练图像的抽象:较低的层存储诸如线条和边缘之类的特征,而较高的层则存储诸如眼睛,面部和鼻子之类的更复杂的图像特征。 通过应用梯度上升过程,我们最大化了loss函数,并有助于发现类似于高层存储的图案的内容图像。 这导致了网络看到虚幻图像的梦想。
更多
许多网站都允许您直接玩 DeepDream。 我特别喜欢DeepArt.io,它允许您上传内容图像和风格图像并在云上进行学习。
另见
在 2015 年发布初步结果之后,还发布了许多有关 DeepDream 的新论文和博客文章:
DeepDream: A code example to visualize Neural Networks--https://research.googleblog.com/2015/07/deepdream-code-example-for-visualizing.html

When Robots Hallucinate, LaFrance, Adrienne--https://www.theatlantic.com/technology/archive/2015/09/robots-hallucinate-dream/403498/
此外,了解如何可视化预训练网络的每一层并更好地了解网络如何记忆较低层的基本特征以及较高层的较复杂特征可能会很有趣。 在线提供有关此主题的有趣博客文章:
- 卷积神经网络如何看待世界
五、高级卷积神经网络
在本章中,我们将讨论如何将卷积神经网络(CNN)用于除图像以外的领域中的深度学习。 我们的注意力将首先集中在文本分析和自然语言处理(NLP)上。 在本章中,我们将介绍一些用于以下方面的方法:
- 创建卷积网络进行情感分析
- 检查 VGG 预建网络学习了哪些过滤器
- 使用 VGGNet,ResNet,Inception 和 Xception 对图像进行分类
- 复用预先构建的深度学习模型来提取特征
- 用于迁移学习的非常深的 Inception-v3 网络
- 使用膨胀的 ConvNets,WaveNet 和 NSynth 生成音乐
- 回答有关图像的问题(可视化问答)
- 使用预训练网络通过六种不同方式来分类视频
介绍
在上一章中,我们了解了如何将 ConvNets 应用于图像。 在本章中,我们将类似的思想应用于文本。
文本和图像有什么共同点? 乍一看,很少。 但是,如果我们将句子或文档表示为矩阵,则此矩阵与每个单元都是像素的图像矩阵没有区别。 因此,下一个问题是,我们如何将文本表示为矩阵? 好吧,这很简单:矩阵的每一行都是一个向量,代表文本的基本单位。 当然,现在我们需要定义什么是基本单位。 一个简单的选择就是说基本单位是一个字符。 另一个选择是说基本单位是一个单词,另一个选择是将相似的单词聚合在一起,然后用代表符号表示每个聚合(有时称为簇或嵌入)。
请注意,无论我们的基本单位采用哪种具体选择,我们都需要从基本单位到整数 ID 的 1:1 映射,以便可以将文本视为矩阵。 例如,如果我们有一个包含 10 行文本的文档,并且每行都是 100 维嵌入,那么我们将用10 x 100的矩阵表示文本。 在这个非常特殊的图像中,如果该句子x包含位置y表示的嵌入,则打开像素。 您可能还会注意到,文本实际上不是矩阵,而是向量,因为位于文本相邻行中的两个单词几乎没有共同点。 确实,与图像的主要区别在于,相邻列中的两个像素最有可能具有某种相关性。
现在您可能会想:我知道您将文本表示为向量,但是这样做会使我们失去单词的位置,而这个位置应该很重要,不是吗?
好吧,事实证明,在许多实际应用中,知道一个句子是否包含特定的基本单位(一个字符,一个单词或一个合计)是非常准确的信息,即使我们不记住句子中的确切位置也是如此。 基本单元位于。
创建用于情感分析的卷积网络
在本秘籍中,我们将使用 TFLearn 创建基于 CNN 的情感分析深度学习网络。 如上一节所述,我们的 CNN 将是一维的。 我们将使用 IMDb 数据集,用于训练的 45,000 个高度受欢迎的电影评论和用于测试的 5,000 个集合。
准备
TFLearn 具有用于自动从网络下载数据集并促进卷积网络创建的库,因此让我们直接看一下代码。
操作步骤
我们按以下步骤进行:
- 导入 TensorFlow
tflearn和构建网络所需的模块。 然后,导入 IMDb 库并执行一键编码和填充:
import tensorflow as tf
import tflearn
from tflearn.layers.core import input_data, dropout, fully_connected
from tflearn.layers.conv import conv_1d, global_max_pool
from tflearn.layers.merge_ops import merge
from tflearn.layers.estimator import regression
from tflearn.data_utils import to_categorical, pad_sequences
from tflearn.datasets import imdb
- 加载数据集,将句子填充到最大长度为 0 的位置,并对标签执行两个编码,分别对应于真值和假值的两个值。 注意,参数
n_words是要保留在词汇表中的单词数。 所有多余的单词都设置为未知。 另外,请注意trainX和trainY是稀疏向量,因为每个评论很可能包含整个单词集的子集:
# IMDb Dataset loading
train, test, _ = imdb.load_data(path='imdb.pkl', n_words=10000,
valid_portion=0.1)
trainX, trainY = train
testX, testY = test
#pad the sequence
trainX = pad_sequences(trainX, maxlen=100, value=0.)
testX = pad_sequences(testX, maxlen=100, value=0.)
#one-hot encoding
trainY = to_categorical(trainY, nb_classes=2)
testY = to_categorical(testY, nb_classes=2)
- 打印一些维度以检查刚刚处理的数据并了解问题的维度是什么:
print ("size trainX", trainX.size)
print ("size testX", testX.size)
print ("size testY:", testY.size)
print ("size trainY", trainY.size)
size trainX 2250000
 size testX 250000
 size testY: 5000
 site trainY 45000
- 为数据集中包含的文本构建嵌入。 就目前而言,将此步骤视为一个黑盒子,该黑盒子接受这些单词并将它们映射到聚合(群集)中,以便相似的单词可能出现在同一群集中。 请注意,先前步骤的词汇是离散且稀疏的。 通过嵌入,我们将创建一个映射,该映射会将每个单词嵌入到连续的密集向量空间中。 使用此向量空间表示将为我们提供词汇表的连续,分布式表示。 当我们谈论 RNN 时,将详细讨论如何构建嵌入:
# Build an embedding
network = input_data(shape=[None, 100], name='input')
network = tflearn.embedding(network, input_dim=10000, output_dim=128)
- 建立一个合适的
convnet。 我们有三个卷积层。 由于我们正在处理文本,因此我们将使用一维卷积网络,并且各层将并行运行。 每层采用大小为 128 的张量(嵌入的输出),并应用有效填充,激活函数 ReLU 和 L2regularizer的多个滤波器(分别为 3、4、5)。 然后,将每个层的输出与合并操作连接在一起。 此后,添加一个最大池层,然后以 50% 的概率进行删除。 最后一层是具有 softmax 激活的完全连接层:
#Build the convnet
branch1 = conv_1d(network, 128, 3, padding='valid', activation='relu', regularizer="L2")
branch2 = conv_1d(network, 128, 4, padding='valid', activation='relu', regularizer="L2")
branch3 = conv_1d(network, 128, 5, padding='valid', activation='relu', regularizer="L2")
network = merge([branch1, branch2, branch3], mode='concat', axis=1)
network = tf.expand_dims(network, 2)
network = global_max_pool(network)
network = dropout(network, 0.5)
network = fully_connected(network, 2, activation='softmax')
- 学习阶段意味着使用
categorical_crossentropy作为损失函数的 Adam 优化器:
network = regression(network, optimizer='adam', learning_rate=0.001,
loss='categorical_crossentropy', name='target')
- 然后,我们使用
batch_size = 32运行训练,并观察训练和验证集达到的准确率。 如您所见,在预测电影评论所表达的情感方面,我们能够获得 79% 的准确率:
# Training
model = tflearn.DNN(network, tensorboard_verbose=0)
model.fit(trainX, trainY, n_epoch = 5, shuffle=True, validation_set=(testX, testY), show_metric=True, batch_size=32)
Training Step: 3519 | total loss: 0.09738 | time: 85.043s
 | Adam | epoch: 005 | loss: 0.09738 - acc: 0.9747 -- iter: 22496/22500
 Training Step: 3520 | total loss: 0.09733 | time: 86.652s
 | Adam | epoch: 005 | loss: 0.09733 - acc: 0.9741 | val_loss: 0.58740 - val_acc: 0.7944 -- iter: 22500/22500
 --
工作原理
用于句子分类的卷积神经网络,Yoon Kim,EMNLP 2014。 请注意,由于筛选器窗口对连续单词进行操作,因此本文提出的模型保留了一些有关位置的信息。 从论文中提取的以下图像以图形方式表示了网络之外的主要直觉。 最初,文本被表示为基于标准嵌入的向量,从而为我们提供了一维密集空间中的紧凑表示。 然后,使用多个标准一维卷积层处理矩阵。
请注意,模型使用多个过滤器(窗口大小不同)来获取多个特征。 之后,进行最大池操作,其思想是捕获最重要的特征-每个特征图的最大值。 为了进行正则化,该文章建议在倒数第二层上采用对权重向量的 L2 范数有约束的丢弃项。 最后一层将输出情感为正或负。
为了更好地理解该模型,有以下几点观察:
- 过滤器通常在连续空间上卷积。 对于图像,此空间是像素矩阵表示形式,在高度和宽度上在空间上是连续的。 对于文本而言,连续空间无非是连续单词自然产生的连续尺寸。 如果仅使用单次编码表示的单词,则空间稀疏;如果使用嵌入,则由于聚集了相似的单词,因此生成的空间密集。
- 图像通常具有三个通道(RGB),而文本自然只有一个通道,因为我们无需表示颜色。
更多
论文《用于句子分类的卷积神经网络》(Yoon Kim,EMNLP 2014)进行了广泛的实验。 尽管对超参数的调整很少,但具有一层卷积的简单 CNN 在句子分类方面的表现却非常出色。 该论文表明,采用一组静态嵌入(将在我们谈论 RNN 时进行讨论),并在其之上构建一个非常简单的卷积网络,实际上可以显着提高情感分析的表现:
如图所示的模型架构示例
使用 CNN 进行文本分析是一个活跃的研究领域。 我建议看看以下文章:
- 《从头开始理解文本》(张翔,Yann LeCun)。 本文演示了我们可以使用 CNN 将深度学习应用于从字符级输入到抽象文本概念的文本理解。 作者将 CNN 应用于各种大规模数据集,包括本体分类,情感分析和文本分类,并表明它们可以在不了解单词,词组,句子或任何其他句法或语义结构的情况下实现惊人的表现。 一种人类的语言。 这些模型适用于英文和中文。
检查 VGG 预建网络了解了哪些过滤器
在本秘籍中,我们将使用 keras-vis,这是一个外部 Keras 包,用于直观检查预建的 VGG16 网络从中学到了什么不同的过滤器。 这个想法是选择一个特定的 ImageNet 类别,并了解 VGG16 网络如何学会代表它。
准备
第一步是选择用于在 ImageNet 上训练 VGG16 的特定类别。 假设我们采用类别 20,它对应于下图中显示的美国北斗星鸟:
美国北斗星的一个例子
可以在网上找到 ImageNet 映射作为 python 泡菜字典,其中 ImageNet 1000 类 ID 映射到了人类可读的标签。
操作步骤
我们按以下步骤进行:
- 导入 matplotlib 和 keras-vis 使用的模块。 此外,还导入预构建的 VGG16 模块。 Keras 使处理此预建网络变得容易:
from matplotlib import pyplot as plt
from vis.utils import utils
from vis.utils.vggnet import VGG16
from vis.visualization import visualize_class_activation
- 通过使用 Keras 中包含的并经过 ImageNet 权重训练的预构建层来访问 VGG16 网络:
# Build the VGG16 network with ImageNet weights
model = VGG16(weights='imagenet', include_top=True)
model.summary()
print('Model loaded.')
- 这就是 VGG16 网络在内部的外观。 我们有许多卷积网络,与 2D 最大池化交替使用。 然后,我们有一个展开层,然后是三个密集层。 最后一个称为预测,并且这一层应该能够检测到高级特征,例如人脸或我们的鸟类形状。 请注意,顶层已明确包含在我们的网络中,因为我们想可视化它学到的知识:
_________________________________________________________________
 Layer (type) Output Shape Param #
 =================================================================
 input_2 (InputLayer) (None, 224, 224, 3) 0
 _________________________________________________________________
 block1_conv1 (Conv2D) (None, 224, 224, 64) 1792
 _________________________________________________________________
 block1_conv2 (Conv2D) (None, 224, 224, 64) 36928
 _________________________________________________________________
 block1_pool (MaxPooling2D) (None, 112, 112, 64) 0
 _________________________________________________________________
 block2_conv1 (Conv2D) (None, 112, 112, 128) 73856
 _________________________________________________________________
 block2_conv2 (Conv2D) (None, 112, 112, 128) 147584
 _________________________________________________________________
 block2_pool (MaxPooling2D) (None, 56, 56, 128) 0
 _________________________________________________________________
 block3_conv1 (Conv2D) (None, 56, 56, 256) 295168
 _________________________________________________________________
 block3_conv2 (Conv2D) (None, 56, 56, 256) 590080
 _________________________________________________________________
 block3_conv3 (Conv2D) (None, 56, 56, 256) 590080
 _________________________________________________________________
 block3_pool (MaxPooling2D) (None, 28, 28, 256) 0
 _________________________________________________________________
 block4_conv1 (Conv2D) (None, 28, 28, 512) 1180160
 _________________________________________________________________
 block4_conv2 (Conv2D) (None, 28, 28, 512) 2359808
 _________________________________________________________________
 block4_conv3 (Conv2D) (None, 28, 28, 512) 2359808
 _________________________________________________________________
 block4_pool (MaxPooling2D) (None, 14, 14, 512) 0
 _________________________________________________________________
 block5_conv1 (Conv2D) (None, 14, 14, 512) 2359808
 _________________________________________________________________
 block5_conv2 (Conv2D) (None, 14, 14, 512) 2359808
 _________________________________________________________________
 block5_conv3 (Conv2D) (None, 14, 14, 512) 2359808
 _________________________________________________________________
 block5_pool (MaxPooling2D) (None, 7, 7, 512) 0
 _________________________________________________________________
 flatten (Flatten) (None, 25088) 0
 _________________________________________________________________
 fc1 (Dense) (None, 4096) 102764544
 _________________________________________________________________
 fc2 (Dense) (None, 4096) 16781312
 _________________________________________________________________
 predictions (Dense) (None, 1000) 4097000
 =================================================================
 Total params: 138,357,544
 Trainable params: 138,357,544
 Non-trainable params: 0
 _________________________________________________________________
 Model loaded.
从外观上看,网络可以如下图所示:
VGG16 网络
- 现在,让我们着重于通过关注 American Dipper(ID 20)来检查最后一个预测层的内部外观:
layer_name = 'predictions'
layer_idx = [idx for idx, layer in enumerate(model.layers) if layer.name == layer_name][0]
# Generate three different images of the same output index.
vis_images = []
for idx in [20, 20, 20]:
img = visualize_class_activation(model, layer_idx, filter_indices=idx, max_iter=500)
img = utils.draw_text(img, str(idx))
vis_images.append(img)
- 让我们在给定特征的情况下显示特定层的生成图像,并观察网络如何在内部看到美国北斗星鸟的概念:
因此,这就是神经网络在内部代表鸟类的方式。 这是一种令人毛骨悚然的形象,但我发誓没有为网络本身提供任何特定种类的人造药物! 这正是这种特殊的人工网络自然学到的东西。
- 您是否仍然想了解更多? 好吧,让我们选择一个较早的层,并代表网络如何在内部看到相同的
American Dipper训练类别:
layer_name = 'block3_conv1'
layer_idx = [idx for idx, layer in enumerate(model.layers) if layer.name == layer_name][0]
vis_images = []
for idx in [20, 20, 20]:
img = visualize_class_activation(model, layer_idx, filter_indices=idx, max_iter=500)
img = utils.draw_text(img, str(idx))
vis_images.append(img)
stitched = utils.stitch_images(vis_images)
plt.axis('off')
plt.imshow(stitched)
plt.title(layer_name)
plt.show()
以下是上述代码的输出:
不出所料,该特定层正在学习非常基本的特征,例如曲线。 但是,卷积网络的真正力量在于,随着我们对模型的深入研究,网络会推断出越来越复杂的特征。
工作原理
密集层的 keras-vis 可视化的关键思想是生成一个输入图像,该图像最大化与鸟类类相对应的最终密集层输出。 因此,实际上该模块的作用是解决问题。 给定具有权重的特定训练密集层,将生成一个新的合成图像,它最适合该层本身。
每个转换滤波器都使用类似的想法。 在这种情况下,请注意,由于卷积网络层在原始像素上运行,因此可以通过简单地可视化其权重来解释它。 后续的卷积过滤器对先前的卷积过滤器的输出进行操作,因此直接可视化它们不一定很有解释性。 但是,如果我们独立地考虑每一层,我们可以专注于仅生成可最大化滤波器输出的合成输入图像。
更多
GitHub 上的 keras-vis 存储库提供了一组很好的可视化示例,这些示例说明了如何内部检查网络,包括最近的显着性映射,其目的是在图像经常包含其他元素(例如草)时检测图像的哪个部分对特定类别(例如老虎)的训练贡献最大。 种子文章是《深度卷积网络:可视化图像分类模型和显着性图》(Karen Simonyan,Andrea Vedaldi,Andrew Zisserman),并在下面报告了从 Git 存储库中提取的示例,在该示例中,网络可以自行了解定义为老虎的图像中最突出的部分是:
显着性映射的示例
将 VGGNet,ResNet,Inception 和 Xception 用于图像分类
图像分类是典型的深度学习应用。 由于 ImageNet 图像数据库,该任务的兴趣有了最初的增长。 它按照 WordNet 层次结构(目前仅是名词)来组织,其中每个节点都由成百上千的图像描绘。 更准确地说,ImageNet 旨在将图像标记和分类为将近 22,000 个单独的对象类别。 在深度学习的背景下,ImageNet 通常指的是 ImageNet 大规模视觉识别挑战,或简称 ILSVRC 中包含的工作。在这种情况下,目标是训练一个模型,该模型可以将输入图像分类为 1,000 个单独的对象类别。 在此秘籍中,我们将使用超过 120 万个训练图像,50,000 个验证图像和 100,000 个测试图像的预训练模型。
VGG16 和 VGG19
在《用于大型图像识别的超深度卷积网络》(Karen Simonyan,Andrew Zisserman,2014 年)中,引入了 VGG16 和 VGG19。 该网络使用3×3卷积层堆叠并与最大池交替,两个 4096 个全连接层,然后是 softmax 分类器。 16 和 19 代表网络中权重层的数量(列 D 和 E):
一个非常深的网络配置示例
在 2015 年,拥有 16 或 19 层就足以考虑网络的深度,而今天(2017 年)我们达到了数百层。 请注意,VGG 网络的训练速度非常慢,并且由于末端的深度和完全连接的层数,它们需要较大的权重空间。
ResNet
ResNet 已在《用于图像识别的深度残差学习》(何开明,张向宇,任少青,孙健,2015)中引入。 该网络非常深,可以使用称为残差模块的标准网络组件使用标准的随机下降梯度进行训练,然后使用该网络组件组成更复杂的网络(该网络在网络中称为子网络)。
与 VGG 相比,ResNet 更深,但是模型的大小更小,因为使用了全局平均池化操作而不是全密层。
Inception
在《重新思考计算机视觉的初始架构》(Christian Szegedy,Vincent Vanhoucke,Sergey Ioffe,Jonathon Shlens,Zbigniew Wojna,2015 年)中引入了 Inception 。关键思想是在同一模块中具有多种大小的卷积作为特征提取并计算1×1、3×3和5×5卷积。 这些滤波器的输出然后沿着通道尺寸堆叠,并发送到网络的下一层。 下图对此进行了描述:
在“重新思考计算机视觉的 Inception 架构”中描述了 Inception-v3,而在《Inception-v4,Inception-ResNet 和残余连接对学习的影响》(Szegedy,Sergey Ioffe,Vincent Vanhoucke,Alex Alemi,2016 年)中描述了 Inception-v4。
Xception
Xception 是 Inception 的扩展,在《Xception:具有深度可分离卷积的深度学习》(FrançoisChollet,2016 年)中引入。 Xception 使用一种称为深度可分离卷积运算的新概念,该概念使其在包含 3.5 亿张图像和 17,000 个类别的大型图像分类数据集上的表现优于 Inception-v3。 由于 Xception 架构具有与 Inception-v3 相同数量的参数,因此表现的提高并不是由于容量的增加,而是由于模型参数的更有效使用。
准备
此秘籍使用 Keras,因为该框架已预先完成了上述模块的实现。 Keras 首次使用时会自动下载每个网络的权重,并将这些权重存储在本地磁盘上。 换句话说,您不需要重新训练网络,而是可以利用互联网上已经可用的训练。 在您希望将网络分类为 1000 个预定义类别的假设下,这是正确的。 在下一个秘籍中,我们将了解如何从这 1,000 个类别开始,并通过称为迁移学习的过程将它们扩展到自定义集合。
操作步骤
我们按以下步骤进行:
- 导入处理和显示图像所需的预建模型和其他模块:
from keras.applications import ResNet50
from keras.applications import InceptionV3
from keras.applications import Xception # TensorFlow ONLY
from keras.applications import VGG16
from keras.applications import VGG19
from keras.applications import imagenet_utils
from keras.applications.inception_v3 import preprocess_input
from keras.preprocessing.image import img_to_array
from keras.preprocessing.image import load_img
import numpy as np
import matplotlib.pyplot as plt
from matplotlib.pyplot import imshow
from PIL import Image
%matplotlib inline
- 定义用于记忆用于训练网络的图像大小的映射。 这些是每个模型的众所周知的常数:
MODELS = {
"vgg16": (VGG16, (224, 224)),
"vgg19": (VGG19, (224, 224)),
"inception": (InceptionV3, (299, 299)),
"xception": (Xception, (299, 299)), # TensorFlow ONLY
"resnet": (ResNet50, (224, 224))
}
- 定义用于加载和转换每个图像的辅助函数。 注意,预训练网络已在张量上训练,该张量的形状还包括
batch_size的附加维度。 因此,我们需要将此尺寸添加到图像中以实现兼容性:
def image_load_and_convert(image_path, model):
pil_im = Image.open(image_path, 'r')
imshow(np.asarray(pil_im))
# initialize the input image shape
# and the pre-processing function (this might need to be changed
inputShape = MODELS[model][1]
preprocess = imagenet_utils.preprocess_input
image = load_img(image_path, target_size=inputShape)
image = img_to_array(image)
# the original networks have been trained on an additional
# dimension taking into account the batch size
# we need to add this dimension for consistency
# even if we have one image only
image = np.expand_dims(image, axis=0)
image = preprocess(image)
return image
- 定义用于对图像进行分类的辅助函数,并在预测上循环,并显示 5 级预测以及概率:
def classify_image(image_path, model):
img = image_load_and_convert(image_path, model)
Network = MODELS[model][0]
model = Network(weights="imagenet")
preds = model.predict(img)
P = imagenet_utils.decode_predictions(preds)
# loop over the predictions and display the rank-5 predictions
# along with probabilities
for (i, (imagenetID, label, prob)) in enumerate(P[0]):
print("{}. {}: {:.2f}%".format(i + 1, label, prob * 100))
5.然后开始测试不同类型的预训练网络:
classify_image("images/parrot.jpg", "vgg16")
接下来,您将看到具有相应概率的预测列表:
1.金刚鹦鹉:99.92%
2.美洲豹:0.03%
3.澳洲鹦鹉:0.02%
4.蜂食者:0.02%
5.巨嘴鸟:0.00%
金刚鹦鹉的一个例子
classify_image("images/parrot.jpg", "vgg19")
1.金刚鹦鹉:99.77%
2.鹦鹉:0.07%
3.巨嘴鸟:0.06%
4.犀鸟:0.05%
5.贾卡马尔:0.01%
classify_image("images/parrot.jpg", "resnet")
1.金刚鹦鹉:97.93%
2.孔雀:0.86%
3.鹦鹉:0.23%
4. j:0.12%
5.杰伊:0.12%
classify_image("images/parrot_cropped1.jpg", "resnet")
1.金刚鹦鹉:99.98%
2.鹦鹉:0.00%
3.孔雀:0.00%
4.硫凤头鹦鹉:0.00%
5.巨嘴鸟:0.00%
classify_image("images/incredible-hulk-180.jpg", "resnet")
1. comic_book:99.76%
2. book_jacket:0.19%
3.拼图游戏:0.05%
4.菜单:0.00%
5.数据包:0.00%
如中所示的漫画分类示例
classify_image("images/cropped_panda.jpg", "resnet")
大熊猫:99.04%
2.英迪尔:0.59%
3.小熊猫:0.17%
4.长臂猿:0.07%
5. titi:0.05%
classify_image("images/space-shuttle1.jpg", "resnet")
1.航天飞机:92.38%
2.三角恐龙:7.15%
3.战机:0.11%
4.牛仔帽:0.10%
5.草帽:0.04%
classify_image("images/space-shuttle2.jpg", "resnet")
1.航天飞机:99.96%
2.导弹:0.03%
3.弹丸:0.00%
4.蒸汽机车:0.00%
5.战机:0.00%
classify_image("images/space-shuttle3.jpg", "resnet")
1.航天飞机:93.21%
2.导弹:5.53%
3.弹丸:1.26%
4.清真寺:0.00%
5.信标:0.00%
classify_image("images/space-shuttle4.jpg", "resnet")
1.航天飞机:49.61%
2.城堡:8.17%
3.起重机:6.46%
4.导弹:4.62%
5.航空母舰:4.24%
请注意,可能会出现一些错误。 例如:
classify_image("images/parrot.jpg", "inception")
1.秒表:100.00%
2.貂皮:0.00%
3.锤子:0.00%
4.黑松鸡:0.00%
5.网站:0.00%
classify_image("images/parrot.jpg", "xception")
1.背包:56.69%
2.军装:29.79%
3.围兜:8.02%
4.钱包:2.14%
5.乒乓球:1.52%
- 定义一个辅助函数,用于显示每个预构建和预训练网络的内部架构:
def print_model(model):
print ("Model:",model)
Network = MODELS[model][0]
model = Network(weights="imagenet")
model.summary()
print_model('vgg19')
('Model:', 'vgg19')
 _________________________________________________________________
 Layer (type) Output Shape Param #
 =================================================================
 input_14 (InputLayer) (None, 224, 224, 3) 0
 _________________________________________________________________
 block1_conv1 (Conv2D) (None, 224, 224, 64) 1792
 _________________________________________________________________
 block1_conv2 (Conv2D) (None, 224, 224, 64) 36928
 _________________________________________________________________
 block1_pool (MaxPooling2D) (None, 112, 112, 64) 0
 _________________________________________________________________
 block2_conv1 (Conv2D) (None, 112, 112, 128) 73856
 _________________________________________________________________
 block2_conv2 (Conv2D) (None, 112, 112, 128) 147584
 _________________________________________________________________
 block2_pool (MaxPooling2D) (None, 56, 56, 128) 0
 _________________________________________________________________
 block3_conv1 (Conv2D) (None, 56, 56, 256) 295168
 _________________________________________________________________
 block3_conv2 (Conv2D) (None, 56, 56, 256) 590080
 _________________________________________________________________
 block3_conv3 (Conv2D) (None, 56, 56, 256) 590080
 _________________________________________________________________
 block3_conv4 (Conv2D) (None, 56, 56, 256) 590080
 _________________________________________________________________
 block3_pool (MaxPooling2D) (None, 28, 28, 256) 0
 _________________________________________________________________
 block4_conv1 (Conv2D) (None, 28, 28, 512) 1180160
 _________________________________________________________________
 block4_conv2 (Conv2D) (None, 28, 28, 512) 2359808
 _________________________________________________________________
 block4_conv3 (Conv2D) (None, 28, 28, 512) 2359808
 _________________________________________________________________
 block4_conv4 (Conv2D) (None, 28, 28, 512) 2359808
 _________________________________________________________________
 block4_pool (MaxPooling2D) (None, 14, 14, 512) 0
 _________________________________________________________________
 block5_conv1 (Conv2D) (None, 14, 14, 512) 2359808
 _________________________________________________________________
 block5_conv2 (Conv2D) (None, 14, 14, 512) 2359808
 _________________________________________________________________
 block5_conv3 (Conv2D) (None, 14, 14, 512) 2359808
 _________________________________________________________________
 block5_conv4 (Conv2D) (None, 14, 14, 512) 2359808
 _________________________________________________________________
 block5_pool (MaxPooling2D) (None, 7, 7, 512) 0
 _________________________________________________________________
 flatten (Flatten) (None, 25088) 0
 _________________________________________________________________
 fc1 (Dense) (None, 4096) 102764544
 _________________________________________________________________
 fc2 (Dense) (None, 4096) 16781312
 _________________________________________________________________
 predictions (Dense) (None, 1000) 4097000
 =================================================================
 Total params: 143,667,240
 Trainable params: 143,667,240
 Non-trainable params: 0
工作原理
我们使用了 Keras 应用,预训练的 Keras 学习模型,该模型随预训练的权重一起提供。 这些模型可用于预测,特征提取和微调。 在这种情况下,我们将模型用于预测。 我们将在下一个秘籍中看到如何使用模型进行微调,以及如何在最初训练模型时最初不可用的数据集上构建自定义分类器。
更多
截至 2017 年 7 月,Inception-v4 尚未在 Keras 中直接提供,但可以作为单独的模块在线下载。 安装后,该模块将在首次使用时自动下载砝码。
AlexNet 是最早的堆叠式深层网络之一,它仅包含八层,前五层是卷积层,然后是全连接层。 该网络是在 2012 年提出的,明显优于第二名(前五名的错误率为 16%,而第二名的错误率为 26% )。
关于深度神经网络的最新研究主要集中在提高准确率上。 较小的 DNN 架构具有同等的准确率,至少具有三个优点:
- 较小的 CNN 在分布式训练期间需要较少的跨服务器通信。
- 较小的 CNN 需要较少的带宽才能将新模型从云导出到提供模型的位置。
- 较小的 CNN 在具有有限内存的 FPGA 和其他硬件上部署更可行。 为了提供所有这些优点,SqueezeNet 在论文 SqueezeNet: AlexNet-level accuracy with 50x fewer parameters and <0.5MB model size 中提出。 SqueezeNet 通过减少 50 倍的参数在 ImageNet 上达到 AlexNet 级别的准确率。 此外,借助模型压缩技术,我们可以将 SqueezeNet 压缩到小于 0.5 MB(比 AlexNet 小 510 倍)。 Keras 将 SqueezeNet 作为单独的模块在线实现。
复用预建的深度学习模型来提取特征
在本秘籍中,我们将看到如何使用深度学习来提取相关特征
准备
一个非常简单的想法是通常使用 VGG16 和 DCNN 进行特征提取。 该代码通过从特定层提取特征来实现该想法。
操作步骤
我们按以下步骤进行:
- 导入处理和显示图像所需的预建模型和其他模块:
from keras.applications.vgg16 import VGG16
from keras.models import Model
from keras.preprocessing import image
from keras.applications.vgg16 import preprocess_input
import numpy as np
- 从网络中选择一个特定的层,并获得作为输出生成的特征:
# pre-built and pre-trained deep learning VGG16 model
base_model = VGG16(weights='imagenet', include_top=True)
for i, layer in enumerate(base_model.layers):
print (i, layer.name, layer.output_shape)
# extract features from block4_pool block
model =
Model(input=base_model.input, output=base_model.get_layer('block4_pool').output)
- 提取给定图像的特征,如以下代码片段所示:
img_path = 'cat.jpg'
img = image.load_img(img_path, target_size=(224, 224))
x = image.img_to_array(img)
x = np.expand_dims(x, axis=0)
x = preprocess_input(x)
# get the features from this block
features = model.predict(x)
工作原理
现在,您可能想知道为什么我们要从 CNN 的中间层提取特征。 关键的直觉是:随着网络学会将图像分类,各层学会识别进行最终分类所必需的特征。
较低的层标识较低阶的特征(例如颜色和边缘),较高的层将这些较低阶的特征组合为较高阶的特征(例如形状或对象)。 因此,中间层具有从图像中提取重要特征的能力,并且这些特征更有可能有助于不同种类的分类。
这具有多个优点。 首先,我们可以依靠公开提供的大规模训练,并将这种学习迁移到新颖的领域。 其次,我们可以节省昂贵的大型训练时间。 第三,即使我们没有针对该领域的大量训练示例,我们也可以提供合理的解决方案。 对于手头的任务,我们也有一个很好的起始网络形状,而不是猜测它。
用于迁移学习的非常深的 InceptionV3 网络
迁移学习是一种非常强大的深度学习技术,在不同领域中有更多应用。 直觉非常简单,可以用类推来解释。 假设您想学习一种新的语言,例如西班牙语,那么从另一种语言(例如英语)已经知道的内容开始可能会很有用。
按照这种思路,计算机视觉研究人员现在通常使用经过预训练的 CNN 来生成新任务的表示形式,其中数据集可能不足以从头训练整个 CNN。 另一个常见的策略是采用经过预先训练的 ImageNet 网络,然后将整个网络微调到新颖的任务。
InceptionV3 Net 是 Google 开发的非常深入的卷积网络。 Keras 实现了整个网络,如下图所示,并且已在 ImageNet 上进行了预训练。 该模型的默认输入大小在三个通道上为299x299:
ImageNet v3 的示例
准备
此框架示例受到 Keras 网站上在线提供的方案的启发。 我们假设在与 ImageNet 不同的域中具有训练数据集 D。 D 在输入中具有 1,024 个特征,在输出中具有 200 个类别。
操作步骤
我们可以按照以下步骤进行操作:
- 导入处理所需的预建模型和其他模块:
from keras.applications.inception_v3 import InceptionV3
from keras.preprocessing import image
from keras.models import Model
from keras.layers import Dense, GlobalAveragePooling2D
from keras import backend as K
# create the base pre-trained model
base_model = InceptionV3(weights='imagenet', include_top=False)
- 我们使用训练有素的 Inception-v3,但我们不包括顶级模型,因为我们要在 D 上进行微调。顶层是具有 1,024 个输入的密集层,最后一个输出是具有 200 类输出的 softmax 密集层。
x = GlobalAveragePooling2D()(x)用于将输入转换为密集层要处理的正确形状。 实际上,base_model.output张量具有dim_ordering="th"的形状(样本,通道,行,列),dim_ordering="tf"具有(样本,行,列,通道),但是密集层需要GlobalAveragePooling2D计算(行,列)平均值,将它们转换为(样本,通道)。 因此,如果查看最后四层(在include_top=True中),则会看到以下形状:
# layer.name, layer.input_shape, layer.output_shape
('mixed10', [(None, 8, 8, 320), (None, 8, 8, 768), (None, 8, 8, 768), (None, 8, 8, 192)], (None, 8, 8, 2048))
('avg_pool', (None, 8, 8, 2048), (None, 1, 1, 2048))
('flatten', (None, 1, 1, 2048), (None, 2048))
('predictions', (None, 2048), (None, 1000))
- 当包含
_top=False时,将除去最后三层并暴露mixed_10层,因此GlobalAveragePooling2D层将(None, 8, 8, 2048)转换为(None, 2048),其中(None, 2048)张量中的每个元素都是(None, 8, 8, 2048)张量中每个对应的(8, 8)张量的平均值:
# add a global spatial average pooling layer
x = base_model.output
x = GlobalAveragePooling2D()(x)
# let's add a fully-connected layer as first layer
x = Dense(1024, activation='relu')(x)
# and a logistic layer with 200 classes as last layer
predictions = Dense(200, activation='softmax')(x)
# model to train
model = Model(input=base_model.input, output=predictions)
- 所有卷积级别都经过预训练,因此我们在训练完整模型时将其冻结。
# i.e. freeze all convolutional Inception-v3 layers
for layer in base_model.layers:
layer.trainable = False
- 然后,对模型进行编译和训练几个周期,以便对顶层进行训练:
# compile the model (should be done *after* setting layers to non-trainable)
model.compile(optimizer='rmsprop', loss='categorical_crossentropy')
# train the model on the new data for a few epochs
model.fit_generator(...)
- 然后我们冻结 Inception 中的顶层并微调 Inception 层。 在此示例中,我们冻结了前 172 层(要调整的超参数):
# we chose to train the top 2 inception blocks, i.e. we will freeze
# the first 172 layers and unfreeze the rest:
for layer in model.layers[:172]:
layer.trainable = False
for layer in model.layers[172:]:
layer.trainable = True
- 然后重新编译模型以进行微调优化。 我们需要重新编译模型,以使这些修改生效:
# we use SGD with a low learning rate
from keras.optimizers import SGD
model.compile(optimizer=SGD(lr=0.0001, momentum=0.9), loss='categorical_crossentropy')
# we train our model again (this time fine-tuning the top 2 inception blocks
# alongside the top Dense layers
model.fit_generator(...)
工作原理
现在,我们有了一个新的深度网络,该网络可以重用标准的 Inception-v3 网络,但可以通过迁移学习在新的域 D 上进行训练。 当然,有许多参数需要微调以获得良好的精度。 但是,我们现在正在通过迁移学习重新使用非常庞大的预训练网络作为起点。 这样,我们可以通过重复使用 Keras 中已经可用的内容来节省对机器进行训练的需求。
更多
截至 2017 年,“计算机视觉”问题意味着在图像中查找图案的问题可以视为已解决,并且此问题影响了我们的生活。 例如:
- 《皮肤科医师对具有深层神经网络的皮肤癌的分类》(Andre Esteva,Brett Kuprel,Roberto A. Novoa,Justin Ko,Susan M. Swetter,Helen M. Blau & Sebastian Thrun,2017 年)使用 129450 个临床图像的数据集训练 CNN,该图像由 2032 种不同疾病组成。 他们在 21 个经过董事会认证的皮肤科医生的活检验证的临床图像上对结果进行了测试,并使用了两个关键的二元分类用例:角质形成细胞癌与良性脂溢性角化病; 恶性黑色素瘤与良性痣。 CNN 在这两项任务上均达到了与所有测试过的专家相同的表现,展示了一种能够对皮肤癌进行分类的,具有与皮肤科医生相当的能力的人工智能。
- 论文《通过多视图深度卷积神经网络进行高分辨率乳腺癌筛查》(Krzysztof J. Geras,Stacey Wolfson,S。Gene Kim,Linda Moy,Kyunghyun Cho)承诺通过其创新的架构来改善乳腺癌的筛查过程,该架构可以处理四个标准视图或角度,而不会牺牲高分辨率。 与通常用于自然图像的 DCN 架构(其可处理
224 x 224像素的图像)相反,MV-DCN 也能够使用2600 x 2000像素的分辨率。
使用膨胀的卷积网络,WaveNet 和 NSynth 生成音乐
WaveNet 是用于生成原始音频波形的深度生成模型。 Google DeepMind 已引入了这一突破性技术,以教授如何与计算机通话。 结果确实令人印象深刻,在网上可以找到合成语音的示例,计算机可以在其中学习如何与名人的声音(例如 Matt Damon)交谈。
因此,您可能想知道为什么学习合成音频如此困难。 嗯,我们听到的每个数字声音都是基于每秒 16,000 个样本(有时是 48,000 个或更多),并且要建立一个预测模型,在此模型中,我们学会根据以前的所有样本来复制样本是一个非常困难的挑战。 尽管如此,仍有实验表明,WaveNet 改进了当前最先进的文本转语音(TTS)系统,使美国英语和中文普通话与人声的差异降低了 50%。
更酷的是,DeepMind 证明 WaveNet 也可以用于向计算机教授如何产生乐器声音(例如钢琴音乐)。
现在为一些定义。 TTS 系统通常分为两个不同的类别:
- 串联 TTS,其中单个语音语音片段首先被存储,然后在必须重现语音时重新组合。 但是,该方法无法扩展,因为可能只重现存储的语音片段,并且不可能重现新的扬声器或不同类型的音频而不从一开始就记住这些片段。
- 参数化 TTS,在其中创建一个模型来存储要合成的音频的所有特征。 在 WaveNet 之前,参数 TTS 生成的音频不如串联 TTS 生成的音频自然。 WaveNet 通过直接对音频声音的产生进行建模,而不是使用过去使用的中间信号处理算法,从而改善了现有技术。
原则上,WaveNet 可以看作是一维卷积层的栈(我们已经在第 4 章中看到了图像的 2D 卷积),步幅恒定为 1,没有池化层。 请注意,输入和输出在构造上具有相同的尺寸,因此卷积网络非常适合对顺序数据(例如音频)建模。 但是,已经显示出,为了在输出神经元中的接收场达到较大的大小,有必要使用大量的大型过滤器或过分增加网络的深度。 请记住,一层中神经元的接受场是前一层的横截面,神经元从该层提供输入。 因此,纯卷积网络在学习如何合成音频方面不是那么有效。
WaveNet 之外的主要直觉是所谓的因果因果卷积(有时称为原子卷积),这仅意味着在应用卷积层的滤波器时会跳过某些输入值。 Atrous 是法语表述为 à trous 的混蛋,意思是带有孔的。 因此,AtrousConvolution 是带孔的卷积。例如,在一个维度中,尺寸为 3 且扩张为 1 的滤波器w将计算出以下总和。
简而言之,在 D 扩散卷积中,步幅通常为 1,但是没有任何东西可以阻止您使用其他步幅。 下图给出了一个示例,其中膨胀(孔)尺寸增大了 0、1、2:
扩张网络的一个例子
由于采用了引入“空洞”的简单思想,可以在不具有过多深度网络的情况下,使用指数级增长的滤波器堆叠多个膨胀的卷积层,并学习远程输入依赖项。
因此,WaveNet 是一个卷积网络,其中卷积层具有各种膨胀因子,从而使接收场随深度呈指数增长,因此有效覆盖了数千个音频时间步长。
当我们训练时,输入是从人类扬声器录制的声音。 波形被量化为固定的整数范围。 WaveNet 定义了一个初始卷积层,仅访问当前和先前的输入。 然后,有一堆散布的卷积网络层,仍然仅访问当前和以前的输入。 最后,有一系列密集层结合了先前的结果,然后是用于分类输出的 softmax 激活函数。
在每个步骤中,都会从网络预测一个值,并将其反馈到输入中。 同时,为下一步计算新的预测。 损失函数是当前步骤的输出与下一步的输入之间的交叉熵。
NSynth是 Google Brain 集团最近发布的 WaveNet 的改进版本,其目的不是查看因果关系,而是查看输入块的整个上下文。 神经网络是真正的,复杂的,如下图所示,但是对于本介绍性讨论而言,足以了解该网络通过使用基于减少编码/解码过程中的错误的方法来学习如何再现其输入。 阶段:
如下所示的 NSynth 架构示例
准备
对于本秘籍,我们不会编写代码,而是向您展示如何使用一些在线可用的代码和一些不错的演示,您可以从 Google Brain 找到。 有兴趣的读者还可以阅读以下文章:《使用 WaveNet 自编码器的音符的神经音频合成》(杰西·恩格尔,辛琼·雷斯尼克,亚当·罗伯茨,桑德·迪勒曼,道格拉斯·埃克,卡伦·西蒙扬,穆罕默德·诺鲁兹,4 月 5 日 2017)。
操作步骤
我们按以下步骤进行:
- 通过创建单独的 conda 环境来安装 NSynth。 使用支持 Jupyter Notebook 的 Python 2.7 创建并激活 Magenta conda 环境:
conda create -n magenta python=2.7 jupyter
source activate magenta
- 安装
magentaPIP 包和librosa(用于读取音频格式):
pip install magenta
pip install librosa
- 从互联网安装预构建的模型,然后下载示例声音。 然后运行演示目录中包含的笔记本。 第一部分是关于包含稍后将在我们的计算中使用的模块的:
import os
import numpy as np
import matplotlib.pyplot as plt
from magenta.models.nsynth import utils
from magenta.models.nsynth.wavenet import fastgen
from IPython.display import Audio
%matplotlib inline
%config InlineBackend.figure_format = 'jpg'
- 然后,我们加载从互联网下载的演示声音,并将其放置在与笔记本计算机相同的目录中。 这将在约 2.5 秒内将 40,000 个样本加载到计算机中:
# from https://www.freesound.org/people/MustardPlug/sounds/395058/
fname = '395058__mustardplug__breakbeat-hiphop-a4-4bar-96bpm.wav'
sr = 16000
audio = utils.load_audio(fname, sample_length=40000, sr=sr)
sample_length = audio.shape[0]
print('{} samples, {} seconds'.format(sample_length, sample_length / float(sr)))
- 下一步是使用从互联网下载的预先训练的 NSynth 模型以非常紧凑的表示形式对音频样本进行编码。 每四秒钟音频将为我们提供
78 x 16尺寸的编码,然后我们可以对其进行解码或重新合成。 我们的编码是张量(#files=1 x 78 x 16):
%time encoding = fastgen.encode(audio, 'model.ckpt-200000', sample_length)
INFO:tensorflow:Restoring parameters from model.ckpt-200000
CPU times: user 1min 4s, sys: 2.96 s, total: 1min 7s
Wall time: 25.7 s
print(encoding.shape)
(1, 78, 16)
- 让我们保存以后将用于重新合成的编码。 另外,让我们用图形表示来快速查看编码形状是什么,并将其与原始音频信号进行比较。 如您所见,编码遵循原始音频信号中呈现的节拍:
np.save(fname + '.npy', encoding)
fig, axs = plt.subplots(2, 1, figsize=(10, 5))
axs[0].plot(audio);
axs[0].set_title('Audio Signal')
axs[1].plot(encoding[0]);
axs[1].set_title('NSynth Encoding')
我们观察到以下音频信号和 Nsynth 编码:
- 现在,让我们对刚刚产生的编码进行解码。 换句话说,我们试图从紧凑的表示中再现原始音频,目的是理解重新合成的声音是否类似于原始声音。 确实,如果您运行实验并聆听原始音频和重新合成的音频,它们听起来非常相似:
%time fastgen.synthesize(encoding, save_paths=['gen_' + fname], samples_per_save=sample_length)
工作原理
WaveNet 是一种卷积网络,其中卷积层具有各种扩张因子,从而使接收场随深度呈指数增长,因此有效覆盖了数千个音频时间步长。 NSynth 是 WaveNet 的演进,其中原始音频使用类似 WaveNet 的处理进行编码,以学习紧凑的表示形式。 然后,使用这种紧凑的表示来再现原始音频。
更多
一旦我们学习了如何通过膨胀卷积创建音频的紧凑表示形式,我们就可以玩这些学习并从中获得乐趣。 您会在互联网上找到非常酷的演示:
- 例如,您可以看到模型如何学习不同乐器的声音:
- 然后,您将看到如何将在一个上下文中学习的一个模型在另一个上下文中重新组合。 例如,通过更改说话者身份,我们可以使用 WaveNet 以不同的声音说同一件事。
- 另一个非常有趣的实验是学习乐器模型,然后以一种可以重新创建以前从未听说过的新乐器的方式对其进行重新混合。 这真的很酷,它为通往新的可能性开辟了道路,坐在我里面的前电台 DJ 无法抗拒超级兴奋。 例如,在此示例中,我们将西塔琴与电吉他结合在一起,这是一种很酷的新乐器。 不够兴奋? 那么,如何将弓弦低音与狗的吠声结合起来呢?玩得开心!:
回答有关图像的问题(可视化问答)
在本秘籍中,我们将学习如何回答有关特定图像内容的问题。 这是一种强大的 Visual Q&A,它结合了从预先训练的 VGG16 模型中提取的视觉特征和词聚类(嵌入)的组合。 然后将这两组异类特征组合成一个网络,其中最后一层由密集和缺失的交替序列组成。 此秘籍适用于 Keras 2.0+。
因此,本秘籍将教您如何:
- 从预先训练的 VGG16 网络中提取特征。
- 使用预构建的单词嵌入将单词映射到相邻相似单词的空间中。
- 使用 LSTM 层构建语言模型。 LSTM 将在第 6 章中讨论,现在我们将它们用作黑盒。
- 组合不同的异构输入特征以创建组合的特征空间。 对于此任务,我们将使用新的 Keras 2.0 函数式 API。
- 附加一些其他的密集和丢弃层,以创建多层感知机并增强我们的深度学习网络的功能。
为了简单起见,我们不会在 5 中重新训练组合网络,而是使用已经在线提供的预先训练的权重集。 有兴趣的读者可以在由 N 个图像,N 个问题和 N 个答案组成的自己的训练数据集上对网络进行再训练。 这是可选练习。 该网络的灵感来自《VQA:视觉问题解答》(Aishwarya Agrawal,Jiasen Lu,Stanislaw Antol,Margaret Mitchell,C.Lawrence Zitnick,Dhruv Batra,Devi Parikh,2015 年):
在视觉问题回答论文中看到的 Visual Q&A 示例
我们这种情况的唯一区别是,我们将图像层产生的特征与语言层产生的特征连接起来。
操作步骤
我们可以按照以下步骤进行操作:
- 加载秘籍所需的所有 Keras 模块。 其中包括用于词嵌入的 spaCy,用于图像特征提取的 VGG16 和用于语言建模的 LSTM。 其余的几个附加模块非常标准:
%matplotlib inline
import os, argparse
import numpy as np
import cv2 as cv2
import spacy as spacy
import matplotlib.pyplot as plt
from keras.models import Model, Input
from keras.layers.core import Dense, Dropout, Reshape
from keras.layers.recurrent import LSTM
from keras.layers.merge import concatenate
from keras.applications.vgg16 import VGG16
from keras.preprocessing import image
from keras.applications.vgg16 import preprocess_input
from sklearn.externals import joblib
import PIL.Image
- 定义一些常量。 请注意,我们假设我们的问题语料库具有
max_length_questions = 30,并且我们知道我们将使用 VGG16 提取 4,096 个描述输入图像的特征。 另外,我们知道单词嵌入在length_feature_space = 300的空间中。 请注意,我们将使用从互联网下载的一组预训练权重:
# mapping id -> labels for categories
label_encoder_file_name =
'/Users/gulli/Books/TF/code/git/tensorflowBook/Chapter5/FULL_labelencoder_trainval.pkl'
# max length across corpus
max_length_questions = 30
# VGG output
length_vgg_features = 4096
# Embedding outout
length_feature_space = 300
# pre-trained weights
VQA_weights_file =
'/Users/gulli/Books/TF/code/git/tensorflowBook/Chapter5/VQA_MODEL_WEIGHTS.hdf5'
3.使用 VGG16 提取特征。 请注意,我们从 fc2 层中明确提取了它们。 给定输入图像,此函数返回 4,096 个特征:
'''image features'''
def get_image_features(img_path, VGG16modelFull):
'''given an image returns a tensor with (1, 4096) VGG16 features'''
# Since VGG was trained as a image of 224x224, every new image
# is required to go through the same transformation
img = image.load_img(img_path, target_size=(224, 224))
x = image.img_to_array(img)
# this is required because of the original training of VGG was batch
# even if we have only one image we need to be consistent
x = np.expand_dims(x, axis=0)
x = preprocess_input(x)
features = VGG16modelFull.predict(x)
model_extractfeatures = Model(inputs=VGG16modelFull.input,
outputs=VGG16modelFull.get_layer('fc2').output)
fc2_features = model_extractfeatures.predict(x)
fc2_features = fc2_features.reshape((1, length_vgg_features))
return fc2_features
请注意,VGG16 的定义如下:
Layer (type) Output Shape Param #
=================================================================
input_5 (InputLayer) (None, 224, 224, 3) 0
_________________________________________________________________
block1_conv1 (Conv2D) (None, 224, 224, 64) 1792
_________________________________________________________________
block1_conv2 (Conv2D) (None, 224, 224, 64) 36928
_________________________________________________________________
block1_pool (MaxPooling2D) (None, 112, 112, 64) 0
_________________________________________________________________
block2_conv1 (Conv2D) (None, 112, 112, 128) 73856
_________________________________________________________________
block2_conv2 (Conv2D) (None, 112, 112, 128) 147584
_________________________________________________________________
block2_pool (MaxPooling2D) (None, 56, 56, 128) 0
_________________________________________________________________
block3_conv1 (Conv2D) (None, 56, 56, 256) 295168
_________________________________________________________________
block3_conv2 (Conv2D) (None, 56, 56, 256) 590080
_________________________________________________________________
block3_conv3 (Conv2D) (None, 56, 56, 256) 590080
_________________________________________________________________
block3_pool (MaxPooling2D) (None, 28, 28, 256) 0
_________________________________________________________________
block4_conv1 (Conv2D) (None, 28, 28, 512) 1180160
_________________________________________________________________
block4_conv2 (Conv2D) (None, 28, 28, 512) 2359808
_________________________________________________________________
block4_conv3 (Conv2D) (None, 28, 28, 512) 2359808
_________________________________________________________________
block4_pool (MaxPooling2D) (None, 14, 14, 512) 0
_________________________________________________________________
block5_conv1 (Conv2D) (None, 14, 14, 512) 2359808
_________________________________________________________________
block5_conv2 (Conv2D) (None, 14, 14, 512) 2359808
_________________________________________________________________
block5_conv3 (Conv2D) (None, 14, 14, 512) 2359808
_________________________________________________________________
block5_pool (MaxPooling2D) (None, 7, 7, 512) 0
_________________________________________________________________
flatten (Flatten) (None, 25088) 0
_________________________________________________________________
fc1 (Dense) (None, 4096) 102764544
_________________________________________________________________
fc2 (Dense) (None, 4096) 16781312
_________________________________________________________________
predictions (Dense) (None, 1000) 4097000
=================================================================
Total params: 138,357,544
Trainable params: 138,357,544
Non-trainable params: 0
_________________________________________
- 使用 spaCy 获取单词嵌入,并将输入的问题映射到一个空格(
max_length_questions, 300),其中max_length_questions是我们语料库中问题的最大长度,而 300 是 spaCy 产生的嵌入的尺寸。 在内部,spaCy 使用一种称为 gloVe 的算法。 gloVe 将给定令牌简化为 300 维表示。 请注意,该问题使用右 0 填充填充到max_lengh_questions:
'''embedding'''
def get_question_features(question):
''' given a question, a unicode string, returns the time series vector
with each word (token) transformed into a 300 dimension representation
calculated using Glove Vector '''
word_embeddings = spacy.load('en', vectors='en_glove_cc_300_1m_vectors')
tokens = word_embeddings(question)
ntokens = len(tokens)
if (ntokens > max_length_questions) :
ntokens = max_length_questions
question_tensor = np.zeros((1, max_length_questions, 300))
for j in xrange(len(tokens)):
question_tensor[0,j,:] = tokens[j].vector
return question_tensor
- 使用先前定义的图像特征提取器加载图像并获取其显着特征:
image_file_name = 'girl.jpg'
img0 = PIL.Image.open(image_file_name)
img0.show()
#get the salient features
model = VGG16(weights='imagenet', include_top=True)
image_features = get_image_features(image_file_name, model)
print image_features.shape
- 使用先前定义的句子特征提取器,编写一个问题并获得其显着特征:
question = u"Who is in this picture?"
language_features = get_question_features(question)
print language_features.shape
- 将两组异类特征组合为一个。 在这个网络中,我们有三个 LSTM 层,这些层将考虑我们语言模型的创建。 注意,LSTM 将在第 6 章中详细讨论,目前我们仅将它们用作黑匣子。 最后的 LSTM 返回 512 个特征,这些特征随后用作一系列密集层和缺失层的输入。 最后一层是具有 softmax 激活函数的密集层,其概率空间为 1,000 个潜在答案:
'''combine'''
def build_combined_model(
number_of_LSTM = 3,
number_of_hidden_units_LSTM = 512,
number_of_dense_layers = 3,
number_of_hidden_units = 1024,
activation_function = 'tanh',
dropout_pct = 0.5
):
#input image
input_image = Input(shape=(length_vgg_features,),
name="input_image")
model_image = Reshape((length_vgg_features,),
input_shape=(length_vgg_features,))(input_image)
#input language
input_language = Input(shape=(max_length_questions,length_feature_space,),
name="input_language")
#build a sequence of LSTM
model_language = LSTM(number_of_hidden_units_LSTM,
return_sequences=True,
name = "lstm_1")(input_language)
model_language = LSTM(number_of_hidden_units_LSTM,
return_sequences=True,
name = "lstm_2")(model_language)
model_language = LSTM(number_of_hidden_units_LSTM,
return_sequences=False,
name = "lstm_3")(model_language)
#concatenate 4096+512
model = concatenate([model_image, model_language])
#Dense, Dropout
for _ in xrange(number_of_dense_layers):
model = Dense(number_of_hidden_units,
kernel_initializer='uniform')(model)
model = Dropout(dropout_pct)(model)
model = Dense(1000,
activation='softmax')(model)
#create model from tensors
model = Model(inputs=[input_image, input_language], outputs = model)
return model
- 建立组合的网络并显示其摘要,以了解其内部外观。 加载预训练的权重并使用 rmsprop 优化器使用
categorical_crossentropy损失函数来编译模型:
combined_model = build_combined_model()
combined_model.summary()
combined_model.load_weights(VQA_weights_file)
combined_model.compile(loss='categorical_crossentropy', optimizer='rmsprop')
____________________________
Layer (type) Output Shape Param # Connected to
====================================================================================================
input_language (InputLayer) (None, 30, 300) 0
____________________________________________________________________________________________________
lstm_1 (LSTM) (None, 30, 512) 1665024 input_language[0][0]
____________________________________________________________________________________________________
input_image (InputLayer) (None, 4096) 0
____________________________________________________________________________________________________
lstm_2 (LSTM) (None, 30, 512) 2099200 lstm_1[0][0]
____________________________________________________________________________________________________
reshape_3 (Reshape) (None, 4096) 0 input_image[0][0]
____________________________________________________________________________________________________
lstm_3 (LSTM) (None, 512) 2099200 lstm_2[0][0]
____________________________________________________________________________________________________
concatenate_3 (Concatenate) (None, 4608) 0 reshape_3[0][0]
lstm_3[0][0]
____________________________________________________________________________________________________
dense_8 (Dense) (None, 1024) 4719616 concatenate_3[0][0]
____________________________________________________________________________________________________
dropout_7 (Dropout) (None, 1024) 0 dense_8[0][0]
____________________________________________________________________________________________________
dense_9 (Dense) (None, 1024) 1049600 dropout_7[0][0]
____________________________________________________________________________________________________
dropout_8 (Dropout) (None, 1024) 0 dense_9[0][0]
____________________________________________________________________________________________________
dense_10 (Dense) (None, 1024) 1049600 dropout_8[0][0]
____________________________________________________________________________________________________
dropout_9 (Dropout) (None, 1024) 0 dense_10[0][0]
____________________________________________________________________________________________________
dense_11 (Dense) (None, 1000) 1025000 dropout_9[0][0]
====================================================================================================
Total params: 13,707,240
Trainable params: 13,707,240
Non-trainable params: 0
- 使用预训练的组合网络进行预测。 请注意,在这种情况下,我们使用该网络已经在线可用的权重,但是感兴趣的读者可以在自己的训练集中重新训练组合的网络:
y_output = combined_model.predict([image_features, language_features])
# This task here is represented as a classification into a 1000 top answers
# this means some of the answers were not part of training and thus would
# not show up in the result.
# These 1000 answers are stored in the sklearn Encoder class
labelencoder = joblib.load(label_encoder_file_name)
for label in reversed(np.argsort(y_output)[0,-5:]):
print str(round(y_output[0,label]*100,2)).zfill(5), "% ", labelencoder.inverse_transform(label)
工作原理
视觉问题解答的任务是通过结合使用不同的深度神经网络来解决的。 预训练的 VGG16 已用于从图像中提取特征,而 LSTM 序列已用于从先前映射到嵌入空间的问题中提取特征。 VGG16 是用于图像特征提取的 CNN,而 LSTM 是用于提取表示序列的时间特征的 RNN。 目前,这两种方法的结合是处理此类网络的最新技术。 然后,在组合模型的顶部添加一个具有丢弃功能的多层感知机,以形成我们的深度网络。
更多
在互联网上,您可以找到 Avi Singh 进行的更多实验,其中比较了不同的模型,包括简单的“袋装”语言的“单词”与图像的 CNN,仅 LSTM 模型以及 LSTM + CNN 模型-类似于本秘籍中讨论的模型。 博客文章还讨论了每种模型的不同训练策略。
除此之外,有兴趣的读者可以在互联网上找到一个不错的 GUI,它建立在 Avi Singh 演示的顶部,使您可以交互式加载图像并提出相关问题。 还提供了 YouTube 视频。
通过六种不同方式将预训练网络用于视频分类
对视频进行分类是一个活跃的研究领域,因为处理此类媒体需要大量数据。 内存需求经常达到现代 GPU 的极限,可能需要在多台机器上进行分布式训练。 目前,研究正在探索复杂性不断提高的不同方向,让我们对其进行回顾。
第一种方法包括一次将一个视频帧分类,方法是将每个视频帧视为使用 2D CNN 处理的单独图像。 这种方法只是将视频分类问题简化为图像分类问题。 每个视频帧产生分类输出,并且通过考虑每个帧的更频繁选择的类别对视频进行分类。
第二种方法包括创建一个单一网络,其中 2D CNN 与 RNN 结合在一起。 这个想法是 CNN 将考虑图像分量,而 RNN 将考虑每个视频的序列信息。 由于要优化的参数数量非常多,这种类型的网络可能很难训练。
第三种方法是使用 3D 卷积网络,其中 3D 卷积网络是在 3D 张量(time,image_width和image_height)上运行的 2D 卷积网络的扩展。 这种方法是图像分类的另一个自然扩展,但同样,3D 卷积网络可能很难训练。
第四种方法基于智能直觉。 代替直接使用 CNN 进行分类,它们可以用于存储视频中每个帧的脱机特征。 想法是,如先前的秘籍所示,可以通过迁移学习使特征提取非常有效。 提取所有特征后,可以将它们作为一组输入传递到 RNN,该 RNN 将学习多个帧中的序列并发出最终分类。
第五种方法是第四种方法的简单变体,其中最后一层是 MLP 而不是 RNN。 在某些情况下,就计算要求而言,此方法可能更简单且成本更低。
第六种方法是第四种方法的变体,其中特征提取的阶段是通过提取空间和视觉特征的 3D CNN 实现的。 然后将这些特征传递给 RNN 或 MLP。
选择最佳方法严格取决于您的特定应用,没有明确的答案。 前三种方法通常在计算上更昂贵,而后三种方法则更便宜并且经常获得更好的表现。
在本秘籍中,我们将通过描述论文 Temporal Activity Detection in Untrimmed Videos with Recurrent Neural Networks 来描述如何使用第六种方法。 这项工作旨在解决 ActivityNet 挑战 。 这项挑战着重于从用户生成的视频中识别高水平和面向目标的活动,类似于在互联网门户网站中找到的那些活动。 该挑战针对两项不同任务中的 200 个活动类别量身定制:
- 未修剪的分类挑战:给定较长的视频,请预测视频中存在的活动的标签
- 检测挑战:给定较长的视频,预测视频中存在的活动的标签和时间范围
呈现的架构包括两个阶段,如下图所示。 第一阶段将视频信息编码为单个视频表示形式,以用于小型视频剪辑。 为此,使用了 C3D 网络。 C3D 网络使用 3D 卷积从视频中提取时空特征,这些视频先前已被分成 16 帧剪辑。
一旦提取了视频特征,第二阶段就是对每个剪辑的活动进行分类。 为了执行这种分类,使用了 RNN,更具体地说是一个 LSTM 网络,该网络试图利用长期相关性并执行视频序列的预测。 此阶段已被训练:
C3D + RNN 的示例
操作步骤
对于此秘籍,我们仅汇总在线呈现的结果:
- 第一步是克隆 git 仓库
git clone https://github.com/imatge-upc/activitynet-2016-cvprw.git
- 然后,我们需要下载 ActivityNet v1.3 数据集,其大小为 600 GB:
cd dataset
# This will download the videos on the default directory
sh download_videos.sh username password
# This will download the videos on the directory you specify
sh download_videos.sh username password /path/you/want
- 下一步是下载 CNN3d 和 RNN 的预训练权重:
cd data/models
sh get_c3d_sports_weights.sh
sh get_temporal_location_weights.sh
- 最后一步包括对视频进行分类:
python scripts/run_all_pipeline.py -i path/to/test/video.mp4
工作原理
如果您有兴趣在计算机上训练 CNN3D 和 RNN,则可以在互联网上找到此计算机管道使用的特定命令。
目的是介绍可用于视频分类的不同方法的高级视图。 同样,不仅有一个单一的秘籍,而且有多个选项,应根据您的特定需求仔细选择。
更多
CNN-LSTM 架构是新的 RNN 层,其中输入转换和循环转换的输入都是卷积。 尽管名称非常相似,但如上所述,CNN-LSTM 层与 CNN 和 LSTM 的组合不同。 该模型在论文《卷积 LSTM 网络:降水临近预报的机器学习方法》(史兴建,陈周荣,王浩,杨天彦,黄伟坚,胡旺春,2015 年)中进行了描述,并且在 2017 年,有些人开始尝试使用此模块进行视频实验,但这仍然是一个活跃的研究领域。

