【内网流量操控技术七】pingtunnel建立icmp隧道
文章目录
- 前言
- 一、pingtunnel工作原理
- 二、部署pingtunnel
-
- 1.下载pingtunnel
- 2.安装依赖库pcap
- 3.编译安装pingtunnel
- 三、C/S命令
-
- 1.客户端命令(攻击机)
- 2.服务端命令(靶机)
- 3.在攻击机kali查看监听
- 4.win2003登录内网server2003
- 总结
前言
前面学习了icmpsh穿透防火墙仅允许icmp协议下的相关配置,我们发现,icmpsh还是有些不足。第一,不能跨平台,其客户端只有icmpsh.exe针对windows的二进制文件,遇到靶机是*inux环境无法使用。第二,icmpsh本质上还不是一个隧道,只是一个反弹shell。第三,icmpsh没有密码认证机制,shell很可能被盗用。因此,有必要再动手将另一icmp常用工具pingtunnel再实验一遍。文中实验相关工具tar包,都可以在此【点击下载】
一、pingtunnel工作原理
在上面实验环境中,我们将分别在攻击机kali2020和靶机webserver部署pingtunnel工具,在两台主机之间实现icmp隧道,再在kali2020上监听端口33889,将webserver访问内网主机server2003远程桌面3389的流量转发到kali2020的33889端口上,从而实现了在win2003上访问server2003上3389端口的目的。这个过程看起来跟ssh隧道本地端口转发非常相似,不同之处只是穿透防火墙的流量一个是通过icmp协议,另一个是通过ssh协议。
二、部署pingtunnel
操作系统环境kali2020.4
1.下载pingtunnel
先到网站http://freshmeat.sourceforge.net/projects/ptunnel下载tar包文件,解压编译安装
tar zxf PingTunnel-0.72.tar.gz
cd PingTunnel
make && makeinstall
遇到报错,缺少库文件pcap
┌──(rootkali20204)-[~/PingTunnel]
└─# make && makeinstall
gcc -Wall -g -MM *.c > .depend
gcc -Wall -g `[ -e /usr/include/selinux/selinux.h ] && echo -DHAVE_SELINUX` -c -o ptunnel.o ptunnel.c
In file included from ptunnel.c:43:
ptunnel.h:70:13: fatal error: pcap.h: No such file or directory
70 | #include 2.安装依赖库pcap
wget http://www.tcpdump.org/release/libpcap-1.9.0.tar.gz
tar zxf libpcap-1.9.0.tar.gz
cd libpcap-1.9.0
./configure
遇见报错
configure: error: Neither flex nor lex was found.
apt-get安装flex
apt-get install flex
回到libpcap-1.9.0目录再次编译
cd libpcap-1.9.0
./configure
再次遇到报错,需要安装yacc不能编译libpcap
configure: error: yacc is insufficient to compile libpcap.
 libpcap requires Bison, a newer version of Berkeley YACC with support
 for reentrant parsers, or another YACC compatible with them.
安装byacc
apt-get install byacc
再次编译、安装libpcap,libpcap安装成功。
cd libpcap-1.9.0
./configure
make && make install
综上,我们在安装libpcap库文件时,可以提前一步安装好其依赖库
apt-get install -y byacc flex
3.编译安装pingtunnel
进入PingTunnel目录,编译安装,成功。
┌──(rootkali20204)-[~/PingTunnel]
└─# make && make install
gcc -Wall -g `[ -e /usr/include/selinux/selinux.h ] && echo -DHAVE_SELINUX` -c -o ptunnel.o ptunnel.c
ptunnel.c: In function ‘pt_proxy’:
ptunnel.c:817:6: warning: ‘memset’ used with constant zero length parameter; this could be due to transposed parameters [-Wmemset-transposed-args]
  817 |      memset(&addr, sizeof(struct sockaddr), 0);
      |      ^~~~~~
ptunnel.c: In function ‘queue_packet’:
ptunnel.c:1263:2: warning: converting a packed ‘icmp_echo_packet_t’ pointer (alignment 1) to a ‘uint16_t’ {aka ‘short unsigned int’} pointer (alignment 2) may result in an unaligned pointer value [-Waddress-of-packed-member]
 1263 |  pkt->checksum   = htons(calc_icmp_checksum((uint16_t*)pkt, pkt_len));
      |  ^~~
In file included from ptunnel.c:43:
ptunnel.h:241:9: note: defined here
  241 | typedef struct {
      |         ^~~~~~
gcc -Wall -g `[ -e /usr/include/selinux/selinux.h ] && echo -DHAVE_SELINUX` -c -o md5.o md5.c
gcc -o ptunnel ptunnel.o md5.o -lpthread -lpcap `[ -e /usr/include/selinux/selinux.h ] && echo -lselinux`
install -d /usr/bin/
install -d /usr/share/man/man8/
install ./ptunnel /usr/bin/ptunnel
install ./ptunnel.8 /usr/share/man/man8/ptunnel.8

┌──(rootkali20204)-[~/PingTunnel]
└─# echo $?
0
三、C/S命令
1.客户端命令(攻击机)
ptunnel -p 192.168.0.166 -lp 33889 -da 172.16.1.14 -dp 3389 -x pass
┌──(rootkali20204)-[~/PingTunnel]
└─# ptunnel -p 192.168.0.166 -lp 33889 -da 172.16.1.14 -dp 3389 -x pass
[inf]: Starting ptunnel v 0.72.
[inf]: (c) 2004-2011 Daniel Stoedle, <[email protected]>
[inf]: Security features by Sebastien Raveau, <[email protected]>
[inf]: Relaying packets from incoming TCP streams.
[inf]: Incoming connection.
[evt]: No running proxy thread - starting it.
[inf]: Ping proxy is listening in privileged mode.
[inf]: Connection closed or lost.
[inf]: Incoming connection.
[inf]: Session statistics:
[inf]: I/O:   0.00/  0.00 mb ICMP I/O/R:        9/       4/       1 Loss:  0.2%
[inf]: Connection closed or lost.
[inf]: Incoming connection.
[inf]: Session statistics:
[inf]: I/O:   0.06/  0.01 mb ICMP I/O/R:      284/     131/       1 Loss:  0.0%
2.服务端命令(靶机)
ptunnel -x pass
root@kali:~/PingTunnel# ptunnel -x pass
[inf]: Starting ptunnel v 0.72.
[inf]: (c) 2004-2011 Daniel Stoedle, <[email protected]>
[inf]: Security features by Sebastien Raveau, <[email protected]>
[inf]: Forwarding incoming ping packets over TCP.
[inf]: Ping proxy is listening in privileged mode.
[inf]: Incoming tunnel request from 192.168.0.164.
[inf]: Starting new session to 172.16.1.14:3389 with ID 30369
[err]: Dropping duplicate proxy session request.
[inf]: Received session close from remote peer.
[inf]:
Session statistics:
[inf]: I/O:   0.00/  0.00 mb ICMP I/O/R:        5/       1/       0 Loss:  0.0%
[inf]:
[inf]: Incoming tunnel request from 192.168.0.164.
[inf]: Starting new session to 172.16.1.14:3389 with ID 24867
[err]: Dropping duplicate proxy session request.
[inf]: Received session close from remote peer.
3.在攻击机kali查看监听
┌──(rootkali20204)-[~]
└─# netstat -anput | grep 33889
tcp        0      0 0.0.0.0:33889           0.0.0.0:*               LISTEN      9758/ptunnel
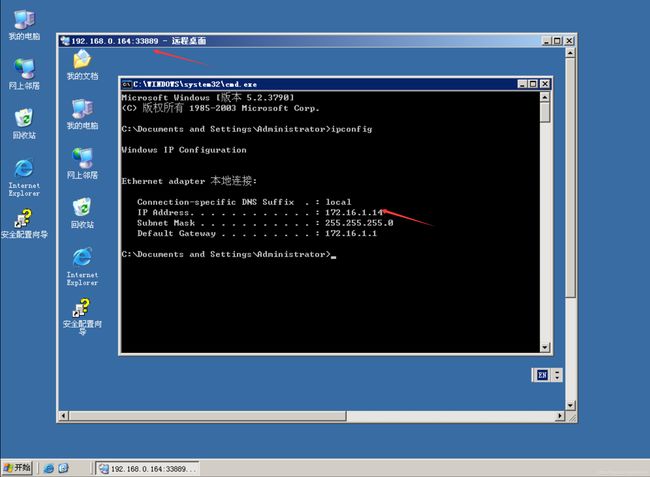
4.win2003登录内网server2003
在win2003上,访问192.168.0.164:33889端口登录内网server2003的mstsc

登录成功后界面

总结
pingtunnel穿过防火墙原理和ssh的本地转发原理极其相似,只是数据通过网络层协议icmp的ICMP echo request 和 ICMP echo reply报文封装了tcp连接。
