Android集成FFmpeg,看这篇就够了
本教程会教大家集成FFmpeg,并使用FFmpeg的代码(非命令行)进行播放mp3。
目录
一、下载FFmpeg源码,编译出静态库.a/动态库.so
二、将库复制到项目中
三、CMakeLists.txt进行第三方库链接
四、gradle.build配置ndk
五、创建Java代码,JNI接口
六、创建cpp,编辑器会自动生成JNI方法
七、执行代码调用
一、下载FFmpeg源码,编译出静态库.a/动态库.so
传送门:https://blog.csdn.net/gxhea/article/details/115539124
二、将库复制到项目中
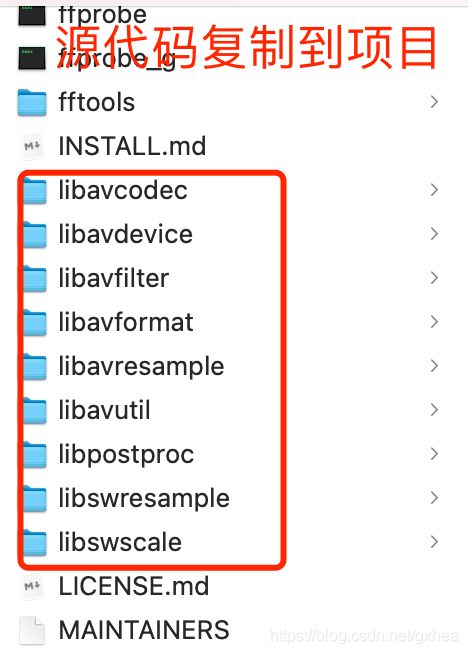
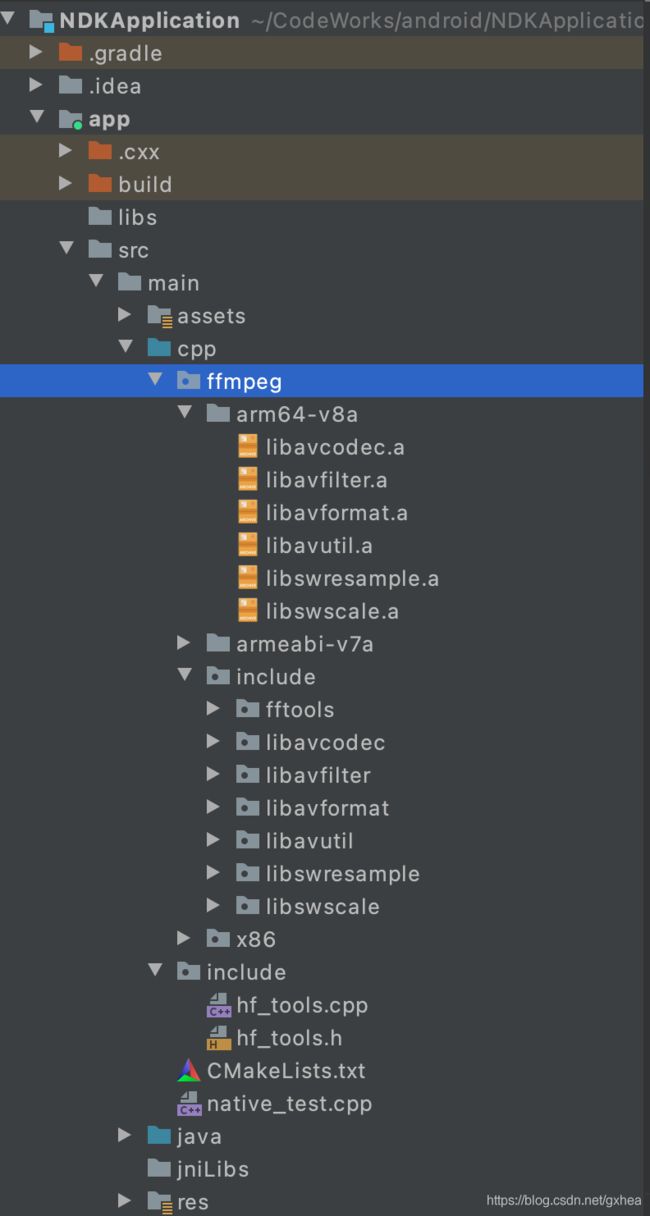
我编译的是.a静态库,复制到项目中;还需要复制FFmpeg的源代码到项目中,源代码在FFmpeg的根目录,具体复制哪些请看项目结构图片
三、CMakeLists.txt进行第三方库链接
# For more information about using CMake with Android Studio, read the
# documentation: https://d.android.com/studio/projects/add-native-code.html

# Sets the minimum version of CMake required to build the native library.

cmake_minimum_required(VERSION 3.10.2)

#打印LOG
#message(STATUS "Cmake build type is: "${CMAKE_BUILD_TYPE})
#message(STATUS "Cmake build android abi is: "${ANDROID_ABI})

find_library(
        log-lib  # Android内置的log模块, 用于将JNI层的log打到AS控制台
        log )

file(GLOB native_srcs
        "*.cpp"
        "include/*.cpp"
        )

#该指令的主要作用就是将指定的源文件生成链接文件,然后添加到工程中去
add_library( # Sets the name of the library.
        my_code
        SHARED
        ${native_srcs}
        )


include_directories(src/main/cpp/ffmpeg/include)

target_link_libraries(

        my_code


        -Wl,--start-group  #忽略静态库的链接顺序。
        ${CMAKE_CURRENT_SOURCE_DIR}/ffmpeg/${ANDROID_ABI}/libavfilter.a
        ${CMAKE_CURRENT_SOURCE_DIR}/ffmpeg/${ANDROID_ABI}/libavformat.a
        ${CMAKE_CURRENT_SOURCE_DIR}/ffmpeg/${ANDROID_ABI}/libavcodec.a
        ${CMAKE_CURRENT_SOURCE_DIR}/ffmpeg/${ANDROID_ABI}/libavutil.a
        #${CMAKE_CURRENT_SOURCE_DIR}/ffmpeg/${ANDROID_ABI}/libavdevice.a
        ${CMAKE_CURRENT_SOURCE_DIR}/ffmpeg/${ANDROID_ABI}/libswresample.a
        ${CMAKE_CURRENT_SOURCE_DIR}/ffmpeg/${ANDROID_ABI}/libswscale.a
        -Wl,--end-group

#        -Wl,--start-group  #忽略静态库的链接顺序。
#        ${CMAKE_CURRENT_SOURCE_DIR}/ffmpeg/arm64-v8a/libavfilter.a
#        ${CMAKE_CURRENT_SOURCE_DIR}/ffmpeg/arm64-v8a/libavformat.a
#        ${CMAKE_CURRENT_SOURCE_DIR}/ffmpeg/arm64-v8a/libavcodec.a
#        ${CMAKE_CURRENT_SOURCE_DIR}/ffmpeg/arm64-v8a/libavutil.a
#        #${CMAKE_CURRENT_SOURCE_DIR}/ffmpeg/arm64-v8a/libavdevice.a
#        ${CMAKE_CURRENT_SOURCE_DIR}/ffmpeg/arm64-v8a/libswresample.a
#        ${CMAKE_CURRENT_SOURCE_DIR}/ffmpeg/arm64-v8a/libswscale.a
#        -Wl,--end-group

#        -Wl,--start-group  #忽略静态库的链接顺序。
#        ${CMAKE_CURRENT_SOURCE_DIR}/ffmpeg/armeabi-v7a/libavfilter.a
#        ${CMAKE_CURRENT_SOURCE_DIR}/ffmpeg/armeabi-v7a/libavformat.a
#        ${CMAKE_CURRENT_SOURCE_DIR}/ffmpeg/armeabi-v7a/libavcodec.a
#        ${CMAKE_CURRENT_SOURCE_DIR}/ffmpeg/armeabi-v7a/libavutil.a
#        #${CMAKE_CURRENT_SOURCE_DIR}/ffmpeg/armeabi-v7a/libavdevice.a
#        ${CMAKE_CURRENT_SOURCE_DIR}/ffmpeg/armeabi-v7a/libswresample.a
#        ${CMAKE_CURRENT_SOURCE_DIR}/ffmpeg/armeabi-v7a/libswscale.a
#        -Wl,--end-group

#        -Wl,--start-group  #忽略静态库的链接顺序。
#        ${CMAKE_CURRENT_SOURCE_DIR}/ffmpeg/x86/libavfilter.a
#        ${CMAKE_CURRENT_SOURCE_DIR}/ffmpeg/x86/libavformat.a
#        ${CMAKE_CURRENT_SOURCE_DIR}/ffmpeg/x86/libavcodec.a
#        ${CMAKE_CURRENT_SOURCE_DIR}/ffmpeg/x86/libavutil.a
#        #${CMAKE_CURRENT_SOURCE_DIR}/ffmpeg/x86/libavdevice.a
#        ${CMAKE_CURRENT_SOURCE_DIR}/ffmpeg/x86/libswresample.a
#        ${CMAKE_CURRENT_SOURCE_DIR}/ffmpeg/x86/libswscale.a
#        -Wl,--end-group

        ${log-lib}
        z #z库 ffmpeg用到
)
四、gradle.build配置ndk
plugins {
    id 'com.android.application'
    id 'kotlin-android'
}

android {
    compileSdkVersion 30
    buildToolsVersion "30.0.3"

    defaultConfig {
        applicationId "com.example.ndk"
        minSdkVersion 21
        targetSdkVersion 30
        versionCode 1
        versionName "1.0"

        ndk {
            // 设置支持的SO库架构
            abiFilters "armeabi-v7a"
        }
        externalNativeBuild {
            cmake {

                cFlags ""
            }
        }
    }

    buildTypes {
        release {
            minifyEnabled false
            proguardFiles getDefaultProguardFile('proguard-android-optimize.txt'), 'proguard-rules.pro'
        }
    }
    compileOptions {
        sourceCompatibility JavaVersion.VERSION_1_8
        targetCompatibility JavaVersion.VERSION_1_8
    }
    kotlinOptions {
        jvmTarget = '1.8'
    }

    externalNativeBuild {
        cmake {
            path "src/main/cpp/CMakeLists.txt"
            version "3.10.2"
        }
    }
    ndkVersion '21.1.6352462'//as 4+ 新版在这里配ndk

    packagingOptions {
        exclude 'META-INF/proguard/coroutines.pro'
    }
}

dependencies {

    implementation "org.jetbrains.kotlin:kotlin-stdlib:$kotlin_version"
    implementation 'androidx.core:core-ktx:1.2.0'
    implementation 'androidx.appcompat:appcompat:1.1.0'
    implementation 'com.google.android.material:material:1.1.0'
    implementation 'androidx.constraintlayout:constraintlayout:1.1.3'
}
五、创建Java代码,JNI接口
NativeTools.java
package com.example.ndk;

public class NativeTools {

    static {
        System.loadLibrary("my_code");//这里的名字与cmake文件里面的my_code一致
    }

    public static native String getWords();

    public static native String getFfmpegVersion();

    public static native void playMp3(MyPlay myPlay);

}
六、创建cpp,编辑器会自动生成JNI方法
native_test.cpp,需要注意的是:引用ffmpeg的代码必须要extern "C"{}包起来
//
// Created by hins on 4/9/21.
//

#include

#include
#include
#include "android/log.h"
#include
#include "include/hf_tools.h"

extern "C" {


#include "ffmpeg/include/libavcodec/avcodec.h"
#include "ffmpeg/include/libavformat/avformat.h"
#include "ffmpeg/include/libavfilter/avfilter.h"

#include "ffmpeg/include/libavutil/file.h"
#include "ffmpeg/include/libavutil/mathematics.h"
#include "ffmpeg/include/libavutil/time.h"
#include "ffmpeg/include/libavutil/mem.h"
#include "ffmpeg/include/libswresample/swresample.h"


//extern "C"
JNIEXPORT jstring JNICALL
Java_com_example_ndk_NativeTools_getWords(JNIEnv *env, jclass clazz) {
    std::string hello = "Hello from C++";
    return env->NewStringUTF(hello.c_str());

}

JNIEXPORT jstring JNICALL
Java_com_example_ndk_NativeTools_getFfmpegVersion(JNIEnv *env, jclass clazz) {

    char strBuffer[1024 * 4] = {0};
    strcat(strBuffer, "libavcodec : ");
    strcat(strBuffer, AV_STRINGIFY(LIBAVCODEC_VERSION));
    strcat(strBuffer, "\nlibavformat : ");
    strcat(strBuffer, AV_STRINGIFY(LIBAVFORMAT_VERSION));
    strcat(strBuffer, "\nlibavutil : ");
    strcat(strBuffer, AV_STRINGIFY(LIBAVUTIL_VERSION));
    strcat(strBuffer, "\nlibavfilter : ");
    strcat(strBuffer, AV_STRINGIFY(LIBAVFILTER_VERSION));
    strcat(strBuffer, "\nlibswresample : ");
    strcat(strBuffer, AV_STRINGIFY(LIBSWRESAMPLE_VERSION));
    strcat(strBuffer, "\nlibswscale : ");
    strcat(strBuffer, AV_STRINGIFY(LIBSWSCALE_VERSION));
    strcat(strBuffer, "\navcodec_configure : \n");
    strcat(strBuffer, avcodec_configuration());
    strcat(strBuffer, "\navcodec_license : ");
    strcat(strBuffer, avcodec_license());

    return env->NewStringUTF(strBuffer);
}


JNIEXPORT void JNICALL
Java_com_example_ndk_NativeTools_playMp3(JNIEnv *env, jclass clazz, jobject my_play) {
    //1.注册组件,打开音频文件并获取内容,找到音频流
    av_register_all();
    avformat_network_init();
    AVFormatContext *avFormatContext = avformat_alloc_context();//获取上下文

    const char *url = "/data/user/0/com.example.ndk/app_mp3/aaa.mp3";
    HTools::logd("url is  " + string(url));

    int ret = avformat_open_input(&avFormatContext, url, NULL, NULL);
    if (ret != 0) {
        HTools::logd("Couldn't open input stream. " + string(av_err2str(ret)));
        return;
    } else {
        HTools::logd("open input stream. file: " + string(url));
    }

    //获取码流信息
    avformat_find_stream_info(avFormatContext, NULL);

    int audio_stream_idx = -1;
    for (int i = 0; i < avFormatContext->nb_streams; ++i) {
        if (avFormatContext->streams[i]->codec->codec_type == AVMEDIA_TYPE_AUDIO) {
            //如果是视频流,标记一哈
            audio_stream_idx = i;
            HTools::logd("找到了音频流");
        }
    }

    //2.获取解码器,申请avframe和avpacket:
    //获取解码器上下文
    AVCodecContext *pCodecCtx = avFormatContext->streams[audio_stream_idx]->codec;
    //获取解码器
    AVCodec *pCodex = avcodec_find_decoder(pCodecCtx->codec_id);
    //打开解码器
    if (avcodec_open2(pCodecCtx, pCodex, NULL) < 0) {

    }
    //申请avpakcet,装解码前的数据
    AVPacket *packet = (AVPacket *) av_malloc(sizeof(AVPacket));
    //申请avframe,装解码后的数据
    AVFrame *frame = av_frame_alloc();
    HTools::logd("2.获取解码器成功");


    //3.初始化SwrContext,进行重采样
    //得到SwrContext ,进行重采样,具体参考http://blog.csdn.net/jammg/article/details/52688506
    SwrContext *swrContext = swr_alloc();
    //缓存区
    uint8_t *out_buffer = (uint8_t *) av_malloc(44100 * 2);
    //输出的声道布局(立体声)
    uint64_t out_ch_layout = AV_CH_LAYOUT_STEREO;
    //输出采样位数  16位
    enum AVSampleFormat out_formart = AV_SAMPLE_FMT_S16;
    //输出的采样率必须与输入相同
    int out_sample_rate = pCodecCtx->sample_rate;

    //swr_alloc_set_opts将PCM源文件的采样格式转换为自己希望的采样格式
    swr_alloc_set_opts(swrContext, out_ch_layout, out_formart, out_sample_rate,
                       pCodecCtx->channel_layout, pCodecCtx->sample_fmt, pCodecCtx->sample_rate, 0,
                       NULL);
    swr_init(swrContext);
    HTools::logd("3.初始化SwrContext,进行重采样成功");


    //4.通过while循环读取内容,并通过AudioTrack进行播放:
    //    获取通道数 2 ,有单声道,双声道
    int out_channel_nb = av_get_channel_layout_nb_channels(AV_CH_LAYOUT_STEREO);
//    反射得到Class类型
    jclass david_player = env->GetObjectClass(my_play);
//    反射得到createAudio方法
    jmethodID createAudio = env->GetMethodID(david_player, "createTrack", "(II)V");
//    反射调用createAudio
    //设置采样率为44100,目前为常用的采样率
    env->CallVoidMethod(my_play, createAudio, 44100, out_channel_nb);
    jmethodID audio_write = env->GetMethodID(david_player, "playTrack", "([BI)V");
    HTools::logd("调用android AudioTrack 开始播放mp3...");
    int got_frame;
    while (av_read_frame(avFormatContext, packet) >= 0) {
        if (packet->stream_index == audio_stream_idx) {
//            解码  mp3   编码格式frame----pcm   frame
            avcodec_decode_audio4(pCodecCtx, frame, &got_frame, packet);
            if (got_frame) {
                HTools::logd("解码,读stream");
                swr_convert(swrContext, &out_buffer, 44100 * 2, (const uint8_t **) frame->data,
                            frame->nb_samples);
//                缓冲区的大小
                int size = av_samples_get_buffer_size(NULL, out_channel_nb, frame->nb_samples,
                                                      AV_SAMPLE_FMT_S16, 1);
                jbyteArray audio_sample_array = env->NewByteArray(size);
                env->SetByteArrayRegion(audio_sample_array, 0, size, (const jbyte *) out_buffer);
                env->CallVoidMethod(my_play, audio_write, audio_sample_array, size);
                env->DeleteLocalRef(audio_sample_array);
            }
        }
    }
    HTools::logd("5.释放需要释放的资源");


    //5.释放需要释放的资源
    av_frame_free(&frame);
    swr_free(&swrContext);
    avcodec_close(pCodecCtx);
    avformat_close_input(&avFormatContext);

    return;
}


}
七、执行代码调用
整体调用流程是:Java(playMp3) -> JNI -> ffmpeg -> Java(AudioTrack)播放
创建一个于ffmpeg交互的播放器类:MyPlay.java
package com.example.ndk;

import android.media.AudioFormat;
import android.media.AudioManager;
import android.media.AudioTrack;

public class MyPlay {

    private AudioTrack audioTrack;

    //    这个方法  是C进行调用
    public void createTrack(int sampleRateInHz, int nb_channals) {
        int channelConfig;//通道数
        if (nb_channals == 1) {
            channelConfig = AudioFormat.CHANNEL_OUT_MONO;
        } else if (nb_channals == 2) {
            channelConfig = AudioFormat.CHANNEL_OUT_STEREO;
        } else {
            channelConfig = AudioFormat.CHANNEL_OUT_MONO;
        }
        int buffersize = AudioTrack.getMinBufferSize(sampleRateInHz,
                channelConfig, AudioFormat.ENCODING_PCM_16BIT);
        audioTrack = new AudioTrack(AudioManager.STREAM_MUSIC, sampleRateInHz, channelConfig,
                AudioFormat.ENCODING_PCM_16BIT, buffersize, AudioTrack.MODE_STREAM);
        audioTrack.play();
    }

    //C传入音频数据
    public void playTrack(byte[] buffer, int lenth) {
        if (audioTrack != null && audioTrack.getPlayState() == AudioTrack.PLAYSTATE_PLAYING) {
            audioTrack.write(buffer, 0, lenth);
        }
    }
}
在MainActivity里调用
package com.example.ndk

import android.Manifest
import android.os.Bundle
import android.util.Log
import androidx.appcompat.app.AppCompatActivity
import androidx.core.app.ActivityCompat
import java.io.File

class MainActivity : AppCompatActivity() {


    // 要申请的权限
    private val permissions = arrayOf(
        Manifest.permission.WRITE_EXTERNAL_STORAGE, Manifest.permission.READ_EXTERNAL_STORAGE,
        Manifest.permission.CAMERA
    )

    override fun onCreate(savedInstanceState: Bundle?) {
        super.onCreate(savedInstanceState)
        setContentView(R.layout.activity_main)

        Log.d(ConsData.TAG, "native :" + NativeTools.getWords())

        ///data/user/0/com.example.ndk
        val dir: File = getDir(ConsData.DIR_MP3, MODE_PRIVATE)
        val p = dir.absolutePath
        val fileMp3 = File("$p/aaa.mp3")
        if(!fileMp3.exists()) {
            FileUtils.copyAssetsFiles2Dir(this, "aaa.mp3")
        }

        var myPlay = MyPlay()
        var t = Thread(object : Runnable {
            override fun run() {
                Log.d(ConsData.TAG, "ffmpeg do run...")
                NativeTools.playMp3(myPlay)

            }

        });
        t.start()

        ActivityCompat.requestPermissions(this, permissions, 321);
    }

}
最后你会,听 海哭的声音

