C# PrintDocument 打印
进来搞Window打印,发现还是很好弄的,就是在PrintDocument上画,跟在Canvas画一样,要什么样子就画什么样子,先上示例代码
private void button1_Click(object sender, RoutedEventArgs e)

        {

            var printDocument = new PrintDocument();

            //指定打印机

            printDocument.PrinterSettings.PrinterName = "Microsoft XPS Document Writer";

            //设置页边距

            printDocument.PrinterSettings.DefaultPageSettings.Margins.Left = 0;

            printDocument.PrinterSettings.DefaultPageSettings.Margins.Top = 0;

            printDocument.PrinterSettings.DefaultPageSettings.Margins.Right = 0;

            printDocument.PrinterSettings.DefaultPageSettings.Margins.Bottom = 0;

            //设置尺寸大小,如不设置默认是A4纸

            //A4纸的尺寸是210mm×297mm,

            //当你设定的分辨率是72像素/英寸时,A4纸的尺寸的图像的像素是595×842

            //当你设定的分辨率是150像素/英寸时,A4纸的尺寸的图像的像素是1240×1754

            //当你设定的分辨率是300像素/英寸时,A4纸的尺寸的图像的像素是2479×3508,

            printDocument.DefaultPageSettings.PaperSize = new PaperSize("A4", 595, 842);


            printDocument.PrintPage += new PrintPageEventHandler(printDocument_PrintPage);

            try

            {

                printDocument.Print();

            }

            catch (InvalidPrinterException)

            {


            }

            finally

            {

                printDocument.Dispose();

            }


        }

 //打印方法

        void printDocument_PrintPage(object sender, PrintPageEventArgs e)

        {

            var printContent ="打印测试";

            var printFont = new Font("宋体", 12, System.Drawing.FontStyle.Regular);

            var printColor = System.Drawing.Brushes.Black;


            var pointY = 10f;

            //画字符串

            e.Graphics.DrawString(printContent, printFont, printColor, 10f, pointY);


            //如何打印带粗体,倾斜,字体中带横线,下划线的字符串,设置字体的FontStyle(粗体,倾斜,字体中带横线,下划线)

            printFont = new Font("宋体", 12, System.Drawing.FontStyle.Bold | System.Drawing.FontStyle.Italic);

            e.Graphics.DrawString(printContent, printFont, printColor, 10f, pointY += 20f);

            printFont = new Font("宋体", 12, System.Drawing.FontStyle.Regular);


            //画图像

            //e.Graphics.DrawImage(Image, 10, 50);


            //设置坐标系缩放

            //设置打印坐标系X值为原值的0.6倍打印

            e.Graphics.ScaleTransform(0.6f, 1.0f);

            e.Graphics.DrawString(printContent, printFont, printColor, 10f, pointY += 20f);

            //恢复坐标系缩放

            e.Graphics.ScaleTransform(1 / 0.6f, 1.0f);

            e.Graphics.DrawString(printContent, printFont, printColor, 10f, pointY += 20f);


            //绘画的设置保存与恢复

            var status = e.Graphics.Save();

            e.Graphics.ScaleTransform(0.6f, 1.0f);

            e.Graphics.DrawString(printContent, printFont, printColor, 10f, pointY += 20f);

            e.Graphics.Restore(status);

            e.Graphics.DrawString(printContent, printFont, printColor, 10f, pointY += 20f);


            //如果打印还有下一页,将HasMorePages值置为true;

            e.HasMorePages = false;

        }
其中Graphics中的方法非常多,大家可以去参考文档,这里只是列出几个常用的,
以下图片就是以上代码打印后的效果

其中的缩放的打印方式不适合针式打印机,缩放后的文字在针式打印机上基本无法查看,后来查看生成的XPS文档,在文档里是图片格式保存的
XPS文档是GZip压缩格式可以使用RAR解压后查看
以下是生成xps文档的目录结构
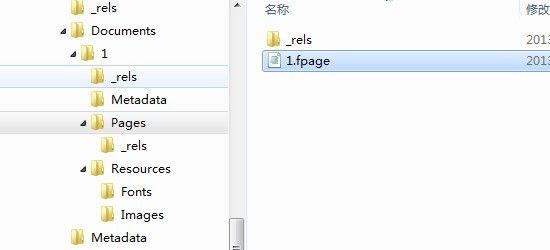
其中1.fpage就是生成的文档结构,其它目录都是一些相关的资源文件,比如Resources中的Fonts字体文件夹,Images图像文件夹等等
下面是1.fpage中生成的内容,大家可以看出里面的格式就是xml
<FixedPage Width="571.04" Height="808.48" xmlns="http://schemas.microsoft.com/xps/2005/06" xml:lang="und">

    <!-- Microsoft XPS Document Converter (MXDC) Generated! Version: 0.3.7600.16385 -->

    <Glyphs Fill="#ff000000"

          FontUri="/Documents/1/Resources/Fonts/FBB4FB52-34A4-45CC-836A-F18952F112F9.odttf"

          FontRenderingEmSize="16.016"

          StyleSimulations="None"

          OriginX="12.32"

          OriginY="23.36"

          Indices="6275;2464;9083;16901"

          UnicodeString="打印测试" />

    <Canvas RenderOptions.EdgeMode="Aliased">

        <Path Data="M 13.92,29.6 L 79.36,29.6 79.36,44.48 13.92,44.48 z" >

            <Path.Fill>

                <ImageBrush ImageSource="/Documents/1/Resources/Images/1.PNG"

                    Viewbox="0,0,409,93" TileMode="None" ViewboxUnits="Absolute"

                    ViewportUnits="Absolute" Viewport="13.92,29.6,65.44,14.88" />

            </Path.Fill>

        </Path>

        <Path Data="M 7.84,48.8 L 45.44,48.8 45.44,63.68 7.84,63.68 z" >

            <Path.Fill>

                <ImageBrush ImageSource="/Documents/1/Resources/Images/2.PNG"

                    Viewbox="0,0,235,93" TileMode="None" ViewboxUnits="Absolute"

                    ViewportUnits="Absolute" Viewport="7.84,48.8,37.6,14.88" />

            </Path.Fill>

        </Path>

    </Canvas>

    <Glyphs Fill="#ff000000" FontUri="/Documents/1/Resources/Fonts/FBB4FB52-34A4-45CC-836A-F18952F112F9.odttf"

          FontRenderingEmSize="16.016" StyleSimulations="None" OriginX="12.32"

          OriginY="80.96" Indices="6275;2464;9083;16901" UnicodeString="打印测试" />

    <Path Data="M 7.84,87.2 L 45.44,87.2 45.44,102.08 7.84,102.08 z" >

        <Path.Fill>

            <ImageBrush ImageSource="/Documents/1/Resources/Images/2.PNG"

                  Viewbox="0,0,235,93" TileMode="None" ViewboxUnits="Absolute"

                  ViewportUnits="Absolute" Viewport="7.84,87.2,37.6,14.88" />

        </Path.Fill>

    </Path>

    <Glyphs Fill="#ff000000" FontUri="/Documents/1/Resources/Fonts/FBB4FB52-34A4-45CC-836A-F18952F112F9.odttf"

          FontRenderingEmSize="16.016" StyleSimulations="None"

          OriginX="12.32" OriginY="119.36" Indices="6275;2464;9083;16901" UnicodeString="打印测试" />

</FixedPage>
大家如果想操作xps文档的话可以引用ReachFramework.dll, System.Windows.Xps.Packaging命名空间
里面封装了xps文档的操作方法,这里抛砖引玉顺便介绍了xps的一些知识
顺便贴一个比较详细介绍打印的文件供大家参考
http://blog.csdn.net/gkq8124372/article/details/7494272