XLNet Fine-Tuning Tutorial with PyTorch
前言
在本教程中,我将向您展示如何使用huggingface PyTorch库对预先训练好的XLNet模型进行调整,以快速生成用于文本分类的分类器。
Introduction
这篇文章有两种形式——一种是博客,另一种是Colab notebook。内容是相同的,但:
- 博客文章格式可能更容易阅读,并包含一个讨论的评论部分。
- Colab Notebook允许您运行代码并在阅读过程中检查它。
What is XLNet?
XLNet是由CMU和谷歌研究人员在2019年年中开发的一种预训练语言表示方法。XLNet的创建是为了解决作者所认为的BERT和其他流行语言模型使用的预训练的自动编码方法的缺点。在这篇文章中,我们不会深入讨论XLNet的细节,但是作者倾向于使用自定义的自回归方法。在一系列NLP任务中,这种预训练方法的效果优于BERT模型,并产生了一个新的最先进的模型。
Install and Import
谷歌Colab提供免费的gpu和TPUs!因为我们将训练一个大型的神经网络,最好利用这个(在这种情况下,我们将附加一个GPU),否则训练将花费很长时间。
添加一个GPU可以到菜单中选择:
Edit -> Notebook Settings -> Add accelerator (GPU)
然后运行以下单元以确认GPU已被检测到。
import tensorflow as tf

device_name = tf.test.gpu_device_name()
if device_name != '/device:GPU:0':
  raise SystemError('GPU device not found')
print('Found GPU at: {}'.format(device_name))

## Found GPU at: /device:GPU:0
接下来,让我们通过HuggingFace来安装XLNet的pytorch接口。(这个库包含其他预训练语言模型的接口,比如OpenAI的GPT、BERT和GPT-2。)我们选择了pytorch接口,因为它在高级api(易于使用,但不提供深入的工作原理)和tensorflow代码(其中包含很多细节,但经常让我们忽略tensorflow)之间取得了很好的平衡。
目前,hug Face库似乎是使用迁移学习模型工作的最广泛和最强大的pytorch接口。除了支持各种不同的预先训练的语言模型(以及未来的模型—在BERT和XLNet发布后的短短几个月,它们都被新模型超越了!)之外,这个库还包括针对您的特定任务预先构建的不同模型的修改。例如,在本教程中,我们将使用XLNet进行序列分类,但是这个库还包括为标记分类、问题回答、下一个句子预测等设计的模型修改。使用这些预构建的类可以简化修改迁移学习模型的过程。
!pip install pytorch-transformers
import torch
from torch.utils.data import TensorDataset, DataLoader, RandomSampler, SequentialSampler
from keras.preprocessing.sequence import pad_sequences
from sklearn.model_selection import train_test_split


from pytorch_transformers import XLNetModel, XLNetTokenizer, XLNetForSequenceClassification
from pytorch_transformers import AdamW

from tqdm import tqdm, trange
import pandas as pd
import io
import numpy as np
import matplotlib.pyplot as plt
% matplotlib inline
为了让torch使用GPU,我们需要识别并指定GPU为设备。稍后,在我们的训练循环中,我们将把数据加载到设备上。
device = torch.device("cuda" if torch.cuda.is_available() else "cpu")
n_gpu = torch.cuda.device_count()
torch.cuda.get_device_name(0)
## 'Tesla T4'
Load Dataset
我们将使用Corpus of Linguistic Acceptability (CoLA)进行单句分类。它是一组语法被标记正确或不正确的句子。数据如下:
- Column 1:表示句子来源的代码。
- Column 2:可接受性判断标签(0=不可接受,1=可接受)。
- Column 3: 作者最初标注的可接受性判断标签。
- Column 4: 句子
从该链接下载数据集,提取并将其移动到本地驱动器。
数据的标记(tokenized)版本和原始(raw)版本都是可用的。我们将使用原始版本,因为我们需要使用XLNet tokenizer将文本分解为tokens和模型将识别的块。
from google.colab import files
uploaded = files.upload()
df = pd.read_csv("in_domain_train.tsv", delimiter='\t', header=None, names=['sentence_source', 'label', 'label_notes', 'sentence'])
df.shape
## (8551,4)
df.sample(10)

# Create sentence and label lists
sentences = df.sentence.values
我们需要在每个句子的开头和结尾添加特殊的标记(“[SEP]”和“[CLS]”),以便XLNet正常工作。
对于BERT,special token pattern是这样的:
[CLS] + Sentence_A + [SEP] + Sentence_B + [SEP]
而XLNet的token pattern是这样的:
Sentence_A + [SEP] + Sentence_B + [SEP] + [CLS]
对于这里的单个句子输入,我们只需要在后面加上[SEP]和[CLS]:
sentences = [sentence + " [SEP] [CLS]" for sentence in sentences]
labels = df.label.values
Inputs
接下来,导入XLNet tokenizer,用于将文本转换为与XLNet词汇表相对应的tokens。
tokenizer = XLNetTokenizer.from_pretrained('xlnet-base-cased', do_lower_case=True)

tokenized_texts = [tokenizer.tokenize(sent) for sent in sentences]
print ("Tokenize the first sentence:")
print (tokenized_texts[0])
Tokenize the first sentence:
['▁our', '▁friends', '▁won', "'", 't', '▁buy', '▁this', '▁analysis', ',', '▁let', '▁alone', '▁the', '▁next', '▁one', '▁we', '▁propose', '.', '▁[', 's', 'ep', ']', '▁[', 'cl', 's', ']']
XLNet需要特定格式的输入。对于每个标记化( tokenized)的输入语句,我们需要创建:
- input ids:使用一个序列的整数去标记每个输入的token在XLNet tokenizer词汇表中的索引号
- segment mask:(可选)一个1和0的序列,用来识别输入是一个句子还是两个句子长。对于一个句子输入,这只是一个0序列。对于两个句子输入,第一个句子的每个标记都是0,第二个句子的每个标记都是1
- attention mask:(可选)1和0的序列,所有的输入标记用1表示,所有填充标记用0表示(我们将在下一段详细介绍)
- labels:单个值1或0。在我们的任务中,1表示“合乎语法的”,0表示“不合语法的”
虽然我们可以有可变长度的输入语句,但XLNet要求输入数组的大小相同。我们首先选择一个最大的句子长度,然后填充和截断输入,直到每个输入序列的长度相同。
在这个上下文中,“pad”我们的输入意味着如果一个句子比最大的句子长度短,我们只需在序列的末尾添加0,直到它是最大的句子长度。
如果一个句子比最大的句子长度长,那么我们简单地截断序列的末尾,丢弃任何不符合最大句子长度的内容。
我们对序列进行填充和截断,使它们的长度都变为MAX_LEN(“post”表示我们希望填充和截断序列的末尾,而不是开头)。pad_sequences 是 Keras的一个工具函数,它只简单处理Python列表的截断和填充。
# Set the maximum sequence length. The longest sequence in our training set is 47, but we'll leave room on the end anyway.
MAX_LEN = 128
# Use the XLNet tokenizer to convert the tokens to their index numbers in the XLNet vocabulary
input_ids = [tokenizer.convert_tokens_to_ids(x) for x in tokenized_texts]
# Pad our input tokens
input_ids = pad_sequences(input_ids, maxlen=MAX_LEN, dtype="long", truncating="post", padding="post")
Create the attention masks
# Create attention masks
attention_masks = []

# Create a mask of 1s for each token followed by 0s for padding
for seq in input_ids:
  seq_mask = [float(i>0) for i in seq]
  attention_masks.append(seq_mask)
# Use train_test_split to split our data into train and validation sets for training

train_inputs, validation_inputs, train_labels, validation_labels = train_test_split(input_ids, labels,                                                             random_state=2018, test_size=0.1)
train_masks, validation_masks, _, _ = train_test_split(attention_masks, input_ids, random_state=2018,test_size=0.1)
# Convert all of our data into torch tensors, the required datatype for our model

train_inputs = torch.tensor(train_inputs)
validation_inputs = torch.tensor(validation_inputs)
train_labels = torch.tensor(train_labels)
validation_labels = torch.tensor(validation_labels)
train_masks = torch.tensor(train_masks)
validation_masks = torch.tensor(validation_masks)
# Select a batch size for training. For fine-tuning with XLNet, the authors recommend a batch size of 32, 48, or 128. We will use 32 here to avoid memory issues.
batch_size = 32

# Create an iterator of our data with torch DataLoader. This helps save on memory during training because, unlike a for loop,
# with an iterator the entire dataset does not need to be loaded into memory

train_data = TensorDataset(train_inputs, train_masks, train_labels)
train_sampler = RandomSampler(train_data)
train_dataloader = DataLoader(train_data, sampler=train_sampler, batch_size=batch_size)

validation_data = TensorDataset(validation_inputs, validation_masks, validation_labels)
validation_sampler = SequentialSampler(validation_data)
validation_dataloader = DataLoader(validation_data, sampler=validation_sampler, batch_size=batch_size)
Train Model
现在我们的输入数据已经正确格式化了,接下来就该对XLNet模型进行调优了。
对于这个任务,我们首先想要修改预训练的模型以提供分类的输出,然后我们想要继续在我们的数据集上训练模型,直到整个模型,端到端的,非常适合我们的任务。值得庆幸的是,huggingface pytorch实现包含一组为各种NLP任务设计的接口。虽然这些接口都是在一个训练好的模型之上构建的,但是每个接口都有不同的顶层和输出类型,以适应它们特定的NLP任务。
我们将装载XLNetForSequenceClassification。这是常规的XLNet模型,在上面添加了一个线性层用于分类,我们将使用它作为句子分类器。当我们输入数据时,整个预先训练过的XLNet模型和额外的未训练的分类层将针对我们的特定任务进行训练。
The Fine-Tuning Process
因为预先训练的模型层已经编码了大量关于语言的信息,所以训练分类器相对好些。而不是每一层在一个大模型从头训练,就好像我们已经进行了95%的训练工作,并且只需要根据具体下游任务适当的调整top layer的训练就可以了。
有时practicioners 会选择在微调时“freeze”某些layers,或者应用不同的学习速率,应用递减的学习速率等等,所有这些都是为了在网络中保持高质量的权重和加速训练(通常是相当快的)。事实上,最近对像BERT这样的转移学习模型的研究已经明确表明,freeze大部分的权重只会导致最低限度的准确性下降,但是也有例外,转移学习的更广泛的规则也应该被考虑。例如,如果您的任务和微调数据集与用于训练转移学习模型的数据集非常不同,那么冻结权重可能不是一个好主意。我们将在以后的文章中讨论NLP中更广泛的迁移学习。
好的,让我们加载XLNet!有几种不同的预先训练过的XLNet模型可用。 “xlnet-base-cased”是指同时包含大小写字母(“大小写混合格式”)和较小的大小写字母(“base”和“large”)的版本.
# Load XLNEtForSequenceClassification, the pretrained XLNet model with a single linear classification layer on top.

model = XLNetForSequenceClassification.from_pretrained("xlnet-base-cased", num_labels=2)
model.cuda()
现在我们已经加载了模型,我们需要从存储的模型中获取训练超参数。
为了进行微调,作者建议在以下范围内使用以下超参数(将它们应用于哪些NLP数据集进行分解):

param_optimizer = list(model.named_parameters())
no_decay = ['bias', 'gamma', 'beta']
optimizer_grouped_parameters = [
    {'params': [p for n, p in param_optimizer if not any(nd in n for nd in no_decay)],
     'weight_decay_rate': 0.01},
    {'params': [p for n, p in param_optimizer if any(nd in n for nd in no_decay)],
     'weight_decay_rate': 0.0}
]
# This variable contains all of the hyperparemeter information our training loop needs
optimizer = AdamW(optimizer_grouped_parameters,
                     lr=2e-5)
下面是我们的训练循环。还有很多工作要做,但基本上我们的循环中的每一次循环都有一个training 阶段和一个validation 阶段。在每一关,我们需要:
Training loop:
- 告诉模型通过将模型设置为train模式来计算梯度
- 解压我们的数据输入和标签
- 加载数据到GPU
- 清除上一遍中计算的梯度。在pytorch中,除非您显式地清除gradients ,否则gradients 会自动累积(对于RNNs之类的东西很有用)
- 前向传递(通过网络输入数据)
- 反向传播
- 告诉网络使用optimizer.step()更新参数
- 跟踪变量以查看进度
Evalution loop:
- 告诉模型在评估模式中不要计算梯度
- 解压我们的数据输入和标签
- 加载数据到GPU
- 前向传递(通过网络输入数据
- 计算验证数据的损失,跟踪变量以查看进度
# Function to calculate the accuracy of our predictions vs labels
def flat_accuracy(preds, labels):
    pred_flat = np.argmax(preds, axis=1).flatten()
    labels_flat = labels.flatten()
    return np.sum(pred_flat == labels_flat) / len(labels_flat)
# Store our loss and accuracy for plotting
train_loss_set = []

# Number of training epochs (authors recommend between 2 and 4)
epochs = 4

# trange is a tqdm wrapper around the normal python range
for _ in trange(epochs, desc="Epoch"):


  # Training

  # Set our model to training mode (as opposed to evaluation mode)
  model.train()

  # Tracking variables
  tr_loss = 0
  nb_tr_examples, nb_tr_steps = 0, 0

  # Train the data for one epoch
  for step, batch in enumerate(train_dataloader):
    # Add batch to GPU
    batch = tuple(t.to(device) for t in batch)
    # Unpack the inputs from our dataloader
    b_input_ids, b_input_mask, b_labels = batch
    # Clear out the gradients (by default they accumulate)
    optimizer.zero_grad()
    # Forward pass
    outputs = model(b_input_ids, token_type_ids=None, attention_mask=b_input_mask, labels=b_labels)
    loss = outputs[0]
    logits = outputs[1]
    train_loss_set.append(loss.item())
    # Backward pass
    loss.backward()
    # Update parameters and take a step using the computed gradient
    optimizer.step()


    # Update tracking variables
    tr_loss += loss.item()
    nb_tr_examples += b_input_ids.size(0)
    nb_tr_steps += 1

  print("Train loss: {}".format(tr_loss/nb_tr_steps))


  # Validation

  # Put model in evaluation mode to evaluate loss on the validation set
  model.eval()

  # Tracking variables
  eval_loss, eval_accuracy = 0, 0
  nb_eval_steps, nb_eval_examples = 0, 0

  # Evaluate data for one epoch
  for batch in validation_dataloader:
    # Add batch to GPU
    batch = tuple(t.to(device) for t in batch)
    # Unpack the inputs from our dataloader
    b_input_ids, b_input_mask, b_labels = batch
    # Telling the model not to compute or store gradients, saving memory and speeding up validation
    with torch.no_grad():
      # Forward pass, calculate logit predictions
      output = model(b_input_ids, token_type_ids=None, attention_mask=b_input_mask)
      logits = output[0]

    # Move logits and labels to CPU
    logits = logits.detach().cpu().numpy()
    label_ids = b_labels.to('cpu').numpy()

    tmp_eval_accuracy = flat_accuracy(logits, label_ids)

    eval_accuracy += tmp_eval_accuracy
    nb_eval_steps += 1

  print("Validation Accuracy: {}".format(eval_accuracy/nb_eval_steps))
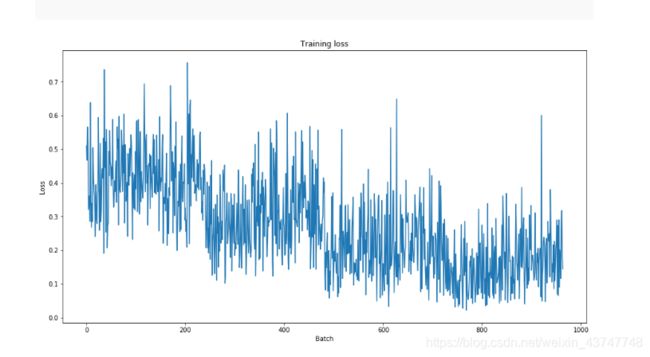
Training Evaluation
Let’s take a look at our training loss over all batches:
plt.figure(figsize=(15,8))
plt.title("Training loss")
plt.xlabel("Batch")
plt.ylabel("Loss")
plt.plot(train_loss_set)
plt.show()
Predict and Evaluate on Holdout Set
现在,我们将加载holdout数据集并准备输入,就像我们对训练集所做的那样。然后,我们将使用Matthew的相关系数来评估预测,因为这是更广泛的NLP社区用来评估CoLA性能的指标。在这个度量中,+1是最好的分数,-1是最差的分数。通过这种方式,我们可以看到我们在针对这个特定任务的最先进模型的状态下执行得有多好。
# Upload the test file from your local drive
from google.colab import files
uploaded = files.upload()
df = pd.read_csv("out_of_domain_dev.tsv", delimiter='\t', header=None, names=['sentence_source', 'label', 'label_notes', 'sentence'])

# Create sentence and label lists
sentences = df.sentence.values

# We need to add special tokens at the beginning and end of each sentence for XLNet to work properly
sentences = [sentence + " [SEP] [CLS]" for sentence in sentences]
labels = df.label.values

tokenized_texts = [tokenizer.tokenize(sent) for sent in sentences]


MAX_LEN = 128

# Use the XLNet tokenizer to convert the tokens to their index numbers in the XLNet vocabulary
input_ids = [tokenizer.convert_tokens_to_ids(x) for x in tokenized_texts]
# Pad our input tokens
input_ids = pad_sequences(input_ids, maxlen=MAX_LEN, dtype="long", truncating="post", padding="post")
# Create attention masks
attention_masks = []

# Create a mask of 1s for each token followed by 0s for padding
for seq in input_ids:
  seq_mask = [float(i>0) for i in seq]
  attention_masks.append(seq_mask)

prediction_inputs = torch.tensor(input_ids)
prediction_masks = torch.tensor(attention_masks)
prediction_labels = torch.tensor(labels)

batch_size = 32


prediction_data = TensorDataset(prediction_inputs, prediction_masks, prediction_labels)
prediction_sampler = SequentialSampler(prediction_data)
prediction_dataloader = DataLoader(prediction_data, sampler=prediction_sampler, batch_size=batch_size)
# Prediction on test set

# Put model in evaluation mode
model.eval()

# Tracking variables
predictions , true_labels = [], []

# Predict
for batch in prediction_dataloader:
  # Add batch to GPU
  batch = tuple(t.to(device) for t in batch)
  # Unpack the inputs from our dataloader
  b_input_ids, b_input_mask, b_labels = batch
  # Telling the model not to compute or store gradients, saving memory and speeding up prediction
  with torch.no_grad():
    # Forward pass, calculate logit predictions
    outputs = model(b_input_ids, token_type_ids=None, attention_mask=b_input_mask)
    logits = outputs[0]

  # Move logits and labels to CPU
  logits = logits.detach().cpu().numpy()
  label_ids = b_labels.to('cpu').numpy()

  # Store predictions and true labels
  predictions.append(logits)
  true_labels.append(label_ids)
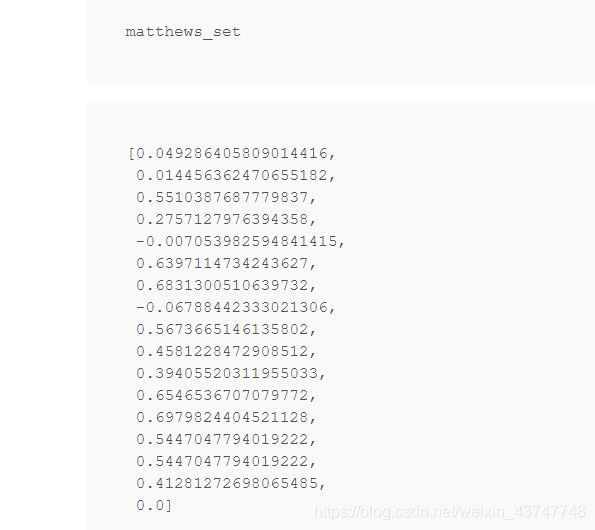
from sklearn.metrics import matthews_corrcoef
matthews_set = []

for i in range(len(true_labels)):
  matthews = matthews_corrcoef(true_labels[i],
                 np.argmax(predictions[i], axis=1).flatten())
  matthews_set.append(matthews)
最终的分数将基于整个测试集,但让我们看看个别批次的分数,以了解批次之间度量的可变性。
# Flatten the predictions and true values for aggregate Matthew's evaluation on the whole dataset
flat_predictions = [item for sublist in predictions for item in sublist]
flat_predictions = np.argmax(flat_predictions, axis=1).flatten()
flat_true_labels = [item for sublist in true_labels for item in sublist]
matthews_corrcoef(flat_true_labels, flat_predictions)
酷,我们已经调优了XLNet!
我们的初始分数不是很高,所以最好尝试一些超参数调优(调整学习率、epoch、批大小、优化器属性等)以获得更好的分数。我还应该提到,我们并没有对整个训练数据集进行训练,而是将其中的一部分作为我们的验证集,以确保代码的可读性。
原文链接