Elasticsearch:使用 ingest pipeline 来管理索引名称
在我之前的文章 “Elasticsearch:使用 pipelines 路由文档到想要的 Elasticsearch 索引中去” 我详述了如何使用已有的 date_index_name 处理器来把文档归类到所需要的和文档日期相关的的索引中去。比如,我们想把 2023 年 4 月的所有文档写入到 my-index-2023-04-01 这个索引名称中去。这个处理器很好地解决了在很多情况下,我们需要把当月或者当年的索引放到我们需要的以文档时间戳相关索引名称中,这样便于以后的管理及搜索。
在今天的文章中,我们将以另外一种方式来实现同样的方案。
各种不同的方法来修改数据
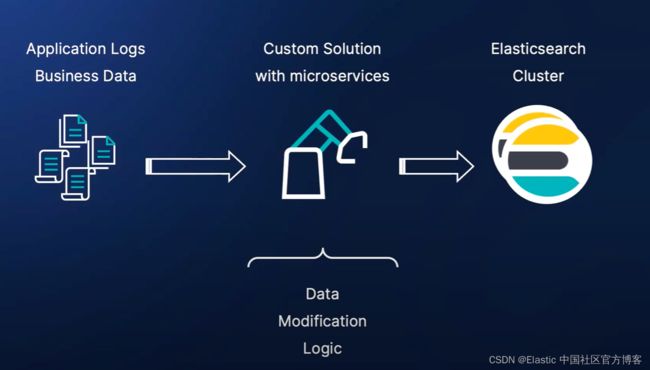
在 Elastic Stack 中的使用中,我们有许多不同的方案来修改数据,比如:
在上面,我们使用定制的微服务来摄入商业应用文档,并使用我们的算法来修改文档,最终通过 client 库把文档写入到 Elasticsearch 中。这种方法的缺点是你需要编写相应的应用程序来完成。针对大量的数据,我们可能没有缓冲,有时我们甚至不能保证至少一次传输。这种在 Logstash 和 Filebeat 中都有实现。
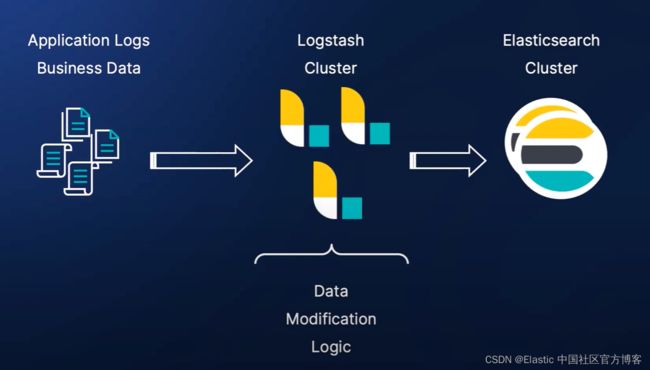
我们也可以采用 Logstash 来对数据进行修改:
Logstash 提供了丰富的过滤器来帮助我们处理数据。你可以阅读文章 “Logstash:Logstash 入门教程 (一)” 以了解更多。这种方案的缺点是,为了应付 single point of failure 及负载均衡,你需要管理多个 Logstash 实例。这个需要额外的工作。
在最新的开发者中,越来越多的开发者倾向于使用 ingest pipeline 来对数据进行处理。更多关于 ingest pipeline 的文章可以参考 “Elastic:开发者上手指南”。
Ingest 节点是 Elasticsearch 集群中的一类节点。它可以帮我们运行丰富的处理器来处理数据。由于它是 Elasticsearch 集群的一个部分,它可以很方便地进行扩容操作来应付更多的需求。
![]()
使用 Ingest pipeline 的好处是:
- 能够在不改变应用程序逻辑的情况下修改数据
- 与 Logstash 相比的轻量级解决方案
- 单独管理集群没有额外开销
- 降低结构复杂性
尽管 ingest pipeline 有上面的很多优点,但是使用 ingest pipeline 也有一些局限性:
- 无法将文档拆分为多个文档([Ingest Pipeline] Ability to split documents · Issue #56769 · elastic/elasticsearch · GitHub)
- 由于摄取管道的性质,同时处理多个文档时可能会遇到挑战
- 不能和外部的数据库进行 join 等操作,也无法访问外部的数据库并写入
除了上面所述的修改数据的方案中,另外一个就是通过 Beats processor 来对数据进行加工。你可以更进一步阅读 “Beats:Beats processors”。
把数据写入到我们想要的索引中去
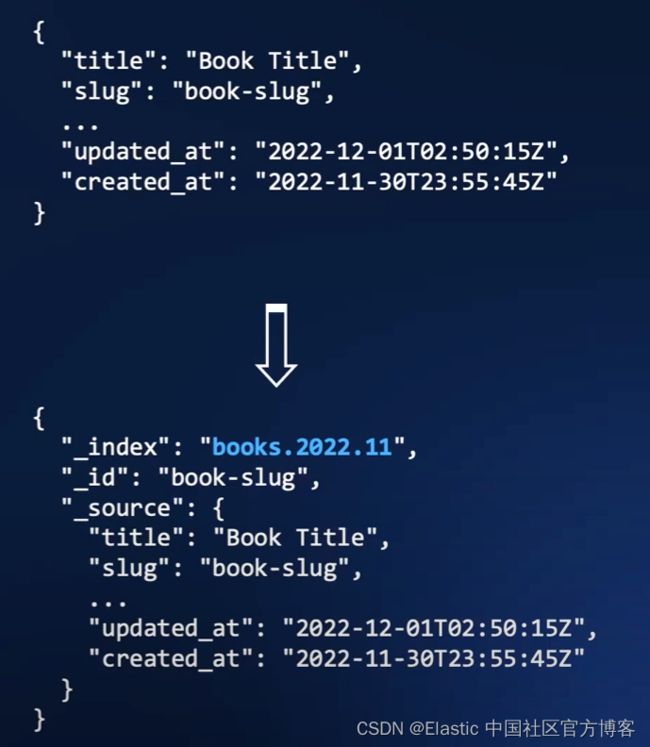
我们接下来通过 ingest pipeline 的方法来把我们想要的数据写入到我们想要的索引中去。我们想把
比如在上面,我们可以看到一个字段叫做 created_at。它是发生在 2022-11-30 这个天。我们想把这个文档写入到我们想要的索引名称中 books.2022.11。道理很简单,我们就是想把当月的所有文档归于同样的一个索引名称 books.2022.11 这个索引中。以后便于归档及搜索。在实际的生产环境中,有这种需求。那么我们该如何实现我们的这种需求呢?
我们采用 ingest pipeline 来实现这个需求。我们在 Kibana 中打入如下的命令:
POST _ingest/pipeline/_simulate
{
  "pipeline": {
    "description": "Change index name according to created_at",
    "processors": [
      {
        "date": {
          "field": "created_at",
          "target_field": "index_suffix",
          "formats": ["ISO8601"],
          "output_format": "yyyy.MM"
        }
      },
      {
        "set": {
          "field": "_index",
          "value": "{{ _index }}.{{index_suffix}}"
        }
      }
    ]
  },
  "docs": [
    {
      "_source": {
        "created_at": "2023-04-13T23:57:11.092808962ZZ",
        "content": "This is Xiaoguo, Liu from Elastic"
      }
    }
  ]
}
运行上面的命令,我们看到的结果是:
{
  "docs": [
    {
      "doc": {
        "_index": "_index.2023.04",
        "_id": "_id",
        "_version": "-3",
        "_source": {
          "created_at": "2023-04-13T23:57:11.092808962ZZ",
          "content": "This is Xiaoguo, Liu from Elastic",
          "index_suffix": "2023.04"
        },
        "_ingest": {
          "timestamp": "2023-04-14T00:01:24.74589526Z"
        }
      }
    }
  ]
}
在上面,由于我们没有指定 _index,所以测试的结果是 _index.2023.04。在下面,如果我们指定 _index,那么就会自动替换我们想要的索引名称。上面显示它已经是我们想要的结果。我们可以创建如下的 pipeline:
PUT _ingest/pipeline/change_index_according_to_created_at
{
  "description": "Change index name according to created_at",
  "processors": [
    {
      "date": {
        "field": "created_at",
        "target_field": "index_suffix",
        "formats": [
          "ISO8601"
        ],
        "output_format": "yyyy.MM"
      }
    },
    {
      "set": {
        "field": "_index",
        "value": "{{ _index }}.{{index_suffix}}"
      }
    }
  ]
}
运行完上面的命令后,我们使用如下的命令来做测试:
PUT books/_doc/1?pipeline=change_index_according_to_created_at
{
  "created_at": "2023-04-13T23:57:11.092808962ZZ",
  "content": "This is Xiaoguo Liu from Elastic"
}
上面的命令返回的结果为:
{
  "_index": "books.2023.04",
  "_id": "1",
  "_version": 1,
  "result": "created",
  "_shards": {
    "total": 2,
    "successful": 1,
    "failed": 0
  },
  "_seq_no": 0,
  "_primary_term": 1
}
如上所示,我们的 _index 名称现在变为 books.2023.04,而不是在写入时的 books。我们可以通过如下的命令来进行查询刚才写入的数据:
GET books.2023.04/_search上面的命令返回:
{
  "took": 1,
  "timed_out": false,
  "_shards": {
    "total": 1,
    "successful": 1,
    "skipped": 0,
    "failed": 0
  },
  "hits": {
    "total": {
      "value": 1,
      "relation": "eq"
    },
    "max_score": 1,
    "hits": [
      {
        "_index": "books.2023.04",
        "_id": "1",
        "_score": 1,
        "_source": {
          "created_at": "2023-04-13T23:57:11.092808962ZZ",
          "content": "This is Xiaoguo Liu from Elastic",
          "index_suffix": "2023.04"
        }
      }
    ]
  }
}
其实安装同样的套路,通过修改 _index,我们可以任意组合我们的索引名称。在生产环境中,我们更希望使用带有日期标签的名称来标识我们的索引!


