Prism4.0CTP Silverlight上手实践: Get Started with the Prism Library
实验目的
- 创建一个基于Prism类库的Silverlight解决方案。
- 创建并加载一个模块。
- 创建一个视图并显示在Shell窗体中。
准备工作
本实验需要如下Prism类库中的程序集:
- Microsoft.Practices.Composite.dll
- Microsoft.Practices.Composite.Presentation.dll
- Microsoft.Practices.Composite.UnityExtensions.dll
- Microsoft.Practices.ServiceLocation.dll
- Microsoft.Practices.Unity.Silverlight.dll
Prism类库以源码方式发布,请编译源码获取程序集。
实验步骤
包括以下任务:
- 任务1:创建基于Prism类库的解决方案
- 任务2:添加一个模块
- 任务3:添加一个视图
任务1:创建基于Prism类库的解决方案
按如下步骤创建该解决方案:
- 新建一个基于C#的Silverlight应用程序项目:HelloWorld.Silverlight。
- 在随后的对话框中选择“ASP.NET Web应用程序项目”用于承载Silverlight项目到解决方案中。点确定即可。
- 在解决方案下创建一个名为Library.Silverlight的文件夹,然后拷贝下列程序集到其中:
- Microsoft.Practices.Composite.dll—Prism的核心组件:模块性、日志服务、通信服务、核心接口定义等,不包括UI元素
- Microsoft.Practices.Composite.Presentation.dll—针对Silverlight实现的一些Commands、Regions、Events
- Microsoft.Practices.Composite.UnityExtensions.dll—基础和工具类,主要使用Unity Application Block实现。比如UnityBootStrapper类用于创建和配置程序启动时的Unity容器
- Microsoft.Practices.Unity.Silverlight.dll—通过该程序集来使用Unity Application Block。你也可以不用它,但是你必须从Prism的扩展点自己实现一个类似的功能。
- Microsoft.Practices.ServiceLocation.dll—包括公共服务定位器接口Common Service Locator Interface,该接口提供一种抽象来支持依赖倒转(IOC)的容器和服务定位器,便于你修改容器实现。
- 在HelloWorld.Silverlight项目中,添加上述程序集引用。(拷贝程序集时连同xml文件一起拷贝就可以在VS中使用相应的智能提示功能)
如何设置Shell
- 在解决方案管理器中,重命名MainPage.xaml文件为Shell.xaml
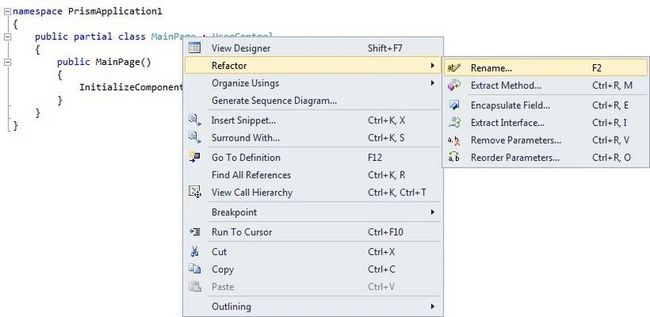
- 打开Shell.xaml的代码文件,重构MainPage类名为Shell,如下图所示:
- 打开Shell.Xaml文件切换到XAML视图,修改代码如下:
     <

     UserControl x:Class

     =

     "

     HelloWorld.Silverlight.Shell

     "


 xmlns

     =

     "

     http://schemas.microsoft.com/winfx/2006/xaml/presentation

     "


 xmlns:x

     =

     "

     http://schemas.microsoft.com/winfx/2006/xaml

     "


 Width

     =

     "

     400

     "

      Height

     =

     "

     300

     "

     >


     <

     Grid x:Name

     =

     "

     LayoutRoot

     "

      Background

     =

     "

     White

     "

     >


     </

     Grid

     >


     </

     UserControl

     >
区域Regions
下面步骤介绍如何添加一个ItemsControl控件并关联到一个区域Region。
- 在Shell.xaml文件中,添加如下命名空间,用于使用Prism类库中区域的附加属性
xmlns:Regions = " clr-namespace:Microsoft.Practices.Composite.Presentation.Regions;assembly=Microsoft.Practices.Composite.Presentation " - 替换Grid为ItemsControl控件,如下所示
< UserControl x:Class = " HelloWorld.Silverlight.Shell "
xmlns = " http://schemas.microsoft.com/winfx/2006/xaml/presentation "
xmlns:x = " http://schemas.microsoft.com/winfx/2006/xaml "
xmlns:Regions = "clr-namespace:Microsoft.Practices. Composite.Presentation.Regions;assembly=Microsoft.Practices.Composite.Presentation "
Width = " 400 " Height = " 300 " >
< ItemsControl Name = " MainRegion " />
</ UserControl > - 设置ItemsControl的附加属性Regions:RegionManager.RegionName为MainRegion,如下所示。该附加属性用于关联MainRegion区域和相关的控件。
     <

     ItemsControl Name

     =

     "

     MainRegion

     "

      Regions:RegionManager.RegionName

     =

     "

     MainRegion

     "

     />
在Shell实例化之后,Silverlight会解析附加属性Regions:RegionManager.RegionName的值,以回调RegionManager类。该回调过程创建了一个区域Region及与之相关的一个ItemsControl控件。
启动引导器BootStrapper
启动引导器负责初始化基于Prism的应用程序。包括UnityBootstrapper 和MefBootstrapper两种。你也可以实现自己的特定容器的启动引导器。
下面介绍如何设置启动引导器Bootstrapper:
- 添加一个新类文件BootStrapper.cs文件到HelloWorld.Silverlight项目。
- 在BootStrapper.cs中添加using语句,以使用UnityBootStrapper类。
using Microsoft.Practices.Composite.Modularity;
using Microsoft.Practices.Composite.UnityExtensions;
using Microsoft.Practices.Unity; - 更新BootStrapper类继承于UnityBootStrapper类。
     class

      Bootstrapper : UnityBootstrapper
{
} - 重载BootStrapper中的CreateShell方法。
     protected


     override

      DependencyObject CreateShell()
{


     return

      Container.Resolve

     <

     Shell

     >

     ();
} - 重载InitializeShell方法,该方法对用户显示Shell。
     protected


     override


     void

      InitializeShell()
{


     base

     .InitializeShell();
 Application.Current.RootVisual

     =

      (UIElement)

     this

     .Shell;
} - 重载ConfigureModuleCatalog方法,此方法用于构建模块目录。模块目录实现了。Microsoft.Practices.Composite.Modularity.IModuleCatalog接口,保存了应用程序中模块的元数据,便于运行时检索和加载模块。
     protected


     override


     void

      ConfigureModuleCatalog()
{


     base

     .ConfigureModuleCatalog();
} - 打开文件App.xaml.cs,修改Application_Startup事件处理函数
     private


     void

      Application_Startup(

     object

      sender, StartupEventArgs e)
{
 Bootstrapper bootstrapper

     =


     new

      Bootstrapper();
 bootstrapper.Run();
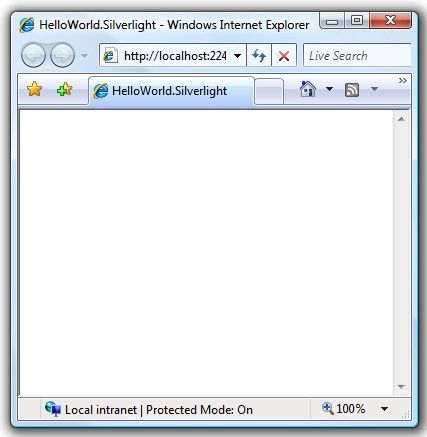
} - 生成运行应用程序可看到如下界面
任务2:添加模块
包括两个子任务:
- 创建一个模块—创建一个带模块初始化器类的模块项目;
- 配置模块加载的方式—配置应用程序来加载模块。
创建模块
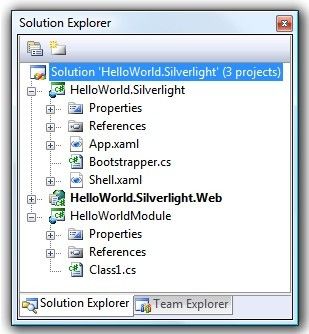
- 添加一个Silverlight类库项目(C#),项目名为HelloWorldModule。
- 添加以下程序集的引用
- Microsoft.Practices.Composite.dll
- Microsoft.Practices.Composite.Presentation.dll
- 重命名Class1.cn文件名为HelloWorldModule.cs,注意要将项目中所有用到Class1名称的地方都改成HelloWorldModule
- 打开HelloWorldModule,添加如下using语句来使用Prism中的模块化功能
using Microsoft.Practices.Composite.Modularity; - 让HelloWorldModule类继承IModule接口
     public


     class

      HelloWorldModule : IModule
{
} - 在HelloWorldModule类中,添加一个初始化方法
     public


     void

      Initialize()
{

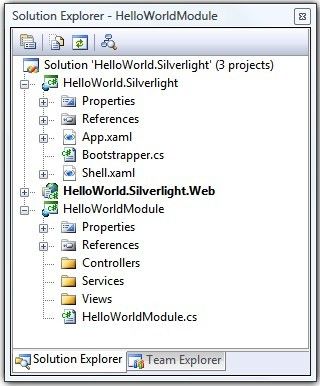
} - 分别添加Views/Service/Controller文件夹到HelloWorldModule项目下,用于组织项目的文件架结构
- 生成解决方案
到此,我们建立了一个基于Prism的模块项目,下面继续介绍如何加载这些模块。
应用程序寿命周期中的模块
在应用程序寿命周期中,模块经历了以下三个步骤:
- 模块通过模块目录被发现。模块目录包含了模块元数据的集合,元数据由模块管理服务使用。
- 模块管理服务协调模块的初始化。它负责管理模块的检索和按顺序初始化模块。加载模块->必要时检索模块->然后验证模块。
- 模块管理器实例化每个模块的初始器类Initializer,然后调用其中的 Initialize方法。
构建模块目录
Prism提供了几种方式用于构建模块目录。Silverlight中可以通过编码方式或者XAML方式来实现模块目录。
以下为构建模块目录的步骤:
- 在外观Shell项目中,添加一个到HelloWorldModule项目的引用
- 打开BootStrapper.cs文件,修改ConfigModuleCatalog方法
     protected


     override


     void

      ConfigureModuleCatalog()
{


     base

     .ConfigureModuleCatalog();
}
ModuleCatalog类用于应用程序以代码的方式来定义模块。它实现了IModuleCatalog接口方法和AddModule方法,帮助开发者手动注册模块以便被应用程序加载
public ModuleCatalog AddModule(Type moduleType, InitializationMode initializationMode, params string[] dependsOn)
AddModule方法返回ModleCatalog实例,但需要以下参数输入
- 模块初始器类的类型,该类型必须实现IModule接口
- 初始模式,该参数指示模块如何被初始化,可能的值为InitializationMode.WhenAvailable 和InitializationMode.OnDemand
- 该模块依赖的其他模块的模块名数组(如果存在)。在模块依赖的模块被加载之后,该模块才会被加载
- 更新ConfigureModuleCatalog 方法来注册带模块目录实例的HelloWorldModule 模块
     protected


     override


     void

      ConfigureModuleCatalog()
{


     base

     .ConfigureModuleCatalog();

ModuleCatalogmoduleCatalog

     =

      (ModuleCatalog)

     this

     .ModuleCatalog;
 moduleCatalog.AddModule(

     typeof

     (HelloWorldModule.HelloWorldModule));
}
- 生成和运行解决方案。你可通过在HelloWorldModule模块的Initialize方法中打一个断点来确认模块能否被正确初始化。
任务4:添加一个视图
该任务将创建一个视图到HelloWorldModule模块项目中。视图(Views)指的是包含可视化内容的对象。视图一般是用户控件。添加视图步骤如下:
- 创建视图。创建一个包括可视化内容和后台管理UI元素的视图
- 在区域中展现视图。获取一个到区域的引用,并添加视图到其中
详细步骤如下
- 在模块HelloWorldModule项目中添加一个新的Silverlight用户控件,名为HelloWorldView.xaml
- 添加“Hello World”TextBlock到视图中
< UserControl x:Class = " HelloWorldModule.Views.HelloWorldView "
xmlns = " http://schemas.microsoft.com/winfx/2006/xaml/presentation "
xmlns:x = " http://schemas.microsoft.com/winfx/2006/xaml " >
< Grid x:Name = " LayoutRoot " Background = " White " >
< TextBlock Text = " Hello World " Foreground = " Green "HorizontalAlignment = " Center " VerticalAlignment = " Center "FontFamily = " Calibri " FontSize = " 24 " FontWeight = " Bold " ></ TextBlock >
</ Grid >
</ UserControl >
- 最后保存文件。
本实验为求简单没有用MVVM模式来实现解决方案。
区域管理器Region Manager
区域管理器服务负责维护区域的集合,和为控件创建新区域。它实现了Microsoft.Practices.Composite.Regions.IRegionManager接口。使得我们可以通过区域名以解耦的方式来定位区域或者添加视图到区域中。默认情况下,UnityBootStrapper基类在应用程序容器中注册了一个区域管理器服务的实例。这样我们就可以通过依赖注入的方式获取区域管理器服务的引用。
下面介绍如何在Shell中展现视图
- 打开HelloWorld.cs文件
- 添加using语句来使用Prism类库中的区域元素
using Microsoft.Practices.Composite.Regions; - 写一个只读区域管理的实例变量
private readonly IRegionManager regionManager; - 更改HelloWorldModule类的构造函数
     public

      HelloWorldModule(IRegionManager regionManager)
{


     this

     .regionManager

     =

      regionManager;
} - 修改Initialize方法
public void Initialize()
{
regionManager.RegisterViewWithRegion(" MainRegion " , typeof (Views.HelloWorldView));
}
以上步骤实现了视图发现方法,使用该方法时,需要制定视图和加载视图的区域。当区域被创建之后,它就会要求查找并自动加载相关的视图。
