Flume系列:案例-Flume负载均衡和故障转移
目录
Apache Hadoop生态-目录汇总-持续更新
逻辑:
2:案例需求-实现故障转移
3:实现步骤:
2.1:实现flume1.conf
2.2:实现flume2.conf - 端口4141
2.3:实现flume3.conf - 端口4142
3:启动传输链路
4:实现负载均衡
Apache Hadoop生态-目录汇总-持续更新
系统环境:centos7
Java环境:Java8
案例只演示通道流程,其中Source,channel,Sink的种类按需调整
故障转移配置与负载均衡两个选一个,不能同时配置
逻辑:
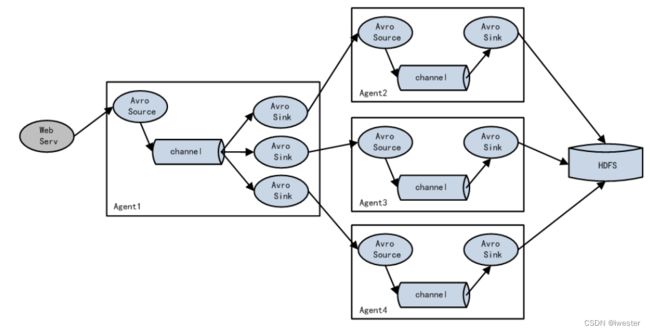
Flume支持使用将多个sink逻辑上分到一个sink组,sink组配合不同的SinkProcessor可以实现负载均衡和错误恢复的功能
负载均衡:多个轮流取任务
故障转移:优先级高的设备取任务 failover
2:案例需求-实现故障转移
使用 Flume1 监控一个端口,其 sink 组中的 sink 分别对接 Flume2 和 Flume3,采用FailoverSinkProcessor,实现故障转移的功能
架构流程:Flume1同时发送给Flume2,Flume3
故障转移:优先级高的设备取任务
3:实现步骤:
2.1:实现flume1.conf
配置1个netcat source和 1个channel、1 个 sink group(2 个 sink),分别输送给flume2 端口4141 和 flume3 端口4142
vim flume1.conf

# 1:定义组件
a1.sources = r1
a1.channels = c1
a1.sinks = k1 k2

# 2:定义source
a1.sources.r1.type = netcat
a1.sources.r1.bind = localhost
a1.sources.r1.port = 44444

# 3:定义channel
a1.channels.c1.type = memory
a1.channels.c1.capacity = 1000
a1.channels.c1.transactionCapacity = 100


# 4:定义sink
a1.sinkgroups = g1  # 定义sink组g1
# 故障转移配置 start
a1.sinkgroups.g1.processor.type = failover
a1.sinkgroups.g1.processor.priority.k1 = 5
a1.sinkgroups.g1.processor.priority.k2 = 10
a1.sinkgroups.g1.processor.maxpenalty = 10000
# 故障转移配置 end

a1.sinks.k1.type = avro
a1.sinks.k1.hostname = worker214
a1.sinks.k1.port = 4141

a1.sinks.k2.type = avro
a1.sinks.k2.hostname = worker215
a1.sinks.k2.port = 4142

# 5:定义关联关系
a1.sources.r1.channels = c1
a1.sinkgroups.g1.sinks = k1 k2
a1.sinks.k1.channel = c1
a1.sinks.k2.channel = c1
2.2:实现flume2.conf - 端口4141
source 端口4141
vim flume2.conf

# 1:定义组件
a2.sources = r1
a2.sinks = k1
a2.channels = c1

# 2:定义source
a2.sources.r1.type = avro
a2.sources.r1.bind = worker214
a2.sources.r1.port = 4141

# 3:定义channel
a2.channels.c1.type = memory
a2.channels.c1.capacity = 1000
a2.channels.c1.transactionCapacity = 100

# 4:定义sink
a2.sinks.k1.type = logger

# 5:定义关联关系
a2.sources.r1.channels = c1
a2.sinks.k1.channel = c1
2.3:实现flume3.conf - 端口4142
source 端口4142
vim flume3.conf

# 1:定义组件
a3.sources = r1
a3.sinks = k1
a3.channels = c2

# 2:定义source
a3.sources.r1.type = avro
a3.sources.r1.bind = worker215
a3.sources.r1.port = 4142

# 3:定义channel
a3.channels.c2.type = memory
a3.channels.c2.capacity = 1000
a3.channels.c2.transactionCapacity = 100

# 4:定义sink
a3.sinks.k1.type = logger

# 5:定义关联关系
a3.sources.r1.channels = c2
a3.sinks.k1.channel = c2
3:启动传输链路
1)启动flume2,监听端口4141
flume-ng agent --name flume2 --conf-file flume2.conf  -Dflume.root.logger=INFO,console

2)启动flume3,监听端口4142
flume-ng agent --name flume3 --conf-file flume3.conf  -Dflume.root.logger=INFO,console

3)启动flume1,sink到flume2 端口4141,到flume3 端口4142
flume-ng agent --name flume1 --conf-file flume1.conf  -Dflume.root.logger=INFO,console
# 所有的source启动后才能启动flume1,它监听其他的端口
测试
worker213向44444端口发送数据
nc localhost 44444
4:实现负载均衡
调整flume1.conf使用负载均衡策略即可-其他流程与配置不变
vim flume1.conf

# 1:定义组件
a1.sources = r1
a1.channels = c1
a1.sinks = k1 k2

# 2:定义source
a1.sources.r1.type = netcat
a1.sources.r1.bind = localhost
a1.sources.r1.port = 44444

# 3:定义channel
a1.channels.c1.type = memory
a1.channels.c1.capacity = 1000
a1.channels.c1.transactionCapacity = 100


# 4:定义sink
a1.sinkgroups = g1  # 定义sink组g1
# 负载均衡 start
a1.sinkgroups.g1.processor.type = load_balance
a1.sinkgroups.g1.processor.backoff = true
a1.sinkgroups.g1.processor.selector = random
# 负载均衡 end

a1.sinks.k1.type = avro
a1.sinks.k1.hostname = worker214
a1.sinks.k1.port = 4141

a1.sinks.k2.type = avro
a1.sinks.k2.hostname = worker215
a1.sinks.k2.port = 4142

# 5:定义关联关系
a1.sources.r1.channels = c1
a1.sinkgroups.g1.sinks = k1 k2
a1.sinks.k1.channel = c1
a1.sinks.k2.channel = c1
Flume系列
Apache Hadoop生态部署-Flume采集节点安装
Flume系列:Flume组件架构
Flume系列:Flume Source使用
Flume系列:Flume Channel使用
Flume系列:Flume Sink使用
Flume系列:Flume 自定义Interceptor拦截器
Flume系列:Flume通道拓扑结构
Flume系列:Flume常用采集通道案例
Flume系列:案例-Flume复制(Replicating)和多路复用(Multiplexing)
Flume系列:案例-Flume负载均衡和故障转移
Flume系列:案例-Flume 聚合拓扑(常见的日志收集结构)
Flume系列:Flume数据监控Ganglia
