qiankun + Vite + React + Vue + Angular 快速构建前端微服务
文章目录
- 一、主应用 vite
- 二、微应用 react
- 三、微应用 vue
- 四、微应用 angular
- 五、项目地址
一、主应用 vite
npm
npm create vite@latest
yarn
yarn create vite
选择是否继续
Need to install the following packages:
  [email protected]
Ok to proceed? (y) y
项目名称
Project name: » vite-project
选择框架
Select a framework: » - Use arrow-keys. Return to submit.
>   Vanilla
    Vue
    React
    Preact
    Lit
    Svelte
    Others
选择项目语言
Select a variant: » - Use arrow-keys. Return to submit.
>   TypeScript
    JavaScript
    Customize with create-vue ↗
    Nuxt ↗
项目构建成功,根据提示进入项目目录,安装依赖
Done. Now run:

  cd vite-project
  npm install
  npm run dev
![]()
安装 qiankun
$ yarn add qiankun # 或者 npm i qiankun -S
在 src 目录新增 micro-apps.ts 用来注册微应用
在 registerMicroApps 参数中的 props 用来编写需要传递给微应用的信息,但是 props 中不可以用( name、entry、container、activeRule) 这几个字段名,否则微应用无法收到主应用传递的信息
import { registerMicroApps, start } from 'qiankun';

const lifeCycles = {
    beforeLoad: (app: any) => {
        console.log("before load app.name====>>>>>", app)
        return Promise.resolve(app)
    },
    beforeMount: (app: any) => {
        console.log("before mount app.name====>>>>>", app)
        return Promise.resolve(app)
    },
    afterMount: (app: any) => {
        console.log("after mount app.name====>>>>>", app)
        return Promise.resolve(app)
    }
}

const register = () => {
    registerMicroApps([
        {
            name: 'vueApp',
            entry: '//localhost:8080',
            container: '#custelement',
            activeRule: '/app-vue',
            props: {
                state: 'props-app-vue',
            },
        },
        {
            name: 'reactApp',
            entry: '//localhost:3000',
            container: '#custelement',
            activeRule: '/app-react',
            props: {
                state: 'props-app-react',
            },
        },
        {
            name: 'angularApp',
            entry: '//localhost:4200',
            container: '#custelement',
            activeRule: '/app-angular',
            props: {
                state: 'props-app-angular',
            },
        }
    ], lifeCycles);
}

export default {
    register,
    start,
}
在 src 目录新增 globalState.ts 用来编写 initGlobalState(initGlobalState() 是 qiankun 提供的通信 API)
import { initGlobalState } from 'qiankun';
export function globalState() {
    const { onGlobalStateChange, setGlobalState, offGlobalStateChange } = initGlobalState({
        user: 'init-qiankun'
    })

    onGlobalStateChange((value, prev) =>
        console.log('[onGlobalStateChange - master]:', value, prev)
    )

    setGlobalState({
        user: 'vite-project'
    })
    offGlobalStateChange();
}
微应用从生命周期 mount 中获取通信方法,微应用中只能修改已存在的一级属性(eg: 主应用 setGlobalState ({ user: ‘’ }),微应用只能设置{ user: ‘’ })
export function mount(props) {
  props.onGlobalStateChange((state, prev) => {
    // state: 变更后的状态; prev 变更前的状态
    console.log(state, prev);
  });

  props.setGlobalState({ user: 'react project state' });
}
注意:主应用除了微应用之外,如果还包含有新的业务组件,那么就需要配置对应路由,但是微应用存放容器 container: '#custelement' 和
<div class="content">
     <router-view />
     <div id="custelement"></div>
</div>
跳转页面使用:history
window.history.pushState({}, '', ‘)
除了 registerMicroApps 之外, qiankun 还支持手动加载微应用 loadMicroApp(eg:可以在某个组件挂载微应用)
<template>
    <div>
        <div id="microElemnet"> </div>
    </div>
</template>

<script setup lang="ts">
import { onMounted, onUnmounted } from 'vue'
import { loadMicroApp } from 'qiankun'

var microApp: any = null

onMounted(() => {
    microApp = loadMicroApp({
        name: 'vueApp',
        entry: '//localhost:8080',
        container: '#microElemnet',
    })
})

// 卸载微应用
onUnmounted(() => {
    if (microApp) {
        microApp.unmount()
    }
})
</script>
注意:手动加载微应用时,微应用的 window.__POWERED_BY_QIANKUN__ 也需要与之对应
// 假设当前组件路径为

http://localhost:8888/nav/list

// 微应用 window.__POWERED_BY_QIANKUN__

base: window.__POWERED_BY_QIANKUN__ ? '/nav/list' : '/',
使用 loadMicroApp 手动加载微应用,页面跳转用路由,不需要使用 history
二、微应用 react
安装脚手架
npm install -g create-react-app
创建项目
npx create-react-app react-project
项目构建成功,根据提示进入项目目录,启动项目
 cd react-project
 npm start
在 src 目录新增 public-path.js 文件,在入口文件最顶部引入 public-path.js
if (window.__POWERED_BY_QIANKUN__) {
  // eslint-disable-next-line no-undef
  __webpack_public_path__ = window.__INJECTED_PUBLIC_PATH_BY_QIANKUN__;
}
设置 history 模式路由的 base
<BrowserRouter basename={window.__POWERED_BY_QIANKUN__ ? '/app-react' : '/'}>
入口文件 index.js 修改,为了避免根 id #root 与其他的 DOM 冲突,需要限制查找范围
import './public-path';
import React from 'react';
import ReactDOM from 'react-dom/client';
import './index.css';
import App from './App';
import reportWebVitals from './reportWebVitals';

var root = null
function render(props) {
    console.log(ReactDOM)
    const { container } = props;
    root = container ? ReactDOM.createRoot(container.querySelector('#root')) : ReactDOM.createRoot(document.querySelector('#root'))
    root.render(
        <React.StrictMode>
            <App />
        </React.StrictMode>
    );
}

if (!window.__POWERED_BY_QIANKUN__) {
    render({});
}

export async function bootstrap() {
    console.log('[react16] react app bootstraped');
}

export async function mount(props) {
    console.log('[react16] props from main framework', props);

    props.onGlobalStateChange((state, prev) => {
        // state: 变更后的状态; prev 变更前的状态
        console.log(state, prev);
    });

    props.setGlobalState({ user: 'react project state' });


    render(props);
}

export async function unmount(props) {
    root.unmount()
}

// If you want to start measuring performance in your app, pass a function
// to log results (for example: reportWebVitals(console.log))
// or send to an analytics endpoint. Learn more: https://bit.ly/CRA-vitals
reportWebVitals();
修改 webpack 配置
安装插件 react-app-rewired
npm i react-app-rewired
根目录新增 config-overrides.js
const { name } = require('./package');

module.exports = {
    webpack: (config) => {
        config.output.library = `${name}-[name]`;
        config.output.libraryTarget = 'umd';
        // config.output.jsonpFunction = `webpackJsonp_${name}`;
        config.output.globalObject = 'window';

        return config;
    },

    devServer: (_) => {
        const config = _;

        config.headers = {
            'Access-Control-Allow-Origin': '*',
        };
        config.historyApiFallback = true;
        config.hot = false;
        config.watchContentBase = false;
        config.liveReload = false;

        return config;
    },
};
修改 package.json
-   "start": "react-scripts start",
+   "start": "react-app-rewired start",
-   "build": "react-scripts build",
+   "build": "react-app-rewired build",
-   "test": "react-scripts test",
+   "test": "react-app-rewired test",
-   "eject": "react-scripts eject"
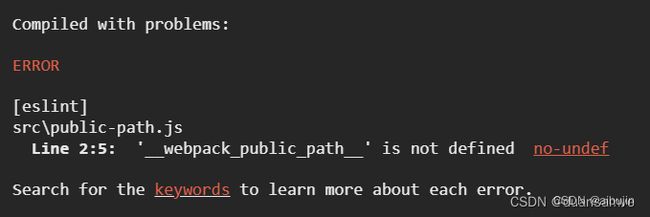
启动项目, public-path.js 报 __ webpack_public_path__ 未定义错误

这是 eslint 的问题, webpack_public_path 不是全局变量所导致的
解决方式 :子应用 package.json 文件中 eslintConfig 配置全局变量,重起服务
"eslintConfig": {
    ...,
    "globals": {
      "__webpack_public_path__": true
    }
}
三、微应用 vue
安装脚手架
npm install -g @vue/cli
创建项目
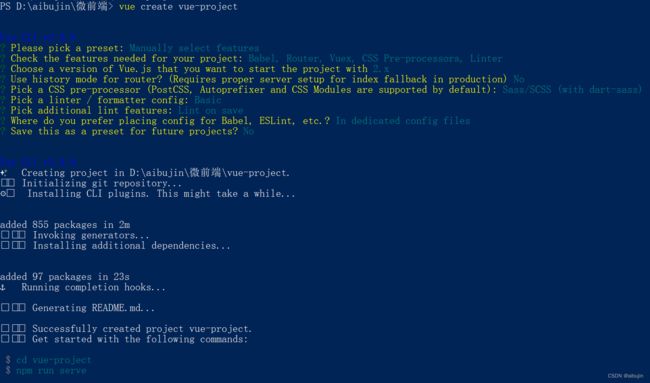
vue create vue-project
选择手动配置
Vue CLI v5.0.8
? Please pick a preset:             // 选择配置
  Default ([Vue 3] babel, eslint)  // vue2 默认配置
  Default ([Vue 2] babel, eslint)  // vue3 默认配置
> Manually select features         // 手动配置
项目配置(按空格键选择或取消选择)
 Check the features needed for your project: (Press <space> to select, <a> to toggle all, <i> to invert selection, and <enter> to proceed)
 (*) Babel                               // 代码 es6 转 es5
 ( ) TypeScript                          // TypeScript
 ( ) Progressive Web App (PWA) Support
 (*) Router                              // 路由
>(*) Vuex                                // Vuex
 (*) CSS Pre-processors                  // css 预处理器
 (*) Linter / Formatter                  // eslint 代码格式规范
 ( ) Unit Testing                        // 单元测试
 ( ) E2E Testing                         // 端到端测试
选择 vue 版本
Choose a version of Vue.js that you want to start the project with
  3.x
> 2.x
第二步如果选择路由,将会有这一步,是否用 history 模式创建路由
Use history mode for router? (Requires proper server setup for index fallback in production) No
第二步如果选择CSS预处理器,将会有这一步,选择CSS预处理器
Pick a CSS pre-processor (PostCSS, Autoprefixer and CSS Modules are supported by default): (Use arrow keys)
> Sass/SCSS (with dart-sass)
  Less
  Stylus
语法检查工具
Pick a linter / formatter config: (Use arrow keys)
> ESLint with error prevention only
  ESLint + Airbnb config
  ESLint + Standard config
  ESLint + Prettier
什么时候校验代码格式
Pick additional lint features: (Press <space> to select, <a> to toggle all, <i> to invert selection, and <enter> to proceed)
>(*) Lint on save              // 保存代码时
 ( ) Lint and fix on commit    // 提交代码时
Babel、ESLint 等配置文件存放位置
Where do you prefer placing config for Babel, ESLint, etc.? (Use arrow keys)
> In dedicated config files   // 独立文件放置
  In package.json             // 放在package.json里
是否当前项目配置作为后续项目的预设?
Save this as a preset for future projects? (y/N) N
项目构建成功,根据提示进入项目目录,启动项目
 cd vue-project
 npm run serve

在 src 目录新增 public-path.js 文件,在入口文件最顶部引入 public-path.js
if (window.__POWERED_BY_QIANKUN__) {
  __webpack_public_path__ = window.__INJECTED_PUBLIC_PATH_BY_QIANKUN__;
}
修改路由, router/index.js
import HomeView from '../views/HomeView.vue'
import AboutView from '../views/AboutView.vue'

const routes = [
    {
        path: '/',
        redirect: '/home'
    },
    {
        path: '/home',
        name: 'home',
        component: HomeView
    },
    {
        path: '/about',
        name: 'about',
        // route level code-splitting
        // this generates a separate chunk (about.[hash].js) for this route
        // which is lazy-loaded when the route is visited.
        component: AboutView
    }
]

export default routes
修改入口文件 main.js
import './public-path';
import Vue from 'vue'
import App from './App.vue'
import VueRouter from 'vue-router'
import routes from './router'

Vue.use(VueRouter)

Vue.config.productionTip = false

let router = null;
let instance = null;
function render(props = {}) {
    const { container } = props;
    router = new VueRouter({
        base: window.__POWERED_BY_QIANKUN__ ? '/app-vue' : '/',
        mode: 'history',
        routes,
    });

    instance = new Vue({
        router,
        render: (h) => h(App),
    }).$mount(container ? container.querySelector('#app') : '#app');
}

// 独立运行时
if (!window.__POWERED_BY_QIANKUN__) {
    render();
}

export async function bootstrap() {
    console.log('[vue] vue app bootstraped');
}
export async function mount(props) {
    console.log('[vue] props from main framework', props);
    props.onGlobalStateChange &&
        props.onGlobalStateChange(
            (value, prev) =>
                console.log(`[onGlobalStateChange - ${props.name}]:`, value, prev),
            true
        )
    props.setGlobalState &&
        props.setGlobalState({
            user: 'vue-project'
        })
    render(props);
}
export async function unmount() {
    instance.$destroy();
    instance.$el.innerHTML = '';
    instance = null;
    router = null;
}
打包配置修改 vue.config.js
const { defineConfig } = require('@vue/cli-service')
const { name } = require('./package');
module.exports = defineConfig({
    transpileDependencies: true,
    devServer: {
        headers: {
            'Access-Control-Allow-Origin': '*',
        },
    },
    configureWebpack: {
        output: {
            library: `${name}-[name]`,
            libraryTarget: 'umd', // 把微应用打包成 umd 库格式
            // jsonpFunction: `webpackJsonp_${name}`,  // webpack5不兼容  npm i [email protected] 可以下载低版本
            globalObject: 'window'
        },
    },
})
四、微应用 angular
安装脚手架
npm install -g @angular/cli
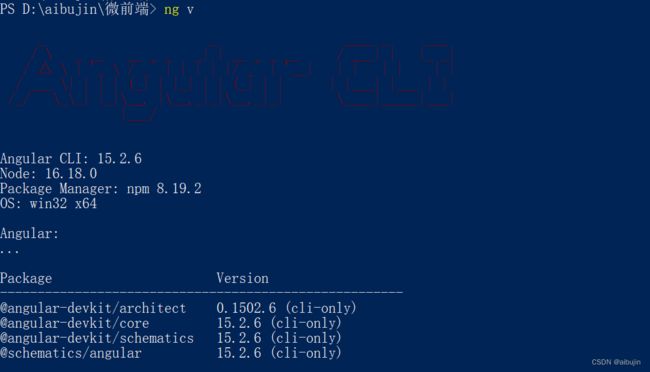
查是否安装成功
ng v
ng version
ng new angular-project
注意: 创建的时候有可能会报错,类似下面这种, 如果没有请忽略;
The Angular CLI requires a minimum Node.js version of either v14.2.0,v16.13 or v18.10.
表示本地 node 和 Angular 版本不对应, 根据提示下载对应版本就行
是否添加路由
Would you like to add Angular routing? Yes
选择 CSS 预编译器
Which stylesheet format would you like to use?
  CSS
> SCSS   [ https://sass-lang.com/documentation/syntax#scss                ]
  Sass   [ https://sass-lang.com/documentation/syntax#the-indented-syntax ]
  Less   [ http://lesscss.org
项目构建成功,切换到项目目录,启动项目
 cd angular-project
 ng serve --open
在 src 目录新增 public-path.js 文件,在入口文件最顶部引入 public-path.js
if (window.__POWERED_BY_QIANKUN__) {
  // eslint-disable-next-line no-undef
  __webpack_public_path__ = window.__INJECTED_PUBLIC_PATH_BY_QIANKUN__;
}
设置 history 模式路由的 base,src/app/app-routing.module.ts 文件
import { NgModule } from '@angular/core';
import { RouterModule, Routes } from '@angular/router';
import { APP_BASE_HREF } from '@angular/common';

const routes: Routes = [];

declare const window: any;

@NgModule({
    imports: [RouterModule.forRoot(routes)],
    exports: [RouterModule],
    providers: [{ provide: APP_BASE_HREF, useValue: window.__POWERED_BY_QIANKUN__ ? '/app-angular' : '/' }]
})
export class AppRoutingModule { }
修改入口文件,src/main.ts 文件
import './public-path';
import { platformBrowserDynamic } from '@angular/platform-browser-dynamic';
import { NgModuleRef } from '@angular/core';
import { AppModule } from './app/app.module';

let app: void | NgModuleRef<AppModule>;
async function render() {
    app = await platformBrowserDynamic()
        .bootstrapModule(AppModule)
        .catch((err) => console.error(err));
}

if (!(window as any).__POWERED_BY_QIANKUN__) {
    render();
}

export async function bootstrap(props: Object) {
    console.log(props);
}

export async function mount(props: Object) {
    render();
}

export async function unmount(props: Object) {
    console.log(props);
    // @ts-ignore
    app.destroy();
}
修改 webpack 打包配置
先安装 @angular-builders/custom-webpack 插件,注意:angular 9 项目只能安装 9.x 版本,angular 10 项目可以安装最新版。
npm i @angular-builders/[email protected] -D
在根目录增加 custom-webpack.config.js
const appName = require('./package.json').name;
module.exports = {
    devServer: {
        headers: {
            'Access-Control-Allow-Origin': '*',
        },
    },
    output: {
        library: `${appName}-[name]`,
        libraryTarget: 'umd',
        // jsonpFunction: `webpackJsonp_${appName}`,
    },
};
修改 angular.json,将 [packageName] > architect > build > builder 和 [packageName] > architect > serve > builder 的值改为我们安装的插件,将我们的打包配置文件加入到 [packageName] > architect > build > options
- "builder": "@angular-devkit/build-angular:browser",
+ "builder": "@angular-builders/custom-webpack:browser",
  "options": {
+    "customWebpackConfig": {
+      "path": "./custom-webpack.config.js"
+    }
  }
- "builder": "@angular-devkit/build-angular:dev-server",
+ "builder": "@angular-builders/custom-webpack:dev-server",
解决 zone.js 的问题
在 父应用 安装zone.js
npm i zone.js
在 父应用 引入,需要在import qiankun 之前引入
import 'zone.js/dist/zone';
将 微应用的 src/polyfills.ts 里面的引入 zone.js 代码删掉(新版本已经没有 polyfills.ts 文件了,修改 angular.json,将 [packageName] > architect > build > options > polyfills 配置为空即可 )
在微应用的 src/index.html 里面的 标签加上下面内容,微应用独立访问时使用
<!-- 也可以使用其他的CDN/本地的包 -->
<script src="https://unpkg.com/zone.js" ignore></script>
修正 ng build 打包报错问题,修改 tsconfig.json 文件
- "target": "es2015",
+ "target": "es5",
+ "typeRoots": [
+   "node_modules/@types"
+ ],
为了防止主应用或其他微应用也为 anuglar 时, 会冲突的问题,建议给 加上一个唯一的 id ,比如说当前应用名称
src/index.html :
- <app-root></app-root>
+ <app-root id="angular15"></app-root>
src/app/app.component.ts :
- selector: 'app-root',
+ selector: '#angular15 app-root',
五、项目地址
项目地址:https://github.com/aibuijn/qiankun

