在本指南中,我们将深入探讨使用 ChatGPT 和 C# 构建聊天机器人的过程。我们将涵盖从设置 ChatGPT API 访问到部署聊天机器人的所有内容。让我们开始吧!
最后你会发现 GitHub Repo
设置您的 ChatGPT API 访问权限
在我们开始构建我们的聊天机器人之前,我们需要设置对 ChatGPT API 的访问。
注册 OpenAI
如果您已有 OpenAI 帐户,请跳过此部分
要访问 ChatGPT API,您首先需要注册一个 OpenAI 帐户。按着这些次序:
- 访问 OpenAI 网站
- 填写所需信息并创建您的帐户。
- 创建帐户后,登录并导航至 API 部分。
获取 API 访问密钥
要在您的 C# 项目中使用 ChatGPT API,您需要一个 API 访问密钥。以下是获得方法:
1. 登录您的 OpenAI 帐户。
2. 转到“查看 API 密钥”部分。
3. 单击“Create API Key”并为其命名。
4. 复制 API 密钥,因为您稍后会需要它。
上面的 API Key 不要尝试使用它,它不起作用。
确保您的 API 密钥安全,因为它会授予您使用 ChatGPT API 的权限。
为您的 ChatGPT 聊天机器人创建 C# 项目
现在我们已经设置了 ChatGPT API 访问权限,是时候为我们的聊天机器人创建一个新的 C# 项目了。
设置一个新的 C# 项目
要创建新的 C# 项目,您可以使用 Visual Studio、Visual Studio Code 或任何其他支持 C# 的 IDE。按着这些次序:
- 打开您喜欢的 IDE 并创建一个新的 C# 项目。
- 选择“控制台应用程序”模板并为您的项目提供名称。
- 单击“创建”以生成项目。
安装必要的包
我们需要安装一些 NuGet 包来帮助我们与 ChatGPT API 进行交互:
RestSharp: 一个用于发出 HTTP 请求的库。Newtonsoft.Json:用于处理 JSON 数据的库。
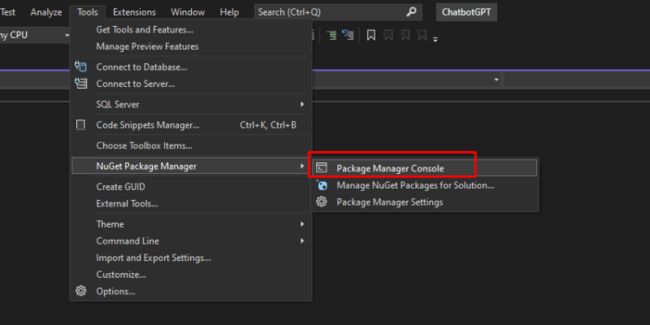
要安装这些包,请在 IDE 的包管理器控制台中运行以下命令:
Install-Package RestSharp
Install-Package Newtonsoft.Json
将 ChatGPT API 与您的 C# 项目集成
项目设置完成后,就可以集成 ChatGPT API 了。
创建 ChatGPT API 客户端
首先,让我们创建一个 C# 类来与 ChatGPT API 交互。我们称之为ChatGPTClient. 这是基本结构:
using System;
using RestSharp;
using Newtonsoft.Json;

public class ChatGPTClient
{
    private readonly string _apiKey;
    private readonly RestClient _client;

    // Constructor that takes the API key as a parameter
    public ChatGPTClient(string apiKey)
    {
            _apiKey = apiKey;
            // Initialize the RestClient with the ChatGPT API endpoint
            _client = new RestClient("https://api.openai.com/v1/engines/text-davinci-003/completions");
    }

    // We'll add methods here to interact with the API.
}
在此类中,我们存储 API 密钥并创建一个RestClient指向 ChatGPT API 端点的实例。
现在让我们添加一个方法来向 API 发送消息:
// Method to send a message to the ChatGPT API and return the response
        public string SendMessage(string message)
        {
            // Create a new POST request
            var request = new RestRequest("", Method.Post);
            // Set the Content-Type header
            request.AddHeader("Content-Type", "application/json");
            // Set the Authorization header with the API key
            request.AddHeader("Authorization", $"Bearer {_apiKey}");

            // Create the request body with the message and other parameters
            var requestBody = new
            {
                prompt = message,
                max_tokens = 100,
                n = 1,
                stop = (string?)null,
                temperature = 0.7,
            };

            // Add the JSON body to the request
            request.AddJsonBody(JsonConvert.SerializeObject(requestBody));

            // Execute the request and receive the response
            var response = _client.Execute(request);

            // Deserialize the response JSON content
            var jsonResponse = JsonConvert.DeserializeObject<dynamic>(response.Content ?? string.Empty);

            // Extract and return the chatbot's response text
            return jsonResponse?.choices[0]?.text?.ToString()?.Trim() ?? string.Empty;
        }
此方法将消息作为输入,使用适当的标头和 JSON 正文创建对 ChatGPT API 的 POST 请求,并从 API 返回响应。
实施聊天机器人逻辑
有了我们ChatGPTClient,让我们在我们的类中实现聊天机器人逻辑Program:
        class Program
        {
            static void Main(string[] args)
            {
                // Replace with your ChatGPT API key
                string apiKey = "your_api_key_here";
                // Create a ChatGPTClient instance with the API key
                var chatGPTClient = new ChatGPTClient(apiKey);

                // Display a welcome message
                Console.WriteLine("Welcome to the ChatGPT chatbot! Type 'exit' to quit.");

                // Enter a loop to take user input and display chatbot responses
                while (true)
                {
                    // Prompt the user for input
                    Console.ForegroundColor = ConsoleColor.Green; // Set text color to green
                    Console.Write("You: ");
                    Console.ResetColor(); // Reset text color to default
                    string input = Console.ReadLine() ?? string.Empty;

                    // Exit the loop if the user types "exit"
                    if (input.ToLower() == "exit")
                        break;

                    // Send the user's input to the ChatGPT API and receive a response
                    string response = chatGPTClient.SendMessage(input);

                    // Display the chatbot's response
                    Console.ForegroundColor = ConsoleColor.Blue; // Set text color to blue
                    Console.Write("Chatbot: ");
                    Console.ResetColor(); // Reset text color to default
                    Console.WriteLine(response);
                }
            }
        }
在这里,我们创建了一个ChatGPTClient使用 API 密钥的实例,然后进入一个循环,该循环接受用户输入,将其发送到 ChatGPT API,并打印聊天机器人的响应。
测试和增强您的 ChatGPT 聊天机器人
现在我们已经实现了聊天机器人,让我们测试并增强它。
测试你的聊天机器人
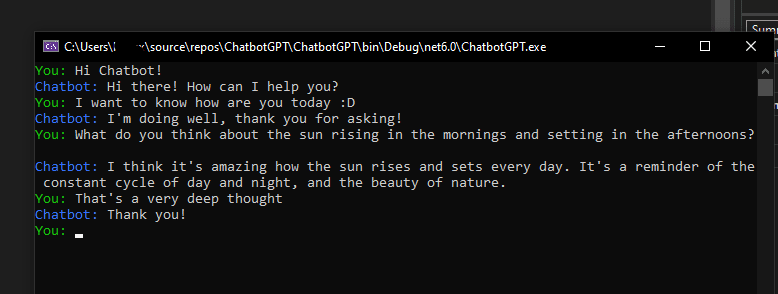
要测试您的聊天机器人,只需运行您的 C# 项目。您应该会看到一个控制台窗口,您可以在其中键入消息并接收来自 ChatGPT 聊天机器人的响应。
处理错误和边缘情况
处理聊天机器人中的错误和边缘情况非常重要。例如,您可以检查空输入、为 API 请求添加错误处理或为长时间运行的请求实施超时。
public string SendMessage(string message)
{
    // Check for empty input
    if (string.IsNullOrWhiteSpace(message))
    {
        return "Sorry, I didn't receive any input. Please try again!";
    }

    try
    {
        // The rest of the SendMessage method implementation...
    }
    catch (Exception ex)
    {
        // Handle any exceptions that may occur during the API request
        Console.WriteLine($"Error: {ex.Message}");
        return "Sorry, there was an error processing your request. Please try again later.";
    }
}
改善用户体验
考虑以下技巧来增强聊天机器人的可用性:
- 添加帮助命令以提供有关使用聊天机器人的指导。
// Enter a loop to take user input and display chatbot responses
while (true)
{
    // Prompt the user for input
    Console.ForegroundColor = ConsoleColor.Green; // Set text color to green
    Console.Write("You: ");
    Console.ResetColor(); // Reset text color to default
    string input = Console.ReadLine() ?? string.Empty;

    // Exit the loop if the user types "exit"
    if (input.ToLower() == "exit")
        break;

    // Display help message if the user types "help"
    if (input.ToLower() == "help")
    {
        Console.WriteLine("Chatbot commands:");
        Console.WriteLine("- Type your message to chat with the bot.");
        Console.WriteLine("- Type 'exit' to quit the chat.");
        continue;
    }

    // Send the user's input to the ChatGPT API and receive a response
    string response = chatGPTClient.SendMessage(input);

    // Display the chatbot's response
    Console.ForegroundColor = ConsoleColor.Blue; // Set text color to blue
    Console.Write("Chatbot: ");
    Console.ResetColor(); // Reset text color to default
    Console.WriteLine(response);
}
- 通过维护消息之间的上下文来实现更自然的对话流。
private string _conversationHistory = string.Empty;

public string SendMessage(string message)
{
    // Check for empty input
    if (string.IsNullOrWhiteSpace(message))
    {
        return "Sorry, I didn't receive any input. Please try again!";
    }

    // Update the conversation history with the user's message
    _conversationHistory += $"User: {message}\n";

    // ... (the rest of the SendMessage method remains unchanged)

    // Deserialize the response JSON content
    var jsonResponse = JsonConvert.DeserializeObject<dynamic>(response.Content ?? string.Empty);

    // Extract and return the chatbot's response text
    string chatbotResponse = jsonResponse?.choices[0]?.text?.ToString()?.Trim() ?? string.Empty;

    // Update the conversation history with the chatbot's response
    _conversationHistory += $"Chatbot: {chatbotResponse}\n";

    return chatbotResponse;
}
- 使用更丰富的格式或用户界面元素来提高可读性。
// Enter a loop to take user input and display chatbot responses
while (true)
{
    // Prompt the user for input
    Console.ForegroundColor = ConsoleColor.Green; // Set text color to green
    Console.Write("You: ");
    Console.ResetColor(); // Reset text color to default
    string input = Console.ReadLine() ?? string.Empty;

    // ... (handle 'exit' and 'help' commands as before)

    // Send the user's input to the ChatGPT API and receive a response
    string response = chatGPTClient.SendMessage(input);

    // Display the chatbot's response
    Console.ForegroundColor = ConsoleColor.Blue; // Set text color to blue
    Console.Write("Chatbot: ");
    Console.ResetColor(); // Reset text color to default
    Console.WriteLine(response);

    // Add a separator and some line breaks
    Console.WriteLine();
    Console.WriteLine("------------------------------------------------");
    Console.WriteLine();
}
部署您的 ChatGPT 聊天机器人
一旦您对聊天机器人感到满意,就可以部署它了。
部署选项
有多种方法可以部署 C# 聊天机器人,例如:
- Web 应用程序:使用 ASP.NET Core 创建一个 Web 应用程序并将聊天机器人嵌入其中。这可以通过为聊天机器人交互创建 API 端点并使用 JavaScript处理用户输入并在浏览器中显示聊天机器人响应来完成。示例项目结构:
ChatGPTWebApp: 主 ASP.NET Core 项目ChatGPTWebApp/Controllers:包含用于聊天机器人交互的 API 控制器ChatGPTWebApp/wwwroot: 包含前端的 HTML、CSS 和 JavaScript 文件ChatGPTClient: 现有的 ChatGPT 客户端类
- 消息平台:将聊天机器人集成到 Slack 或 Microsoft Teams 等消息平台中。这涉及在所需平台上创建机器人应用程序、配置必要的身份验证和事件处理,以及将 ChatGPT API 连接到机器人的消息处理逻辑。
Slack 机器人的示例项目结构:
ChatGPTSlackBot: 主要机器人项目ChatGPTSlackBot/Controllers:包含用于处理 Slack 事件的 API 控制器ChatGPTSlackBot/Services:包含用于处理 Slack API 交互的服务ChatGPTClient:现有的 ChatGPT 客户端类 您需要遵循平台的文档来创建和配置您的机器人,例如Slack 的 API 文档。
- 桌面应用程序:使用 WPF 或 WinForms 开发桌面应用程序。这涉及为聊天机器人创建图形用户界面 (GUI)、处理用户输入和显示聊天机器人响应。WPF 应用程序的示例项目结构:
ChatGPTWPFApp: 主 WPF 项目ChatGPTWPFApp/Views:包含 GUI 的 XAML 文件ChatGPTWPFApp/ViewModels: 包含用于数据绑定的 ViewModel 类ChatGPTClient: 现有的 ChatGPT 客户端类
选择最适合您的需求和目标受众的部署选项。
将聊天机器人集成到您现有的应用程序中
如果您已有 C# 应用程序,则可以通过添加类ChatGPTClient并调整用户界面以适应聊天机器人交互来集成 ChatGPT 聊天机器人。
例如,如果您有一个现有的 WPF 应用程序,您可以按照以下步骤操作:
- 将类添加
ChatGPTClient到您的项目中。 - 为聊天机器人界面创建一个新的 UserControl。这可能包括用于用户输入的 TextBox、用于发送消息的 Button 以及用于显示对话的 ListBox 或 ScrollView。
- 在您的 ViewModel 中实施必要的数据绑定和事件处理,以将用户输入发送到 ChatGPT API 并显示聊天机器人的响应。
- 将聊天机器人 UserControl 添加到您的主应用程序窗口或导航结构。
请记住根据现有应用程序的特定框架或架构调整这些步骤。
结论和未来的可能性
恭喜!您已使用 C# 构建了 ChatGPT 聊天机器人。我们介绍了设置 ChatGPT API 访问、创建 C# 项目、集成 API、测试、增强和部署聊天机器人。
有许多方法可以扩展和改进您的聊天机器人,例如添加更多功能、改进对话流或与其他 API 集成。可能性是无止境。编码愉快!


