116.【SpringBoot和Vue结合-图书馆管理系统】
前后端分离
- (一)、SpringBoot+Vue概述
-
- 1.基本概述
- 2.实现技术
- (二)、Vue3.x搭建 (SpringBoot+Vue)
-
- 1.搭建Vue基本环境
-
-
- (1).搭建Vue项目框架
- (2).介绍Vue项目内容
-
- 2.搭建SpringBoot基本环境
-
-
- (1).创建SpringBootTest项目
- (2).初始化项目
- (3).测试SpringBoot的控制层
-
- 3.通过路由跳转访问组件 ⭐⭐
-
-
- (1).创建Book.vue组件
- (2).配置路由router/index.js
- (3).展示在App.vue之下
-
- 4.SpringBoot+Vue交互-全部书籍
-
-
- (1).安装axios插件
- (2).组件中引入axios插件
- (3).通过Java解决跨域问题
-
- (二)、Vue2.x搭建 (ElementUI+Vue)
-
- 1.搭建Vue基本环境
-
-
- (1).安装Vue项目框架
- (2).安装elementui插件
- (3).跑一下项目
-
- 2.非Vue-router搭建静态资源
-
-
- (1).基本介绍
- (2).Vue前端静态页面搭建
-
- 3.Vue-router动态搭建(左侧菜单栏部分)
-
-
- (1).配置路由
- (2).搭建前端接受路由
-
- 4.问题探究-(多级路由问题)⭐⭐⭐
-
-
- (1).问题展现
- (2).解决问题
- (3).问题总结 ⭐⭐⭐
-
- 5.左侧菜单页与右侧页面交互
-
-
- (1).三个基本步骤
- (2).开始搭建
-
- (三)、前后端分离数据对接
-
- 1.搭建静态页面
- 2.前后端交互-(填充表格数据-分页)
-
-
- (1).前端安装axios并配置
- (2).后端配置SpringBoot的数据
-
- 3.ElementUI-表单数据分析
-
-
- (1).表单数据校验
- (2).表单数据的填充
- (3).表单提交后数据到哪里?
- (4).全部置空的操作
-
- 4.操作表单数据-(添加数据)
-
-
- (1).SpringBoot后端布局
- (2).Vue前端布局
-
- 5.操作表单:数据-(修改数据)
-
-
- (1).SpringBoot后端布局
- (2).Vue前端布局
-
- 6.操作表单数据-(删除数据)
-
-
- (1).SpringBoot后端布局
- (2).Vue前端布局
-
- (四)、总结
-
- 1.SpringBoot接受数据风格
- 2.前端传向后端
- 3.前端传向前端
- 4.自动刷新页面
(一)、SpringBoot+Vue概述
1.基本概述
前后端分离就是将一个应用的前端代码和后端代码分开写:
-
传统的JavaWeb开发中,前端使用JSP进行开发,JSP不是由后端开发者来独立完成的。(前端
编写静态页面转交给后端开发)。这种开发方式的利用率极低…
单体应用结构

-
使用前后端开发,就可以完美的解决这一问题。(前端只需要
独立编写客户端代码,后端也只需要独立编写服务端代码提供数据接口即可。前端通过axios请求来访问后端的数据接口,将Model展示到View即可) -
使用SpringBoot+Vue前后端开发者只需要提前约定好接口文档(URL、参数、数据类型…),然后分别独立开发。前端可以造假数据进行测试,完全不需要依赖后端。真正实现了前后端应用的解耦合。
-
由原来的单体应用分为了:
纯前端应用 + 纯后端应用。前端应用:负责数据展示和用户交互。后端应用: 负责提供数据处理接口。
前后端分离结构
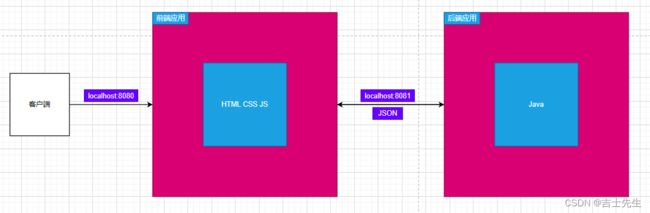
前后端分离应用就是将一个单体应用拆分成独立的应用,前端应用和后端应用咦JSON的个数进行数据的交互。
2.实现技术
SpringBoot+Vue: SpringBoot进行后端应用的开发,使用Vue进行后端应用的开发。
(二)、Vue3.x搭建 (SpringBoot+Vue)
1.搭建Vue基本环境
(1).搭建Vue项目框架
1.我们使用命令行的方式进行创建:这个仅支持vue-cil3.0以上
vue ui
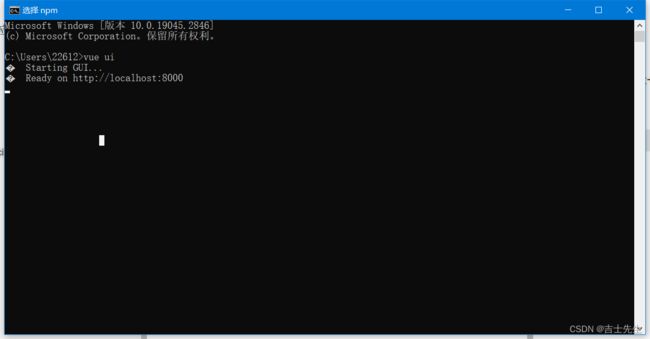
会自动跳转到ui页面...
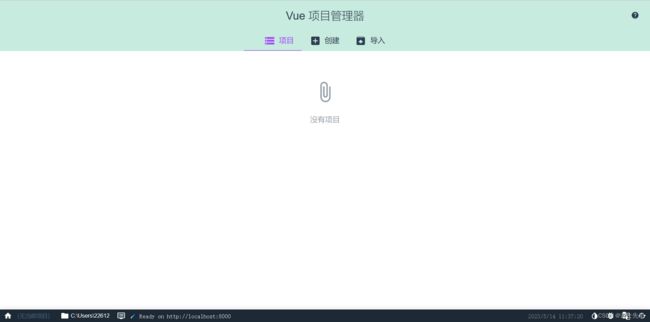
1.我们选择在E:\Vscode源码创建我们的vue项目
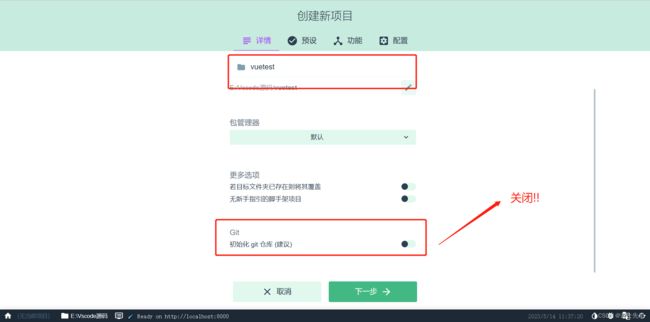
2.手动配置我们的vue
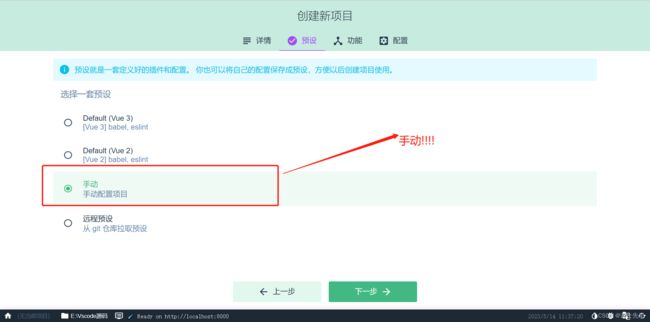
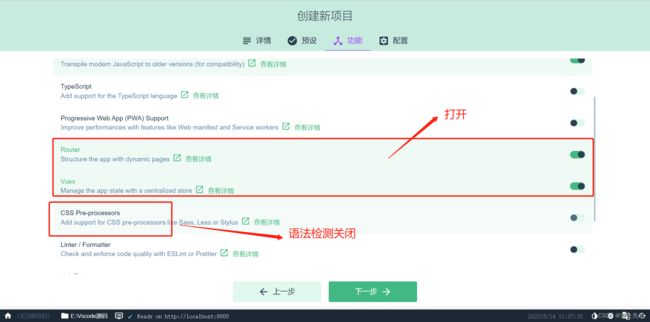
3.开启router和vuex。关闭语法检测
4.开启历史记录...

5.预设项目不选

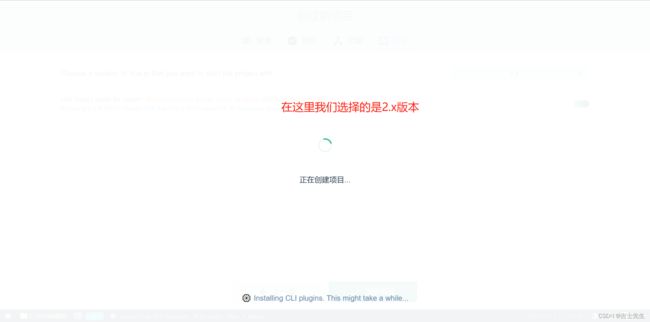
6.创建成功后就会进入...

我们通过运行测试发现会出现以下的错误...
 ERROR  Error: @vitejs/plugin-vue requires vue (>=3.2.13) or @vue/compiler-sfc to be present in the dependency tree.

Error: @vitejs/plugin-vue requires vue (>=3.2.13) or @vue/compiler-sfc to be present in the dependency tree.
    at Object.<anonymous> (E:\Vscode源码\vuetest\node_modules\vue-loader\dist\compiler.js:14:15)
    at Module._compile (internal/modules/cjs/loader.js:956:30)
    at Object.Module._extensions..js (internal/modules/cjs/loader.js:973:10)
    at Module.load (internal/modules/cjs/loader.js:812:32)
    at Function.Module._load (internal/modules/cjs/loader.js:724:14)
    at Module.require (internal/modules/cjs/loader.js:849:19)
    at require (internal/modules/cjs/helpers.js:74:18)
    at Object.<anonymous> (E:\Vscode源码\vuetest\node_modules\vue-loader\dist\index.js:29:20)
    at Module._compile (internal/modules/cjs/loader.js:956:30)
    at Object.Module._extensions..js (internal/modules/cjs/loader.js:973:10)

Total task duration: 0.65s
我们只需要在我们的控制台的地方安装一个vue新版本即可。
npm i vue@3.2.26
添加完毕之后: 我们发现的项目能够跑的动了...

访问 localhost:8080端口,我们就会跳转到这个页面...

(2).介绍Vue项目内容
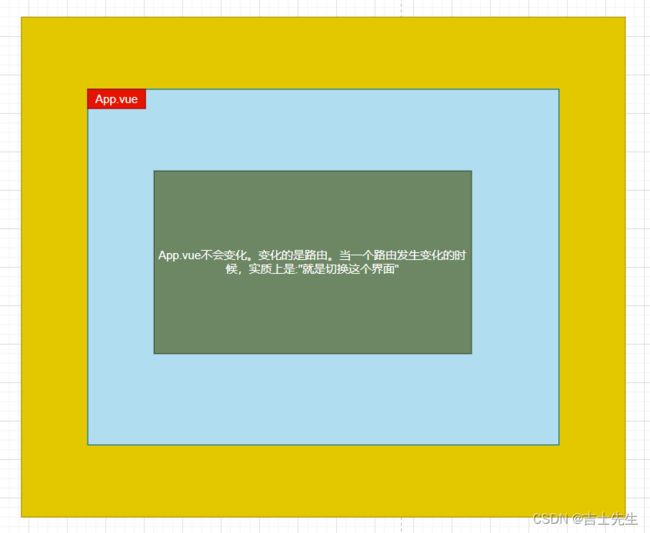
1.Vue.app: 实质上Vue的内容是不会变化的,变化的实质上是路由跳转的部分。

2.搭建SpringBoot基本环境
(1).创建SpringBootTest项目
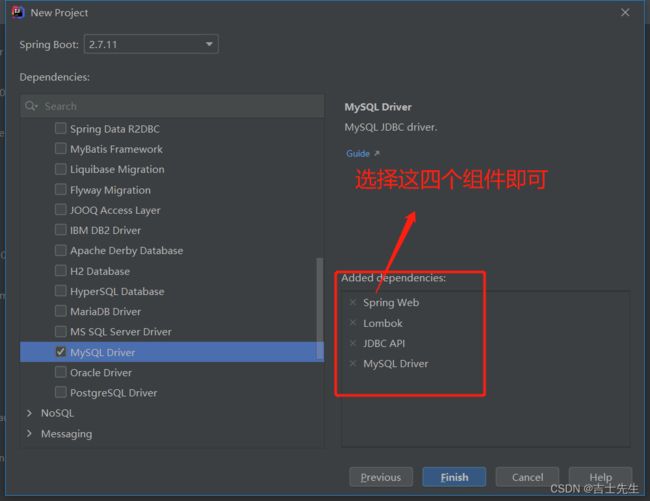
需要的依赖:
    <dependencies>

        <dependency>
            <groupId>org.springframework.bootgroupId>
            <artifactId>spring-boot-starter-webartifactId>
        dependency>

        <dependency>
            <groupId>org.springframework.bootgroupId>
            <artifactId>spring-boot-starter-jdbcartifactId>
        dependency>

        <dependency>
            <groupId>mysqlgroupId>
            <artifactId>mysql-connector-javaartifactId>
            <version>5.1.6version>
        dependency>

        <dependency>
            <groupId>org.projectlombokgroupId>
            <artifactId>lombokartifactId>
            <optional>trueoptional>
        dependency>
        <dependency>
            <groupId>org.springframework.bootgroupId>
            <artifactId>spring-boot-starter-testartifactId>
            <scope>testscope>
        dependency>

        <dependency>
            <groupId>org.springframework.bootgroupId>
            <artifactId>spring-boot-starter-data-jpaartifactId>
        dependency>
    dependencies>

    <build>
        <plugins>
            <plugin>
                <groupId>org.springframework.bootgroupId>
                <artifactId>spring-boot-maven-pluginartifactId>
                <configuration>
                    <excludes>
                        <exclude>
                            <groupId>org.projectlombokgroupId>
                            <artifactId>lombokartifactId>
                        exclude>
                    excludes>
                configuration>
            plugin>
        plugins>
    build>
(2).初始化项目
1.实体类
package com.jsxs.pojo;

import lombok.AllArgsConstructor;
import lombok.Data;
import lombok.NoArgsConstructor;

import javax.persistence.Entity;
import javax.persistence.Id;

/**
 * @Author Jsxs
 * @Date 2023/5/14 14:54
 * @PackageName:com.jsxs.pojo
 * @ClassName: Book
 * @Description: TODO
 * @Version 1.0
 */
@Data
@NoArgsConstructor
@AllArgsConstructor
@Entity  //这个注意一定要添加: 这个是和数据库的表进行匹对,假如出现书写错误会立刻报错...
public class Book {
    @Id
    private Integer id;
    private String name;
    private String author;
    private String publish;
    private Integer pages;
    private float price;
    private Integer bookcaseid;
    private Integer abled;

}
2.编写接口利用SpringJPA框架类似于Mybatis-plus
package com.jsxs.repository;

import com.jsxs.pojo.Book;
import org.springframework.data.jpa.repository.JpaRepository;

/**
 * @Author Jsxs
 * @Date 2023/5/14 15:14
 * @PackageName:com.jsxs.repository
 * @ClassName: BookRepository
 * @Description: TODO
 * @Version 1.0
 */
public interface BookRepository extends JpaRepository<Book,Integer> {

}
3.创建SpringJPA测试类:

会给我们生成一个在test/目录下对应的测试类

4.测试成功后添加:controller
package com.jsxs.controller;

import com.jsxs.pojo.Book;
import com.jsxs.repository.BookRepository;
import org.springframework.web.bind.annotation.GetMapping;
import org.springframework.web.bind.annotation.RestController;

import javax.annotation.Resource;
import java.util.List;

/**
 * @Author Jsxs
 * @Date 2023/5/14 15:23
 * @PackageName:com.jsxs.controller
 * @ClassName: BookHandler
 * @Description: TODO
 * @Version 1.0
 */

@RestController
public class BookHandler {
    @Resource
    private BookRepository bookRepository;

    @GetMapping("/findAll")
    public List<Book> findAll(){
        return bookRepository.findAll();
    }
}
(3).测试SpringBoot的控制层
http://localhost:8181/findAll

3.通过路由跳转访问组件 ⭐⭐
- 创建想要展示的组件 *.vue。
- 在路由中配置组件: path:‘/xxx’。
- 在App.vue组件中输入路由跳转的位置: < router-view>
(1).创建Book.vue组件
编写Book.vue这个组件
<template>
  <div>
    <table>
      <tr>
        <th>编号th>
        <th>图书名称th>
        <th>作者th>
      tr>
      <tr v-for="item in books" :key="item.id">
        <td>{{item.id}}td>
        <td>{{item.name}}td>
        <td>{{item.author}}td>
      tr>
    table>
  div>
template>

<script>
export default {
  name: "Book",
  data() {
    return {
      books: [
        { id: "001", name: "活着1", author: "余华1" },
        { id: "002", name: "活着2", author: "余华2" },
        { id: "003", name: "活着3", author: "余华3" },
      ],
    };
  },
};
script>

<style scoped>
style>
(2).配置路由router/index.js
这里我们配置Book.vue的组件的路径为: /book
import { createRouter, createWebHistory } from 'vue-router'
import HomeView from '../views/HomeView.vue'
import Book from '../views/Book.vue'
const routes = [
  {
    path: '/',
    name: 'home',
    component: HomeView
  },
  {
    path: '/about',
    name: 'about',
    // route level code-splitting
    // this generates a separate chunk (about.[hash].js) for this route
    // which is lazy-loaded when the route is visited.
    component: () => import(/* webpackChunkName: "about" */ '../views/AboutView.vue')
  },
  {
    path: '/book',
    name:'book',
    components:Book
  }

]

const router = createRouter({
  history: createWebHistory(process.env.BASE_URL),
  routes
})

export default router
(3).展示在App.vue之下
这里我们必须要有
<template>
  <nav>
    <router-link to="/">Homerouter-link> |
    <router-link to="/about">Aboutrouter-link>
  nav>
  <router-view/>
template>

<style>
#app {
  font-family: Avenir, Helvetica, Arial, sans-serif;
  -webkit-font-smoothing: antialiased;
  -moz-osx-font-smoothing: grayscale;
  text-align: center;
  color: #2c3e50;
}

nav {
  padding: 30px;
}

nav a {
  font-weight: bold;
  color: #2c3e50;
}

nav a.router-link-exact-active {
  color: #42b983;
}
style>
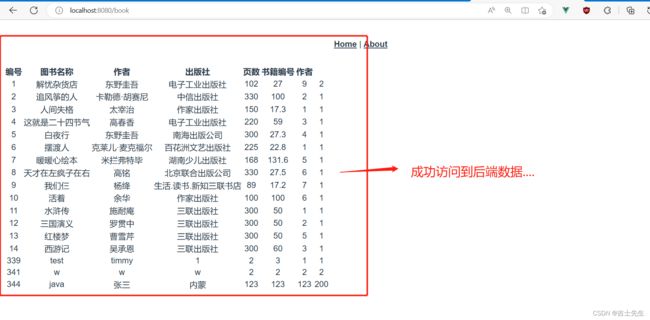
http://localhost:8080/book

4.SpringBoot+Vue交互-全部书籍
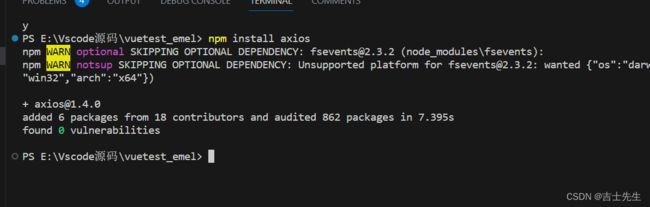
(1).安装axios插件
1.这个下载的axios,一定要使用这个
npm install axios
(2).组件中引入axios插件
Book.vue
引入我们的axios插件
import axios  from 'axios'

进行请求
mounted(){  // 在这个页面创建的时候,就初始化上去
    const _this=this;
    axios.get('http://localhost:8181/findAll/').then(function(resp){
      _this.books=resp.data; // 这里的this指向的是这个函数的this。所以我们用_this来指向vm
     console.log(resp.data)
    })
}
<template>
  <div>
    <table>
      <tr>
        <th>编号th>
        <th>图书名称th>
        <th>作者th>
        <th>出版社th>
        <th>页数th>
        <th>书籍编号th>
        <th>作者th>
      tr>
      <tr v-for="item in books" :key="item.id">
        <td>{{item.id}}td>
        <td>{{item.name}}td>
        <td>{{item.author}}td>
        <td>{{item.publish}}td>
        <td>{{item.pages}}td>
        <td>{{item.price}}td>
        <td>{{item.bookcaseid}}td>
        <td>{{item.abled}}td>
      tr>
    table>
  div>
template>

<script>
import axios  from 'axios'
export default {
  name: "Book",
  data() {
    return {
      books: [],
    };
  },
  mounted(){  // 在这个页面创建的时候,就初始化上去
    const _this=this;
    axios.get('http://localhost:8181/findAll/').then(function(resp){
      _this.books=resp.data;
     console.log(resp.data)
    })
  }
};
script>

<style scoped>
style>
运行代码后发现:

(3).通过Java解决跨域问题
package com.jsxs.config;

import org.springframework.context.annotation.Configuration;
import org.springframework.web.servlet.config.annotation.CorsRegistry;
import org.springframework.web.servlet.config.annotation.WebMvcConfigurer;

/**
 * @Author Jsxs
 * @Date 2023/5/14 18:51
 * @PackageName:com.jsxs.config
 * @ClassName: CrosConfig
 * @Description: TODO
 * @Version 1.0
 */
@Configuration
public class CrosConfig implements WebMvcConfigurer {
    @Override
    public void addCorsMappings(CorsRegistry registry) {
        registry.addMapping("/**")
                .allowedOrigins("*")
                .allowedMethods("GET","HEAD","POST","PUT","DELETE","OPTIONS")
                .allowCredentials(false)
                .maxAge(3600)
                .allowedHeaders("*");
    }
}
(二)、Vue2.x搭建 (ElementUI+Vue)
1.搭建Vue基本环境
(1).安装Vue项目框架
1.创建vue2.x
2.查看版本是否正确

3.测试我们的Vue脚手架是否能够跑的动...

(2).安装elementui插件
1.搜索插件并安装

2.选择默认的的数据

3.查看我们的插件是否安装成功!!

(3).跑一下项目

2.非Vue-router搭建静态资源
(1).基本介绍
官网: https://element.eleme.cn/#/zh-CN

Vue继承了Element UI
Element UI后台管理系统主要的标签:
el-container: 构建整个页面的框架。el-aside:构建左侧菜单的。el-menu: 构建左侧菜单的详细数据。常用属性如下-
- default-openeds: 默认展开的菜单,通过菜单的index值来关联。:default-openeds=“[‘1’, ‘3’]”
-
- default-active: 默认选中的菜单子结点,通过菜单的index值来关联。:default-active=“‘1-1’”
el-subment: 可展开的菜单,常用属性-
- index:菜单的下标,文本类型,不能是数值类型的。
-
- template: 对应el-submenu的菜单名。
i:设置菜单的图标,通过class属性拉设置的。-
- el-icon-messae 信封的图标
-
- el-icon-menu菜单的图标
-
- el-icon-setting设置的图标
- el-menu-item : 菜单的子结点,不可再展开的子结点。常用属性:
-
- index:菜单的下标,供default-active调用…
(2).Vue前端静态页面搭建

<template>
<div>

  <el-container style="height: 500px; border: 1px solid #eee">

  <el-aside width="200px" style="background-color: rgb(238, 241, 246)">

    <el-menu :default-openeds="['1', '3']" :default-active="'1-1'">

      <el-submenu index="1">

        <template slot="title"><i class="el-icon-message">i>导航一template>

        <el-menu-item-group>
          <template slot="title">分组一template>

          <el-menu-item index="1-1">选项1el-menu-item>
          <el-menu-item index="1-2">选项2el-menu-item>
        el-menu-item-group>

      el-submenu>

    el-menu>
  el-aside>

  <el-container>
    <el-header style="text-align: right; font-size: 12px">
      <el-dropdown>
        <i class="el-icon-setting" style="margin-right: 15px">i>
        <el-dropdown-menu slot="dropdown">
          <el-dropdown-item>查看el-dropdown-item>
          <el-dropdown-item>新增el-dropdown-item>
          <el-dropdown-item>删除el-dropdown-item>
        el-dropdown-menu>
      el-dropdown>
      <span>王小虎span>
    el-header>

    <el-main>
      <el-table :data="tableData">
        <el-table-column prop="date" label="日期" width="140">
        el-table-column>
        <el-table-column prop="name" label="姓名" width="120">
        el-table-column>
        <el-table-column prop="address" label="地址">
        el-table-column>
      el-table>
    el-main>
  el-container>
el-container>
div>
template>

<script>
  export default {
    data() {
      const item = {
        date: '2016-05-02',
        name: '王小虎',
        address: '上海市普陀区金沙江路 1518 弄'
      };
      return {
        tableData: Array(20).fill(item)
      }
    }
  };
script>

<style>
  .el-header {
    background-color: #B3C0D1;
    color: #333;
    line-height: 60px;
  }

  .el-aside {
    color: #333;
  }
style>
3.Vue-router动态搭建(左侧菜单栏部分)
(1).配置路由
router/main.js
import Vue from 'vue'
import VueRouter from 'vue-router'
import HomeView from '../views/HomeView.vue'
import PageOne from '../views/PageOne.vue'
import PageTwo from '../views/PageTwo.vue'
import PageThree from '../views/PageThree.vue'
import PageFour from '../views/PageFour.vue'
import App from '../App.vue'
Vue.use(VueRouter)

const routes = [
  // 导航1
  {
    path: '/',
    name: '导航1',
    component: App,
    children: [  // 二级路由
      {
        path: '/pageone',
        name: 'pageone',
        component: PageOne
      },
      {
        path: '/pagetwo',
        name: 'pagetwo',
        component: PageTwo
      },
    ]
  },
  // 导航2
  {
    path: '/navigation',
    name: '导航2',
    component: App,
    children: [
      {
        path: 'pagethree',
        name: 'pagethree',
        component: PageThree
      },
      {
        path: 'pagefour',
        name: 'pagefour',
        component: PageFour
      }
    ]
  }
]

const router = new VueRouter({
  mode: 'history',
  base: process.env.BASE_URL,
  routes
})

export default router
(2).搭建前端接受路由
App.vue
这里我们index对我们的项目很有用,主要可以帮助我们独立化高亮选择。
<template>
  <div>

    <el-container style="height: 500px; border: 1px solid #eee">

      <el-aside width="200px" style="background-color: rgb(238, 241, 246)">


        <el-menu default-active="0">

          <el-submenu  v-for="(item_father, index_father) in $router.options.routes" :key="index_father" :index="index_father+''">

            <template slot="title"><i class="el-icon-message">i>{{item_father.name}}template>

            <el-menu-item  v-for="(item_son, index_son) in item_father.children" :key="index_son" :index="index_father+'-'+index_son">{{item_son.name}}el-menu-item>
          el-submenu>
        el-menu>

      el-aside>

      <el-container>
        <el-header style="text-align: right; font-size: 12px">
          <el-dropdown>
            <i class="el-icon-setting" style="margin-right: 15px">i>
            <el-dropdown-menu slot="dropdown">
              <el-dropdown-item>查看el-dropdown-item>
              <el-dropdown-item>新增el-dropdown-item>
              <el-dropdown-item>删除el-dropdown-item>
            el-dropdown-menu>
          el-dropdown>
          <span>王小虎span>
        el-header>

        <el-main>
          <router-view>router-view>
        el-main>
      el-container>
    el-container>
  div>
template>

<script>
export default {
  data() {
    const item = {
      date: "2016-05-02",
      name: "王小虎",
      address: "上海市普陀区金沙江路 1518 弄",
    };
    return {
      tableData: Array(20).fill(item),
    };
  },
  mounted(){
    console.log('vc',this);
  }
};
script>

<style>
.el-header {
  background-color: #b3c0d1;
  color: #333;
  line-height: 60px;
}

.el-aside {
  color: #333;
}
style>

4.问题探究-(多级路由问题)⭐⭐⭐
(1).问题展现
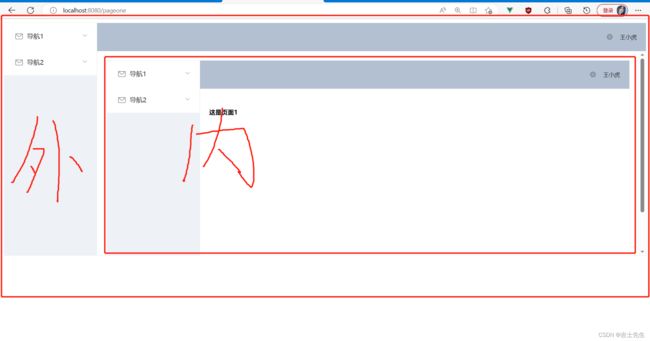
我们发现假如我们按照上面的代码编写程序的话,就会发现内嵌两个主题框架的情况。这种情况出现的原因是:
- 内层: 因为我们在配置路由的时候,我们配置的是儿子类。
在Vue中儿子类是展现在父Vue组件的身体中的。又因为我们在配置路由的时候把这个父类设置成了App.vue这个组件,所以最里面的内嵌套我们可以理解了。 - 外层: 我们因为在App.vue组件中搭建了框架,又通过router-view这个路由展现的操作,所以实现了对内层的嵌套。
(2).解决问题
1.我们将App.vue的框架抽出来生成新的Index.vue这个组件如下:
views/index.vue
<template>
  <div>

    <el-container style="height: 500px; border: 1px solid #eee">

      <el-aside width="200px" style="background-color: rgb(238, 241, 246)">


        <el-menu default-active="0">

          <el-submenu  v-for="(item_father, index_father) in $router.options.routes" :key="index_father" :index="index_father+''">

            <template slot="title"><i class="el-icon-message">i>{{item_father.name}}template>

            <el-menu-item  v-for="(item_son, index_son) in item_father.children" :key="index_son" :index="index_father+'-'+index_son">{{item_son.name}}el-menu-item>
          el-submenu>
        el-menu>
      el-aside>

      <el-container>
        <el-header style="text-align: right; font-size: 12px">
          <el-dropdown>
            <i class="el-icon-setting" style="margin-right: 15px">i>
            <el-dropdown-menu slot="dropdown">
              <el-dropdown-item>查看el-dropdown-item>
              <el-dropdown-item>新增el-dropdown-item>
              <el-dropdown-item>删除el-dropdown-item>
            el-dropdown-menu>
          el-dropdown>
          <span>王小虎span>
        el-header>
            <router-view>router-view>
        <el-main>

        el-main>
      el-container>
    el-container>

  div>
template>

<script>
export default {

}
script>

<style>

style>
2.配置路由,将路由的父亲都设置成我们抽象出来的index.vue
index.js
import Vue from 'vue'
import VueRouter from 'vue-router'
import HomeView from '../views/HomeView.vue'
import PageOne from '../views/PageOne.vue'
import PageTwo from '../views/PageTwo.vue'
import PageThree from '../views/PageThree.vue'
import PageFour from '../views/PageFour.vue'
import App from '../App.vue'
import Index from '../views/Index.vue'
Vue.use(VueRouter)

const routes = [
  // 导航1
  {
    path: '/',
    name: '导航1',
    component: Index,
    children: [  // 二级路由
      {
        path: '/pageone',
        name: 'pageone',
        component: PageOne
      },
      {
        path: '/pagetwo',
        name: 'pagetwo',
        component: PageTwo
      },
    ]
  },
  // 导航2
  {
    path: '/navigation',
    name: '导航2',
    component: App,
    children: [
      {
        path: 'pagethree',
        name: 'pagethree',
        component: PageThree
      },
      {
        path: 'pagefour',
        name: 'pagefour',
        component: PageFour
      }
    ]
  }
]

const router = new VueRouter({
  mode: 'history',
  base: process.env.BASE_URL,
  routes
})

export default router
3.App.vue进行展现生成的框架
App.vue
<template>
  <div>
    <router-view>router-view>
  div>
template>

<script>
export default {
  data() {
    const item = {
      date: "2016-05-02",
      name: "王小虎",
      address: "上海市普陀区金沙江路 1518 弄",
    };
    return {
      tableData: Array(20).fill(item),
    };
  },
  mounted(){
    console.log('vc',this);
  }
};
script>

<style>
.el-header {
  background-color: #b3c0d1;
  color: #333;
  line-height: 60px;
}

.el-aside {
  color: #333;
}
style>

(3).问题总结 ⭐⭐⭐
- 假如我们设置的是多级路由,所以
子路由跳转实际上都是在父路由的一个 < router-view> 区间进行变化。App.vue展现的是被子路由改变后的父路由。

5.左侧菜单页与右侧页面交互
(1).三个基本步骤
< el -menu>标签添加router属性- 在
父路由页面中添加< router-view>标签,它是一个容器,动态渲染你选择的子路由router。 < el-menu-item>标签的index值就是要跳转的 路由
(2).开始搭建
1.如何实现路由跳转
index.vue

- index属性居然是用于跳转的???
- 加上router属性名
<template>
  <div>

    <el-container style="height: 500px; border: 1px solid #eee">

      <el-aside width="200px" style="background-color: rgb(238, 241, 246)">


        <el-menu :default-openeds="['0','1']" router>

          <el-submenu  v-for="(item_father, index_father) in $router.options.routes" :key="index_father" :index="index_father+''">

            <template slot="title"><i class="el-icon-message">i>{{item_father.name}}template>

            <el-menu-item  v-for="(item_son, index_son) in item_father.children" :key="index_son" :index="item_son.path" :class="$route.path==item_son.path ? 'is-active':''">{{item_son.name}}el-menu-item>
          el-submenu>
        el-menu>
      el-aside>

      <el-container>
        <el-header style="text-align: right; font-size: 12px">
          <el-dropdown>
            <i class="el-icon-setting" style="margin-right: 15px">i>
            <el-dropdown-menu slot="dropdown">
              <el-dropdown-item>查看el-dropdown-item>
              <el-dropdown-item>新增el-dropdown-item>
              <el-dropdown-item>删除el-dropdown-item>
            el-dropdown-menu>
          el-dropdown>
          <span>王小虎span>
        el-header>
            <router-view>router-view>
        <el-main>

        el-main>
      el-container>
    el-container>

  div>
template>

<script>
export default {

}
script>

<style>

style>
通过网址进行高亮、以前只能通过点亮到地址
:class="$route.path==item_son.path ? 'is-active':''"

2.router/index.js
我们一打开页面,用哪个子路由组件进行填充
import Vue from 'vue'
import VueRouter from 'vue-router'
import HomeView from '../views/HomeView.vue'
import PageOne from '../views/PageOne.vue'
import PageTwo from '../views/PageTwo.vue'
import PageThree from '../views/PageThree.vue'
import PageFour from '../views/PageFour.vue'
import App from '../App.vue'
import Index from '../views/Index.vue'
Vue.use(VueRouter)

const routes = [
  // 导航1
  {
    path: '/',
    name: '导航1',
    component: Index,
    redirect:'/pageone',  // 当我们访问到父路径 / 的时候,用这个子组件填充父组件并展示
    children: [  // 二级路由
      {
        path: '/pageone',
        name: 'pageone',
        component: PageOne
      },
      {
        path: '/pagetwo',
        name: 'pagetwo',
        component: PageTwo
      },
    ]
  },
  // 导航2
  {
    path: '/navigation',
    name: '导航2',
    component: Index,

    children: [
      {
        path: '/navigation/pagethree',
        name: 'pagethree',
        component: PageThree
      },
      {
        path: '/navigation/pagefour',
        name: 'pagefour',
        component: PageFour
      }
    ]
  }
]

const router = new VueRouter({
  mode: 'history',
  base: process.env.BASE_URL,
  routes
})

export default router
(三)、前后端分离数据对接
1.搭建静态页面
1. 路由 router/index.js
import Vue from 'vue'
import VueRouter from 'vue-router'
import HomeView from '../views/HomeView.vue'
import PageOne from '../views/PageOne.vue'
import PageTwo from '../views/PageTwo.vue'
import PageThree from '../views/PageThree.vue'
import PageFour from '../views/PageFour.vue'
import App from '../App.vue'
import Index from '../views/Index.vue'
Vue.use(VueRouter)

const routes = [
  // 导航1
  {
    path: '/',
    name: '导航1',
    component: Index,
    redirect:'/pageone',  // 当我们访问到父路径 / 的时候,用这个子组件填充父组件并展示
    children: [  // 二级路由
      {
        path: '/pageone',
        name: 'pageone',
        component: PageOne
      },
      {
        path: '/pagetwo',
        name: 'pagetwo',
        component: PageTwo
      },
    ]
  },
  // 导航2
  {
    path: '/navigation',
    name: '导航2',
    component: Index,

    children: [
      {
        path: '/navigation/pagethree',
        name: 'pagethree',
        component: PageThree
      },
      {
        path: '/navigation/pagefour',
        name: 'pagefour',
        component: PageFour
      }
    ]
  }
]

const router = new VueRouter({
  mode: 'history',
  base: process.env.BASE_URL,
  routes
})

export default router
2. 文件入口 main.js
import Vue from 'vue'
import App from './App.vue'
import router from './router'
import store from './store'
import './plugins/element.js'

Vue.config.productionTip = false

new Vue({
  router,
  store,
  render: h => h(App)
}).$mount('#app')
3. App.vue
<template>
  <div>
    <router-view>router-view>
  div>
template>

<script>
export default {
  data() {
    const item = {
      date: "2016-05-02",
      name: "王小虎",
      address: "上海市普陀区金沙江路 1518 弄",
    };
    return {
      tableData: Array(20).fill(item),
    };
  },
  mounted(){
    console.log('vc',this);
  }
};
script>

<style>
.el-header {
  background-color: #b3c0d1;
  color: #333;
  line-height: 60px;
}

.el-aside {
  color: #333;
}
style>
4. 父路由 Index.vue
<template>
  <div>

    <el-container style="height: 500px; border: 1px solid #eee">

      <el-aside width="200px" style="background-color: rgb(238, 241, 246)">


        <el-menu :default-openeds="['0','1']" router>

          <el-submenu  v-for="(item_father, index_father) in $router.options.routes" :key="index_father" :index="index_father+''">

            <template slot="title"><i class="el-icon-message">i>{{item_father.name}}template>

            <el-menu-item  v-for="(item_son, index_son) in item_father.children" :key="index_son" :index="item_son.path" :class="$route.path==item_son.path ? 'is-active':''">{{item_son.name}}el-menu-item>
          el-submenu>
        el-menu>
      el-aside>

      <el-container>
        <el-header style="text-align: right; font-size: 12px">
          <el-dropdown>
            <i class="el-icon-setting" style="margin-right: 15px">i>
            <el-dropdown-menu slot="dropdown">
              <el-dropdown-item>查看el-dropdown-item>
              <el-dropdown-item>新增el-dropdown-item>
              <el-dropdown-item>删除el-dropdown-item>
            el-dropdown-menu>
          el-dropdown>
          <span>王小虎span>
        el-header>
            <router-view>router-view>
        <el-main>

        el-main>
      el-container>
    el-container>

  div>
template>

<script>
export default {

}
script>

<style>

style>
5. pageThree.vue pageTwo.vue pageFour 页面一样
<template>
  <div>
    <h1>这是页面2h1>
  div>
template>

<script>
export default {
    name:'PageTwo',
}
script>

<style>

style>
6. PageOne.vue
<template>
  <div>
    <el-table :data="tableData" border style="width: 100%">
      <el-table-column
        fixed
        prop="id"
        label="编号"
        width="150"
      >el-table-column>
      <el-table-column prop="name" label="书名" width="120"> el-table-column>
      <el-table-column prop="author" label="作者" width="120">el-table-column>
      <el-table-column fixed="right" label="操作" width="100">
        <template slot-scope="scope">
          <el-button @click="handleClick(scope.row)" type="text" size="small"
            >查看el-button
          >
          <el-button type="text" size="small">编辑el-button>
        template>
      el-table-column>
    el-table>

    <el-pagination background layout="prev, pager, next" page-size="6"  :total="50" @current-change="page">el-pagination>
  div>
template>

<script>
export default {
  methods: {
    handleClick(row) {
      console.log(row);
    },
    page(currentpage){  //得到的参数是我们的页码
        alert(currentpage)
    }
  },
  data() {
    return {
      tableData: [
        {
          id: "1",
          name: "活着1",
          author: "余华1",
        },
        {
          id: "2",
          name: "活着2",
          author: "余华2",
        },
        {
          id: "3",
          name: "活着3",
          author: "余华3",
        },
        {
          id: "4",
          name: "活着4",
          author: "余华4",
        },
      ],
    };
  },
};
script>
页码
以下两个步骤:
1. ElementUI->页码 @current-change="page"
 <el-pagination background layout="prev, pager, next" page-size="6"  :total="50" @current-change="page"></el-pagination>

2. 调用的方法
page(currentpage){  //得到的参数是我们的页码
        alert(currentpage)
    }

2.前后端交互-(填充表格数据-分页)
(1).前端安装axios并配置
1.安装axios
npm install axios
2.配置跨域的问题 PageOne.vue
<template>
  <div>
    <el-table :data="tableData" border style="width: 100%">
      <el-table-column
        fixed
        prop="id"
        label="编号"
        width="150"
      >el-table-column>
      <el-table-column prop="name" label="书名" width="120"> el-table-column>
      <el-table-column prop="author" label="作者" width="120">el-table-column>
      <el-table-column fixed="right" label="操作" width="100">
        <template slot-scope="scope">
          <el-button @click="handleClick(scope.row)" type="text" size="small"
            >查看el-button
          >
          <el-button type="text" size="small">编辑el-button>
        template>
      el-table-column>
    el-table>

    <el-pagination background layout="prev, pager, next" page-size="6"  :total="totalPage" @current-change="page">el-pagination>
  div>
template>

<script>
import axios from "axios"
export default {
  methods: {
    handleClick(row) {
      console.log(row);
    },
    page(currentpage){  //得到的参数是我们的页码
         const _this=this;
      axios.request("http://localhost:8181/findAll/"+currentpage+"/6").then(function(response) {
      console.log(response)
      // 传送数据- 页面信息
        _this.tableData=response.data.content
      // 传递总页数-
      _this.totalPage=response.data.totalElements
    }).catch({

    }).finally({

    })
    }
  },
  data() {
    return {
      tableData: [],
      totalPage:0
    };
  },
  mounted() {
    const _this=this;
    axios.request("http://localhost:8181/findAll/1/6").then(function(response) {
      console.log(response)
      // 传送数据- 页面信息
        _this.tableData=response.data.content
      // 传递总页数-
      _this.totalPage=response.data.totalElements
    }).catch({

    }).finally({

    })
  },
};
script>

分页的操作
    page(currentpage){  //得到的参数是我们的页码
         const _this=this;
      axios.request("http://localhost:8181/findAll/"+currentpage+"/6").then(function(response) {
      console.log(response)
      // 传送数据- 页面信息
        _this.tableData=response.data.content
      // 传递总页数-
      _this.totalPage=response.data.totalElements
    }).catch({

    }).finally({

    })
    }
加载数据的操作
  mounted() {
    const _this=this;
    axios.request("http://localhost:8181/findAll/1/6").then(function(response) {
      console.log(response)
      // 传送数据- 页面信息
        _this.tableData=response.data.content
      // 传递总页数-
      _this.totalPage=response.data.totalElements
    }).catch({

    }).finally({

    })
  },

(2).后端配置SpringBoot的数据
控制层: BookHandler.java
package com.jsxs.controller;

import com.jsxs.pojo.Book;
import com.jsxs.repository.BookRepository;
import org.springframework.data.domain.Page;
import org.springframework.data.domain.PageRequest;
import org.springframework.data.domain.Pageable;
import org.springframework.web.bind.annotation.GetMapping;
import org.springframework.web.bind.annotation.PathVariable;
import org.springframework.web.bind.annotation.RestController;

import javax.annotation.Resource;


/**
 * @Author Jsxs
 * @Date 2023/5/14 15:23
 * @PackageName:com.jsxs.controller
 * @ClassName: BookHandler
 * @Description: TODO
 * @Version 1.0
 */

@RestController
public class BookHandler {
    @Resource
    private BookRepository bookRepository;

    @GetMapping("/findAll/{page}/{size}")
    public Page<Book> findAll(@PathVariable("page") Integer page, @PathVariable("size") Integer size){
//      页数是从0开始的所以-1
        Pageable pageable= PageRequest.of((page-1),size);  // 第一个参数是 : 页数、 第二个数是: 一页几张
        return bookRepository.findAll(pageable);
    }
}
2.配置跨域的问题
package com.jsxs.config;

import org.springframework.context.annotation.Configuration;
import org.springframework.web.servlet.config.annotation.CorsRegistry;
import org.springframework.web.servlet.config.annotation.WebMvcConfigurer;

/**
 * @Author Jsxs
 * @Date 2023/5/14 18:51
 * @PackageName:com.jsxs.config
 * @ClassName: CrosConfig
 * @Description: TODO
 * @Version 1.0
 */
@Configuration
public class CrosConfig implements WebMvcConfigurer {
    @Override
    public void addCorsMappings(CorsRegistry registry) {
        registry.addMapping("/**")
                .allowedOrigins("*")
                .allowedMethods("GET","HEAD","POST","PUT","DELETE","OPTIONS")
                .allowCredentials(false)
                .maxAge(3600)
                .allowedHeaders("*");
    }
}
3.ElementUI-表单数据分析
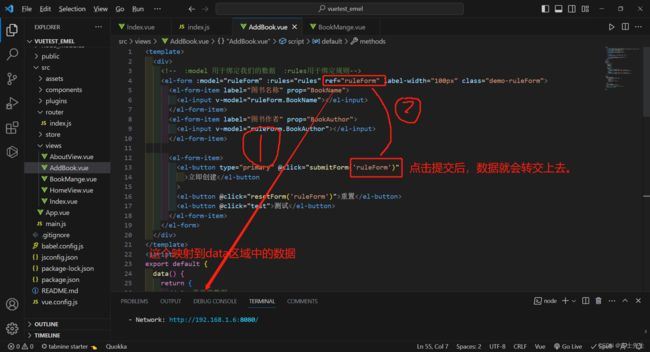
(1).表单数据校验
定义一个rules对象,在rules对象中设置表单各个选项的校验规则。
- 先绑定表单 (:roules)。
- 指定文本框绑定规则: prop=“规则名字”
- 在data区域设置规则及名字。
- 表单提交的时候验证规则。(先传递数据作为形参ref=“ruleForm”,然后在js中进行验证)
1. 绑定表单样式:  :rules="rules"  -》绑定规则。
2.  prop="BookName"-》绑定文本框。
3.  ref="ruleForm"-》传递参数给submit作为形参。

    <el-form :model="ruleForm" :rules="rules" ref="ruleForm" label-width="100px" class="demo-ruleForm">
      <el-form-item label="图书名称" prop="BookName">
        <el-input v-model="ruleForm.BookName">el-input>
      el-form-item>
      <el-form-item label="图书作者" prop="BookAuthor">
        <el-input v-model="ruleForm.BookAuthor">el-input>
      el-form-item>

      <el-form-item>
        <el-button type="primary" @click="submitForm('ruleForm')"
          >立即创建el-button
        >
        <el-button @click="resetForm('ruleForm')">重置el-button>
        <el-button @click="test">测试el-button>
      el-form-item>
    el-form>

4. 在data区域配置规则:
      rules: {
        BookName: [
          // 是否强制? 提示信息? 触发条件?
          { required: true, message: "请输入图书名称", trigger: "blur" },
          { min: 3, max: 5, message: "长度在 3 到 5 个字符", trigger: "blur" },
        ],
        BookAuthor: [
          { required: true, message: "请输入图书作者", trigger: "blur" },
          { min: 3, max: 5, message: "长度在 3 到 5 个字符", trigger: "blur" },
        ],
      },
5.表单提交的时候验证规则。
submitForm(formName) { //获取到传递过来的规则名
      this.$refs[formName].validate((valid) => { //判断表单全部校验是否为true
        if (valid) {  // 假如表单数据验证成功。
          alert("submit!");
        } else {  // 假如表单数据验证失败。
          console.log("error submit!!");
          return false;
        }
      });
    },
当我们点击立即创建的时候就会触发 submint方法。这里是通过ref里面的名字
(2).表单数据的填充
我们给表单中的文本框进行绑定值,需要以下两个步骤
- 绑定表单 :model。
- v-model: 绑定属性值即(name)。
- 在data区域设置值。
1.绑定表单   :model="ruleForm"

    <!--  :model 用于绑定我们的数据  :rules用于绑定规则-->
    <el-form :model="ruleForm" :rules="rules" ref="ruleForm" label-width="100px" class="demo-ruleForm">
      <el-form-item label="图书名称" prop="BookName">
        <el-input v-model="ruleForm.BookName"></el-input>
      </el-form-item>
      <el-form-item label="图书作者" prop="BookAuthor">
        <el-input v-model="ruleForm.BookAuthor"></el-input>
      </el-form-item>

      <el-form-item>
        <el-button type="primary" @click="submitForm('ruleForm')"
          >立即创建</el-button
        >
        <el-button @click="resetForm('ruleForm')">重置</el-button>
        <el-button @click="test">测试</el-button>
      </el-form-item>
    </el-form>
2.数据
  data() {
    return {
      // 1. 表单的数据
      ruleForm: {
        BookName: "",
        BookAuthor: "",
      },
      // 2. 校验的规则
      rules: {
        BookName: [
          // 是否强制? 提示信息? 触发条件?
          { required: true, message: "请输入图书名称", trigger: "blur" },
          { min: 3, max: 5, message: "长度在 3 到 5 个字符", trigger: "blur" },
        ],
        BookAuthor: [
          { required: true, message: "请输入图书作者", trigger: "blur" },
          { min: 3, max: 5, message: "长度在 3 到 5 个字符", trigger: "blur" },
        ],
      },
    };
  },
(3).表单提交后数据到哪里?
1.因为按钮具有提交表单的功能,所以我们又新增了一个测试的按钮。这个按钮绑定一个方法,用于输出表单提交后数据的变化...
 test() {  // 我们通过测试发现我们的文本会出现在这里...
      console.log(this.ruleForm);
    },
<template>
  <div>

    <el-form :model="ruleForm" :rules="rules" ref="ruleForm" label-width="100px" class="demo-ruleForm">
      <el-form-item label="图书名称" prop="BookName">
        <el-input v-model="ruleForm.BookName">el-input>
      el-form-item>
      <el-form-item label="图书作者" prop="BookAuthor">
        <el-input v-model="ruleForm.BookAuthor">el-input>
      el-form-item>

      <el-form-item>
        <el-button type="primary" @click="submitForm('ruleForm')"
          >立即创建el-button
        >
        <el-button @click="resetForm('ruleForm')">重置el-button>
        <el-button @click="test">测试el-button>
      el-form-item>
    el-form>
  div>
template>
<script>
export default {
  data() {
    return {
      // 1. 表单的数据
      ruleForm: {
        BookName: "",
        BookAuthor: "",
      },
      // 2. 校验的规则
      rules: {
        BookName: [
          // 是否强制? 提示信息? 触发条件?
          { required: true, message: "请输入图书名称", trigger: "blur" },
          { min: 3, max: 5, message: "长度在 3 到 5 个字符", trigger: "blur" },
        ],
        BookAuthor: [
          { required: true, message: "请输入图书作者", trigger: "blur" },
          { min: 3, max: 5, message: "长度在 3 到 5 个字符", trigger: "blur" },
        ],
      },
    };
  },
  methods: {
    submitForm(formName) {
      this.$refs[formName].validate((valid) => {
        if (valid) {
          alert("submit!");
        } else {
          console.log("error submit!!");
          return false;
        }
      });
    },
    resetForm(formName) {
      this.$refs[formName].resetFields();
    },
    test() {  // 我们通过测试发现我们的文本会出现在这里...
      console.log(this.ruleForm);
    },
  },
};
script>
我们发现数据提交后,就会进入表单绑定的data区域的对象

(4).全部置空的操作
这里依然是通过ref里面的这个名字进行传递的...
1.
<el-form :model="ruleForm" :rules="rules" ref="ruleForm" label-width="100px" class="demo-ruleForm">
      <el-form-item label="图书名称" prop="BookName">
        <el-input v-model="ruleForm.BookName">el-input>
      el-form-item>
      <el-form-item label="图书作者" prop="BookAuthor">
        <el-input v-model="ruleForm.BookAuthor">el-input>
      el-form-item>

      <el-form-item>
        <el-button type="primary" @click="submitForm('ruleForm')"
          >立即创建el-button
        >
        <el-button @click="resetForm('ruleForm')">重置el-button>
        <el-button @click="test">测试el-button>
      el-form-item>
    el-form>
2.置空的方法和数据..
    resetForm(formName) {
      this.$refs[formName].resetFields();
    },

4.操作表单数据-(添加数据)
(1).SpringBoot后端布局
BookHander.java
因为是表单数据保证用户的隐私问题:所以我们使用Post传递。我们Java传递过去的是JSON对象。前端传递过来的也是JSON对象,我们只需要添加一个@RequestBody注解就好。
package com.jsxs.controller;

import com.jsxs.pojo.Book;
import com.jsxs.repository.BookRepository;
import org.springframework.data.domain.Page;
import org.springframework.data.domain.PageRequest;
import org.springframework.data.domain.Pageable;
import org.springframework.web.bind.annotation.*;

import javax.annotation.Resource;


/**
 * @Author Jsxs
 * @Date 2023/5/14 15:23
 * @PackageName:com.jsxs.controller
 * @ClassName: BookHandler
 * @Description: TODO 以前我们的方法返回值为String目的是为了跳转页面,现在只是为了传递数据
 * @Version 1.0
 */

@RestController
public class BookHandler {
    @Resource
    private BookRepository bookRepository;
// 1.查找数据的方法
    @GetMapping("/findAll/{page}/{size}")
    public Page<Book> findAll(@PathVariable("page") Integer page, @PathVariable("size") Integer size){
//      页数是从0开始的所以-1
        Pageable pageable= PageRequest.of((page-1),size);  // 第一个参数是 : 页数、 第二个数是: 一页几张
        return bookRepository.findAll(pageable);
    }
//  2.新增数据的方法
    @PostMapping("/save")
    public String save(@RequestBody Book book){ //这个注解是将传递过来的Json对象转换为Java对象
        Book result = bookRepository.save(book);
        if (result !=null){
            System.out.println("数据"+book);
            return "恭喜添加成功";
        }else {
            return "对不起添加失败";
        }

    }
}
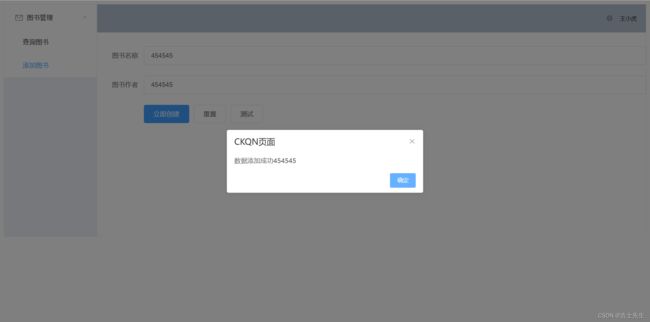
(2).Vue前端布局
AddBook.vue
- data区域的name值一定要和实体类的字段名要一致。
- post提交
<template>
  <div>
  提示框的样式
    <el-button type="text" @click="open" v-show="'false'">el-button>

    <el-form
      :model="ruleForm"
      :rules="rules"
      ref="ruleForm"
      label-width="100px"
      class="demo-ruleForm"
    >
      <el-form-item label="图书名称" prop="name">
        <el-input v-model="ruleForm.name">el-input>
      el-form-item>
      <el-form-item label="图书作者" prop="author">
        <el-input v-model="ruleForm.author">el-input>
      el-form-item>

      <el-form-item>
        <el-button type="primary" @click="submitForm('ruleForm')"
          >立即创建el-button
        >
        <el-button @click="resetForm('ruleForm')">重置el-button>
        <el-button @click="test">测试el-button>
      el-form-item>
    el-form>
  div>
template>
<script>
import axios from "axios";
export default {
  data() {
    return {
      // 1. 表单的数据-->这里的字段名一定要和数据库的对应上
      ruleForm: {
        name: "",
        author: "",
      },
      isSuccess: false,
      // 2. 校验的规则
      rules: {
        BookName: [
          // 是否强制? 提示信息? 触发条件?
          { required: true, message: "请输入图书名称", trigger: "blur" },
          {
            min: 1,
            max: 10,
            message: "长度在 1 到 10 个字符",
            trigger: "blur",
          },
        ],
        BookAuthor: [
          { required: true, message: "请输入图书作者", trigger: "blur" },
          {
            min: 1,
            max: 10,
            message: "长度在 1 到 10 个字符",
            trigger: "blur",
          },
        ],
      },
    };
  },
  methods: {
    submitForm(formName) {// 这里传递过来的是data区域的值
      const _this = this;  //vm的this
      this.$refs[formName].validate((valid) => {  //验证
        if (valid) {// 假如规则都正确
          // TODO: post形式传递一个对象
          axios.post("http://localhost:8181/save", _this.ruleForm).then((Response) => {
              if (Response.status == 200) {  //假如状态码正确,就进行下面的操作
                console.log(Response);
                // 跳转路由
                // _this.$router.push('/BookMange')
                // 带提示框的复杂路由跳转
                _this.$alert("数据添加成功"+_this.name, "CKQN页面", {
                  confirmButtonText: "确定",
                  callback: (action) => {
                      _this.$router.push('/BookMange')
                  },
                });
              }
              console.log(Response);
            });
        } else {
          console.log("error submit!!");
          return false;
        }
      });
    },
    resetForm(formName) {
      this.$refs[formName].resetFields();
    },
    test() {
      // 我们通过测试发现我们的文本会出现在这里...
      console.log(this.ruleForm);
    },
  },
};
script>
    submitForm(formName) { // 这里传递过来的是data区域的值

      const _this = this;
      this.$refs[formName].validate((valid) => {
        if (valid) {
          // 假如规则都正确
          // TODO: post形式传递一个对象
          axios
            .post("http://localhost:8181/save", _this.ruleForm)
            .then((Response) => {
              if (Response.status == 200) {
                console.log(Response);
                // 简单跳转路由
                // _this.$router.push('/BookMange')
                _this.$alert("数据添加成功"+_this.name, "CKQN页面", {  //
                  confirmButtonText: "确定",
                  callback: (action) => {
                      _this.$router.push('/BookMange')
                  },
                });
              }
              console.log(Response);
            });
        } else {
          console.log("error submit!!");
          return false;
        }
      });
    },
接受到的Response

5.操作表单:数据-(修改数据)
(1).SpringBoot后端布局
1.根据id查找数据
package com.jsxs.controller;

import com.jsxs.pojo.Book;
import com.jsxs.repository.BookRepository;
import org.springframework.data.domain.Page;
import org.springframework.data.domain.PageRequest;
import org.springframework.data.domain.Pageable;
import org.springframework.web.bind.annotation.*;

import javax.annotation.Resource;


/**
 * @Author Jsxs
 * @Date 2023/5/14 15:23
 * @PackageName:com.jsxs.controller
 * @ClassName: BookHandler
 * @Description: TODO 以前我们的方法返回值为String目的是为了跳转页面,现在只是为了传递数据
 * @Version 1.0
 */

@RestController
public class BookHandler {
    @Resource
    private BookRepository bookRepository;

    // 1.查找数据的方法
    @GetMapping("/findAll/{page}/{size}")
    public Page<Book> findAll(@PathVariable("page") Integer page, @PathVariable("size") Integer size) {
//      页数是从0开始的所以-1
        Pageable pageable = PageRequest.of((page - 1), size);  // 第一个参数是 : 页数、 第二个数是: 一页几张
        return bookRepository.findAll(pageable);
    }

    //  2.新增数据的方法
    @PostMapping("/save")
    public String save(@RequestBody Book book) { //这个注解是将传递过来的Json对象转换为Java对象
        Book result = bookRepository.save(book);
        if (result != null) {
            System.out.println("数据" + book);
            return "恭喜添加成功";
        } else {
            return "对不起添加失败";
        }
    }

    //  3.通过id进行查找的方法
    @GetMapping("/findbyid/{id}")
    public Book findById(@PathVariable("id") Integer id) {
        System.out.println("-------通过id查询数据成功!!");
        return bookRepository.findById(id).get();
    }
//  4.通过id进行数据的修改
    @PostMapping("/update")
    public String updateById(@RequestBody Book book){
        Book save = bookRepository.save(book);
        if (save!=null){
            return "修改数据成功";
        }else {
            return "修改数据失败";
        }
    }
//   5.删除的操作
    @GetMapping("/deletedid/{id}")
    public String deleteById(@PathVariable("id") Integer id){
        bookRepository.deleteById(id);
        return "删除成功";
    }

}

(2).Vue前端布局
BootMange.vue
1. 点击按钮
 <el-button @click="edit(scope.row)" type="text" size="small" >修改el-button>
2.跳转路由并携带参数
  methods: {
    edit(row) {
      // 获取本行所有的属性封装成一个对象
      console.log(row);
      // 利用query传递参数
      this.$router.push({
        path: "/BookUpdate",
        query: {
          id: row.id,
        },
      });
    },
Bookupdate.vue
3.利用传递的参数进行查找id,并更新数据
  created(){
        // 获取传递过来的参数
        const _this = this;
        axios.get('http://localhost:8181/findbyid/'+this.$route.query.id).then(function(response){
            _this.ruleForm = response.data
        })
    },
4.提交数据
  methods: {
    submitForm(formName) {
      // 这里传递过来的是data区域的值
      const _this = this;
      this.$refs[formName].validate((valid) => {
        if (valid) {
          // 假如规则都正确
          // TODO: post形式传递一个对象
          axios
            .post("http://localhost:8181/update", _this.ruleForm)
            .then((Response) => {
              if (Response.status == 200) {
                console.log(Response);
                // 跳转路由
                // _this.$router.push('/BookMange')
                _this.$alert("数据修改成功", "小提示", {
                  confirmButtonText: "确定",
                  callback: (action) => {
                    _this.$router.push("/BookMange");
                  },
                });
              }
              console.log(Response);
            });
        } else {
          console.log("error submit!!");
          return false;
        }
      });
    },
<template>
  <div>
    <el-button type="text" @click="open" v-show="'false'">el-button>

    <el-form
      :model="ruleForm"
      :rules="rules"
      ref="ruleForm"
      label-width="100px"
      class="demo-ruleForm"
    >
          <el-form-item label="图书名称" prop="id">
        <el-input v-model="ruleForm.id" readonly>el-input>
      el-form-item>
      <el-form-item label="图书名称" prop="name">
        <el-input v-model="ruleForm.name">el-input>
      el-form-item>
      <el-form-item label="图书作者" prop="author">
        <el-input v-model="ruleForm.author">el-input>
      el-form-item>

      <el-form-item>
        <el-button type="primary" @click="submitForm('ruleForm')"
          >立即修改el-button
        >
        <el-button @click="resetForm('ruleForm')">重置el-button>
        <el-button @click="test">测试el-button>
      el-form-item>
    el-form>
  div>
template>
<script>
import axios from "axios";
export default {
  data() {
    return {
      // 1. 表单的数据-->这里的字段名一定要和数据库的对应上
      ruleForm: {
        id:1,
        name: "",
        author: "",
      },
      isSuccess: false,
      // 2. 校验的规则
      rules: {
        BookName: [
          // 是否强制? 提示信息? 触发条件?
          { required: true, message: "请输入图书名称", trigger: "blur" },
          {
            min: 1,
            max: 10,
            message: "长度在 1 到 10 个字符",
            trigger: "blur",
          },
        ],
        BookAuthor: [
          { required: true, message: "请输入图书作者", trigger: "blur" },
          {
            min: 1,
            max: 10,
            message: "长度在 1 到 10 个字符",
            trigger: "blur",
          },
        ],
      },
    };
  },
  methods: {
    submitForm(formName) {
      // 这里传递过来的是data区域的值
      const _this = this;
      this.$refs[formName].validate((valid) => {
        if (valid) {
          // 假如规则都正确
          // TODO: post形式传递一个对象
          axios
            .post("http://localhost:8181/update", _this.ruleForm)
            .then((Response) => {
              if (Response.status == 200) {
                console.log(Response);
                // 跳转路由
                // _this.$router.push('/BookMange')
                _this.$alert("数据修改成功", "小提示", {
                  confirmButtonText: "确定",
                  callback: (action) => {
                    _this.$router.push("/BookMange");
                  },
                });
              }
              console.log(Response);
            });
        } else {
          console.log("error submit!!");
          return false;
        }
      });
    },
    resetForm(formName) {
      this.$refs[formName].resetFields();
    },
    test() {
      // 我们通过测试发现我们的文本会出现在这里...
      console.log(this.ruleForm);
    },
  },
  created(){
        // 获取传递过来的参数
        const _this = this;
        axios.get('http://localhost:8181/findbyid/'+this.$route.query.id).then(function(response){
            _this.ruleForm = response.data
        })
    },
    mounted() {
         console.log('更新',this)
    },
};
script>
6.操作表单数据-(删除数据)
(1).SpringBoot后端布局
package com.jsxs.controller;

import com.jsxs.pojo.Book;
import com.jsxs.repository.BookRepository;
import org.springframework.data.domain.Page;
import org.springframework.data.domain.PageRequest;
import org.springframework.data.domain.Pageable;
import org.springframework.web.bind.annotation.*;

import javax.annotation.Resource;


/**
 * @Author Jsxs
 * @Date 2023/5/14 15:23
 * @PackageName:com.jsxs.controller
 * @ClassName: BookHandler
 * @Description: TODO 以前我们的方法返回值为String目的是为了跳转页面,现在只是为了传递数据
 * @Version 1.0
 */

@RestController
public class BookHandler {
    @Resource
    private BookRepository bookRepository;

    // 1.查找数据的方法
    @GetMapping("/findAll/{page}/{size}")
    public Page<Book> findAll(@PathVariable("page") Integer page, @PathVariable("size") Integer size) {
//      页数是从0开始的所以-1
        Pageable pageable = PageRequest.of((page - 1), size);  // 第一个参数是 : 页数、 第二个数是: 一页几张
        return bookRepository.findAll(pageable);
    }

    //  2.新增数据的方法
    @PostMapping("/save")
    public String save(@RequestBody Book book) { //这个注解是将传递过来的Json对象转换为Java对象
        Book result = bookRepository.save(book);
        if (result != null) {
            System.out.println("数据" + book);
            return "恭喜添加成功";
        } else {
            return "对不起添加失败";
        }
    }

    //  3.通过id进行查找的方法
    @GetMapping("/findbyid/{id}")
    public Book findById(@PathVariable("id") Integer id) {
        System.out.println("-------通过id查询数据成功!!");
        return bookRepository.findById(id).get();
    }
//  4.通过id进行数据的修改
    @PostMapping("/update")
    public String updateById(@RequestBody Book book){
        Book save = bookRepository.save(book);
        if (save!=null){
            return "修改数据成功";
        }else {
            return "修改数据失败";
        }
    }
//   5.删除的操作
    @GetMapping("/deletedid/{id}")
    public String deleteById(@PathVariable("id") Integer id){
        bookRepository.deleteById(id);
        return "删除成功";
    }
}
}
(2).Vue前端布局
1.传递本行的信息
 <el-button type="text" size="small" @click="delete_one(scope.row)">删除</el-button
 2.进行删除
methods{
 // 删除的操作
    delete_one(row) {
      console.log("sdsdsd", row);
      const _this = this;
      axios;
      this.$confirm("此操作将永久删除该文件, 是否继续?", "提示", {
        confirmButtonText: "确定",
        cancelButtonText: "取消",
        type: "warning",
      })
        .then(() => {
          this.$message({
            type: "success",
            message: "删除成功!",
          });
          axios
            .get("http://localhost:8181/deletedid/" + row.id)
            .then(function (respsone) {
              console.log("删除->", respsone);
              _this.$router.push("/AddBook");
            });
        })
        .catch(() => {
          this.$message({
            type: "info",
            message: "已取消删除",
          });
        });
    },
  },
BookMange.vue
<template>
  <div>
    <el-button type="text" @click="open" v-show="'false'"></el-button>
    <el-table :data="tableData" border style="width: 100%">
      <el-table-column
        fixed
        prop="id"
        label="编号"
        width="150"
      ></el-table-column>
      <el-table-column prop="name" label="书名" width="120"> </el-table-column>
      <el-table-column prop="author" label="作者" width="120"></el-table-column>
      <el-table-column fixed="right" label="操作" width="100">
        <template slot-scope="scope">
          <el-button @click="edit(scope.row)" type="text" size="small"
            >修改</el-button
          >
          <el-button type="text" size="small" @click="delete_one(scope.row)"
            >删除</el-button
          >
        </template>
      </el-table-column>
    </el-table>
    <!-- 分页的操作 : 这里的页数是: 总条数/每页的条数-->
    <el-pagination
      background
      layout="prev, pager, next"
      page-size="6"
      :total="totalPage"
      @current-change="page"
    ></el-pagination>
  </div>
</template>

<script>
import axios from "axios";
export default {
  methods: {
    edit(row) {
      // 获取本行所有的属性封装成一个对象
      console.log(row);
      // 利用query传递参数
      this.$router.push({
        path: "/BookUpdate",
        query: {
          id: row.id,
        },
      });
    },
    page(currentpage) {
      //得到的参数是我们的页码
      const _this = this;
      axios
        .get("http://localhost:8181/findAll/" + currentpage + "/6")
        .then(function (response) {
          console.log(response);
          // 传送数据- 页面信息
          _this.tableData = response.data.content;
          // 传递总页数-
          _this.totalPage = response.data.totalElements;
        })
        .catch({})
        .finally({});
    },
    // 删除的操作
    delete_one(row) {
      console.log("sdsdsd", row);
      const _this = this;
      axios;
      this.$confirm("此操作将永久删除该文件, 是否继续?", "提示", {
        confirmButtonText: "确定",
        cancelButtonText: "取消",
        type: "warning",
      })
        .then(() => {
          this.$message({
            type: "success",
            message: "删除成功!",
          });
          axios
            .get("http://localhost:8181/deletedid/" + row.id)
            .then(function (respsone) {
              console.log("删除->", respsone);
              _this.$router.push("/AddBook");
            });
        })
        .catch(() => {
          this.$message({
            type: "info",
            message: "已取消删除",
          });
        });
    },
  },
  data() {
    return {
      tableData: [],
      totalPage: 0,
    };
  },
  mounted() {
    const _this = this;
    axios
      .get("http://localhost:8181/findAll/1/6")
      .then(function (response) {
        console.log(response);
        // 传送数据- 页面信息
        _this.tableData = response.data.content;
        // 传递总页数-
        _this.totalPage = response.data.totalElements;
      })
      .catch({})
      .finally({});
  },
};
</script>

(四)、总结
1.SpringBoot接受数据风格
- 只能用Resultful风格进行接受前端传来的数据
2.前端传向后端
- axios.get(‘http:xxxx’,).then()
- axios.post(‘http:xxxx’,参数).then()
3.前端传向前端
- vm.$router.push({path:‘/xxx’,query{},params{}})
- vm.$router.replace({path:‘/xxx’,query{},params{}})
4.自动刷新页面
window.location.reload() // 自动刷新页面